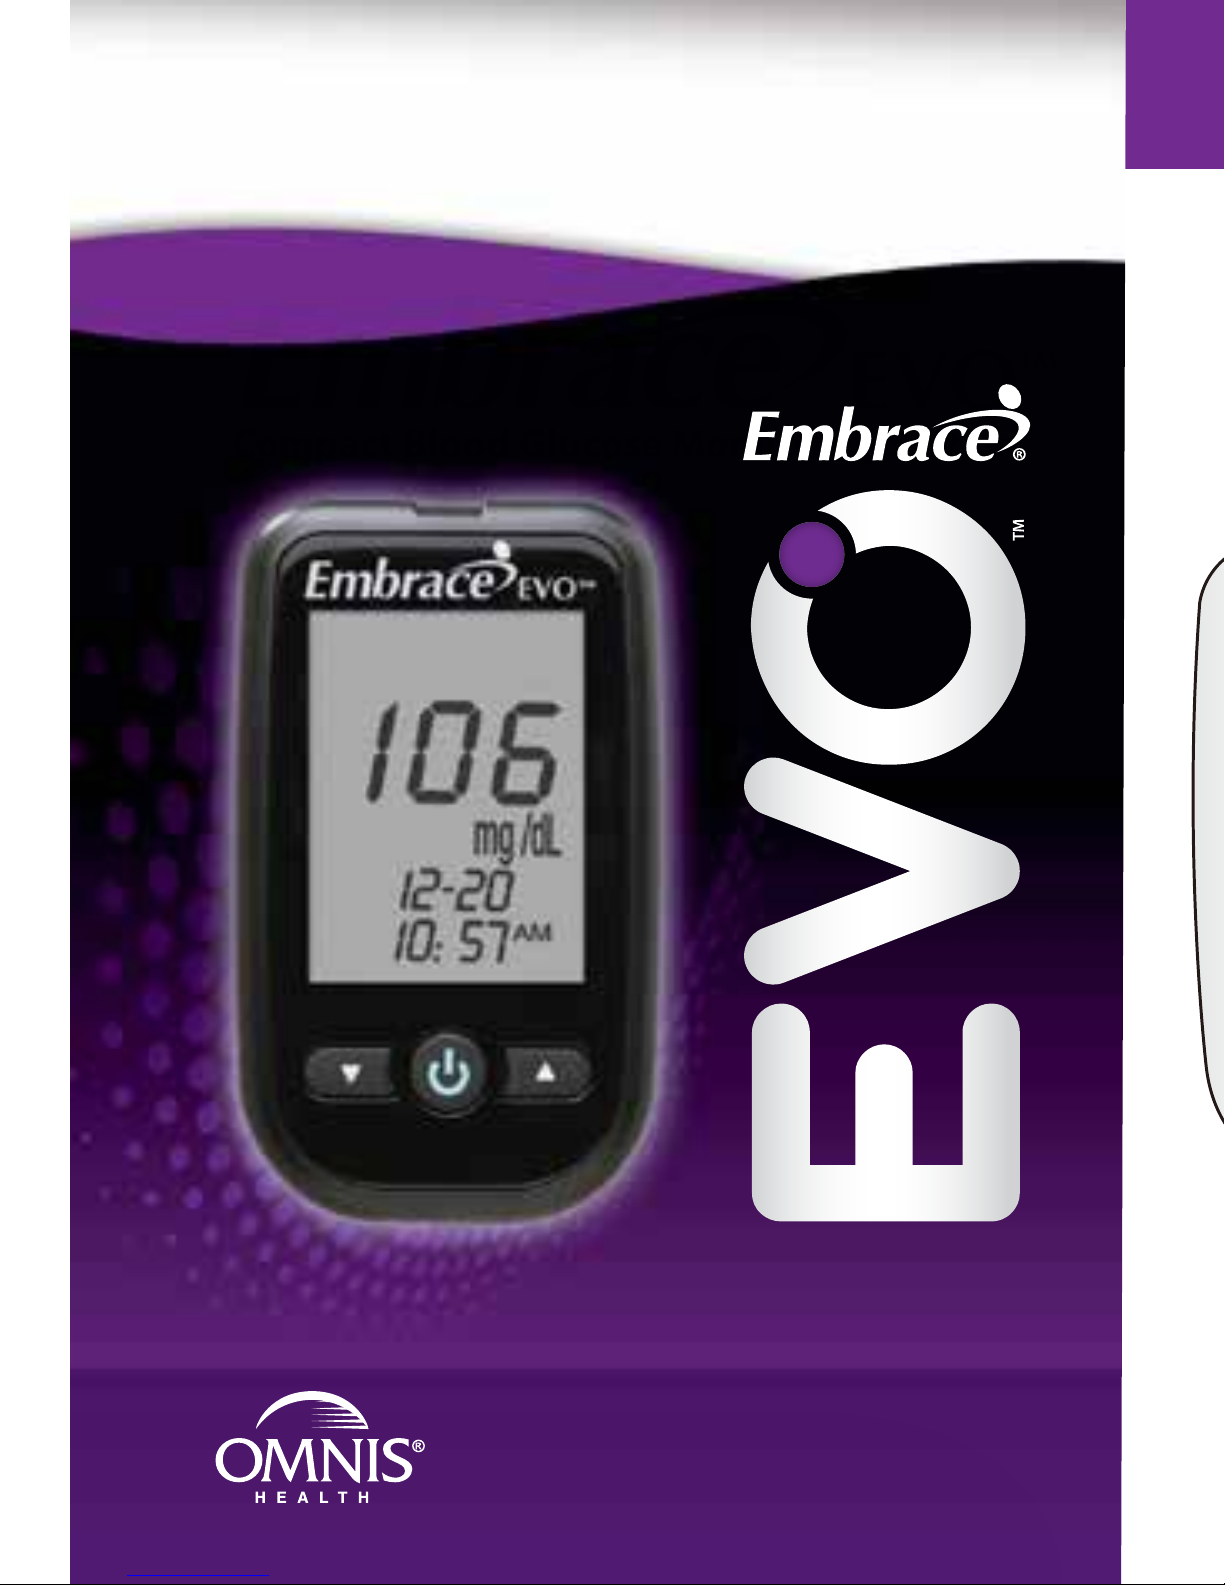
embrace EVO User manual
Understanding Your New Meter Understanding Your New Meter Setting Date and Time Testing Your Blood Glucose
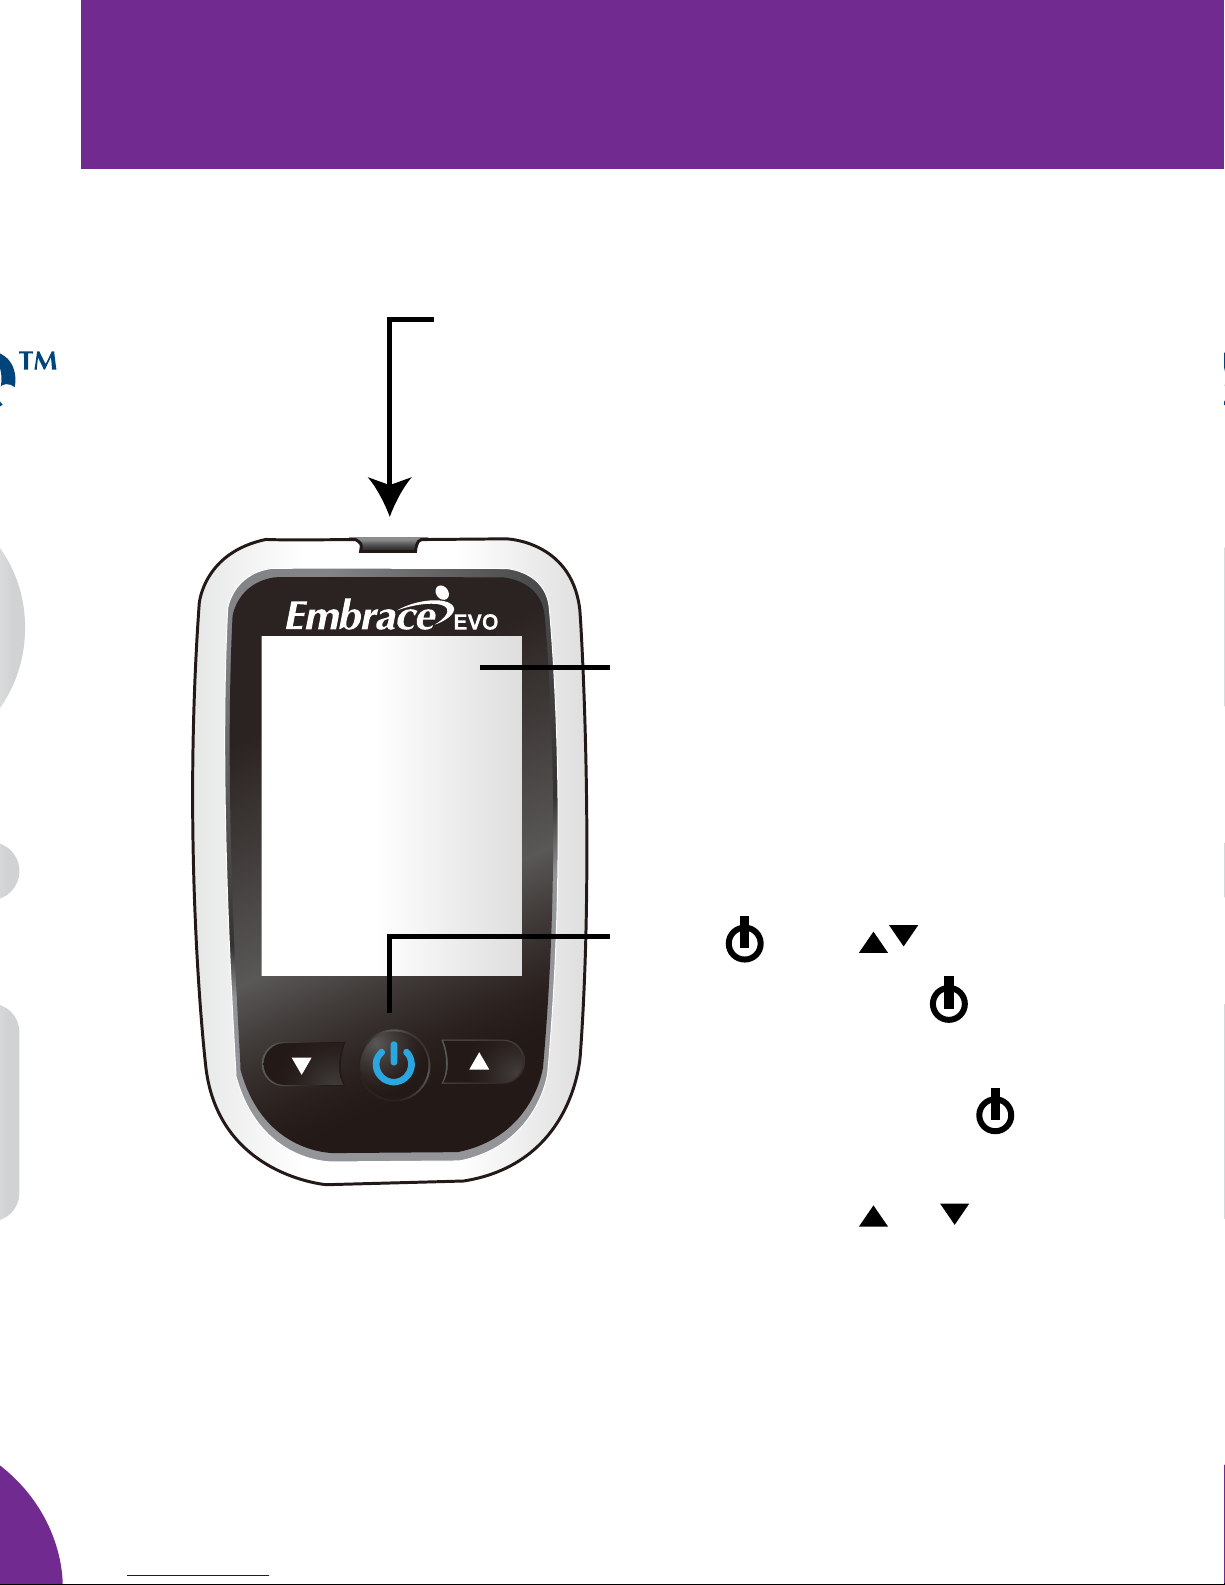
Front of the Embrace EVO™ No Code Meter Back of the Embrace EVO™ No Code Meter
Test Strip Port
This is where you insert the test strip and
the meter will turn on automatically.
Meter Display
Shows your blood glucose test
results, memory values, averages,
and other messages.
Battery Compartment
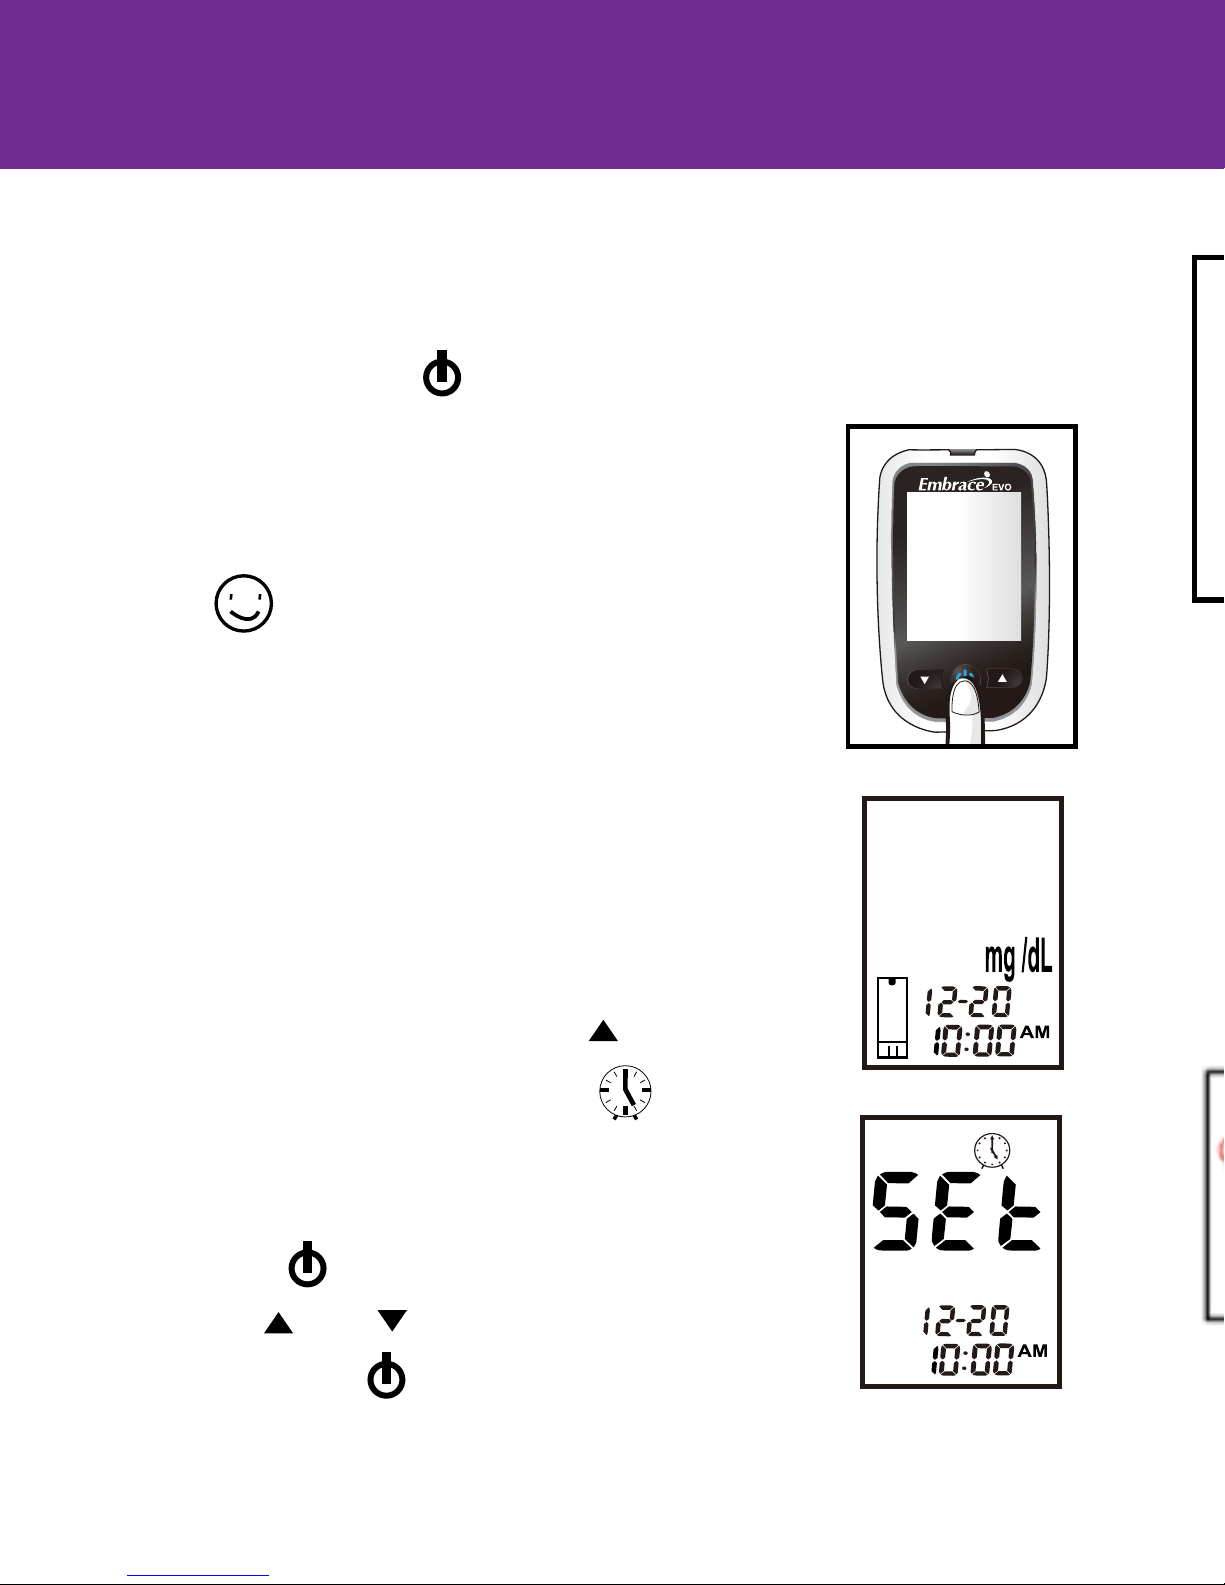
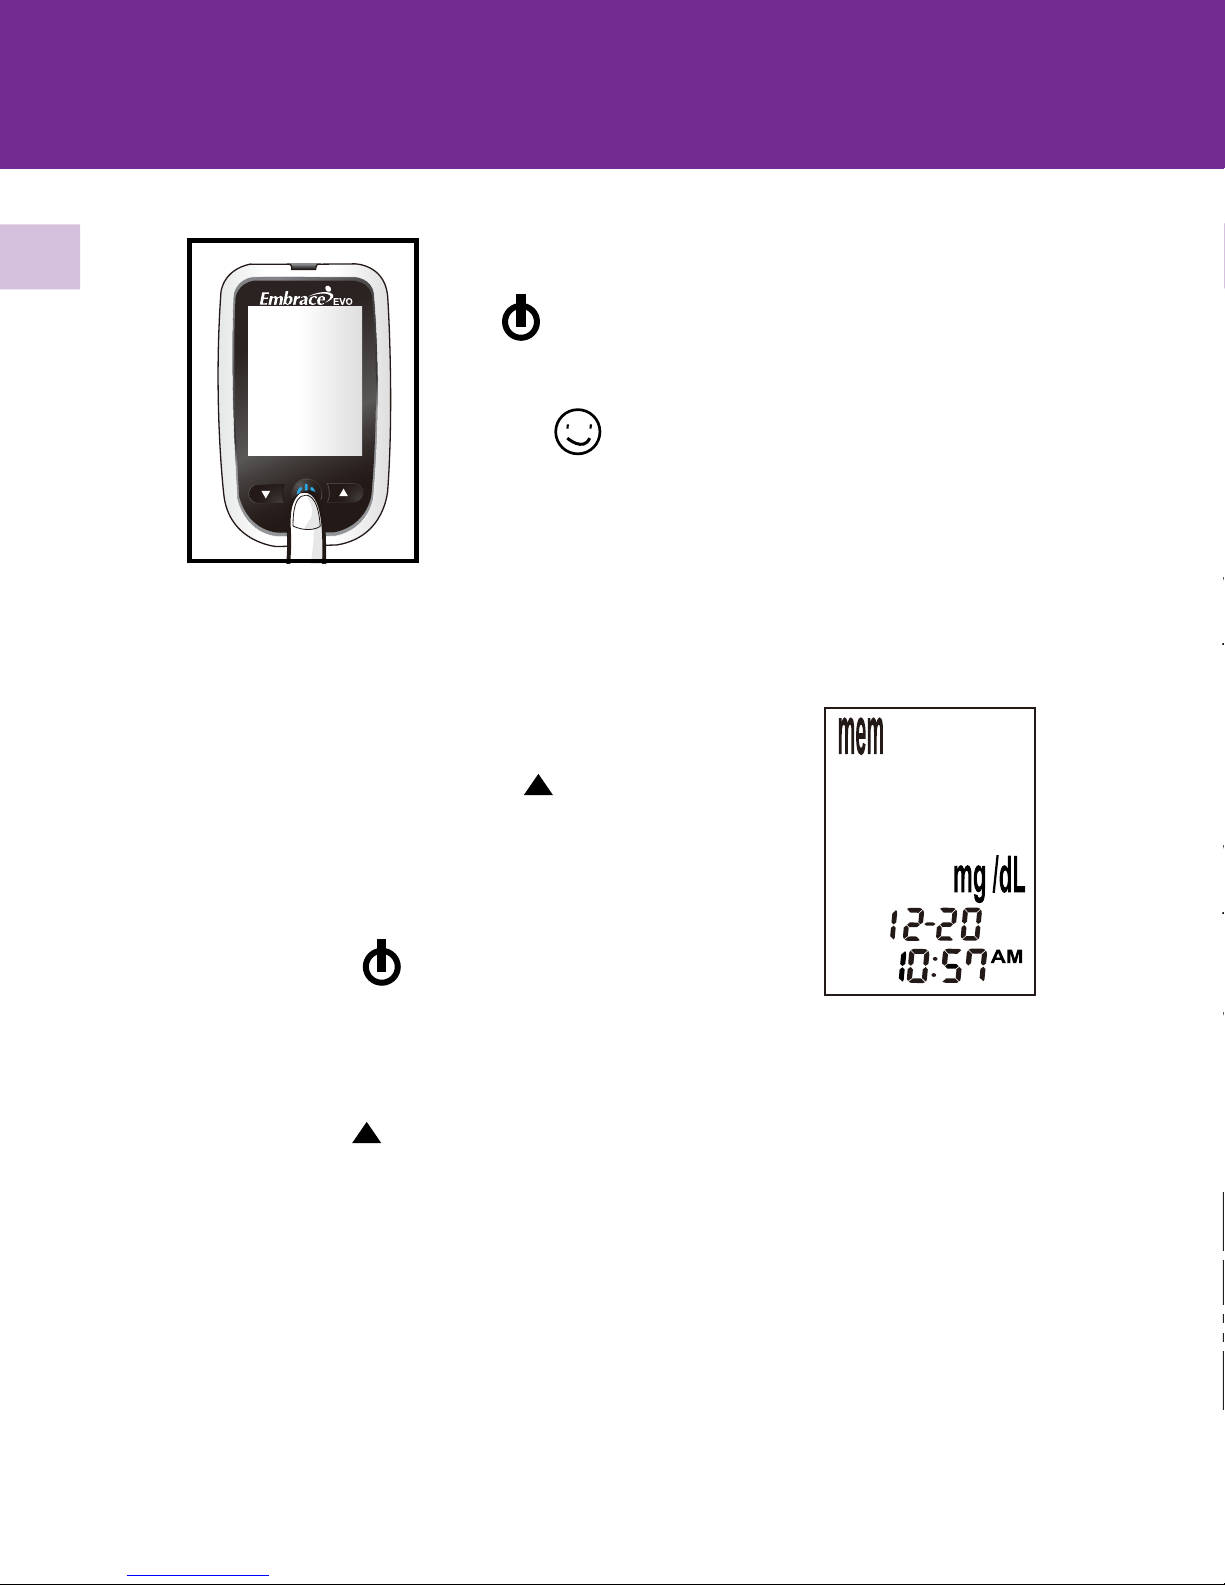
Step 1
Press and hold “ ” to turn on the meter
Step 2
The meter will run a series of self tests.
“ ” will appear on the screen before
entering the main mode. If error messages
(Err1, Err 3, etc) appear, see Solving Problems
on page 55 of the Embrace EVO™ No Code
instruction manual.
Step 3
After a flashing test strip icon appears on the
meter display screen, press “ ” twice until
meter display screen shows “ ”.
Step 4
Press “ ” and the current year will flash. Use
the “ ” or “ ” buttons to select the correct
year. Press “ ” button to confirm your choice
and to advance to set the month.
Holds one CR 2032 3V
Lithium coin cell battery.
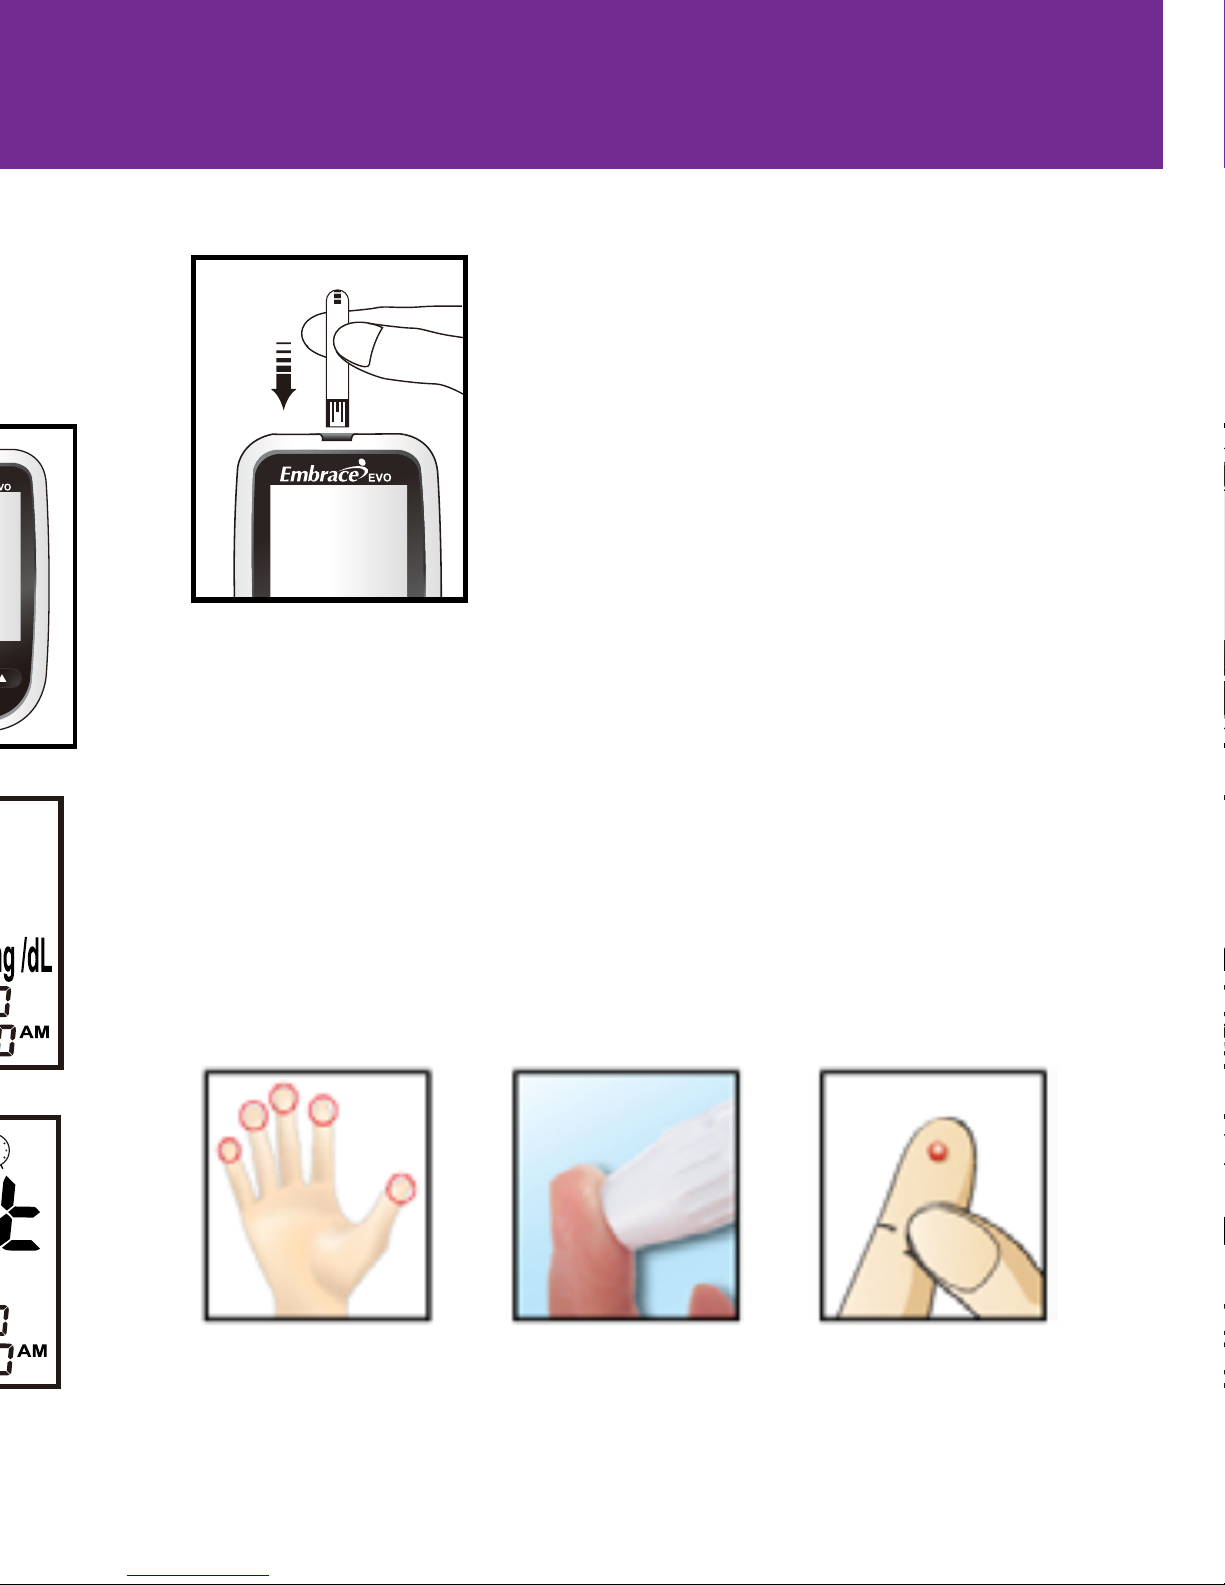
1.
2.
3.
Take out an Embrace EVO™ Test Strip
from the test strip bottle and close
the bottle immediately. Insert the
test strip to turn on the meter.
Wait for the flashing blood drop and
test strip icons to appear on the left
of the meter display screen.
Obtain blood sample.
For Finger Testing:
Hold the lancing device against the side of your fingertip and
press the release button to create a puncture.
For Testing on Palm and Forearm:
Please refer to the Embrace EVO™ No Code instruction manual
for more complete, detailed instructions and important safety warnings.
Data Port
Connect an Omnis Health
data cable here to send data
to a PC*.
*purchased separately
Enter ( ) and buttons
Press and hold Enter ( ) for
two seconds to turn the Meter
on or off, or press Enter ( )
to go into setup mode when
not testing Press or to
enter control mode with test strip inserted, during meter
setting, or to navigate the stored test values and averages.
Note: Please refer to the Embrace EVO™ No Code instruction manual
for more complete and detailed instructions and important safety warnings.
Compact Blood Glucose Monitoring System
Quick Reference Guide
An Evolution in Affordable,
Quality Meter Technology.
Quick Reference Guide
Small & Simple!
Note: Please read through your Meter User Manual before using this guide.
™
™
™
Understanding Your New Meter Understanding Your New Meter Setting Date and Time Testing Your Blood Glucose
Front of the Embrace EVO™ No Code Meter Back of the Embrace EVO™ No Code Meter
Test Strip Port
This is where you insert the test strip and
the meter will turn on automatically.
Meter Display
Shows your blood glucose test
results, memory values, averages,
and other messages.
Battery Compartment
Step 1
Press and hold “ ” to turn on the meter
Step 2
The meter will run a series of self tests.
“ ” will appear on the screen before
entering the main mode. If error messages
(Err1, Err 3, etc) appear, see Solving Problems
on page 55 of the Embrace EVO™ No Code
instruction manual.
Step 3
After a flashing test strip icon appears on the
meter display screen, press “ ” twice until
meter display screen shows “ ”.
Step 4
Press “ ” and the current year will flash. Use
the “ ” or “ ” buttons to select the correct
year. Press “ ” button to confirm your choice
and to advance to set the month.
Holds one CR 2032 3V
Lithium coin cell battery.
1.
2.
3.
Take out an Embrace EVO™ Test Strip
from the test strip bottle and close
the bottle immediately. Insert the
test strip to turn on the meter.
Wait for the flashing blood drop and
test strip icons to appear on the left
of the meter display screen.
Obtain blood sample.
For Finger Testing:
Hold the lancing device against the side of your fingertip and
press the release button to create a puncture.
For Testing on Palm and Forearm:
Please refer to the Embrace EVO™ No Code instruction manual
for more complete, detailed instructions and important safety warnings.
Data Port
Connect an Omnis Health
data cable here to send data
to a PC*.
*purchased separately
Enter ( ) and buttons
Press and hold Enter ( ) for
two seconds to turn the Meter
on or off, or press Enter ( )
to go into setup mode when
not testing Press or to
enter control mode with test strip inserted, during meter
setting, or to navigate the stored test values and averages.
Note: Please refer to the Embrace EVO™ No Code instruction manual
for more complete and detailed instructions and important safety warnings.
Compact Blood Glucose Monitoring System
Quick Reference Guide
An Evolution in Affordable,
Quality Meter Technology.
Quick Reference Guide
Small & Simple!
Note: Please read through your Meter User Manual before using this guide.
™
™
™

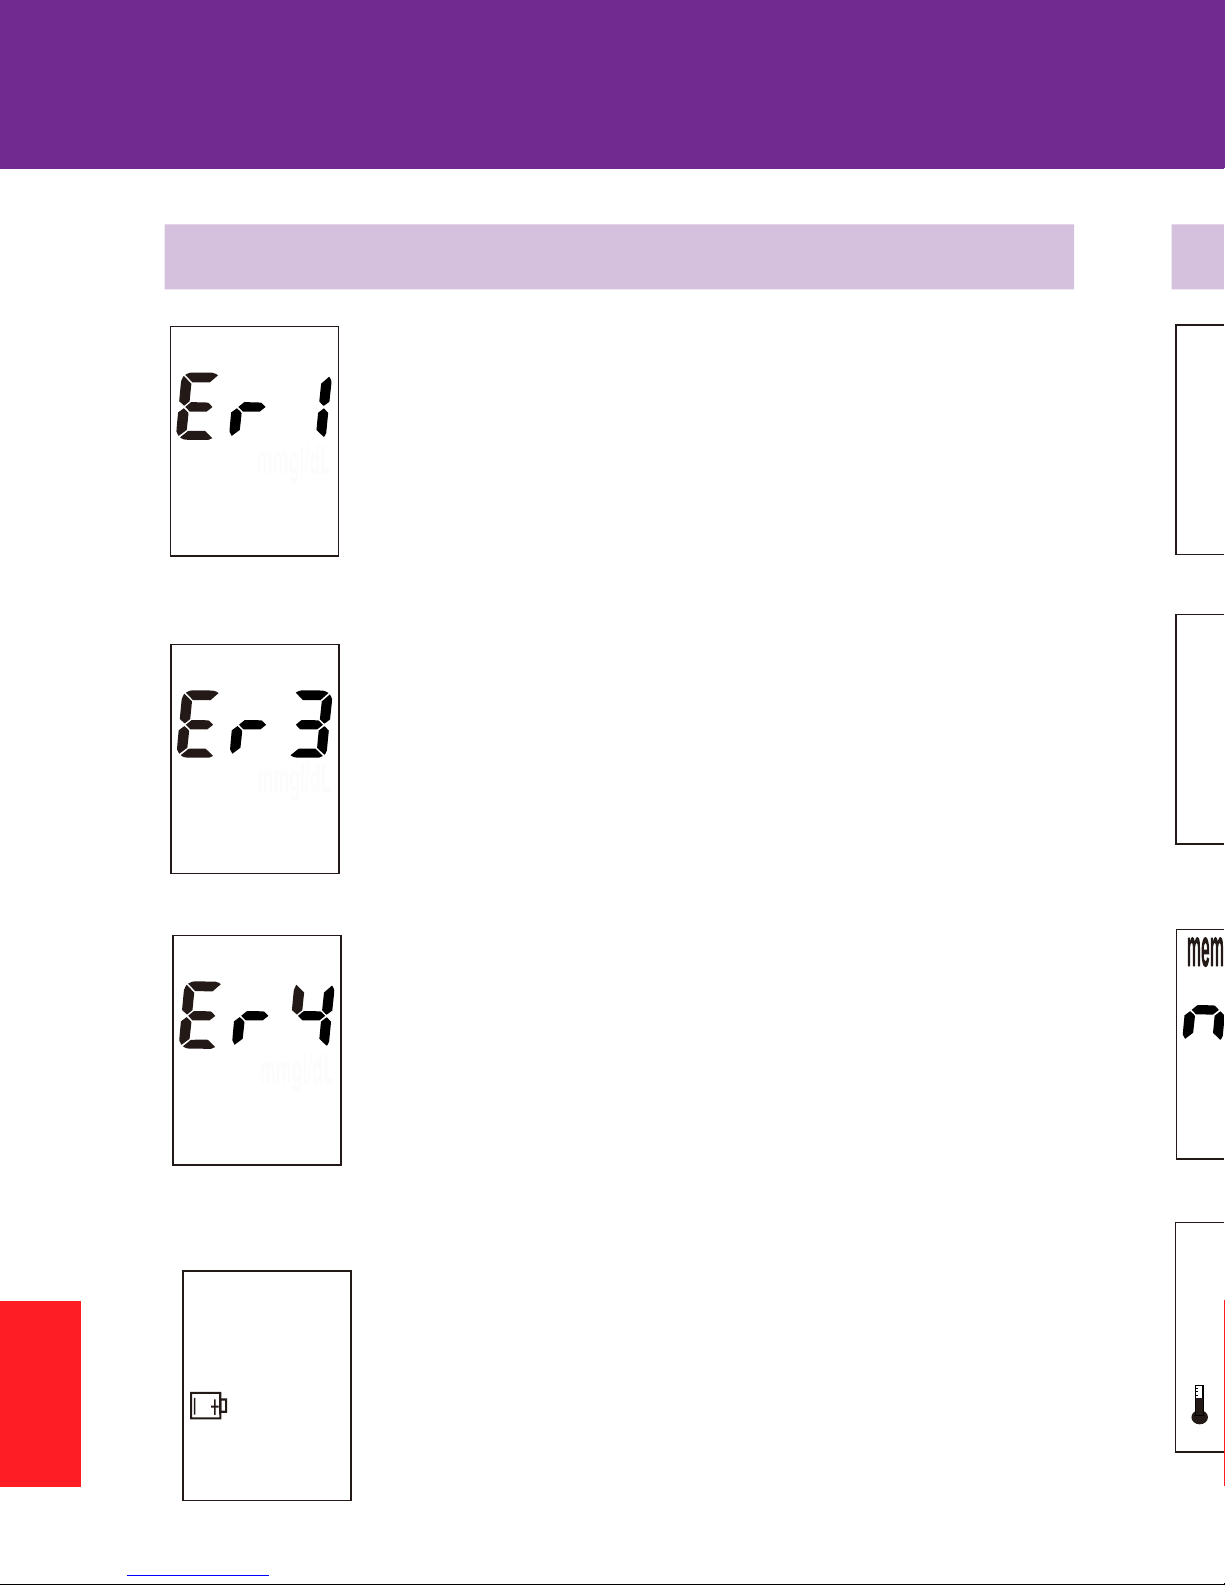
Problem SolvingTesting Your Blood Glucose Problem Solving Recalling Memory Recalling Memory
Turn on the meter by pressing and holding
“ ” button.
The “ ” will appear on the screen, and
then the meter will display the main mode.
If error messages (Err 1, Err 3, etc) appear,
see Solving Problems on page 51 for
trouble shooting.
Message Description and Remedy
The meter electronics or test strip is damaged
Replace the battery and turn on the meter again.
Remove the test strip and insert a new test
strip again.
If problem persists, call us at 1-877-979-5454
between 8:00am and 8:00pm (eastern time),
Monday through Friday.
9:00am - 5:00pm (eastern time), Saturday
Used or contaminated test strip
Repeat the test with a new test strip.Wait until
you see the flashing blood drop icon before
you add blood or a control solution sample.
Not enough sample on the test strip to start
Remove the Test Strip and repeat the test
with a new test strip. See Testing Your
Blood Glucose on page 29.
Battery is low
Change the battery according to instructions
on page 12 , Inserting (or Changing) the Battery.
•
•
•
4. 1.
2.
3
4
5.
6.
7.
Gently bring the test strip and touch
the drop of blood at a slight angle.
The test strip acts like a straw to
pull the blood in. Keep the test strip
in the blood drop until the meter
beeps to indicate the test strip has
enough blood to test.
The screen will start to count down. After six seconds,
your glucose testing result will appear on the meter display
screen.Your test result will be automatically stored into the
meter memory.
Remove the used test strip and throw it into a proper
wastebasket.The meter will time-out after 1.5 minutes of
inactivity. Press “ ” to reactivate the meter.
Remove the used lancet from your lancing device according
to instructions and discard into proper wastebasket.
After the flashing test strip icon
appears, press the “ ” button once,
and the “mem” will appear at the
upper left corner of the display screen.
Press “ ” to select the
“mem” mode.
Press “ ” to view your result, from the most recent to
the oldest.
When less than 300 results are stored in the meter’s
memory,“nil” will appear after the last recorded test result.
For 7-Day, 14-Day, or 30-Day Average
results, continue to press the “ ”
button until you see the
7-Day, 14-Day, or 30-Day Average
icon according to your choice.
When your 30-day average is displayed, you can press “ ”
to go back to view your averages and stored readings.
5.
Message Description and Remedy
Test result is higher than 600 mg/dL
Wash and dry your hands and repeat the
test using a new test strip. If the result is
still “HI,” contact your physician or healthcare
professional immediately.
Test result is lower than 20 mg/dL
Wash and dry your hands and repeat the
test using a new test strip. If the result is
still “LO,” contact your physician or healthcare
professional immediately.
There are no memorized results in the meter
Check if the date and time on your meter
is set up. See Setting Up Your New System
on page 12 .
Start testing your blood glucose, see Testing
Your Blood Glucose on page 29 .
Temperature out of range
Move the meter into an area that is between
50°F~104°F, and allow 10 to 15 minutes for it to
reach the new temperature.
CAUTION: IFYOU SEE “HI” OR “LO” DISPLAYED,YOUR BLOOD
GLUCOSE LEVEL MAY BE ABOVE 600 MG/DL OR BELOW 20 MG/DL,
REPEAT TESTING. IFYOU STILL RECEIVE THE SAME RESULT, CALL
YOUR PHYSICIAN OR HEALTHCARE PROFESSIONAL IMMEDIATELY.
NOTE:
Control testing results will not be included in the day averages.
When there are no memorized results stored in the meter,
the display screen will show “nil.”
When there is no day average data available, the display
screen will show three dashes.
EmbraceEVO™ is a
trademark of Omnis Health.
Manufactured for:
505 Airpark Center Drive
Nashville, TN 37217
1-877-979-5454
www.embraceEVO.com
@embracemeter
/embracemeter
™
™
Other manuals for EVO
1
Table of contents
Other embrace Blood Glucose Meter manuals


