EMD Millipore Pellicon XL User manual

PelliconPellicon
PelliconPellicon
Pellicon®®
®®
®XLXL
XLXL
XL
Pellicon XL Device
Operating Instructions

Pellicon XL Device
- 2 -
Operating Instructions
- 3 -
Please read all of the directions before you begin.
Pellicon XL devices are 100 % integrity tested.
A cerA cer
A cerA cer
A certificate of quality is included in evertificate of quality is included in ever
tificate of quality is included in evertificate of quality is included in ever
tificate of quality is included in every box.y box.
y box.y box.
y box.
The packaging contains a Pellicon XL device and anThe packaging contains a Pellicon XL device and an
The packaging contains a Pellicon XL device and anThe packaging contains a Pellicon XL device and an
The packaging contains a Pellicon XL device and an
Accessories Kit located in the section below the Pellicon XLAccessories Kit located in the section below the Pellicon XL
Accessories Kit located in the section below the Pellicon XLAccessories Kit located in the section below the Pellicon XL
Accessories Kit located in the section below the Pellicon XL
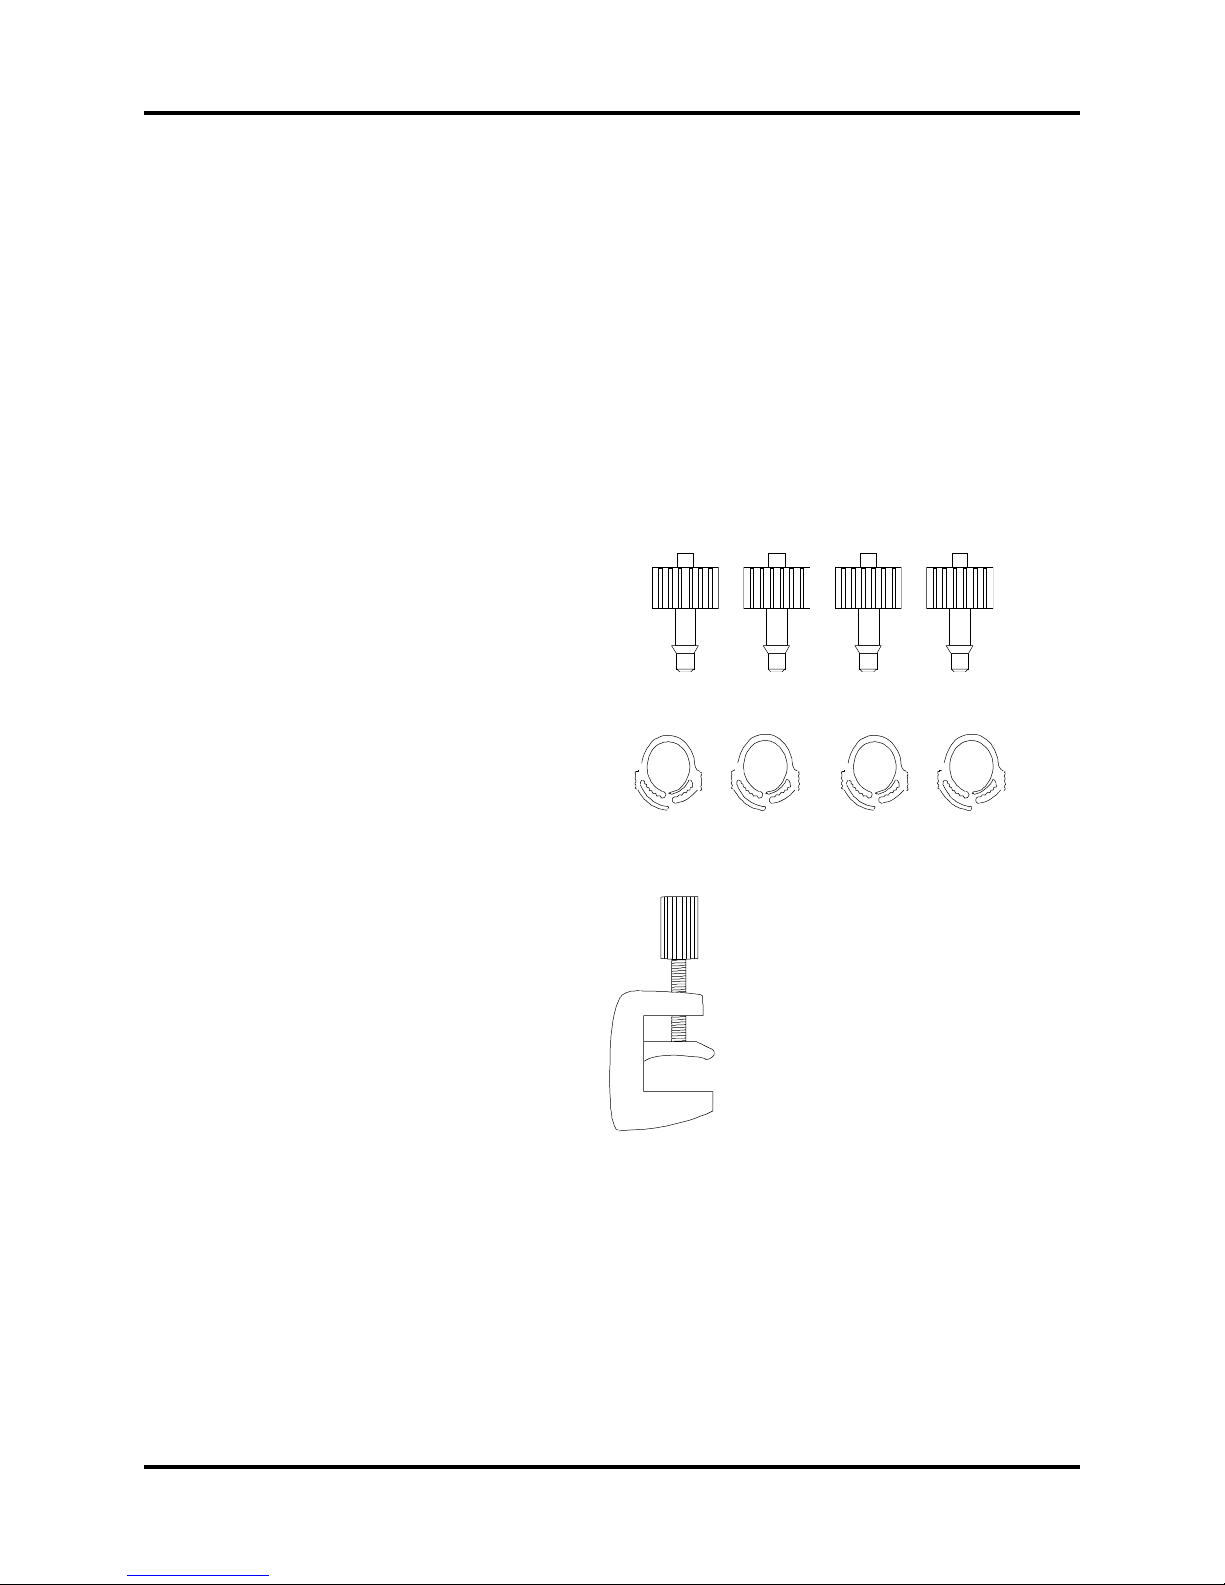
device. The components in the kit include:device. The components in the kit include:
device. The components in the kit include:device. The components in the kit include:
device. The components in the kit include:
4 luer to barb fittings (Figure A)
4 tubing clamps (Figure B)
1 retentate clamp (Figure C)
4 ft of LFL Tygon®tubing
6mm (1/4”) OD 3mm (1/8”) ID

Pellicon XL Device
- 4 -
Equipment required but not provided:
Peristaltic pump drive, variable speed, 60-600 RPM (or
equivalent)
Pump head 480 mL/min at 600 RPM (or equivalent)
Suitable containers for feed, retentate and permeate
Optional equipment:
Ring stand with clamps or Pellicon XL stand
25 mL syringe
50 mL graduated cylinder
Stopwatch
Stir plate
Gauge kit
100 mL reservoir
Multimanifold
Scissors or tubing cutter

Operating Instructions
- 5 -
Section I. Set-up
1. Remove the Pellicon XL device from the plastic bag.
2. Cut three lengths of tubing, one for the retentate,
permeate and feed lines. The approximate length for
each piece of tubing for set-up and flushing as seen in
Figure 2 is 30 cm (12”) for the retentate and permeate
lines and 56 cm (22”) for the feed line.
Note:
To minimize hold-up volume shorten the tubing
lengths where possible.
3. Remove the luer caps (do not discard) from the Pellicon XL
device ports labeled perm 2, retentate and feed (Figure 1).
4. Secure a luer to barb fitting to the ports.
Perm 2
Retentate
Perm 1Feed
Figure 1: Device with Stand
Pellicon XL Device
- 6 -
5. Slip tubing clamps over the ends of the tubing.
6. Place the clamps over the barbs and secure the clamps.
7. Stabilize the Pellicon XL device. Place it in the stand
(Figure 1)—or a ring stand—to hold the device upright,
or lay it flat on the bench.
8. Place the retentate clamp on the retentate tubing
approximately 3.8 cm (1.5”) from the tubing clamp.
Secure but do not tighten the clamp.
9. Install the feed tubing into the pump head according to
the pump manufacturer’s directions.
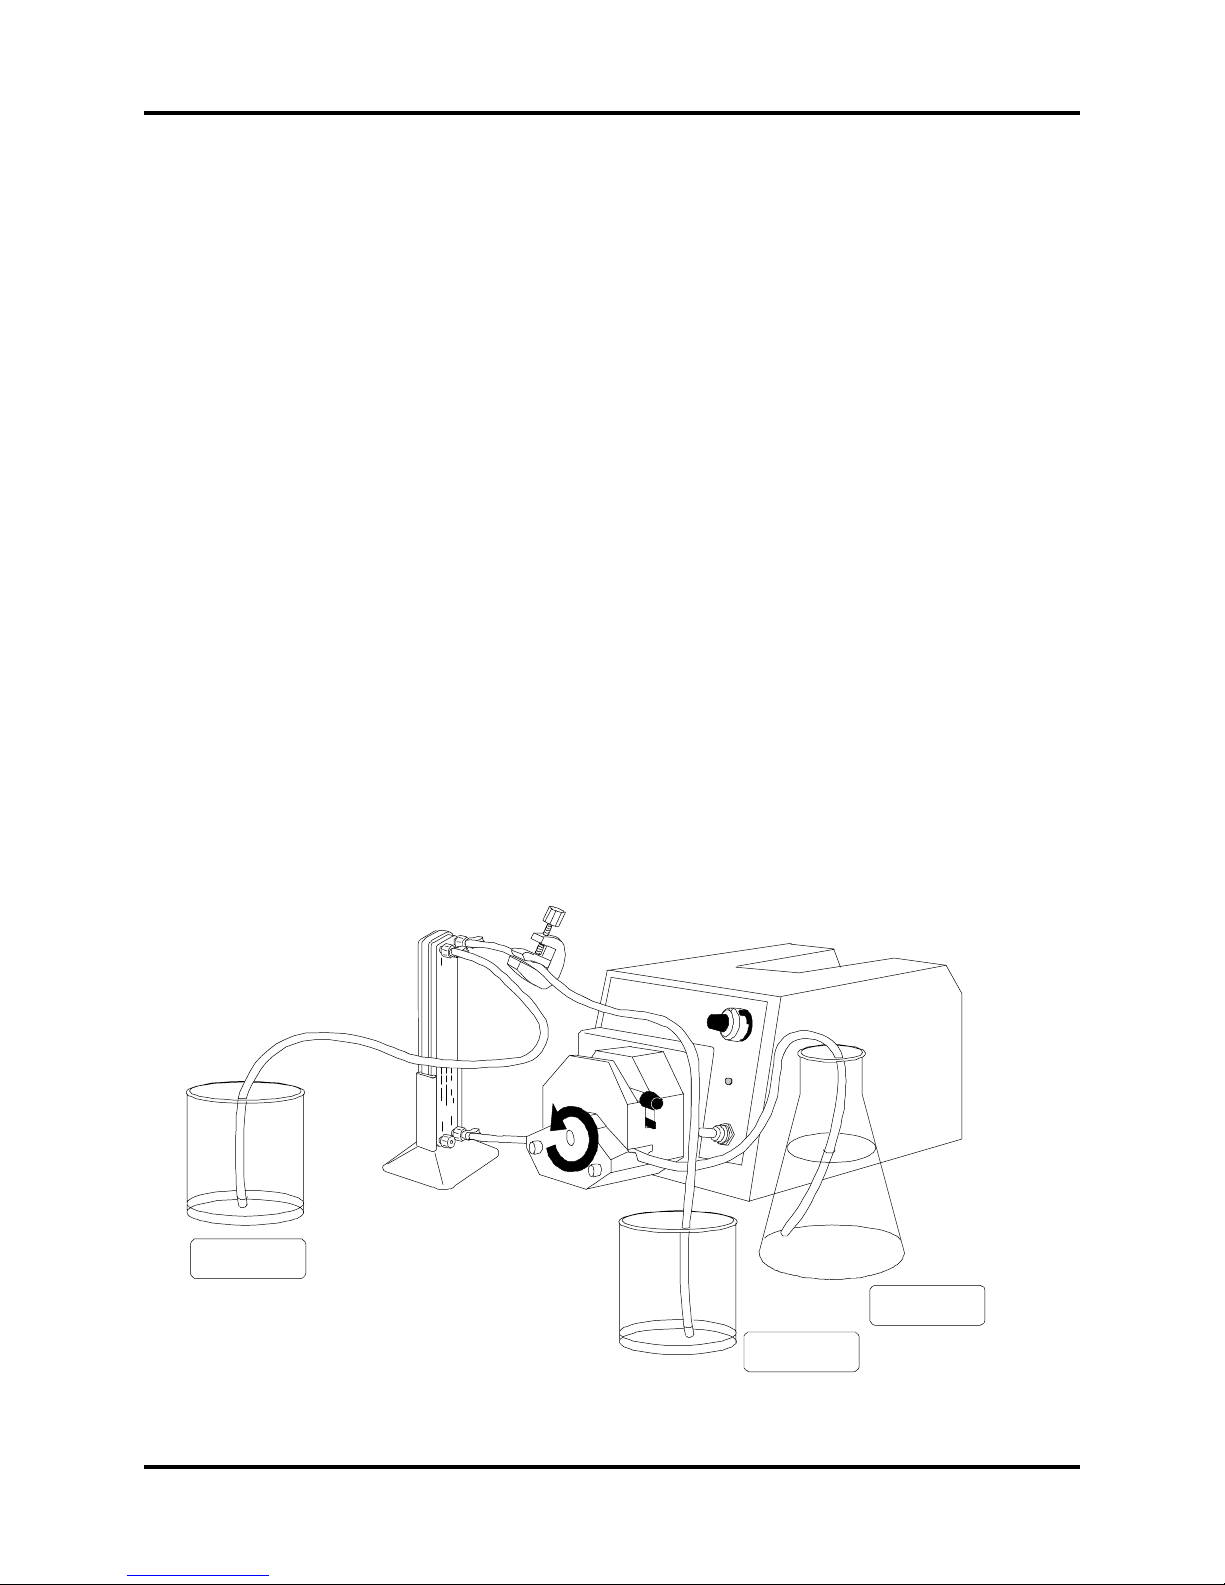
10.Place the tubing ends into three separate containers.
(see Figure 2).
MILLIPORE
Pellicon XL
Permeate
Retentate
Feed
Figure 2: Setup

Operating Instructions
- 7 -
Section II: Flushing
The Pellicon XL device contains trace amounts of glycerine
and preservatives. To remove these trace amounts before
sample processing, follow the flushing procedure below
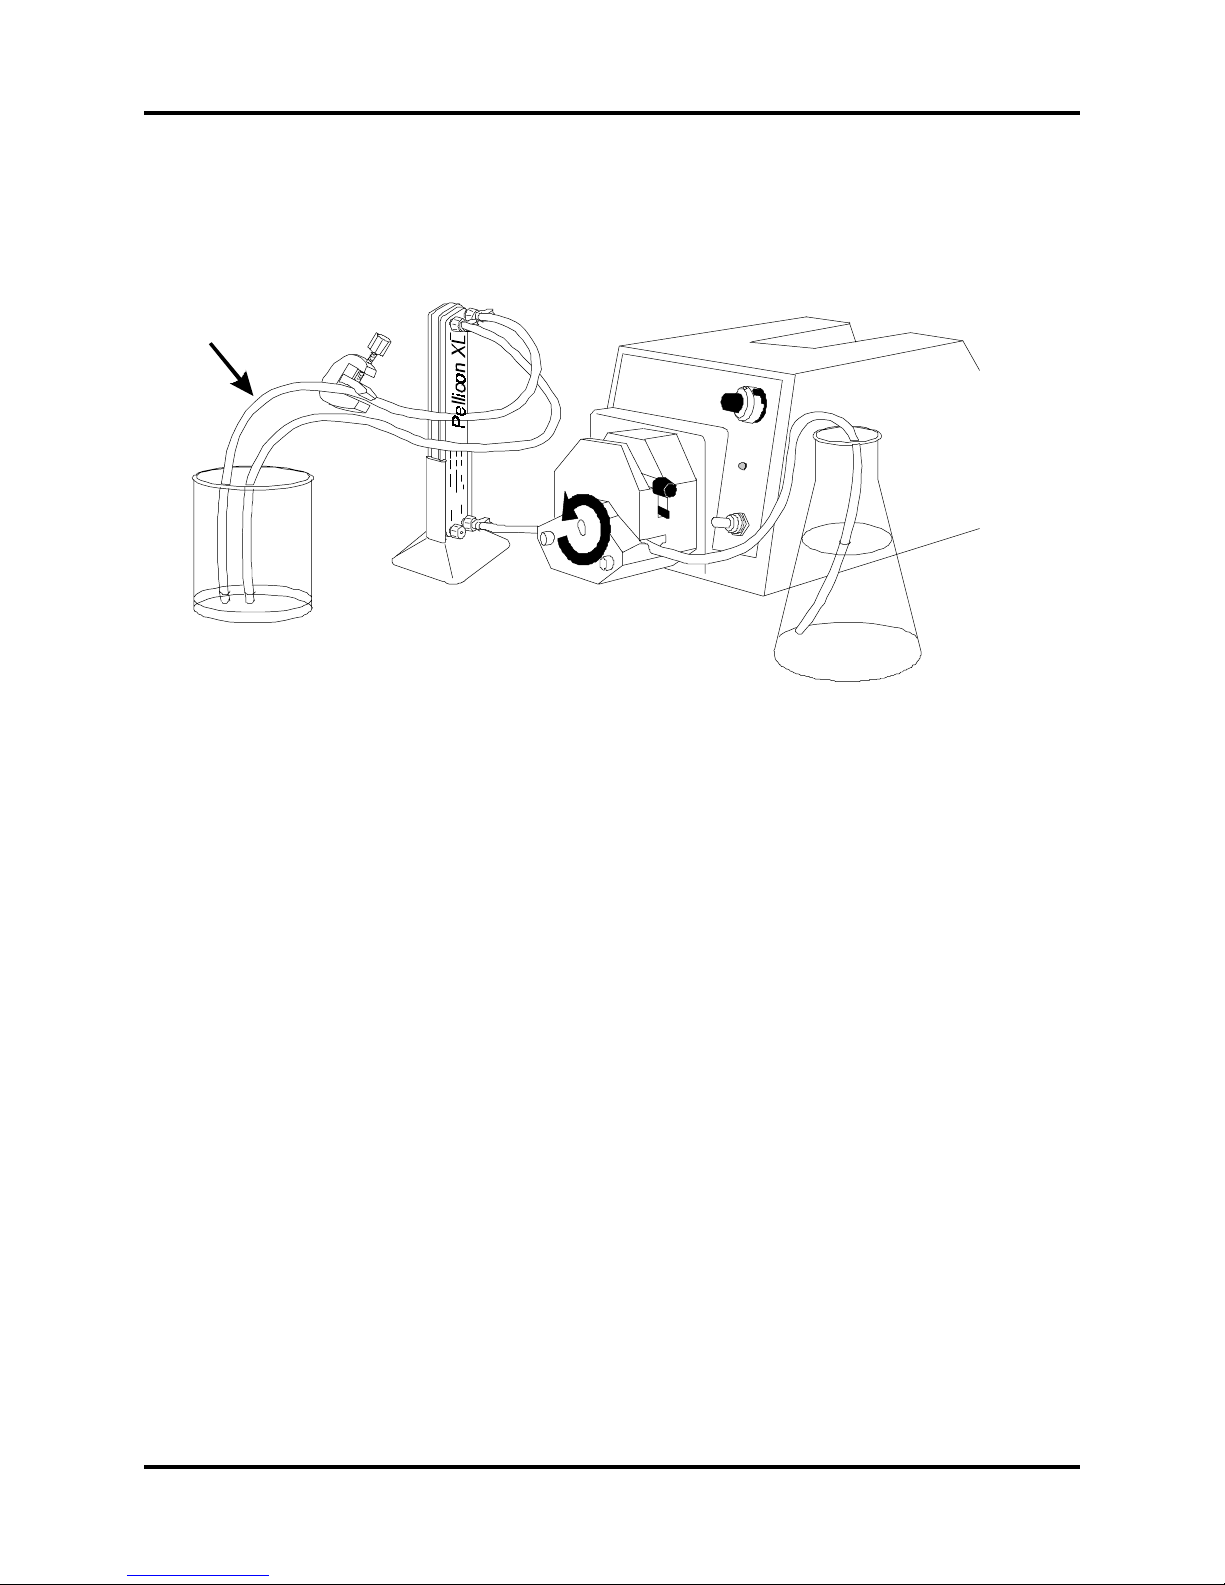
(Figure 3).
MILLIPORE
Permeate
Retentate
Feed
Pellicon XL
Figure 3: Flushing

Pellicon XL Device
- 8 -
1. Fill the feed container with 500 mL of purified water.
2. Turn on the pump. Set the retentate flow rate (crossflow)
to 30–50 mL/min. To measure the flow rate place the
end of the retentate tubing into a graduated cylinder
and collect water for 1 minute and measure volume
collected to obtain flow rate. Adjust pump speed if
necessary and measure again. Once the correct flow
rate is obtained, note the pump setting for future
reference.
3. Flush 150 mL through the retentate tubing.
4. Continue flushing until 300 mL are collected in the
permeate container. Add more feed liquid as required.
Permeate flow can be increased by tightening the
retentate clamp.
Note:
Do not restrict retentate flow completely.
5. Turn off the pump.
6. Empty all containers.

Operating Instructions
- 9 -
Section III: Integrity Testing (optional)
The following tools can be used for low-volume integrity
testing:
•mass flow meter
•inverted graduated cylinder
•rotameter
•liquid displacement in a graduated pipette
The procedure detailed below is for liquid displacement in a
graduated pipette.
Pipette Method
A clean air source with a pressure gauge is required for
integrity testing. Obtain test pressure to be used from
integrity testing section in the Certificate of Quality.
1. With the permeate ports open, connect a clean air
source to the feed port and blow across feedside of
membrane at 5 psi to remove as much liquid as possible
through the retentate port.
2. Turn off air source.
3. Place cap on retentate port and permeate 1 port.
4. Connect tubing to perm 2. Add approximately 0.1 mL
water to a 1 mL pipette.

Pellicon XL Device
- 10 -
5. Insert the pipette tip into the permeate tubing.
6. Turn on air source. Stabilize at test pressure (see
Certificate of Quality).
7. Measure air flow by timing displacement of liquid in the
pipette for 30 seconds and multiply by 2 to obtain an
air flow rate.
The Pellicon XL device is integral if the air flow is less than or
equal to the value in the Certificate of Quality.

Operating Instructions
- 11 -
Section IV: Preconditioning
1. Arrange clean containers and tubing as in Figure 4.
Figure 4: Preconditioning
2. Fill the feed container with 100–250 mL of an
appropriate buffer.
3. Turn on the pump which has been set at a crossflow
rate of 30–50 mL/min.
4. Pump approximately 30 mL of buffer through the
permeate tubing to remove residual water.
5. Turn off the pump. Remove the feed and retentate tubing
from the feed container
6. Empty the feed container.
7. Remove permeate tubing from the permeate port and
hold upright over the waste container to drain. Replace
permeate tubing.
MILLIPORE
Buffer
Waste
Feed
Pellicon XL

Pellicon XL Device
- 12 -
Section V: Sample Processing (concentration)
Mixing of the sample is recommended during processing. A
stir plate can be used.
1. Arrange clean containers and tubing connections as
in Figure 5.
2. Fill feed container with sample to be concentrated.
3. Turn on the pump which has been set at a crossflow
rate of 30–50 mL/min.
4. Filter the solution until the desired concentration or
volume is obtained. Permeate flow can be increased by
tightening the retentate clamp slightly.
Note:
Do not restrict retentate flow completely.
MILLIPORE
Sample
Permeate
Feed
Pellicon XL
Figure 5: Sample Processing

Operating Instructions
- 13 -
5. Turn the pump off. Remove the feed tubing from the feed
container.
6. Turn the pump on. Pump all the retentate and upstream
fluid into the feed container.
7. Turn the pump off. Remove the feed tubing from the
pump head.

Pellicon XL Device
- 14 -
Section VI: Product Recovery
To maximize product recovery follow the steps below.
Minimum working volume will vary depending upon tubing
length, container and pump setup. It is possible to get
15–20 mL final working volume.
1. Place the feed tubing in the feed container.
2. Remove the permeate tubing from the permeate port.
Replace with cap.
3. Remove the retentate tubing from the retentate port. Keep
the other end in the feed container.
4. Hold the end of the retentate tubing (with the tubing
clamp) higher than the feed container to allow sample to
drain out.
5. Fill a 25 mL syringe with 5 mL of permeate or buffer.
6. Attach the syringe to the retentate port.
7. Slowly push all the buffer or permeate into the Pellicon XL
device.
8. Disconnect the syringe.
9. Fill the syringe with air. Withdraw the syringe plunger to
the 10 mL mark.

Operating Instructions
- 15 -
10.Reconnect the syringe to the retentate port and push the
air into the Pellicon XL device.
11.Recover sample remaining in the feed tubing by
removing the tubing from the Pellicon XL device and
allow it to drain into the feed container.

Pellicon XL Device
- 16 -
Section VII: Cleaning
Recommended cleaning solutions (marked by X):
Do not exceed 30 psi inlet for cleaning cycle.
gninaelCgninaelC gninaelC gninaelCgninaelC
stnegAstnegA stnegA stnegAstnegA noitartnecnoCnoitartnecnoC noitartnecnoC noitartnecnoCnoitartnecnoC
eugolataCeugolataC eugolataC eugolataCeugolataC
srebmuNsrebmuN srebmuN srebmuNsrebmuN
xiferphtiwxiferphtiw xiferphtiw xiferphtiwxiferphtiw
BXPBXP BXP BXPBXP
xamoiBxamoiB xamoiB xamoiBxamoiB
MTMTMTMTMT
enarbmeMenarbmeM enarbmeM enarbmeMenarbmeM
-lusrehteylop(-lusrehteylop( -lusrehteylop( -lusrehteylop(-lusrehteylop(
)enohp)enohp )enohp )enohp)enohp
eugolataCeugolataC eugolataC eugolataCeugolataC
htiwsrebmuNhtiwsrebmuN htiwsrebmuN htiwsrebmuNhtiwsrebmuN
CXPxiferpCXPxiferp CXPxiferp CXPxiferpCXPxiferp
ecartlUecartlU ecartlU ecartlUecartlUll
l
ll
MTMTMTMTMT
PP
P
PPCLCLCLCLCL
enarbmeMenarbmeM enarbmeM enarbmeMenarbmeM
c(c(c(c(c(etisopmoetisopmo etisopmo etisopmoetisopmo
detarenegerdetareneger detareneger detarenegerdetareneger
)esolullec)esolullec )esolullec )esolullec)esolullec
eugolataCeugolataC eugolataC eugolataCeugolataC
htiwsrebmuNhtiwsrebmuN htiwsrebmuN htiwsrebmuNhtiwsrebmuN
,VXPxiferp,VXPxiferp ,VXPxiferp ,VXPxiferp,VXPxiferp
,HXP,GXP,HXP,GXP ,HXP,GXP ,HXP,GXP,HXP,GXP
DXPDXP DXP DXPDXP
eroparuDeroparuD eroparuD eroparuDeroparuD
®®
®
®®
enarbmeMenarbmeM enarbmeM enarbmeMenarbmeM
)FDVP()FDVP( )FDVP( )FDVP()FDVP(
pmeTpmeT pmeT pmeTpmeT
CºCºCºCºCºHpHpHpHpHp
emiTemiT emiT emiTemiT
)nim()nim( )nim( )nim()nim(
HOaNHOaN HOaN HOaNHOaNN5.0-1.0X 54-047.31-3106-03
HOaNHOaN HOaN HOaNHOaNN1.0X04-523106-03
LCOaNLCOaN LCOaN LCOaNLCOaNmpp052X X54-0411-0106-03
notirTnotirT notirT notirTnotirT
®®
®
®®
001X-001X- 001X- 001X-001X-%01.0XXX54-048-506-03
SDSSDS SDS SDSSDS%01.0XXX54-048-506-03
neewTneewT neewT neewTneewT
®®
®
®®
0808080808%01.0XXX54-048-506-03
emyz-a-greTemyz-a-greT emyz-a-greT emyz-a-greTemyz-a-greT
®®
®
®®
tnegreteDtnegreteD tnegreteD tnegreteDtnegreteD %02.0XXX54-0401-906-03
Operating Instructions
- 17 -
Arrange clean containers and tubing connections as
in Figure 6.
MILLIPORE
Retentate
Figure 6: Cleaning
1. Loosen retentate clamp.
2. Fill the feed container with 500 mL of cleaning solution.
3. Set the pump control to the same pump setting used in
the flushing step (30–50 mL/min)
4. Turn the pump on and collect 250 mL of cleaning
solution in the waste container.
5. Turn the pump off. Place the retentate tubing in the feed
container.
6. Turn the pump on. Slightly tighten the retentate tubing
clamp to increase permeate flow rate.

Pellicon XL Device
- 18 -
Note:
Do not restrict retentate flow completely.
7. Recirculate the cleaning solution for 30–60 minutes.
8. Turn the pump off and discard the cleaning solution.
Flushing:
Repeat flushing procedure detailed in Section II.

Operating Instructions
- 19 -
Section VIII: Storage
Recommended storage solutions:
Pump storage solution through the device or follow the steps
below.
1. Remove the retentate tubing from the device.
2. Remove the feed tubing from the pump head.
3. Fill a syringe with 10 mL of storage solution.
noitulosegarotSnoitulosegarotS noitulosegarotS noitulosegarotSnoitulosegarotSnoitartnecnoCnoitartnecnoC noitartnecnoC noitartnecnoCnoitartnecnoC
eugolataCeugolataC eugolataC eugolataCeugolataC
htiwsrebmuNhtiwsrebmuN htiwsrebmuN htiwsrebmuNhtiwsrebmuN
BXPxiferpBXPxiferp BXPxiferp BXPxiferpBXPxiferp
xamoiBxamoiB xamoiB xamoiBxamoiB
enarbmeMenarbmeM enarbmeM enarbmeMenarbmeM
-rehteylop(-rehteylop( -rehteylop( -rehteylop(-rehteylop(
)enohplus)enohplus )enohplus )enohplus)enohplus
eugolataCeugolataC eugolataC eugolataCeugolataC
htiwsrebmuNhtiwsrebmuN htiwsrebmuN htiwsrebmuNhtiwsrebmuN
CXPxiferpCXPxiferp CXPxiferp CXPxiferpCXPxiferp
lecartlUlecartlU lecartlU lecartlUlecartlUPP
P
PPCLCLCLCLCL
enarbmeMenarbmeM enarbmeM enarbmeMenarbmeM
etisopmoc(etisopmoc( etisopmoc( etisopmoc(etisopmoc(
detarenegerdetareneger detareneger detarenegerdetareneger
)esolullec)esolullec )esolullec )esolullec)esolullec
eugolataCeugolataC eugolataC eugolataCeugolataC
htiwsrebmuNhtiwsrebmuN htiwsrebmuN htiwsrebmuNhtiwsrebmuN
,GXP,VXPxiferp,GXP,VXPxiferp ,GXP,VXPxiferp ,GXP,VXPxiferp,GXP,VXPxiferp
DXP,HXPDXP,HXP DXP,HXP DXP,HXPDXP,HXP
eroparuDeroparuD eroparuD eroparuDeroparuD
enarbmeMenarbmeM enarbmeM enarbmeMenarbmeM
)FDVP()FDVP( )FDVP( )FDVP()FDVP(
HOaNHOaN HOaN HOaNHOaNN1.0X
HOaNHOaN HOaN HOaNHOaNN50.0X
losyLlosyL losyL losyLlosyL
®®
®
®®
)KAB()KAB( )KAB( )KAB()KAB(%1.0XXX
edizAmuidoSedizAmuidoS edizAmuidoS edizAmuidoSedizAmuidoS%50.0XXX
HH
H
HH
33
3
33
OPOPOPOPOP
44
4
44
N1.0XXX

Pellicon XL Device
- 20 -
4. Attach the syringe to the retentate port and slowly push
the solution into the device.
5. Disconnect the syringe and all tubing. Replace the caps
on the ports.
Store flat at 4–25 ºC.
Note:
After prolonged exposure to water, the tubing may
absorb a small volume of water. As a result, tubing color
may change from clear to opaque, which is normal. Air
or oven drying will return the color to clear.
Table of contents
Popular Laboratory Equipment manuals by other brands

SPEX SamplePrep
SPEX SamplePrep 6875 Freezer/Mill Series operating manual

Evoqua
Evoqua WALLACE & TIERNAN BARRIER M Series operating manual

Integra
Integra VIAFLO 96 6000 quick start guide
Specac
Specac ARROW Quick start manual

NanoEnTek
NanoEnTek ADAM MC2 instruction manual

Sartorius
Sartorius PICUS user manual


