eMoyo KUDUwave User manual

eMKW-TD0054-21| Date of Issue: 22 October 2020
User Manual

eMKW-TD0054-21- Page 1
Contents
Introduction 2
Operator Training Requirements 4
Getting Started 7
Remote Testing 12
Getting Started with the KUDUwave™ Software 14
Working with Folders 15
Working with Patients 23
Working with Clinical Tests 29
KUDUwave™ Tympanometer 51
KUDUwave™ Integrations 62
Settings 67
X-check (Cross Check) 70
Assistance from the Manufacturer 75
Cleaning and Maintenance 76
Storage and Shipping 77
Expected Service Life 78
Disposal and Recycling 78
Traveling with Your KUDUwave™ 78
Upgrades, Maintenance and Support 78
Troubleshooting 79
Technical Specifications 80
Electromagnetic Compatibility (EMC) 90
End User License Agreement (EULA) 94
Warranty and Disclaimer 95

eMKW-TD0054-21- Page 2
Introduction
Purpose of this Manual
This manual provides instructions for use and describes the various functions and the features of the
KUDUwave. It also describes how all the technologies involved in the KUDUwave’s function work in
conjunction. This manual is not intended as a method to train KUDUwave operators to be healthcare
professionals or to act as such. An operator may not act as a professional unless qualified to do so.
Medical Purpose
The medical purpose of the KUDUwave is to assist in testing the behavioral auditory responses of a
patient and to determine hearing thresholds which will assist in diagnosis of hearing impairments.
The KUDUwave is intended to:
●Test air and bone conduction thresholds (at conventional and extended high frequencies) to
amplitude threshold levels of that of a Type 3 Basic Diagnostic Audiometer as described in BS
EN 60645-1
●Test word recognition and speech reception thresholds as a Type B Basic Speech Audiometer
in accordance with BS EN 60645-1
●Test aural acoustic impedance/admittance functions in accordance with the requirements for
a Type 1 Diagnostic/ clinical Tympanometer as detailed in BS EN 60645-5.
Clinical Benefits
●Serving and accessing more patients as a result of the KUDUwave portability
●Boothless assessments allowing for diagnostic audiometry outside of the sound booth
●Comprehensive testing allowing for timely and cost-efficient auditory disorder management
and direct referrals
●Ability to assess two ears simultaneously (bilateral tympanometry)
●Integrated with acoustic reflex measurements
●Has two tympanometers, which allows a hearing health clinic to continue functioning should
one tympanometer stop functioning
●Effective first-time probe sealing as a result of KUDUwave TMP placement
Patient Populations
The KUDUwave is suitable for testing all patient populations, regardless of gender, age, weight, general
health or ethnicity other than the following:
●very young children (suitable for ages 3+)
●patients with physical or mental disabilities that prevent them from signaling a response to a
test audio tone presented to them.
During testing, patients should be calm and comfortable and free from distractions.
Indications
The KUDUwave can be used to perform behavioural pure tone (air and bone conduction) audiometry,
speech audiometry, and objective acoustic immittance testing on test subjects. The KUDUwave is ideal

eMKW-TD0054-21- Page 3
to use:
1. Inside a sound-treated booth, similar to traditional audiometer/ booth setup,
2. In healthcare facilities,
3. In the clinician's consultation room,
4. At schools, factories, shops and old age homes,
5. In conditions where open air testing is clinically required - for example, in cases of subjects with
contagious diseases (i.e. MDR-TB),
6. Alongside a hospital bed, or inside a prison cell,
7. Where test room ambient noise certification services are limited,
8. Where trusted testing is needed in conditions where ambient noise levels fluctuate,
9. Where there is a need to conduct a remote test as a result of not having a clinician onsite to
perform the test,
10. Where there is a need for automatic testing as a result of mass audiometric testing and/ or lack
of qualified professionals onsite,
11. Where there are poor infrastructure and a shortage of technicians to calibrate audiometers
and certify test rooms to be quiet enough for compliant testing, and
12. Where the audiometer needs to travel regularly from one test site to the next.
Contra-Indications
The KUDUwave cannot be used to do behavioural testing in subjects that cannot clearly indicate when
they heard the sounds presented, for example younger children (less than 12 months of age) and mentally
compromised test subjects.
The KUDUwave acoustic immittance and pure tone testing should not be conducted if;subjects have
otorrhea, otitis externa, or the presence of a foreign body in the ear canal.
Residual Risk
●Cross-infection between patients when eartips are re-used. Please do not re-use eartips on
various patients.
●Cross-contamination between patients when applied parts are not sufficiently cleaned
according to the instructions provided. Please ensure that these parts are cleaned sufficiently
between patients.
●Temporary threshold shift (TSS) can occur when loud tones are played for extended periods of
time. Please do not present loud tones over extended periods of time.
●Possible temporary patient discomfort caused by the silicone sleeve of the KUDUwave OH.
Although discomfort may be experienced by some patients, please do not modify the sleeve
as it provides robustness and physical protection from shock, based on the device's intended
purpose.
Device Description and Application
The KUDUwave is a portable, PC controlled, USB-powered, audiometric device capable of performing
diagnostic testing for pure-tone, speech and aural acoustic impedance/admittance audiometry outside a
certified sound room.
The device is manufactured as a headset with two ear cups and a head-band joining the two earcups. It
connects to a Windows PC using two 3 m USB cables and is supplied with a USB Patient Response Button
which can be plugged into the PC or the headset itself.
The device makes use of insert earphones and passive noise-attenuating ear cups to allow for compliant

eMKW-TD0054-21- Page 4
testing outside a traditional soundproof booth. Custom sound-pressure-level meters are included to
monitor the ambient noise.
The device is suitable for open air testing in areas free from excessive noise. It must be kept dry and free
from dust for reliable, safe operation. The device is a highly sensitive and technically complex device that
should be treated with care. We highly recommend that you use the robust, shock-absorbing, carry case
to transport your device. Mark the package as FRAGILE when it is in transit.
Frequent Usage
The KUDUwave is suitable for continuous, regular use. Analysis of all its functions confirms that there is
no risk to either the operator or patient. These functions are detailed within this document and include
measures to minimise any potential risk.
Applied Parts Details
The following parts are defined as “applied parts” in accordance with
BS EN 60601-1:
Ear Inserts: The Left and Right Ear Inserts will be positioned in the outer
ear by the operator. They do not carry any electrical, chemical or
mechanical energy and contain no metallic parts, and facilitate the
delivery of sound energy to the patient’s ears.
Bone Vibrator: The bone vibrator is positioned against the patient’s
forehead by the operator. From this position it can be used to deliver
sound energy to the patient’s cochlea. The KUDUwave uses a certified
bone vibrator from Radioear.
Operator Training Requirements
Basic Requirements
The operator must be a trained healthcare professional (typically an audiologist, hearing aid acoustician,
general practitioner, ENT, nurse or audiometrist) or a practitioner who has been trained in audiometry.
The operator must be able to read and communicate fluently in English and/or the primary language of
the patient.
Training and Certification Requirements
Training is provided free of charge via an online session within the first 30 days of purchase for both
facilitators and operators of the KUDUwave. Additional training resources are available via the
KUDUwave academy (https://emoyo.net/kuduwave-academy/) as well as a comprehensive helpdesk
available at emoyo.net/category/helpdesk/. The operator will receive a certificate of completion after
successfully completing their training.

eMKW-TD0054-21- Page 5
Additional technical support is also available via our ticket based system, online chat, email and telephone
with the KUDUwave support team. Additional group or one-one training may be provided at a cost, to
be determined at such time as it is necessary.

eMKW-TD0054-21- Page 6
Description of Symbols
The following important symbols are used on the KUDUwave and its components.:
Symbol
Description
Manufacturer, eMoyoDotNetza (Pty) Ltd, 179 Beyers Naude Drive,
Johannesburg, South Africa
EC Authorised Representative, PSF Medical BV, Marten Messweg 8, 3068AV Rotterdam,
The Netherlands
Symbol for CE Mark with Notified Body Number. Conforms to Medical Device Directive
93/42/EEC.
Symbol designating Type B Applied Parts according BS EN 60601-1.
or
Caution. Indicates the need for the user to consult the instructions for use for important
cautionary information such as warnings and precautions that cannot, for a variety of
reasons, be presented on the medical device itself.
Consult instructions for use. Indicates the need for the user to consult the instructions for
use.
Single use only.
Serial number.
Batch code. Indicates the manufacturer's batch code so that the batch or lot can be
identified.
Ingress protection.
Keep Dry. Indicates that the medical device needs to be protected from moisture
Temperature limit. Indicates the temperature limits to which the medical device can be
exposed safely.
Humidity limit. Indicates the range of humidity to which the medical device can be safely
exposed.
Fragile, handle with care. Indicates a medical device that can be broken or damaged if not
handled carefully.

eMKW-TD0054-21- Page 7
Getting Started
Get to know your KUDUwave™
All KUDUwave devices have the following capabilities:
●Pure Tone Air Conduction Testing
●Active Noise Monitoring
●Automated and Manual Testing
●Testing Protocols
●Patient Management and Medical Record Suite - eMoyo EMR
●Telemedicine Enabled
Your KUDUwave can be one of the following configurations, which determines what tests it can perform
and extra features it may have.
KUDUwave™ OH
KUDUwave™ Prime
KUDUwave™ Pro
KUDUwave™ Pro TMP
Screening
Screening
Screening
Screening
-
-
Diagnostic
(Bone VIbrator Included)
Diagnostic (Bone VIbrator
Included)
-
-
Monitoring of Ototoxicity
Monitoring of Ototoxicity
-
-
Extended High
Frequency (up to 16kHz)
Extended High
Frequency (up to 16kHz)
-
-
-
Tympanometry
KUDUwave™ Serial Number
The unique serial number is clearly marked on the KUDUwave headset. Serial number information is
required when contacting customer support and booking calibrations.
Unpacking the KUDUwave™ Hardware
The KUDUwave is packaged in a robust, shock-absorbing case designed to protect it during
transportation. Inspect the case for signs of any damage and notify your supplier immediately if any signs
of mechanical or physical damage are found.

eMKW-TD0054-21- Page 8
Packaging Checklist
Please check that all items listed below are received in good condition. If any items are missing or
damaged, immediately notify your KUDUwave™ distributor.
●The KUDUwave headset
●Three meter long twisted KUDUwave dual USB cable
●USB patient response button
●Radio Ear Bone vibrator with metal headband attached to the KUDUwave black headband with
a screw (Pro and Pro TMP configurations only)
●Calibration certificate
●Two sound tubes with stainless steel ear tip couplers or silicone ear tip coupler/ TMP probes,
attached to the KUDUwave (dependent on the KUDUwave configuration).
●Spares:
○Prime and Pro configurations come with 6 sound tubes and 1 stainless steel coupler
○TMP and OH configurations come with one spare tympanometer probe and one
stainless steel ear tip coupler
●TMP configurations come with one calibration pod
Laptop Requirements
Laptop Minimum Requirements
●Core i3 Processor
●Windows operating system (no older than Windows 8)
●4GB RAM
●No less than a 250GB hard drive
●WiFi enabled
●A Webcam

eMKW-TD0054-21- Page 9
●2 USB ports (response button can be plugged into one ear cup if necessary)
If a USB hub is required, please ensure it adheres to the following specifications:
●Self-powered (it must have its own power supply from an electrical wall plug)
●Supplies 5 Volts and 1 Amp per port
●USB 2.0
●at least 3 ports available for the KUDUwave connections (Left cup, Right cup and Response
Button)
●A USB Hub cannot be used with the KUDUwave Pro TMP. Consult support if you require one.
Software Installation
If your KUDUwave controller PC was professionally configured by eMoyo, all the necessary software will
already be installed. Should this not be the case, or should you wish to install the software on more than
one computer, please visit the eMoyo website (www.emoyo.net). Click on KUDUwave Audiometers in
the main menu and select eMoyoEMR Software for KUDUwave. Submit your contact information to gain
access to the downloads page.
These details will be added to our customer database so
that you may be alerted of any changes or updates to the
software. The change log is also publically available on our
website and is regularly reviewed for any updates. Next,
download the software from the provided link and run the
saved installation file as an administrator. Use the chat
function in the bottom right hand corner of your screen to
chat to us live if you need help.
Software Launch
You should find this eMoyoEMR shortcut on your PC’s desktop. Alternatively you can find
eMoyoEMR under programs in your start menu. Launch immediately after installation or, click
the icon to launch.
Software Language
The software is currently available in English, Spanish, French, Portuguese, Bahasa and Dutch.
Preparing the Test Environment

eMKW-TD0054-21- Page 10
It is essential that the test environment is as quiet as possible in order to ensure test compliance and that
the patient is not disturbed. The KUDUwave software will indicate if ambient noise is too loud and is
disrupting the test. The test environment should be free from any distractions that may disturb either the
operator or the patient as these may result in incorrect test results.
Preparing and Positioning the Patient
The patient should be seated in the test environment near to the test computer but should not be able
to view the computer screen. If the computer is being used so that the space bar is the patient response
button, then the computer can face the patient, however the testing screen must be put into hidden
mode. Read more under Working with Clinical Tests. Care should be taken to ensure the patient is
comfortable so as to minimise distractions. If the patient is unable to sit, care must be taken to ensure
they are positioned in as comfortable and relaxed a position as possible. Patients who are notably anxious
should be calmed and reassured before testing. Furthermore, condition your patient as to how the test
will be conducted and use the software conditioning page to show them what the pure tones and masking
will sound like.
Preparing the KUDUwave™ Equipment
Connecting the KUDUwave™
Plug the larger USB plugs into the USB ports of the PC. Plug the smaller plugs into the corresponding
ports of the KUDUwave headset. Ensure these are secure and pushed all the way in until the LED light
comes on.
The KUDUwave will indicate the right side with a red light (Note this is not a warning light) and the left
side with a blue light when powered. You will now be able to begin testing. If the device is not plugged
in, it will not be possible to proceed to testing until the device is properly connected. Ensure that the
cables are positioned out of the way so that they are not a hazard.
Device Drivers
KUDUwave is a plug and play device and all drivers will automatically begin installing when KUDUwave’s
USB cables are plugged into a PC. If the device is plugged into a different USB port on the same computer
for the first time, then some drivers will be installed again. Please wait until Windows notifies you that
the drivers have been installed successfully.
Warning: If the drivers did not install correctly, you will need to remove the old drivers and reintroduce
the KUDUwave to the computer. Read more under Troubleshooting.
Warning: If you launch the KUDUwave software before the drivers are installed, the KUDUwave
software will prompt you that it could not find the device, even though the device is plugged in. Close
and reopen the software once the KUDUwave device is set up. Contact Support should the software still
not find the device.
Performance Verification of the KUDUwave™
To test the KUDUwave hardware, plug in the device and perform X-Check (built in calibration verification
tool). This will also indicate any performance issues. Report any faults found to your distributor.
eMKW-TD0054-21- Page 11
Disconnecting the KUDUwave™
If it is required that the KUDUwave be disconnected, ensure all test data is saved and close the software.
The USB cables can then be unplugged. For safe storage and to extend the lifespan, please wind the USB
cables in large loops when returning to the case for storage.
Ear Inserts
Ear tips must be firmly attached to the plastic tubes using the stainless steel couplers
or the plastic probe designed for silicone eartips. Ear tips are intended for single use
and should be disposed of as medical waste after testing. eMoyo will not be held
liable for any complications if eartips are reused.
USB Patient Response Button
Connect the USB cable of the response button to either one of the ear cup USB
ports, or into a third USB port in the PC. A light will pulse (come on and switch
off again) if connected correctly.
Note: Not all KUDUwaves are powered the same by different laptops and the
response button may not work when plugged into the ear cup USB port. Use the
response button in the laptop port in these cases.
Positioning the KUDUwave™ Headset
When not in use, place the headset on a stable surface. Cleaning and disinfection can be done with
cleaning wipes which are intended for cleaning plastics that comply with EN1276.
Although there are a number of ways to position the KUDUwave correctly on the patient’s head, the
following technique is recommended:
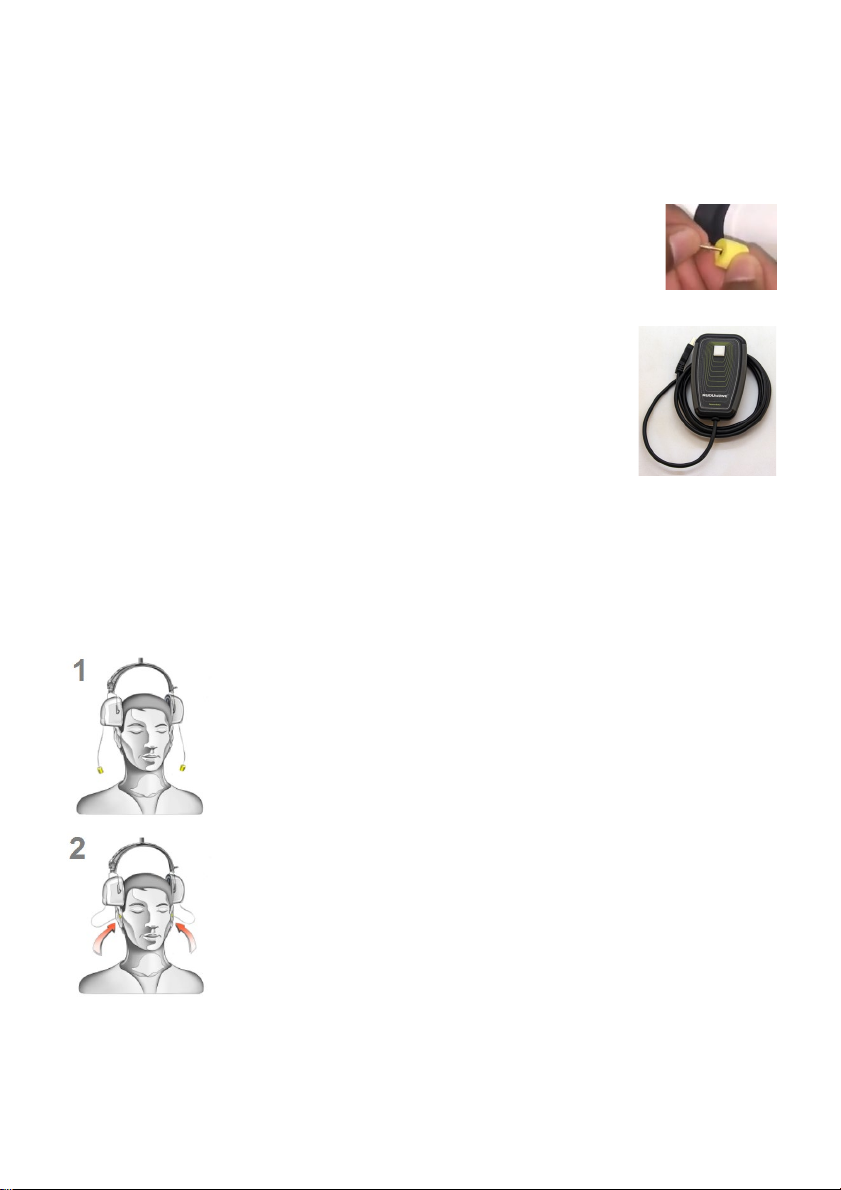
Step 1: Initial Position
Gently place the KUDUwave headset on the patient’s head, resting just above
both ears. Ensure the headset is positioned correctly i.e. the left ear cup
(indicated by a Blue LED light) must be on the patient’s left hand side and the
right ear cup (indicated by a Red LED light) must be on the patient’s right hand
side.
Step 2.1: Insert KUDUFoam Eartips
Squeeze and roll the foam tip down to its smallest diameter using your thumb
and index finger. Pull the ear by the pinna up and back for adults, (pull the pinna
down for children) and insert the foam tip into the ear canal. Ensure that the ear
tip is fully inserted. Hold the ear tip in position while the memory foam expands
to fill the ear canal. This will ensure that the eartip sits firmly in place. A loosely

eMKW-TD0054-21- Page 12
fitted ear tip or shallow insertion will result in testing inaccuracy.
Yellow eartip inserts are intended for most ear canal sizes while beige eartip inserts are intended for very
small ear canals (i.e. children).
Warning: Improper selection or insertion of eartips may affect test results.
Step 2.2: Insert Silicone Eartips
Select the correct size silicone eartip, pull
the ear pinna up and back and insert the
silicone ear tip in position. Ensure the
eartip is firmly in place and flush with the
ear canal. A loosely fitted ear tip or
shallow insertion will result in testing
inaccuracy. Silicone eartips are used only
by KUDUwave OH and ProTMP models.
Step 3: Final Position
The headset can now be lifted and placed over the patient’s ears. Ensure the ear
cups are supported by the headband and do not hang on the ears. Care must be
taken not to dislodge the ear inserts from the patient’s ear canal.
It is important to lift the left and right ear cups slightly in turn to visually confirm
the ear inserts are still correctly positioned. Make sure that the tubing is not
tangled under the cups. The tubing should loop out under the cups towards the
front of the ear to avoid tangling and or bending.
Step 4: Bone Vibrator Positioning
If the bone vibrator is to be used, the metal headband must be adjusted and
placed over the patient’s head. Ensure that it is positioned carefully on the
patient’s forehead, in line with the middle partition between the eyebrows or in
line with the centre between their eyes.
Warning: Bone vibrators are calibrated to a specific KUDUwave intended for forehead placement. They
are not interchangeable between KUDUwaves. Swapping of bone vibrators between devices may result
in inaccurate testing. If you are unsure about which bone vibrator should be used with your KUDUwave
please check its calibration certificate or alternatively contact eMoyo support.
Step 5: Patient Response Button
The Patient Response Button must be placed in the patient’s hands. Ensure that the cable does not
become tangled or damaged. The patient must keep their finger on the button and be ready to press it
when a sound is played. The patient must be told to press the button as quickly as possible and then let
go of the button.
Remote Testing
The KUDUwave can easily and safely be used for remote testing over internet connections.

eMKW-TD0054-21- Page 13
To test remotely:
●The trained operator positions the KUDUwave on the patient or the patient is instructed to
position the KUDUwave on themselves.
●The trained facilitator can login to the patient’s PC to control the test through a remote
connection (like TeamViewer), or the test can be conducted on the patient’s PC and the
result emailed to the clinician at a later time.
Both the operator and facilitator need to complete the eMoyo KUDUwave training.

eMKW-TD0054-21- Page 14
Getting Started with the KUDUwave™ Software
Practitioner Details
Run the eMoyoEMR application by double clicking on the
icon on your desktop, and enter your details (not
mandatory). These details will appear on all reports and
audiograms.
You can also select your language of choice.
Click the “Go” button to proceed.
Home Page
Your Portal to Patient Management
The home page appears as below with 3 main sections.
1. System Menu
Here you have access to:
●Home
(return to the home page)
●Records (
return back to the folder you were busy with)
●Plugins
(additional features which can be added to your software)
●Support
(Contact support here, or use these tools to troubleshoot)
●Cloud
(synchronization of data to eMoyo cloud storage)
●Settings
(backup data, personalise your reports and more
)
eMKW-TD0054-21- Page 15
2. Folder Management Pane
Folders can be created and managed here. It is recommended to organise patients either under
alphabetical folders, organisation / company names or according to the date (month/year) they
were tested.
See more examples on the KUDUwave help desk at: emoyo.net/category/helpdesk/
3. Data View Pane
A series of quick links are made available for your convenience.
●Scan QR codes
(for quick retrieval of patient data)
●KUDUwave X-Check
(built in automated calibration verification tool
)
●Orca X-Check
(spirometry calibration for the Orca)
●Search
(filter through your patients using the search tool)
Give us your feedback
Help us improve the KUDUwave by giving us your feedback. In the software is a link to a short 5 min
survey, where you can let us know how you are experiencing your mobile audiometer and its
accompanying software. We’d appreciate your feedback so we can improve your KUDUwave experience.
Or contact us through our website : www.emoyo.net.
Working with Folders
Management of folders is done within the Folder Management Pane
Creating Folders and Subfolders
To create a folder click:
Enter the name of your folder in the space provided. Select a smart folder
setting if you wish to use this feature. Learn more in the Smart folder section. Select “OK” to save.
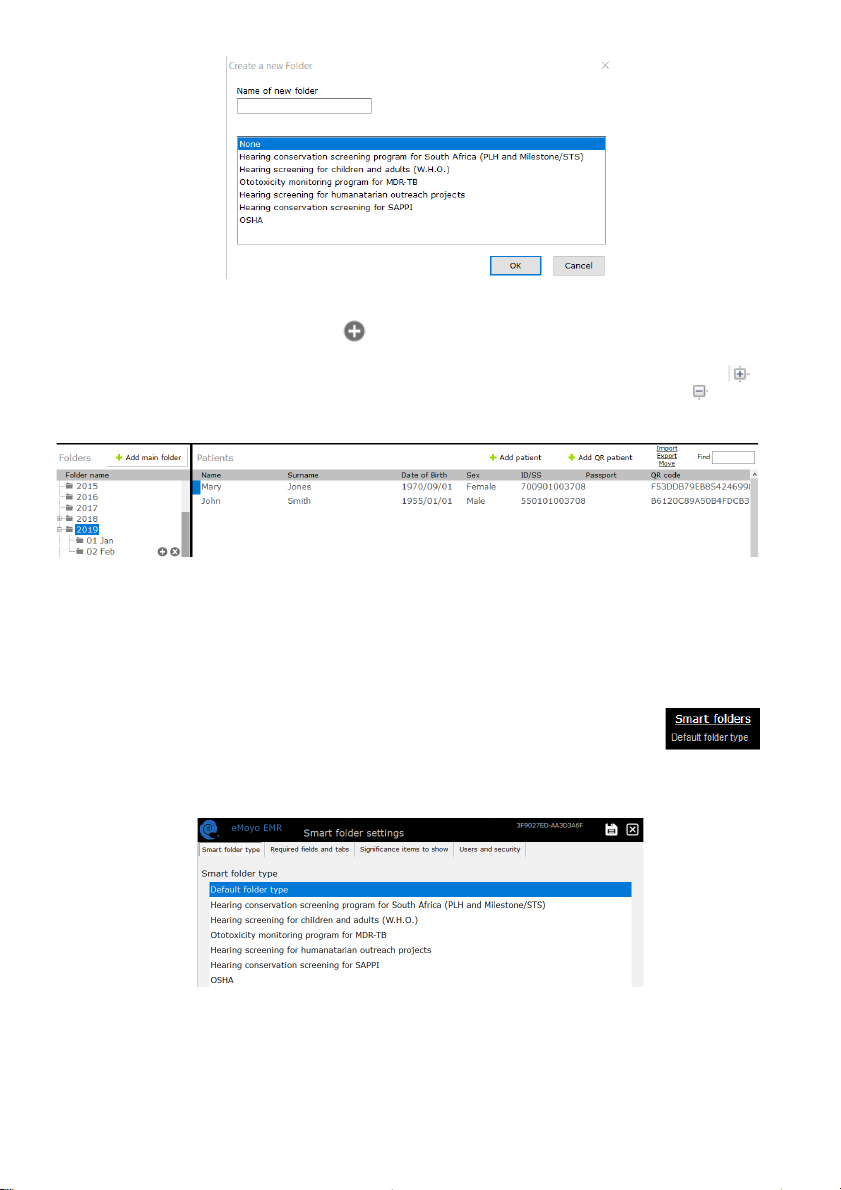
eMKW-TD0054-21- Page 16
Patient details will only be displayed, if the folder they fall under is selected. Once a folder is selected, a
subfolder can be created by clicking the icon next to its name.
Access a folder by clicking on the folder name. Double click on the folder name or click on the icon
to view subfolders. To hide subfolders, double click again on the folder icon or click on the icon.
Selecting a folder or subfolder will display its contents in the right hand pane.
Smart Folders
The KUDUwave uses multiple criteria (OSHA, SANS, WHO etc.) to develop testing protocols and assistive
interpretations of results. The KUDUwave also uses these criteria to separate which test protocols are
most needed and used by a particular industry.
To streamline the process of choosing which tests need to be done with which
patients, you can change the default settings of the folder. Change the smart folder
type by selecting the folder and click on “Smart folders” in the top right hand corner.
Under the “Smart folder type” there are seven available smart folder configurations, each with their own
user interfaces and pre-selected tests for all patients in this folder. Select an option and save.
Under “Required fields and tabs”, you can customise the selected smart folder type by selecting which
details you want to make required fields before any tests can be conducted.

eMKW-TD0054-21- Page 17
You can change the last four field names to relate to a hospital or school setting.
Under “Significance items to show”, you can select the labels which are available to use for the tests
generated in this folder. Note: Some of these test significances are relevant for particular audiogram
layouts which pertain to your industry. (i.e. PLH test significances are required for the software to do test
comparisons and identify between baseline, screening and exit tests)
Under “Users and security”, you can set up folder security restricting access to particular folders.
Contact eMoyo by completing the online form.

eMKW-TD0054-21- Page 18
Click the save icon to save changes. The folder type will be displayed at the top right hand corner of
your screen.
Listed below are the different types of smart folders and how you can use them.
Hearing Conservation Screening Program for South Africa (PLH and Milestone/STS)
Using this smart folder type simplifies the method of testing to identify early hearing loss and to calculate
measures for compensation.
Which tests can I perform in this folder type?
●Milestone Baseline & STS Screening (Standard Threshold Shift)
●PLH Baseline, Screening, Entry, Follow-up, Periodic and Exit (Percentage Loss of Hearing)
How do I start testing?
1. After adding a patient to the smart folder, click on +Note/Test to open a new test.
2. This next menu below will appear for you to select the relevant test you want to perform. The
test will begin automatically when you click on a button. You can return to the normal interface
by clicking on the button "Select a new Test / Note / Interpretation / Notification" in the top
left corner.
3. At any point during the test you can manually take over by clicking on pause.
4. Save the test once it is completed.

eMKW-TD0054-21- Page 19
Baseline Tests
●If you want to collect a baseline result, select from the top section.
●Complete two baseline tests, or even a third if you suspect the patient is malingering.
●Manually enter the baseline results of the patient if they were tested before, but are new in
the KUDUwave database.
●Adjust the dB level to limit the test. By default this is set to 10dB
Follow Up Tests
●If the patient already has a baseline result in the database, and you want to collect a follow-up
result, select the type of test from the bottom section.
●Adjust the dB level to limit the test. By default this is set to 15dB
Hearing Screening for Children and Adults (WHO)
This folder is designed to screen masses efficiently and effectively using World Health Organization
guidelines.
Which tests can I perform in this folder type?
●Pure tone test which finds thresholds between 25 - 45 dB HL at 1kHz, 2kHz and 4kHz for
Children
●Pure tone test which finds thresholds between 25 - 45 dB HL at 500Hz, 1kHz, 2kHz and 4kHz
for Adults.
How do I start testing?
1. After adding a patient to the smart folder, click on +Note/Test to open a new test.
2. The menu below will appear for you to start the automatic test. You can return to the normal
interface by clicking on the button "Select a new Test / Note / Interpretation / Notification" in
the top left corner.
3. At any point during the test you can manually take over by clicking on pause.
4. Save the test once it is completed.
Other manuals for KUDUwave
1
Table of contents


