manuals.online logo
Brands
  1. Home
  2. •
  3. Brands
  4. •
  5. ADC
  6. •
  7. Diagnostic Equipment
  8. •
  9. ADC DIAGNOSTIX 932 series User manual

ADC DIAGNOSTIX 932 series User manual

Other manuals for DIAGNOSTIX 932 series

1

Other ADC Diagnostic Equipment manuals

ADC 5112N Series Maintenance manual

ADC

ADC 5112N Series Maintenance manual

ADC 872N User manual

ADC

ADC 872N User manual

ADC 2.5V EENT Instruments User manual

ADC

ADC 2.5V EENT Instruments User manual

ADC Diagnostix 752M User manual

ADC

ADC Diagnostix 752M User manual

ADC Diagnostix 952B User manual

ADC

ADC Diagnostix 952B User manual

ADC WorldDSL UTU-731 User manual

ADC

ADC WorldDSL UTU-731 User manual

ADC Soneplex HMS-358 Installation and operation manual

ADC

ADC Soneplex HMS-358 Installation and operation manual

ADC ADView 2 User manual

ADC

ADC ADView 2 User manual

ADC AdView User manual

ADC

ADC AdView User manual

ADC Diagnostix ADSTATION User manual

ADC

ADC Diagnostix ADSTATION User manual

ADC Diagnostix ADSTATION User manual

ADC

ADC Diagnostix ADSTATION User manual

Popular Diagnostic Equipment manuals by other brands

Mindray Zonare ZS3KP Elite Service manual

Mindray

Mindray Zonare ZS3KP Elite Service manual

Snap-On VERDICT D7 user manual

Snap-On

Snap-On VERDICT D7 user manual

Mindray M7Vet Operation note

Mindray

Mindray M7Vet Operation note

TEXA TMD2 installation manual

TEXA

TEXA TMD2 installation manual

Autel MaxiIM IM608 manual

Autel

Autel MaxiIM IM608 manual

Sealey BT2012 instructions

Sealey

Sealey BT2012 instructions

Diagnoptics Age Reader Instructions for use

Diagnoptics

Diagnoptics Age Reader Instructions for use

LAUNCH TECH X-431 PRO5 user manual

LAUNCH TECH

LAUNCH TECH X-431 PRO5 user manual

Hella Gutmann Mega macs X quick start guide

Hella Gutmann

Hella Gutmann Mega macs X quick start guide

Foxwell I80TS manual

Foxwell

Foxwell I80TS manual

KaVo 3D eXam Operator's manual

KaVo

KaVo 3D eXam Operator's manual

Qiagen QIAcube Connect MDx user manual

Qiagen

Qiagen QIAcube Connect MDx user manual

Alber BDSU installation guide

Alber

Alber BDSU installation guide

St. Jude Medical QUANTIEN Instructions for use

St. Jude Medical

St. Jude Medical QUANTIEN Instructions for use

Bosch DCU 100 Original instructions

Bosch

Bosch DCU 100 Original instructions

Launch CNC-602A user manual

Launch

Launch CNC-602A user manual

Innova 3568 user manual

Innova

Innova 3568 user manual

ATEQ VT46 user guide

ATEQ

ATEQ VT46 user guide

manuals.online logo
manuals.online logoBrands
  • About & Mission
  • Contact us
  • Privacy Policy
  • Terms and Conditions

Copyright 2025 Manuals.Online. All Rights Reserved.

DIAGNOSTIX™932
• SCHEMATIC
• PARTS LIST
55 Commerce Drive
Hauppauge, NY 11788
Customer Service: 1-800-ADC-2670
Voice: 1-516-273-9600
Fax: 1-516-273-9659
email: [email protected]
http://www.adctoday.com
NEW YORK • LONDON • TAIPEI • TOKYO
2002 ADC Part# 9356A-00
MAINTENANCE
To Lock Mercury Within the Reservoir: Tilt the entire unit back
45° towards the reservoir to permit mercury to flow out of
cartridge tube and into reservoir. When cartridge tube is
completely emptied of ALL mercury (and while it is still tilted
45°), move locking lever to the right “OFF”. Mercury should be
locked within the reservoir during maintenance or transport. To
release mercury, move lever to “ON” position. If necessary, tilt
unit towards tube to allow mercury to flow out of reservoir.
Lift up the spring loaded EZ-Tube™mechanism
located at the top of the instrument. Tilt
instrument forward to free tube. If necessary
use a small flat head screw driver to help
dislodge the top of the tube. To replace tube,
lift EZ-Tube™mechanism and inset base of
tube into main unit, being sure graduation
marks face out. Next position top of tube and
release EZ-Tube™mechanism.
To Register Your Product, visit us at
www.adctoday.com
and follow the links
9356A-Diagnostix 932-SchemParts 9/12/02 12:50 PM Page 1
1
2
3
4
5
13
15
16
18
19
20
21
22
23
24
25
26
27
28
29
30
33
34
35
17W
932 DIAGNOSTIX™DESKTOP
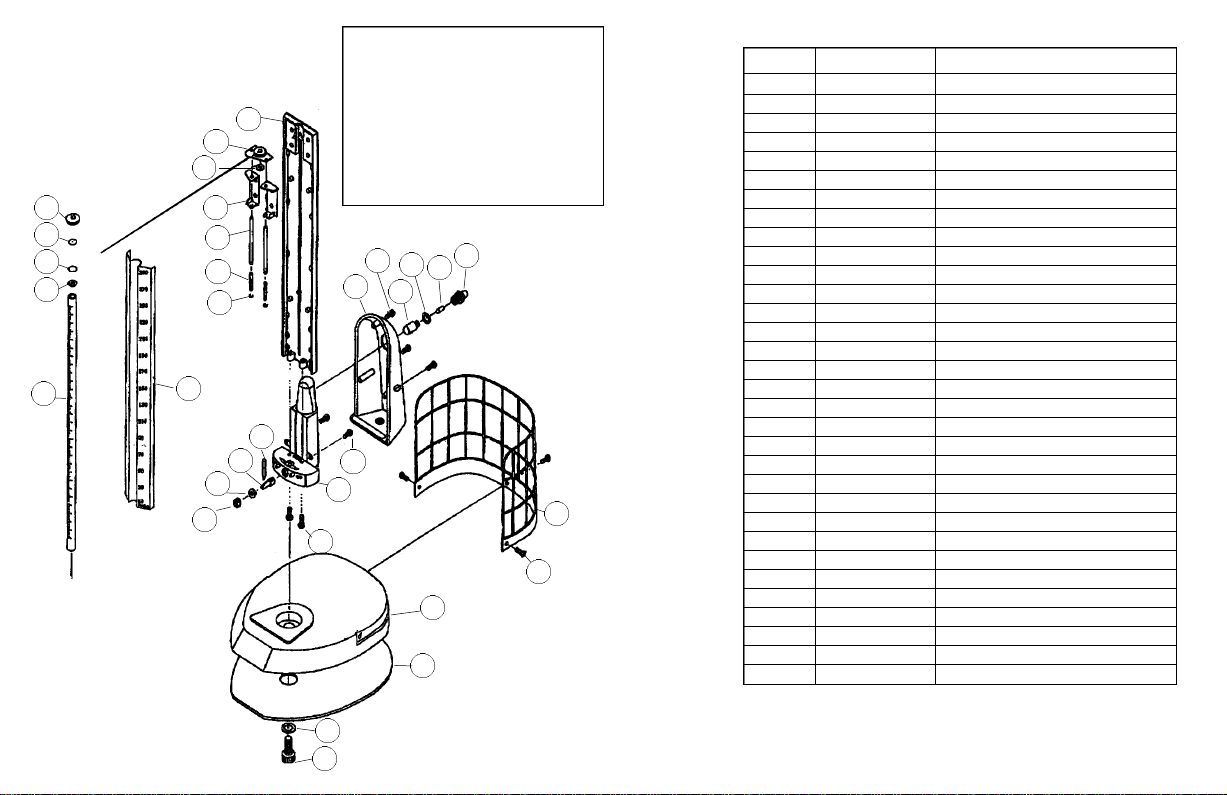
MERCURY UNIT Ref # Item # Description
1 932-101 Base Hex Bolt
2 932-102 Base Washer
3 932-103 Base Felt
4 932-104 Base
5 932-105 Basket Screws (3)
6 932-106 Basket
13 952-109 Reservoir Connector
14 952-110 Cotton Filter
15 952-111 Reservoir Connector Gasket
15A 952-112 Reservoir Feeder Tube
16 952-113 Reservoir Cover Screws (3)
17W 952-114 Reservoir Cover
18 952-115 Scale Plate Holder
19 952-116 Cartridge Top Holder
20 952-117 Rubber Gasket
21 952-118 Reservoir Holder for Top Plate
22 952-119 Rods (2)
23 952-120 Springs (2)
24 952-121 Locking Washer (2)
25 952-122 Locking Lever Handle
26 952-123 Reservoir Screws (2)
27 952-124 Reservoir Tank
28 952-125 Reservoir Rod
29 952-126 Bushing
30 952-127 Locking screw (1)
31W 952-128 Scale Plate
32W 952-129 Graduated Plastic Cartridge Tube
33 952-130 Rubber Gasket
34 952-132 Filter Plug
35 952-131 Kidskin Diaphragm
36 952-133 Screw Cap
37 952-134 Reservoir Base Screws (2)
14
15A
31W
32W
36
37
6
CONNECTINGTHE INFLATION
SYSTEMTO MANOMETER
Remove red safety cap which seals the reservoir
containing mercury (on the 952, the red safety cap is
located on the air inlet beneath swivel base). Attach
free end of reservoir tube securely to air inlet. Save
red safety cap for later use. When transporting mer-
cury instrument we recommend placing the red
safety cap on reservoir. Please Note: it is normal for
negligible amounts of residual mercury droplets to
accumulate around the air inlet beneath the red
safety cap during transportation.
9356A-Diagnostix 932-SchemParts 9/12/02 12:50 PM Page 2