Empava EMPV-BR01S User manual
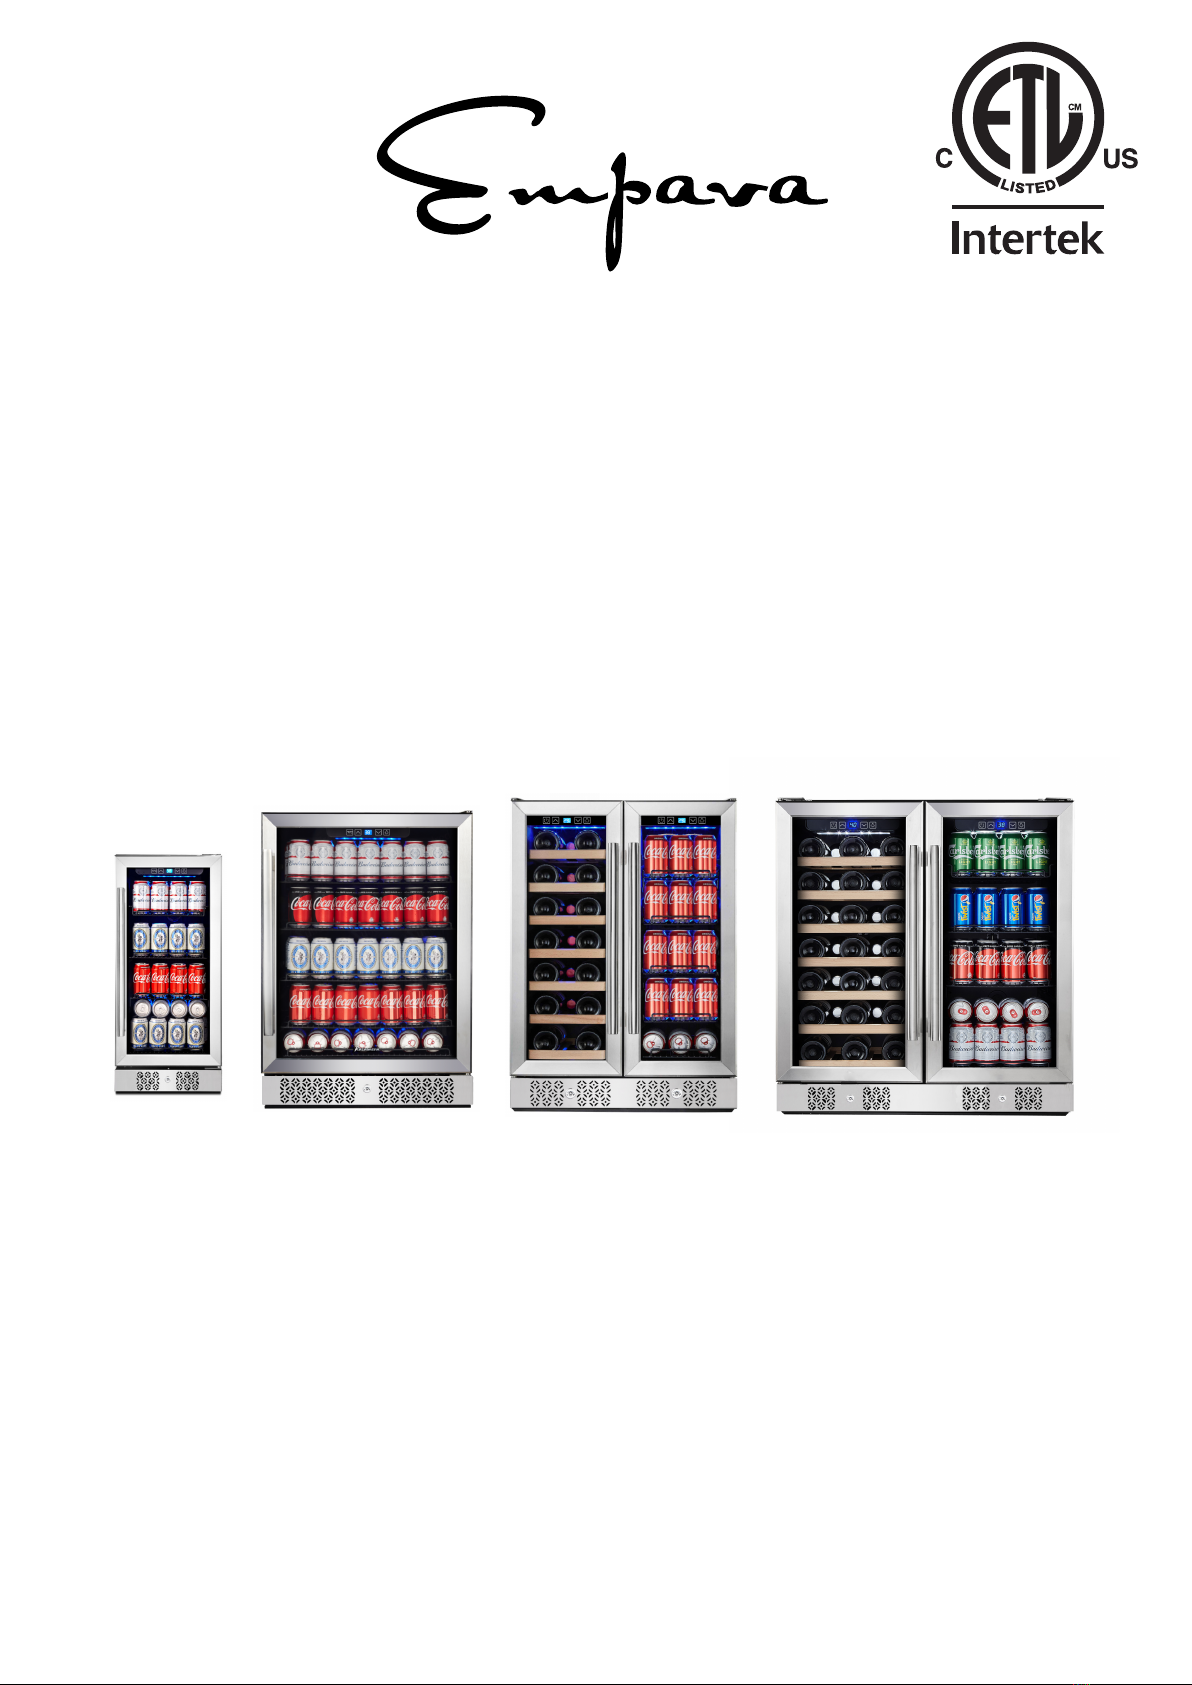
COMPRESSOR BEVERAGE COOLER
User Manual
EMPV-BR04D
Please read this user manual before using this product
EMPV-BR01S EMPV-BR02S EMPV-BR03D
EMPAVA APPLIANCES INC
15253 DON JULIAN RD CITY OF INDUSTRY.CA 91745
TEL:888-682-882
WWW.EMPAVA.COM


CONTENT
1. Before First Use....................................................................................4
2. Important Safety Measures and Instructions...................................4
3. Warning and Cautions......................................................................... 5
4. Specifications........................................................................................ 7
5. Device Overview...................................................................................8
6. Before Initial Operation.......................................................................
12
7. Temperature Setting.......................................................................... 13
8. Operation............................................................................................. 14
9. Energy Saving....
.................................................................................14
10. Cleaning and Maintenance.............................................................14
11. How to Move the Appliance............................................................15
12. Installation......................................................................................... 15
13. Trouble Shooting...................
........................................................... 19
14. Decommission.................................................................................. 20
15. Electrical Circuit Diagram............................................................... 21

4
Thank you for choosing our product. If operated and taken care of properly in
accordance with these instructions, this appliance will be useful for many years.
1. Before First Use
Before first use, remove any stickers or similar from the appliance except for the
rating label.
Dispose of any plastic bags as they pose a risk of suffocation to young children.
Please read this manual before operating the appliance and keep it in a safe place for
future reference. If this appliance is transferred to a new owner, the manual should
also be provided to the new owner. If you ignore the safety instructions, you will
endanger your health and life.
2. Important Safety Measures and Instructions
Before operating the appliance, check if the voltage indicated on the appliance’s
technical plate corresponds to the voltage of the electricity supplied to your home.
Check the technical periphery of the appliance. Do all wires and connections to the
appliance work properly? Or are they time-worn and do not match the technical
requirements of the appliance? A check-up of existing and newly made connections
must be done by an authorized professional. All connections and energy-leading
components (incl. wires inside a wall) must be checked by a qualified professional.
All modifications to the electrical mains to enable the installation of the appliance
must be performed by a qualified professional.
This appliance is intended for private use only.
This appliance is intended for cooling wine in a private household only.
This appliance is for indoor use only.
This appliance is not intended to be operated for commercial purposes,during
camping or in public transport.
Operate the appliance in accordance with its intended use only.
Do not allow anybody who is not familiar with this instruction manual to operate the
appliance.
This appliance may be operated by children aged from 8 years and above as well as
by persons with reduced physical, sensory and mental capabilities or lack of
experience and knowledge if they are supervised or have been instructed concerning
the safe use of the appliance and do comprehend the hazards involved. Children
must not play with the appliance. Cleaning and user maintenance must not be carried
out by children unless they are supervised.
Ambient temperature below 10°C or above 32°C will hinder the performance of the
appliance.

5
EXPLOSION HAZARD
Do not store any explosive materials or sprays that contain flammable propellants in your appliance.
3. Warning and Cautions
Do not connect the appliance to the mains if the appliance itself or the power cord or
the plug are visibly damaged.
Never try to repair the appliance yourself. If the appliance does not operate properly,
please contact the shop you purchased the appliance at. Original spare parts should
be used only.
When the power cord is damaged, it must be replaced by the manufacturer or an
authorized after sales service or a qualified professional only.
If any part of the cooling circuit is damaged, the appliance must not stand near a fire,
naked light or spark-generating devices. Contact the shop you purchased the
appliance at immediately.
Keep all components of the appliance away from fire and other sources of ignition
when you dispose of or decommission the appliance.
Do not install the appliance near volatile or combustible materials (e.g. gas, fuel,
alcohol, paints) or in rooms which may have poor air circulation (e.g. garage).
Do not connect the appliance to the electric supply unless all packaging and transit
protectors have been removed.
Operate the appliance with 110–120V AC 60Hz only. All connections and
energy-leading components must be replaced by an authorized professional.
Do not use a socket board or a multi socket when connecting the appliance to the
mains.
A dedicated and properly grounded socket meeting the data of the plug is required to
minimize any kind of hazard. The appliance must be grounded properly.
Check that the power cord is not placed under the appliance or damaged when
moving the appliance.
The technical data of your energy supplier must meet the data on the model plate of
the appliance.
Your domestic circuit must be equipped with an automatic circuit breaker.
Do not modify the appliance.
RISK OF ELECTRIC SHOCK
Turn off the power before you install the appliance and before you connect it to the mains. Do not
use any steam cleaners to clean or defrost the appliance. The steam can get into contact with the
electrical parts and cause an electrical short. Never use mechanical devices, knives or other sharp-
edged items to remove encrusted ice inside the appliance.

6
Disconnect the appliance from the mains before you clean or maintain it.
Do not use any electric appliances inside the food storage compartments of your
appliance unless they are recommended by the manufacturer of your refrigerator.
Do not put any heat-radiating appliances onto your appliance.
Do not install the appliance in a place where it may come in contact with
water/rain, otherwise the insulation of the electrical system will be damaged.
Do not put a water-boiler or vases onto your appliance. The electrical components
of your appliance can be seriously damaged by water over- boiling or spilled
water.
Children must never play with the appliance.
If you decommission your appliance (even temporarily), ensure that children
cannot get into the appliance.
Do not touch the extremely cooled surfaces with wet or damp hands, because
your skin may stick on these surfaces.
When you move the appliance, hold it at its base and lift it carefully. Keep the
appliance in an upright position.
Never use the door for moving the appliance as you will damage the hinges.
Do not operate the appliance unless all components are installed properly.
Do not stand or lean on the base,the drawers,the doors etc of the appliance.
Do not put hot liquids or hot foodstuff into the appliance.
4. Specifications
MODEL
VOLUME 84L 147 L 123L
VOLTAGE AC 110-120V
FREQUENCY 60Hz 60Hz 60Hz
PROTECTION TYPE I I I
CLIMATE CLASS SN.N SN.N SN.N
INPUT POWER 90 Watt 90 Watt 110Watt
ENERGY CONSUMPTION 0.257 Kw.h/24h 0.402 Kw.h/24h Kw.h/24h
TEMPERATURE RANGE 38-50℉(3-10℃)
NET WEIGHT lbs lbs 107.5 lbs
PRODUCT DIMENSION W x H x D inches W x H x D inches W x H x D inches
1 L
I
.
0.371 .h/
x x
60Hz
I
SN.N
Watt
Kw.h/24h
lbs
W xH x D inches
I
.
0.492 .h/ h
x x
EMPV-BR01S EMPV-BR02S EMPV-BR03D EMPV-BR04D
134.5
99.2
71.7
14.8 33.9 22.4 23.4
22.4
33
23.4 29.8
33.9 33.9
22.4 22.4
7
177L1 L
110
38-50℉(3-10℃)zone:40- ℉(5-1 ℃)
zone: - ℉3 -1 ℃)
n : 0- ℉( - ℃)
:50
-℉(-℃
Left
Right
66 8
0
38
zone:40- ℉(5-1℃)
zone: - ℉3 -1 ℃)
: - ℉( - ℃)
:50
-℉(-℃
Left
Right
668
0
38
AC 110-120V AC 110-120V AC 110-120V

8
EMPV-BR01S

9
Model No.: EMPV-BR02S
1. 2. 3. 4.
5. 6. 7. 8.
9. 10. 11. 12.
13. 14. 15. 16.
17.
℉/℃Switch
NTC point Light switch Temperature display Light
Temperature switch Exhuaust window
Shelf Foot
Exhuaust window
Body
Glass Door seal Door frame Lower hinge
Lock
Fan

10
Model No.: EMPV-BR03D
1. 2. 3. 4.
5. 6. 7. 8.
9. 10. 11. 12.
13. 14. 15. 16.
17.
Left light switch Left temperature setting left temperature display Left temperature setting
Left upper hinge Power switch Left fan Left light
Exhaust window Door frame Left glass
18. 19. 20.
Left door seal
NTC point Shelf Carbon filter
Foot
Right temperature display
. . . .
.
.
21. 22. 23 24
25 26 27 28
29
Right temperature setting
Right upper hinge Right fan
Door frame Right glass Right door seal
Right light
Lock
Exhaust window
Right light switch
Right temperature setting
Lock

Model No.: EMPV-BR04D
11
1. 2. 3. 4.
5. 6. 7. 8.
9. 10. 11. 12.
13. 14. 15. 16.
17.
Left light switch Left temperature setting left temperature display Left temperature setting
Left upper hinge Power switch Left fan Left light
Exhaust window Door frame Left glass
18. 19. 20.
Left door seal
NTC point Shelf Carbon filter Lock catch
Foot Right light switch
Right temperature setting
Right temperature display
. . . .
.
.
21. 22. 23 24
25 26 27 28
29
Right upper hinge
Right fan Right glass
Right door seal
Right light
Lock
Exhaust window
Right temperature setting
Door frame
30. Lock catch

6. Before Initial Operation
Leave the appliance in an upright position for 4–6 hours before you connect it to the
mains.
Clean the appliance thoroughly. Be very careful, especially inside the appliance (see
chapter Cleaning and Maintenance).
The appliance must be connected to the mains properly.
Allow the appliance to stabilize the temperature for approx. 24 h before use.
Do not overfill the appliance.
12
13
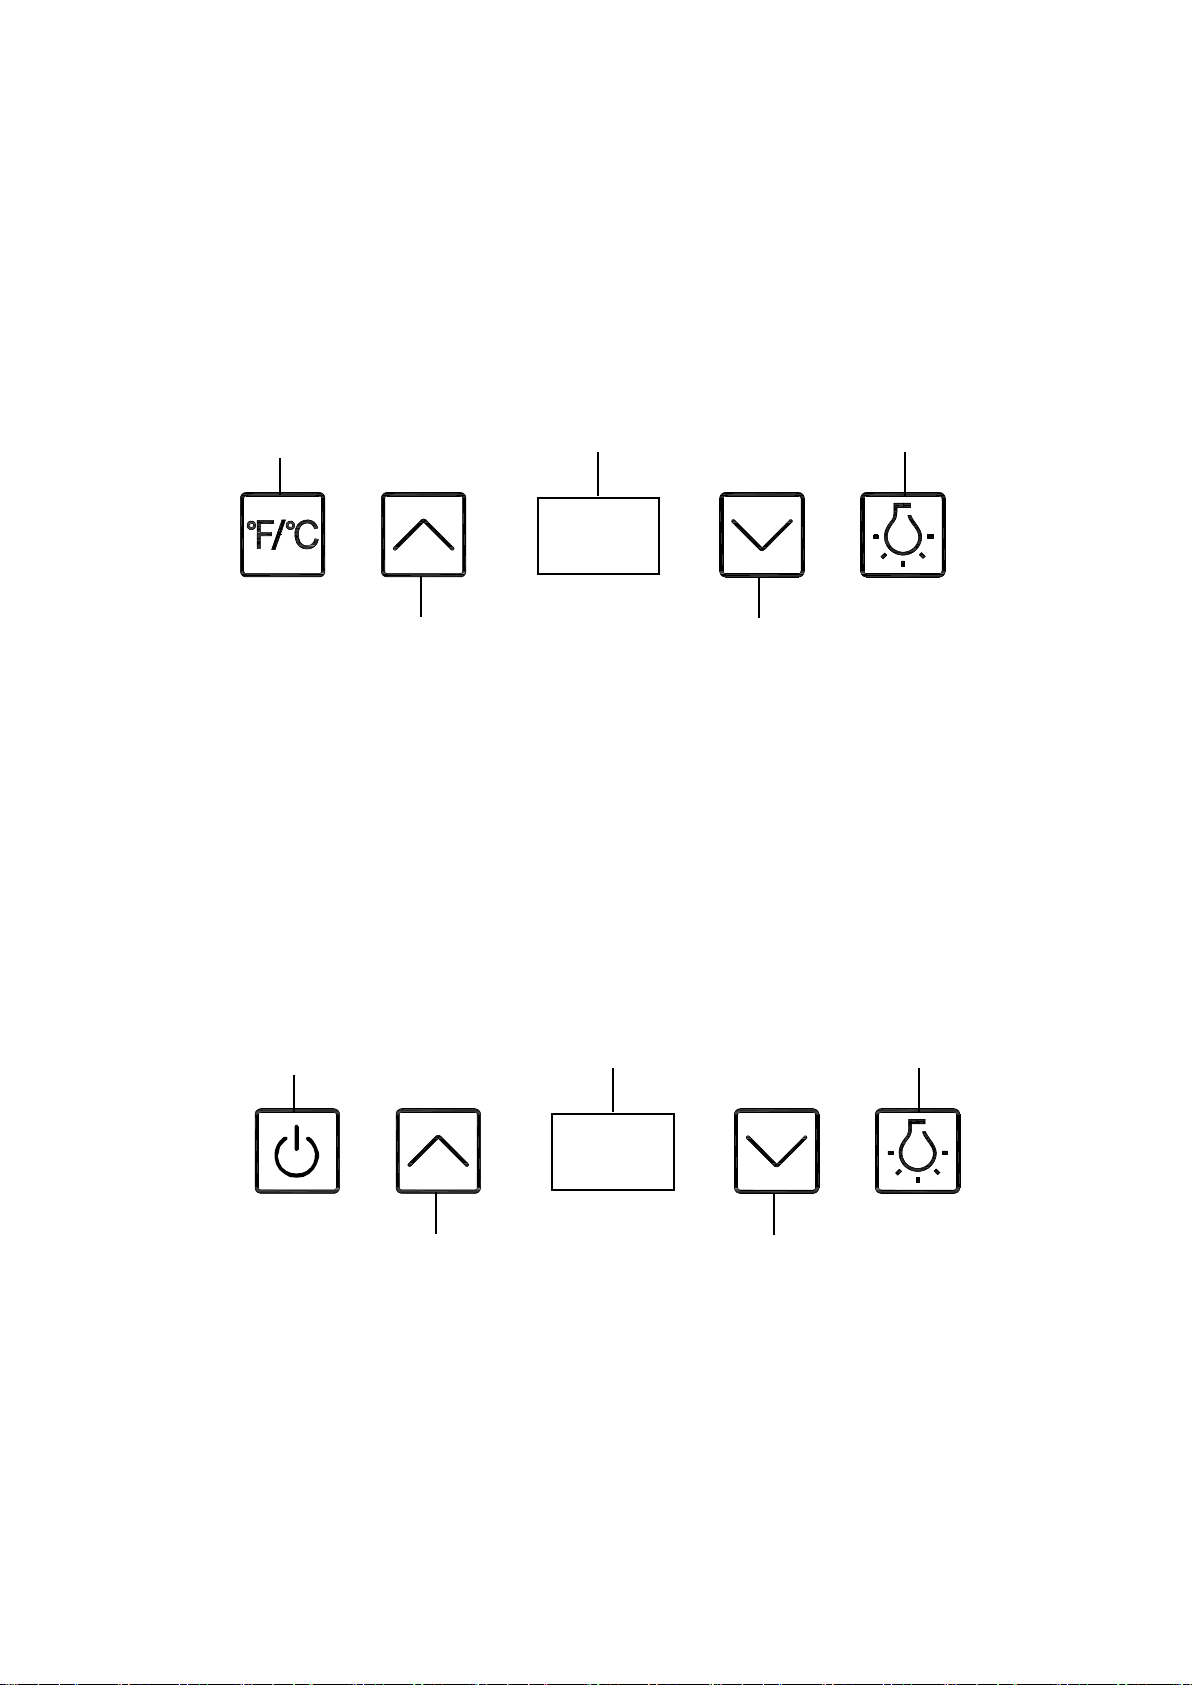
7. Temperature Setting
Model No.:
Temperature range: 38-50℉(3-10℃).
Flashing LED = Setting mode of the temperature.
Constant LED = Cooling temperature.
Model No.:
Temperature range: Left Zone:40-66℉(5-18℃);Right Zone:38-50℉( 3-10℃)
Flashing LED = Setting mode of the temperature.
Constant LED = Cooling temperature.
℉/℃
Switch
Temp
Displa
y
Lighting
Switch
Temp.
Increase
Temp.
Decrease
EMPV-BR01S / EMPV-BR02S
EMPV-BR03D / EMPV-BR04D
Power
Switch
Temp
Displa
y
Lighting
Switch
Temp.
Increase
Temp.
Decrease

14
WARNING
Disconnect the appliance from the mains before you clean or maintain it.
8. Operation
The appliance can only reach the relevant temperatures when:
1. The ambient temperature meets the climatic class.
2. The doors close properly.
3. You do not open the doors too often or too long.
4. The door seals are in proper condition.
5. The appliance is properly positioned.
6. You have not overfilled the appliance.
7. You do not store warm or hot food in the appliance.
9. Energy Saving
Try opening the door as little as possible, especially when the weather is warm and
humid. When you open the door, close it as soon as possible.
Make sure the appliance is always well-ventilated.
Disconnect the appliance from the mains if you do not operate it.
Always keep the door seals clean and in a proper condition.
10. Cleaning and Maintenance
Always keep the appliance clean so that unpleasant odors do not occur.
Dust deposits on the condenser will increase the energy consumption. Clean the
condenser twice a year with a vacuum cleaner or a soft brush.
Take off all rings and bracelets before cleaning or maintaining the appliance,
otherwise you may damage the surface of the appliance.
Detergent
Do not use any harsh, abrasive detergents.
Do not use any aggressive detergents.
Do not use any solvents.
15
External Cleaning
Use a moist cloth and a mild, non-acid detergent.
Use clear water to rinse.
Try the cleaned surfaces with a cloth.
Internal Cleaning
Clean the shelves and the other removable parts with warm water and a mild,
non-acid detergent.
Use clear water to rinse.
Dry the cleaned surfaces with a cloth.
Clean the interior with water and a mild, non-acid detergent.
Use clear water to rinse.
Dry the cleaned surfaces with a cloth.
Check the water drain and clean it if needed.
11. How to Move the Appliance
Remove all bottles.
Securely tape down all loose items inside the appliance.
Turn the level feet up to the base to avoid damage.
Tape the door.
The appliance must be moved in an upright position.
12. Installation
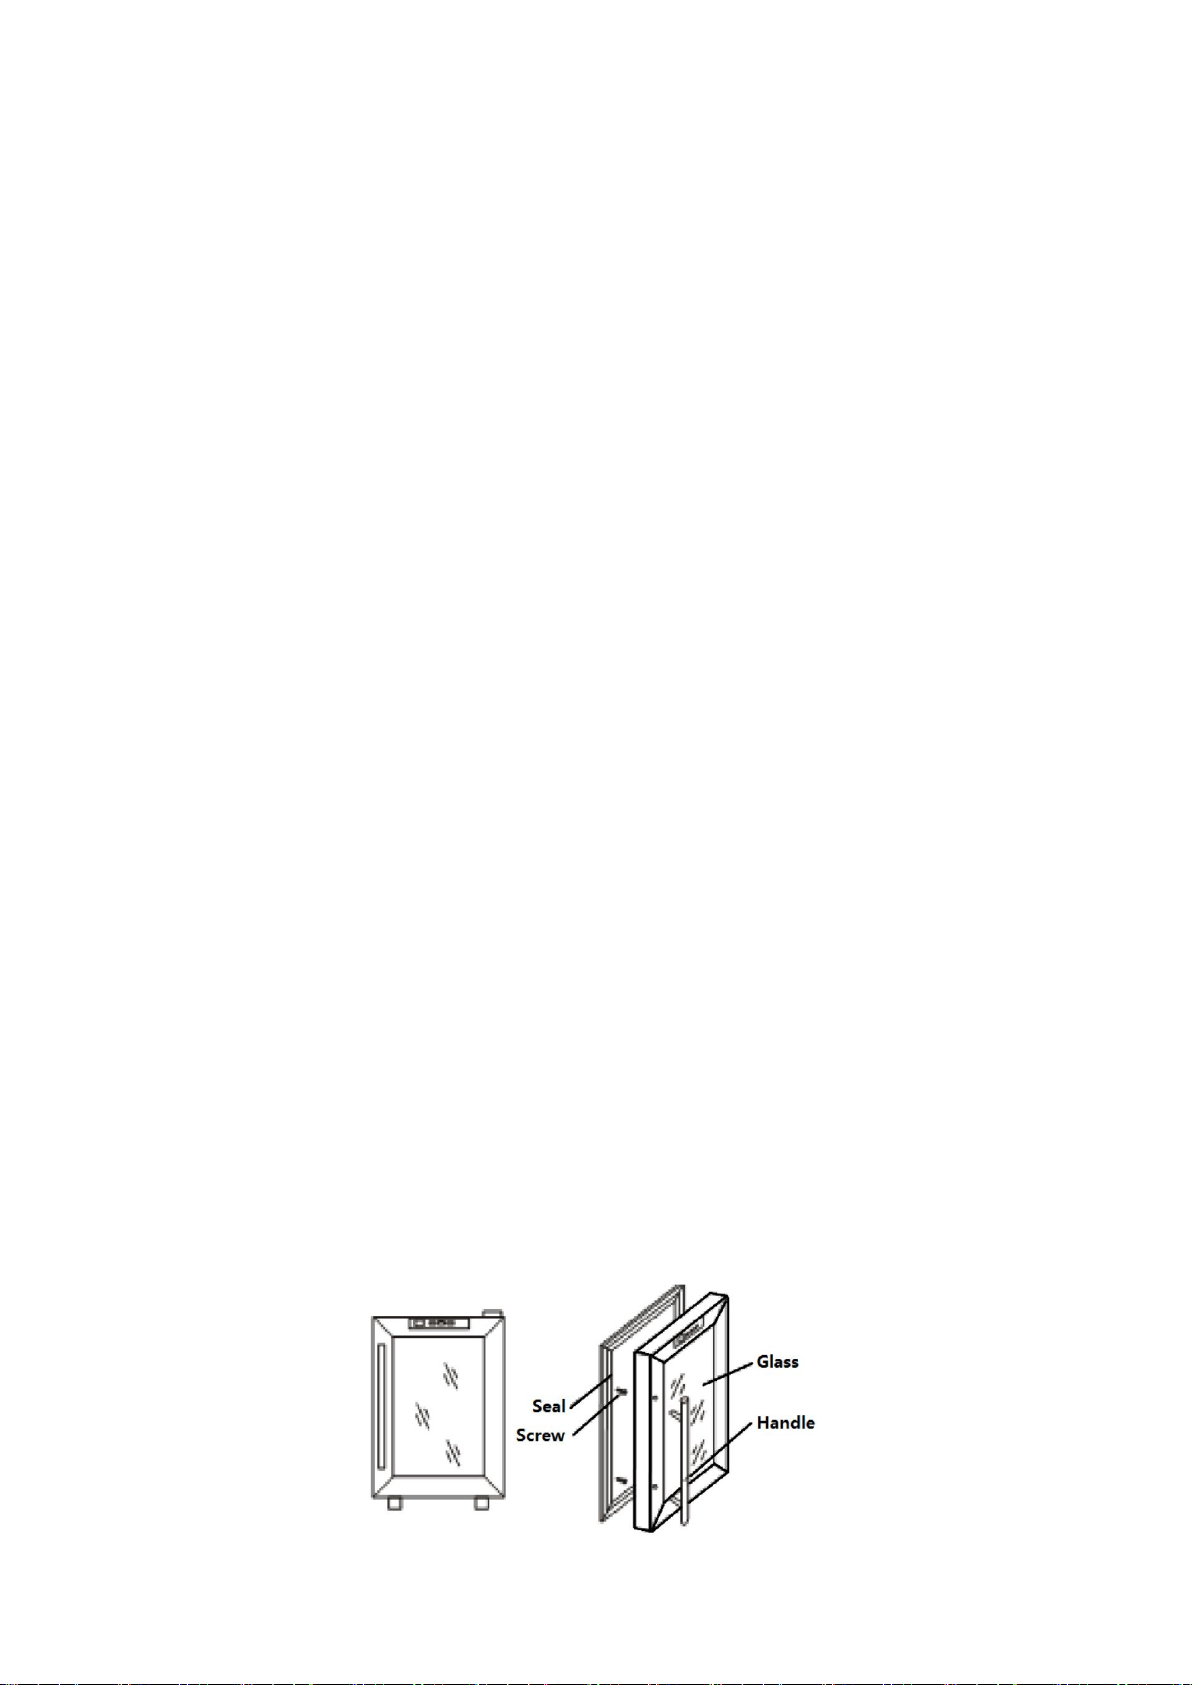
To install the door handle:
For the shipment,the door handle has been stored inside of the binding to the wood
shelves.To install the handle,the door gasket should be gently pulled back where the
screw holes for the handle,then the handle should be attached by screwing with the two
screws which are packed in the box with this instruction manual and other spare parts.
1 6
To reverse the door swing:
As you received your wine cooler, the door swings open at the left.If you wish to reverse
the swing so that the door opens from the right,it is most important too have at least one
other person to help.It is very dangerous to try to reverse the door swing by
yourself,without anybody’s help the door might fall and glass might be broken,which is
terribly dangerous.
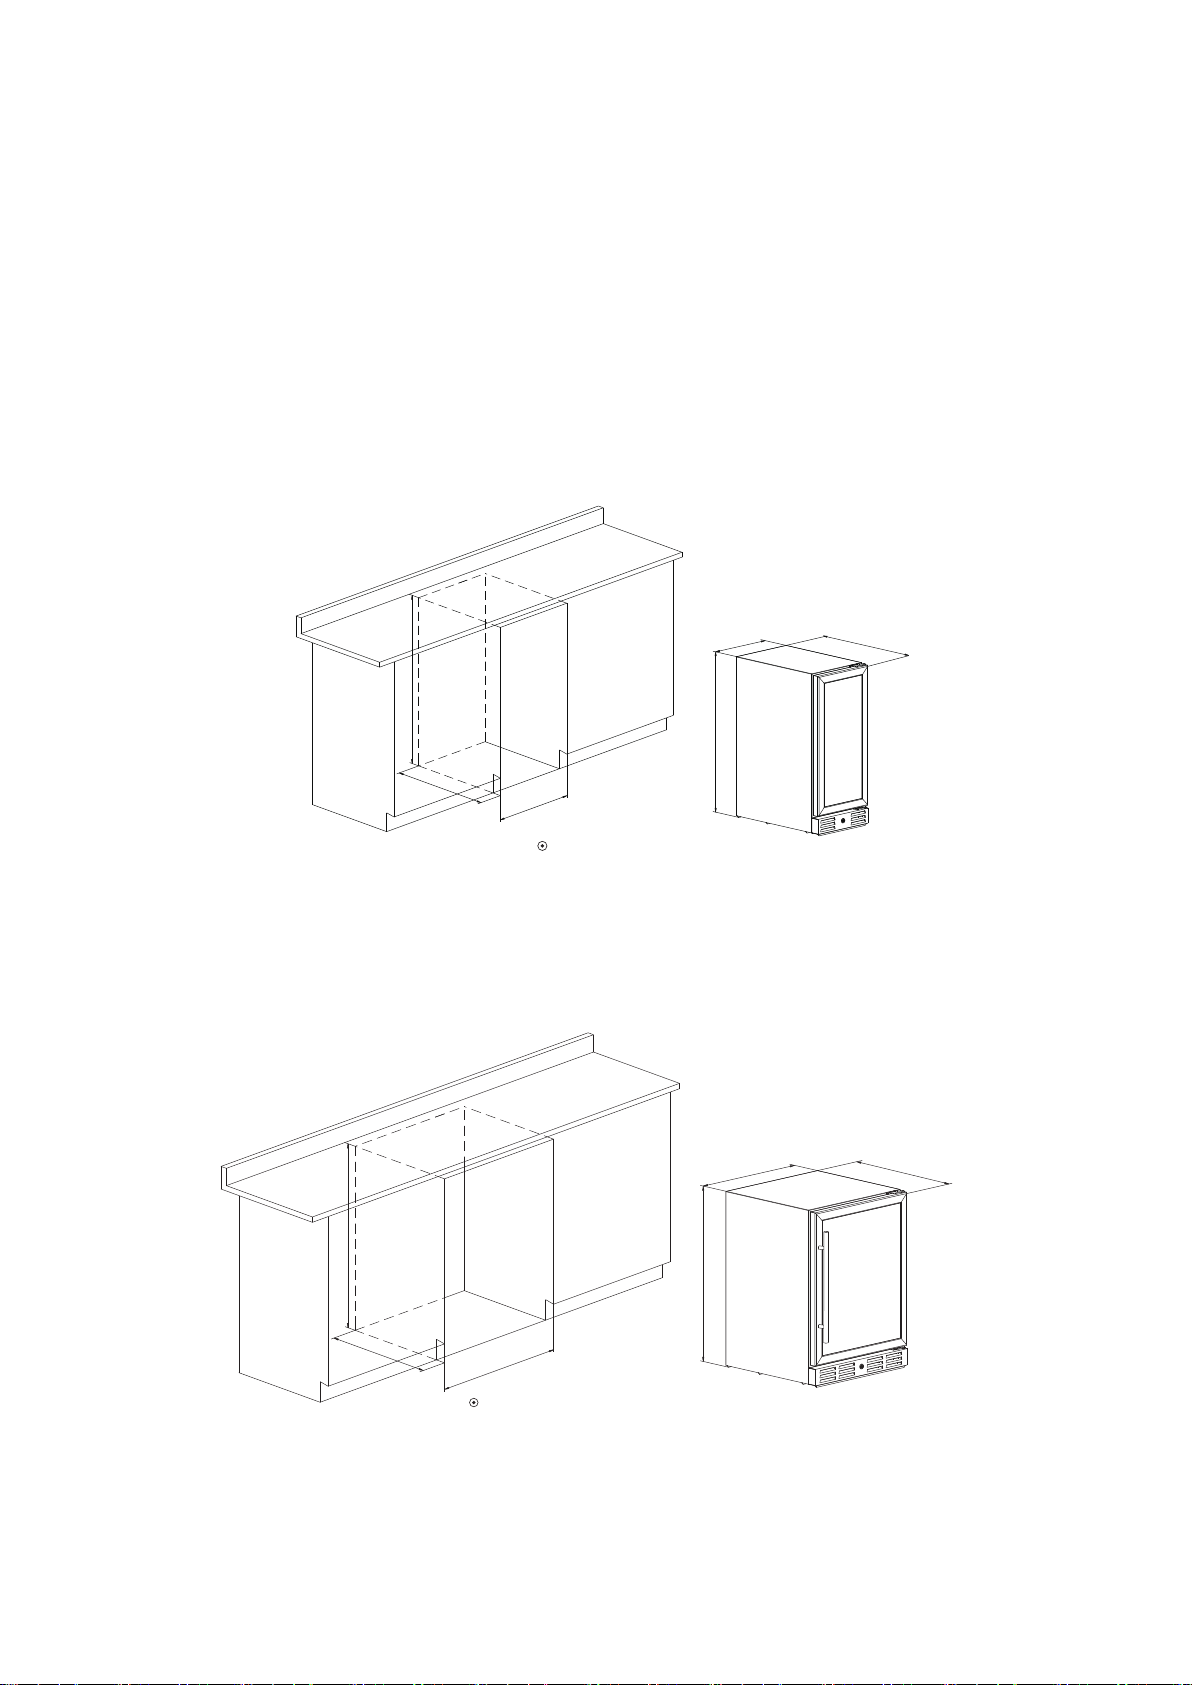
Suggest Cabinet Dimension:
EMPV-BR01S
EMPV-BR02S
>15.3”
>22.4”
>34.1”
33.9”
14.8”
22.4”
Installation Drawing
Installation Drawing
>33.2”
>23.8”
33”
23.4”
22.4”
>22.4”

17
EMPV-BR03D
EMPV-BR04D
>33.9”
33.9”
Installation Drawing
>22.4”
>23.8”
22.4”
23.4”
>34.1”
>22.4”
>30.9”
33.9”
22.4”
29.8”

Spare Parts Details:
Spare Parts Pictures Use
Upper Hinge To switch the door open from
right.
Bottom Hinge To switch the door open from
tight.
Screw x 2 For the handle installation.
Gasket x 2 For the handle installation.
Key x 2 To lock the door.
Big rubber plug x 1 To cover the hole on the left
front corner of the body.
Round rubber plug To cover the holes on the left
front corner of the body.
18
EMPV-BR01S
EMPV-BR01S
EMPV-BR01S
EMPV-BR01S
EMPV-BR01S
EMPV-BR01S
EMPV-BR01S
EMPV-BR02S
EMPV-BR02S
EMPV-BR02S
EMPV-BR02S
EMPV-BR02S
EMPV-BR02S
EMPV-BR02S
EMPV-BR03D
EMPV-BR03D
EMPV-BR03D
EMPV-BR03D
EMPV-BR04D
EMPV-BR04D
EMPV-BR04D
EMPV-BR04D

13. Trouble Shooting
POSSIBLE CAUSE MEASURE
The plug of the appliance is not
connected to the socket.
Check the corresponding socket by
connecting it with another appliance.
The plug has become loose. Check the fuse box.
•The socket is not supplied with energy.
•The fuse is switched off.
•The voltage is too low.
Compare the data on the model plate with
the data of your energy supplier.
The door was frequently opened. Close the door properly.
The door is not properly closed. Do not overfill.
•The appliance is overfilled. The door seals
are damaged.
Replace the seal.
•Main control board is defective.
•PCB is defective.
•Plug is defective.
Contact the service.
•LED is defective.
•Temperature cannot be determined.
Contact the service.
The appliance is not installed on a
level, dry, solid floor.
Realign the appliance. Readjust
the appliance.
The appliance is in contact with a wall or
another item. The bottles are incorrectly
positioned.
Realign the bottles.
Some items have dropped behind
the appliance.
Remove these items.
The appliance is not installed on a
level, dry, solid floor.
Realign the appliance.
Door seal is defective. Replace the door seal.
Shelves are not inserted properly. Insert the shelves properly.
Control panel is defective. Contact the service.
19

14. Decommission
If the appliance is not used for a longer period of time:
1. Draw the plug out of the socket.
2. Remove all food stored in the appliance.
3. Dry the inside of the appliance with a cloth and leave the door open for a few days.
While away on an average vacation/holiday (14–21 days):
1. Do the same as described above, or do not let the appliance operate.
2. Remove all perishable food from the cooling compartment.
3. Clean the cooling compartment.
4. Freeze all food which is suitable to be frozen.
If you want to move the appliance:
1. Secure all removable parts and the contents of the appliance. Pack them separately
if necessary.
2. Transport the appliance in an upright position only. All other positions can cause
damage to the compressor.
3. Do not damage the feet of the appliance.
20
This manual suits for next models
3
Table of contents


