Emperor Aquatics 02814 User manual

Instructions for Emperor Aquatics, Inc.’s 16, 25, & 57 Watt
Retro-Fit UV Sterilizer (for Savio’s Skimmers)
Congratulations! Thank you for purchasing our 16, 25, or 57 Watt Retro-Fit UV Sterilizer. Please read all instructions
carefully before attempting to install this UV Sterilizer. If at any time you have questions regarding parts or installation,
please feel free to contact our Customer Service Department at 610-970-0440 x0.
16, 25, & 57 Watt Retro-Fit UV Sterilizer - What is included?
1. UV Lamp
2. Quartz Sleeve
3. Jamb Plate
4. Clear Quartz Sleeve Retaining Module
1.0 Introduction to Ultraviolet Sterilization
Ultraviolet radiation in the 200-300 nanometer (nm) range is extremely effective in killing microorganisms such as
bacteria, viruses, algae and molds. A low pressure, mercury arc germicidal lamp, produces ultraviolet light or radiation. This
type of lamp emits about 90% of its radiation energy at 254nm. By coincidence, this is very close to the peak of the
germicidal effectiveness curve of (264nm), the most lethal wavelength to microorganisms. When microorganisms are
exposed to the UV light the UV radiation alters their DNA, disabling them from reproducing or even destroying them. Your
Emperor Aquatics, Inc. UV Sterilizer will function without altering the PH or chemical make-up of your garden pond water.
Also, the UV filter unit will not adversely affect the fish or beneficial nitrifying bacteria. This UV Sterilizer will not affect
filamentous algae (string algae) either, due to the fact that it never travels through the UV.
*** Before Installing, Inspect for damage ***
5. Power Cord w/ Sealed Power Supply
6. Lamp Connector
7. Gray Power Supply Adapter
8. Black Power Supply Jamb Nut
02934-INS-SAVIO
Rev.A

2.0 16, 25, & 57 Watt Retro-Fit UV Sterilizer Features:
1. Hard Quartz Glass UV Lamp offering 9,000 hours of continual operation;
until reaching 80% efficiency
2. Protective Quartz Sleeve that ensures optimal UV lamp operating temperature (110oF)
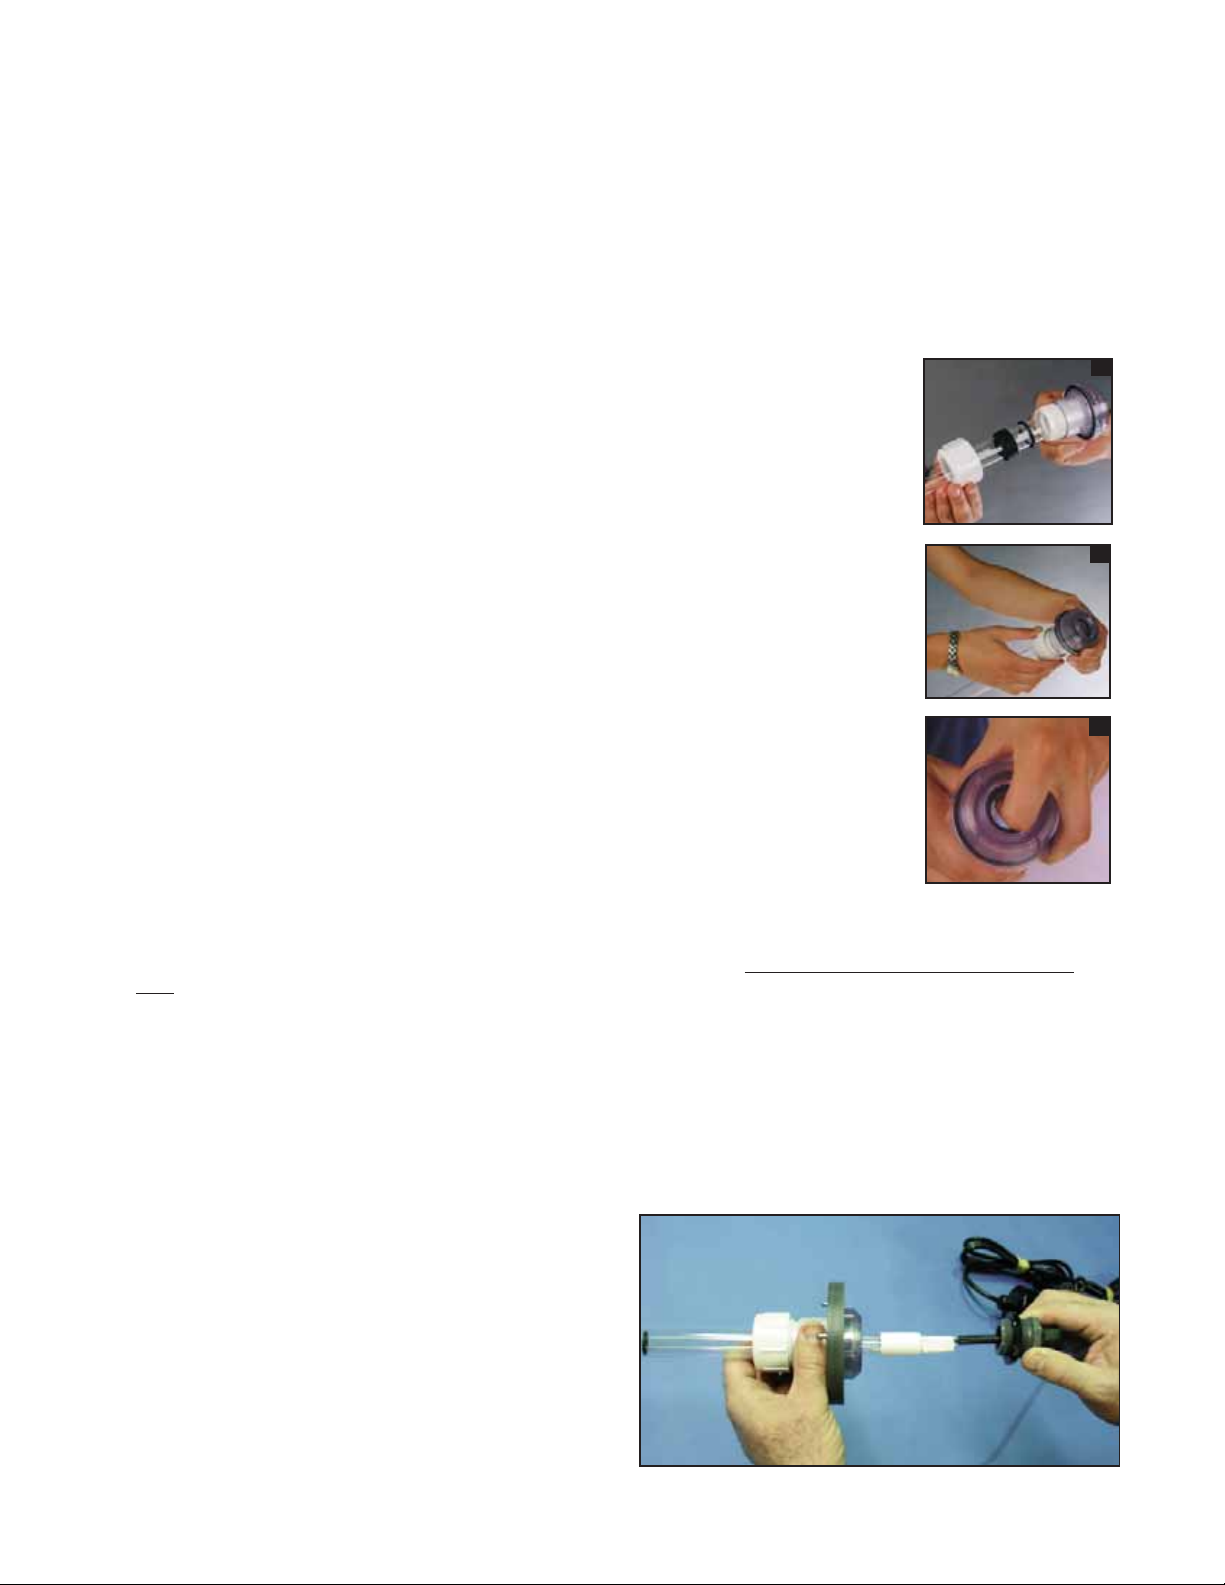
3. Easy to use "Quarter-twist Attachment" (Jamb Plate)
4. "On the Cord" Sealed Power Supply
3.0 Important Safety Instructions for Retro-Fit UV Sterilizers
WARNING: To guard against injury, basic safety precautions should be observed, including the following. Water and
electricity can be a dangerous combination. Help us ensure your safety PLEASE READ AND FOLLOW INSTRUCTIONS.
3.1 Always unplug the unit from its power source before opening the skimmer’s lid. UV light can be very
dangerous, to avoid injury don’t handle or look at the UV lamp while it’s operating. Direct exposure to UV
rays can cause health risks and skin tissue damage.
3.2 DANGER: Special care should be taken to avoid the possibility of receiving an electric shock, due to water being
employed in the use of this pond equipment. For each of the following situations, do not attempt repairs
yourself. Call EMPEROR AQUATICS, INC. for services or discard the appliance.
3.3 If the unit falls into the water, DO NOT REACH FOR IT! First unplug it and then retrieve it. If internal electrical
components of the unit get wet, unplug it immediately.
3.4 If the unit shows signs of water leakage inside the quartz sleeve, immediately unplug it from the power source.
3.5 Carefully examine the uplugged unit after installation. The assembled quartz sleeve and UV lamp should be inside the
filter’s UV chamber. The unit’s "Jamb Plate" should be positioned tightly, using a quarter-turn on the top of the UV
chamber.
3.6 Do not operate this unit if is has a damaged cord or plug, if it is malfunctioning, or if it has been dropped or damaged
in any manner.
3.7 Close supervision is necessary when any appliance is used by or near children.
3.8 Always unplug the unit from an outlet when not in use, before servicing, and cleaning or removing parts. Never yank
the cord to pull the plug from the outlet. Grasp the plug and pull to disconnect.
3.9 Do not use the Emperor Aquatics, Inc. Retro-Fit UV Sterilizer on any applications other than its intended use. The use
of attachments not recommended or sold by Emperor Aquatics, Inc. may cause unsafe conditions.
4.0 Important Notices
4.1 Do not allow the power supply module to be submerged in water. Do not place the power supply in the pond
or in an area where rain water may collect.
4.2 The electrical requirements for this Retro-Fit UV Sterilizer are 120VAC 60 Hz. This unit must be plugged into a well
grounded (GFI) electrical outlet. To comply with the National Electrical Code (NFPA 70) and to provide additional
protection from risk of electrical shock, this unit should only be connected to a receptacle that is protected by a ground fault
circuit interrupter (GFI). Do not attempt to cut the ground plug off or change the cord to a two-wire plug. Altering the power
assembly will void the manufacturer's warranty.
4.3 Use only three-wire extension cords that have 3-prong grounding-type plugs and 3-pole cord connectors that accept
the plug from this unit.

5.0 Inspection and Installation
5.1 The 16, 25, & 57 Watt Retro-Fit UV Sterilizer is shipped
from our factory as shown here:
- Power Supply mounted on the Cord (Power Assembly)
- Quartz Sleeve Assembly & UV Lamp
- Jamb Plate and Instructions
Please inspect these items for possible shipping
damage before use. Thoroughly inspect the quartz
sleeve and uv lamp for damage of any kind as they
are made of glass and are easily breakable.
5.2 Remove the bubble wrapped lamp & quartz sleeve from
the triangle box. Also remove the grey jamb plate from the
envelope on the outside of the same box.
5.3 With the quartz sleeve assembly, UV lamp, and Power
Assembly lying flat, unthread/remove the plastic threaded
cap (may be blue or red) on the clear power assembly.
Then remove the foam packing insulation (these items are
for shipping purposes only, please discard). Next pull the
lamp out of the quartz sleeve and set it aside.
5.5 Gently slide the lamp now connected to the power cord
back into the quartz sleeve assembly, screwing down the
gray adapter into the clear quartz sleeve module until snug.
Next, screw down the black jamb nut till it is snug.
5.6 Your Retro-Fit UV Sterilizer is now ready to be installed
inside the filter.
5.7 Slide the quartz sleeve end of the unit gently into the UV
chamber of the filter, locking the jamb plate pins in place
using a quarter-turn.
5.4 Place the gray jamb plate onto the clear quartz sleeve
module with the pins facing towards the quartz sleeve. Next
Connect the lamp’s 4 pins to the 4-pin lamp connector.

5.8 Drape the power cord over and out of the filter as shown
at the right. Allow a fair amount of slack to ensure the cord
will not interfere with the lid. Under no circumstances should
the power supply be submerged under water.
Retro-Fit UV Sterilizer Capacity
#02814 16 W Maximum Water Flow Rate 500 Gallons Per Hour (per unit) Maximum Pond Size 1,500 Gallons
#02825 25 W Maximum Water Flow Rate 780 Gallons Per Hour (per unit) Maximum Pond Size 2,340 Gallons
#02857 57 W Maximum Water Flow Rate 1,600 gallons Per Hour (per unit) Maximum Pond Size 4,800 Gallons
6.0 Servicing the 16, 25, & 57 Watt Retro-Fit UV Sterilizer
6.1 Quartz Sleeve Cleaning: To clean the quartz sleeve,
unplug the unit and remove it from the filter. Using a soft,
damp cloth, remove unwanted algae and dirt from the outside
of the sleeve. Use vinegar or muratic acid to remove calcium
deposits (Use extra caution when handling acids and strong
cleaning solutions as they can cause bodily harm). A mild
dish soap may also be used to clean the quartz sleeve. Make
sure to thoroughly remove all cleaning solutions from the
quartz sleeve before reinstalling the UV into the filter.
5.8a (16-watt) Drape the power cord over and out of the filter as shown to the
left. Make sure the cord is resting within one of the knotches as shown on the
left, to ensure the cord will not interfere with the filter lid. Under no circum-
stances should the power supply be submerged under water.
5.9 You are now ready to operate the Retro-Fit UV Sterilizer.
16-watt Retro-Fit UV Sterilizer
25 & 57-watt Retro-Fit UV Sterilizer
16 Watt UV
25 & 57 Watt UV

1. Make sure the UV is disconnected from electrical outlet.
2. Remove entire UV assembly from the filter.
3. Unscrew the black jamb nut on the grey power supply adapter.
4. Unscrew the grey power supply adapter, which in turn will pull the lamp out of the quartz sleeve.
5. Now unscrew the white quartz sleeve retaining nut from the clear quartz sleeve retaining
module. (hold on to the quartz sleeve or it will fall out)
6. Pull the quartz sleeve out from the clear quartz sleeve retaining module.
7. Make sure seals are in proper order, white quartz sleeve retaining nut should slide down over
sleeve first, then the heavier (bigger) gasket and then the o-ring should be at the open end
of quartz sleeve. (See Photo A)
8. Now, place the quartz sleeve back into the clear quartz sleeve retaining module. Slide the
white retaining nut up over the seals and tighten. Make sure you only hand tighten the nut
until it is snug. Do not over tighten, this could crack or break the quartz sleeve! (See Photo B)
9. Place your index finger in the top of the clear quartz sleeve retaining module. You can feel
where the quartz sleeve and quartz sleeve retaining module meet. This should be flush and
there shouldn’t be any gaps between these two parts. If there is a gap you will need to
disassemble the quartz sleeve assembly and follow steps 6-10 and start over. (See Photo C)
10. Attach the lamp’s 4-pins to the power cord’s white 4-pin connector, slide into quartz sleeve.
11. With the UV lamp/power cord connection complete and the lamp now entirely inside of the quartz sleeve, screw the
gray power supply adapter into the quartz sleeve module until it is snug. DO NOT OVERTIGHTEN, hand tighten
only. Now screw the black power supply jamb nut down until it makes contact with the quartz sleeve module.
IMPORTANT: If you do not have the black jamb nut back far enough before tightening the gray adapter, the gray adapter
will not make contact with the power supply gasket and will cause the unit to leak.
12. Place the quartz sleeve assembly back in the unit, make sure you seat the quartz sleeve’s domed end properly
at the bottom of the filter.
6.2 Adjusting Quartz Sleeve Seal Assembly -- once annually
6.3 Removing/Replacing the UV lamp: First, unplug the unit.
Remove the unit from the filter and unscrew the gray power
adapter from the quartz sleeve assembly, sliding the lamp out
gently. Disconnect the 4-pin lamp connector from the UV
lamp and finish removing the lamp from the quartz sleeve.
Connect the new UV lamp to the lamp connector, slide the
lamp into the quartz sleeve and tighten down the gray power
adapter, then tighten the black jamb nut.
Note: Do NOT allow the lamp to drop into quartz sleeve!
This could break the closed end of the quartz sleeve.
A
B
C

7.0 Winterizing
7.1 Operating in Cold Temperatures: Operating the Retro-Fit UV in extreme cold temperatures should be avoided, as there
is a potential of freezing. Regardless of whether you intend to operate the filter during extreme cold weather conditions or
not, remove the Retro-Fit UV from the filter. Allowing the Retro-Fit UV to remain inside the filter during freezing conditions
may cause damage to the unit, and will void the manufacturer's warranty.
7.2 During extreme cold weather remove the Retro-Fit UV from the filter, clean and store in a dry warm place until
needed.
2229 Sanatoga Station Rd. Pottstown, PA 19464 T: (610) 970-0440 F: (610) 970-0443
8.0 Replacement Parts
22316: 16-watt Quartz Sleeve Replacement
22325: 25 & 57-watt Quartz Sleeve Replacement
22016: 16-watt UV Lamp Replacement
22025: 25-watt UV Lamp Replacement
22057: 57-watt UV Lamp Replacement
20078: 4 Pin Lamp connector with Starter Bulb (for 16 & 25-watt)
20077: 4 Pin Lamp connector without Starter Bulb (57-watt)
20100-SAVIO: 16 & 25-watt Power Supply
20257-SAVIO: 57-watt Power Supply
20601- Gray Power Supply Adapter
22321: Service Kit (Seal Replacement)

SERVICE AND REPAIR
Your retailer or distributor is not an authorized service or repair center! If trouble develops, do not take
the unit back to your retail store. Instead, call Emperor Aquatics Inc. at (610)-970-0440 x0 to discuss the
problem then if necessary we will give you an RMA number, so you may return the unit to us for proper
service. After being given an RMA number carefully pack the unit up to avoid shipping damage. Send the
unit to the following address:
Emperor Aquatics, Inc.
2229 Sanatoga Station Road
Pottstown, PA 19464
DO NOT RETURN ANY PRODUCT WITHOUT PRIOR AUTHORIZATION
Be sure to insure your package prior to shipping it; clearly indicate the problem on paper and place it in
the box. Please provide your return address, as well as a daytime phone number where you can be
reached. Upon receipt of your unit, we will repair or replace the unit (at no charge if the warranty is still in
effect, proof of date of purchase will be required) or call/send you an estimate of the cost of the repairs
which requires your authorization in order for us to proceed.
Emperor Aquatics, Inc. warrants to the original purchaser of its Retro-Fit UV Sterilizer, to be free from
defects within the time constraints as listed below. The UV lamp and the Quartz Sleeve are not warranted
against breakage since they are made of glass. The UV Lamp however, is warranted for 90 days for
electrical operation only. Also, the UV Sterilizer Power Supply is covered for a period of 12 months from
the date of original purchase.
Should any of the integral parts of the unit become defective within their time constraints from the date of
purchase, they will be repaired or replaced, if proven defective in workmanship or material in the opinion
of the manufacturer, also not including damage by freezing, abuse or the reuse of gasket seals that are
more than 12 months old. Any costs incurred for the labor of removing the unit shall be the responsibility
of the original purchaser. Also, all shipping charges to and from Emperor Aquatics, Inc.’s factory will also
be the responsibility of the original purchaser. Non-warranted repairs will be billed at the rate of $78.00
per hour with a one-hour minimum plus parts. Damage or failure of any part of the UV Sterilizer covered
by this warranty, which results from causes, directly or indirectly, connected with the installation, operation,
environment, use or willful abuse, including, without limitation, improper packaging and damage incurred
during shipping is not covered by this warranty. Otherwise, any implied warranties that accompany the
sale of these goods are limited to their respective time constraints from the date of purchase. The manu-
facturer will only be responsible for the repair or replacement of any of its products or parts thereof that
are found to be defective and will not bear the cost of any incidental or consequential damages arising
out of the occurrence of such a defect.

OWNER'S REGISTRATION OF EQUIPMENT
FOR YOUR WARRANTY TO BE VALID YOU MUST SUBMIT A FILLED OUT INFORMATION CARD OR COMPLETE AN
ONLINE REGISTRATION FORM AT WWW.EMPERORAQUATICS.COM WITHIN 30 DAYS OF PURCHASE.
PURCHASER'S NAME:
PHONE #: FAX #:
STREET ADDRESS:
CITY: STATE: ZIP
SERIAL #: MODEL #: PURCHASE DATE:
EMAIL ADDRESS:
(PLEASE PRINT)
HOW DO YOU LIKE OUR PRODUCT?
We at Emperor Aquatics take your comments about our products very seriously. Please take a few moments to
answer these questions and return this form with your product registration.
1. Was this product packaged well?
2. Did you receive all of the parts and instructions with the unit?
3. Were the instructions easy to understand?
4. Were you satisfied with the quality of the product?
5. Are you satisfied with the product’s performance?
6. Would you recommend our products to someone else?
7. Where did you purchase the unit?
8. What did you pay for the unit?
This manual suits for next models
2
Table of contents
Other Emperor Aquatics Laboratory Equipment manuals
Popular Laboratory Equipment manuals by other brands

Sutter Instrument
Sutter Instrument MPC-78 Assembly guide

Dräger
Dräger Babylog V Series Disassembly/Assembly

Oxford Instruments
Oxford Instruments OpAL System manual

D&H
D&H Lifelabs AquaSolvo Eco AAE-5005 Series instruction manual

Agilent Technologies
Agilent Technologies G5562A Safety and installation guide

Sartorius
Sartorius Cubis MCA Series operating instructions