MRC INE-ZD-2 User manual

INE-ZD-2
Automatic potential titrator
Instruction Manual
PLEASE READ THIS MANUAL CAREFULLYBEFORE OPERATION
3, Hagavish st. Israel 58817 Tel: 972 3 5595252, Fax: 972 35594529 [email protected]
MRC. 3.21

INE-ZD-2 Automatic Potential Titartor

Please read this INSTRUCTION carefully before using the instrument.
The instrument must be sent to metrological service or other departments that are
qualified to check for checking after being used for one year, and only those qualified
ones can be used again.
The expiration date of electrode is one year. Its performance will be affected one
year after its delivery regardless of whether using or not. Should be replaced
immediately .
Warning - when using dangerous chemicals, please read the chemical MSDS and use
protection measures before operating a titrator.
Warning - Attention should be paid to protection, when doing titration test,
especially the analysis of strong alkali, strong acid and perchloric acid corrosive
solution. It is best to take the mask and gloves, in case the harm of solution to human
body.

INE-ZD-2 Automatic Potential Titartor
CONTENT
1. Introduction
2. Specifications and Perfermance
3. Structure
4. Operation
5. Application example
6. Notice
7. Troubleshooting
8. Appendix

INE-ZD-2 Automatic Potential Titartor
1 Introduction
1.1 Application
INE-ZD-2 Automatic potential titrator can be used to complete different potential titration. It is widely used in
scientific research, education, chemical industry and environmental protection.
1.2 Characteristic
1) Volumetric analysis by potential titration in laboratory;
2) pH value or electric potential controlled titration;
3) Volumetric analysis by manual;
4) Measure pH value of sample solution in laboratory;
5) Measure electric potential of electrodes
2 Specifications and Performance
1) Measuring range: pH: (0~14.00)pH; mV: (0~±1400)mV
2) Resolution: pH: 0.01pH; mV: 1mV
3) The accuracy of electronic unit: pH: ±0.03pH±1 bit; mV: ±5mV
4) pH measuring accuracy: ±0.06pH
5) Electronic unit input current: 2×10-12A
6) Electronic unit input impedance: ≥3×10¹¹Ω
7) Repeatability of volumetric analysis: 0.2%
8) Sensitivity of titration control: pH:±0.1pH; mV:±5mV
9) Endpoint setup range: (0~±1400)mV or (0~14.00)pH
10) Stability of electronic unit: ±0.01pH/3h
11) Normal working conditions of meter
a) Ambient temperature: (5~40)℃;
b) Relative humidity: ≤85%;
c) Power supply: AC(220±22)V,Frequency(50±0.5)Hz;
d) There is no corrosive air nearby;
e) There is no vibration nearby;
f) There is no magnetic interference except earth magnetic influence.

INE-ZD-2 Automatic Potential Titartor
3 Structure
3.1 Front view of the meter
The front panel of meter is shown as above. The display screen is 240X128 Graphics dot matrix LCD. There are 20
keys on the panel, 9 of which are double-function keys. The key function is shown as follows:
‘Start’: Start titration;
‘Exit’: Finish titration and begin measuring;
‘pH/mV’: Choose pH and mV measurement or titration. Pressing this key can switch two working
modes. Make sure pH or mV status before setting “Ep” and “Pp”;
‘Ep’: Set end point potential or pH value;
‘Pp’: It can set presetting electronic potential or pH value, which depend on the properties of
chemical reaction, that is the volume of titrating jump. General oxidation reduction titration, strong
acid strong alkali neutralization titration and precipitation titration may select smaller presetting
value. Weak acid strong alkali, strong acid weak alkali may select middle presetting value; and weak
acid weak alkali titration need select large presetting value;
‘Delay’: It can set delay time between titration endpoint and stopping titration. Since the chemical
reaction needs some time, when the titrator finds the endpoint potential or pH value, the potential
and pH readings will become unstable after turning off the solenoid valve, so you’d better not stop
titration when meter just found endpoint potential or pH value. The best method is to delay for some

INE-ZD-2 Automatic Potential Titartor
period. If the readings are unstable, you should continue titrating until potential or pH value becomes
stable. The effective range is ‘0~200’ seconds. If you input a number which is larger than 200, titrator
will display XXX and will not terminate titration automatically;
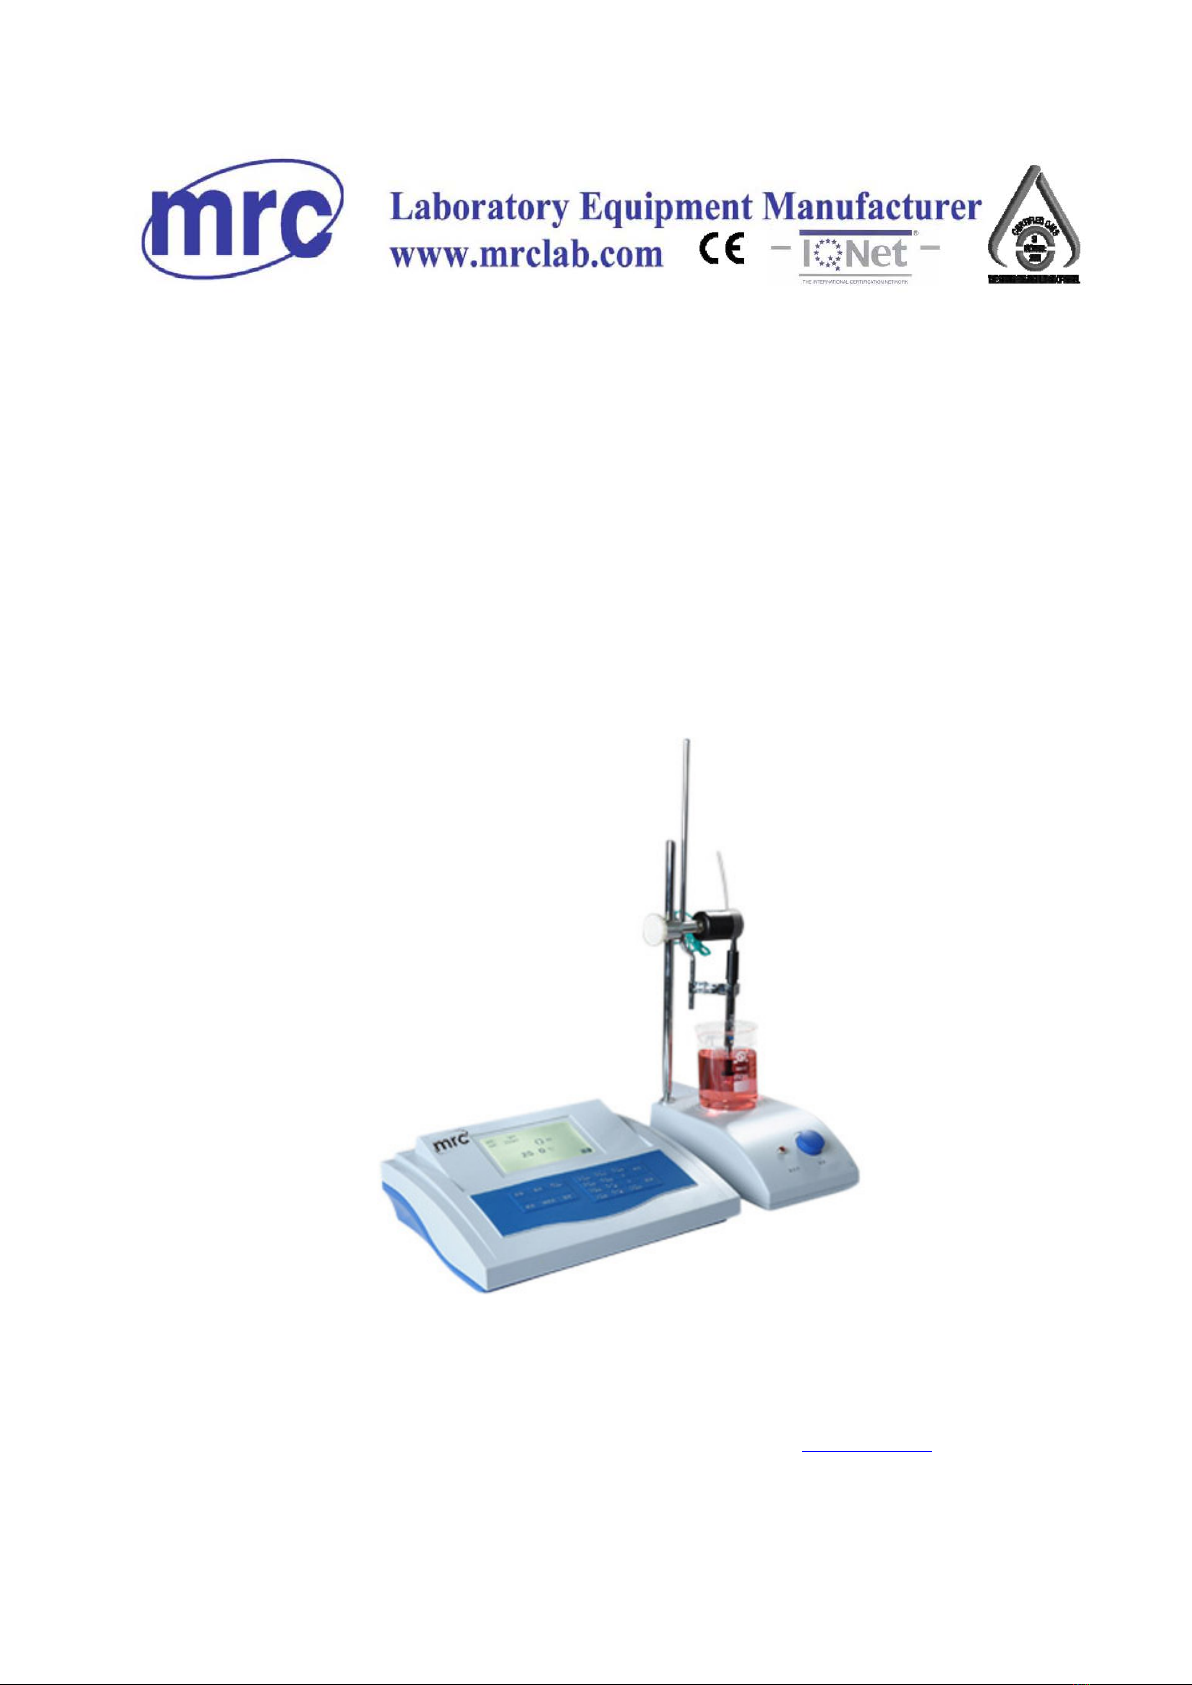
‘1 /Auto’: In the digital input states, the key works as number ‘1’; In measuring mode, it indicates
automatic titration;
‘2 /Print’: In the digital input states, the key works as number ‘2’; In measuring mode, pressing it can
print potential or pH data of last titration. The titrator can store up to 100 data;
‘3 /Temp’: In the digital input states, the key works as number ‘3’; In measuring mode, you can input
current solution temperature by pressing it.;
‘4 /Fast’: In the digital input states, the key works as number ‘4’; In measuring mode, titration speed
is fast;
‘5 /View’: In the digital input states, the key works as number ‘5’; In measuring mode, pressing it can
view potential or pH value in the last titration; it can store up to 100 data.
‘6’:It indicates number ‘6’;
‘7 /Slow’: In the digital input states, the key works as number ‘7’; In measuring mode, titration speed
is slow;
‘8 /▲’: In the digital input states, the key works as number ‘8’; it means page up when viewing
data;
‘9’: It indicate number ‘9’;
‘. /Cont’: In the digital input states, the key indicates decimal point; In measuring mode, pressing it
can turn on the solenoid valve and solution will drop from burette. Release the key and solenoid
valve will turn off immediately;
‘0 /▼’: In the digital input states, it indicates number’0’; it means page down when viewing data;
‘-/Cali’: In the digital input states, it indicates minus sign; In measuring mode, it is calibrating pH
valuue and the lower right corner will display ‘Cali’. During the calibration of the first kind of solution,
when the potential reading is stable, you can press ‘Enter’ key for one-point calibration; You should
press ‘-/Cali’ key instead of ‘Enter’ key if you need two-point calibration. Then the lower right
corner on LCD will display ‘Slope’ and it indicates the calibration of the second kind of solution in two
point calibration. When the potential readings become stable, you just press ‘Enter’ key and the
two-point calibration is finished;
‘Enter’: It indicates the number is already input or operation has finished;
‘Cancel’: It indicates the number input will be cancelled.

INE-ZD-2 Automatic Potential Titartor
3.2 Rear panel of the meter
Power: It indicates AC 220V power supply;
ON/OFF: It indicates power switch;
0.5A: It indicates 0.5A fuse holder;
Valve:It indicates solenoid valve interface, Φ3.5 microphone jacket;
Ref:It indicates reference electrode socket;
Meas:It indicates measuring electrode socket, BNC type;
Print:It indicates DB9 socket, connected with TPuP16 Printer.
3.3 Titration device
Installation of titration device
The titration device is installed on JB-1A stirrer. The installation procedure is listed as follows
(1) Clamp
(2) Electrode pole B
(3) Solenoid valve
(4) Electrode holder
(5) Set screw
(6) Electrode pole A
(7) Base of electrode pole
(8) Supporting seat

INE-ZD-2 Automatic Potential Titartor
Note:
Spin electrode pole A (6) on mounting thread (8), then spin electrode pole B (2) on electrode pole A (6).
Install solenoid valve (3) into the electrode pole, and make sure the direction of arrow on it is down.
Installation of stirrer and titration device
(1) Clamp component (SC5.100.045 with 1 set screw)
(2) Solenoid valve component (SC5.100.045 with 1 set screw )
(3) Electrode holder component (SC5.108.019 with 1 set screw)
(4) Capillary burette (SC8.403.008)
(5) JB-10 stirrer
(6) Electrode pole B (SC8.100.250)
(7) Electrode pole A component (SC8.100.249 with 1 base of electrode pole)
(8) Supporting seat component (SC8.022.106)
Connect the outlet of solenoid valve to capillary burette with silicone rubber tube, then insert
capillary burette into electrode holder.
4 Operation
After installation, connect titrator with power supply. Turn it on and preheat it for 15 minutes.
4.1 mV measurement
(1) Press ‘pH/mV’ key and the upper left corner of LCD will display ‘mV’;
(2) Insert the electrode into sample solution. Stir the solution well and read the mV value;
4.2 pH calibration and measurement
4.2.1 pH calibration
The titrator should be calibrated before pH measurement. Generally, meter should be calibrated once
everyday when it is in continuous use. The procedures are listed as follows:
(1) Measure the temperature of sample solution with thermometer.
(2) Press ‘Temp’ key and input the temperature value to the meter and press ‘Enter’ key.
(3) Press ‘-/Cali’ key and lower right corner of LCD will display ‘Cali’;
(4) Insert the rinsed electrode into buffer solution of pH6.86.
(5) When the potential readings are stable, press ‘Enter’ key to finish if you just need one-point calibration. If
you need two-point calibration, you should press ‘-/Cali’ key instead of ‘Enter’ key. When the lower right
corner of LCD display ‘Slope’, you can calibrate the second solution and continue the following operation.

INE-ZD-2 Automatic Potential Titartor
(6) Rinse the electrode with distilled water and insert the electrode into buffer solution of pH4.00 (or
pH9.18).
(7) When the potential readings are stable, press ‘Enter’ key to finish two-point calibration.
4.2.2 pH measurement
(1) Press ‘pH/mV’ key and upper left corner of LCD will display ‘pH’
(2) Rinse the head of electrode with distilled water and rinse it with sample solution.
(3) Measure the temperature of sample solution with thermometer.
(4) Press ‘Temp’ key and input the temperature value to the titrator and press ‘Enter’ key.
(5) Insert the electrode into the sample solution. Stir the solution well and read the pH value.
4.3 Titration
4.3.1 Preparation before titration
(1) Install the titration device according to 2.3 and put the stir bar into the test cup. Then put the test cup on
JB-10 stirrer.
(2) The selection of electrodes: It depends on chemical reaction during titration.
Redox reaction: you can use platinum electrode, calomel electrode and tungsten electrode;
Neutralization reaction: you can use pH combination electrode, glass electrode and calomel electrode;
Silver salt and halogen reaction: you can use silver electrode and special calomel electrode.
4.3.2 Manual operation of dropping liquid
Press ‘-/Cont’ key and solenoid valve will be turned on, and solution will drop from burette. If you release the
key, the solenoid valve will be turned off immediately.
4.3.3 Automatic Potential Titration
(1) Press ‘pH/mV’ key and the upper left corner of LCD will display ‘mV’.
(2) The setting of endpoint potential: Press ‘Ep’ key and input endpoint value by pressing number key.
(3) The setting of presetting potential: Presetting functions as adjusting titration speed automatically. When
the current potential is larger than presetting potential, the speed of titration will become fast; When the
current potential is smaller than presetting potential, the speed of titration will become slow for
accurately controlling potential endpoint.
(4) Press ‘Pp’ key and input presetting potential by pressing number key. For example, set the endpoint
potential as 500mV and presetting potential as 60mV. If the electrode potential is 800mV, when
measured potential is larger than 560mV, automatic titration becomes fast. When measured potential is
smaller than 560mV, the automatic titration becomes slow. When the electrode potential is 100mV and
the measured potential is smaller than 440mV, automatic titration becomes fast; When measured
potential is larger than 440mV, automatic titration becomes slow.

INE-ZD-2 Automatic Potential Titartor
(5) Turn on the stirrer and adjust the speed from slow to fast and then to the appropriate one.
(6) Press ‘1/Auto’ key and ‘Start’ key, and meter will start automatic titration and finish titration at the
endpoint.
(7) You should record the consumption readings of dropping in the burette.
4.3.4 Potential Control Titration
(1) Press ‘pH/mV’ key and upper left corner of LCD will display ‘mV’.
(2) The setting of endpoint potential: Press ‘Ep’ key and input endpoint potential by pressing number key.
(3) Turn on the stirrer and adjust the speed from slow to fast and then to the appropriate one.
(4) Press ‘4/Fast’ key or ‘7/Slow’ key, the titrator will start titration with preset speed (fast or slow) and finish
titration at the endpoint.
(5) Press ‘Cancel’ to exit control titration.
(6) Record the consumption readings of dropping in the burette.
4.3.5 pH Automatic Titration
Press ‘pH/mV’ key and upper left corner of LCD will display ‘PH’, and rest of the operation is similar to ‘4.3.3
Automatic Potential Titration’.
4.3.6 pH Control Titration
Press ‘pH/mV’ key and upper left corner of LCD will display ‘PH’, and rest of the operation is similar to ‘4.3.4
Potential Control Titration’.
5 Application Example
Redox titration: Potessium ions titrate ferrous ions
(1) Insert 213 platinum electrode into ‘Meas’ socket, and 217 calomel electrode into ‘Ref’ socket.
(2) Titrant: potassium bichromate(0.0167mol/L±10%)
Back titrant: Take 10ml ammonium ferrous sulfate (0.1mol/L±10%) and add 10ml sulfuric acid with
concentration of 15% and dissolve them in 50ml distilled water.
(3) Press ‘pH/mV’ key and the upper left corner of LCD will display ‘590mV’.
(4) Set the endpoint as 590mV and ‘Presetting’ as 90mV.
(5) Press ‘1/Auto’ key and ‘Start’ key so that titrator begins titration automatically and finishes titration when it
reaches endpoint. Then you can read the data of burette.

INE-ZD-2 Automatic Potential Titartor
6 Notice
(1) The input end (Electrode socket) should be kept dry and clean. When the titrator does not work, you should
insert short circuit plug into ‘Meas’ socket in case of dust and vapor invasion.
(2) During measurement, the conductor wire should be kept static otherwise it may arouse unstable
measurement.
(3) Ensure the reliability of buffer solution when you calibrate the titrator with buffer solution. Don’t mismatch
solution otherwise it may lead to incorrect measurement.
(4) After putting the electrode jacket off, you should avoid the touch of sensitive glass bulb with hard thing since
any damage or friction will deactivate the electrode.
(5) The external reference (or calomel electrode) should keep saturated KCl solution and filling liquid should be
added in the hole on the electrode.
(6) Electrodes should avoid being immersed in distilled water, protein solution and acidic fluoride solution for a
long time.
(7) Electrodes should avoid being touched with silicone oil.
(8) You’d better rinse solenoid valve rubber pipe with titrant for several times before titration.
(9) When the titration reaches the endpoint, you can not press ‘Start’ key otherwise it will start titration again.
(10) Don’t use potassium permanganate solution which will have chemical reaction with rubber pipe.
7 Troubleshooting
(1) The titrator LCD indicates it is performing titration, but there’s no liquid dripping and connection of solenoid
valve is correct. When this situation occurs, you may adjust solenoid valve screw(4)to the proper position so
that the solution can drop appropriately.
(2) When the solenoid valve is turned off, there’s still solution dropping. In this situation, you can adjust solenoid
valve screw(4) again. If it still can not solve problem, it may indicates the rubber pipe is used too long and is out
of shape. The rubber pipe has bad elasticity or is incorrectly installed. In this case, according to 2.3.3 you can
take solenoid valve apart and alter the position of rubber pipe or replace rubber pipe. You’d better stew the
rubber pipe in the solution with weak alkaline for several hours before replacement.

INE-ZD-2 Automatic Potential Titartor
8 Appendix
Appendix 1:
The comparison form showing the relationship between pH value and temperature of buffer solution.
Temperature
(℃)
0.05mol/L
potassium acid phthalate
0.025mol/L
Mixture phosphate
0.01mol/L
sodium tetraborate
5
4.00
6.95
9.39
10
4.00
6.92
9.33
15
4.00
6.90
9.28
20
4.00
6.88
9.23
25
4.00
6.86
9.18
30
4.01
6.85
9.14
35
4.02
6.84
9.11
40
4.03
6.84
9.07
45
4.04
6.84
9.04
50
4.06
6.83
9.03
55
4.07
6.83
8.99
60
4.09
6.84
8.97
Appendix 2: Preparation of buffer solution
(1) pH4.00 solution: Take 10.21g GR potassium acid phthalate and dissolve it in 1000mL ultra purity deionized
water.
(2) pH6.86 solution:Take 3.4g GR monopotassium phosphate and 3.55g disodium hydrogen phosphate, and
dissolve them in 1000mL ultra purity deionized water.
(3) pH9.18 solution:Take 3.81g GR sodium borate and dissolve it in 1000mL ultra purity deionized water.
Appendix 3: How to find titration endpoint
The following two methods can help to find endpoint of titration.
(1) Please set endpoint far away from the starting point and press ‘7/Slow’ key so that titrator performs controlled
titration. When you find the potential or pH data are changed dramatically and afterwards becomes small
slightly, press ‘Exit’ key to finish titration. You can press ‘5/View’ key and LCD will display titration data, or you
can press ‘2/Print’ key and titrator will print the data out. You can find out the largest potential mV1 and mV2,
or pH1 and pH2.
mV1+mV2 pH1+pH2
It’s the endpoint.: mV=or pH=
2 2
(2) You can use color reagent to perform titration until it reaches endpoint. Then you can use meter to measure
mV or pH value.

INE-ZD-2 Automatic Potential Titartor
Parking List
No Name and specifications Quantity
1
INE-ZD-2 Automatic potential titrator
1
2
217-01 Calomel electrode
1
3
213-01 Platinum electrode
1
4
216-01 Silver electrode
1
5
pH combination electrode
1
6
JB-10 Stirrer
1
7
Solenoid valve component (SC5.461.049, with 1 set screw)
1
8
Universal Power line
1
9
Fuse BGXP-1 Φ5×20 0.5A
2
10
9V DC, 500mA regulated power supply
1
11
Electrode pole A (SC8.100.249, with 1 base of electrode pole)
1
12
Electrode pole B (SC8.100.250)
1
13
Capillary burette (SC8.403.008)
1
14
Clamp (SC5.100.045, with 1 set screw)
1
15
Supporting seat (SC88.022.106)
1
16
Spring clamp (SC8.214.090)
1
17
Electrode holder (SC5.108.019)
1
18
Silicon rubber (Inner Φ3, outer Φ6, L500mm)
2
19
Stirring bar (small)
3
20
Buffer powder (pH4.01, 7.00,10.01)
5 for each type
21 Dust cover(large) 1
22
RS-232 print line
1
23
INE-ZD-2 Instruction manual
1
Table of contents
Other MRC Laboratory Equipment manuals