manuals.online logo
Brands
  1. Home
  2. •
  3. Brands
  4. •
  5. Novita
  6. •
  7. Laboratory Equipment
  8. •
  9. Novita aircare pro NAS12000 Operating instructions

Novita aircare pro NAS12000 Operating instructions

Popular Laboratory Equipment manuals by other brands

Radleys Carousel 6 Plus instructions

Radleys

Radleys Carousel 6 Plus instructions

Hemotherm 400MR Operation & technical manual

Hemotherm

Hemotherm 400MR Operation & technical manual

mrclab DVO Series Operation manual

mrclab

mrclab DVO Series Operation manual

CoolLED pE-800 quick start guide

CoolLED

CoolLED pE-800 quick start guide

Luminex Guava easyCyte Maintenance Guide

Luminex

Luminex Guava easyCyte Maintenance Guide

IKA A10 basic operating instructions

IKA

IKA A10 basic operating instructions

Belden HIRSCHMANN RPI-P1-4PoE installation manual

Belden

Belden HIRSCHMANN RPI-P1-4PoE installation manual

Koehler K1223 Series Operation and instruction manual

Koehler

Koehler K1223 Series Operation and instruction manual

Globe Scientific GCM-12 quick start guide

Globe Scientific

Globe Scientific GCM-12 quick start guide

Getinge 86 SERIES Technical manual

Getinge

Getinge 86 SERIES Technical manual

CORNING Everon 6000 user manual

CORNING

CORNING Everon 6000 user manual

Biocomp GRADIENT MASTER 108 operating manual

Biocomp

Biocomp GRADIENT MASTER 108 operating manual

Cole Parmer Stuart SB3/1 instruction manual

Cole Parmer

Cole Parmer Stuart SB3/1 instruction manual

BEVS 2501/2A user manual

BEVS

BEVS 2501/2A user manual

Qiagen DML 3000 user manual

Qiagen

Qiagen DML 3000 user manual

Queensgate NANOSCAN OP400 Quick start instructions

Queensgate

Queensgate NANOSCAN OP400 Quick start instructions

Parr Instrument 4560 Operating instructions manual

Parr Instrument

Parr Instrument 4560 Operating instructions manual

Integra DOSE IT operating instructions

Integra

Integra DOSE IT operating instructions

manuals.online logo
manuals.online logoBrands
  • About & Mission
  • Contact us
  • Privacy Policy
  • Terms and Conditions

Copyright 2025 Manuals.Online. All Rights Reserved.

OPERATING INSTRUCTIONS AND E-WARRANTY APPLICATION
UP TO
60 MILLION
NEGATIVE IONS
FIR PM2.5
PARTICLE
SENSOR
MOVING
AVERAGE FIR
PM2.5 DISPLAY
QUADSYSTEMTM
TECHNOLOGY
AIRBORNE
STERILIZATION
& SURFACE
SANITIZATION
AWAY MODE EXTENSIVE
COVERAGE
AREA
SMART
PROGRAMMED
SETTING
PURIPRO®
FILTER
SMART APP
MANAGEMENT
CONTENT
THIS PRODUCT INCLUDES
• Novita AirCare ProTM Air/Surface Sterilzer NAS12000 with Remote Control
• Novita AirCare ProTM Air Sterilzer NAS12000 Operating Instructions & e-Warranty Application (this booklet)
• Novita 4-In-1 PuriPRO®Filter x 1
• NAS12000 Starter Guide
• Smart App Management Starter Guide
Please contact us immediately if any of the above-mentioned items are not included.
PRODUCT FEATURES
PRODUCT DESCRIPTION
AIR/SURFACE STERILIZER NAS12000
UNIT LCD DISPLAY & TOUCH PANEL DESCRIPTION
STEP
1
STEP
2
STEP
3
STEP
4
◊Pre-Mesh Filter, Cool Catalyst Filter, Granular Activated Carbon Filter & 99.97% True HEPA
Filter are combined as a single filter unit.
QUADSYSTEMTM TECHNOLOGY
REMOTE CONTROL DESCRIPTION
• The contaminants are magnified for better illustration purposes only and they are not
in actual proportion to the Filters.
4-IN-1
PURIPRO®
FILTER◊
ADVANCED UV
NANO
PHOTOCATALYTIC-
OXIDATION
(SEMI-PERMANENT)
ADVANCED
ELECTRON SPRAY
IONIZATION
(SEMI-PERMANENT)
ADVANCED CORONA
DISCHARGE
(SEMI-PERMANENT)
UNIT SETTING UP
STEP 01
Remove all packaging materials from the unit and place the unit on a dry, stable and level surface.
STEP 02
Grap the top recess edges of the Front Panel Casing and pull outwards to release the magnetic catch.
STEP 03
Gently lift up the grooves at the bottom. Remove the plastic packaging on the 4-in-1 PuriPRO®Filter and place it into the unit with Pre-Mesh Filter as the
outermost layer while 99.97% True HEPA Filter as the innermost layer.
• Ensure the parallel tags by both sides of the 4-in-1 PuriPRO®Filter is facing the front panel casing.
• Ensure the 4-in-1 PuriPRO®Filter is properly assembled and installed in position before usage.
• Please refer to page 18 for instructions to remove or reattach the filter unit.
STEP 04
To reattach the Front Panel Casing, align and insert the grooves at the bottom into the designated slots of the internal housing. Exert some pressure to
close the Front Panel Casing towards the magnetic catch.
• Please be careful not to injure your hand while attaching the front panel casing back onto the unit.
• There will be a “click” sound when the front panel casing is securely installed and locked in position.
STEP 05
Ensure that there is a clearance of at least fifty (50) cm for the air inlets at both sides of the unit and clearance of at least ten (10) cm for the back where the
air outlet is located. Unit is recommended to be placed one (1) metre away from human activity.
• DO NOT block the air inlet and air outlet to ensure sufficient air ventilation and maximum efficiency of the unit.
USING THE NOVITA AIRCARE PROTM AIR/SURFACE STERILIZER
Ensure that the power plug is disconnected from the power supply at all times during installation, maintenance and transportation.
• DO NOT operate the unit without filter unit installed. Please remove the plastic packaging on the filter unit and insert them in the correct sequence
before use.
• When unit is in operation, removing the front panel casing will switch OFF the unit operation automatically.
• After one (1) minute of unit idling, unit’s LCD screen display will auto dim by 50%. Press any button on the LCD screen, remote control or
Smart App Management to override and resume 100% brightness on the unit’s LCD screen display.
• After three (3) minutes of unit idling, childlock function will be automatically activated to guard against curious kids.
• To unlock childlock function, tap and hold button on the unit’s touch panel for four (4) seconds. This is to prevent mishandling/ misactivation
by young children who may change the operations unintentionally. Alternatively, user may press button on the remote control or
Smart App Management to unlock childlock function.
STEP 04
To switch ON/OFF the Wi-Fi indicator, tap button on the unit’s touch panel once. To enter Wi-Fi pairing mode, tap and hold button on the unit’s touch
panel for five (5) seconds until there is a “beep” sound with Wi-Fi indicator flashing quickly. User may now proceed to pair up their pairing/control device’s
Smart App Management with NAS12000. The Wi-Fi indicator illuminates permanently when the unit is already connected to a Wi-Fi network.
To master reset Wi-Fi connection, tap and hold button on the unit’s touch panel for five (5) seconds until there is a “beep” sound. Please wait for
another nine (9) seconds for the unit to “beep” twice to ensure the NAS12000 and server has completed the master reset command. Proceed to switch OFF
the unit and disconnect the power plug from the power supply for five (5) seconds, then power on the unit. Repeat Wi-Fi pairing mode steps for new
pairing.
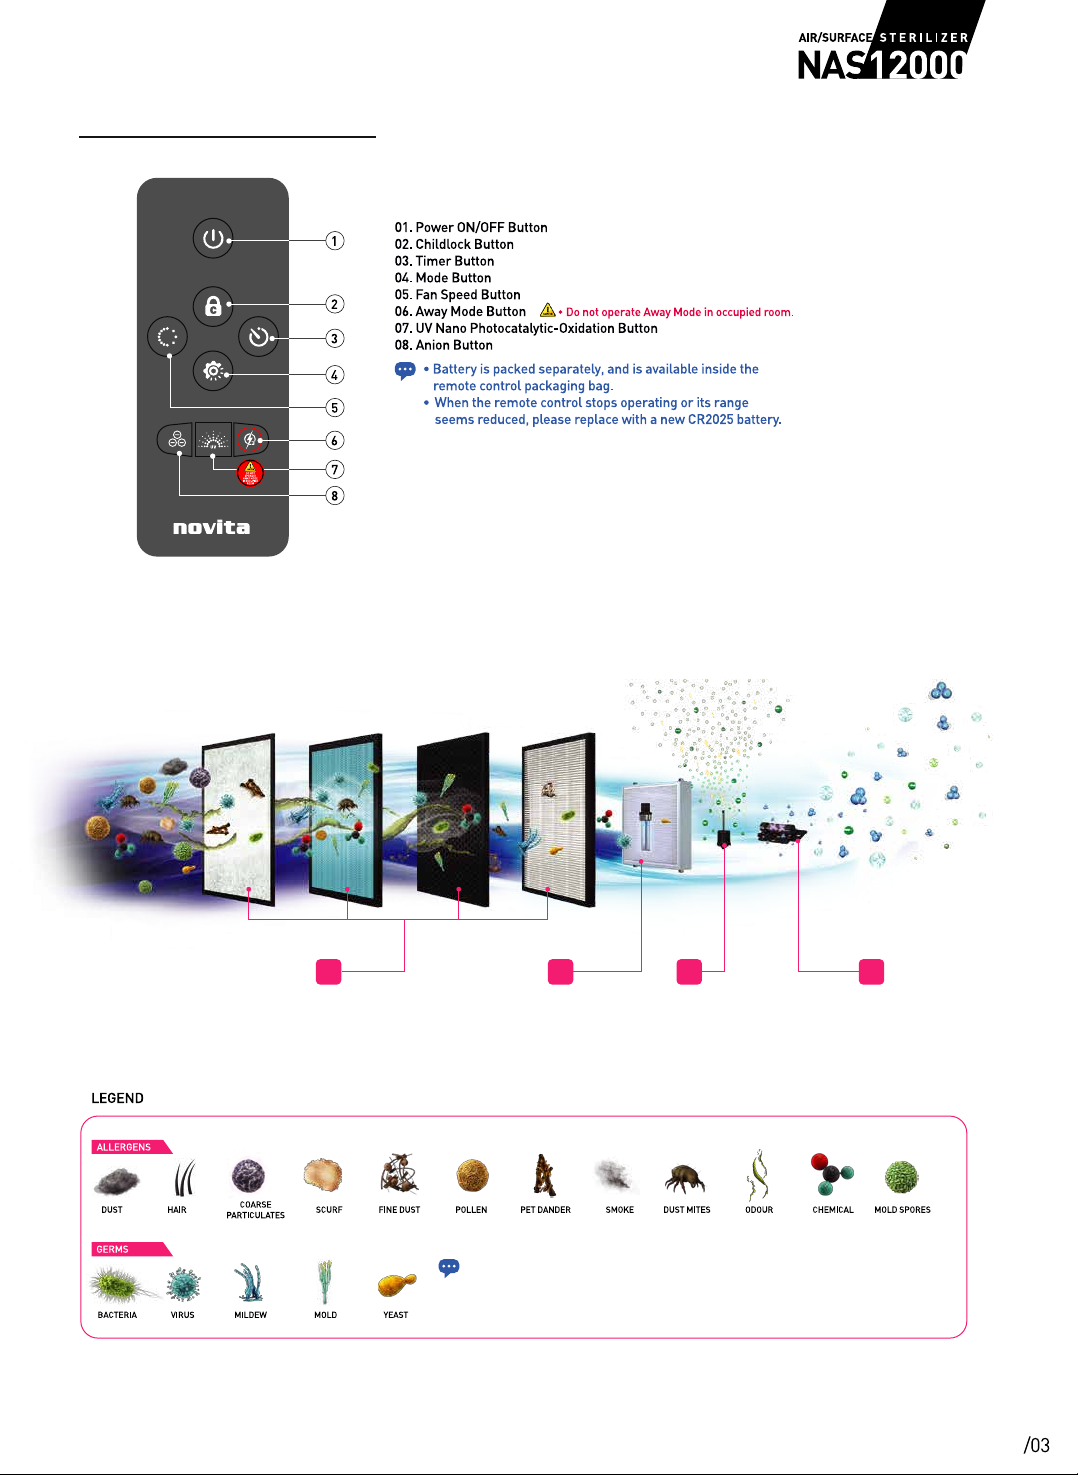
UNIT OPERATING NOTES
STEP 02
To switch ON/OFF the unit, tap button on the unit’s touch panel once or press button on the remote control once. When unit is switched ON, it will
produce a “beep” sound. Tilt the adjustable LCD panel in accordance to user viewing angle preference. By default, unit operates in Auto Mode, Wi-Fi On
(flashing slowly), Anion On, PCO On, Childlock Off and runs on continuous operation.
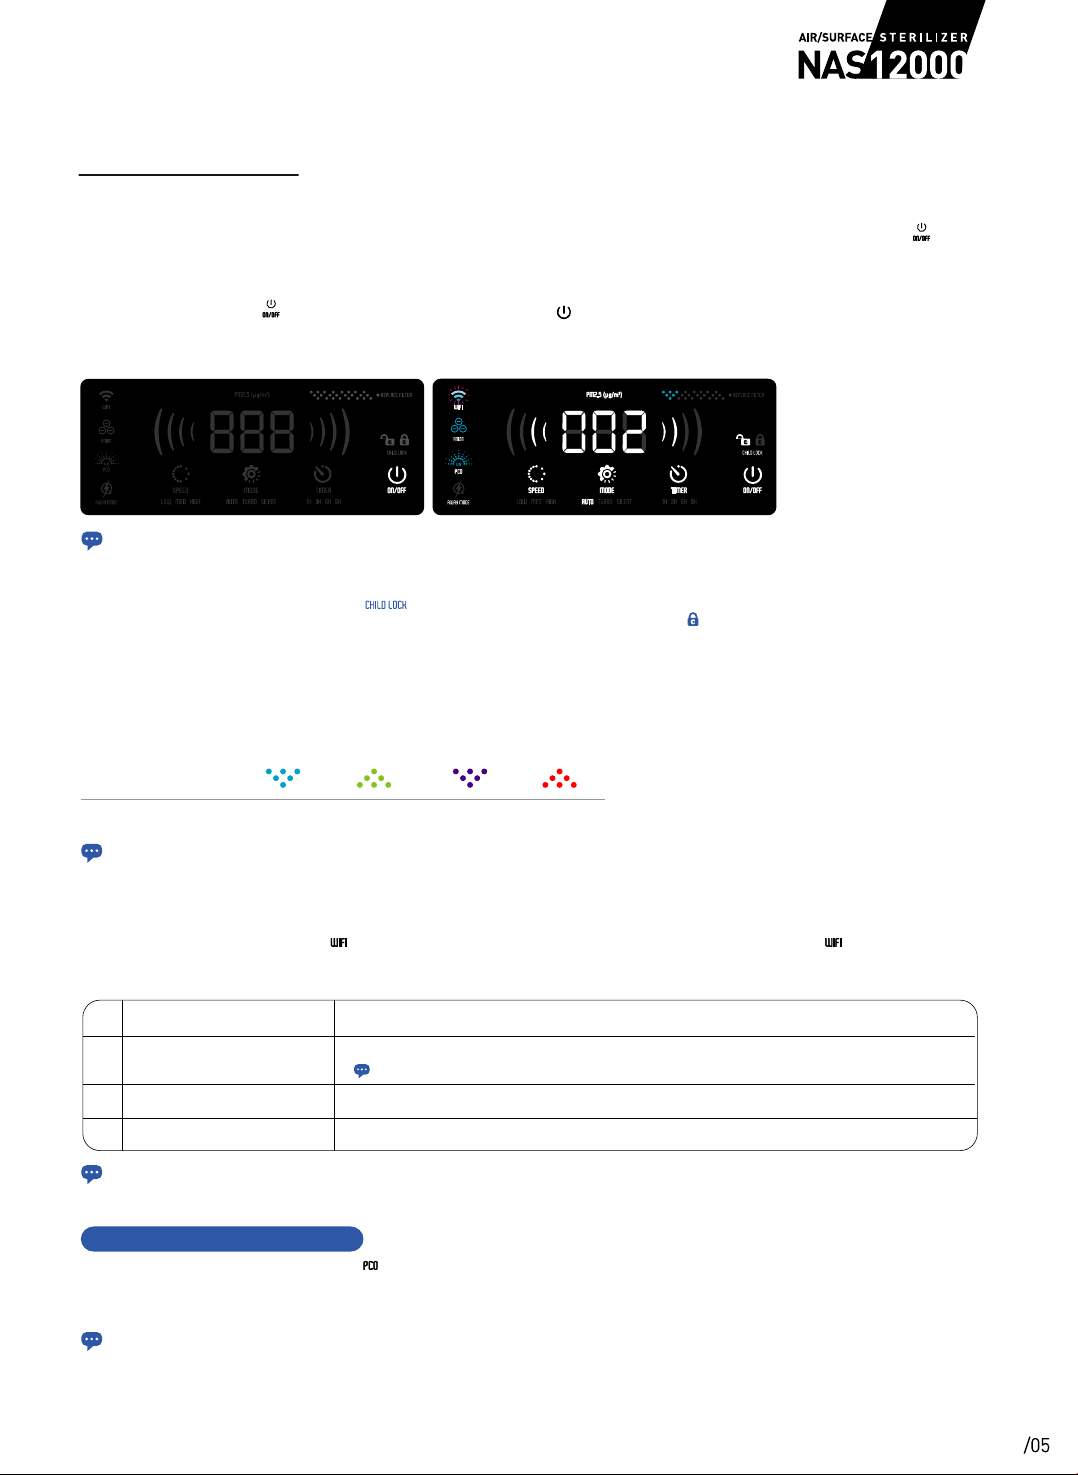
STEP 01
Insert the power plug into the power supply. In OFF mode, unit “beep” once with all LCD screen indicators illuminate once then goes off. Only button
illuminates on the unit’s LCD screen.
At OFF mode At ON mode
STEP 03
The Far Infrared PM2.5 Particle Sensor will take about ten (10) seconds for initialization. During the initialization process, the PM2.5 display will show
“002” and upon the completion of the initialization, LCD screen will show the PM2.5 reading (unit: µg/m3) based on two (2) minutes moving average.
Its corresponding air quality sensor light indicator colour will vary accordingly to the Far Infrared PM2.5 readings.
Air Quality Sensor
Light Indicator
Air Quality Indication Excellent Good Moderate Poor
• Whenever the unit is switched OFF or the unit’s power plug is unplugged from the power supply, the FIR PM2.5 Particle Sensor will take
about ten (10) seconds for initialization.
• FIR PM2.5 Particle Sensor is subjected to depreciation and calibration / replacement may be required for optimum air quality detection.
• By default, Wi-Fi is activated when the unit is switched on and its corresponding indicator will be flashing at a slower rate.
• Please refer to page 08 for Smart App Management setting up instructions.
• To ensure safety and limit point of access, once unit’s Wi-Fi connection is master reset, all prior connections between the unit and pairing/control
devices will be disconnected.
• The disconnected pairing/control device will no longer be able to control or to access any information on the unit unless the authorizer (master user)
re-generate an unit authorization code to the disconnected/new user to authorize the pair up in order to access the unit.
NO. WI-FI INDICATOR WHAT DOES IT MEAN?
Illuminates permanently.
Flashing quickly. The unit is in Wi-Fi pairing mode.
The unit is already connected to a Wi-Fi network.
The unit is in Wi-Fi standby mode.
Flashing slowly.
1
2
3
• When Wi-Fi indicator illuminates permanently, it does not mean unit is paired up with the Smart App Management.
MASTER RESET WI-FI CONNECTION
• Fan speed setting indicator will not be displayed during Auto, Turbo or Silent operating mode.
STEP 08
To select the preferred fan speed (Low, Medium or High) setting, tap button on the unit’s touch panel consecutively or press button on the remote
control consecutively. Its corresponding LCD screen indicator will be illuminated.
LCD Screen
Indicator
Fan Speed Indicator
LowFan Speed Medium High
• By default, PCO Mode is activated when the unit is switched on.
STEP 06
To switch ON/OFF PCO Mode, tap button on the unit’s touch panel once or press button on the remote control once. When PCO Mode is activated,
its corresponding LCD screen indicator will be illuminated.
LCD Screen
Display
ActivatedPCO Mode Not Activated
STEP 05
To switch ON/OFF the Anion Mode, tap button on the unit’s touch panel once or press button on the remote control once. When Anion Mode is
activated, its corresponding LCD screen indicator will be illuminated.
• By default, Anion Mode is activated when the unit is switched on.
LCD Screen
Indicator
Anion Mode Activated Not Activated
LCD Screen
Indicator
ActivatedAway Mode
Ozone Emission Up to 500 mg/hr
Not Activated
STEP 07
To switch ON/OFF Away Mode, tap and hold button on the unit’s touch panel for five (5) seconds or press button on the remote control once.
When Away Mode is activated, its corresponding LCD screen indicator will be illuminated.
• By default, Away Mode is deactivated when the unit is switched on.
• Once Away Mode is activated via unit’s touch panel or remote control, Away Mode will be programmed for continuous operation.
• To customize Away Mode schedule timer operation, please refer to page 16 for instructions to program the Smart App Management.
• When Away Mode is activated, Turbo Mode is automatically activated and it is normal for corona discharge module to produce a hissing sound.
• Ozone concentration should not be determined by the scent of fresh sweet smell, since ozone concentration is not solely determined by the intensity
detected from the human nose.
• Ozone production will be subjected to overall condition of the unit.
• Efficiency of ozone production and its concentration produced will be subjected to environmental conditions, such as the humidity and purity of air,
temperature, voltage applied and pressure. High humidity in the air leads to formation of Nitrogen Oxides (NOx) and Nitric Acid (HNO3) by-products
which may cause deterioration to the corona discharge module and hence decrease the efficiency of ozone production. Service maintenance is
available on purchase at estore.novita.com.sg/nas-services to ensure unit’s optimum performance.
• After air sterilization/surface sanitization operations, it is recommended to leave the area vacant for another one (1) hour. During this time, the
residual ozone will oxidize the surrounding airborne/surface germs and then revert back to oxygen molecules.
• Do not operate Away Mode in occupied room.
• By default, Auto Mode is activated when the unit is switched on.
• User may only tap the touch panel button area to resume the LCD screen display function. Tapping any other non-functional area (eg. PM2.5 Display)
would not be able toresume LCD screen display function.
• Fan speed setting indicator will not be displayed during Auto, Turbo or Silent operating mode.
STEP 09
To select the preferred Operating Mode (Auto, Turbo or Silent), tap button on the unit’s touch panel consecutively or press button on the remote
control consecutively. Its corresponding LCD screen indicator will be illuminated.
LCD Screen
Indicator
Auto ModeOperating Mode Turbo Mode Silent Mode
At Auto Mode, unit operates in accordance to the detected air quality automatically.
At Turbo Mode, unit provides the extra strong air flow rate that is required during very poor air quality for maximum purification efficiency.
Air Quality Sensor
Light Indication
Air Quality Indication Excellent Good Moderate Poor
Fan Speed Setting Low Medium High Turbo
LCD Screen
Indicator
Turbo ModeOperating Mode
Fan Speed Indicator
LCD Screen
Indicator
Silent ModeOperating Mode
Fan Speed Indicator
At Silent Mode, unit is programmed to the lowest speed setting with minimal noise level. With energy conservation in mind, at Silent Mode, after one (1)
minute of unit idling, unit’s LCD screen will auto dim by 50% and on the second (2) minutes of unit idling, unit’s LCD screen will be 100% dim, with only
indicator illuminating on the LCD screen.
To resume LCD Screen Display function, tap any button on the unit’s touch panel, press any button on the remote control or Smart App Management.
• User may only tap the touch panel button area to resume the LCD screen display function. Tapping any other non-functional area (eg. PM2.5 Display)
would not be able to resume LCD screen display function.
• Unit continues to run at its preceding operating setting after the LCD screen display function is resumed.
STEP 10
To switch OFF all LCD Screen Display, tap and hold button on the unit’s touch panel for five (5) seconds.
To resume LCD Screen Display function, tap any button on the unit’s touch panel, press any button on the remote control or Smart App Management.
STEP 11
To select a preferred timer (1, 3 ,6 or 9 hours) operation, tap button on the unit’s touch panel consecutively or press button on the remote control
consecutively. Its corresponding LCD screen indicator will be illuminated. Unit automatically switch OFF when the timer is up. Continuous operation is
activated when Timer Operation Indicator does not illuminate.
• By default, unit is programmed to run at continuous operation when it is switched on.
• To customize Air Purification scheduled timer operation on Smart App Management, please refer to page 14 for instructions.
LCD Screen
Indicator
1 HourTimer Operation 3 Hours 6 Hours 9 Hours
Continuous
Operation
• To disconnect all prior paired up users, please do a master reset. Tap and hold button on the unit’s touch panel for five (5) seconds until there is a
“beep” sound. Please wait for another nine (9) seconds for the unit to “beep” twice to ensure the NAS12000 and server has completed the master
reset command. Proceed to switch OFF the unit and disconnect the power plug from the power supply for five (5) seconds, then power on the unit
again. Repeat Wi-Fi pairing mode steps for new pairing.
APP SETTING UP
App FAQ &
Troubleshooting
SCAN THE QR CODE TO VIEW
APP PAIRING VIDEO GUIDE
SCAN THE QR CODE TO VIEW
APP FAQ & TROUBLESHOOTING INFORMATION
• User is unable to set up two (2) or more NAS12000
at the same time. Please only power on the unit to
undergo pairing, to avoid unnecessary Wi-Fi
signal interferences.
STEP 01
Insert the air/surface sterilizer power plug into the power supply. Switch ON the air/surface sterilizer with Wi-Fi indicator flashing slowly on the unit’s LCD
screen. Tap and hold the button on the unit’s touch panel for five (5) seconds until you hear a “beep” sound and see Wi-Fi indicator flashing quickly to
activate Wi-Fi pairing mode.
STEP 02
Ensure pairing/control device is connected to Wi-Fi network working frequency 2.4 GHz. For first time pairing, ensure unit & pairing/control device is placed
near (within ten (10) metres, without any obstructions) to router/modem for strong and stable Wi-Fi signal. Ensure the pairing/control device must be
connected to the same Wi-Fi network as the novita AirCare Pro™ Air/Surface Sterilizer NAS12000 for first time pairing.
• Applicable Wi-Fi pairing frequency must be at 2.4 GHz.
• User may use other Wi-Fi or mobile network to control the NAS12000 after successful pairing.
STEP 12
To manually activate the childlock function, tap button on the unit’s touch panel once or press button on the remote control once. When childlock
is activated, its corresponding LCD screen indicator will be illuminated and unit’s touch panel will be locked.
To unlock childlock function, tap and hold button on the unit’s touch panel for four (4) seconds. Alternatively, user may tap button on the remote
control or Smart App Management to unlock childlock function. When childlock function is deactivated, its corresponding LCD screen indicator will be
illuminated and unit’s touch panel will be unlocked.
LCD Screen
Indicator
Childlock ActivatedChildlock Childlock Deactivated
• By default, childlock is deactivated when unit is switched on.
• After three (3) minutes of unit idling, childlock will be automatically activated to guard against curious kids.
• The purpose to tap and hold button on the unit’s touch panel for four (4) seconds is to prevent mishandling/ misactivation by young children
who may change the operations unintentionally.
LCD Screen
Indicator
PuriPRO®Filter
Due Replacement
Replace Filter
STEP 13
When unit is in operation for every twenty-four (24) months* (Approx. 6,000 hours), indicator illuminates and flashes on the LCD screen
as an indication that PuriPRO®Filter replacement is required for optimum performance.
STEP 14
Filter Timer Master Reset
In the event of pre-mature filter replacement, user may perform a master reset to the unit.
* Based on average eight (8) hours a day, seven (7) days a week usage under normal domestic indoor environment.
• Please refer to page 18 for PuriPRO®Filter replacement instructions.
• Upon the completion of filter replacement, tap and hold indicator on the unit’s touch panel for five (5) seconds to
reset the filter replacement timer indicator. Unit “beep” three (3) times and indicator stops flashing to notify user that the filter reset
procedure is completed.
• Please refer to page 19 for full filter timer master reset instructions.
SMART APP MANAGEMENT