Enable Lifecare Joerns Hoyer User manual
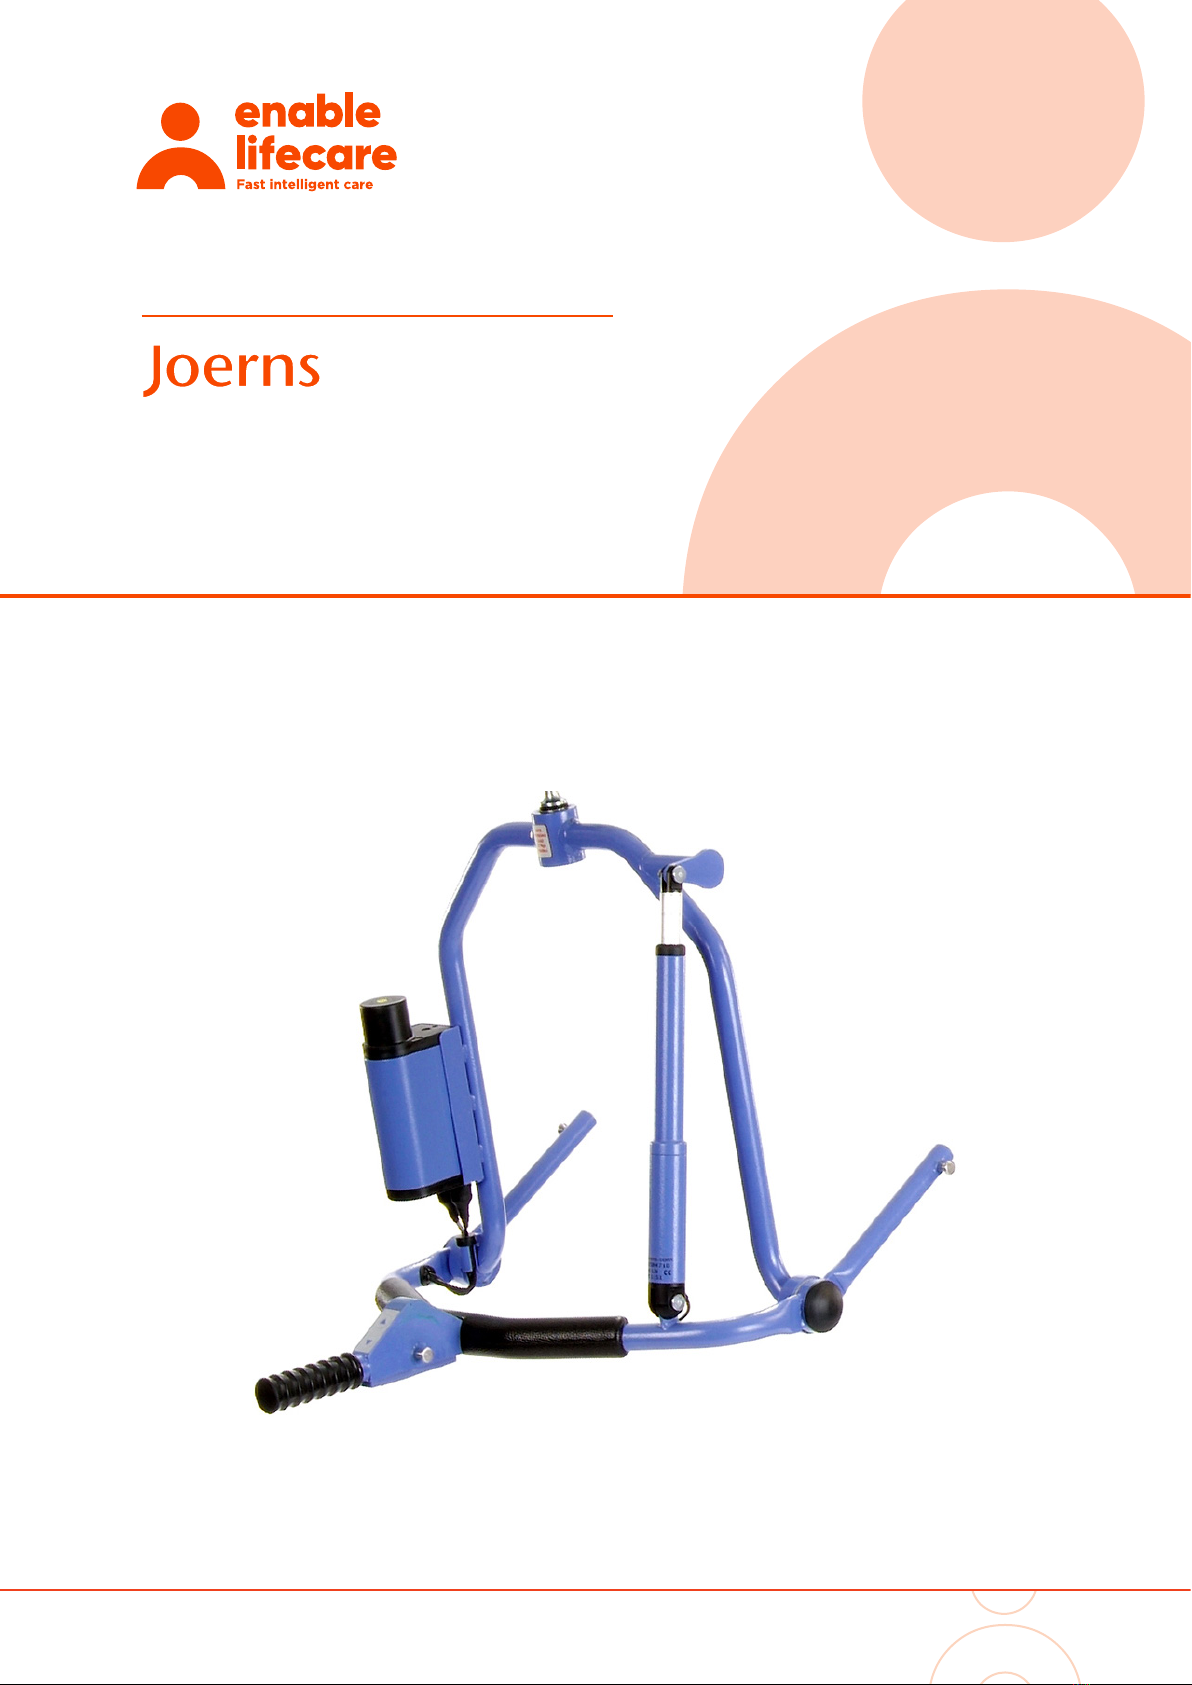
Joerns Hoyer 4-Point Adaptive Power Cradle
®
To avoid injury, read user manual
prior to use.
U S E R M A N U A L
Hoyer ® 4-Point Adaptive Power Cradle
Product name
to go here
Product description to go here
USER MANUAL
enablelifecare.com.au

Joerns Hoyer 4-Point Adaptive Power Cradle
®
Contents
1. Installing your Hoyer 4-point Adaptive Power Cradle ............................................................ 3
2. Component Parts............................................................................................................................. 4
3. Assembly Instructions (connection and removal)................................................................... 4
4. Sling Attachment ............................................................................................................................ 5
5. Safety Precautions .......................................................................................................................... 6
6. Cradle Operation ............................................................................................................................. 7
7. Service & Maintenance ................................................................................................................... 10
8. Electrical Specification................................................................................................................... 13
9. Warranty ........................................................................................................................................... 14
2

Joerns Hoyer 4-Point Adaptive Power Cradle
®
1. Hoyer 4-point Adaptive Power Cradle
3
The Hoyer Presence lift is fitted with a 6-point spreader bar as standard and the Stature lift is
fitted with a 4-point cradle as standard (see fig. 1).
As an accessory, you can retrofit your standard spreader bar/cradle with an Adaptive Power
Cradle (see fig. 2).
This accessory utilises Hoyer Comfort slings featuring the Securi3 safety clip system (see fig. 3).
Oxford®
Adaptive Power Cradle
3
English
1. Oxford 4-point Adaptive Power Cradle
The Oxford Presence lift is tted with a 6-point spreader bar as standard and the Stature lift is
tted with a 4-point cradle as standard (see g. 1).
As an accessory, you can retrot your standard spreader bar/cradle with an Adaptive Power
Cradle (see g. 2).
This accessory utilises Oxford Comfort slings featuring the Securi3 safety clip system
(see g. 3).
Fig. 1
Standard conguration
4-point cradle
Standard conguration
6-point spreader bar
Fig. 2
Fig. 3
User Instruction Manual
Oxford®Comfort Disposable Sling
(Including Securi3 Clip System)
To avoid injury, read user manual prior to use.
Fig. 1
Fig. 2
Fig. 3
Parts Manual
Oxford®Presence
Parts Manual
Oxford®Stature
Standard configuration
6-point spreader bar
Standard configuration
4-point cradle
Joerns Hoyer 4-Point Adaptive Power Cradle
®
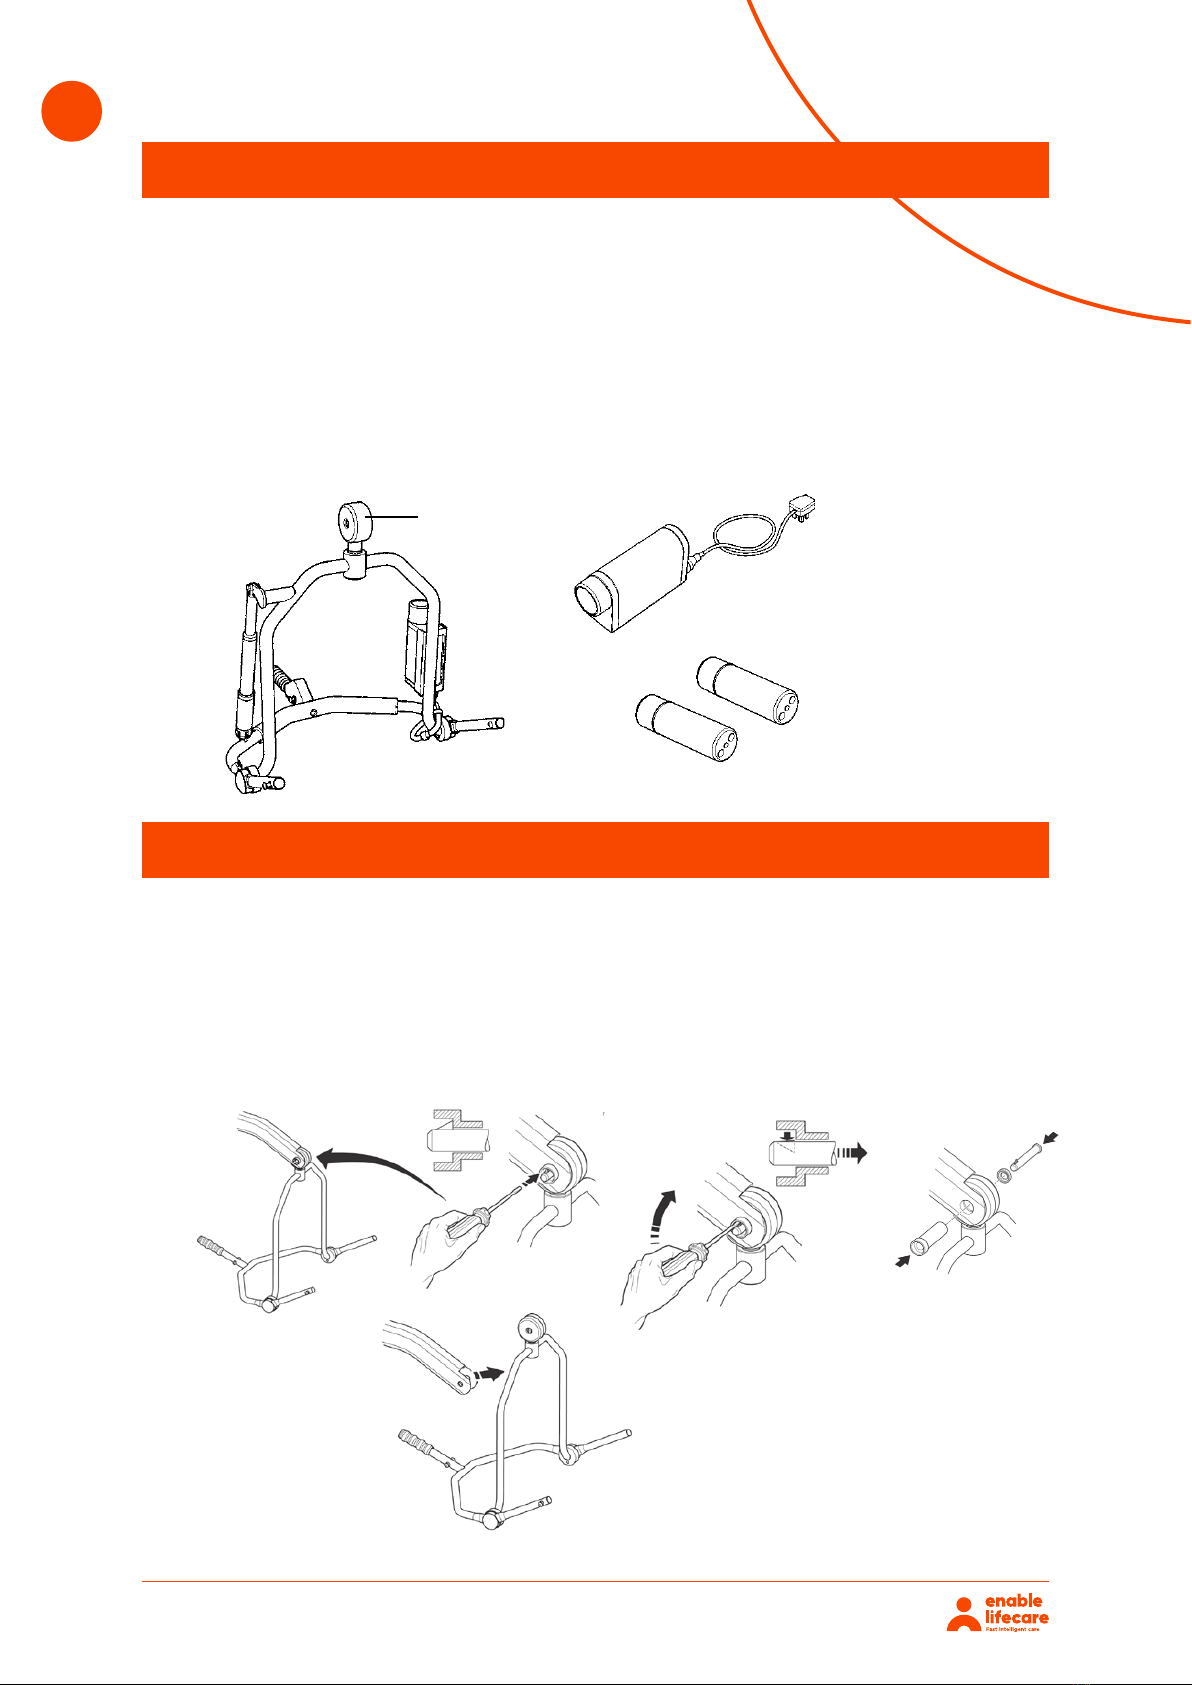
The following components are included with your 4-point Adaptive Power Cradle
(see fig. 4).
1. 1 x 4-point Adaptive Power Cradle
2. 1 x Battery charger
3. 2 x Rechargeable batteries, NiMH
4. 2 x Black plastic caps for Stature and Presence boom
5. 1 x User/service manual (not shown)
To attach your 4-point Adaptive Power Cradle you must first remove the old spreader bar/cradle
from the lift. This is achieved by removing the quick-release pin that retains the non-powered
spreader bar/cradle (see fig. 5). A small flat blade screwdriver or similar is the only tool required.
Assembly is quick and easy but it is important that you follow the procedure carefully.
FOLLOW THESE INSTRUCTIONS EXACTLY:
Removal:
2. Component Parts: Adaptive Power Cradle
4
Oxford®
Adaptive Power Cradle
4
English
2. Component Parts: Adaptive Power Cradle
The following components are included with your 4-point Adaptive Power Cradle (see fig. 4).
1. 1 x 4-point Adaptive Power Cradle
2. 1 x Battery charger
3. 2 x Rechargeable batteries, NiMH
4. 2 x Black plastic caps for Stature and Presence boom
5. 1 x User/service manual (not shown)
3. Assembly Instructions
Assembly is quick and easy but it is important that you follow the procedure carefully.
FOLLOW THESE INSTRUCTIONS EXACTLY:
Removal:
To attach your 4-point Adaptive Power Cradle you must first remove the old spreader bar/cradle
from the lift. This is achieved by removing the quick-release pin that retains the non-powered
spreader bar/cradle (see fig. 5). A small flat blade screwdriver or similar is the only tool required.
Fig. 4
Battery Charger
(UK lead shown only)
2 x Rechargeable
Batteries
Fig. 5
4-point Adaptive Power Cradle
Black Plastic Caps
Fig. 4
Fig. 5
3. Assembly Instructions
Oxford®
4-Point Positioning Cradle
4
English
2. Assembly Instructions
Lifter Model: OXF-PRESENCE
OXF-STATURE
Cradle Model Number: 0Y0050
0Y0189
Tools Required: Flat blade screwdriver
FOLLOW THESE INSTRUCTIONS EXACTLY:
Your Oxford Presence lift has the option of using both a 6-point spreader bar or 4-point
positioning cradle.
The removal of either of these spreader bars is completed easily by the use of a quick-release
pin. This is done quickly and easily, but you must read the following safety instructions to ensure
the spreader bar is safely locked into position before use.
Removal:
1. To detach pin, depress the spring barb (Fig. 1 and 2).
Fig. 1
Fig. 2
Oxford®
4-Point Positioning Cradle
5
English
2. Pull the pin out (Fig. 3, item 1).
3. Support the spreader bar, and then pull the pin sleeve (Fig. 3, item 2) in the opposite
direction, removing it from the boom. This will release the spreader bar completely (Fig 4).
Connection:
1. To connect, raise the spreader bar up toward the boom slot (Fig. 5). Insert the pin sleeve
through the plastic end cap and to support the cradle (Fig. 6, item 1).
2. Once aligned in the boom slot, reinsert the quick release pin fully into the sleeve until it locks
into position (Fig. 6, item 2).
Fig. 3 Fig. 4
1
2
Fig. 5 Fig. 6
Oxford®
4-Point Positioning Cradle
4
English
2. Assembly Instructions
Lifter Model: OXF-PRESENCE
OXF-STATURE
Cradle Model Number: 0Y0050
0Y0189
Tools Required: Flat blade screwdriver
FOLLOW THESE INSTRUCTIONS EXACTLY:
Your Oxford Presence lift has the option of using both a 6-point spreader bar or 4-point
positioning cradle.
The removal of either of these spreader bars is completed easily by the use of a quick-release
pin. This is done quickly and easily, but you must read the following safety instructions to ensure
the spreader bar is safely locked into position before use.
Removal:
1. To detach pin, depress the spring barb (Fig. 1 and 2).
Fig. 1
Fig. 2
Joerns Hoyer 4-Point Adaptive Power Cradle
®5
CAUTION
WARNING
Prior to removing the quick release pin, the cradle needs to
be supported by a stationary object such as a workbench or
table. This will prevent the cradle from dropping suddenly
which could result in an injury or damage to the cradle.
YOU MUST CHECK THAT THE PIN IS SECURELY FITTED; a
noticeable “click” will sound when the connection has been
made secure.
*Ensure you use the correct version of the black plastic cap for
your lift, as 2 are supplied. Check the cap width against your
lifts boom before fitting.
!
!
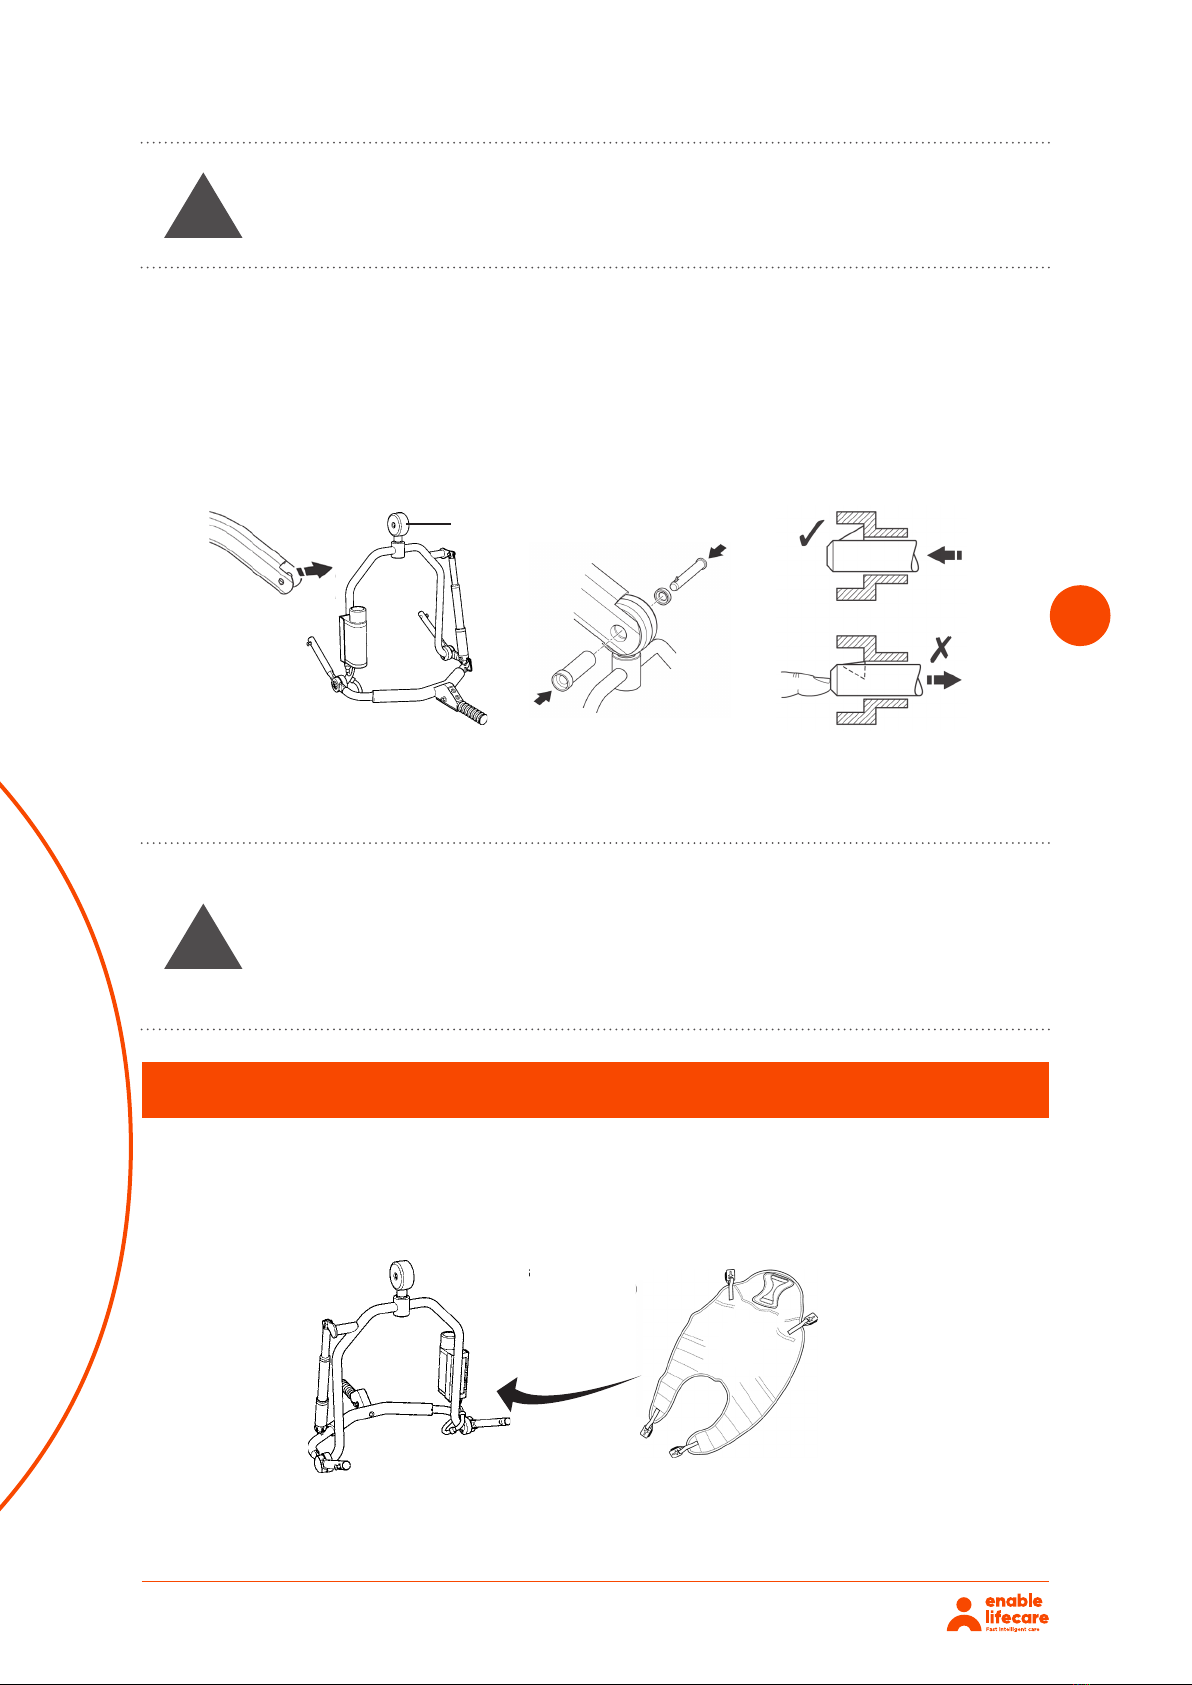
To connect, raise the 4-point Adaptive Power Cradle up towards the boom slot. Insert the pin
sleeve through lift boom, the black plastic end cap* and the cradle king pin. Once the pin sleeve
has been installed and is supporting the weight of the Adaptive Power Cradle, re-insert the quick
release pin fully into the sleeve until it locks into position (See fig. 6).
To verify that the pin is securely fitted, press your finger into the barbed end. If the pin remains
stationary, the lift is safe to use (See fig. 7).
Attachment of the Comfort sling to your Adaptive Power Cradle:
The Comfort sling attaches to the cradle studs via the Securi3 safety clip system (shown below);
each sling is supplied with instructions. Please study the instruction guide before use (See fig. 8).
Black Plastic Caps
Connection:
Fig. 6 Fig. 7
4. Sling Attachment
Oxford®
Adaptive Power Cradle
4
English
2. Component Parts: Adaptive Power Cradle
The following components are included with your 4-point Adaptive Power Cradle (see fig. 4).
1. 1 x 4-point Adaptive Power Cradle
2. 1 x Battery charger
3. 2 x Rechargeable batteries, NiMH
4. 2 x Black plastic caps for Stature and Presence boom
5. 1 x User/service manual (not shown)
3. Assembly Instructions
Assembly is quick and easy but it is important that you follow the procedure carefully.
FOLLOW THESE INSTRUCTIONS EXACTLY:
Removal:
To attach your 4-point Adaptive Power Cradle you must first remove the old spreader bar/cradle
from the lift. This is achieved by removing the quick-release pin that retains the non-powered
spreader bar/cradle (see fig. 5). A small flat blade screwdriver or similar is the only tool required.
Fig. 4
Battery Charger
(UK lead shown only)
2 x Rechargeable
Batteries
Fig. 5
4-point Adaptive Power Cradle
Black Plastic Caps
User Instruction Manual
Oxford®Comfort Disposable Sling
(Including Securi3 Clip System)
To avoid injury, read user manual prior to use.
Fig. 8
Example of Securi3 safety clip system. The 3 key stages assure patient and carer of complete
safety and comfort throughout the transfer (see fig. 9).

Joerns Hoyer 4-Point Adaptive Power Cradle
®6
5. Safety Precautions
4
When tted to the patient, the sling is connected to the 4 point cradle by using the Securi3 clip system
(step by step guide as follows). To remove, simply reverse this procedure.
SECURI3 CLIP SYSTEM
Pivot Handle
Fitting the Sling to the 4-Point Cradle
Oxford®
Comfort Disposable English
Fig. 9
1. 2. 3. 4.
1. Attach clip to lug
2. Pull plastic clip down to secure
3. Feed green ‘safe’ tab through slot
4. Sling is attached and ready to use
• Before using your 4-point Adaptive Power Cradle ensure the quick release pin is FULLY
ENGAGED as shown in figure 6 and 7 on page 5.
• The Hoyer 6-point spreader bar and the Hoyer 4-point Adaptive Power Cradle (power and
non-power) are only compatible with the Hoyer Presence and Stature lifts. Do not use this
cradle or spreader bar with any other manufacturer’s lift or slings.
• When placing the cradle and sling in the most upright position do not leave the patient
unattended. The patient could slump forward in the sling, which could result in an injury to the
patient.
• Do not use a sling unless it is recommended for use with the cradle/lift.
• Always check that the sling is suitable for the particular patient and is of the correct size and
capacity.
• Never use a sling that is frayed or damaged.
• Always fit the sling according to the user instructions provided (sling user instructions).
• Always plan your lifting operations before commencing.
• Always check that your Hoyer 4-point Adaptive Power Cradle is in good working order prior
to any lifting operation.
• Always use the 4-point Adaptive Power Cradle in a clean, dry and temperature controlled
indoor environment.
WARNING
!
Joerns Hoyer 4-Point Adaptive Power Cradle
®7
6. Cradle Operation
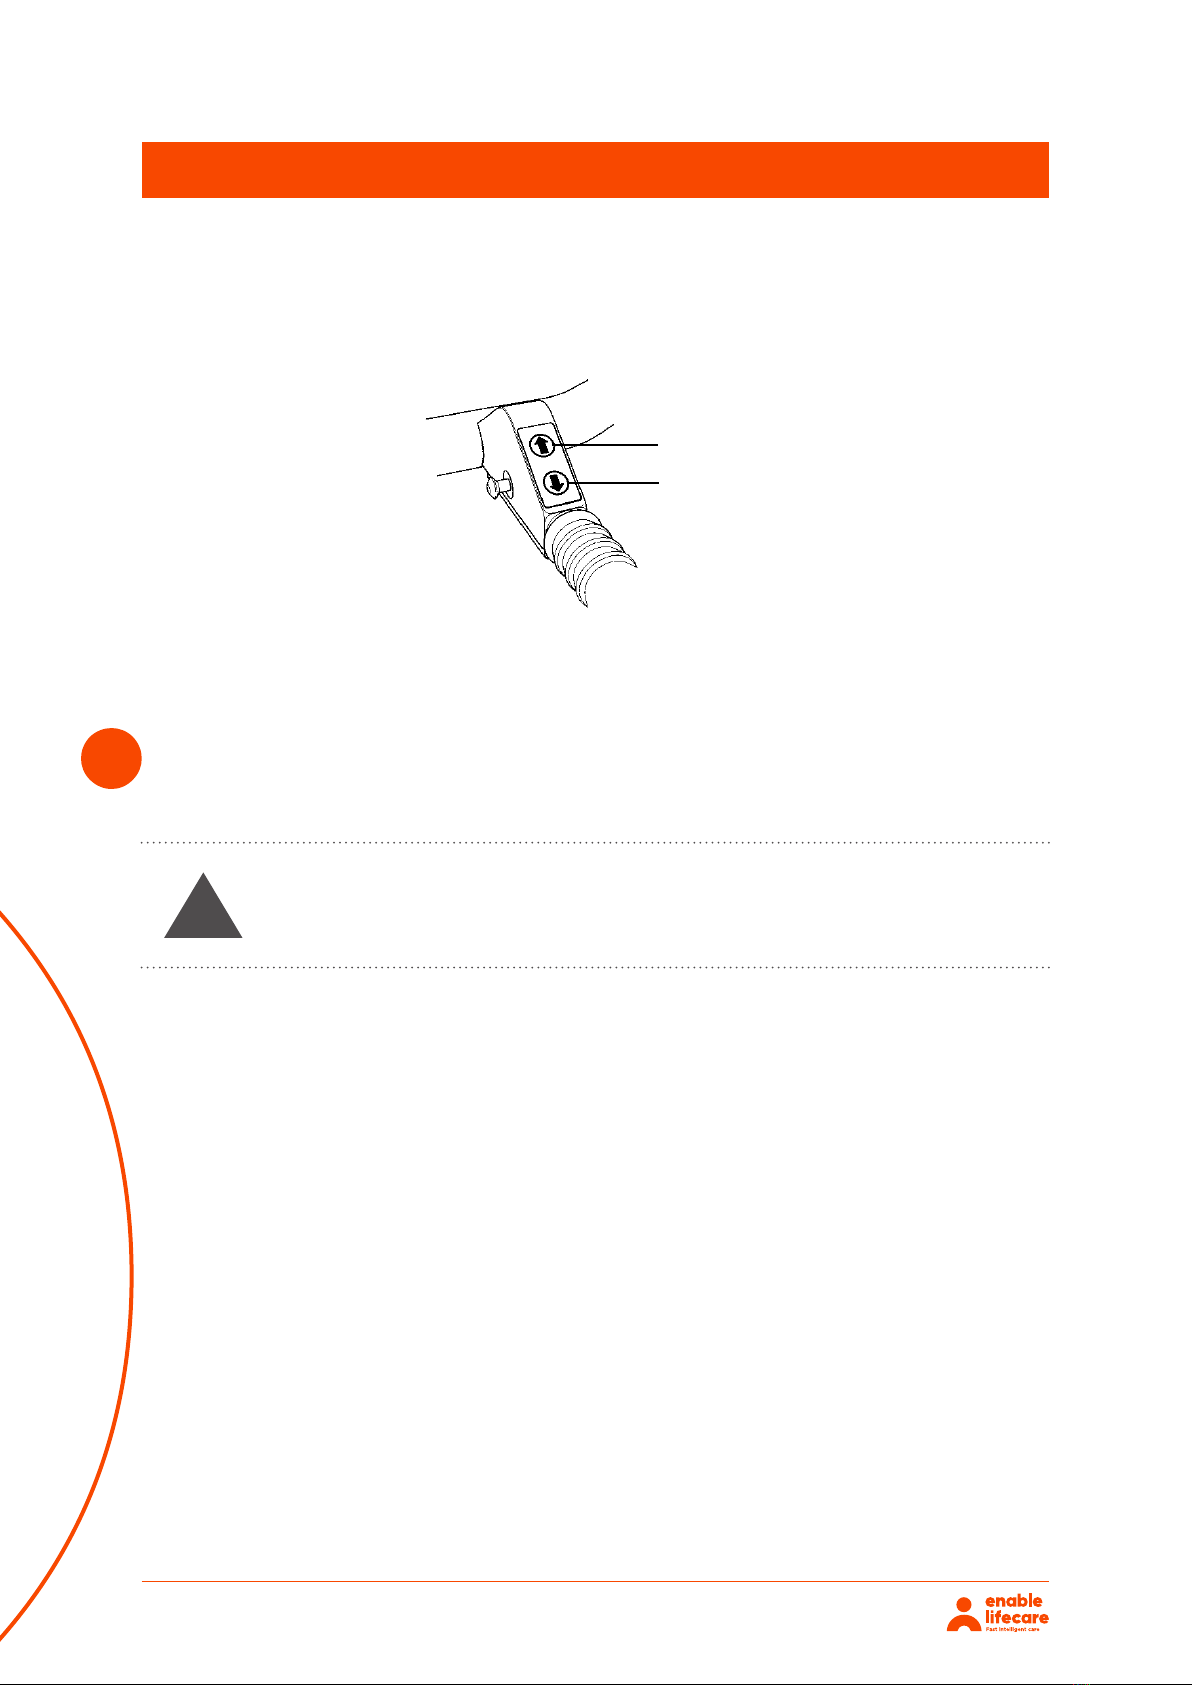
Hand Control:
Operating the 4-point Adaptive Power Cradle is a very easy process. Once the patient has been
placed in the sling and the sling has been attached to the Adaptive Power Cradle, the cradle is
positioned by using the hand control located in the cradle handle (see fig. 10).
Battery & Control Box:
The 4-point Adaptive Power Cradle requires a minimum of maintenance but it is very important
to perform regular maintenance and to have a thorough understanding of the control system. The
control box has been designed to provide audible signals. The signals are indicated with long,
short or multiple “beeps”.
Pressing the “Up” arrow button will move the patient into a reclined or lying position.
Pressing the “Down” arrow button will move the patient into an upright or sitting position.
The 4-point Adaptive Power Cradle can be positioned in incremental movements or in one constant
motion. This ensures the patient is positioned in the optimum profile for their maximum comfort.
Oxford®
Adaptive Power Cradle
8
English
6. Cradle Operation
Hand Control:
Operating the 4-point Adaptive Power Cradle is a very easy process. Once the patient has been
placed in the sling and the sling has been attached to the Adaptive Power Cradle, the cradle is
positioned by using the hand control located in the cradle handle (see fig. 10).
Pressing the “Up” arrow button will move the patient into a reclined or lying position.
Pressing the “Down” arrow button will move the patient into an upright or sitting position.
The 4-point Adaptive Power Cradle can be positioned in incremental movements or in one
constant motion. This ensures the patient is positioned in the optimum profile for their maximum
comfort.
WARNING!
When placing the cradle and sling in the most upright position do not leave the patient
unattended. The patient could slump forward in the sling, which could result in an injury
to the patient.
Battery & Control Box:
The 4-point Adaptive Power Cradle requires a minimum of maintenance but it is very important to
perform regular maintenance and to have a thorough understanding of the control system.
The control box has been designed to provide audible signals. The signals are indicated with
long, short or multiple “beeps”.
1. Power On (Power is on when the battery is inserted):One extended “BEEP”
2. Sleep Mode: Two short “BEEPS”
3. Low Battery: Two short “BEEPS” repeated every 24 seconds. (charge battery)
4. Start Operation: Two “BEEPS” (low voltage, charge battery soon)
5. During Operation: One long BEEP (the battery charge is too low; only a reclined position
can be achieved). Replace the battery with a fully charged battery.
Fig. 10
Reclined
Upright
Fig. 10
WARNING
When placing the cradle and sling in the most upright position
do not leave the patient unattended. The patient could slump
forward in the sling, which could result in an injury to the
patient.
!
1. Power On (Power is on when the battery is inserted): One extended “BEEP”
2. Sleep Mode: Two short “BEEPS”
3. Low Battery: Two short “BEEPS” repeated every 24 seconds. (charge battery)
4. Start Operation: Two “BEEPS” (low voltage, charge battery soon)
5. During Operation: One long BEEP (the battery charge is too low; only a reclined position can
be achieved). Replace the battery with a fully charged battery.

Joerns Hoyer 4-Point Adaptive Power Cradle
®8
Charging Instructions:
To charge the battery, follow the instruction below:
Oxford®
Adaptive Power Cradle
9
English
Charging Instructions:
To charge the battery, follow the instruction below:
1. Remove the battery from the cradle (see fig. 11). The battery is retained by a magnetic force.
Simply pull the battery straight out of the control box on the cradle.
2. Connect the power lead into the charger.
3. Place the battery in the charging unit (see fig. 12). The battery is held in place by a magnetic
force and will automatically align itself in the charger unit.
4. Plug the charger into the mains power outlet (see fig. 13). An amber light will illuminate,
indicating there is power to the charger.
5. A green light will begin to “flash” indicating that the battery is being charged. The amber light
remains constantly illuminated.
6. Once the green indicator light stops flashing and remains illuminated, the battery is fully
charged and may be returned to service.
7. To return the battery to service, switch off (UK/EU) the mains supply and remove the battery
from the charging unit. Fit the battery into the control box on the cradle. One long “BEEP” will
indicate that the battery has been properly placed in the control box and the cradle is ready
for use.
NOTE: Ensure the batteries are fully charged prior to using your 4-point Adaptive Power
Cradle for the first time.
NOTE: The cradle will sound a single “beep” after the battery has been removed. The
“beep” will occur on a regular interval for several hours.
WARNING!
•KEEP the battery fully charged. Place the battery on charge whenever it is not in use.
If it is more convenient to do so, place on charge every night. The charger WILL NOT
allow the battery to overcharge.
•Battery or charger is not to be opened by unauthorized personnel. (Contact Joerns
Healthcare or your distributor for warranty and repairs).
•Do not touch battery/charger terminals.
Fig. 11 Fig. 12 Fig. 13
(UK version shown)
Fig. 11 Fig. 12 Fig. 13
1. Remove the battery from the cradle (see fig. 11). The battery is retained by a magnetic force.
Simply pull the battery straight out of the control box on the cradle.
2. Connect the power lead into the charger.
3. Place the battery in the charging unit (see fig. 12). The battery is held in place by a magnetic
force and will automatically align itself in the charger unit.
4. Plug the charger into the mains power outlet (see fig. 13). An amber light will illuminate,
indicating there is power to the charger.
5. A green light will begin to “flash” indicating that the battery is being charged. The amber light
remains constantly illuminated.
6. Once the green indicator light stops flashing and remains illuminated, the battery is fully
charged and may be returned to service.
7. To return the battery to service, switch o (UK/EU) the mains supply and remove the battery
from the charging unit. Fit the battery into the control box on the cradle. One long “BEEP” will
indicate that the battery has been properly placed in the control box and the cradle is ready
for use.
NOTE: Ensure the batteries are fully charged prior to using your 4-point Adaptive Power Cradle
for the first time.
NOTE: The cradle will sound a single “beep” after the battery has been removed. The “beep” will
occur on a regular interval for several hours.

Joerns Hoyer 4-Point Adaptive Power Cradle
®9
• KEEP the battery fully charged. Place the battery on charge whenever it is not in use. If it
is more convenient to do so, place on charge every night. The charger WILL NOT allow the
battery to overcharge.
• Battery or charger is not to be opened by unauthorized personnel. (Contact Joerns Healthcare
or your distributor for warranty and repairs).
• Do not touch battery/charger terminals.
• Never run the battery completely flat. As soon as the audible warning sounds, complete the
lifting operation in hand and place on charge.
• CAUTION: Never store the battery for long periods without regular charging throughout the
storage period. This can result in damage to the battery preventing it from being charged
correctly.
• Always make sure the mains power is switched o before connecting or disconnecting the
battery (UK/EU).
• CAUTION: Never leave the battery in the charging unit with mains power o (UK/EU) or un-
plugged from the wall outlet (US).
• CAUTION: Never leave the battery charger switched on with the battery removed.
• Do not pull on the power lead cable when disconnecting from the charger. Always remove by
grasping firmly the connector plug at the charger end.
WARNING
!

Joerns Hoyer 4-Point Adaptive Power Cradle
®
7. Service and Maintenance Schedule
10
Hoyer®
Adaptive Power Cradle
11
English
7. Service and Maintenance Schedule
Cleaning
The Hoyer 4-point Adaptive Power Cradle will when necessary require cleaning. It can be cleaned
with warm water or a disinfectant cleaning uid.
CAUTION: Harsh chemicals may dull or remove the paint/finish from the cradle.
WARNING
DO NOT spray or submerge the lift in any liquid.
Initially
Before Use
Service
Intervals
1. Check for freedom of rotation (power cradle) üüü
2. Check for wear on the central pivot point (the pivot pin located in the
cradle frame)
üü
3. Check for rm attachment to the boom of the lift üüü
4. Check for wear of the boom and quick release pin on the lift
üü
5. Check the actuator for correct operation listen for unusual noise üüü
6. Lubricate the pivot joints, including boom and cradle ü
7. Inspect pivot joints, including boom and cradle for excessive wear.
Replace as required ü
8. Check power cable is rmly attached to the charger ü
Cleaning
The Oxford 4-point Adaptive Power Cradle will when necessary require cleaning. It can be cleaned
with warm water or a disinfectant cleaning fluid.
CAUTION
WARNING
Harsh chemicals may dull or remove the paint/finish from the
cradle.
DO NOT spray or submerge the lift in any liquid.
!
!

Joerns Hoyer 4-Point Adaptive Power Cradle
®11
Service Parts:
Oxford®
Adaptive Power Cradle
12
English
Service Parts:
Fig. 14
Fig. 14

Joerns Hoyer 4-Point Adaptive Power Cradle
®12
No. Part No. Description
10Y0457 Actuator
20Y0459 Battery charger with UK lead
30Y0460 Battery charger with EU lead
40Y0458 Battery charger with US lead
50Y0461 Control box
60Y0462 Battery
70Y0463 Hand switch assembly
80Y0464 Wire harness between conrol box, actuator and switch
90Y0465 Hardware (fixings)
10 0Y0380 Washer and O-ring kit
11 0Y0761 Battery charger with AU lead

Joerns Hoyer 4-Point Adaptive Power Cradle
®13
BATTERIES.................................................................. 24VDC, rechargeable NiMH sealed
BATTERY CAPACITY................................................ 1400mAh
CHARGER RATED INPUT........................................ 100 - 240V AC// 24 VDC 50/60 Hz Max. 75mA
CHARGER RATED OUTPUT.................................... Max 28,4VDC
CHARGER.................................................................... CLASS II
CHARGER.................................................................... TYPE B
Temperature .............................................................. -5C to +70C
Temperature .............................................................. -40C to +85C
Control Box ................................................................ IP50 (with battery inserted)
Actuator ...................................................................... IP66
O Board Charger ................................................... No rating (not to be used in wet environment)
Battery ........................................................................ IP50
Handset ....................................................................... IP67
Actuator ...................................................................... 10% (2 min./18 min.)
Charger ....................................................................... Approx. 6 hrs.
Cradle including battery ......................................... 9.5 kg
Battery ........................................................................ 0.5 kg
A-Weighted sound power level ............................ 51.5 dB (A)
Outside this environment functionality and safety may be compromised.
Electric Shock Protection
Degree of Shock Protection
Operating :
Storage :
IP Ratings
Duty Cycle
Acoustics
Weight
Environmental Conditions:
8. Electrical Specification

Joerns Hoyer 4-Point Adaptive Power Cradle
®14
9. Warranty
This warranty covers HoyerPro lifts only. Lifts not covered under this warranty include, but are not
limited to Advance-H, HML400, HPL600WB, HPL600WBSC, HPL402, C-HLA (and variations).
HoyerPro lifts are guaranteed for a period of two years from the date of delivery against defects in
materials and workmanship under normal use and service. This warranty includes all mechanical
and electrical components.
Aluminium structural components and mechanical components on lifts are covered under
warranty for a period of five (5) years from the date of delivery.
Damage caused by use in unsuitable environmental conditions or failure to maintain the product
in accordance with user and service instructions is not covered. Any alteration, modification or
repair unless performed by or authorized in writing by Joerns Healthcare will void this warranty.
Parts:
HoyerPro lifts contain various parts that wear from normal use. These parts, such as DC batteries
and casters are not covered under the two-year warranty but are covered for 90 days after date
of delivery.
Joerns Healthcare’s obligation under this warranty is limited to supplying replacement parts,
servicing or replacing, at its option, any product which is found by Joerns Healthcare to be
defective.
Warranty replacement parts are covered by the terms of this warranty until the product’s original
warranty period expires.
When requested by Joerns Healthcare, parts must be returned for inspection at the customer’s
expense. Credit will be issued only after inspection.
Service:
Most service requests handled by the facility Maintenance Department with assistance from the
Joerns Healthcare Product Service Department.
Most parts requested can be shipped next day air at the customer’s expense.
Should a technician be required, one will be provided by Joerns Healthcare, at our discretion. Only
the Joerns Healthcare Product Service Department can dispatch authorized technicians.
This warranty is extended to the original purchaser of the equipment.

Joerns Hoyer 4-Point Adaptive Power Cradle
®
ENABLE LIFECARE PTY LTD
T 1300 370 370
enablelifecare.com.au
At Enable we source quality,
aordable and innovative
products globally and have
them available for fast delivery.
But we do more than just
provide products.
We give the knowledge and
support to help our customers
grow their business and deliver
better life care.
Table of contents
Other Enable Lifecare Medical Equipment manuals


