enbrighten Vintage Series User manual

www.byjasco.com
37842_37496 vers.1 3/17
LED Lantern
User’s Guide
Linterna DEL guía
del usuario
®
MADE IN CHINA
Distributed by Jasco Products Company LLC, 10 E. Memorial
Rd., Oklahoma City, OK 73114. This Jasco product comes with
a 5-year limited warranty. Visit www.byjasco.com for warranty
details. Questions? Contact us at 1-800-654-8483 between
7:00AM—8:00PM CST.
Lifetime LED warranty
enbrighten® light source never needs
replacing. Visit www.byjasco.com for
enbrighten® LED warranty details.
La garantía de por vida del LED
enbrighten® la fuente de iluminación
nunca necesita repuestos. Visite
www.byjasco.com para detalles de la
garantía enbrighten® LED.
HECHO EN CHINA
Distribuido por Jasco Products Company LLC, 10 E Memorial Rd.,
Oklahoma City, Oklahoma 73114. Este producto de Jasco tiene una
garantía limitada de 5 años. Visite www.byjasco.com para obtener
detalles de la garantía y registrar el producto.
¿Preguntas? Comuníquese al 1-800-654-8483 entre las 7:00 a. m.
y las 8:00 p. m. CST (hora central estándar).
Battery Installation
The enbrighten™ Vintage Series LED Lantern requires
4 AA batteries. If replacing used batteries, remove the
old batteries and follow the instructions here:
Hanging the Lantern
The lantern can be hung securely with the built-in
carabiner hook located under the base.
If the lantern has been
mounted*, the battery install
and replace steps are the
same. It is not necessary
to unmount the base to
replace batteries.
BATTERIES MAY LEAK HARMFUL LIQUIDS OR IGNITABLE
MATERIALS OR EXPLODE CAUSING INJURY OR PRODUCT
DAMAGE.
• DO NOT MIX OLD AND NEW OR OTHER BATTERY TYPES
• REPLACE ALL BATTERIES AT THE SAME TIME
• REPLACE FULLY DISCHARGED BATTERIES IMMEDIATELY
• REMOVE BATTERIES IF PRODUCT IS TO BE UNUSED FOR
EXTENDED PERIOD OF TIME
1. Grasp the lantern with
both hands and carefully
twist the base counter-
clockwise to remove it.
This reveals the battery
compartment of
the lantern.
1. Carefully release the
carabiner hook from its
recessed storage location.
2. Press the latch, and clip
the carabiner onto a sturdy
fastener or tree branch.
Spring-loaded latch must
close completely to be
secure.
Lantern is suitable for indoor/
outdoor use. Always be sure
to hang the lantern in a safe
and secure area.
2. Insert four AA batteries,
noting the polarity markings
located inside the battery
compartment.
3. Replace the lantern base
by aligning it with the body
(position the enbrighten
logo just right of the power
switch) and giving a small
clockwise twist to secure.
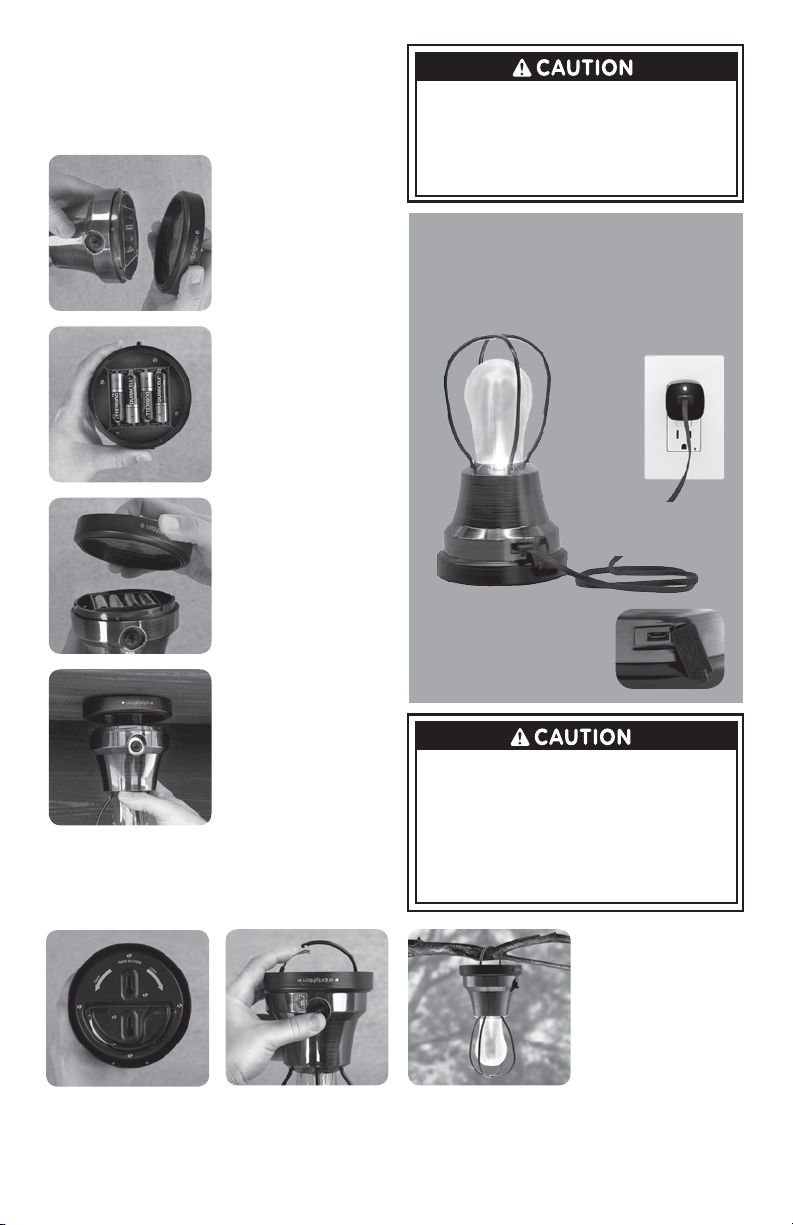
USB Power Option
The lantern can be operated with a micro USB
cable and USB charging accessory† to conserve
battery life (battery bypass). It can also be run
entirely without batteries in this configuration.
Plug in to
conserve
batteries!
†Micro USB cable and USB
power/charging accessories
are not included. Minimum
5V@1.0A charger required.
The micro USB port DOES
NOT charge the lantern or USB
devices, it only provides an
alternative power option for
the lantern.
IP44 (splash) rated for
water resistence. DO NOT
leave lantern out in rainy
conditions.
Lantern should never be
left out in excessive wind.
Lantern cannot be
permanently installed
outdoors.
*See back page
for mounting
instructions and
template.
• USB POWER OPTION SHOULD NOT BE USED AS A PERMANENT
INSTALLATION.
• USB POWER INPUT SHOULD BE USED IN DRY LOCATIONS ONLY.
• ONLY USE UL LISTED 5V@1A USB CHARGER TO OPERATE THE
LANTERN IN BATTERY BYPASS MODE.
• DO NOT USE USB CABLE WITH FRAYED WIRES, DAMAGED CORD,
OR DAMAGED CONNECTORS.
• DO NOT RUN USB CABLES UNDER RUGS, PILLOWS, CUSHIONS,
OR BEHIND CURTAINS.
• DO NOT USE USB INPUT IF THE RUBBER GUARD IS BROKEN
OR MISSING.

Instalación de Pilas
La linterna enbrighten™ DEL de serie de antiguo
requiere 4 pilas tipo AA. Si reemplaza las pilas usadas,
retire las pilas usadas y siga las instrucciones aquí:
Hanging the Lantern
The lantern can be hung securely with the built-in
carabiner hook located under the base.
If the lantern has been
mounted*, the battery install
and replace steps are the
same. It is not necessary
to unmount the base to
replace batteries.
1. Grasp the lantern with
both hands and carefully
twist the base counter-
clockwise to remove it.
This reveals the battery
compartment of
the lantern.
1. Carefully release the
carabiner hook from its
recessed storage location.
2. Press the latch, and clip
the carabiner onto a sturdy
fastener or tree branch.
Spring-loaded latch must
close completely to be
secure.
Lantern is suitable for indoor/
outdoor use. Always be sure
to hang the lantern in a safe
and secure area.
2. Insert four AA batteries,
noting the polarity markings
located inside the battery
compartment.
3. Replace the lantern base
by aligning it with the body
(position the enbrighten
logo just right of the power
switch) and giving a small
clockwise twist to secure.
USB Power Option
The lantern can be operated with a micro USB
cable and USB charging accessory† to conserve
battery life (battery bypass). It can also be run
entirely without batteries in this configuration.
Plug in to
conserve
batteries!
†Micro USB cable and USB
power/charging accessories
are not included. Minimum
5V@1.0A charger required.
LAS PILAS PUEDEN DERRAMAR LÍQUIDOS NOCIVOS O MATE-
RIALES INFLAMABLES O ESTALLAR CAUSANDO LESIONES Y
DAÑOS AL PRODUCTO
• NO MEZCLE PILAS VIEJAS Y NUEVAS NI TAMPOCO DISTINTOS
TIPOS DE PILAS.
• REEMPLACE TODAS LAS PILAS AL MISMO TIEMPO.
• REEMPLACE LAS PILAS TOTALMENTE DESCARGADAS
INMEDIATAMENTE.
• QUITE LAS PILAS SI EL DISPOSITIVO NO VA A SER UTILIZADO
POR UN TIEMPO LARGO.
The micro USB port DOES
NOT charge the lantern or USB
devices, it only provides an
alternative power option for
the lantern.
IP44 (splash) rated for
water resistence. DO NOT
leave lantern out in rainy
conditions.
Lantern should never be
left out in excessive wind.
Lantern cannot be
permanently installed
outdoors.
*See back page for
mounting instruc-
tions and template.
• USB POWER OPTION SHOULD NOT BE USED AS A PERMANENT
INSTALLATION.
• USB POWER INPUT SHOULD BE USED IN DRY LOCATIONS ONLY.
• ONLY USE UL LISTED 5V@1A USB CHARGER TO OPERATE THE
LANTERN IN BATTERY BYPASS MODE.
• DO NOT USE USB CABLE WITH FRAYED WIRES, DAMAGED CORD,
OR DAMAGED CONNECTORS.
• DO NOT RUN USB CABLES UNDER RUGS, PILLOWS, CUSHIONS,
OR BEHIND CURTAINS.
• DO NOT USE USB INPUT IF THE RUBBER GUARD IS BROKEN
OR MISSING.

FCC Statement
This device complies with part 15 of the FCC Rules and Industry
Canada license-exempt RSS standard(s). Operation is subject to
the following two conditions: (1) this device may not cause
harmful interference, and (2) this device must accept any
interference received, including interference that may cause
undesired operation.
FCC NOTE: The manufacturer is not responsible for any radio or
TV interference caused by unauthorized modifications to this
equipment. Such modifications could void the user’s authority to
operate the equipment.
NOTE: This equipment has been tested and found to comply
with the limits for a Class B digital device, pursuant to Part 15 of
the FCC Rules. These limits are designed to provide reasonable
protection against harmful interference in a residential installation.
This equipment generates, uses and can radiate radio frequency
energy and, if not installed and used in accordance with the
instructions may cause harmful interference to radio communi-
cations. However, there is no guarantee that interference will not
occur in a particular installation. If this equipment does cause
harmful interference to radio or television reception, which can
be determined by turning the equipment o and on, the user is
encourage to try to correct the interference by one or more of
the following measures:
• Reorient or relocate the receiving antenna.
• Increase the separation between the equipment and receiver.
• Connect the equipment into an outlet on a circuit dierent from
that to which the receiver is connected.
• Consult the dealer or an experienced radio/TV technician
for help.
CAN ICES-3(B)/NMB-3(B)
Reglas de la FCC
Este dispositivo cumple con el apartado 15 de las normas de la
FCC y con los estándares RSS exentos de licencia de Industry
Canada. La operación está sujeta a las siguientes dos condiciones:
(1) este dispositivo no puede causar interferencias perjudiciales
y (2) este dispositivo debe aceptar cualquier interferencia
recibida, incluidas las interferencias que puedan provocar una
operación indeseable.
FCC NOTA: Los cambios o modificaciones a esta unidad que no
hayan sido expresamente aprobados por la parte responsable
del cumplimiento de las reglas, pueden anular la autoridad del
usuario para poder operar el equipo.
NOTA: Este equipo ha sido probado y cumple con los límites para
un dispositivo digital de Clase B, de conformidad con la Parte 15
de las Normas de la FCC. Estos límites están diseñados para pro-
porcionar una protección razonable contra interferencias en una
instalación residencial. Este equipo genera, utiliza y puede irradiar
energía de radiofrecuencia y, si no se instala y utiliza de acuerdo
con las instrucciones, puede causar interferencia dañina a la co-
municación por radio. Sin embargo, no hay ninguna garantía que
no ocurra interferencia en una instalación en particular. Si este
equipo causa interferencias perjudiciales a la recepción de radio o
televisión, esto se puede comprobar apagando y encendiendo el
equipo repetidamente, se le sugiere al usuario tratar de remediar
la interferencia tomando una o más de las siguientes medidas.
• Reorientar o reubicar la antena de recepción.
• Aumentar la separación entre el equipo y el receptor.
• Conectar el equipo a un tomacorriente en un circuito distinto
de aquel al que está conectado el receptor.
• Consultar al distribuidor o a un técnico de radio / TV para
obtener ayuda.
CAN ICES-3(B)/NMB-3(B)
Mounting
template
The lantern can be easily
screw-mounted to walls
or ceilings using this
handy template.
1. Use template to install two
#6 screws with the head
extending about 1/4” from
the mounting surface.
2. Use the keyhole slots in
the base to securely mount
the lantern to the screws.
Plantilla
de montaje
The lantern can be easily
screw-mounted to walls
or ceilings using this
handy template.
1. Use template to install two
#6 screws with the head
extending about 1/4” from
the mounting surface.
2. Use the keyhole slots in
the base to securely mount
the lantern to the screws.
Other enbrighten Lantern manuals


Popular Lantern manuals by other brands

Visual Comfort & Co.
Visual Comfort & Co. Kensington CHO2802 Assembly instructions

MELINERA
MELINERA 24777 instructions

InoTec
InoTec SN 9107 Ino-Traq Series operating instructions
High End Systems
High End Systems StudioPix Pixelation Luminaire user manual

Lunux
Lunux Q-Rail instruction manual

Smartwares
Smartwares GWS-001-DS instructions


