Endecotts Sonic Sifter User manual


The Sonic Sifter User Guide
Test Sieve Shaker
________________________________________________
ISSUE 03-03 Contents
Description Page 1
Setting Up: 2 - 6
Unpacking 2
Assembly & Operating Conditions 3
Electrical Connections 4
Sieve Stacking 5 - 6
Operating Instructions 7 - 12
Position of Controls 7
Setting & Functions
Run/Stop 8
Pause/Resume 8
Program 8
Memory 8
TestSequences 9
Adjusting Pulse Amplitude & Tappers 10
Programming-Saving-Recalling-Running 11 - 12
Maintenance 13 - 14
Cleaning 13
Care of Sieves 13
Care of Accessories 14
Fuse Replacement 14
General Advice 15
Specification 16

Description
_________________________________________
The Endecotts Sonic Sifter is a vibrating sifter employing an acoustic method to
carry out sieve tests for particle size analysis of various material samples.
It is based on the principle of pulsating a column of air through a stack of sieves at
a set frequency. This causes the particles of the sample material to vibrate and
move around the mesh of the sieves in order to pass through the apertures. To
assist in this movement of particles there is pulsator that periodically taps the base
of the table to release blocked or blinded apertures with particles that are close to
the aperture size. The Sonic Sifter incorporates
a horizontal pulse which provides an
electromechanical shock wave horizontally.
This assists in sifting samples that are 45µm
and finer where agglomeration occurs due to
electrostatic charges.
The Sonic Sifter has an amplitude control
to vary the vibration amplitude. It also has a
digital timer than can be programmed for process time. It switches of automatically
at the end.
- 1 -

Setting Up
_______________________________________________________
Unpacking
The Sonic Sifter should be set up according to the following procedure and the
diagram on Page 3:
Carefully remove the Sonic Sifter from carton, remove the internal packing
material and check the contents as follows:
1 off Endecotts Sonic Sifter
1 off Mains Cable
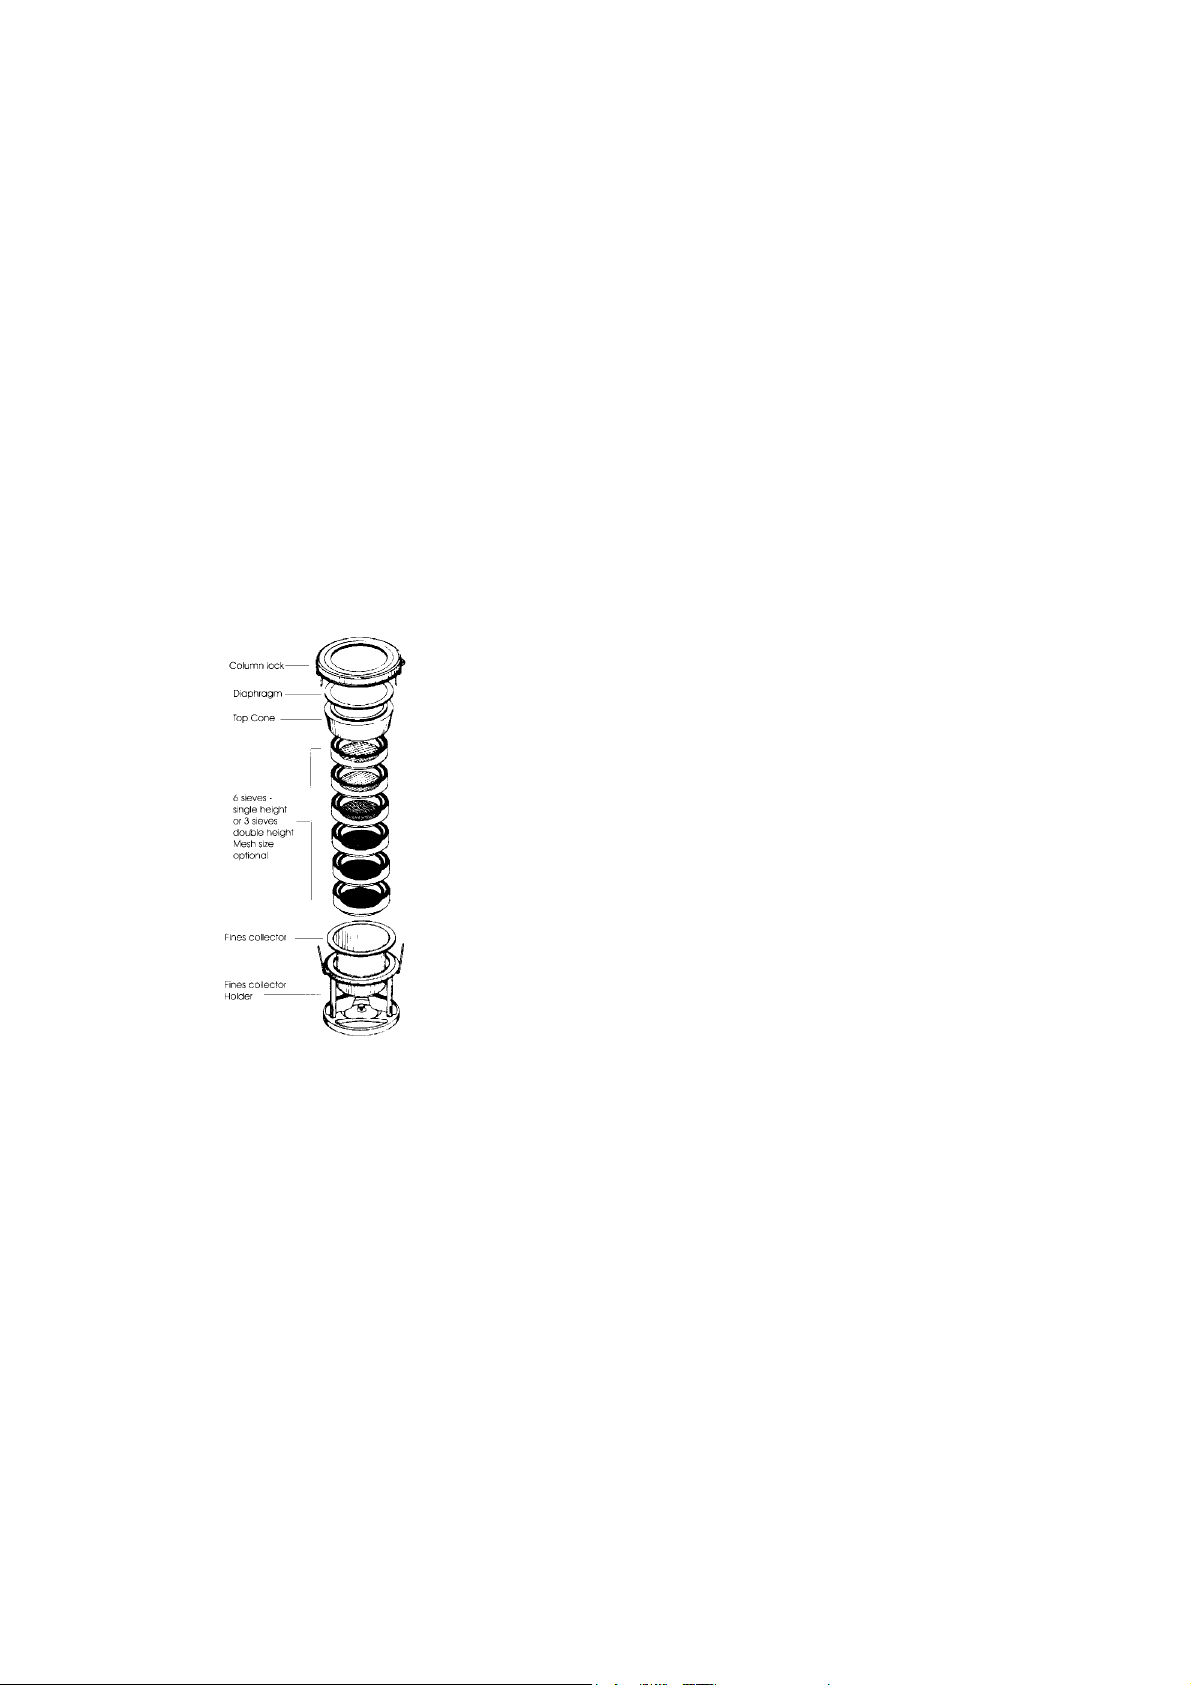
1 off Stack Assembly Comprising:-
1offColumnLock
6 off Spacers, Standard
1 off Fines Collector
1 off Fines Collector Holder
1 off Diaphragm
1 off Top Cone
1 off Instruction Manual
The Sonic Sifter does not need any assembly apart from connecting the mains
cable to the IEC connector at the rear of the instrument. Assembly of the sieve
stack is described in Sieve Stack Assembly.
- 2 -

Setting Up
______________________________________________________
Assembly & Operating Conditions
Operating Conditions
The Sonic Sifter will function correctly at any non-condensing humidity level
within the temperature limits of -18ºCto+49º(OºF to + 120ºF). However, for best
results, it is recommended that the ambient temperature and humidity be
controlled. Sieves should never
be subjected to temperatures above
+49ºC (+ 120ºF) or below
-43ºC (-45ºF). External vibrations
of low amplitude will have little
effect on the accuracy of the
results. To ensure that optimum
results are achieved the instrument
should be placed on a level surface.
This will help ensure an even layer
of particles on each sieve.
- 3 -

Setting Up
_______________________________________________________
Electrical Connections
Ensure that the voltage and frequency on the Rating Label and switchable fused
IEC inlet at the rear of the Sonic Sifter correspond with the local electrical mains
supply. If there is any discrepancy please consult your supplier or a qualified
electrician.
Do Not Connect to any supply other than that stated
on the nameplate
Important – This equipment must be connected to mains earth
The Endecotts Sonic Sifter is provided with a detachable 2 metre long mains cable
with an IEC moulded connector at the shaker end. Certain models may be supplied
with a fused plug. In the event of failure the fuse must be replaced with a fuse of
identical rating.
IF THERE IS ANY DOUBT CONSULT A QUALIFIED ELECTRICIAN
- 4 -
Setting Up
_______________________________________________________
Sieve Stacking
The Sonic Sifter accommodates
upto: 6 Standard Sieves or
1 Precision Sieve
+4Standardsieves
Any combination of Standard and
Precision Sieves can be used in one
stack provided that the stack height
is equivalent to the height of
6 Standard Sieves. When a sieve
stack is smaller in height, the
discrepancy can be made up with
spacers. Extra Spacers may be
purchased separately.
1. Assemble the sieve stack with the coarsest sieve at the top and the finest at the
bottom from the sieves that are selected for the test to be carried out. Generally
any spacers used are placed at the top of the stack.
2. Install the Fines Collector in the Fines Collector Holder.
3. Fasten the round metal plate at the bottom of the Fines Collector to the Fines
Collector Holder. This is done by sliding the keyhole slot in the Fines
Collector over the fastener mounted in the Fines Collector Holder base.
- 5 -

Setting Up
_______________________________________________________
Sieve Stacking
4. Place the sieve stack in the Fines Collector Holder with the Fines
Collector in position.
5. Place the Top Cone on the top sieve or spacer if it is used.
6. Sample material for test is then placed in the top sieve.
7. Position the Diaphragm with the metallic ring downwards on the Top one.
8. Place the Column Lock onto the sieve stack and press own until the latch
bars lock onto the Fines Collector Holder. The sieve stack is ready for
placing in the sift chamber.
9. Disassembling the sieve stack is done by sliding the thumb and forefinger
into the openings between the lowest sieve or spacer and the column
locking arms. While steadying the stack with the other hand, spread the
column locking arms. The spring loaded column lock will release.
Remove the column lock carefully and access can be gained to the rest of
the stacking components.
10. Test times vary with size, density, texture, and quantity of samples. Five
minutes is typical, but sieving time can be as little as 30 seconds under
favorable conditions.
When using woven wire sieves, maximum sample quantities are 10g or
4cc for samples smaller than 38µm, and 20g or 7cc for larger particle
samples. A one gram sample is typical for precision sieving with
electroformed sieves.
- 6 -
Operating instructions
_______________________________________________________
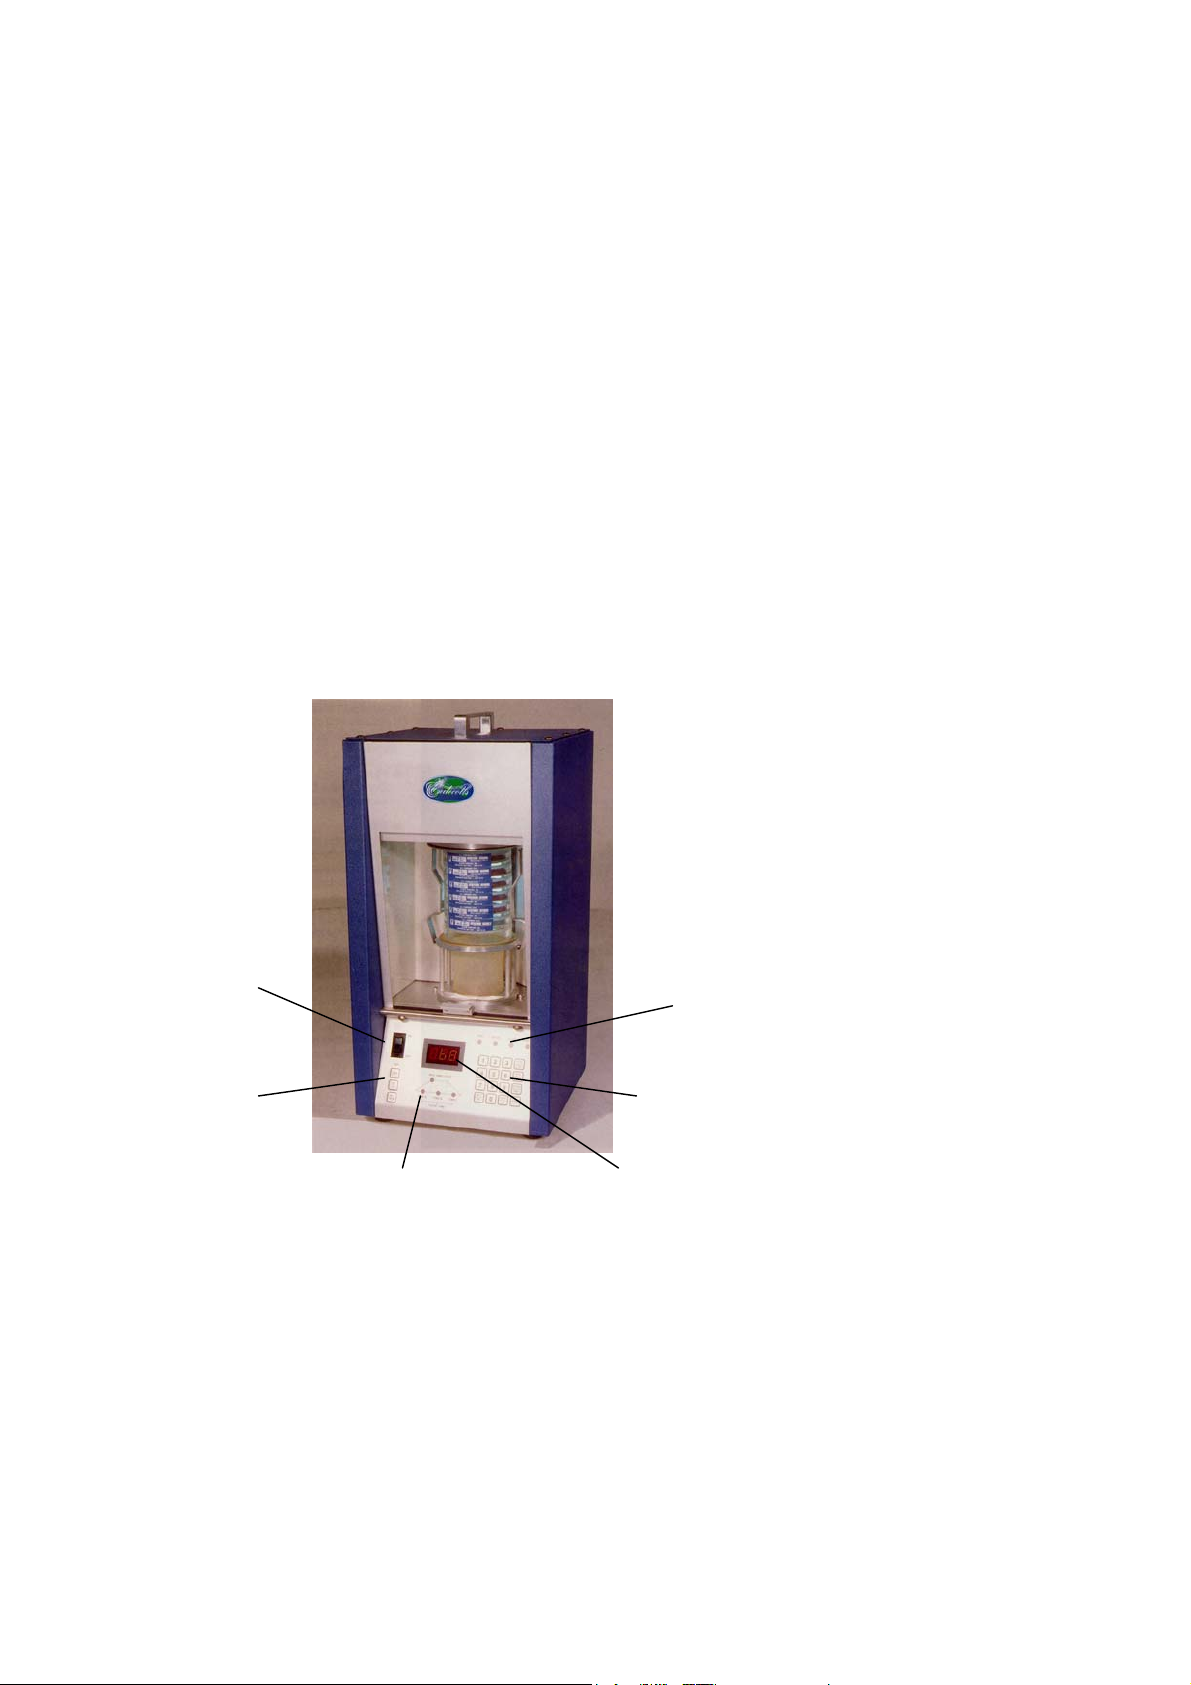
Position of Controls
Operators should be familiar with, and fully understand the controls and indicators
before operating the machine. This should be done in conjunction with the diagram
below:-
ON/OFF
Power Switch
Operating Mode
Indicator
Lights
Tapping Action
Control Programmable
Buttons Control Keypad
LEDDigitalDisplay
Test Phase Diagram & Indicator Lights
- 7 -

Operating Instructions
_______________________________________________________
Settings & Functions
The 16-button keypad used for digital entries of amplitude and times is also used to
activate the following functions:
Run / Stop
The Run/Stop function starts and halts the sieving action. The LED light is on
when the Sonic Sifter is running. The digital display counts down from the total
test time to automatically stop when the counter reaches zero. The program
sequence LEDs indicate which phase is active.
Pause / Resume
The Pause/Resume function interrupts the progress of a sieving sequence. The
Pause LED light is lit when this function is activated. Tim remaining and the
position in the A,B,C sequence are indicated on the display and program LEDs.
Press the Pause button a second time to resume operation.
Program
Amplitude and Phase times are programmed in order by entering each via the
keypad. The Program button is used to advance to the next entry or is used without
entries to review an existing program from the memory.
Memory
The Memory function is used to store and retrieve programmed sequence from 10
memory locations coded from 0 to 9. Buttons to Save and Recall the programmed
sieving sequences are activated when operating in the Memory Mode.
- 8 -

Operating Instructions
_________________________________________
Test Sequences
Establish the maximum amplitude for the test. Set the Sonic Sifter in Manual
Mode, vary the amplitude and determine visually the intensity of oscillation needed
to move the largest particles on the largest size sieve. Note the amplitude value of
this point on the 0-99 scale on the Sonic Sifter’s display.
The stepwise test sequence is illustrated on the Sonic Sifter control panel marked
by red signal lights. In Program Mode the maximum amplitude, as determined
above, is entered via the keypad. Three Phase times and Amplitude are entered in
sequence.
Time A is the duration needed for pulsing to build from zero to maximum
amplitude, During this phase, small particles are gently separated from larger ones
and roughly sorted in the sieve stack. This avoids initial exposure to more severe
agitation which often creates electrostatic attraction of fines to larger particles and
hinder proper separation.
Time B runs constantly at maximum amplitude. Most of the test time occurs in
this phase.
Time C is the duration needed for the pulse amplitude to decline from the
maximum to zero. Each sieve size has an optimum separation amplitude that
decreases with particle size. The gradual decrease at the end of the test serves to
clean up separation of near-sized particles on each sieve.
Note: Total test times (A+B+C) . i.e.9.9 + 99.9 +9.9
up to 119 minutes may be programmed.
- 9 -

Operating Instructions
_________________________________________
Adjusting Pulse Amplitude & Tappers
Load a sample typical of the given type into the sieves to be used with that sample
and place them in the Sonic Sifter.
When the On button is engaged, the unit will be in the Automatic mode. To
determine the proper vibratory level and duration for separating a given sample
type, switch the unit to Manual mode. When the Manual mode indicator light is on,
the amplitude value of pulsing (the power level) must be entered. Generally, start
by setting the value at some low value such as five (5).
To select tappers press arrow keys in the lower left of key pad. The vertical arrow
key activate the vertical tapper located in the bottom plate. The combined
horizontal/vertical arrow key turns on both horizontal and vertical tappers. (Note:
Horizontal tappers cannot be enabled separately).
Press the Run/Stop key. The maximum amplitude indicator light will light, and the
power level can be adjusted upward or downward as indicated by the up and down
arrows on the Record (REC) and Save (SAVE) buttons.
Adjust the amplitude until the sample on the top sieve flows smoothly in a gentle
fluid action. Note the final value on the LED readout for later programming. This
maximum amplitude value should be determined for every sample type, or for
similar sample types with variations in particle topsize.
- 10 -

Operating Instructions
________________________________________
Programming-Saving-Recalling-Running
After you determine the proper amplitude (power level) for sieving a sample, press
the Manual/Auto key and return the unit to automatic operation. The timing is
programmed in 1/10th of a minute intervals. The power level (amplitude) is from 0
to 99% of power.
1) Press the Program key (PGM) until the Time A indicator light starts to blink.
Then enter the duration using the numbered keypad for the power level to rise
from 0 to the maximum power for the run. A minimum default value of 0.1
minutes (6 seconds) is pre-established.
The TIME A, or ramp-up time, is critical with samples containing large
amounts of fines and/or samples of low specific gravity or with tendencies to
acquire electrostatic charge. Gradual power build up allows such particles to
gently separate before the more severe action causes electrostatic charges to
agglomerate the particles. Experimentation may be necessary to determine
whether extended ramp-up times should be used with each sample type.
2) Press the program key until the maximum amplitude light starts blinking, then
enter the percentage of power needed to sift the particles as determined in
Manual mode during Setup Adjustment.
3) Press the Program key again and the TIME B indicator light will start blinking.
Enter the time of the main test duration to be run at a constant maximum
amplitude.
- 11 -

Operating Instructions
_________________________________________
2) Press the Program key again, and the TIME C indicator light will blink. Enter
the desired time for the power to ramp down to 0 value.
3) Press the Program key once more. The total time set for the test (the value of
A+B+C times) will appear.
4) Select tappers as previously advised (see Page 10), these settings will be stored
with the program.
5) If the program is to be stored for future re-execution, press the Save key, and
enter a number from 0 to 9 as the program’s identifying code. Up to ten
programs may be stored in memory for later retrieval by assigned code
number.
6) To operate with a stored program, press the RECALL button, enter the
program’s code number, then press the RUN key.
7) After completing the test, press down on the sieve stack locking bar brace
until the bars latch onto the fines collector holder.
8) Remove the stack assembly and weigh the sieves with the separated material
on them.
9) Subtract the tare weight of the sieve from the loaded sieve weight to obtain the
weight of the separated portion of the test sample.
The following added technique yields an accurate weight without any loss of
test sample from handling and cleaning of the sieves. Weigh the fines on the
tared fines collector, the top diaphragm, the top cone and the spacers. Subtract
the tare of each part of the stack assembly to obtain the total weight of the
fines.
Note: Balance should be accurate to .01 grams
- 12 -

Maintainance
_______________________________________________________
The Endecott’s Sonic Sifter and accessories will perform satisfactorily if the
following basic instructions for care are observed:
Cleaning
The Sonic Sifter cabinet, Sift Chamber and aluminium components may be wiped
clean periodically with a soft damp cloth.
Do not use any solvents for cleaning or harsh detergents
Care of Sieves
1) For best results, sieves should be cleaned in an ultrasonic cleaner of 150 watts
or less. General cleaning is accomplished in a mild detergent. The solution
must be maintained at a temperature of 24ºC to 27ºC (75ºF to 85ºF). If an
ultrasonic cleaner is not available, immerse the items to be cleaned in the same
mild solution. After washing, rinse the parts with water, and allow the parts to
air dry.
2) Precision and Finer (150 microns or less) mesh sieves especially should be
treated carefully as these are very fragile. Please observe the following when
using or cleaning these sieves.
3) Store all sieves in the protective containers supplied after cleaning.
Important
Care of precision and finer sieves
Do not expose the sieves, spacers or top cone to heat sources
Do not brush or use sharp objects to remove particles in the mesh
Do not use compressed air to clean or remove particles in the mesh
- 13 -

Maintainance
_______________________________________________________
Care of Accessories
The Fines Collector and Diaphragm should be cleaned with a mild detergent. Do
not use solvents of any kind as this will cause disintegration and failure of the
Latex parts. After the Fines Collector and Diaphragm have dried, dust lightly with
fine talcum powder and store in a cool, dry place. Avoid heat and direct sunlight
on all the Latex parts.
All spacers and the Top Cone may be cleaned in the ultrasonic bath used for sieves
in the same place as the sieves and accessories. Avoid heat and direct sunlight.
Fuse
Should either of the fuses require replacement they must be of the identical type
and rating as the originals. The rating and the type are marked on the yellow
warning label at the rear of the unit. Switch off the mains supply at the local outlet
and remove the IEC mains connector at the rear. Remove the holder and fuses from
the combined IEC inlet fuseholder with a suitable tool. Test the fuses and replace
any which have blown.
All replacement parts must be ordered by quoting the serial number of the
machine and the correct part number. Part number can be obtained from our
sales or technical department
- 14 -
GENERAL ADVICE
_______________________________________________________
Endecotts shakers are fully tested and factory checked before shipping to
customers. No parts require lubrication or resetting unless disturbed.
The machine has been constructed and factory tested to ensure correct operation
when connected to the specified electricity supply indicated on the machines
rating plate.
Use of unapproved spares or any alteration to the machine would invalidate all
warranties and compliance with European directives for ‘CE’Marking.
Endecotts Ltd does not accept any responsibility if
the operating instructions contained in this manual
are not strictly followed.
The Sonic Sifter is fully EMC and LVD
compliant and complies with all
relevant European directives.
- 15 -

Specification
__________________________________________________________
Model: Sonic Sifter
Voltage: 115 Volts or 230 Volts (selectable)
Frequency: 60 Hz or 50 Hz
Phase: Single
Power Consumption: 90 VA 90 VA
Class: 1 (earthed)
Vibrations Speed: 3,000 per minute at 50 & 60Hz
Tapping: A. No tapping
B. Vertical only. 30/min
C. Vertical and horizontal, alternating 60/min
Process Time: 0 – 119 minutes
Incremental 0.1 minutes (in 6 second increments)
Time Ranges 9.9 + 99.9 + 9.9
Clock: 24 Hour (hours and minutes)
Operating Temp: -18ºC to 49ºC
Humidity: 90 % Non Condensing
Dimensions: 508mm Height x 254mm Width x 254mm Deep
Weight: 16.8 kg
Endecotts policy is one of continuous development and we
reserve the right to modify future models.
- 16 -
Table of contents


