Energenie MiHome Gateway User manual

User Manual
Energenie MiHome Gateway
The Gateway provides the communications
between all your MiHome devices and
the internet
Mi
Home
™
Out of the box
1. Gateway
2. PSU adapter
3. MicroUSB cable
4. Ethernet patch cable
1 2
3
4
Visit mihome4u.co.uk
Scan this QR code with your smartphone QR
app to take you directly there.
Quick Start
IF YOU DO NOT WANT TO READ THE FULL
MANUAL
1. Connect your Gateway to your home router by
plugging one end of the ethernet cable into the
socket on the Gateway and the other end into
one of your router’s free ethernet sockets.
2. Plug the PSU into an adjacent free mains wall
socket and switch on.
3. Plug the microUSB cable into the Gateway
and the PSU.
4. The Gateway should now be powered and
connect automatically via your router to the
internet. This is indicated by the light on the
front illuminating orange then steady green. It
may take up to 20 seconds for this to happen.
The light will also blip briey red as message
trac is being exchanged.
4. Manage your Gateway and MiHome devices
using one of the methods as follows:
Using a Smartphone App
(iPhone/Android)
1. Download the MiHome smartphone app from
the appropriate store (i.e Apple Store/Play
Store) and install and then open it.
2. Follow the on-screen instructions that will
take you through the Gateway set-up process.
Using a Browser and Internet Server
1. Go to the server by selecting the web address
mihome4u.co.uk in your chosen browser. Here
you can create an account.
2. Then go to Manage Devices and register your
Gateway device using the 10 digit key code on
the back of your Gateway.
1

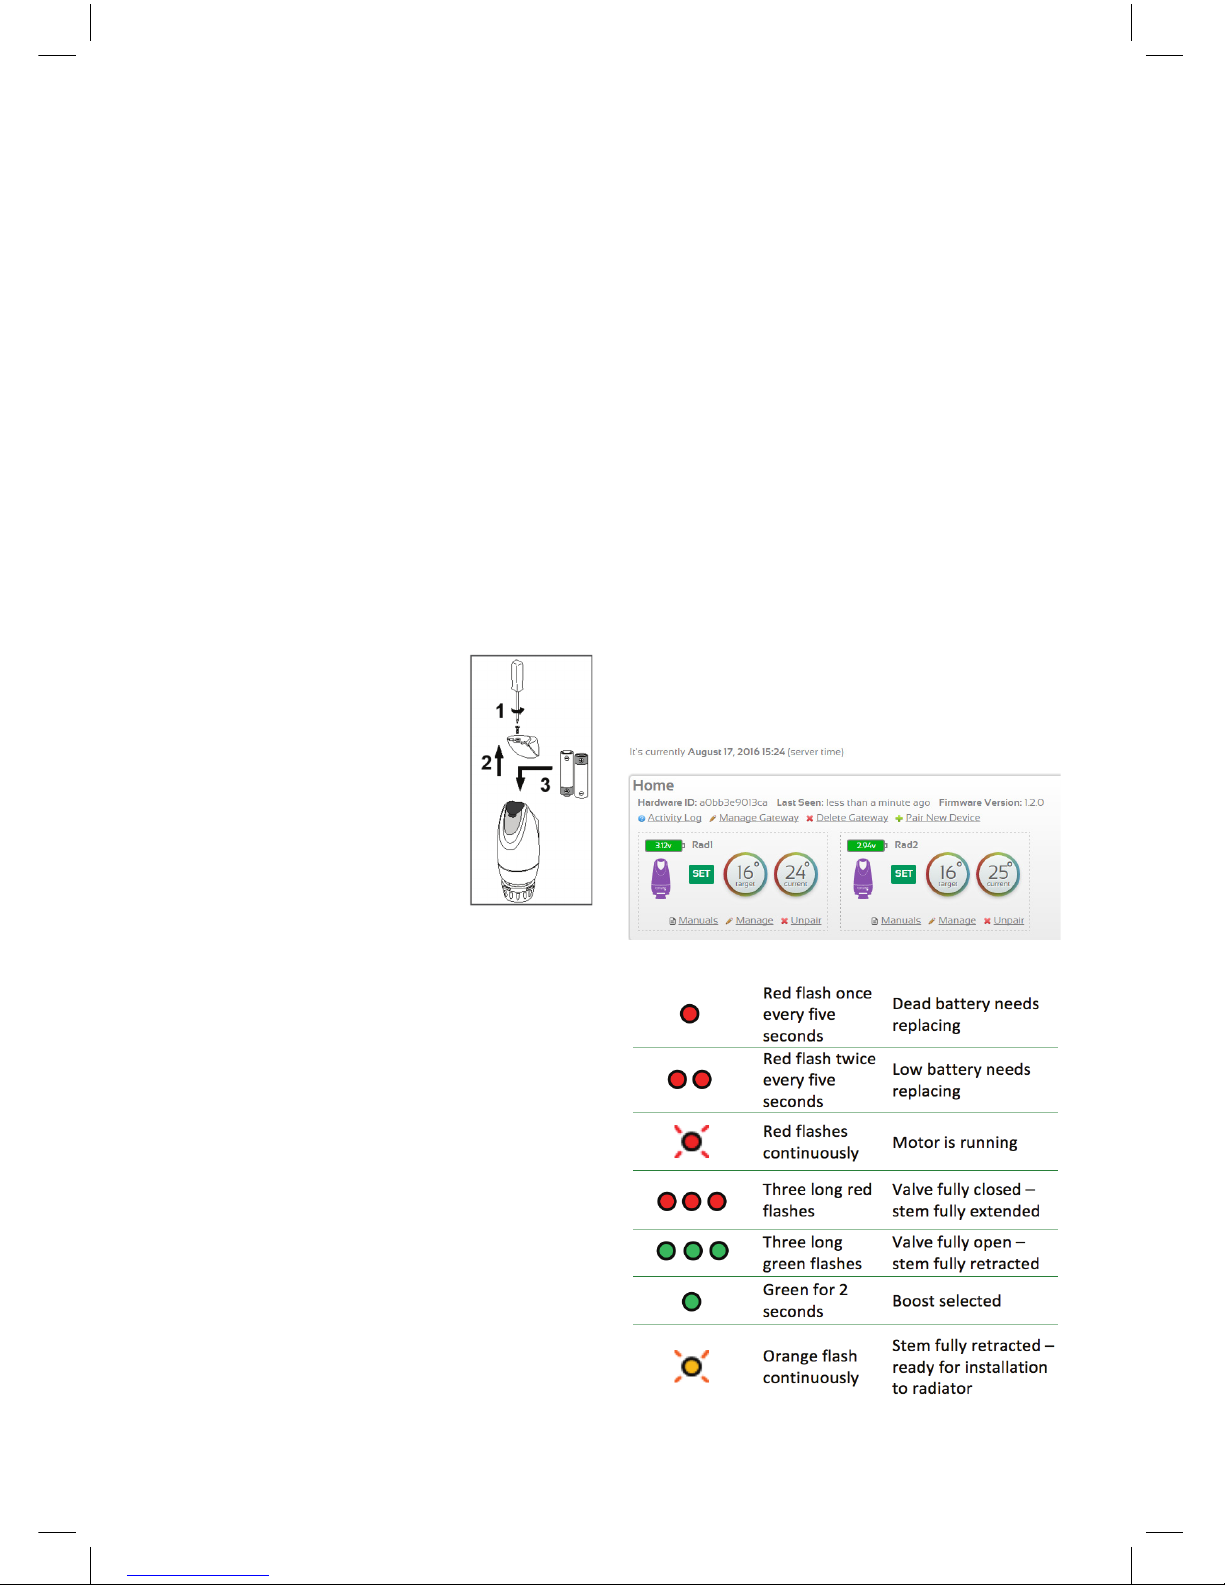
Remove your existing TRV head
• Step 1 - turn the TRV thermostat
anticlockwise as far as it will go.
• Step 2 - release the base by turning it
anticlockwise, by hand or with a spanner
as appropriate.
• Step 3 - pull existing TRV thermostat
o the valve.
Insert the Batteries
Using a Phillips screwdriver unscrew the battery
cover and remove it. Ensure that the screw is
still held in by the small rubber washer to
prevent it being lost. Insert the two AA (LR6)
batteries that came with the eTRV into the
battery compartment as shown.
Make sure you insert the
batteries the right way round.
Inside the battery cover there
is a diagram showing which
way to t the batteries when
looking at the front of the eTRV.
Put the battery compartment
cover back on holding it in
place while you gently tighten
the screw. Overtightening
may crack the screw seating.
After installing the batteries you should hear
the motor running and the LED lamp slowly
ashing red. Wait several minutes until you see
the LED lamp ash briey green then ash
orange, indicating it is ready to install on the
radiator. It is important at this stage that the
stem of the eTRV is fully retracted (in),
not extended (out).
Now press the button on the unit for 4 seconds.
The lamp should now change from orange to
ashing slowly red and the motor should start
driving the stem of the valve to set the initial
default temperature to 16°C. It may take a
minute or so. When this has happened the LED
should stop ashing.
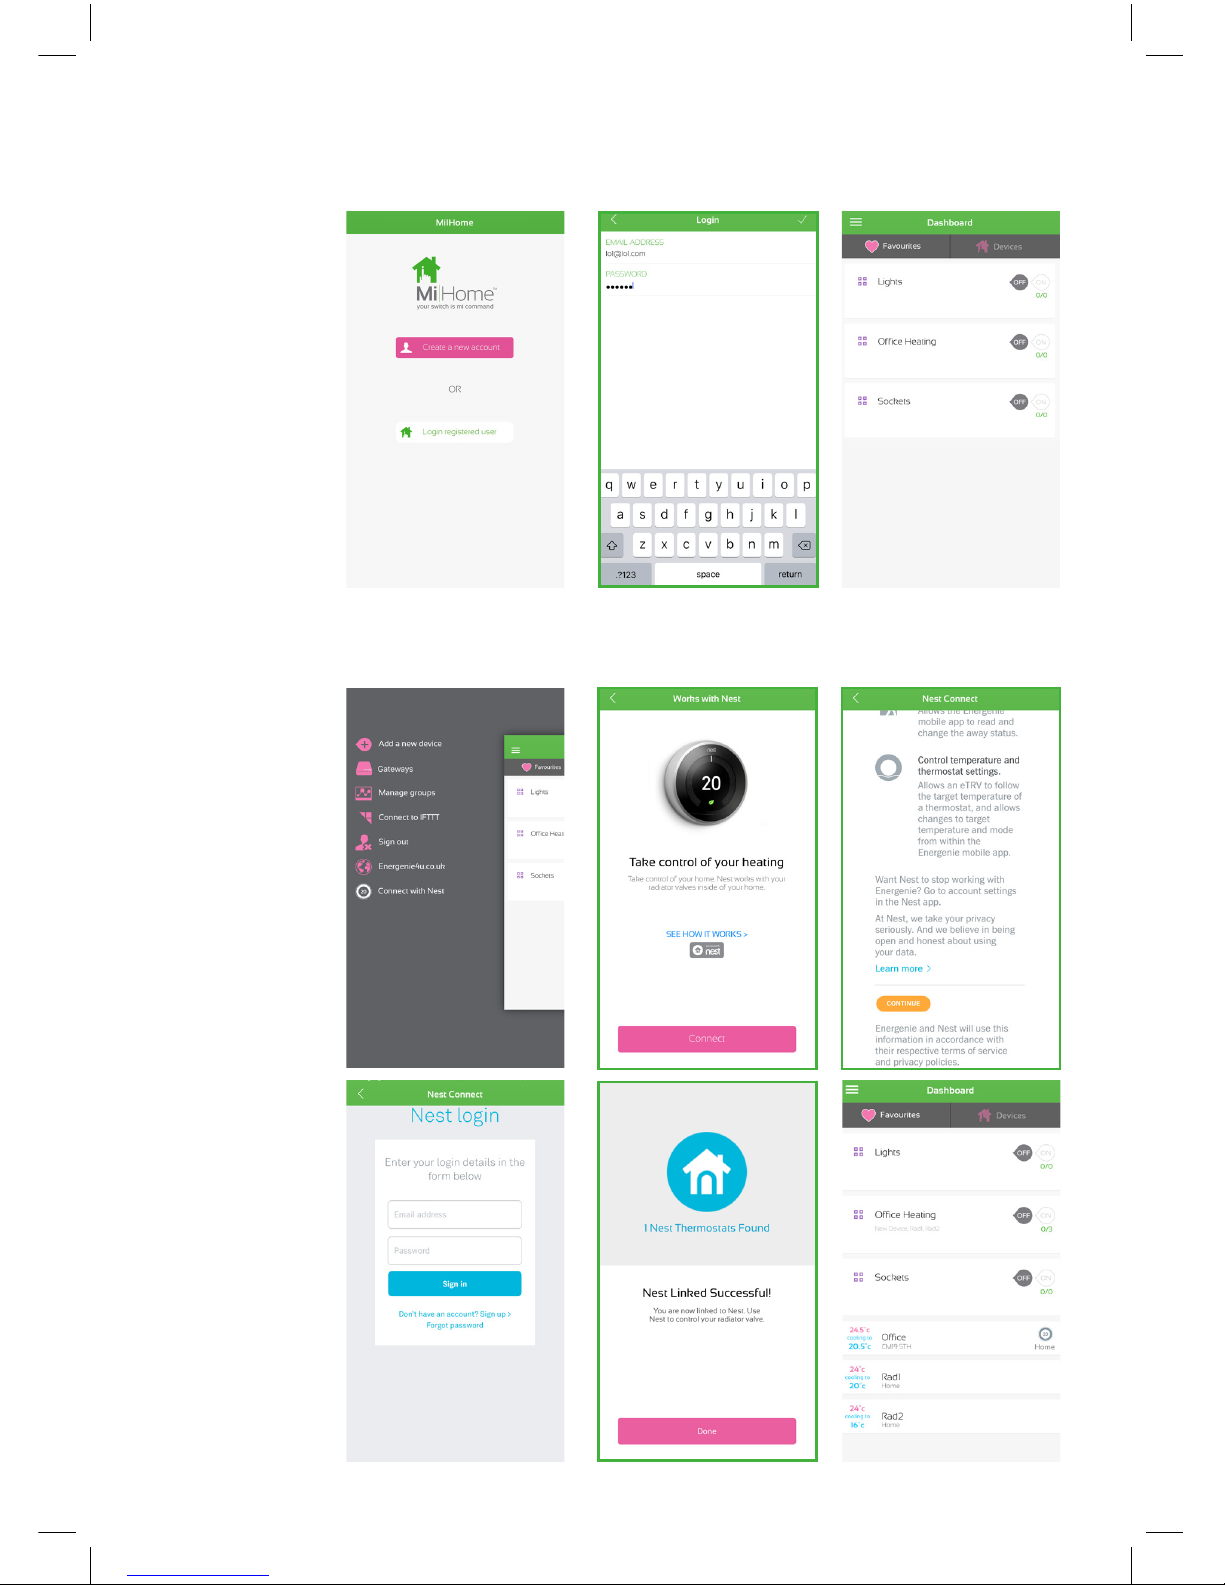
Installing on the MiHome Network
The eTRV now needs to be installed to the
MiHome network. This will allow remote control
from a smart device such as a smartphone or
tablet or from any browser connected directly to
the MiHome server.
MiHome Heating (eTRV)
Quick Start Guide
Pair with your MiHome Gateway
Once installed the device must be paired with
your MiHome Gateway device which you should
have already successfully installed.
You will need to select the eTRV device to be
paired in your smart device App or in the
internet browser. Follow the instructions to
install the eTRV. This will involve pressing and
holding the grey button on the top of the unit
for 4 seconds to place it into its pairing mode.
The LED will go briey green then ash red
indicating that pairing has started. Pairing is
complete when the red LED lamp ashes more
quickly and turns o.
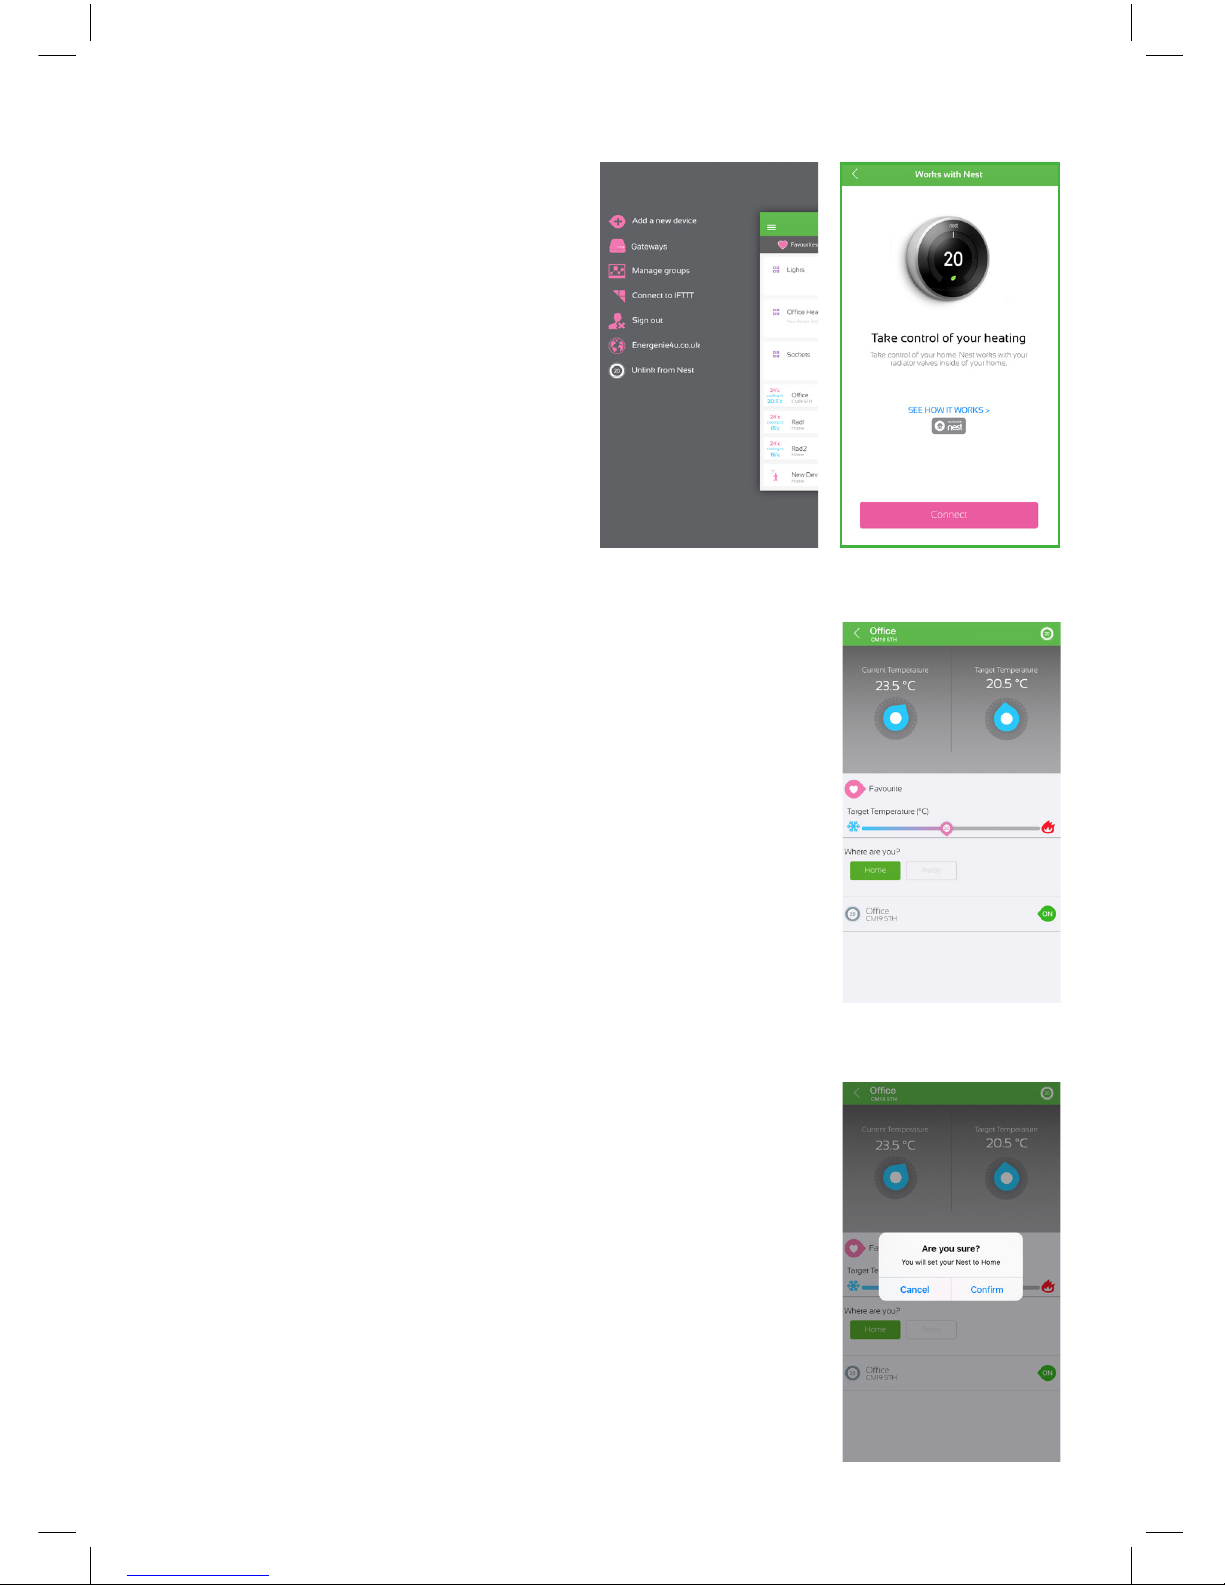
Remote Control
From your MiHome network you will have the
following controls for the eTRV:
• Set a target room temperature
• Control radiator heating using timers
• Control using an external temperature reading
• Maintenance functions to exercise the valve,
check the battery voltage level or set the valve
to fully open or closed
A more detailed manual can be found on the
www.energenie4u.co.uk website.
What the LED indicator means
2

Setting up the App with Nest
1. Sign into the
Mi|Home app
using your
Mi|Home account
credentials. If you
do not already
have a Mi|Home
account you can
create an account
by pressing the
“create new
account” button
2. To connect a
Nest thermostat
to your Mi|Home
account you will
rst need to select
the options menu
in the top left hand
corner. A list will
appear. The last
option is “Connect
with Nest”. You
will be prompted
to log into your
pre-existing Nest
account where
your Nest
thermostat is
linked to. After
logging in your
Nest thermostat
will be linked to
your Mi|Home
account
Linking Nest
MiHome Login
3
2

Setting Temperature
Setting Nest Status
Unlinking Nest
3. To unlink a Nest device, rst select the
options menu in the top left hand corner.
A list will appear. The last option is
“Unlink from Nest”
4. You will be able to change the
temperature on your Nest Thermostat
from your Mi|Home app by selecting your
Nest Thermostat from the dashboard. You
will be able to select your desired
temperature by sliding the temperature
bar. The Nest thermostat will display the
updated temperature
5. You can change your Nest status to
either Home or Away by pressing the
Home or Away button. When Auto-Away
detects when the user has left their
house. It changes their status to Away.
A note appears to let the user know that
“Nest thinks you’re away” 4

TRV Follows Nest
Setting Override Timers
Unfollowing Nest
6. You can enable one of your TRVs to
follow your Nest Thermostat. By
following the Nest Thermostat, the TRV
will replicate and maintain the same
target temperature as the Nest
Thermostat. To do this, select your desired
TRV from the dashboard. Select the last
option on the page “Follow Nest
Temperature”
7. An Override timer allows a TRV that is
following a Nest Thermostat to ignore the
target temperature of the Nest
Thermostat for a period. The timer will
specify the time of the override, the days
to activate the override and the desired
temperature during this time. To set an
Override timer. Select your desired TRV.
The option to set an override timer below
the temperature slide bar. You will need to
dene the temperature, times and days of
the override
8. To unfollow a Nest thermostat select
your desired TRV from the dashboard.
Select the last option on the page
“Unfollow Nest Temperature”
4
5

Set Timers
Extras
9. To set a timer for a TRV, the TRV should
not be following a Nest thermostat. To
do this, select your desired TRV from the
dashboard. Select programmes, You will
need to dene the temperature, times and
days
10. To add a new TRV you will rst need
to select the options menu in the top left
hand corner. A list will appear. Select add
device. Then select TRV. Follow the on
screen instructions. Hold down on the
grey button on the TRV 6

Q. How do I update my Gateway with
the latest version of rmware?
A. Mandatory rmware updates to the Gateway
are done automatically from the Mi|Home
server. These will include xes and other
required features. Optional updates are
indicated in the Managed device screen and
can be uploaded by user conrmation.
Q. The version of rmware on my
gateway is shown as Unknown?
What does this mean?
A. The server was unable to conrm the version
of the rmware installed. To rectify this, please
remove power from the gateway for 10 seconds,
then reconnect the power.
Q. How Can I ensure the device timers
stored on my Gateway are not still
active?
A. You can press the reset button on the front of
the housing with a paperclip or similar pointed
device to clear all timers.
Q. My Gateway has crashed and is
not working at all. How can I revert to
original factory state?
A. With the Gateway power switched o, press
the reset button on the front of unit housing
with a paperclip or similar pointed device and
hold. Then apply power via the USB to the unit.
Keep holding the button down for 10seconds or
so after powering on.
FAQ
Q. Can I connect my Gateway to the
internet via my PC?
A. You can use the patch cable to connect to
the internet port on a PC and then use a service
such as the Internet Connection Service (ICS)
on a windows machine.
Q. What is the response time once a
command has been sent?
A. There may be up to a 5 minute delay before
the eTRV can receive a command message and
starts reacting to it. It has a pre-set reporting
interval of 5 minutes and at the same time it can
receive a command message. This is done to
enhance the battery life of the eTRV.
Q. How do I access the service
functions
The service functions may be accessed from
your browser by going to the settings page for
the eTRV and then adjusting the last element
(etrv_control) of the url in the address bar as
follows:
https://mihome4u.co.uk/devices/..../subdevic-
es/..../etrv_maintenance
This will be changed to a more user friendly link
in due course.
Mi
Home
™
6
7
This manual suits for next models
1
Table of contents
Popular Gateway manuals by other brands

Ricoh
Ricoh Remote Communication Gate S Operator's manual

ZyXEL Communications
ZyXEL Communications P-661HW-D Series Support note

H3 System
H3 System H3G-800 Instruction

ZyXEL Communications
ZyXEL Communications P-660HW-Tx v3 Series quick start guide

Linksys
Linksys WAG110 user guide

Ositech Communications
Ositech Communications Ositech Titan II Getting started guide