Energometrika EnergoM-4002-Gas User manual

!
Portable gas detector with pump type
Operation manual
EnergoM-4002-Gas
ООО «Энергометрика», [email protected], тел.: +7(495) 276-0510, www.energometrika.ru

"
Hunan QianShuo Instrument Co., Ltd.
Catalogue
!# $%&'()*+,(%- -#################################################################################################################!
"# ./0'0+&1'23,+3-(4-&/1-5'()*+&- -#####################################################################################"
6# 7+/180,+-)209'08-(4-&/1-5'()*+&- -##############################################################################:
:# 7&0%)0')-+(%;9*'0,(%- -################################################################################################<
<#-=1+/%2+0>-50'081&1'3-(4-&/1-5'()*+&- -############################################################################?
?# @'()*+&-1A5>(32(%-5'((4-80'B- -#####################################################################################C
D# E0F1'G-%(,;+0,(%- -######################################################################################################C
H# @'1+0*,(%3-0902%3&-3&0,+-1>1+&'2+2&G- -###########################################################################C
C# I*2+B-3&0'&-9*2)1- -########################################################################################################!J
C#!7&0'&-*5-K-7/*&)(L%- -##########################################################################################!J
C#"-M02%-2%&1'40+1- -###################################################################################################!J
C#6N1G3- -####################################################################################################################!!
C#:-@0'081&1'3-8()2;+0,(%- -###################################################################################!!
C#<-I*2+B-31O%9- -#####################################################################################################!!
C#?-M02%-81%*- -########################################################################################################!"
C#DM1%*-&'11- -##########################################################################################################!6
C#H-71%3('-31>1+,(%- -################################################################################################!<
C#C-P1'(-+0>2Q'0,(%- -#################################################################################################!<
C#!J-.(%+1%&'0,(%-+0>2Q'0,(%- -################################################################################!<
C#!!-R21L-'1+(')3- -###################################################################################################!?
C#!"./0'92%9- -###########################################################################################################!?
!J#!$%3&'*81%&-+0>2Q'0,(%- -#####################################################################################!D
!J#!#!.0>2Q'0,(%-2%&1'S0>- -################################################################################!D
Manual of EnergoM-4002-Gas
handheldpump suction gas
detector v2.0

6
!J#!#"T0+&('G-'131&- -#########################################################################################!D
!J#!#6UV.- -#######################################################################################################!D
!J#!#:-.(%+1%&'0,(%- -#######################################################################################!D
!J#"U>0'8-31O%93- -##################################################################################################!D
!J#"#!W1S1>-!-0>0'8- -#########################################################################################!D
!J#"#"-W1S1>-"0>0'8- -#########################################################################################!D
!J#"#67(*%)-31O%93- -#######################################################################################!D
!J#6@0'081&1'-31O%93- -###########################################################################################!D
!J#6#!X03-*%2&3- -###############################################################################################!D
!J#6#"M(>1+*>0'-L129/&- -##################################################################################!D
!J#6#6.T.-S0>*1- -###############################################################################################!H
!J#6#:X03-&G51- -################################################################################################!H
!J#6#<X03-'0%91- -##############################################################################################!H
!J#6#?V1+280>-5(2%&- -########################################################################################!H
!J#:7G3&18-31O%93- -################################################################################################!H
!J#:#!@*85-3511)-31O%9- -###############################################################################!H
!J#:#"E'29/&%133-31O%93- -################################################################################!H
!J#:#6YZ[3+'11%-,81- -#####################################################################################!H
!J#:#:7&('091-,81- -##########################################################################################!H
!J#:#<W0%9*091-31>1+,(%- -################################################################################!H
!J#:#?.>(+B-31O%93- -########################################################################################!H
!J#<-R21L-'1+(')3- -###################################################################################################!H
!J#<#!\23&('G- -###################################################################################################!H
!J#<#"U>0'8-'1+(')3- -########################################################################################!C
!J#<#6.0>2Q'0,(%-'1+(')3- -################################################################################!C
!!#-V02>G-802%&1%0%+1- -####################################################################################################!C
!"#-$%3&'*81%&-+0>2Q'0,(%-'1+(')- -###################################################################################"J
!6#-=1'83-(4-71'S2+1- -########################################################################################################"J
!6#!-]0''0%&G-+(882&81%&- -####################################################################################"J
!6#"-=281-(4-&'(*Q>1-802%&1%0%+1- -##########################################################################"J
!6#6-W282&1)->20Q2>2&G-9*0'0%&11- -###############################################################################"!
7+/1)*>1-!-^7*880'G-(4-+(88(%-I*13,(%3_- -################################################################""


@091- -a-=(&0>- -! "D
1. Introduction
◆The instrument can only be calibrated and maintained by qualified professionals, and
the user is not allowed to take the instrument apart without authorization.
◆Uncovering, battery replacement, parts repairment, etc. can only be carried out in an
uncharged and safe site.
◆The calibration inspection shall be carried out on a regular basis, which shall not
exceed once per year, and the sensor beyond the date of expiry and out of action shall be
replaced in time.
◆It is forbidden to impact the sensor with gas beyond the range.
◆The air hose must be kept clean. Otherwise, large measurement error may be caused
by the pollution.
◆It is strictly prohibited to expose the instrument to high concentration of corrosive
gas or oily gas.
◆The use of the instrument in hot and humid environment is not allowed.
◆The user shall not take the instrument apart for repairment or parts replacement
without authorization.
◆It is not allowed to replace the components or structures that affect the explosion-
Welcome to use our company’s EnergoM-4002-Gas hand-held pumping gas detector,
thank you sincerely for your choice.Ihope this manual canfacilitateyou at your
convenience.If you still do not know how to operateafterlooking up this manual,please
callour after-salesservice department for help. Before the use of the instrument, please read
the manual carefully and use the instrument withproper operation method to avoid damage
to your personal safety and the instrument itself. Eachtime afteruse, this manual should be
kept for future reference.It is forbidden to disseminateallthe content in this manual without
permission. We are committedto the continuous updating of our products. And we reserve
the right to improve our productsand manuals without advance notice.Detailedinformation
is in accordance withthe final product.Incorrectoperation or unsuitable operating
environment mayweaken the performance of the instrument. Please readthe following notes
carefully in order to ensure your safetyand the correct use of the instrument:

@091- -a-=(&0>- -" "D
proof capability without authorization in case of damage to the sensor.
◆It is forbidden to use the instrument in hot and humid environment.
◆The replacement of components or structures without authorization is not allowed, in
case of affecting the explosion-proof performance.
◆It’s necessary to guard against the potential danger of electrostatic charge. The
ignition caused by electrostatic charge during normal use, maintenance or cleaning shall
be avoided.
◆Never touch or wipe the equipment when used in explosive environment; if it’s
necessary to be wiped or touched, it shall be carried out in a safe site with a wrung-out
wet cloth. It is strictly prohibited to wipe the shell with a dry cloth.
◆The replacement of batteries must be carried out in a safe place. It is strictly
prohibited to dismantle, charge or replace batteries in a dangerous place. It’s necessary to
use batteries of the same model and specification.
◆The charging must be carried out in a safe place with a matched charger.
◆The human body shall be firstly electrostatic discharged before carrying this
instrument to the dangerous area.
◆Set zero when the clean air rather than the target gas is aerated.
◆It is forbidden to block the air inlet or outlet to avoid burning-out the internal
sorption pump.
◆The air inlet must be equipped with dust filter to prevent dust from entering the
interior of the instrument, which may cause damage to the air pump and other
accessories.
◆Please cover the USB dustproof cap when the battery is not charged, so as to prevent
the dust from entering and causing the fault.
2. Characteristics of the product
❖imported high-precision sensor
❖Sampling method by pump type
❖Chinese / English switching

@091- -a-=(&0>- -6 "D
❖switching of concentration unit (ppm and mg/m3, PPB/ug/m3)
❖3.5-inch TFT color LCD with backlight
❖Zero calibration, three target point calibration
❖affirmation by two popups
❖Real-time and dynamic curve display of concentration
❖Storage of up to 10000 historic records
❖More than 400 gas types are available
❖convenient tabular view of history, alarm and calibration records
❖Real time monitoring of battery power
❖One-key start by pure hardware, auto power-off for low power
❖large-capacity rechargeable battery with long endurance
❖waterproof and dustproof design
@091- -a-=(&0>- -: "D
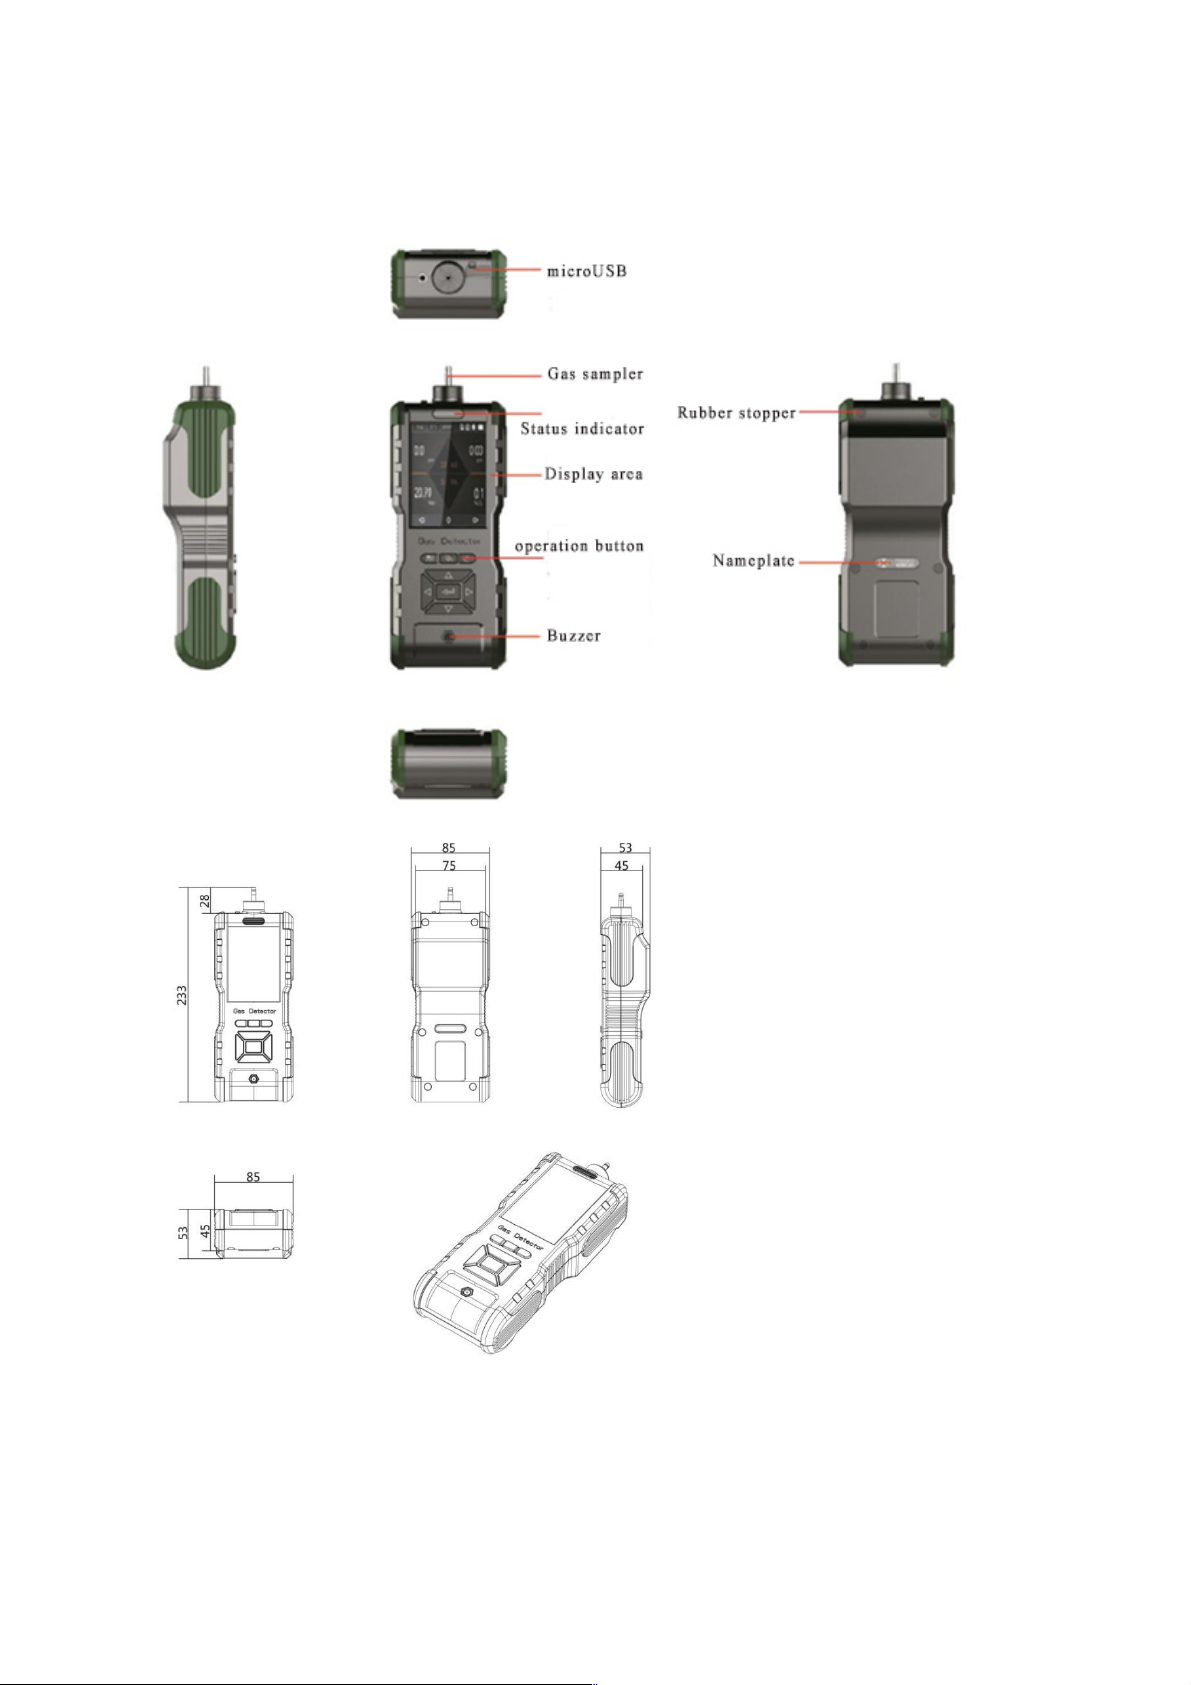
3. Schematic diagram of the product

@091- -a-=(&0>- -< "D
4. Standard configuration
Item
Name
Qty
Note
1
Hard suitcase (with a key)
1
2
Gas detector
1
3
5V/2A power adapter
1
4
Data line
1
5
filter
2
6
20cm air compression hose
1
7
Product test report, instruction manual and
certificate
1
9
Quick connect fitting(optional)
1
10
Sampling probe(opti0nal)
1

@091- -a-=(&0>- -? "D
5. Technical parameters of the product

@091- -a-=(&0>- -D "D
sampling method
Pump-suction
Types of gases
Optional for more than 400 gases
Detection range
Optional, factory settings
T h e p r i n c i p l e o f
detection
PID photoionization, electrochemistry, catalytic combustion,
infrared Ray, thermal conduction, etc.
Resolution
0.1ppm(default),1ppm resolution optional
Maximum admissible
≤±3%F.S
Repeatability
≤±2%F.S
Response time
T90≤30S
Recovery time
≤30S
Concentration unit
ppm、mg/m3、LEL%、VOL%、ppb、ug/m3,etc.
Display mode
3.5-inch HD color display
Charging instructions
Green light in the front panel lampshade is on, real-time
change of power symbol in the upper right corner of the LCD
Alarm indication
Sound and light alarm (sound production of 1HZ for low
alarm, andof 2HZ for high alarm, with red light in front panel
lampshade on)
Calibration interval
The default setting of calibration interval is 180days, and a re-
calibration is prompted after expiration
Shortcut button
Quick setting (1)air pump: high/low speed;(2)display
brightness: high/low;(3)sound: on/off
History records
1,000,000
Alarm records
1,000,000
Calibration records
1,000,000
C o m m u n i c a t i o n
interface
Connection with PC host computer by Micro USB interface to
export data (optional)
Working power
3.7VDC/6000mAh Rechargeable Polymer Lithium Battery
Working hours
7to8 hours in a row

@091- -a-=(&0>- -H "D
Charging method
Micro USB Charger,5V/2A
Working environment
Operating temperature: -20 -20℃~+50℃
O p e r a t i n g h u m i d i t y : Most:0-90%RH (no
condensing),15%RH≤electrochemical principle≤90%RH (no
condensing))
Working pressure:90 to 110 KPa
With extended tube (including sintering filter), suitable for use
in environments with high humidity or high concentration of
T e m p e r a t u r e o f
Sample air
-20℃~+50℃, optional for high-temperature sampling handle,
the highest temperature of flue gas it can detect reaches up
Shell material
ABS
Overall unit
233*85*53mm(Lx W x H),)net weight:490g(bare metal)
Design basis and
standards
GB3836.1-2010 explosive atmospheres Part 1: General
GB3836.4-2010 explosive atmospheres Part 4: equipment
protected by intrinsically safe "I"
GB12358-2006 General Technical Requirements for Detection
and Alarm of Environmental Gas at Work Site
GBT 50493-2019 design standard for detection and alarm of
Petrochemical Flammable gas and toxic gas
GB/T 13384-2008 General Technical Conditions for
JJF 1172-2007 Calibration Specification for Photoionization
Tester of Volatile Organic Compound

@091- -a-=(&0>- -C "D
6. Product explosion proof mark
7. Battery notification
8. Precautions against static electricity
explosion
proof
mark:
Ex ib IIC T4 Gb
Ex:explosion proof mark;ib:It can be applied to intrinsically safe
electrical products in zone 1 and zone 2;IIC:min current rate<0.8;T4:
Max surface temperature of equipment 135℃
Nominal
voltage:
3.7V ~ 4.2VDC
Rated capacity:
6000mAh
warn:
1. Please only use this type of battery;
2. Do not charge in dangerous places;
3. Do not replace the battery when explosive gases may be present。

@091- -a-=(&0>- -!J "D
9. Quick start guide
9.1Start up & Shutdown
(1) Start up: In shutdown mode, long press the power switch
for more than 3 seconds to enter the " LOGO " and self check interface
of our company, the buzzer rings, the red alarm light at the front panel
lampshade flashes, the screen lights up, and enter the main interface after
60 seconds of countdown, and the suction pump is on. (Note: if the
power icon is and the buzzer "drips" three times in a row, you need
to shut down and use the compatible charger to charge to 50% before the
follow-up use.)
(2) Shut down: In the startup mode, long press the power switch
for more than 3 seconds to shut down, the suction pump is off, and the screen is off.
9.2 Main interface
Enter the main interface after the instrument is started, the upper left part of the screen
The shell of this product is made of plastic, which is easy to produce electrification
after friction. This kind of static electricity may adsorb dust, or cause explosion and
fire. Therefore, static electricity can be reduced in the following ways:
1. It can prevent static electricity by preventing friction or selecting appropriate
materials (such as metal) to rub with plastics.
2. Grounding is a common method of anti-static.
3. Try to reduce the resistance of the plastic to less than 10 ohms to remove static
electricity。
4. Air humidity (e.g. spray method) or air ionization can also be used to remove static
electricity.。
5. Add inorganic antistatic agent or organic antistatic agent to the internal or external
coating of plastic. Inorganic antistatic agent: conductive powder, such as graphite,
carbon black, aluminum powder and other metal powders, as well as various
inorganic salts easy to ionize; Organic antistatic agents include highly polar
materials such as quaternary ammonium salts and surfactants。

@091- -a-=(&0>- -!! "D
displays the date and time, the upper right part displays the electric
quantity (Note: not shown in the figure), the upper part displays the
real-time concentration curve, the lower part displays the gas type,
gas concentration and unit, the bottom part displays the peak value
(the maximum measured concentration in the current period), A1
(low alarm), A2 (high alarm), pump speed, alarm sound switch,
alarm code (0: None Alarm, 1: low alarm: 2: high alarm).
Press the shortcut key, the setting of brightness, pump speed and
sound will be displayed in the middle position.
9.3Keys
9.4 Parameters modification
When you need to modify the value, move the cursor to the modified item, press the
confirmation key , press the up and down key to change the value until the long
cursor becomes short cursor , press the confirmation key again to
confirm the modification or press the menu key to cancel the modification.
9.5 Quick setting
Name
Shortcuts
Menu keys
Power
switch
Confirmation
key
Up /Down key
Left /Right
Key
Icon
Function
Quick
settings
Enter /exit
Menu
Start up &
Shutdown
Confirm the
modification,
Go to the next
menu
Move the cursor
up and down,
Add and subtract
values
Move the
cursor left and
right
@091- -a-=(&0>- -!" "D
On the main interface, press the shortcut key to quickly set the brightness high /
low, press the confirmation key , press the up and down key for modification until
the long cursor becomes a short cursor, press the confirmation key again to confirm the
modification; press the left and right key to modify the pump speed and sound until the
short cursor becomes a long cursor; press the menu key to go back to the main interface
9.6 Main menu
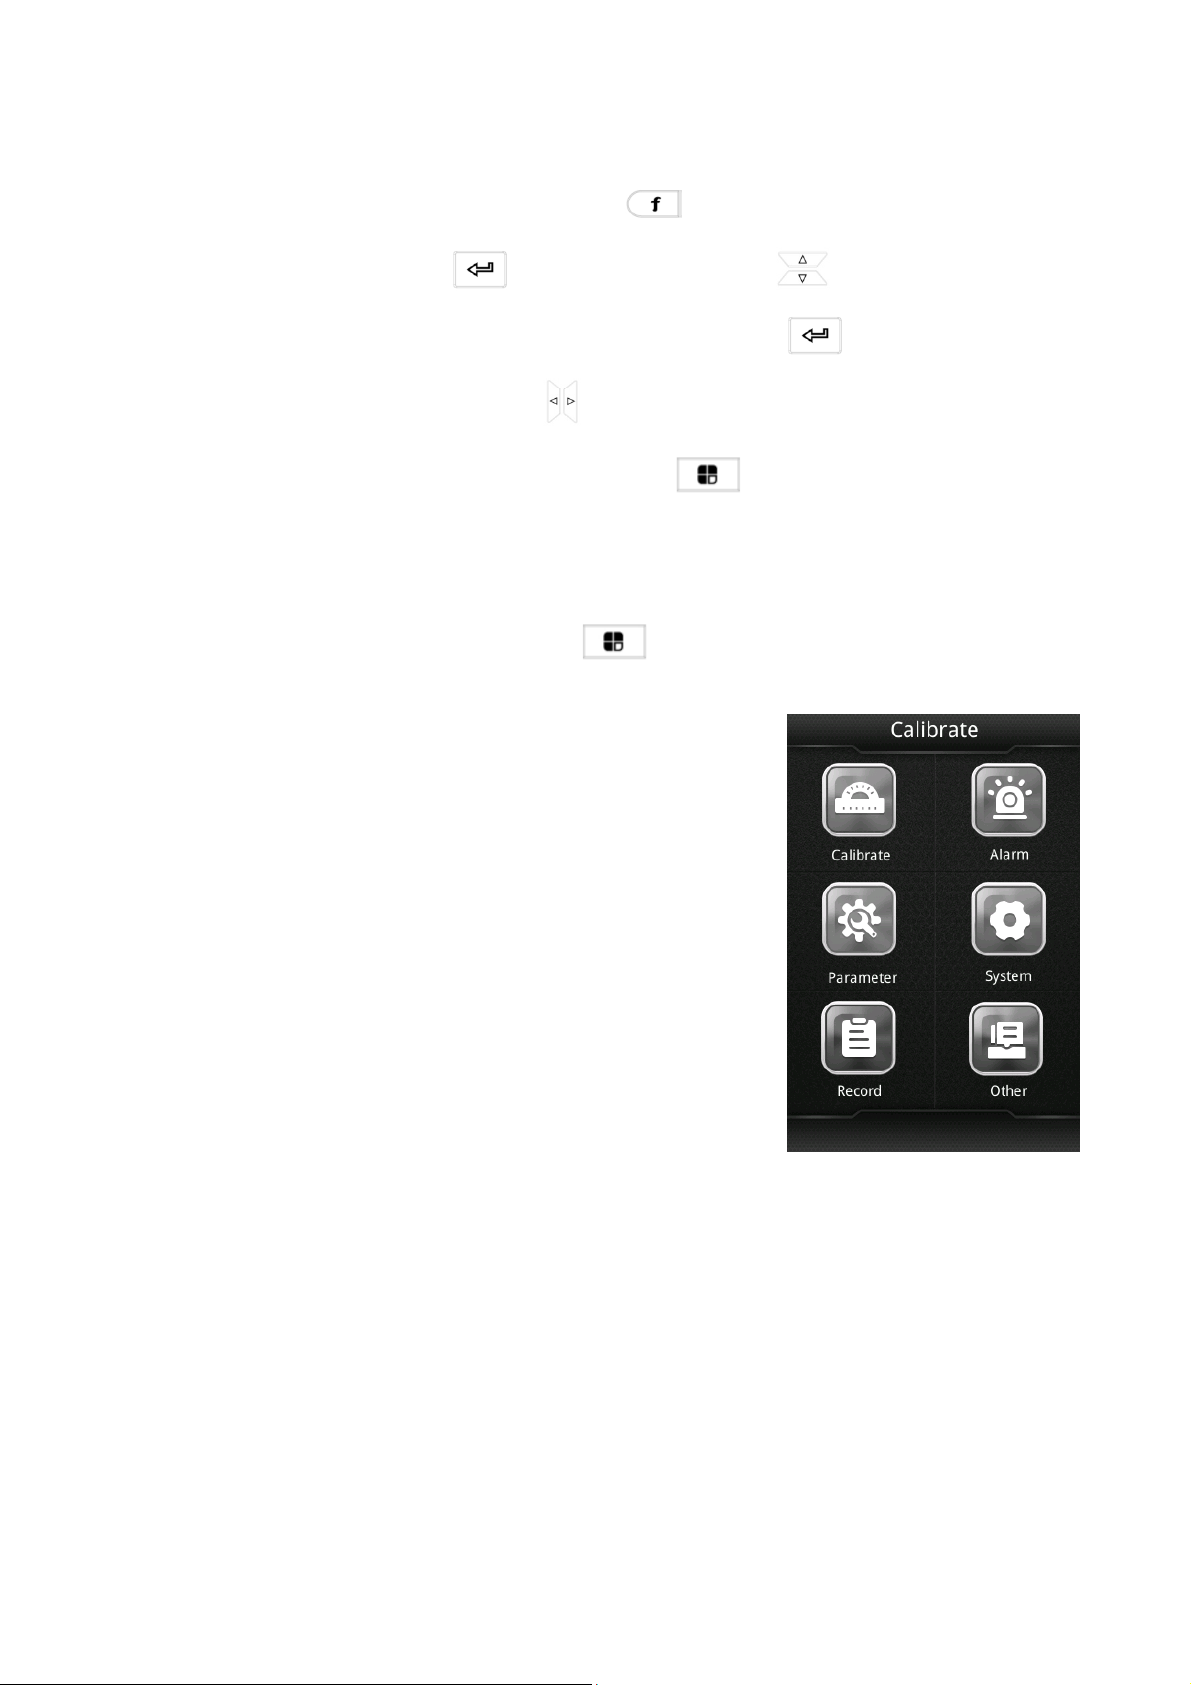
On the main interface, press the menu key to enter the main menu interface. The
main menu is designed as six-packs icons, in order to facilitate
the quick setting of the function:
[Instrument calibration] is related to zero calibration and
calibration of standard gas.
[Alarm setting] is related to the setting of low alarm and high
alarm. [Parameter setting] is related to unit switching,
range, type, etc.
[System setting] is related to pump speed, screen, language and
clock.
[View record] is related to history record, alarm record and
calibration record.
@091- -a-=(&0>- -!6 "D
9.7Menu tree
Level 1 menu
Level 2menu
Function
Z e r o
calibration
Zero Calibration for instrument
Concentration
calibration
Calibration for the target point of the instrument
C a l i b r a t i o n
interval
How many days later will it prompt for calibration
Re-factory
Recovery the instrument to default settings
ADC
View real-time ADC values of instrument
Level 1 alarm
Low alarm, level 1 alarm is triggered when the concentration
exceeds this value
S e c o n d a r y
alarm
A secondary alarm is triggered when the concentration exceeds this
value
S o u n d
settings
Set whether the sound is made when the instrument is alarmed
Gas units
Set the unit displayed by the instrument, whose default is ppm
M o l e c u l a r
weight
Set the molecular weight of the gas type detected by the instrument,
defaulting to 56.1(TVOC)
CFC value
Set the correction factor corresponding to calibration gas, defaulting
to 1
Gas type
Read gas type of sensor, not open
Gas range
Read gas range of sensor, not open
Decimal point
Read decimal points of sensor, not open
Pump speed
setting
Set speed of the instrument pump high /low
Brightness
settings
Set brightness displayed by the instrument high /low
O f f s c r e e n
time
Set how much time of disoperation later the instrument turn offs the
screen after
Storage time
Set the storage interval for history records
Language
settings
Set up the play of the instrument Chinese/English
Clock settings
Set date and time of the instrument
H i s t o r y
records
View all dates, times, measurements of the history record for the
instrument
Alarm records
View all dates, times, alarm types of alarm record for the instrument
Parameter settings
Instrument
calibration
System settings
View records
Alarm settings

@091- -a-=(&0>- -!: "D
C a l i b r a t i o n
records
View all dates, times, calibration values of the calibration records for
the instrument

@091- -a-=(&0>- -!< "D
9.8 Sensor selection
Select instrument calibration in the main menu interface , press the up and down keys to
move to the sensor number menu bar. After pressing the OK key, the menu bar will display a
drop-down menu item indicating the number of No. 1 ~ 4 sensors. Press the up and down
keys to select the sensor number to be adjusted, and press the OK key to confirm. If the
instrument has only one sensor, the sensor number cannot be selected.
9.9 Zero calibration
Select instrument calibration on the main menu interface,
press the confirmation key to enter the calibration interface, inlet
the pure air (the sensor of oxygen and carbon dioxide cannot be marked
zero in the air) or pure nitrogen to the ventilation pipe, press the
confirmation key until the ADC value is stable (30 to 90
seconds),the pop screen shows "Whether to mark zero!" Select Yes to
mark zero. Select “No” to return to the calibration interface. The lower
left corner shows "Zero calibration success!" for successful Zero calibration.
9.10 Concentration calibration
Select instrument calibration in the main menu interface,
press the confirmation key to enter the calibration interface,
press the upper and lower keys to select the concentration
calibration, press the confirmation key , and modify the
concentration after the long cursor becomes a short cursor. Inlet a
certain concentration of gas to the ventilation pipe, press the

@091- -a-=(&0>- -!? "D
confirmation key again until the ADC value is stable (30 to 90 seconds), the pop
screen shows "whether to calibrate!" Select Yes to calibrate the gas. Select No and return to
the calibration interface. “The lower left corner shows "Ccalibration success!" after
successful calibration.
9.11 View records
Select in the main menu interface, press the confirmation key
, select the history / alarm / calibration record, press the
confirmation key again to view the history / alarm / calibration
record.
9.12Charging
1. Please charge it in time when the battery is below 25%, it should be charged in time;
when the battery is lower than 1%, the buzzer "beeps" for
alarming. Be sure to turn it off and charge more than 25% to
avoid the instrument being turned off due to low power;
2. When charging, open the dust cover of the USB port and
charge it with a compatible USB charger with a green light in the
front light shade on.
(Note: No device are allowed when charging)
Table of contents
Popular Gas Detector manuals by other brands


RKI Instruments
RKI Instruments GX-86A instruction manual

iCeeO2
iCeeO2 500P instruction manual

Spectrex
Spectrex SafEye Quasar 900 manual

S+S Regeltechnik
S+S Regeltechnik AERASGARD AC02-SD-TYR2 Operating Instructions, Mounting & Installation

Sun Nuclear
Sun Nuclear 1029 user guide

GASTRON
GASTRON GTD-2000Tx instruction manual

Macurco
Macurco TX-6-HS User instructions

United Electric Controls
United Electric Controls UE VANGUARD WirelessHART TCD60HXY Installation and maintenance instructions

AGS
AGS Merlin GDP4 user guide

UE
UE VANGUARD WirelessHART TCD50H1A Installation and maintenance instructions

Sensitron
Sensitron SMART3G Installation and user manual

TUYA
TUYA HUA6-3C manual