manuals.online logo
Brands
  1. Home
  2. •
  3. Brands
  4. •
  5. ENERGY KINETICS
  6. •
  7. Boiler
  8. •
  9. ENERGY KINETICS Ascent Combi Installation instructions

ENERGY KINETICS Ascent Combi Installation instructions

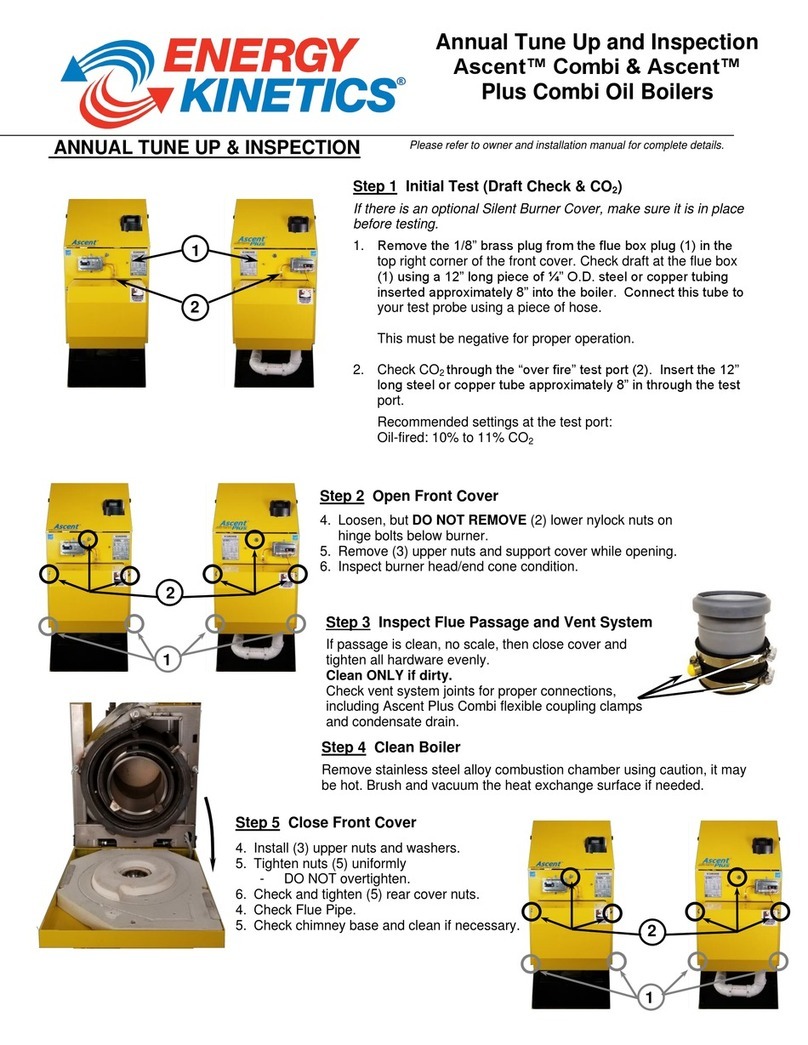
Step 2 Open Front Cover
1. Loosen, but DO NOT REMOVE (2) lower nylock nuts on
hinge bolts below burner.
2. Remove (3) upper nuts and support cover while opening.
3. Inspect burner head/end cone condition.
ANNUAL TUNE UP & INSPECTION
Annual Tune Up and Inspection
Ascent™ Combi & Ascent™ Plus
Combi Gas Boilers
Please refer to installation manual and burner manual for complete details and for burners other than EZ-Gas.
Step 3 Inspect Flue Passage and Vent System
If passage is clean, no scale, then close cover and tighten all hardware
evenly.
Clean ONLY if dirty.
Check vent system joints for proper connection, including Ascent Plus
Combi flexible coupling clamps and condensate drain.
Step 4 Clean Boiler
Remove stainless steel alloy combustion chamber using caution, it
may be hot. Brush and vacuum the heat exchange surface if needed.
Step 1 Initial Test (Draft Test & CO2)
If there is an optional Silent Burner Cover, make sure it is in
place before testing.
1. Remove the 1/8” brass plug from the flue box plug (1) in the
top right corner of the front cover. Check draft at the flue
box (1) using a 12” long piece of ¼” O.D. steel or copper
tubing inserted approximately 8” into the boiler. Connect
this tube to your test probe using a piece of hose.
This must be negative for proper operation.
2. Check O2 through the “over fire” test port (2). Insert the 12”
long steel or copper tube approximately 8” in through the
test port.
Nominal settings at the test port:
Natural: CO2: 8.6%-9.2%, O2: 5.5%-4.5%
Propane: CO2: 9.7%-10.7%, O2: 6.0%-4.5%
Note: All burners require
“Amulet” retention head
protector.
Flame Sense Rod Tip
should extend in front of
diffuser by 1-1/4”.
Ignitor Electrode
Tip should be set back
1/16” from the inside
surface of diffuser.
Diffuser Plate
1
2
1
2
Step 5 Remove Drawer Assembly
(Refer to burner manual for detailed instructions
on removal and for burners
other than EZ-Gas)
1. Close the front cover and finger
tighten a nut on the top center stud
to hold the cover closed while
working on the burner. Do not
tighten the rest of the nuts at this
time because you will need to open
the cover up again to check the
drawer assembly to the diffuser
plate.
2. Check porcelain condition.
3. Check and clean flame sense rod.
Step 3 Open Front
Completely remove cover nuts,
washers and jacket screws at back,
sides and top.
With hands at top and bottom, pull
cover and insulation board straight
back as a single unit.
2.
Step 8 Zone controls
Open/Close zone valves or operate zone circulators several times to see that they move freely.
Step 9 Plate Heat Exchanger Maintenance
1. Close the isolating ball valve located on the bypass circulator flange, connect a drain hose to the hydronic
bypass Y-strainer, open flush valve, and flush into a bucket to remove debris. Close flush valve, remove drain
hose, open isolating ball valve on bypass circulator flange, and confirm boiler pressure is adequate, adding
makeup water if necessary.
2. Open a fixture and wait until hot water is continuously flowing. Turn the mixing valve up and down in
temperature to ensure that it moves freely. Set the mixing valve temperature feeding the domestic hot water
fixtures to the desired temperature of approximately 120°F using mixing valve instructions and hot water
temperature gauge.
Note: If the domestic water supply is “hard” with high mineral or lime content, clean and flush plate heat
exchanger and mixing valve when necessary. Symptoms include poor hot water quality or low domestic hot
water flow. See Hot Water Maintenance for mineral cleaning and flushing instructions. Consider installing
Scale Stopper (EK P/N: 10-0650) or water softener in hard water conditions so recurring plate heat exchanger
cleaning will no longer be necessary in most circumstances.
Step 6 Check Burner
(Refer to burner manual for complete details and for burners other than EZ-Gas)
1. Check Fan/Air Inlet for dirt or lint.
2. Install drawer assembly carefully lining up the ignitor electrode and flame sense rod. Open the front cover and
check, neither should be any closer to the diffuser plate than 1/16”. Adjust if necessary.
3. Check amulet for cracking or other physical damage. Replace if necessary.
(See amulet replacement section in installation manual).
4. Check burner diffuser plate.
Step 7 Close Front Cover
1. Install (3) upper nuts and washers.
2. Tighten nuts (5) uniformly
- DO NOT overtighten.
3. Check and tighten (5) rear cover nuts.
4. Check Flue Pipe.
5. Check chimney base and clean if necessary.
1
2
Bypass Y-Strainer Flush Valve
1
1
1
Shown with optional clean
in place valves
Step 10 Start Burner & Check Safety Functions
Check & Record:
1. Chimney: Draft at the breech should be slightly negative (at least -
.02”wc).
2. Check CO2at “over fire” test port (2) per ‘gas burner operation’
section
Natural: CO2 :8.6%-9.2%, O2 5.5%-4.5% Nominal
Propane: CO2 :9.7%-10.7%, O2 6.0%-4.5% Nominal
3. CO Test: Carbon Monoxide must be less than 400ppm (Port 1).
Stack Temp:
1. EK1T Ascent Combi - 350º-550ºF measured at stack or flue box port
2. EK1T+ Ascent Plus Combi - 150°-300°F measured at the flue box port
Test Ascent Hydrostat Safety High Limit operation:
1. Remove all heat and hot water calls so there is no heating load on
the system. Disable all zone controls and DHW flow switch.Turn
System switch off, then jumper T-T on the Ascent Hydrostat control to
simulate a thermostat call.
2. Restore power. The burner should start shortly.
3. At approximately the High Limit set point, the Ascent Hydrostat
control should shut off burner.
4. Turn off power and disconnect the T-T jumper. Reconnect zone
controls and DHW flow switch.
5. Check safety lockout: Shut off fuel supply and operate burner to verify
safety lockout.
Power Vent and Sidewall Vent Only:
1. Disable power venter motor by disconnecting the orange motor
power wire in the junction box.
2. Start burner. Safety lockout should occur in approximately 1 minute.
3. Restore power to the power venter motor.
For Ascent Plus Combi ONLY
See Troubleshooting Safety Pressure Switches Section for
additional details.
1. Check proper operation of the blocked air intake detection
switch:
2. Block air inlet to burner
3. Attempt to start the burner. Safety lockout should occur in
approximately 1 minute.
4. Unblock air inlet to burner.
1
2
Over-Fire
Flue Box

This manual suits for next models

1

Other ENERGY KINETICS Boiler manuals

ENERGY KINETICS RESOLUTE RT Service manual

ENERGY KINETICS

ENERGY KINETICS RESOLUTE RT Service manual

ENERGY KINETICS System 2000 Frontier User manual

ENERGY KINETICS

ENERGY KINETICS System 2000 Frontier User manual

ENERGY KINETICS SYSTEM 2000 Ascent Combi Service manual

ENERGY KINETICS

ENERGY KINETICS SYSTEM 2000 Ascent Combi Service manual

ENERGY KINETICS SYSTEM 2000 Accel CS Installation instructions

ENERGY KINETICS

ENERGY KINETICS SYSTEM 2000 Accel CS Installation instructions

ENERGY KINETICS 90+RESOLUTE BOILER Installation instructions

ENERGY KINETICS

ENERGY KINETICS 90+RESOLUTE BOILER Installation instructions

ENERGY KINETICS System 2000 Service manual

ENERGY KINETICS

ENERGY KINETICS System 2000 Service manual

ENERGY KINETICS System 2000 EK1 Frontier Service manual

ENERGY KINETICS

ENERGY KINETICS System 2000 EK1 Frontier Service manual

ENERGY KINETICS EK1 Frontier User manual

ENERGY KINETICS

ENERGY KINETICS EK1 Frontier User manual

ENERGY KINETICS 90+RESOLUTE BOILER Service manual

ENERGY KINETICS

ENERGY KINETICS 90+RESOLUTE BOILER Service manual

ENERGY KINETICS System 2000 Supplement

ENERGY KINETICS

ENERGY KINETICS System 2000 Supplement

ENERGY KINETICS Ascent Combi Service manual

ENERGY KINETICS

ENERGY KINETICS Ascent Combi Service manual

ENERGY KINETICS Ascent Combi Installation instructions

ENERGY KINETICS

ENERGY KINETICS Ascent Combi Installation instructions

ENERGY KINETICS Ascent Combi Boilers Guide

ENERGY KINETICS

ENERGY KINETICS Ascent Combi Boilers Guide

ENERGY KINETICS 90+RESOLUTE BOILER User manual

ENERGY KINETICS

ENERGY KINETICS 90+RESOLUTE BOILER User manual

ENERGY KINETICS System 2000 Guide

ENERGY KINETICS

ENERGY KINETICS System 2000 Guide

ENERGY KINETICS EK2C Supplement

ENERGY KINETICS

ENERGY KINETICS EK2C Supplement

ENERGY KINETICS Accel CS User manual

ENERGY KINETICS

ENERGY KINETICS Accel CS User manual

ENERGY KINETICS EK1 Frontier Service manual

ENERGY KINETICS

ENERGY KINETICS EK1 Frontier Service manual

ENERGY KINETICS Resolute Boiler Supplement

ENERGY KINETICS

ENERGY KINETICS Resolute Boiler Supplement

ENERGY KINETICS EK3 Frontier Quick start guide

ENERGY KINETICS

ENERGY KINETICS EK3 Frontier Quick start guide

ENERGY KINETICS Resolute RT Installation instructions

ENERGY KINETICS

ENERGY KINETICS Resolute RT Installation instructions

Popular Boiler manuals by other brands

Viessmann VITOCELL 100-U Service instructions

Viessmann

Viessmann VITOCELL 100-U Service instructions

Ferroli Sigma 30 FF 41-267-07 Installation and servicing instruction

Ferroli

Ferroli Sigma 30 FF 41-267-07 Installation and servicing instruction

Boulter Buderus Camray 5 Combi Installation & maintenance manual

Boulter Buderus

Boulter Buderus Camray 5 Combi Installation & maintenance manual

ECR International Pennco FSB II Series Installation, operation & maintenance manual
ECR International

ECR International Pennco FSB II Series Installation, operation & maintenance manual
Saunier Duval Xeon 18 HE Instructions for use installation and servicing

Saunier Duval

Saunier Duval Xeon 18 HE Instructions for use installation and servicing

Market Forge Industries M24E24A Installation, operating, maintenance and parts manual

Market Forge Industries

Market Forge Industries M24E24A Installation, operating, maintenance and parts manual

Viessmann Vitodens 300 installation instructions

Viessmann

Viessmann Vitodens 300 installation instructions

Viessmann Vitodens 200-W System Installation and service instructions

Viessmann

Viessmann Vitodens 200-W System Installation and service instructions

Potterton Titanium Installation & service instructions

Potterton

Potterton Titanium Installation & service instructions

Worcester ZSBR 7-28 ICS1 Service booklet

Worcester

Worcester ZSBR 7-28 ICS1 Service booklet

SOLARFOCUS octoplus installation manual

SOLARFOCUS

SOLARFOCUS octoplus installation manual

Beretta METEO GREEN HE R.S.I. installer and user manual

Beretta

Beretta METEO GREEN HE R.S.I. installer and user manual

Raypak XVers 856-3006 User's information manual

Raypak

Raypak XVers 856-3006 User's information manual

Viessmann Vitodens 100 WB1A Installation and service instructions

Viessmann

Viessmann Vitodens 100 WB1A Installation and service instructions

Fröling TI 350 installation instructions

Fröling

Fröling TI 350 installation instructions

Viadrus Hercules U 24 Manual for operation and installation

Viadrus

Viadrus Hercules U 24 Manual for operation and installation

Potterton Eurocondense three Programming manual

Potterton

Potterton Eurocondense three Programming manual

gledhill benchmark BoilerMate A-Class OV Series Design, installation and servicing instructions

gledhill

gledhill benchmark BoilerMate A-Class OV Series Design, installation and servicing instructions

manuals.online logo
manuals.online logoBrands
  • About & Mission
  • Contact us
  • Privacy Policy
  • Terms and Conditions

Copyright 2025 Manuals.Online. All Rights Reserved.