EnerSys OutBack Power SkyBox User manual

SkyBox
True Hybrid Energy System
Handbook

About OutBack Power
OutBack Power Technologies is a leader in advanced energy conversion technology. OutBack Power products include true sine wave
inverter/chargers, maximum power point tracking charge controllers, and system communication components, as well as circuit
breakers, batteries, accessories, and assembled systems.
Applicability
These instructions apply to OutBack Power model SBX5048-120/240 only.
Contact Information
Address: 1628 West Williams Drive
Phoenix, AZ 85027 USA
Telephone:
Fax:
+1 360.435.6030
+1.360.435.6019
Website: www.outbackpower.com
Warranty
The warranty for this product can be downloaded from https://www.outbackpower.com/resources/warranty/procedures
or you may request a copy by sending a self addressed envelope to the above address.
Notice of Copyright
SkyBox True Hybrid Energy System Handbook ©2021 by OutBack Power Technologies, Inc. All Rights Reserved.
Trademarks
Trademarks and logos are the property of Outback Power Technologies, Inc. and its affiliates unless otherwise noted. Subject to
revisions without notice. E. & O.E.
Date and Revision
March 2021, Revision A
Part Number
900-00272-01-001 Rev A

900-00272-01-001 Rev A 3
Table of Contents
Preface................................................................................................... 4
The Screen ..................................................................................................................................... 4
The Set-Up Wizard ......................................................................................................................... 4
Making it Run........................................................................................... 5
Materials ......................................................................................................................................... 5
Choosing the Right AC Profile ....................................................................................................... 5
Programming .................................................................................................................................. 5
The Basics .............................................................................................. 6
The Power Grid and You ................................................................................................................ 6
Keeping Your Battery Alive and Well............................................................................................ 10
Charge Cycle ........................................................................................................................................................10
Battery Temperature Compensation .........................................................................................................11
Charging Source........................................................................................................................................11
Charge Cycle Initiation ..............................................................................................................................12
Battery Charging Precautions ...................................................................................................................12
Harnessing the Sun ...................................................................................................................... 13
Solar Gotchas............................................................................................................................................13
Maximum Power Point Tracking................................................................................................................13
Computer Stuff.............................................................................................................................. 14
Setting Up Your OPTICS RE Account.......................................................................................................14
The Nitty Gritty ....................................................................................... 17
More Power Please ...................................................................................................................... 17
What About This Inverter I Already Have? (AC Coupling)........................................................... 17
It’s Cloudy, My Batteries Are Dead, and the Power is Out – What Now? (Using a Generator).... 18
Using My Own Custom Batteries.................................................................................................. 18
Aux Terminals and Rapid Shutdown ............................................................................................ 20
Rapid Shutdown Options...........................................................................................................................20
Modbus Controls........................................................................................................................... 20
External CTs ................................................................................................................................. 21
Energy Arbitrage (aka: I just want my utility bill to shrink already!).............................................. 23
The Catch-All Section ................................................................................................................... 26
PV Self-Tests.............................................................................................................................................26
Troubleshooting...................................................................................... 28
Index.................................................................................................... 30
4
900-00272-01-001 Rev A
Preface
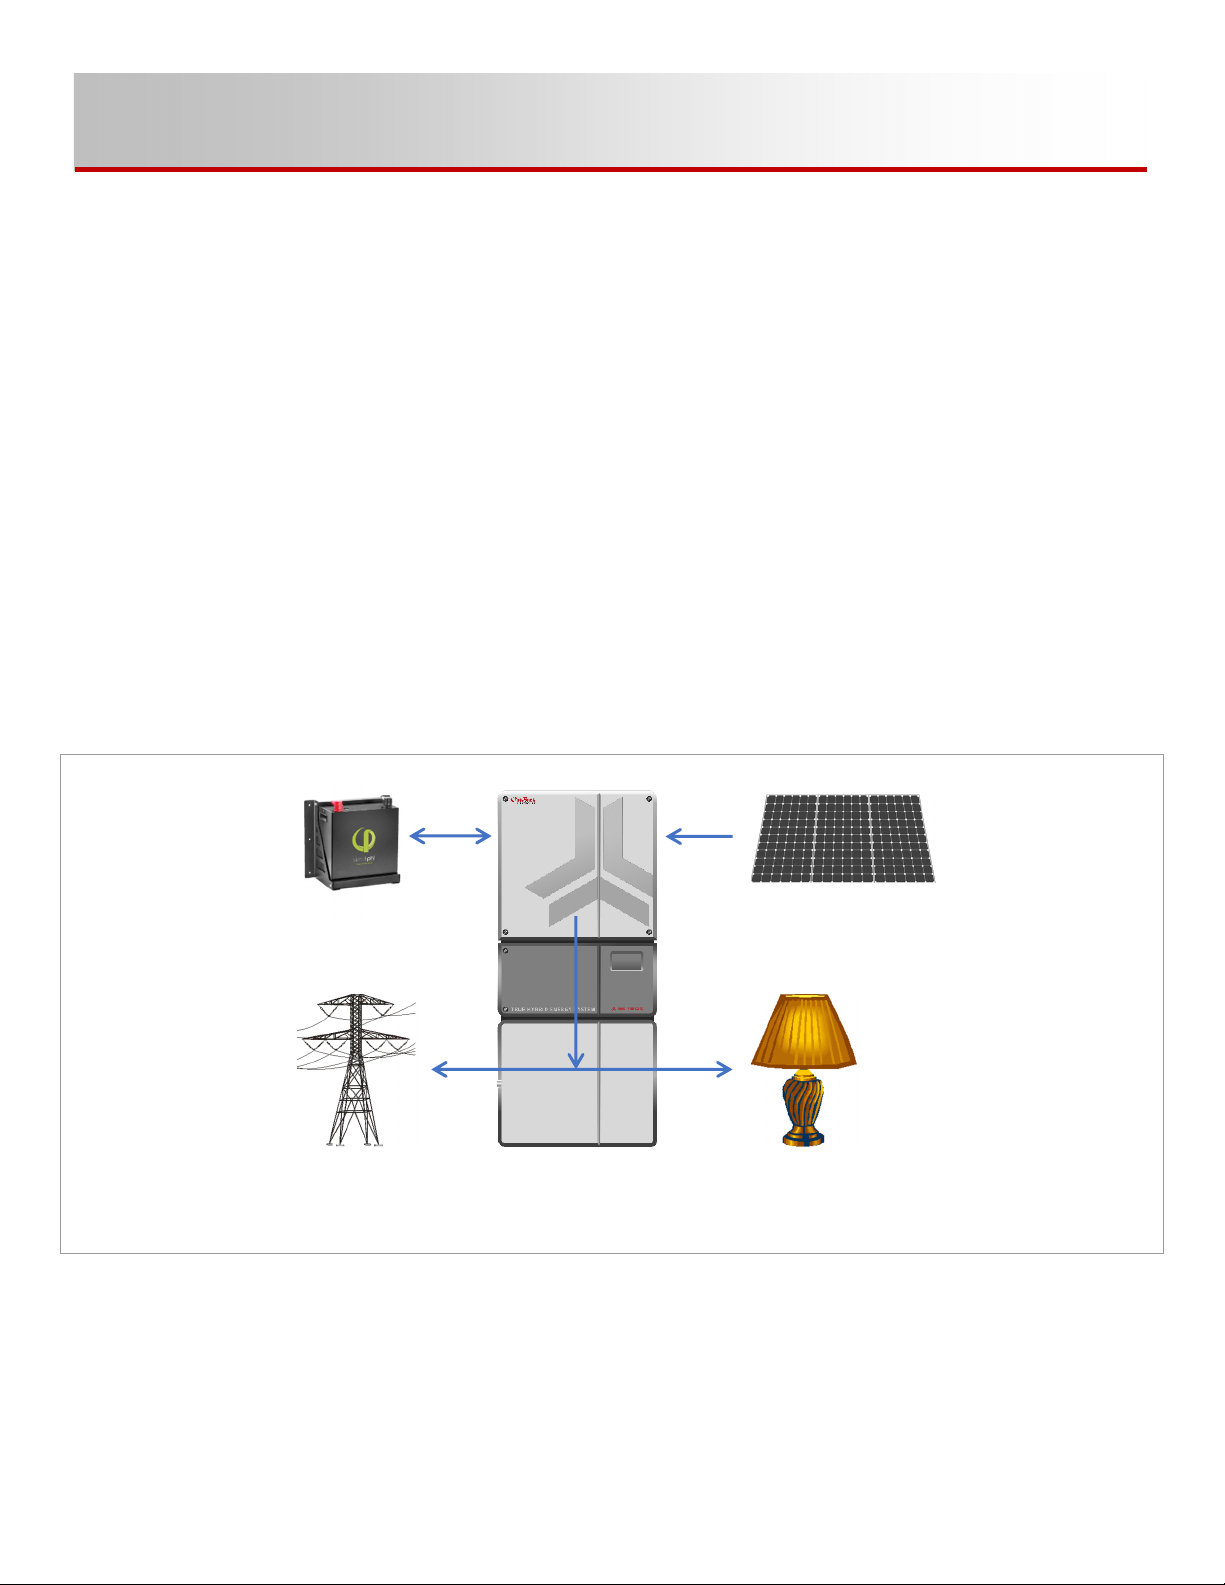
The SkyBox True Hybrid Energy System is a machine that connects the solar panels on your roof to the
toaster in your kitchen so you can use solar or battery energy to power that toaster. This guide will walk you
through the basic decisions you need to make to successfully set up a SkyBox. We will also dive into the
details for each component of the SkyBox for ambitious installers and tinkerers out there.
This Handbook does not have linear instructions. You can pick which chapter is most relevant to your situation
and go straight there without wading through pages of unnecessary information. However, this Handbook
IS NOT a replacement for the SkyBox Quick Start Guide (link 1)1provided in the box with the product.
We won’t be reviewing any wiring steps, just operation and behaviors.
If you’re a SkyBox newbie, the best place to start is at the beginning with Making it Run on page 5. Go
through this section, try it out on your SkyBox, then come back and read about all the details and special
features that make SkyBox unique. The details and special features of this inverter are covered in The Nitty
Gritty on page 17.
The following sections will sometimes make references to SkyBox settings. These are shown in bold italic
text. Detailed explanations can be found in the SkyBox Programming Guide.
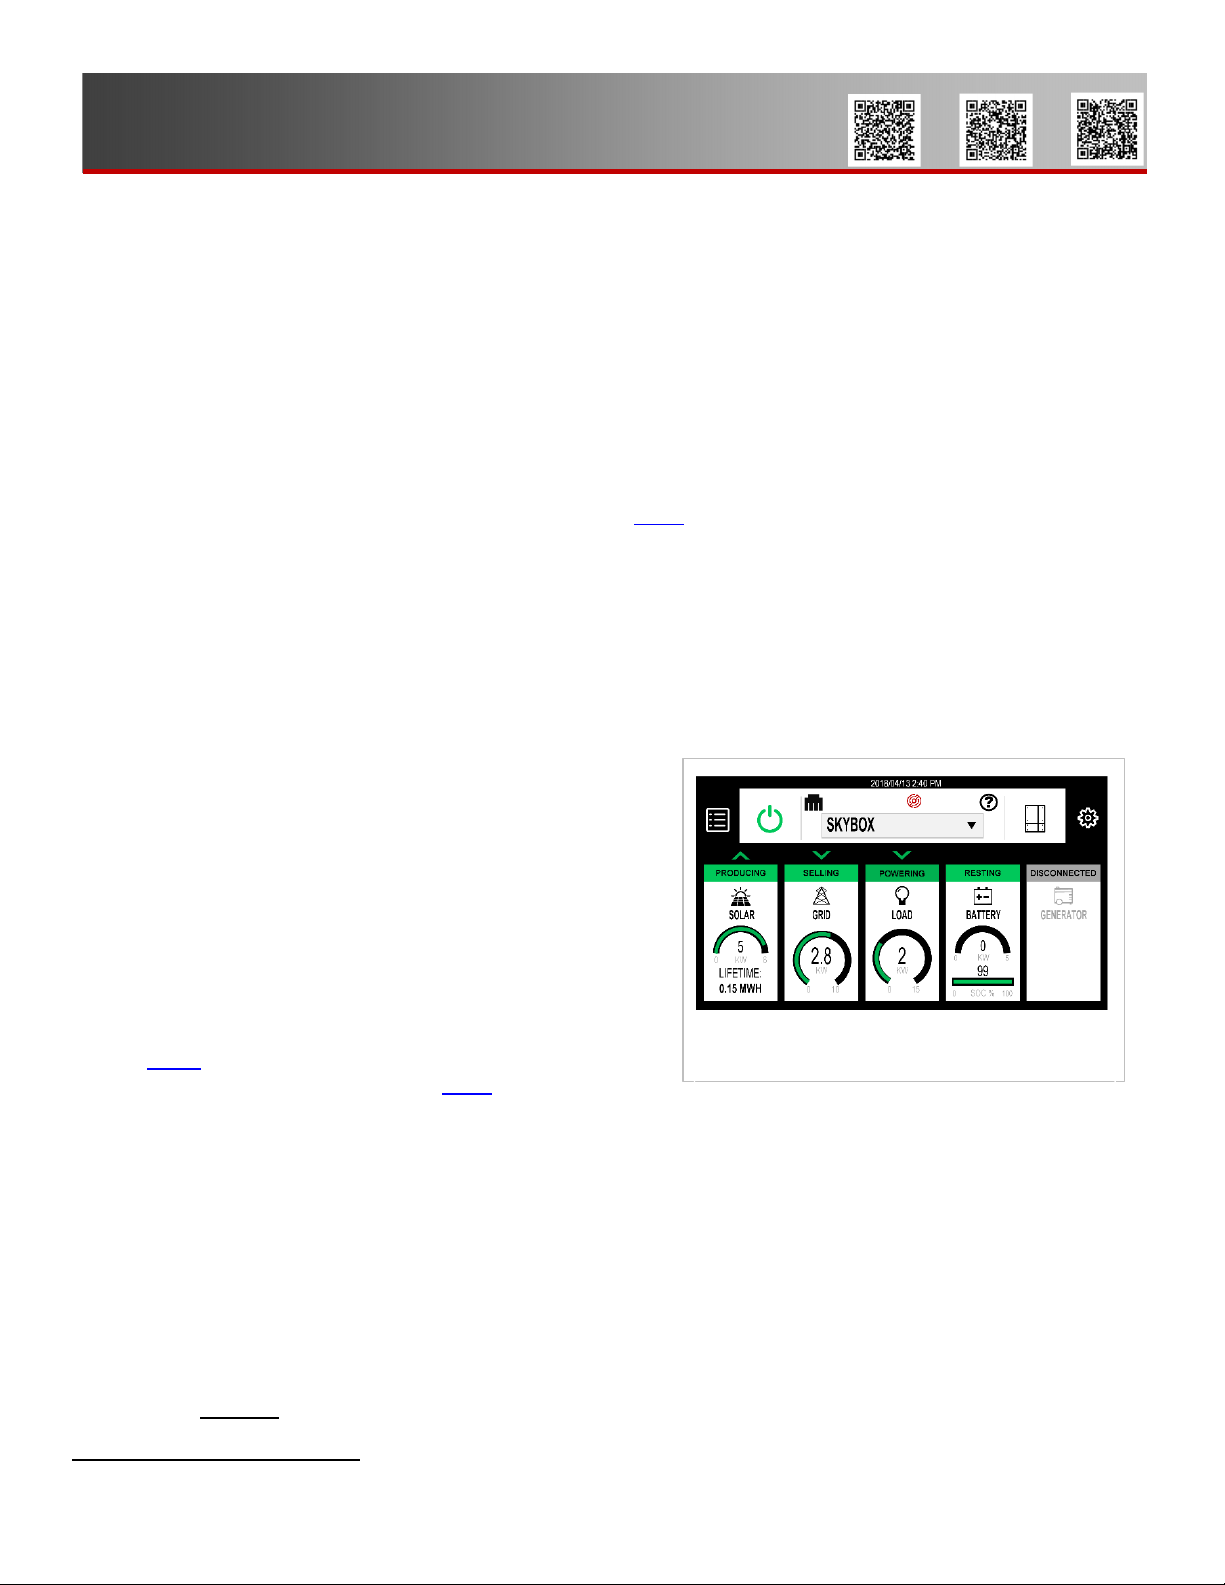
The Screen
The SkyBox display is a resistive, touch-sensitive interface.
Unlike your cell phone, this screen supports single touch and
relies on pressure from your finger or a stylus — it does not
make use of the human body's natural conductivity. It
monitors all aspects of SkyBox performance. Items such as
buttons, tiles
, or icons respond or open when tapped
with a finger or stylus.
For a description of all controls, see the SkyBox Overview
Guide (link 2). For an in-depth description of all functions,
see the SkyBox Programming Guide (link 3).
The Set-Up Wizard
The set-up wizard walks you through each section of settings in order to get your SkyBox up and running.
The first time your SkyBox is turned on, the Wizard will appear. The Wizard does not cover rapid shutdown
or the use of the auxiliary terminals.
One setting in the Wizard is the selection of AC Profile. The AC Profile tells the SkyBox how to interact with
the utility grid. You must select an AC Profile during setup, regardless of whether grid power will be used.
To decide which AC Profile to use, see page 5.
After the initial setup, you can access the wizard by logging in as Installer and navigating to the Configure
menu on the System tab.
1
Each numbered link is an active hyperlink, but it also refers to the corresponding QR code at the top of the page.
Figure 1 SkyBox Screen
1 2 3

5
Making it Run
Materials
You will need the following:
o
Properly installed SkyBox inverter
oSkyBox BOS
oSkyBox Overview Guide
oSkyBox Quick Start Guide
Optional:
o
A small stylus to tap on the SkyBox touchscreen
oSkyBox Programming Guide
Choosing the Right
AC Profile
Use the flow chart to the right to determine which grid
use profile is the most appropriate for your system.
Each profile is discussed in more detail in The Power
Grid and You on page 6.
Programming
To make the initial program settings, use the Setup
Wizard that appears during power-up. These settings
include the AC Profile, battery charging, screen
brightness, passwords, and so on.
To make additional settings after closing the Wizard,
see the SkyBox Programming Guide.
900-00272-01-001 Rev A
Figure 3 AC Profile Flowchart
Net Metering
with Backup
Net Metering
with Backup
Figure 3 AC Profiles

6
900-00272-01-001 Rev A
The Basics
The Power Grid and You
SkyBox is designed with four AC profiles. Each profile interacts with the utility grid in a different manner.
In all of the AC profiles, no battery power will be supplied to the site when the battery reaches Minimum SOC
(state-of-charge). This means if there is a power outage and you drain your battery to this low setting, your
refrigerator, freezer, wifi, etc. will be off until the utility power returns or the battery is charged.
Sell for All You’re Worth (Net Metering With Backup)
When the Net metering with backup profile is selected, the SkyBox harvests as much solar power as it can.
After sending power to your protected loads, all extra power will be sent to the utility.
Protected loads are those household items needing electricity to run that you’d rather not lose during a power
outage. This usually includes things like your freezer, refrigerator, internet router, etc. If the load demand (the
amount of electricity needed to run all those things) exceeds the available solar power, the SkyBox will buy
power from the utility to cover the difference.
IMPORTANT:
This is the ONLY profile which functions correctly WITHOUT a battery installed.
When running in a standalone fashion
(without a battery), the SkyBox operates
like any other grid-dependent inverter.
Solar power is produced, harvested,
and sent to the utility while the utility is
active (no power outage). During an
outage, the SkyBox shuts down and no
solar power is harvested.
When paired with batteries, the SkyBox
keeps the batteries full. This ensures
that when power goes out, your lights
stay on for the maximum time. Ideally,
your installer (or you, the installer) sizes
the system so this maximum time is an
entire night of protected loads. This
assumes the sun is available the next
morning and solar power takes over,
allowing the battery to take a break.
This profile is best used when the utility
is normally stable and only short
interruptions are expected.
Figure 4 Net Metering with Backup Power Flow
900-00272-01-001 Rev A
7
Cycle That Battery (Self-Consumption)
Self-consumption is the best profile for those who have high energy rates and low return when selling power,
but are still able to send power back to the utility. When this profile is selected, the SkyBox will harvest as
much solar power as it can. After sending power to your protected loads, all extra power will be sent to the
utility grid.
When the protected loads (freezer, refrigerator, etc.) need more power than the available solar power, the
SkyBox uses the battery to make up the difference. The SkyBox drains the battery as long as solar power is
less than the load demand until the battery reaches the Minimum SOC setting. At this point, the SkyBox stops
draining the battery and makes up any power needed by buying from the utility.
Because you’ve told the SkyBox to ‘zero’ its utility use, the only allowed charging source for the battery is
solar power. There are a few exceptions to this rule, but in this section we are only covering the main ideas.
The exceptions are found in Charging Source on page 11.
Here’s the ideal scenario for this profile. The battery reaches Minimum SOC sometime during the night and
the loads are powered from the grid for a minimal amount of time. Once the sun rises and the array starts
producing power, the SkyBox begins charging the battery. The battery only charges if the power needed by
the loads is less than the available solar power.
The SkyBox will continue charging the battery until it reaches the Maximum SOC setting. The battery is not
drained again until it reaches the Maximum SOC setting.
Figure 5 Self-consumption Power Flow

8
900-00272-01-001 Rev A
Don’t Sell (Non-Export)
The Non-export profile is best for systems in utility districts that do not allow power to be sold back to the
utility. As the name implies, the SkyBox will not export any power when programmed in this profile. Unlike
Net metering with backup and Self-consumption, a SkyBox in Non-export only harvests enough solar
power to meet the power needed by the loads. This means some power could be lost when loads are low and
the sun is shining. Typically, this occurs during midday.
When the protected loads (freezer, refrigerator, etc.) need more power than the available solar power, the
SkyBox uses the battery to make up the difference. The SkyBox drains the battery as long as solar power is
less than the load demand until the battery reaches the Minimum SOC setting. At this point, the SkyBox stops
draining the battery and makes up any power needed by buying from the utility.
Because you’ve told the SkyBox to ‘zero’ its utility use, the only allowed charging source for the battery is
solar power. There are a few exceptions to this rule, but in this section we are only covering the main ideas.
The exceptions are found in Charging Source.
Here’s the ideal scenario for this profile. The battery reaches Minimum SOC sometime during the night and
the loads are powered from the grid for a minimal amount of time. Once the sun rises and the array starts
producing power, the SkyBox begins charging the battery. The battery only charges if the power needed by
the loads is less than the available solar power.
The SkyBox will continue charging the battery until it reaches the Maximum SOC setting. The battery is not
drained again until it reaches the Maximum SOC setting.
Figure 6 Non-export Power Flow

900-00272-01-001 Rev A
9
I Want To Be Off-Grid, But Not Really
(Maximum Independence)
This profile should not be chosen without a lot of forethought. It is intentionally not included in the flow chart on
page 5. The solar array must be sized appropriately to support both the average loads and battery charging
simultaneously. The battery bank must be sized to support the loads overnight at the very least.
In this profile, the SkyBox physically disconnects from the grid and runs off solar power and battery alone until
the battery reaches the Minimum SOC setting. At this point, the SkyBox re-connects to the grid and
any loads are carried by the grid. Until the batteries reach 85% of the Maximum SOC setting, solar power
will not contribute to the loads. The SkyBox disconnects from the grid once the battery reaches the
Maximum SOC setting.
Figure 7 Maximum Independence Power Flow

10
900-00272-01-001 Rev A
Keeping Your Battery Alive and Well
IMPORTANT:
The minimum allowed battery voltage is 42 Vdc. The SkyBox will not connect to a
battery below 42 Vdc. A battery discharged below this level must be charged from an
external source.
Battery Types
Many batteries have been tested and are compatible with the SkyBox. Each choice in the drop-down menu
loads the SkyBox with the correct charging voltages for each battery. All that is needed is to tell the SkyBox
the number of paralleled items (strings) in the energy storage system.
Given the increasing popularity and variety of lithium-ion batteries now available, it is important to clarify the
interoperability and safety considerations for pairing these batteries with OutBack Power inverters and charge
controllers. Lithium-ion batteries present different safety risks and performance impacts than the lead-acid
batteries many of our products were originally designed around. For this reason, OutBack Power has adopted
a white-list approach to battery interoperability. The Compatible Batteries list (link 4) includes batteries that
have been reviewed and tested by OutBack Power personnel and whose manufacturers have provided specific
guidance on equipment settings and limitations. Use of batteries not on this list — including unlisted battery
models from the same manufacturers — is at the risk of the installer and host site and may result in your
warranty being void. This remains the case regardless of any technical advice or assistance that may be
provided by OutBack Power, its personnel, or representatives.
Please refer to the application notes (link 5) and any manufacturer recommendations for recommended
settings. Note that inclusion on this list does not constitute an endorsement of these battery products and that
not all combinations carry the safety listings required by some permitting authorities.
PLEASE NOTE THAT OUTBACK POWER DOES NOT CLAIM RESPONSIBILITY FOR ANY DAMAGE DONE
BY OR TO BATTERIES THAT ARE DEPLOYED USING THE INFORMATION FOUND IN THIS NOTICE.
What if you’ve chosen to add energy storage later? In this case, your system should be operating in Net
metering with backup and your battery choice should be None. This tells the SkyBox that no interaction is
necessary with the battery and that no loads can be powered when there is a utility outage.
If you’ve chosen to use a battery that is not included in the pre-configured list, you’ll need to read Using My
Own Custom Batteries on page 18.
Charge Cycle
The SkyBox uses a three-stage charging method.
The SkyBox Programming Guide provides a basic
explanation of this process.
What you’ll see on the SkyBox screen for
Charge status
:
o
Charger Off – No charge cycle triggered
oBulk – Battery has reached re-bulk voltage or Minimum
SOC or is currently charging up to absorb voltage
oAbsorb – Battery has finished the bulk stage and is
charging at the absorb voltage
oFloat – Battery has reached re-float voltage or is
currently charging at the float voltage
4
Figure 8 Battery Details Screen
5

900-00272-01-001 Rev A
11
Battery Temperature Compensation
Battery performance changes when the temperature varies above or below room temperature (77°F or 25°C).
Temperature compensation is a process that adjusts battery charging to correct for these changes.
CAUTION: Hazard to Equipment
Temperature compensation should never be used with lithium batteries. Set the
Temperature Compensation setting to 0 mV/˚C*cell.
The SkyBox, when equipped with the Remote Temperature Sensor (RTS), compensates for changes in
temperature. To achieve a representative temperature, the RTS is attached to a single battery near the center
of the bank. The SkyBox has a designated port for RTS installation. See the SkyBox Quick Start Guide for
more information.
If you do not have the RTS installed, you will get a notification on startup. This is even true if you are using a
lithium battery, which should not have the RTS anyway. This notification is there to remind the user that
temperature compensation is specifically important for lead-acid batteries.
For an explanation of how temperature compensation works, see the SkyBox Programming Guide.
Charging Source
Let’s walk through a charge scenario. Normally, you simply make solar power on your roof and send it to the
utility. However, yesterday you had a power outage that lasted through the night. The SkyBox was great and
you hardly noticed there was an outage. Now your backup battery (attached to the SkyBox) is sitting at 30%
state of charge. It’s a sunny morning and the power has been restored. The SkyBox begins charging your
battery. If both solar power and utility power are available, the SkyBox uses solar power before trying to
charge from another source (like the utility). This function is independent of the chosen grid use profile.
While the SkyBox normally prioritizes using solar power over the utility, there are certain conditions which
prevent the SkyBox from using utility power at all to charge the battery.
oAC Profile is set to Self-consumption, OR
oAC Profile is set to Non-export, OR
oAC Profile is set to Maximum independence, OR
oCharge limit is set to zero kilowatts
There are also certain times when the SkyBox uses power from any available source to charge the battery.
This is usually to protect the battery.
o
A manual charge cycle has been initiated, OR
oA low battery cutout event has occurred

12
900-00272-01-001 Rev A
Charge Cycle Initiation
Condition: Grid connected, battery at minimum state-of-charge (SOC)
If the SkyBox reaches the Minimum SOC setting while connected to the grid, the SkyBox initiates a recovery
cycle. A recovery cycle stops the battery from discharging and begins to draw power from the grid for all
loads. The cycle continues as normal (bulk, absorb, float), drawing power from the allowed source, until the
Maximum SOC is reached. At this point, if the system is programmed to use the battery to support loads,
it will begin discharging the battery. A user cannot manually stop a recovery cycle. See Energy Arbitrage on
page 23 for more details on charging when using time-of-use.
Condition: Battery voltage goes below the re-float or re-bulk setting
Similar to the legacy products, battery voltage decreasing below re-float or re-bulk will not prevent the battery
from discharging to support the loads. When the re-bulk or re-float set point is reached, Charge status will
change from Charger Off to either Bulk or Float. Once the battery is no longer required to support the loads,
solar and grid power (if applicable) are used to charge the battery. A user can manually stop this cycle.
Condition: Battery state-of-charge reaches Minimum SOC, off-grid
If solar power is available, the SkyBox initiates a bulk stage and begins charging the battery from solar power
and/or the grid. The SkyBox will not discharge the battery again to support the loads until it has reached 85%
of Maximum SOC.
Battery Charging Precautions
o
A system fault causing the system to stop producing power will force the SkyBox to take its idle power (~200 W) from
the battery.
o
During a low battery cutout event, the Grid Charge Limit provides a protective feature allowing the battery to charge
from any available source. Setting this limit to zero eliminates this battery protection. If an LBCO event occurs while
the Grid Charge Limit is set to zero and no solar power is available, the battery will not charge, and will remain at ow
voltage.
o
Master inverter battery settings do not auto-populate to any other inverters. They must be set independently. See the
SkyBox Stacking Application Note (link 6) for more information.
o
Batteries will only charge from solar power when the available solar power exceeds load demand.
6

900-00272-01-001 Rev A 13
Harnessing the Sun
SkyBox can harvest up to 5 kW of power from a solar array and send this power to the battery, your home, the
utility, or any combination of these three places.
Usually, you will see the SkyBox Producing on the solar tile. At night, or when the sun is exceptionally weak,
the SkyBox home screen will display Sleeping on the solar tile. The SkyBox “wakes up” once the array
voltage reaches 250 Vdc. At this point, it runs three self-tests to ensure it is safe to connect to the array. If you
stand next to the SkyBox during these tests, you’ll hear the PV relay click closed and open again. The
descriptions of these tests can be found in PV Self-Tests on page 26.
Once the self-tests have passed, SkyBox closes the PV relay. On the SkyBox home screen, the SOLAR
tile changes to a yellow bar with the title Sweeping. To “sweep” the array means the SkyBox searches for the
voltage point where the most power is produced. While it would seem like this would be the highest voltage,
it’s usually not. The “maximum power point voltage” is closer to the middle of the voltage range for the array.
Since the SkyBox is looking for the most power throughout the whole range of voltage, you’ll see the power
displayed on the home screen go up and down. This operation occurs when one of the following conditions
is met:
oSolar startup (morning)
oForced (button push)
oEvery hour off-grid if a 200 W or more deficit exists between PV and load
oIf significant change to the maximum power point occurs while on-grid
In most applications, SkyBox continually harvests as much solar power as it can to provide power to the loads
and to charge the battery. However, when operating in Non-export or off-grid (grid relay is open), the SkyBox
only harvests as much power as necessary. In either of these cases, if you have a 5 kW array and the day is
sunny, but you only have 500 W of load with a full battery, SkyBox will only produce 500 W of solar power.
This means the array is not under producing, it is just being under-utilized.
Solar Gotchas
Many installers who have used OutBack Power products in the past are very familiar with how to set up an
array for a charge controller and inverter system. However, since the SkyBox is a completely different platform
these rules no longer apply. The SkyBox needs to be treated as a brand new system.
Two commonplace items CANNOT be used on a SkyBox array: optimizers and lightning arrestors or other
surge protection. Both of these hardware items can cause interference with the IRD and AFCI self-tests
(see PV Self-Tests on page 26). This completely prevents the SkyBox from connecting to the solar array.
Maximum Power Point Tracking
Maximum power point tracking (MPPT) is the technology used by the SkyBox to optimize the harvest of power
from PV arrays. At this time, SkyBox only supports one MPPT array. This just means you can’t have two
different arrays facing in completely opposite directions connected to the SkyBox and expect to get full power
out of either.
14
900-00272-01-001 Rev A
Computer Stuff
You’re on vacation, relaxing by an alpine lake and your buddy (who somehow has internet access on his
phone way out there) tells you there was a big storm back home and no one has power. What now?! Is your
SkyBox running? What about that refrigerator and freezer full of food in the garage? Enter OPTICS RE, the
OutBack Power remote monitoring system.
OPTICS RE allows system installers and owners to monitor and control system settings from any internet
connected device. This means you could use your buddy’s phone at that alpine lake to make sure your
SkyBox is keeping that freezer supplied with power.
Setting Up Your OPTICS RE Account
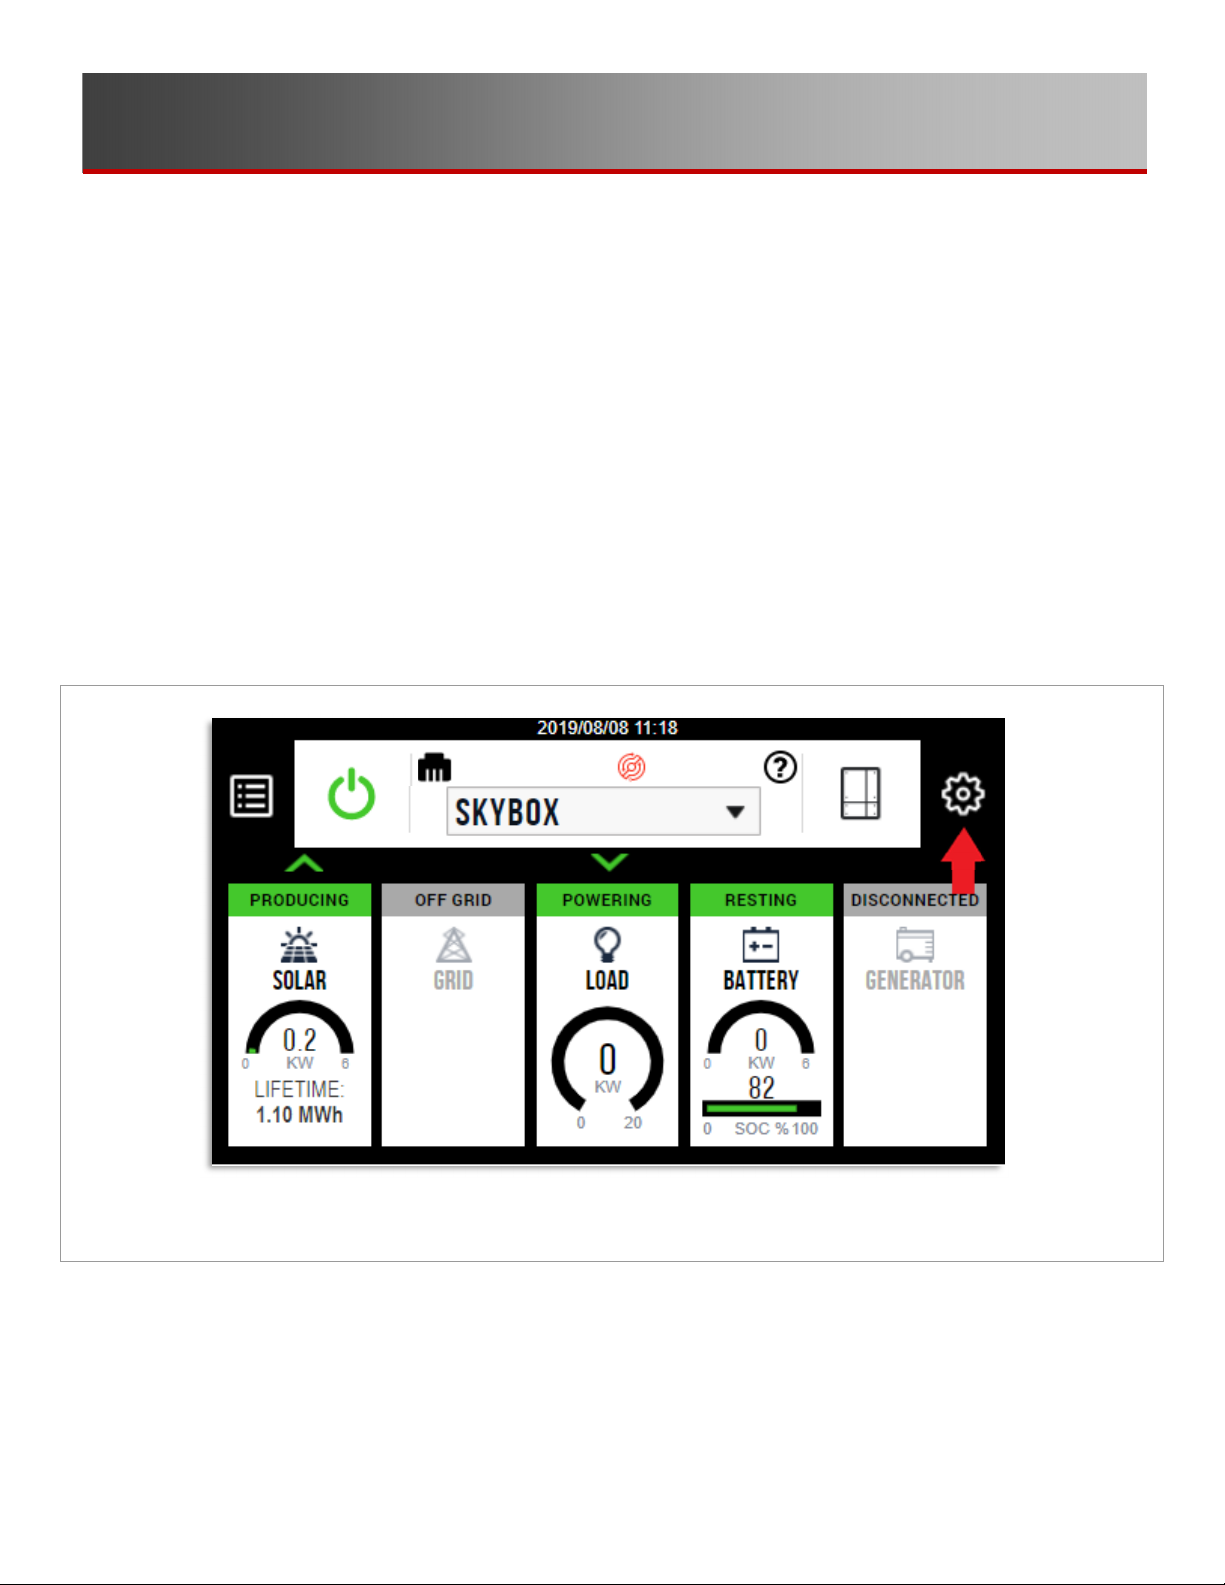
The first step in setting up your OPTICS account is actually connecting the SkyBox to your home network.
The wiring steps are outlined in the SkyBox Quick Start Guide. In a nutshell, connect a CAT5 cable to the
WALL port in the SkyBox and plug the other end into your router. You’ll know if this was successful or not by
the color of the ethernet icon Aas shown in Figure 9. Black indicates a good connection, yellow a partial
connection, and red is no connection.
Figure 9 Home Screen
Step 1: Once your SkyBox is connected to the internet, locate its MAC address.
A. Press the settings button, which is the gear wheel Bshown in Figure 9.
A
B

900-00272-01-001 Rev A
15
B. Navigate to the Network tab.
Figure 10 Network Tab
C. Using the down chevron Cin Figure 10, page down three times. You should arrive at the screen
below. OPTICS RE is enabled by default. Write down the Mac Address
(Din Figure 11).
Figure 11 MAC Address
C
D

16
900-00272-01-001 Rev A
Figure 12 OPTICS RE Account
Step 2: Creating an Account
Create an account to be able to log in. From www.opticsre.com, click Create an Account. See Ein Figure 12.
Step 3: Creating a Profile
Create a profile to monitor a specific site or system. (See Fin Figure 12.) Once signed into the account, click
Add a System. Follow the on-screen wizard. Completing this section requires the MAC address from Step 1.
After entering the MAC address, you will be asked to name a profile, site, and system.
A profile is the highest level container which is managed by a profile administrator. Each profile can have any
number of sites underneath it. A site is a physical location that can have any number of systems underneath it.
A system is the lowest level classification and is a specific group of OutBack devices working together.
Step 4: Monitor Your SkyBox
Now that your system is all set up, you can monitor your SkyBox from anywhere. Figure 13 shows an example
of an OPTICS RE SkyBox system. More information is available through the OPTICS RE Knowledge Base.
Figure 13 SkyBox on OPTICS RE
E
F

900-00272-01-001 Rev A
17
The Nitty Gritty
This section is geared toward those installers and homeowners who are thoroughly familiar with the previous
section. In this section, we’ll use a few acronyms and technical terms the reader is assumed to know and
understand. If you’re still learning about solar plus storage and/or the SkyBox, make sure you’ve read the
previous section. If you’re an installer, it wouldn’t hurt for you to have installed a few basic SkyBox systems
before continuing through this Handbook.
More Power Please
What if 5 kW just doesn’t cut it for your site? With proper planning, two SkyBoxes can be linked to work
together to provide up to 10 kW of power. We call this stacking. Two SkyBoxes can be stacked. If you find
you need more power than this, contact OutBack Sales (link 7) before proceeding.
In this configuration, one SkyBox acts as the ‘leader’ and one as the ‘follower’. The master is in charge of the
system’s overall behavior when operating off-grid (power outage, the Maximum independence profile, etc.).
Each SkyBox acts independently when operating on-grid. The SkyBox Stacking Application Note describes
more details.
What About This Inverter I Already Have?
(AC Coupling)
While AC coupling is not the most preferred use for the SkyBox, or any battery-based inverter, it is possible to
link your old grid-dependent inverter with the SkyBox.
So, what happens when these two devices work together? In normal day-to-day operations, not much
changes. Your old inverter continues to produce solar power from the existing array and send it to the grid,
albeit now the power is routed through the SkyBox. The SkyBox also produces power from its own solar array
(if installed).
The biggest change comes when the utility goes down. Previously with just a grid-dependent inverter, if the
power went out, so did the grid-dependent inverter. Even though the sun could still be shining, no power was
being produced because there was no safe place to send it. Now, when the utility goes down, the SkyBox
fakes the grid-dependent inverter into thinking the utility is still operational. The grid-dependent inverter
continues on its way, making power from the solar panels and sending it through to “the grid”, which is really
the SkyBox. The SkyBox takes this power and sends it either to the protected loads, uses it to charge the
battery connected to the SkyBox, or both.
The ability to AC couple with grid-dependent inverters is inherent in the SkyBox firmware (with version 1.4.15
and later). More details along with a wiring diagram can be found in the SkyBox AC Coupling Planning Guide
(link 8).
8
7

18 900-00272-01-001 Rev A
It’s Cloudy, My Batteries Are Dead, and the
Power is Out – What Now? (Using a Generator)
The SkyBox accepts generator input when needed; however, it doesn’t accept every generator at every time.
The SkyBox is picky and wants a generator that produces a (mostly) smooth waveform.
The best way to describe the operation is with an example. Let’s say that it’s night, your batteries have been
taxed by a cloudy day, the power has been cut off by the utility, and you have several heavy loads running.
The generator-start function recognizes the need to start the generator in order to conserve the batteries.
The SkyBox sends a signal to a starting circuit on the generator. The generator starts and spins up to the
rated voltage and frequency. The SkyBox closes the generator relay as long three conditions are met:
1) the grid relay is open, 2) the generator voltage and frequency are within tolerances, and 3) PV is not
running all the loads. Once all conditions are verified, it closes the generator relay. Generator power is
directly connected to the loads.
Next, the SkyBox wants to charge the batteries. You have configured it so that it can use generator power
to charge if needed. There are more conditions here. In order to charge the batteries using generator power,
the SkyBox must sense at least 4 Aac (~500 to 600 W) on its load port. PV cannot be present.
oThe load ensures the generator waveform has been dampened enough for the SkyBox to connect without risking
any damage.
oIf PV is present, the SkyBox will use the generator to power the loads and use PV to charge the batteries.
oThese items mean that no mixing of generator power and solar power is allowed.
The example shows the conditions that need to be met for the SkyBox to connect to a generator, but how do
you start the generator in the first place? The SkyBox uses a function called Advanced Generator Start
(AGS) to control the starting and stopping of the generator. To read up on AGS, see the applicable section in
the SkyBox Programming Guide.
If you’ve chosen to manually start the generator, but have AGS configured, know that AGS will never stop a
manually started generator. Just remember that if you start it, you also have to stop it.
Using My Own Custom Batteries
Okay – great! The SkyBox is compatible with many batteries, but you’ll need to track down all the information
about your battery before connecting it to the SkyBox.
Given the increasing popularity and variety of lithium-ion batteries now available, it is important to clarify the
interoperability and safety considerations for pairing these batteries with OutBack Power inverters and charge
controllers. Lithium-ion batteries present different safety risks and performance impacts than the lead-acid
batteries many of our products were originally designed around. For this reason, OutBack Power has adopted
a white-list approach to battery interoperability. The Compatible Batteries list (see link on page 18) includes
batteries that have been reviewed and tested by OutBack Power personnel and whose manufacturers have
provided specific guidance on equipment settings and limitations. Use of batteries not on this list — including
unlisted battery models from the same manufacturers — is at the risk of the installer and host site and may
result in your warranty being void. This remains the case regardless of any technical advice or assistance that
may be provided by OutBack Power, its personnel, or representatives.

900-00272-01-001 Rev A 19
Please refer to the application notes and any manufacturer recommendations for recommended settings.
Note that inclusion on this list does not constitute an endorsement of these battery products and that not all
combinations carry the safety listings required by some permitting authorities.
PLEASE NOTE THAT OUTBACK POWER DOES NOT CLAIM RESPONSIBILITY FOR ANY DAMAGE DONE
BY OR TO BATTERIES THAT ARE DEPLOYED USING THE INFORMATION FOUND IN THIS NOTICE.
Some ground rules before we start talking about the custom settings:
oThe voltage range on SkyBox is 42 to 60 Vdc. That’s it. Nothing more, nothing less.
oIf your battery needs to speak with the inverter in order to operate, too bad — SkyBox only talks with compatible
batteries from the list on the website. (See the link on page 10.)
oAll lithium batteries require careful programming to avoid over- or undercharging.
oOutBack Technical Support cannot assist you with programming values that are not available in the list.
We will point you back to the battery manufacturer, so you might as well just start with them.
Now that the ground rules are out of the way, let’s talk specifics. First is the low battery cutout (LBCO) set
point. This setting should be the voltage equivalent of a completely empty battery. Why? Because the
SkyBox uses the LBCO value to define 0% state-of-charge (SOC).
If LBCO is set too high, the battery will reach LBCO well before it actually reaches 0% SOC. The SkyBox
will assume the capacity has decreased and recalculate the SOC accordingly. Over a few cycles, this can
result in the SkyBox only using a fraction of the energy available to it and cutting off power to the loads
prematurely. A similar result is seen when the Battery amp-hours per string or the Number of strings
are set incorrectly.
Figure 14 Battery Protection Settings

20 900-00272-01-001 Rev A
Next, pay special attention to the charging parameters. If one of these is set incorrectly, it throws off the whole
system and you’ll see red lines and error messages.
The equalize voltage should be the highest in value or at the very least, equal to absorb. If your batteries are
not supposed to be equalized, then set the EQ voltage equal to the absorb voltage for safety. The absorb
voltage should be followed by float, re-float, then re-bulk voltages. If one of these voltages is out of order (say
re-bulk higher than re-float), you will either not be allowed to save your changes, or the system will auto-correct
the voltages to a different value than you had set.
Protection level voltages should be set so that LBCO is the lowest voltage and HBCO (high battery cut out)
is the highest voltage by at least 1 volt from any charging value. This will ensure there are no conflicts in
the system.
Aux Terminals and Rapid Shutdown
The SkyBox has a 12-volt output and a normally open (NO) auxiliary relay. Either can be configured for AGS
or rapid shutdown. The 12-volt output and relay operate independently of each other.
Configuring the auxiliary terminal for AGS does not mean that rapid shutdown is no longer enabled. The rapid
shutdown function in the SkyBox is dependent on the connection between the auxiliary terminals 4 and 12.
(See the link to the Quick Start Guide on page 4 and refer to item 12 in the Wiring section.) When rapid
shutdown is selected as an auxiliary function, the SkyBox activates either the output or the relay when it
senses a rapid shutdown command.
Rapid Shutdown Options
You have two basic options when setting up a SkyBox to comply with the rapid shutdown requirements of the
NEC 2017: The IMO FireRaptor and the Tigo TS4-S. OutBack Power has tested both the FireRaptor and the
TS4-S successfully.
Both options work with the OutBack Rapid Shutdown Initiator (RSI) and individual modules attached to each
panel in the array. If the main power goes out, the FireRaptors or TS4-S modules lose power and shutdown
the power of the array. The SkyBox senses this loss of continuity at its rapid shutdown terminals (pins 4 and
12) and discontinues operations until the condition is cleared. Wiring diagrams and a more in-depth
explanation can be found in the SkyBox Rapid Shutdown Application Note.
Modbus Controls
If you would like to connect to the SkyBox using the SunSpec protocol, please contact OutBack Power Sales.
Other manuals for OutBack Power SkyBox
1
Table of contents
Other EnerSys Inverter manuals


Popular Inverter manuals by other brands


Champion
Champion 82001I-DF Operator's manual

Sungrow
Sungrow SG250HX-US user manual

Cutting Edge
Cutting Edge SOLAR TRAILER Assembly and operation manual

Power One
Power One AURORA PVI-6000-OUTD-AU Series Installation and operator's manual

Setec
Setec 750L manual

Amtex
Amtex XP600 Installation and operation manual


