Engler DRILL-AIRE PLUS User manual

DRILL – AIRE PLUS
INTRUCTION MANUAL
Engler High Speed Dental Air Unit
Rev. C 0 /18/2021

COMPANY PROFILE
Engler Engineering Corporation has been in business since 1964 and occupies an 8000 square foot
facility in Hialeah, Florida USA). Engler manufactures high speed air units and table top ultrasonic
dental scalers, polishers and combination units. Other devices include electrosurgery equipment and
ultrasonic instruments for the veterinary market as well as a microprocessor controlled anesthesia
delivery system and a respiratory monitor for veterinary use.
Engler also manufactures dental equipment for the human market. Please visit our website
www.englerusa.com for more detailed information or call us at the numbers shown below.
Engler Engineering Corp. acquired the exclusive manufacturing and marketing rights of Dynax
products, including stretchers, gurneys, The Cat Grabber, comfort cots, warm water heater / circulator
with pads, and other products. We also acquired the Alpha-Sonic, Ora-Sonic, and Pro-Sonic line of
piezo scalers.
Engler manufactures all of the inserts and tips used in the Engler products as well as many others on
the market today in the 18K and 25K frequency range.
Our repair department has the technical knowledge to repair and maintain a number of dental devices
manufactured by other companies including Shorline.
Engler Engineering Corporation’s foreign sales are handled through a large and growing network of
dental and veterinary distributors. At the present time we are represented throughout the Middle East,
Europe, Central and South America, Canada, Asia, New Zealand, Australia, and most other countries.
If you have any questions, comments, or suggestions, please contact:
Engler Engineering Corporation
1099 East 47th Street, Hialeah, Florida 01
800-445-8581 – 05-688-8581 – FAX 05-685-7671
Web site: www.englerusa.com Help site: www.engler411.com
2

ENGLER ENGINEERING CORPORATION’S BRAND NAME VETERINARY
PRODUCTS
•ADS 2000, microprocessor controlled anesthesia delivery system / ventilator,
•Excelsior, high speed dental air unit with vacuum / electrosurgery / ultrasonic scaler / high
speed drill / low speed polisher / air - water syringe, and on demand compressor,
•Scale - Aire, high speed dental air unit with ultrasonic scaler / high speed drill / low speed
polisher / air - water syringe and on demand compressor,
•Scale - Aire Mini, high speed dental air unit with ultrasonic scaler / high speed drill / low speed
polisher / air - water syringe,
•Drill - Aire Plus, high speed dental air unit, high speed drill / low speed polisher / air - water
syringe,
•Drill - Aire, high speed dental air unit, high speed drill / air - water syringe,
•Son - Mate II, ultrasonic scaler / 35,000 RPM handpiece / low speed polisher,
•Piezo - Mate, ultrasonic scaler / 35,000 RPM handpiece / low speed polisher
•
•Tri - Mate, ultrasonic scaler / 35,000 RPM handpiece / low speed polisher / electrosurge,
•Vet II, 25K ultrasonic scaler / 35,000 RPM handpiece / low speed polisher,
•Sonus II, ultrasonic dental scaler,
•Engler Piezo Ultrasonic Scaler,
•Electro - Son, touch screen, mono / bi-polar electrosurgical unit,
•Poli - X, 35,000 RPM handpiece / low speed polisher,
•Sentinel V.R.M., respiratory monitor,
•Engler Veterinary Respiratory Monitor (EVRM)
•More coming soon!
3

INTRODUCTION
Thank you for selecting the Drill - Aire Plus High Speed Dental Air Unit. We believe you have selected
the best product available for performing basic and advanced dentistry for your veterinary patients.
The design of the Drill - Aire Plus uses time tested technology to produce a powerful and potent tool
against periodontal disease.
The high speed drilling handpiece allows the operator to quickly and efficiently perform the same
advanced dental techniques, drilling shaping and cutting to name a few, being taught in the largest
teaching hospitals and clinics around the world. The low speed handpiece is used for smoothing and
polishing the teeth after scaling.
PLEASE READ VERY CAREFULLY
Engler Engineering Corporation (EEC) makes every effort to verify that all parts for the device
along with any optional accessories ordered with it are included in this shipment. It is
imperative that the shipment be inspected immediately upon arrival. Should any parts be
missing or damaged, Engler Engineering must be notified immediately. All claims submitted
after fifteen days of receipt will not be valid.
EEC makes every effort to verify that our devices are built and tested to approved standards.
Any modification to the device, hoses or power supply initiated by others nullifies all warranty
statements. Engler Engineering Corporation will not be held liable in any way, for any damage,
injury or death due to non-authorized service, improper installation, or improper use of this
device. EEC's liability will not exceed the purchase price of this machine.
The information contained herein is intended only as a guide. Individuals not properly trained
should not use this equipment. It is intended for professional use only.
4

TABLE OF CONTENTS
COMPANY PROFILE......................................................................................................2
ENGLER ENGINEERING CORPORATION’S BRAND NAME VETERINARY
PRODUCTS....................................................................................................................3
INTRODUCTION............................................................................................................4
TABLE OF CONTENTS.................................................................................................5
INSTALLATION...............................................................................................................6
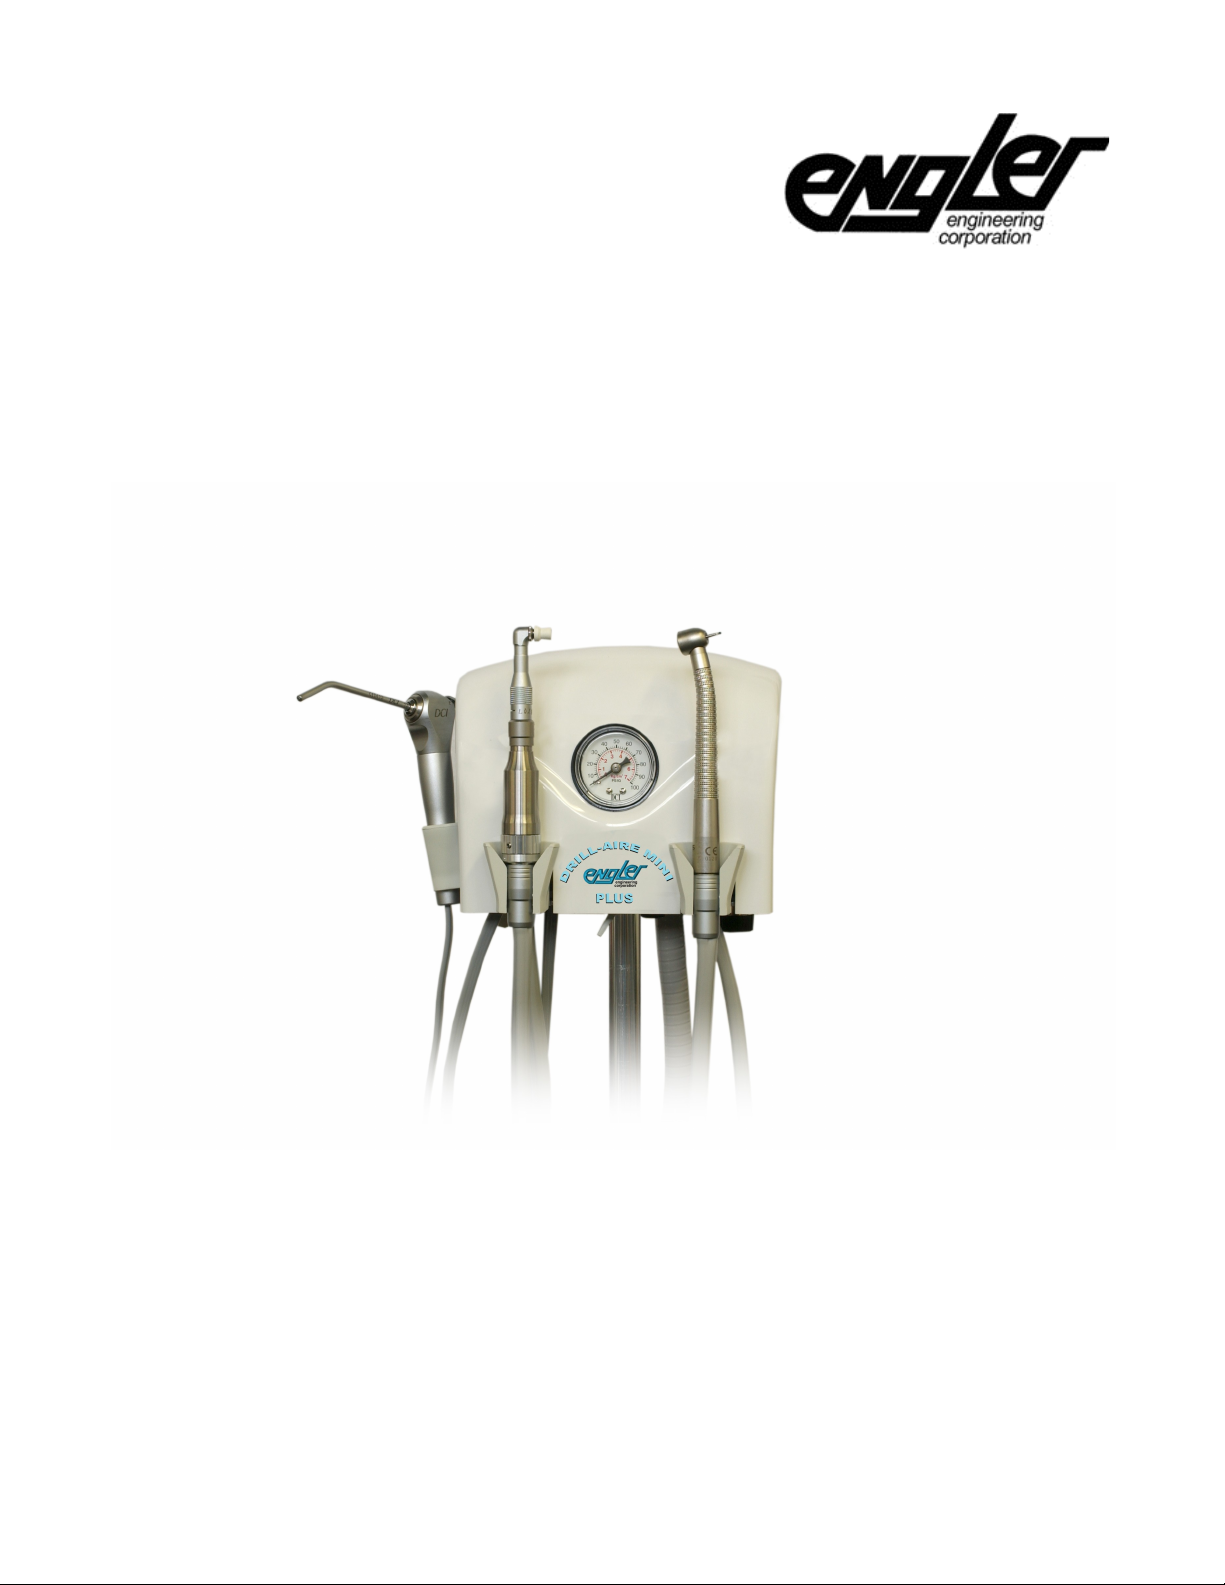
DRILL - AIRE PLUS MINI DIAGRAM..............................................................................7
BEFORE FIRST USE......................................................................................................8
HIGH SPEED HANDPIECE.............................................................................................................8
LOW SPEED HANDPIECE..............................................................................................................9
GETTING TO KNOW YOUR CONTROLS....................................................................11
WATER ON / OFF...........................................................................................................................11
AIR HANDPIECE TOGGLE SWITCH............................................................................................11
HANDPIECE AIR FLOW CONTROL CONTROLS.........................................................................11
WATER FLOW CONTROL.............................................................................................................11
AIR HANDPIECE PRESSURE GAUGE.........................................................................................11
FOOTSWITCH CONTROL.............................................................................................................11
Note: The high and low speed handpieces are NOT interchangeable..........................11
INSTRUCTIONS FOR OPERATION AND MAINTENANCE.........................................12
REGULAR OPERATIONAL CONSIDERATIONS..........................................................................12
MAINTENANCE KITS....................................................................................................................12
START UP AND SHUT DOWN SEQUENCE.................................................................................13
CLEANING HANDPIECES, FOOTSWITCH AND POWER CABLES...........................13
HIGH SPEED HANDPIECE...........................................................................................................14
Cleaning the high speed handpiece...............................................................................................15
HIGH AND LOW SPEED HANDPIECE STERILIZATION PROCEDURES: .................................16
AUTOCLAVE AND CHEMICLAVE ONLY)....................................................................................16
IMPORTANT SAFETY PRECAUTIONS........................................................................................17
INFECTION CONTROL.................................................................................................................17
SGII – Doriot One - Piece Handpiece...........................................................................................19
THREE-WAY AIR / WATER SYRINGE..........................................................................................22
PROPHY ANGLE CLEANING AND MAINTENANCE INSTRUCTIONS.......................................24
MAINTENANCE FREE PROPHY ANGLE.....................................................................................25
WATER TANK INSTRUCTIONS...................................................................................26
WATER TANK CARE & MAINTENANCE......................................................................27
CARE AND MAINTENANCE OF YOUR PORTABLE WATER TANK............................27
TECHNICAL SPECIFICATIONS:..................................................................................28
5

INSTALLATION
1. Unpack unit and confirm all items checked off on your packing list..
2. Attach unit to optional stand or wall mount included):
A. Assemble stand.
B. Connect stand bracket to “key holes” on the back of the unit.
C. Tighten wing nuts.
3. Place handpieces on handpiece holders.
4. Connect pressurized air / nitrogen to gray hose. DO NOT EXCEED 90 PSI. Use pressure
regulator and filter when needed. The recommended operating pressure is 80 PSI.
5. Connect water to red hose.
6. Connect power supply to power plug located at the end of the umbilical bundle.
7. Connect power supply to power outlet.
8. Test each handpiece.
To avoid unit damage and / or injury, confirm input line pressure for the air or nitrogen is set to a
maximum of 80 PSI. If using a compressor, verify your compressor pressure ratings, if it provides
more than 80 psi, a pressure regulator is required.
#5 WATER
#4 AIR OR NITROGEN,
80 PSI MAX.
#6 POWER
WATER FILTER
WALL
MOUNT
STAND BRACKET
WING NUTS
6

DRILL - AIRE PLUS MINI DIAGRAM
Locate the handpieces on the front of your Drill - Aire Plus Mini. From right to left they are:
High Speed Handpiece
Low Speed Handpiece
Air / Water Syringe
LOW SPEED
POLISHER
AIR / WATER
SYRINGE HIGH SPEED
DRILL
7
WATER
CONTROL
KNOB

BEFORE FIRST USE
The Drill – Aire Plus was purged before shipping, the first time the high speed handpieces are
activated, the water lines will be empty. Turn the water regulator several rotations counterclockwise,
lift the handpiece from it's cradle, holding the handpiece over a sink, turn the power ON by turning the
power knob to click on, then press the footswitch. Water will flow after a few seconds.
HIGH SPEED HANDPIECE
This handpiece is used for advanced dentistry, including but not limited to; cutting, sectioning, and
shaping cracked or broken teeth, repairing, preparing cavities etc.
Flush to remove water. Keep well oiled.
8

LOW SPEED HANDPIECE
The Drill - Aire Plus is equipped with the Doriot One-piece Handpiece.
Maximum air input, 60 PSI Maximum RPM: 20,000
Normal operating RPM, 500 – 1500 RPM – as slow as possible without splattering paste)
Attachments: Accepts both handpiece burs and Doriot / U-type attachments prophy angle)
It is used with a prophy angle to polish the teeth after a scaling procedure. Use only approved
attachments and polishing compounds. Follow all manufacturers recommendations.
The water should be turned OFF when using the low speed handpiece polisher).
No straight handpiece is used with the short-grip Doriot one-piece handpiece. The prophy angle
attaches directly to the motor.
AIR / WATER SYRINGE
The three-way air / water syringe features
Well balanced design, and smooth styling for comfortable use.
Easy release for a speedy exchange of tips.
Fully autoclavable tips.
This handpiece allows the operator the ability to rinse the operative site with a stream of water or mist
or dry / blow debris with a stream of air.
Press-in here to release tip
9

WATER ON / OFF
AIR FLOW
ADJUSTMENTS
Behind Selector
Switch)
LOW SPEED / HIGH
SPEED HANDPIECE
SELECTOR
FOOTSWITCH
10
WATER FLOW
CONTROL KNOB

GETTING TO KNOW YOUR CONTROLS
WATER ON / OFF
The control is equipped with a wet / dry toggle to activate the water flow. Move the toggle forward to turn
water on.
AIR HANDPIECE TOGGLE SWITCH
This switch allows you to select between low speed and high speed handpieces.
HANDPIECE AIR FLOW CONTROL CONTROLS
On the underside of the unit the flow control screws can be found. These screws control the amount
of air that is delivered to the handpieces.
The high speed adjustment should be set no higher than 25 – 32 PSI.
The low speed adjustment should be set no higher than 60 PSI.
Caution: Allowing more pressure than the maximum allowed pressure to your handpiece will cause
your handpiece to fail prematurely. Verify your handpiece manufacture's specifications before
modifying these settings.
WATER FLOW CONTROL
This control adjusts the water flow to the handpieces. A water control knob is provided for each handpiece.
Turn clockwise to decrease flow, and counter-clockwise to increase flow.
AIR HANDPIECE PRESSURE GAUGE
Gives a visual indication of the air pressure delivered to the handpieces. The pressure gauge will not work
when the scaler is ON.
FOOTSWITCH CONTROL
The foot control applies air pressure to the selected handpiece. The footswitch is responsive, high
volume, and variable flow that can be actuated by pressing any point on the durable, chrome-plated
cover. By pressing harder on the footswitch, more power will be delivered to the air handpieces.
Note: The high and low speed handpieces are NOT interchangeable
11

INSTRUCTIONS FOR OPERATION AND MAINTENANCE
REGULAR OPERATIONAL CONSIDERATIONS
The low speed polisher and the high speed drill must be lubricated daily when in use. Remove the
quick disconnect hose and spray lubricant in the smaller of the two larger ports of the handpiece.
The straight handpiece if available) must be lubricated daily. Note: Short grip Doriot low speed
handpiece does not use a straight handpiece.
The prophy angle head must be removed, cleaned with soap and water, dried, and lubricated at the
end of each day depending on use, then re-assembled.
All handpiece holders and three way syringe must be kept cleaned.
One can of Lares Handpiece Conditioner spray lubricant is included with every Drill – Aire Plus Mini.
For the best care and maintenance order the Drill - Aire Plus Mini deluxe maintenance kit which
includes Lares Handpiece Conditioner from Engler Engineering Corporation optional, not included
with unit).
MAINTENANCE KITS
There are maintenance kits available for the Drill - Aire Plus Mini optional, not included with unit).
These kits are essential to keep your unit working properly. Each kit varies. Please make sure you
specify your systems configuration and part number when ordering the kit.
# KIT MINI BASIC , The standard kit, includes One Step conditioner for the low and high speed
handpieces, and port cleaning tool necessary to perform basic maintenance.
# KIT MINI DELUXE , includes replacement parts that are normal wear and tear items such as F.G.
Bur kit, replacement O-rings for high and low speed handpieces in addition to items in the standard
kit.
12

START UP AND SHUT DOWN SEQUENCE
Start up:
1. Connect unit to a clean, filtered water source.
2. Connect air / compressor / nitrogen source.
3. Set the regulator to 80 PSI.
Note: When using a Nitrogen tank / cylinder, handpiece performance will diminish when the
tank pressure drops below 500 PSI. It will be necessary to switch out the tank / cylinder.
Shut down:
1. Clean all air handpieces according to the original manufacturer instructions. Thoroughly wipe
the unit, all handpieces and cables with a mild cleaning solution or disinfectant and a damp
cloth. Follow the procedures approved by your institution or use a validated infection control
procedure. Do not allow fluids to enter the chassis. Do not autoclave the main unit.
2. Remove and sterilize three way syringe tip tip only), prophy angle, burs, low and high speed
handpieces. Prophy angle, low and high speed handpieces must be lubricated regularly
and after autoclave.
3. Disconnect the air / nitrogen source.
4. Disconnect unit from the water source.
.
CLEANING HANDPIECES, FOOTSWITCH AND POWER CABLES
After each procedure, or at least once a day, it is suggested that the handpieces and cables be
thoroughly cleaned and sterilized.
Clean the outer surface of the handpieces and cables with an antiseptic soap, rinse with water and
sterilize with a chemical sterilization solution.
Caution: No chemicals or cleaners should ever be used inside or allowed to get into the scaler
handpiece. Flush the handpiece thoroughly and completely with clean water.
The footswitch and power cables should be cleaned regularly by spraying a fine mist of sterilization or
cleaning solution on the cables. It should remain on the cables for the length of time recommended by
the manufacturer. Wipe the surface with a damp cloth and dry the cables completely.
13

HIGH SPEED HANDPIECE
INSERTING A BUR INTO THE HANDPIECE: CHANGING BURS
Lares high speed handpieces should be used with friction grip burs with shank diameters that
conform to ISO and ADA size standards.
Model Recommended Optional
757 Ultralite / Euro Standard 19.0 mm) Surgical Length 26 mm) 757 Ultralite / Euro
1. Hold handpiece handle as shown and position end of thumb on push button with index finger
wrapped around underside of handpiece neck for support.
Figure 2
2. To insert a bur, first be sure bur is clean and free of external debris or corrosion. Without
depressing push button, insert bur into chuck as far as possible. Then fully depress push
button hard and fast while simultaneously inserting bur into chuck the rest of the way until fully
seated. Release push button and insertion is completed.
Caution: Be sure to tug firmly on the bur immediately after completing the insertion procedure
to verify full seating and secure retention of the bur before operation.
3. To remove a bur, fully depress push button hard and fast while simultaneously pulling bur until
removed from chuck. Figure 2. Push button may then be released until next bur is inserted.
Caution: Never force a scored, bent or rusty bur into chuck as it may damage the chuck voiding the
warranty. Never depress push button during handpiece operation or while turbine is still rotating. Be
sure to remove bur at end of day.
14

Clean ng the h gh speed handp ece
1. Remove the bur.
2. Unscrew the high speed handpiece from the air hose coupler.
3. Use the water port cleaning tool item # 10541) to clean the small water spray holes.
4. Use the spray lube with red tube) to spray lubricant into the chuck and into the air drive hole
the smaller of the two large holes).
5. Re-connect the air-hose coupler.
6. Re-insert a bur or bur blank – NEVER run the handpiece without a bur or bur blank in place.
7. With water toggle switch OFF, depress the foot-switch pedal for at least 5 seconds to expel
excess lube from the handpiece.
8. Wipe the handpiece of excess lubricant.
DAILY HANDPIECE LUBRICATION IS ABSOLUTELY ESSENTIAL.
Operate the high speed handpiece between 25 - 32 PSI. The handpiece is engineered to attain
speeds of 360,000 RPM at 32 PSI.
Use the brush to remove foreign particles. A fine wire is provided for cleaning the water spray hole
and to prevent clogging. Blowing air backward into the drill head can dislodge particles. NOTE: DO
NOT attempt to blow particles from the rear end of the handpiece, as larger particles could block the
water tube.
15

HIGH AND LOW SPEED HANDPIECE STERILIZATION PROCEDURES:
(AUTOCLAVE AND CHEMICLAVE ONLY)
Clean external surface: Remove bur from handpiece and scrub with a toothbrush or 2” x 2” gauze
using warm tap water. DO NOT IMMERSE HANDPIECE.
Dry: Thoroughly dry handpiece using gauze, paper towel or air syringe.
Clean / lubricate: Using a combination cleaner / lubricant, spray into handpiece drive air hole and in
chuck.
Expel cleaner / lubricant: Reinsert bur into handpiece head, connect handpiece to tubing and run for a
few seconds to thoroughly expel debris and excess lubricant.
Bag and cycle in autoclave: Place handpiece into autoclave bag or pouch. Cycle as per autoclave /
chemiclave manufacturer’s instructions. DO NOT EXCEED 275° F 135° C).
Cool down and lubricate: Allow handpiece to return to room temperature. Lubricate handpiece as per
instructions listed above. Expel excess lubricant as per previous instructions. Wipe down handpiece.
DO
Use warm tap water to scrub the exterior of handpiece.
Expel excess lubricant from handpiece by running it for a few seconds after cleaning and lubricating.
Use separate cans of lubricant before and after sterilization to prevent cross contamination.
Use autoclave bags and pouches with indicators to protect handpiece.
DON’T
DON’T immerse handpiece in water or chemical disinfectant / sterilizer
DON’T use any type of disinfectant on handpiece.
DON’T sterilize handpiece with bur inserted.
DON’T exceed 275° F 135° C) in autoclave or chemiclave.
DON’T dry heat or heat transfer sterilize.
DON’T operate handpiece without bur or bur blank inserted in chuck.
TROUBLESHOOTING COMMON HIGH SPEED HANDPIECE ISSUES
A. Handpiece sluggish could be lack of lubrication or too much debris)
1. Try heavily spraying “correct” drive air tube with a combination cleaner / lubricant #10083
available from Engler Engineering Corporation and run handpiece for a minute.
B. Burs are sticking inside of turbine or falling out
1. Flush the chuck / spindle with a handpiece cleaner.
2. Ensure that burs are not worn or scored, less than .0625” or larger than .0630” which can
damage spindle.
C. Water spray is weak or completely stopped
1. Insert water port cleaning tool item # 10541 into water tube from head of handpiece to
remove debris.
2. Use our Smart Cleaner to clear clogged tube.
If these simple solutions fail, more serious problems are likely affecting the handpiece, which should
be sent to the manufacturer if under warranty or Engler Engineering Corporation if warranty has
expired.
16

IMPORTANT SAFETY PRECAUTIONS
All high speed handpieces are potentially dangerous if safety precautions are not followed. Be sure to
read and observe the following precautions.
Never use the back of the handpiece for tissue retraction, or otherwise cause push button to be
depressed during operation. Doing so may result in button getting hot and burning the patient.
Never operate handpiece with a bent or damaged bur engaged in chuck.
Never insert or remove handpiece from oral cavity before rotation of bur is completely stopped.
Never operate handpiece at air pressure in excess of recommended maximum settings.
Never operate handpiece after turbine cartridge replacement without double checking that head
cap is tightened securely.
Never depress push button during operation.
Never operate handpiece without fully inserting bur in chuck. Do not extend burs. Longer burs are
available.
Sterilize between patients to prevent cross contamination.
INFECTION CONTROL
Be sure to use only Lares Handpiece Conditioner for this handpiece. Use of lubricants / conditioners
other than Lares approved conditioner or failure to follow the maintenance schedule described above
will automatically void the limited warranty for this product. Lares Handpiece Conditioner is available
from Engler engineering corporation, part #10083.
All Lares high speed handpieces may be steam autoclaved or chemiclaved.
Prior to cycling, be sure to have Lares Handpiece Conditioner available with the appropriate nozzle
hardware attached.
PROCEDURE
This procedure should be performed after every patient to prevent cross-contamination and to assure
long, trouble-free operation.
1.Clean external surface of handpiece thoroughly to remove saliva, blood, and other organic soil.
Scrub handpiece with small brush under running water. Rinse and dry thoroughly.
CAUTION:
NEVER Submerge Components In Any Cleaning Or Disinfecting Solution
DO NOT Use Ultrasonic Cleaners
2. Apply Lares Handpiece Conditioner. Follow specific instructions detailed on can.
3. Remove bur from chuck.
4. Place handpiece in autoclave bag. The use of autoclave bags prevents damage to the handpiece.
5. Load autoclave bag containing handpiece into autoclave or chemiclave. Be sure to load autoclave
bags for maximum penetration of steam or chemical vapor.
6. Cycle the handpiece according to the autoclave / chemiclave manufacturer’s instructions. Do not
exceed 275°F 135°C).
17

Infection control continued
CAUTION:
DO NOT Autoclave or Chemiclave For Extended / Unusual Periods Of Time Such As
Overnight).
DO NOT Leave Handpiece Components In Sterilizer After Cycle Is Completed.
7. Immediately remove handpiece from autoclave or chemiclave. Allow to cool sufficiently prior to
handling.
18

SGII
– Dor ot One - P ece Handp ece
Your unit may be equipped with the SGII – Doriot One-Piece Handpiece instead of the E-TYPE LOW
SPEED HANDPIECE, in this case use the following instructions.
The speed of the polishing head is proportional to the amount of pressure applied to the foot-switch
pedal. Use low pressure to maintain a low speed.
SGII – Doriot One-piece Handpiece
Technical Facts
SGII: Doriot One-piece Handpiece
Maximum RPM: 20,000 min or 5,000 max
Attachment: accepts both handpiece burs and Doriot / U-type
attachments
Air Requirements: Clean filtered moisture free air with recommended
pressure of at least 45 psi. Do not exceed 60 psi.
Operation
2 1
Removing handpiece bur or Doriot attachment from Doriot Handpiece: Hold the handpiece in
the left hand, depress housing ring toward the body of the handpiece while twisting ¼ turn to the right
to open the chuck.
**Push then Pull the handpiece bur or attachment and remove from the chuck.
Forward / Reverse Speed:
Forward: Twist change ring fully clockwise
Reverse: Twist change ring fully conter-clockwise
–In mid position, handpiece will not
operate
19

Cleaning and Care
Your Doriot One-piece Handpiece low speed motor is a high quality precision instrument.
Correct maintenance and care will significantly increase the life of this product.
We recommend One Step Handpiece Cleaner and Conditioner for daily cleaning and lubrication,
available from Engler Engineering Corporation.
External Cleaning
Remove angle or attachment from motor. Disconnect from hose and clean the external surface
thoroughly with a sponge or gauze using warm tap water. DO NOT IMMERSE INSTRUMENT. Wipe
dry with a clean cloth.
Clean / Lubricate
Lubricate after every sterilization. Using the combination cleaner / lubricant available from Engler
Engineering Corporation. Spray the cleaner / lube into the drive air tube. Run motor to expell excess
lubricant. This ensures all internal parts of motor are completed lubricated. Wipe off handpiece.
20
This manual suits for next models
1
Table of contents
Other Engler Dental Equipment manuals
Popular Dental Equipment manuals by other brands

Designs for Vision
Designs for Vision NanoCam 4K/Go user guide

Zyris
Zyris Isolite 3 Training instructions

Durr Dental
Durr Dental VistaScan Nano Easy Installation and operating instructions

Dentsply Sirona
Dentsply Sirona Propex IQ Directions for use

Morita
Morita SIGNO G10 II TU101 Operation manual

Ultradent Products
Ultradent Products VALO GRAND manual