ENGWE L20 User manual

L20
CAUTION READ THIS MANUAL BEFORE USING YOUR EQUIPMENT

Table of contents
1.lmportant warning ...................................................... 1
2.Product components ................................................. 3
3.Technical parameters ................................................ 4
4.Product installation .................................................... 5
4.1 Install the handlebar ...........................................6
4.2 Install the front wheel ......................................... 7
4.3 Install the front mudguard .................................. 8
4.4 Install the front basket ........................................9
4.5 Install the headlight .......................................... 10
4.6 Install the pedals ...............................................11
5.Display instructions ..................................................12
6.Battery ......................................................................19
7.Charging .................................................................. 21
8.Warranty policy ........................................................ 22

1
1.lmportant warning
This manual include important safety performance
informatlon and service informatlon.Please make sure you have
read the following warning content before the first time you use
our product.
lf you borrow your electric bicycle to other people, please let
the user read this manual, it could help to decrease the risk of
accident.
Please wear a suitable and safe helmet before riding,
please wear the clothes with fluores-cent and reflective stripes
when you ride at night.Don't exceed speed limit, it is a main
reason of traffic accident, we should abide by the traffic rule, we
shouldn't exceed the speed limit.
Don't touch the charging hole on the bike, or use metal
touch it, otherwise, the accident will be caused by the transient
short circuit of the current.
Zero starting, braking frequent, driving against the wind,
carrying people or anything;insufficient air pressure on the tires.
All of these will use much electric energy, and thenreduce the
endurance mileage.lf you want the best endurance mileage,
please do something as follows :
1) Please use assist mode;
2) On the premise of safety, don't brake frequently or use
zero starting.
3) Don't overload;
4) Before riding, please check the pressure of the tire and
supply enough pressure.
Our Ebike should avoid prolonged exposure to the sun or
rain, avoid storage in places with high temperature or corrosive
gas, so as to avoid electroplating parts and paint surface by

2
chemical corrosion and electrical parts damage, resulting in
operational failure and accidents.
Your current insurance business may not cover the situation
you may encounter when riding an electric bike, please contact
your insurance company or insurance broker forrelevant
consultation.
If you use our ebike in your country, pls refer to the local laws and
regulation. For example in China, riding an electric bicycle must reach
the age of 16.
Bicycles are vehicles with certain risk fact factor, please be sure
to abide by the traffic rules. At the same time, when emergency
braking, brake the rear wheel first, then brake the frontwheel, when
cycling speed is too fast. There is a danger of tipping over if you brake
the frontwheel suddenly, please ride carefully.
3
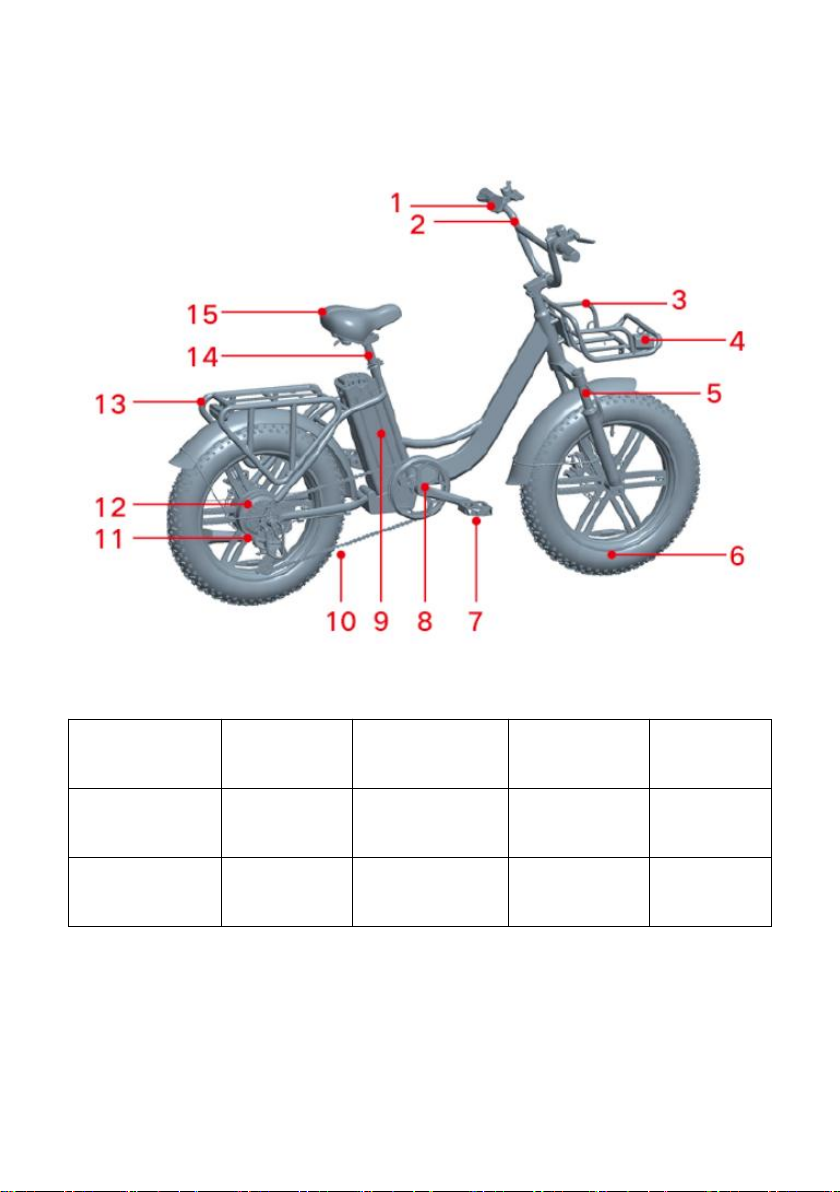
2.Product components
1.Display
2.Handlebar
3.Front basket
4.Front light
5.Fork
6.Tire
7.Pedal
8.Crank set
9.Battery
10.Chain
11.Freewheel
12.Motor
13.Rear light
14.Seatpost
15.Saddle

4
3.Technical parameters
Performance
index
Project
US
EU
Basic
Parameters
Vehicle Size
1737*700*1140
1737*700*1140
wheel Size
20Inches
20Inches
Body Material
Aluminium alloy
Aluminium alloy
Maximum Load
264 Ibs(120KG)
264 Ibs(120KG)
Vehicle weight
74.8 Ibs(34KG)
74.8 Ibs(34KG)
Main
Parameters of
the Whole
Vehicle
Maximum Speed
25mph(39km/h)
25km/h(15mph)
Maximum
Gradient
10°
10°
Rear Derailleur
7-Speed
7-Speed
Mileage Range
42km
26miles
66km
41miles
Working
Temperature
23°F-95°F(-5~35)
23°F-95°F(-5~35)
Battery
Parameters
Rated Voltage
48V
48V
Battery Capacity
13AH
13AH
Service Life
500 Times
500 Times
Motor
Parameters
Motor Power
750W
250W
Motor Type
Brushless Gear
Motor
Brushless Gear
Motor
Maximum Torque
50Nm
50Nm
Charger
Parameters
Input voltage
100-240v
100-240v
output voltage
54V
54V
Output Current
2A
2A

5
4.Product installation
Tool box checklist
6
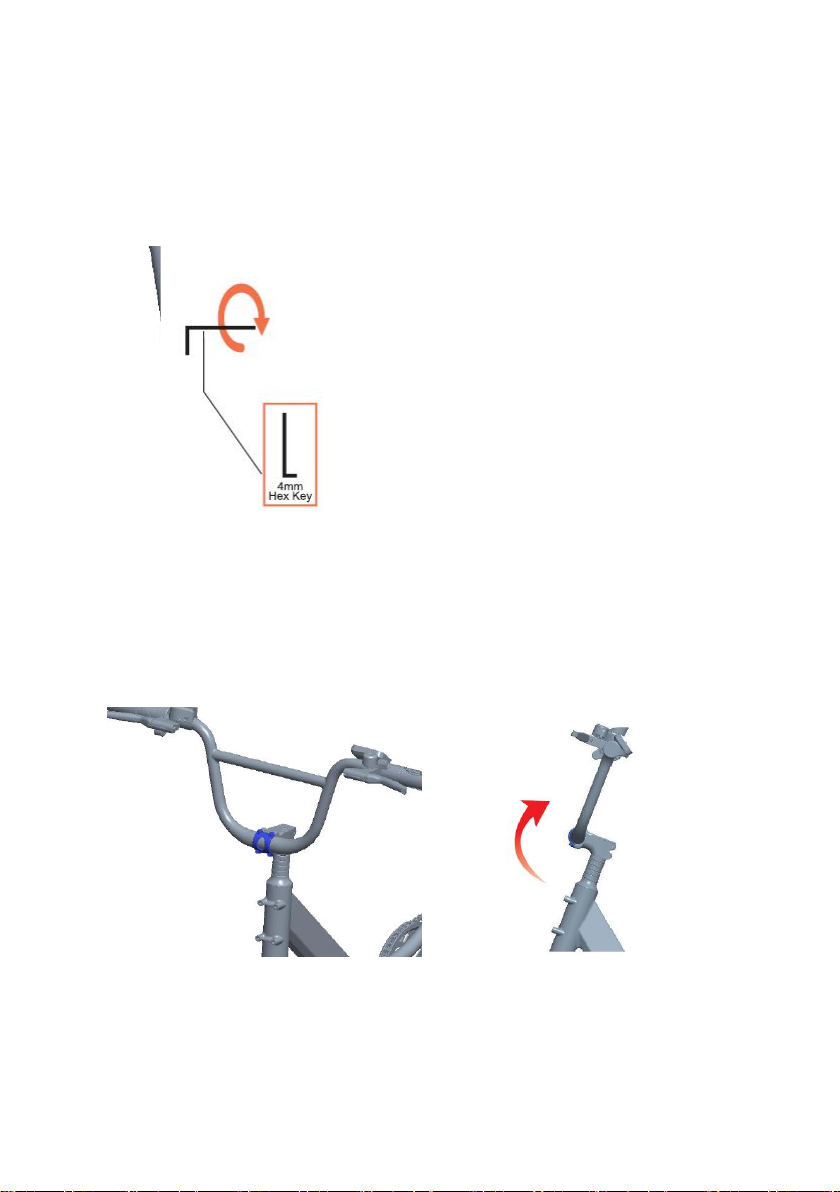
4.1 Install the handlebar
(1)
Remove the handlebars to remove the packing material and
place the center at the riser clamlet.
(2)Install 4mm hexagon wrench clockwise. Do not tighten the
4 bolts in FIG. A. Adjust the handle to the proper Angle in Fig. B,
and then tighten the 4 bolts with proper force.
A
B

7
4.2 Install the front wheel
(1)Remove the front wheel to remove the packing material,
and install the screw gasket shaft sleeve according to the
drawing.
(2)Place the front wheel in the front fork card slot and lock it
with a 15mm wrench.
8
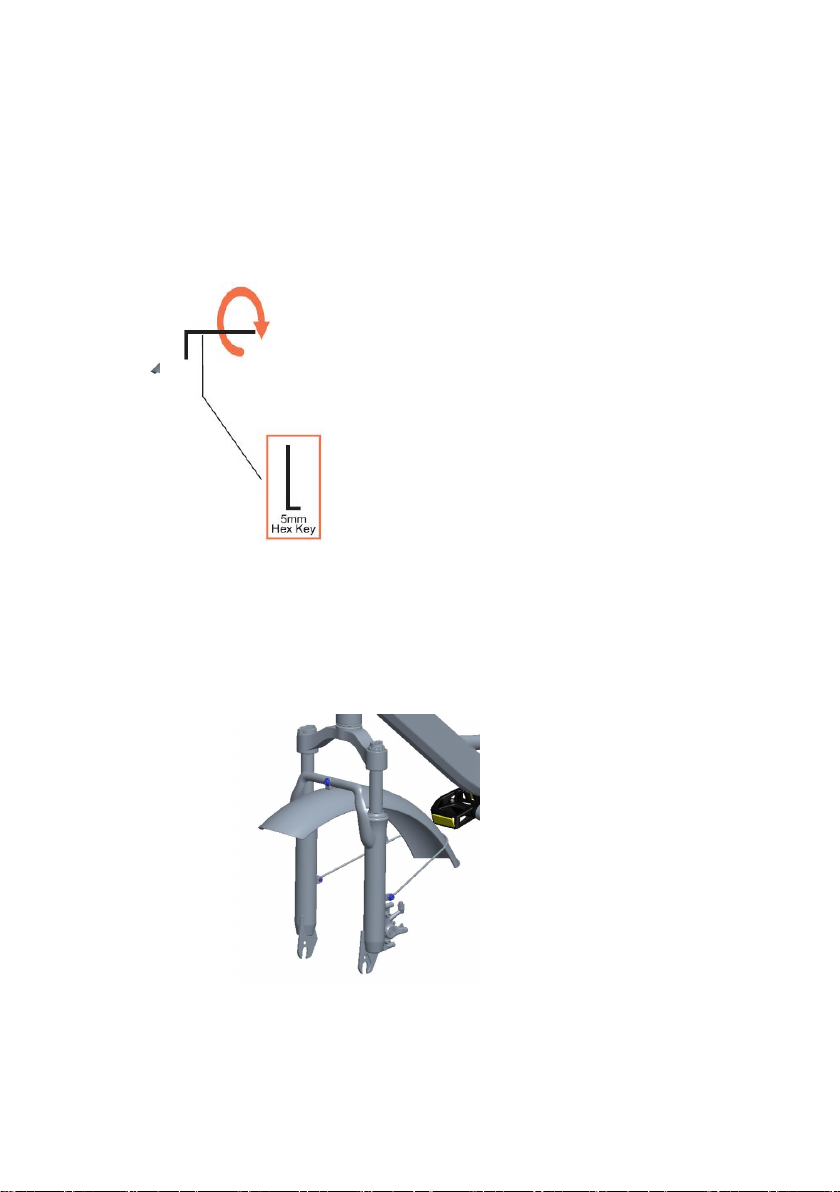
4.3 Install the front mudguard
(1)The lifting lug of the mud pan is connected with the hole of
the front fork axle pipe,and then threaded in the screw to tighten
it.
(2)The mudguard support shall be aligned with the front fork
mudguard take-up hole position,and then threaded into the
screw for tightening.
9
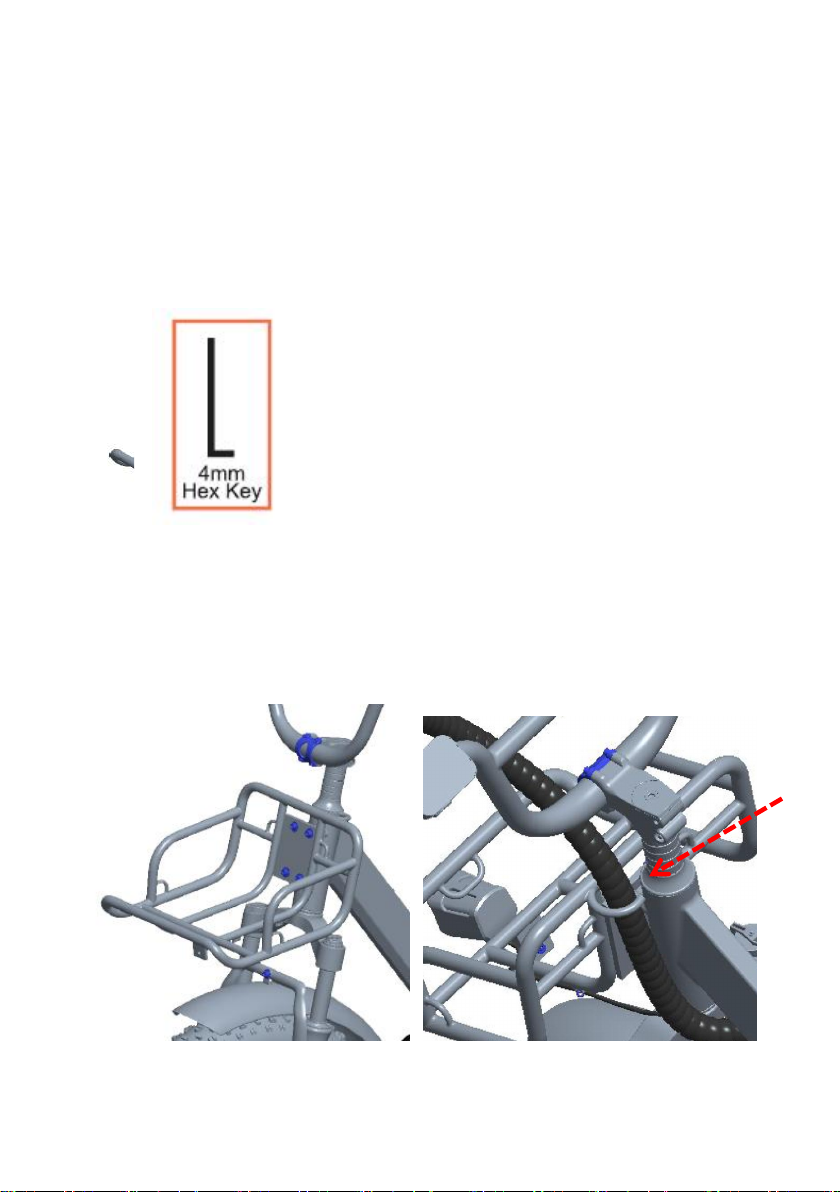
4.4 Install the front basket
(1)Remove the basket to remove the packaging material, and
install the screw gasket according to the drawing.
(2)Install 4 bolts clockwise using a 4mm hexagon wrench, and
place the harness in the front shelf hook.
10
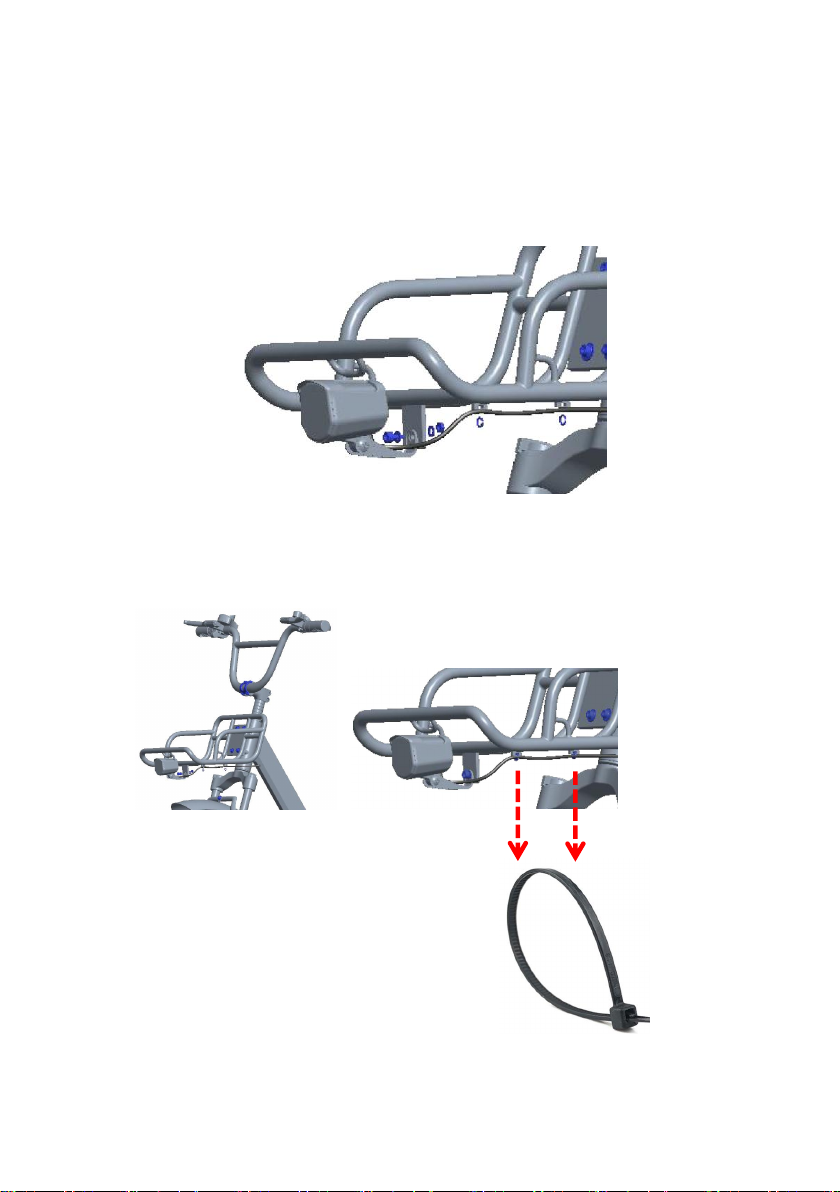
4.5 Install the headlight
(1)Install the headlight screw washer nut according to the
drawing.
(2)The headlight line is fixed as shown in the figure.

11
4.6 Install the pedals
(1)
Prepare left and right pedal,
The pedal“R”is installed on one
side of the chainring, and "L" is opposite to the chainring.
(2)Tighten the right pedal “R” clockwise, Tighten the left pedal
“L” counterclockwise.
12
5.Display instructions
1.Product name and model name
Intelligent LCD display for e-bike; model: YL81C.
2.Specifications
●36V/48V power supply
●Rated working current 15mA
●Maximum working current 30mA
●Leakage current at power-off <1uA
●Working current at the supply controller end 50mA
●Working temperature -20~60℃
●Storage temperature -30~70℃
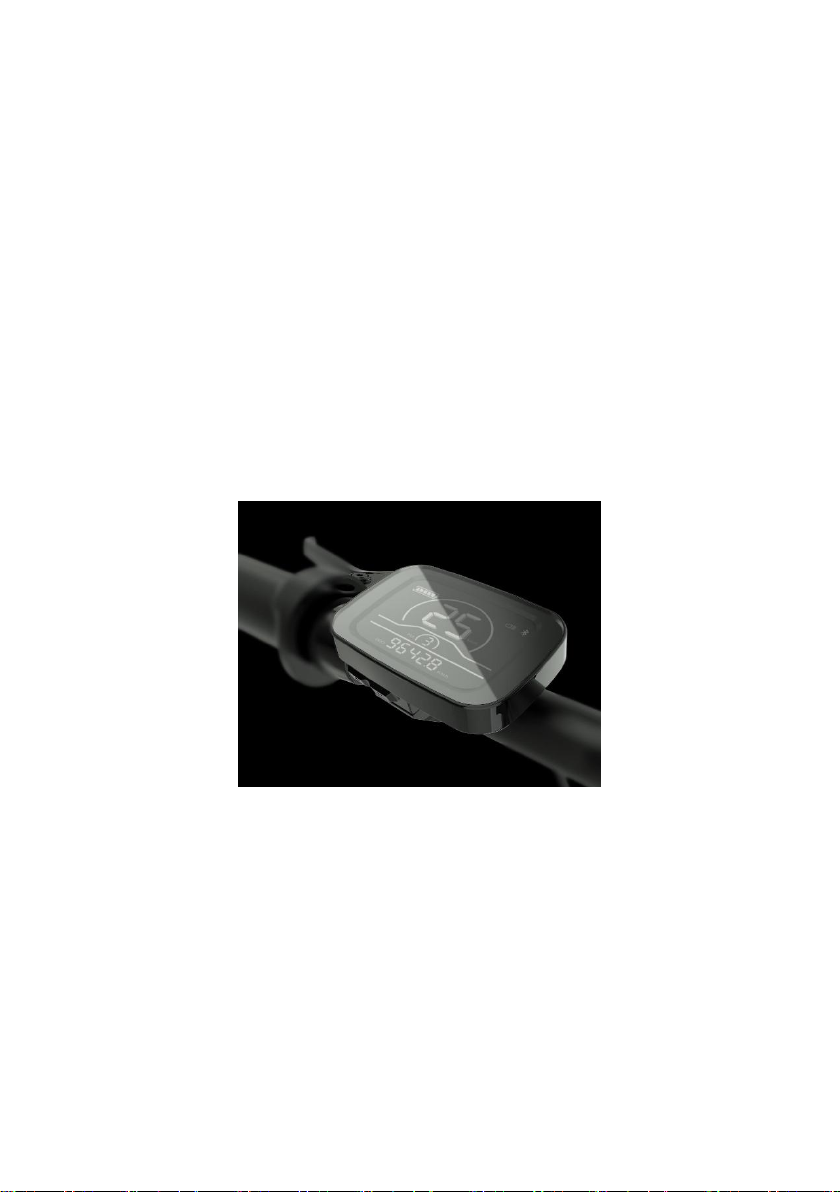
3.Appearance and dimension
4.Function overview and functional area layout
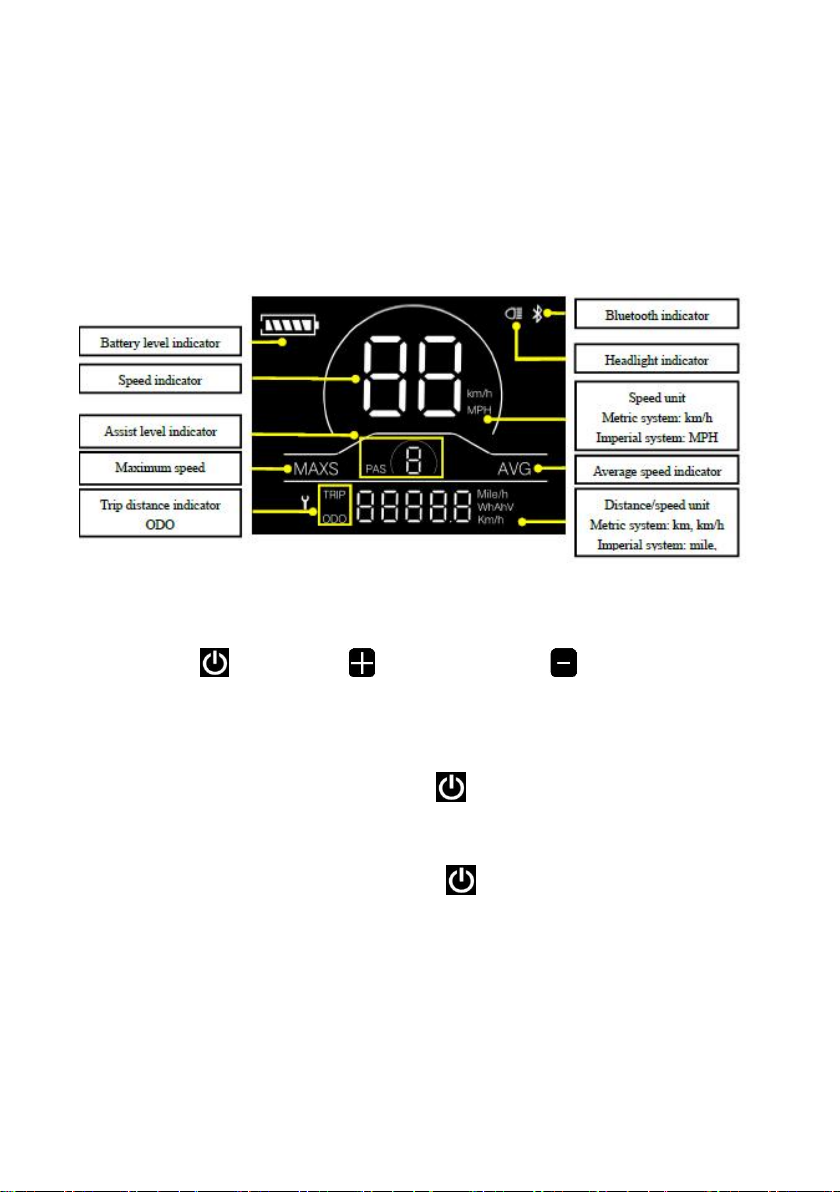
4.1 Function overview
Display YL81C provides a variety of functions to meet the riding needs of
users, including:
●Battery level indicator
●Assist level adjustment and indication
●Headlight indicator
●Speed indicator (including real-time speed, maximum speed (MAXS) and
13
average speed (AVG))
●Distance indicator (including ODO and trip distance (Trip))
●Error code indicator
●Bluetooth connection indicator (reserved)
●Parameter setting function
4.2 Functional area layout
4.3 Button definitions
There are three buttons on the operating unit of display YL81C, i.e., the
on/off button , plus button and minus button .
5. General operation
5.1 Power on/off
By pressing and holding the button , the display will start to work and
the working power supply of the controller will be turned on. In the power-on
state, by pressing and holding the button , your e-bike will be powered off.
In the power-off state, the display will no longer use the battery power, and its
leakage current will be less than 1uA.
■If your e-bike is not used for more than 10 minutes, the display will be
automatically powered off.
5.2 Display interface
After the display is turned on, the display will show the real-time speed

14
(km/h) and the trip distance (km) by default. By pressing the button , the
information displayed will be switched between the trip distance (km), ODO
(km), maximum speed (km/h) and average speed (km/h).
When the distance reaches 9999.9 km, it will be automatically reset to
zero.
5.3 Push assistance
By pressing and holding the button , the electric push assistance
mode will be enabled. Your e-bike will run at the constant speed of 6km/h.
The display will show level P. By releasing the button , your e-bike will
immediately stop power output and return to the state before push
assistance.
■ The push assistance function can only be used when you are pushing your
e-bike. Please do not use it during riding.
5.4 Headlight on/off
By pressing and holding the button , the controller will turn on the
headlights and the display backlight will turn dark. By pressing and holding
the button again, the controller will turn off the headlights and the display
backlight will resumes the luminance.
5.5 Assist level selection
By pressing the button / , the e-bike assist level will be switched to
change the motor output power. The assist levels available for the display
include: levels 1-5.
5.6 Battery level indicator
The battery level indicator consists of five segments. When the battery is
fully charged, the five segments will be all on. In case of low voltage, the
outline of the battery indicator will flash, which means the battery has to be

15
charged immediately.

16
5.7 Error code indicator
When a fault occurs in the electronic control system of your e-bike, the
display will automatically indicate the error code in the distance area in the
format of E0**. Detailed definitions of error codes are shown in Schedule 1.
■When an error code appears on the display interface, please conduct
troubleshooting in time. Otherwise, your e-bike will not work normally.
6. General setting
■ All parameters can only be set when your e-bike stops.
The steps for general setting are as follows:
In the power-on state, when the display shows the speed of 0,
6.1 Trip distance reset
Press and hold the buttons and at the same time for more than
2 seconds to reset the trip distance.
6.2 Factory reset
dEF refers to factory reset. dEF-n represents not to restore factory
settings, and dEF-y represents to restore factory settings. Press and hold the
buttons and at the same time for more than 2 seconds to enter the
factory reset interface, and press the button / to select a parameter.
6.3 Speed limit setting
P3 represents the speed limit setting option. The adjustable range is
10~40km/h. Press the button to enter the parameter modification

17
interface. Press the button / for parameter selection. Press the button
to save the parameter and return to the selection interface of general setting
options.
6.4 Metric/imperial system setting
P4 refers to the metric/imperial system setting option. 00 represents the
metric system, and 01 represents the imperial system. Press the button
to enter the parameter modification interface. Press the button / for
parameter selection. Press the button to save the parameter and return
to the selection interface of general setting options.
18
Schedule 1 Error Code Definitions
Error codes for protocols YL-01 and YL-02:
Error
codes for
protocols
YL-01
and
YL-02:
Definition
Error
codes for
protocols
YL-01
and
YL-02:
Definition
E001
Controller Abnormality
E004
Throttle Abnormality
E002
Communication
Abnormality
E005
Brake Abnormality
E003
Motor Hall Signal
Abnormality
E006
Motor Phase
Abnormality
Error codes for protocols YL-05, KDS and YL-J:
Error
codes for
protocols
YL-01
and
YL-02:
Definition
Error
codes for
protocols
YL-01
and
YL-02:
Definition
E021
Current Abnormality
E024
Motor Hall Signal
Abnormality
E022
Throttle Abnormality
E025
Brake Abnormality
E023
Motor Phase
Abnormality
E030
Communication
Abnormality
Table of contents
Other ENGWE Bicycle manuals


