HOMCOM 370-225V00 User manual

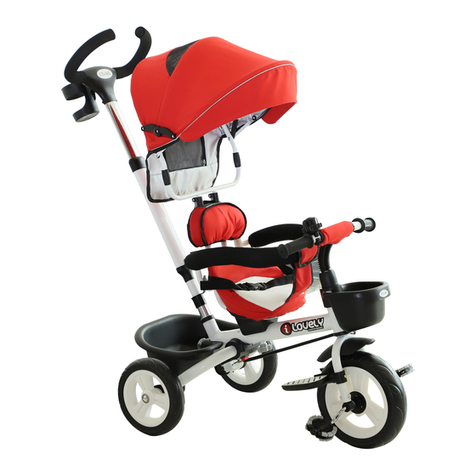
* The maximum load is 25kg.
ASSEMBLY INSTRUCTION
IMPORTANT, RETAIN FOR FUTURE REFERENCE: READ CAREFULLY
IN221200391V01_UK
370-225V00
months
12-50

Note:
Tricycle structure and appearance are subject to change without
notice. Pictures are for reference only.
Maintenance:
Regularly check the trike, ensuring all screws and components are
properly secured.
1. Clean the tricycle with a slightly damp cloth instead of water, so
the structure does not get damaged.
2. Check the tricycle components, ensuring they are lubricated
regularly.
3. Any loose or damaged screws need to be replaced immediately.
4. Before installing, read these instructions carefully. Keep this
manual for future reference.
Warning:
1. Read all instructions thoroughly before installing and using.
Keep this manual for future reference.
2. Adult assembly is required.
3. Keep away from streets, roads, rivers, slopes and swimming
pools.
4. The maximum load is 25kg. The specified age is 12-50 months.
Do not exceed the maximum load.
5. Before riding, ensure children understand how to use this
tricycle.
6. Children must wear protective clothing when riding. An adult
should carefully check the trike before use, ensuring there are
no damages.
7. Adult supervision is always required.
8. When unassembled, keep away from small children. There are
small and sharp parts, which could be a potential choking
hazard.
9. Remove packaging and keep away from children to avoid
suffocation.
10. This product is suitable for one child at a time.

4.
5.
6.
7. 8.

1. Unfolding the U-shaped tube
Unfold the U-shaped tube backwards, following the arrow from picture 1, ensuring the
tube is completely fixed.
2. Installing front/back wheels
As shown in 'PICTURE 2', put the brake pedal 5 into the transverse tube of the rear
wheel frame, then insert the rear wheel 6 into the corresponding hole on brake pedal 5,
completing the installation of the rear wheel.
Note: When installing the brake pedal, ensure you distinguish between the left and the
right – pay attention when fixing the brake pedal onto the right position.
Insert the front wheel 2 into the hole, which is under the head tube of frame 1. To
remove, press the quick release button to remove the front wheel.
3. Installing footrest
Place the footrest 3 under frame 1, using the footrest knob 4 to secure.
4. Unfolding the backrest and handlebar
Pull up the handle on the backside of the backrest, then unfold the backrest to the
appropriate position. Pull up the handlebar to secure.
5. Installing Canopy
Install the canopy as shown in 'PICTURE 4'.
6. Installing push rod
Install the push rod as shown in 'PICTURE 5'.
7. Securing the back basket
As shown in 'PICTURE 6', fix the basket (7) onto the trike, following the track of the
dotted line.
6
8

Direction for use
4. Backrest adjustment
Hold the handle behind the backrest to adjust its angle.
5. Folding
- Fold the canopy.
- Pull up the armrest.
- Fold the handlebar backwards.
- Fold the backrest forwards.
- Shorten the push rod and fold it forwards (PICTURE 10).
1. Unfolding the footrest pedal
There is a footrest pedal under frame 1 (PICTURE 7). You can unfold the footrest, so
children can rest their feet as the trike gets pushed.
2. Moving the seat forward and backward
There is a switch under the seat, on the left – adjust the seat's position by pulling the
switch (PICTURE 8).
3. Rotating the seat
There is a button on the rear of the seat. Press and hold the button to change the
seat's direction (PICTURE 8).

IMPORTANTE! CONSERVARE IL PRESENTE MANUALE PER FUTURO
RIFERIMENTO E LEGGERLO ATTENTAMENTE.
*Carico massimo 25kg.
TRICICLO PER BAMBINI
ISTRUZIONI DI ASSEMBLAGGIO
IN221200391V01_IT
370-225V00
mesi
12-50

Nota:
La struttura e l'aspetto del triciclo sono soggetti a modifiche senza
preavviso. Le figure riportate sono solo di riferimento.
Manutenzione:
Controllare regolarmente il triciclo, assicurarsi che tutte le viti e le
parti siano fissate correttamente in posizione.
1. Pulire il triciclo passando un panno leggermente umido invece
dell'acqua, in modo da non danneggiare la struttura.
2. Controllare le parti del triciclo, assicurandosi di lubrificarle
regolarmente.
3. Sostituire immediatamente eventuali viti allentate o
danneggiate.
4. Prima dell'installazione, leggere attentamente queste istruzioni.
Conservare questo manuale per riferimenti futuri.
Avvertenze:
1. Leggere attentamente tutte le istruzioni prima dell'installazione
e dell'uso. Conservare questo manuale per riferimenti futuri.
2. È necessario il montaggio da un adulto.
3. Tenere lontano da strade, vicoli, fiumi, pendii e piscine.
4. Il carico massimo è di 25 kg. L'età adatta è di 12-50 mesi.
Non superare il carico massimo.
5. Prima di lasciare che si mettano alla guida, assicurarsi che i
bambini comprendano come utilizzare questo triciclo.
6. I bambini devono indossare indumenti protettivi durante la
guida. Un adulto deve controllare attentamente il triciclo prima
dell'uso, assicurandosi che non sia danneggiato in alcun modo.
7. È sempre richiesta la supervisione di un adulto.
8. Una volta smontato il triciclo, tenerlo lontano dalla portata dei
bambini. Esso contiene parti piccole e taglienti che potrebbero
comportare un potenziale rischio di soffocamento.
9. Rimuovere l'imballaggio e tenerlo lontano dalla portata dei
bambini per evitare il rischio di soffocamento.
10. Questo prodotto è adatto per essere usato da un bambino alla
volta.
LISTA PARTI
Telaio
Cestello anteriore
Poggiapiedi
Ruota
anteriore Manopola
poggiapiedi Pedale freno
Pedale
poggiapiedi Ruota posteriore
Cestello posteriore
Asta di spinta
Tettuccio
1.Telaio×1 2.Ruota anteriore×1 3.Poggiapiedi×1 4.Pedale freno×2
5.Ruota
posteriore×2
6.Asta di spinta×1
8.Cestello
anteriore×1
7. Tettuccio×1

1. Estendere il tubo a U
Estendere il tubo a U all'indietro, seguendo la freccia in figura 1, assicurandosi che il
tubo sia completamente fissato in posizione.
2. Installare le ruote anteriori/posteriori
Come mostrato in 'FIGURA 2', inserire il pedale del freno 5 nel tubo trasversale della
ruota posteriore, quindi inserire la ruota posteriore 6 nel foro corrispondente sul pedale
del freno 5, per completare l'installazione della ruota posteriore.
Nota: quando si installa il pedale del freno, assicurarsi di separare quello sinistro e
destro: fare attenzione quando si installa il pedale del freno in posizione corretta.
Fissare la ruota anteriore 2 nel foro, situata sotto il telaio 1. Per rimuovere la ruota
anteriore, premere il pulsante di sgancio rapido.
3.Installare il poggiapiedi
Posizionare la pedana poggiapiedi 3 sotto il telaio 1, fissare con la manopola del
poggiapiedi 4.
4. Estendere lo schienale e il manubrio
Sollevare la maniglia sul retro dello schienale, quindi estendere lo schienale in posizione
corretta. Sollevare il manubrio per fissarlo in posizione.
5. Installare il tettuccio
Installare il tettuccio come mostrato in 'FIGURA 4'.
6. Installare l'asta di spinta
Installare l'asta di spinta come mostrato in FIGURA 5'.
7. Fissare il cestello posteriore
Come mostrato in FIGURA 6', fissare il cestello (7) al triciclo seguendo la linea
tratteggiata.
6
8
STEP DI MONTAGGIO
Manopola
poggiapiedi
Cestello
posteriore
FIGURA 1 FIGURA 2 FIGURA 3
FIGURA 4 FIGURA 5 FIGURA 6

Istruzioni per l'uso
4. Regolare lo schienale
Premere la maniglia dietro lo schienale per regolarne l'inclinazione.
5. Ripiegamento
- Ripiegare il tettuccio.
- Sollevare il bracciolo.
- Ripiegare il manubrio all'indietro.
- Ripiegare lo schienale in avanti.
- Accorciare l'asta di spinta e ripiegarla in avanti (FIGURA 10)
1. Estendere il pedale del poggiapiedi
Il pedale del poggiapiedi è situato sotto il telaio 1 (FIGURA 7). È possibile aprire il
poggiapiedi in modo che i bambini possano riposare i piedi mentre il triciclo viene
spinto da un adulto.
2. Regolare il sedile in avanti e indietro
L' interruttore è situato sotto il sedile, sul lato sinistro: regolare la posizione del sedile
tirando l'interruttore (FIGURA 8).
3. Ruotare il sedile
Il pulsante è situato sul retro del sedile. Tenere premuto il pulsante per cambiare la
direzione del sedile (FIGURA 8).
FIGURA 7 FIGURA 8
Interruttore di
regolazione in
avanti e indietro
del sedile
Pulsante di
rotazione dle
sedile
FIGURA 10FIGURA 9

In caso di dubbio, si prega di contattare il nostro centro assistenza clienti.
I nostri dettagli di contatto sono di seguito:
0039-0249471447
clienti@aosom.it
IMPORTATO DA:
AOSOM Italy srl
Centro Direzionale Milanofiori
Strada 1 Palazzo F1
20057 Assago (MI)
P.I.: 08567220960
FATTO IN CINA
IT
If you have any questions, please contact our customer care center.
Our contact details are below:
0044-800-240-4004
enquiries@mhstar.co.uk
IMPORTER ADDRESS:
MH STAR UK LTD
Unit 27, Perivale Park,
Horsenden lane South
Perivale, UB6 7RH
MADE IN CHINA
UK

Table of contents
Languages:
Other HOMCOM Bicycle manuals

HOMCOM
HOMCOM 370-191 User manual

HOMCOM
HOMCOM 53-0016 Assembly instructions

HOMCOM
HOMCOM 370-098 User manual

HOMCOM
HOMCOM 370-207 User manual

HOMCOM
HOMCOM 370-188V80 User manual

HOMCOM
HOMCOM 342-007 User manual

HOMCOM
HOMCOM 370-025 User manual

HOMCOM
HOMCOM 712-046 Installation guide

HOMCOM
HOMCOM 370-106 User manual

HOMCOM
HOMCOM 370-092 User manual

HOMCOM
HOMCOM 370-097 User manual

HOMCOM
HOMCOM 370-061 User manual

HOMCOM
HOMCOM 370-027 User manual

HOMCOM
HOMCOM 370-156 User manual

HOMCOM
HOMCOM 370-155 User manual

HOMCOM
HOMCOM 370-095 User manual

HOMCOM
HOMCOM 370-211V70 User manual

HOMCOM
HOMCOM 370-205 User manual

HOMCOM
HOMCOM 712-048 Installation guide

HOMCOM
HOMCOM 370-182 User manual