Enhance Mobility MOJO MJ100 User manual

MOJO-MJ100
MOJO AutoFold-MJ101

Thank you for choosing the MOJO Folding Scooter. Please read this manual carefully before
operating the MOJO. If you have any questions or need further assistance, please contact your MOJO
Dealer or Enhance Mobility directly at 800-296-4151 Extension 2 or Service@EnhanceMobility.com.
This manual covers the MOJO’s characteristics, components, functions, safety guidelines, battery, and
maintenance.
Please note all information and photos in this manual are for reference only and are subject to factory changes
and modifications.
Before using your MOJO Scooter please be sure that the delivery is complete. Your MOJO package should
include the User manual, 2 batteries, 2 keys, 2 remote controls (automatic folding version only), basket,
battery charger, removable arm rests, 2 thumb screws, 2 allen wrenches and a MOJO backpack. If you did
not receive a complete delivery, contact your authorized MOJO dealer.
Table of Contents
1. ---------- Table Of Contents
2. --------- MOJO Feature Guide
3. --------- MOJO Specifications List
4. --------- MOJO Key Components
5. --------- Operating Instructions
6. --------- Operating Instructions Cont...
7. --------- Folding and Unfolding the MOJO
8. --------- MOJO Assembly & Disassembly
9. --------- Safety Requirements
10. --------- Battery Maintenance & Charging
11. -------- Battery F.A.Q.
Children should not operate the MOJO Electric Scooter.
People with health concerns should consult a physician before use.
1
12. -------- Maintenance & Troubleshooting
13. -------- Troubleshooting Cont...
14. -------- Warranty Information
The following symbol is used in this manual to indicate warning. It is extremely important
you fully understand the content. Failure to note the warnings may cause personal injury
and/or damage the scooter.

MOJO Feature Guide
The MOJO is composed of the following parts: front and rear frame, handlebar
controls, rear wheels, front wheels, front shroud, headlight, tiller, height adjust-
ment lock lever, tiller tilt adjuster, foldable seat, seat supporting frame, deck,
battery, charger port, armrests and remote bi-pass switch.
1. Handlebar Control Pod 8. Front wheels 15. Backrest
2. Steering Handle 9. Deck 16. Seat Cushion
3. Forward/Reverse Directional Controls 10. Rear Wheels 17. Tiller Tilt Adjustment
4. Telescoping Tiller 11. Anti-Tip Wheels 18. Free Wheel Lever
5. Height Adjustment Lock Lever 12. Rear Axle Group 19. Automatic Folding Switch (MOJO AF only)
6. Front Shroud 13. Arm Screws 20. Charger Port
7. Battery 14. Arm Rests 21. Headlight
22. Manual Folding Lever (MOJO Only)
1. 2.
3.
4.
5.
6.
7.
8.
9.
10.
11.
12.
13.
14.
15.
16.
17.
18.
19.
20.
21.
22.
2

1. Handlebar Control Pod 8. Front wheels 15. Backrest
2. Steering Handle 9. Deck 16. Seat Cushion
3. Forward/Reverse Directional Controls 10. Rear Wheels 17. Tiller Tilt Adjustment
4. Telescoping Tiller 11. Anti-Tip Wheels 18. Free Wheel Lever
5. Height Adjustment Lock Lever 12. Rear Axle Group 19. Automatic Folding Switch (MOJO AF only)
6. Front Shroud 13. Arm Screws 20. Charger Port
7. Battery 14. Arm Rests 21. Headlight
22. Manual Folding Lever (MOJO Only)
Model
MOJO Auto-Fold MOJO
Overall Length
Overall Width
Front Tires
Rear Tires
Max Speed
Range
Turning Radius
Weight
Colors
Brakes
Drive System
Handlebar
Maximum Weight
Capacity
Seat Width
Seat Height
Battery
Motor
Battery Charger
Folded Length
Folded Height
Heaviest Piece
Ground Clearance
40 Inches 40 Inches
20.5 Inches 20.5 Inches
HoneyComb 6” Solid Tires HoneyComb 6” Solid Tires
HoneyComb 7” Solid Tires HoneyComb 7” Solid Tires
Up to 3.75 MPH Up to 3.75 MPH
Up to 13 Miles Up to 13 Miles
55 Inches 55 Inches
65 Lbs (without battery pack) 65 Lbs (without battery pack)
Red, Blue, Aqua, Lemony-Lime Red, Blue
Electromagnetic Electromagnetic
Rear Wheel Drive Rear Wheel Drive
PU Foam PU Foam
Up to 300 Lbs Up to 300 Lbs
15 Inches 15 Inches
16.5 inches from deck 16.5 inches from deck
Dual (2) 24V 7.5AH Dual (2) 24V 7.5AH
24V 120W 24V 120W
29V 2AH 29V 2AH
20.5 Inches 20.5 Inches
26 Inches 26 Inches
44 lbs (Front Frame) 44 lbs(Front Frame)
1 Inch 1 Inch
3
MOJO Specifications
MJ101 MJ100

Handlebar Control Pod
Horn
Battery Indicator
Directional Controls
Auto-Folding Switch
Speed Control
Knob
Headlight Switch
Keyed Ignition
The Handlebar Control Pod consists of the steering handle, LCD display with battery indica-
tor, keyed ignition, directional controls, automatic folding switch, charging port, headlight
switch, horn and speed control
Always protect the MOJO Handlebar Controls from humidity and water. If the
handlebar controls have been affected by moisture, be sure to dry before
operation.
Always slow down when turning or operating in reverse.
4
(MOJO AF ONLY)
Steering Handle
MOJO Key Components

Operating Instructions
Turning on the Power
Put key in ignition and turn clockwise to turn on. The LCD display will turn on when the scooter is on.
Turn the key counterclockwise to power off. The LCD display will turn off when the scooter is off.
Free Wheel Lever
The Free Wheel Lever is located on the rear of the scooter on the left-hand side. Pushing the lever down will
allow the wheels to move freely. The lever must be pulled up to drive the scooter.
Please note – When Free Wheel mode is engaged the scooter will slow down if being pushed/pulled too fast.
– When the Free Wheel Lever is engaged, the scooter will make a beeping noise when the
scooter is turned on. Turn off, and disengage the Free Wheel Lever to operate the scooter.
Engage Free Wheel Lever (Neutral) -
Push down on free wheel lever to the “OFF” position
to unlock the brake.
LCD Display
The LCD Display shows the battery level, battery voltage, current speed, and distance.
The battery level indicator will show the battery level when the scooter is on. When 5 bars are visible,
the battery is fully charged. The bars disappear as the battery loses charge. The battery is ½ charged
when 3 bars are left. When there is only one bar left, the battery needs to be charged.*
Speedometer
Battery Indicator
5
Directional Control Lever
The Directional Control Lever is used to control forward and reverse motion.
To move forward - slowly pull the right-side fingertip control paddle towards the
handlebar.
To reverse - slowly pull the left side of the fingertip control paddle towards the
handlebar.
Stop - Stop the scooter by releasing the Directional Control Lever.
*SEE PAGE 7 FOR MORE INFORMATION REGARDING BATTERY CHARGING
Disengage Free Wheel Lever (Drive) - Pull up
on the free wheel lever to the “ON” position to engage the
brake and drive your MOJO.
Free Wheel Lever
Directional Control Lever

Operating Instructions Cont...
Automatic Folding Switch
The Automatic Folding Switch is located on the handlebar control pod. The switch can be used instead
of the remote control to open and close the scooter. To close the scooter, power on the MOJO, and press
the Automatic Folding Switch toward the “II” and hold the button. Release the button when the scooter is
fully closed. To open the scooter, press the Automatic Folding Switch towards the “I” and hold the button
down. Release the button when the scooter is fully opened.
Speed Control Knob
The Speed Control Knob is used for controlling the scooter’s speed. Adjust the knob to the left to
decrease maximum speed; adjust the knob to the right to increase the maximum speed.
Brakes
The MOJO Scooter is equipped with electromagnetic brakes. Releasing the Directional Control
Lever will stop the scooter.
Horn
The Horn is located on the front side of the Handlebar Control Pod. When you press the button, the
horn will sound.
Armrests
Armrests come standard with the MOJO. The scooter can be used with or without the armrests. To
install the MOJO armrests, slide the armrest into the armrest bracket and insert the thumb screw at
desired height (pic 1).
The angle of the armrest can be adjusted by adjusting the height of the screw in the armrest. The
higher the screw, the higher the pitch of the armrest (pic 2).
Telescoping Tiller (Picture 3)
The tiller height can be adjusted. Push and hold the height adjustment lever while pulling up or
pushing down on the tiller. When the tiller is adjusted to your liking, let go of the height adjustment
lever to lock the tiller into place.
Adjusting the Tiller (Picture 4)
The MOJO’s tiller can adjust for rider’s comfort. To adjust – squeeze and hold the tiller tilt adjuster
lever towards the tiller then move the tiller towards the seat to a reach comfortable position. To put
the tiller to the original position, squeeze the tiller tilt adjuster lever and the tiller will move to the
original position.
Attaching the Basket (Picture 5)
The basket attaches to the bracket on the front of the tiller. Simply slide the basket into place. The
basket can be easily removed and folded for transport and storage.
Arm Rest (1) Arm Rest (2) Tiller Adjust (3) Tiller Adjust (4)
Basket Install (5)
6
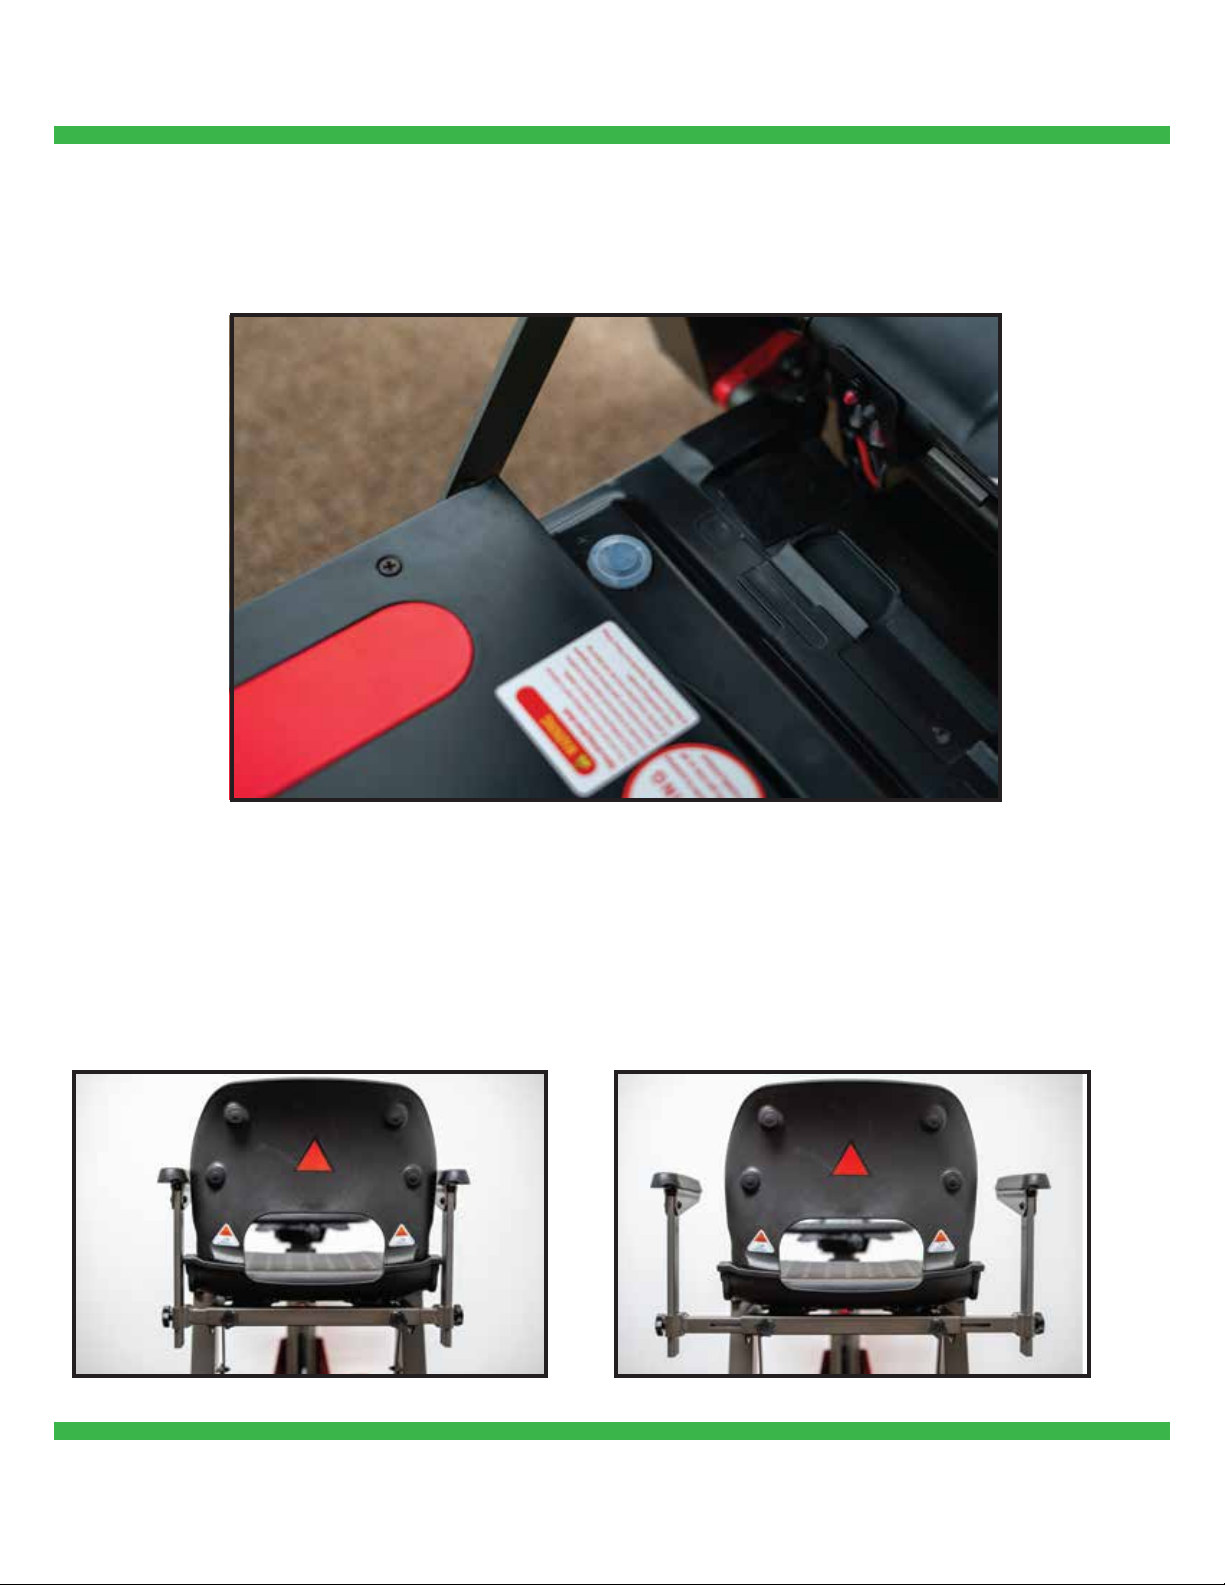
Back up Alarm On/Off Switch
The On/Off switch for the back up alarm is located just underneat the seat, and to the right. To turn
the back up alarm ON, set the switch to the “O” position. To turn off your back up alarm, set the
switch to the “I” Position.
Extended Arm Rests
The arm rests on the MOJO can both extend, and retract. To extend the arm rests, locate the
knob on the back side of the seat. Loosen the knob fully, before pulling out on the arm rest.
Once you have chosen the desired position for your arm rests, tighten the same knob to lock
them in place.
To retract the arm rests, loosen the knob on the back of the seat fully, before pushing the arm
rests in, towards the MOJO. Tighten the knob to lock the positon of the arm rests.
7
Standard Position Extended Position
Operating Instructions Cont...
Loremipsum

Folding And Unfolding The Mojo
Automatic Remote Control Operation (MOJO AF)
Manually Folding The MOJO (MOJO Only)
To UNFOLD (open) the MOJO Scooter, with the MOJO is turned on, press and release the open button on
the key fob. The scooter will open fully.
To FOLD (close) the MOJO Scooter – with the MOJO powered on, press and release the fold button on the
key fob. The scooter will close.
To UNFOLD (open) the MOJO Scooter- Locate the Red, manual folding bar in the center of the folded
scooter. Press down on the tab, unlocking the latch. With the latch unlocked, pull up and out on the seat
back of the MOJO scooter, until it opens fully. You should hear a click when the scooter locks in the open
position.
To FOLD (close) the MOJO Scooter – Locate the manual folding bar on the floor board of the Mojo.
Pull straight up on this bar, and the scooter will begin to fold at the middle. Squeeze the scooter at the
base until you hear a click, signifying that the scooter is locked in the folded postition.
The remote indicator light comes on when a button is pressed on the remote control. If you press a button
and it flickers or does not come on, the battery in the remote control should be replaced. The remote
control uses a CR2032 battery. If the remote indicator light doesn’t turn off, it indicates one of the buttons
is stuck on the remote control and needs adjustment.
Syncing The Remote Control
Find the Remote Relay Box located directly below the seat on the left. Press the button on the remote
relay box one time. The blue light will flash three times and you will hear three beeps. Then press the
close button on the remote control once. There will be two beeps, indicating the remote has been
successfully synced.
To clear the remote control memory, press and hold the button on the remote relay box for five seconds.
There will be one beep to indicate the memory has been cleared. Up to four remotes can be synced at
once.
8
Remote Relay Button Remote Relay Button
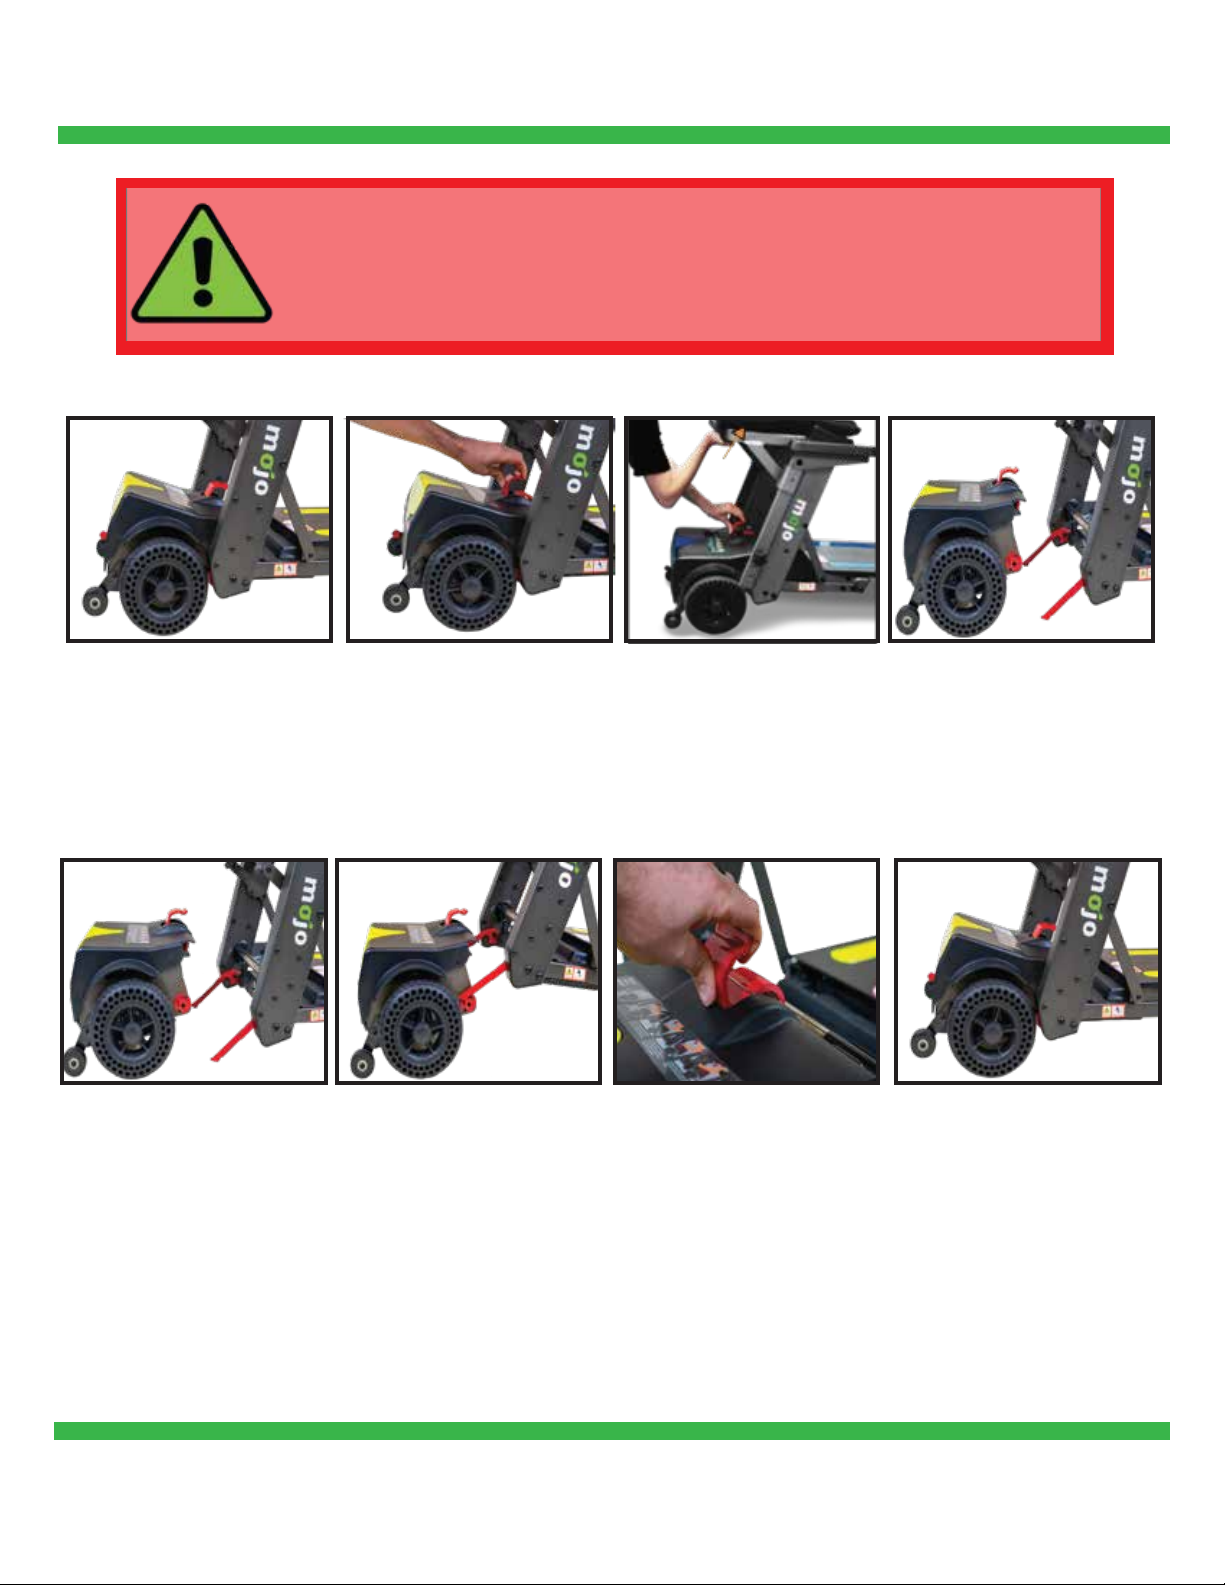
MOJO Disassembly
MOJO Assembly
9
To disassemble the
MOJO scooter, locate
the red, Axle Group
Release Lever in the
rear of the scooter.
Pull the Axle Group
Release Lever backward
until the anti-tip wheels
rest on the ground. This
will detach the Rear
Transaxle from the
frame.
While the Axle Release
Lever is pulled back,
use your other hand to
push up on the bottom
of the seat, until the
frame is fully detached
from Rear Transaxle.
Complete. Your
MOJO is now
fully disassembled.
To reassemble the
MOJO, line up the red
tabs on the Rear
Transaxle with the red
bars on the frame.
Guide the red bars
from the frame of the
MOJO, over the top of
the red tabs on the
Rear Transaxle. Slowly
lower the frame of the
Mojo down into the
Rear Transaxle.
Once you have fully
lowered the MOJO’s
frame into the Rear
Transaxle, pull out on
the red Axle Group
Release Lever. The fame
will lock into its final
position.
Complete. Your MOJO
is now fully assembled.
Use Caution when assembling and disassembling the MOJO Scooter.
Attachment points may pinch hands and fingers. Be sure to read pinch
point warnings on your MOJO Scooter prior to attempting.
MOJO Assembly/Disassembly
1.
1.
2.
2.
3.
3.
4.
4.

The MOJO has the best stability under normal driving conditions (dry, level ground with concrete or asphalt).
Extra care must be taken when riding on other surfaces (grass, gravel, etc.)
It is unsafe to drive the MOJO up steep inclines.
Please read the manual instruction completely before operation.
• Check the physical conditions (tires, battery, bolts) before driving the scooter.
• ALWAYS SLOW DOWN BEFORE TURNING.
• ALWAYS TURN THE KEY OFF BEFORE GETTING ON OR OFF THE SCOOTER.
• The MOJO can be used safely in short grass and hard gravel.
• Avoid driving in loose gravel, soft soil, and sandstone.
• Do not drive the scooter in unknown road conditions.
• The MOJO can ride over small obstacles within a certain height, but you must minimize the speed and slowly
drive over the obstacle.
• Do not operate the scooter before you have fully read and understand this manual.
• Do not carry additional riders on the scooter, chassis, or lap.
• Do not operate while under the influence of alcohol or drugs.
• Slow down when operating on uneven or soft ground.
• Do not park on slopes.
• Changing the initial settings or refitting your scooter will void the warranty.
• Use caution when operating near busy streets, markets, or shopping centers. Do not operate in unsafe
areas. Please consult local authorities about the traffic rules for scooters.
• Hold the handlebar with both hands and put both feet on the deck when operating.
• Never sit on the MOJO in a moving vehicle.
• Do not exceed the MOJO maximum weight capacity of 300lbs. This weight includes rider, accessories, and
baggage.
• Do not reverse on uneven slopes or uneven ground; be careful when passing over slopes.
• Never use the MOJO to go up or down stairs.
• Never take your MOJO on an escalator.
• Do not operate on frozen, slippery, or salty ground.
• Never charge a frozen battery.
• Do not use an extension cord when charging the Mojo Scooter.
10
Safety Requirements

• Check the physical conditions (tires, battery, bolts) before driving the scooter.
• ALWAYS SLOW DOWN BEFORE TURNING.
• ALWAYS TURN THE KEY OFF BEFORE GETTING ON OR OFF THE SCOOTER.
• The MOJO can be used safely in short grass and hard gravel.
• Avoid driving in loose gravel, soft soil, and sandstone.
• Do not drive the scooter in unknown road conditions.
• The MOJO can ride over small obstacles within a certain height, but you must minimize the speed and slowly
drive over the obstacle.
• Do not operate the scooter before you have fully read and understand this manual.
• Do not carry additional riders on the scooter, chassis, or lap.
• Do not operate while under the influence of alcohol or drugs.
• Slow down when operating on uneven or soft ground.
• Do not park on slopes.
• Changing the initial settings or refitting your scooter will void the warranty.
• Use caution when operating near busy streets, markets, or shopping centers. Do not operate in unsafe
areas. Please consult local authorities about the traffic rules for scooters.
• Hold the handlebar with both hands and put both feet on the deck when operating.
• Never sit on the MOJO in a moving vehicle.
• Do not exceed the MOJO maximum weight capacity of 300lbs. This weight includes rider, accessories, and
baggage.
• Do not reverse on uneven slopes or uneven ground; be careful when passing over slopes.
• Never use the MOJO to go up or down stairs.
• Never take your MOJO on an escalator.
• Do not operate on frozen, slippery, or salty ground.
• Never charge a frozen battery.
• Do not use an extension cord when charging the Mojo Scooter.
Battery Maintenance & Charging
The MOJO Scooter is designed to use two maintenance free 24V/7.5 AH Lithium Batteries. It comes with
an easy-to-use DC29V-2AH charger.
• Charge the battery completely before the first operation. -Not doing so can cause damage to the battery.
• Make sure key is in the off position to charge the battery.
• The battery should be charged monthly when not utilizing or when storing for long periods.
Installing MOJO Batteries
To install, slide the batteries into the battery compartments (Pic. 1) on each side of the seat (Pic. 2).
Pull up on strap to remove (Pic. 3)
1 2 3
Charging Your MOJO
1. Turn off the MOJO and remove the key.
2. Open the charger cap on the Handlebar Control Pod, and insert the charger into the charging port.
3. Plug AC power outlet into household power outlet. A red or blue light on the charger indicates power
is on, and the unit is charging. The green light on the charger means the batteries are fully charged
4. Unplug the charger when charging is complete.
*The battery can be charged out of the scooter using the optional docking station accessory and quick charger
Match the charger port and charger plug properly. Do not force.
11

Battery FAQ
Guide to a Safe and Long-Lasting Battery
How does the charger work?
When the battery voltage is low, the battery charger outputs a large current to charge the battery. When the battery
voltage is near full, the battery charger outputs a small current. When the battery is full, the battery charger will output
very little current. Therefore, the battery will continually charge after connecting the charger, but will not overcharge. It
is better to charge the battery for less than 24 hours.
What does the light on the charger mean?
The red/blue light indicates that the scooter is charging. The green light indicates the battery is fully charged.
Can other chargers be used?
To charge safely and efficiently, use the charger supplied by the original manufacturer only. Using any
other charger will void warranty.
How often should you charge the battery?
The charge time depends on the use.
• If you’re operating the scooter every day, charge after each use so it will have a full charge the next day.
• If you’re operating the scooter once a week, then the battery should be charged once a week. If at any time the
battery indicator is below 50 percent, charge the battery.
• If you are not using the scooter for more than 3 weeks, remove battery from scooter, store in a warm, dry location
and charge every month. The time to charge the battery fully can vary from 6 to 8 hours.
How can you get the maximum operating distance?
Driving conditions such as hills, uneven and soft surface, temperature, and user weight will affect the
distance or running time for battery life.
Methods of obtaining the maximum driving distance
• Fully charge your battery before operating the MOJO.
• Maintain a constant speed when possible.
• Only carry the necessities to reduce weight.
• Avoid intermittent driving.
Why is the power of the new battery weak?
Deep-cycle batteries use unique chemical technology and design. It can be charged quickly and be used for a long time
after a full charge. The battery is fully charged before leaving the factory but may change its initial performance during
transportation due to the temperature. The power of the battery will lessen in higher temperatures, and it will extend the
charging time in low temperatures. The battery requires a few days to adapt to the surrounding environment before it
gets stable performance.
Please follow the steps below to improve the battery performance:
• A new battery must be fully charged before using.
• Low speeds are recommended for the first time. Do not travel too far until you are familiar with the operation of the
scooter and the battery.
• Fully charge the battery after operating the MOJO the second time.
• The battery capacity will reach 100% and extend the driving time after four to five charging and discharging cycles.
How to ensure the battery life
A fully charged battery will provide better performance and extend battery life. Do not fully discharge the battery.
How to store scooter and battery
• Charge your battery fully before you store it.
• Remove battery from the MOJO.
• Store your scooter and battery in a warm, dry place, not hot.
• Avoid storing the scooter in areas with drastic temperature variations.
• If storing the scooter, charge battery at least once per month.
• For optimal battery life, be sure to use your scooter monthly.
Do Not Let the Battery Fully Discharge before Charging.
Do Not Dismantle the battery, or expose to water.
Failure to observe this warning will void the warranty
and damage the battery.
If battery is frozen, warm for several days before
charging.
12

Maintenance
With care and regular maintenance, the MOJO is designed to provide years of enjoyment. The following will
keep your MOJO running at optimum levels.
Battery
• Make sure battery is fully charged.
• Store the battery in a dry environment.
• Check electrode connections for corrosion.
• Never charge a frozen battery (warm for a couple days before charging).
• Never fully discharge the battery. Charge once a month when storing the scooter.
Seat
• Clean seat cover with a clean, damp cloth.
Cleaning
• A clean, damp, non-abrasive cloth works best to wash and clean the MOJO.
• Do not wash your MOJO with a water hose as this may create an electrical short and damage the electrical
system.
Wiring
• Check all wire connections and wiring insulation for wear and damage regularly. This
includes the charger power cord.
Motor, Bearings and Transmission parts
• These components have been lubricated and sealed by the factory, there is no need to lubricate these parts.
• Store in dry environment. Electric components should avoid moisture. If they come into contact with moisture,
dry before use.
• Check and tighten bolts regularly.
Basic Troubleshooting
Power stops while operating
• Make sure key is in the ON position.
• Make sure battery is properly inserted.
• Make sure battery is properly charged.
Scooter not opening with the Remote Control
• Is there a light that comes on when you press a button on the remote control? If yes, go to next step. If no,
change the battery of the remote control.
• Will the scooter fold/unfold with the Automatic Folding Switch? If yes, go to next step. If no, call for service.
• Try to sync the remote control (Page 7) and try to open/close the scooter again. If this step fails, call for service.
Slow speeds while driving
• Adjust speed control knob.
• Make sure battery is properly charged.
Battery is not charging
• Check that the cord is plugged into the wall and scooter completely.
• If there is no light lit on the charger box when plugged into the wall, the charger may be broken. Call for service.
Lost keys or remote control
• Call your local MOJO dealer to order replacements
Armrests not staying up
• Use a 4mm Allen wrench to adjust bolt on armrest and a 10mm nut is used to hold the bolt in place. First
loosen the nut. If you tighten the bolt, the pitch of the arm rest will go down. If you loosen the bolt, the pitch
of the armrest will go up. Tighten the nut to lock the pitch into place.
13
Maintenance & Troubleshooting

Troubleshooting Cont...
MOJO Error Indicators
If your MOJO won’t go, listen to the beeps to help troubleshoot the cause
If you continue to have trouble with your MOJO, contact
Enhance Mobility at 800-296-4151 – Option 2 or your
authorized MOJO dealer.
14
1 Beep
2 Beeps
3 Beeps
4 Beeps
5 Beeps
6 Beeps
7 Beeps
8 Beeps
9 Beeps
10 Beeps
The Battery needs to be charged, or there is a bad connection. Check the battery connections, if the
battery connections are good, charge the battery.
There is a faulty connection to the motor. Check all connections between the motor and controller.
There is a short circuit within your scooter. Please contact your service agent.
Not In Use
Not In Use
The S-Drive cannot be driven. This may be due to the battery charger being connected. Please
ensure the you have fully unplugged your charging cable from your scooter.
The throttle is not functioning properly. Please ensure there is no pressure on either directional
control lever, and the levers are in the neutral position prior to turning on the MOJO.
A controller fault is indicated. Please ensure all connections are secure.
The parking brake has a bad connection. Check to ensure the free wheel lever is disengaged.
Check the parking brake and motor connection. Ensure all controller connections are secure.
The MOJO has detected an excess of voltage to the controller. Please check all battery connections.

Standard Warranty
For the Period Listed below at time of purchase, in the event of defective materials or workmanship,
Enhance Mobility will repair or replace at our option for the parts that are defective.
MOJO Scooter
2-year parts for all electrical and mechanical components
1-year limited warranty for battery (limited to manufacturers defects - not wear and tear)
3-year warranty on frame
Warranty Exclusions
Tires
Tubes
Trim Pieces and Plastic Shrouds
Upholstery (Seat Back and Seat Cushions)
This warranty also excludes the following:
Loss or theft of any and all accessories (such as keys, remote controls etc.)
Damage caused by:
Abuse, misuse, or negligence
Improper Storage, Operation or Maintenance
Exceeding the specified weight capacity of the unit
Accessories
Acts of Nature
*Enhance Mobility is not liable for damages caused by shipping.
Enhance Mobility will ship the parts directly to the customer or to the service center of
their choice. Enhance Mobility will provide technical assistance and documentation to
ensure the scooter is repaired properly.
If after calling in to the Enhance Mobility Service line 800-296-4151- Option 2 and
speaking to a service representative, it may be determined that the repair is covered
under the warranty and requires return to the factory. In this case the customer will
prepay for shipping to and from Enhance Mobility. Shipping Labels will be provided.
Labels and return authorizations must be requested and approved by place of
purchase and Enhance Mobility.
Return shipping must be in Original Packing to protect against damage. Enhance
Mobility is not responsible for damage caused by shipping. Enhance Mobility will
perform the necessary labor and replace covered parts at its expense.
15
Warranty
Loremipsum

16
Thank You from Enhance Mobility!
Thank you again for your recent purchase of a
MOJO Scooter! We are excited to welcome you to our
Enhance Mobility family, and are honored that you
entrusted Enhance Mobility for such an important
purchase. We hope you are loving your new MOJO
Scooter so far, and are looking forward to many
adventures ahead!

1-800-296-4151
Service: Ext. 2
Service Team
Service@Enhancemobility.com
15380 County Rd 565A,
Groveland, FL 34736
Contact Us
Enhance Mobility
This manual suits for next models
1
Table of contents
Other Enhance Mobility Scooter manuals

Enhance Mobility
Enhance Mobility TRIAXE TOUR T3050 User manual

Enhance Mobility
Enhance Mobility triaxe sport User manual

Enhance Mobility
Enhance Mobility TRIAXE CRUZE User manual

Enhance Mobility
Enhance Mobility MOJO Auto-Fold User manual

Enhance Mobility
Enhance Mobility TRANSFORMER S3021 User manual

Enhance Mobility
Enhance Mobility TRANSFORMER S3021 User manual

Enhance Mobility
Enhance Mobility triaxe sport User manual


