ENMET Formaldemeter htV-m User manual

ENMET
680 Fairfield Court
Ann Arbor, MI 48108
734.761.1270 Fax 734.761.3220
www.enmet.com
PPM Formaldemeter™ htV-m
3 Parameter IAQ Monitor with Built-In Memory
Operation and Maintenance Manual

Formaldemeter htV-m
ENMET
Manual Revision Date – March 9, 2017
Page | 1
Manual Part No. – 80012-020
Table of Contents
1.0 INTRODUCTION....................................................................................................................................................................................3
1.1 Unpack.............................................................................................................................................................................................3
1.2 Check Order.....................................................................................................................................................................................4
1.3 Serial Numbers.................................................................................................................................................................................4
2.0 FEATURES............................................................................................................................................................................................5
2.1 PPM Formaldemeter™ htV-m elements..........................................................................................................................................5
2.2 PPM Formaldemeter™ htV-m Display Key....................................................................................................................................5
3.0 OPERATION..........................................................................................................................................................................................6
3.1 Principle of Operation......................................................................................................................................................................6
3.2 Interferents.......................................................................................................................................................................................6
3.3 Using the Formaldemeter™ htV-m..................................................................................................................................................7
3.3.1 Taking a Sample........................................................................................................................................................................7
3.3.2 Sensor Recovery Period............................................................................................................................................................7
3.3.3 Memory Full..............................................................................................................................................................................7
4.0 CALIBRATION CHECK AND ADJUSTMENT...........................................................................................................................................8
4.1 Temperature & Humidity Sensor.....................................................................................................................................................8
4.2 The PPM Formaldemeter™ htV-m Calibration Standard................................................................................................................8
4.2.1 Calibration Check Procedure...................................................................................................................................................9
4.2.2 Calibration Adjustment Procedure...........................................................................................................................................9
4.3 Additional Features........................................................................................................................................................................10
4.3.1 Data Retrieval.........................................................................................................................................................................10
4.3.2 Clearing the Non-FRAM Memory...........................................................................................................................................10
5.0 USING THE FORMALDEMETER™HTV-M AS A CONTINUOUS MONITOR.........................................................................................11
5.1 Switching the Formaldemeter™ htV-m from a Handheld Device to a Continuous Monitor.........................................................11
5.2 Starting a Schedule ........................................................................................................................................................................11
5.3 Ending a Schedule..........................................................................................................................................................................12
5.4 Stop On Full Mode.........................................................................................................................................................................12
5.5 Flow Chart .....................................................................................................................................................................................13
5.5.1 Schedule Selection ..................................................................................................................................................................14
5.5.2 Mode Selection........................................................................................................................................................................14
5.5.3 Limit Selection ........................................................................................................................................................................14
5.5.4 Alarm Selection.......................................................................................................................................................................14
5.6 How to use Data Mode with your Formaldemeter htV-m..............................................................................................................15
6.0 TROUBLESHOOTING..........................................................................................................................................................................16
6.1 Diagnosing the problem.................................................................................................................................................................16
6.2 Checking the Gain..........................................................................................................................................................................16
6.3 Performing a full re-set of the instrument......................................................................................................................................16
7.0 MAINTAINANCE ...........................................................................................................................................................................17
7.1 Cleaning the Formaldemeter™ htV-m...........................................................................................................................................17
7.2 Storage...........................................................................................................................................................................................17
7.3 Instrument Battery -Low battery indicator.....................................................................................................................................17
7.4 Battery Replacement......................................................................................................................................................................17
8.0 REPLACEMENT PART NUMBERS.......................................................................................................................................................17
8.1 Calibration Standard and Filter Replacements...............................................................................................................................17
9.0 TERMS AND CONDITIONS ..................................................................................................................................................................19
9.1 Ordering Information.....................................................................................................................................................................19
9.2 Shipping Terms..............................................................................................................................................................................19
9.3 Payment .........................................................................................................................................................................................19
9.4 Warranty Information and Guidelines ...........................................................................................................................................19
9.5 Return Policy .................................................................................................................................................................................20
9.6 Returning an Instrument for Service Instructions ..........................................................................................................................20

Formaldemeter htV-m
ENMET
Manual Revision Date – March 9, 2017
Page | 2
Manual Part No. – 80012-020
List of Figures
Figure 1: PPM Formaldemeter™ htV-m Features.....................................................................................................................................5
List of Tables
Table 1: List of Known and Tested Interferents for the Formaldemeter™..............................................................................................18
Reference Information:
NOTE:[important information about use of instrument]
CAUTION:[affects equipment – if not followed may cause damage to instrument, sensor etc.…]
WARNING:[affects personnel safety – if not followed may cause bodily injury or death.]
Attention / Warning
Earth Ground
!

Formaldemeter htV-m
ENMET
Manual Revision Date – March 9, 2017
Page | 3
Manual Part No. – 80012-020
1.0 Introduction
The PPM Formaldemeter™ htV-m is a precise 3 parameter indoor air quality monitor suitable for monitoring low level
concentrations of hazardous formaldehyde vapors under extremes of temperature and humidity, in parts per million (ppm) and mg/m3.
Fast and easy to use, pressing a single button gives an immediate indication of concentration levels. The htV-m has a built in non-
volatile memory and real time clock. It can be used as a manual hand held device or a continuous data logger capable of over 7 days
(optional) continuous monitoring and thus has the option of being mains or battery powered. A PC can automate the sampling and
logging of data at specific times by a direct USB/RS232 interface or via a wireless connection. The SPC-2 program can be used to
monitor the instrument continuously using the USB/RS232 interface on the Formaldemeter™ htV-m. Please read these instructions
carefully and familiarize yourself with the instrument before use. The operating manual will provide you with all the necessary
information for the correct use of your Formaldemeter™ htV-m. Please note that PPM Technology Limited shall not be liable for
errors that may appear herein or for incidental or consequential damages about or arising from the use of this material.
NOTE:All specifications stated in this manual may change without notice.
1.1 Unpack
The PPM Formaldemeter™ htV-m is a precise 3 parameter indoor air quality monitor suitable for monitoring low level
concentrations of hazardous formaldehyde vapors under extremes of temperature and humidity, in parts per million (ppm) and
mg/m3. Fast and easy to use, pressing a single button gives an immediate indication of concentration levels. The htV-m has a built
in non-volatile memory and real time clock. It can be used as a manual hand held device or a continuous data logger capable of
over 7 days (optional) continuous monitoring and thus has the option of being mains or battery powered. A PC can automate the
sampling and logging of data at specific times by a direct USB/RS232 interface or via a wireless connection. The SPC-2 program
can be used to monitor the instrument continuously using the USB/RS232 interface on the Formaldemeter™ htV-m. Please read
these instructions carefully and familiarize yourself with the instrument before use. The operating manual will provide you with
all the necessary information for the correct use of your Formaldemeter™ htV-m. Please note that PPM Technology Limited shall
not be liable for errors that may appear herein or for incidental or consequential damages about or arising from the use of this
material. Kit has been packaged carefully and includes all the components necessary for full operation. Immediately upon receipt,
please examine the kit contents carefully to ensure that you have received the following items in good condition.
Kit Contents:
• Formaldemeter™ htV-m instrument with stand
• Formaldemeter Calibration Standard
• CD Formaldemeter™ htV-m Downloader Software
• USB Cable
• AC/DC Adapter with Universal Input Plugs
• Vial of phenol filters (10)
• Certificate of Calibration
• Quick sett-up Guide, and Full Operation Manual
Regarding Damaged Shipments
NOTE: It is your responsibility to follow these instructions. If they are not followed, the carrier will not honor any claims for
damage.
•This shipment was carefully inspected, verified and properly packaged at ENMET and delivered to the carrier in good
condition.
•When it was picked up by the carrier at ENMET, it legally became your company’s property.
•If your shipment arrives damaged:
oKeep the items, packing material, and carton “As Is.” Within 5 days of receipt, notify the carrier’s local office and request
immediate inspection of the carton and the contents.
oAfter the inspection and after you have received written acknowledgment of the damage from the carrier, contact ENMET
Customer Service for return authorization and further instructions. Please have your Purchase Order and Sales Order
numbers available.
•ENMET either repairs or replaces damaged equipment and invoices the carrier to the extent of the liability coverage, usually
$100.00. Repair or replacement charges above that value are your company’s responsibility.

Formaldemeter htV-m
ENMET
Manual Revision Date – March 9, 2017
Page | 4
Manual Part No. – 80012-020
•The shipping company may offer optional insurance coverage. ENMET only insures shipments with the shipping company
when asked to do so in writing by our customer. If you need your shipments insured, please forward a written request to
ENMET Customer Service.
Regarding Shortages
If there are any shortages or questions regarding this shipment, please notify ENMET Customer Service within 5 days of receipt at
the following address: ENMET
680 Fairfield Court
Ann Arbor, MI 48108
734-761-1270 Fax 734-761-3220
Toll Free: 800-521-2978
1.2 Check Order
Check, the contents of the shipment against the purchase order. Verify that the Formaldemeter™ htV-m is received as ordered. If
there are accessories on the order, ascertain that they are present. Check the contents of calibration kits. Notify ENMET customer
service personnel of any discrepancy immediately.
1.3 Serial Numbers
Each Formaldemeter™ htV-m is serialized. These numbers are on tags on the equipment and are on record in an ENMET
database.

Formaldemeter htV-m
ENMET
Manual Revision Date – March 9, 2017
Page | 5
Manual Part No. – 80012-020
2.0 Features
2.1 PPM Formaldemeter™ htV-m elements
See Figure 1 for location of features:
Feature
Description
Display
The liquid crystal display (LCD) shows the formaldehyde concentration of the sample in
0.01ppm increments. The display also shows messages during certain operations.
Sampling Port
The brass sampling port is the inlet through which the sample is drawn into the sensor.
Power Port
The DC Power Port gives the option of the instrument to be AC powered.
USB/RS232 Port
The USB/RS232 allows direct connection to PC to be used with PPM Monitoring software.
Battery
Compartment
The battery compartment is located beneath a cover at the bottom rear of the instrument.
To gain access to the battery, simply remove the cover by unscrewing the two screws. A
low battery is indicated by the display flashing: bAt
Keypad
Four buttons operate the instrument; some of which have multiple functions.
The button switches are located beneath the membrane and are operated by pressing firmly
where indicated.
Figure 1: PPM Formaldemeter™ htV-m Features
2.2 PPM Formaldemeter™ htV-m Display Key
Display
Description
- - - -
Sensor recovering
0.00
Sensor ready
run
Sampling
CAL
Taking calibration sample
Set
Set calibration level
bAt
Replace battery
Set CAL
Instrument not calibrated
FULL
Memory full
Schd
Schedule
USB/RS23

Formaldemeter htV-m
ENMET
Manual Revision Date – March 9, 2017
Page | 6
Manual Part No. – 80012-020
3.0 Operation
Unlike other formaldehyde monitoring devices such as color stain tubes and badges, the Formaldemeter™ htV-m can measure many
samples consecutively without the need for inconvenient ancillary equipment. Being ultra-compact and battery operated, the
instrument is truly field portable. It can also be mains powered suitable for continuous monitoring. It can be connected directly to a
manager PC for automation via the USB/RS232 interface.
3.1 Principle of Operation
Electrochemical Formaldehyde Sensor
The Formaldemeter™ htV-m uses proven electrochemical sensing technology for determining the concentration of formaldehyde
in air samples. The instrument contains an electrochemical formaldehyde sensor comprising two noble metal electrodes and a
suitable electrolyte.
When air is drawn into the sensor by means of the internal sampling system, a small voltage is generated which is directly
proportional in magnitude to the concentration of formaldehyde in the sample.
This voltage is produced because of the electro-oxidation of formaldehyde at one of the catalytically active electrodes.
The signal is fed to a precision electronic amplifier and output on the instrument’s display, when calibrated, as formaldehyde
concentration in ppm (parts-per-million by volume).
All the electronic systems are based on modern, integrated circuitry employing the latest surface mount technology to ensure that
the Formaldemeter™ htV-m is an exceptionally robust and reliable instrument.
3.2 Interferents
Phenol and Resorcinol
The presence of phenol in the air can give a reading on the Formaldemeter™ htV-m. When monitoring formaldehyde in situations
where phenolic resins are used. These fit onto the sampling port of the instrument. The filters will completely remove phenol
from the sample at concentrations more than 1000ppm without affecting the formaldehyde concentration.
Alcohols and Aldehydes
As is found with other portable detection equipment, the meter is not totally specific to formaldehyde alone, being susceptible to a
degree of interference from a small range of other chemicals. Other aldehydes and alcohols such as methanol and ethanol in the
atmosphere can cause cross-interference effects.
Sensor Background Reading
Due to the high sensitivity of the sensor: a background reading can often be produced even when sampling in an atmosphere
considered to be free of interference. Background interference can be reduced using the new features on the Formaldemeter™
htV-m, please contact PPM Technology Ltd for details.
Humidity Extremes
As the sensor is very sensitive, it is possible that extremes of humidity (generally, anything outside 40-60% RH) may cause a
background reading on Formaldemeter instruments. The Formaldemeter™ htV-m is specially designed to reduce the effect.
A list of common chemicals, which can cause interference, is available on request.

Formaldemeter htV-m
ENMET
Manual Revision Date – March 9, 2017
Page | 7
Manual Part No. – 80012-020
3.3 Using the Formaldemeter™ htV-m
The Formaldemeter™ htV-m, is set to function as a handheld.
3.3.1 Taking a Sample
Power On
Press the POWER button once. The display will show - - - -
Followed by: 0.00
This indicates that the instrument is ready to take a sample.
Power Off
Switch the instrument off by pressing and holding down the ON-OFF button for 3 seconds until display shows
OFF
Then release. A click is heard, your instrument is now off.
Sampling
Turn instrument on; hold the instrument in the atmosphere to be sampled. Press and release the SAMPLE button.
The display will show run
The internal pump should be heard running for a short period as it samples the air.
The display will next flash between the following two screens for 10 seconds
-. - - and 0.00
The display will then show -. - - flashing, as the sample is analyzed. After 60 seconds, the display will show a non-flashing
value, which is held until the instrument is switched off. This indicates the formaldehyde concentration in parts per million
(ppm).
By holding down the button the instrument will show the reading in mg/m3alternating with the following screen:
Alt=
By holding down the button, the display will show the time taken to reach the displayed concentration in seconds. If high
levels of an interferent is present, the instrument will give a reading in around 10 seconds, to avoid the sample being affected
by the interference.
Alternative Settings
The two durations listed above (10 and 60 seconds), may vary depending on the specifications of the supplier or customer.
These values are the default set by the instruments manufacturer. For further details please contact your local distributor.
3.3.2 Sensor Recovery Period
Between samples, the instrument should be left switched off for a few minutes to allow the sensor to clear of any residual
formaldehyde. As a rule, the higher the reading obtained, the longer it takes for the sensor to clear.
If the instrument is switched on before the sensor has cleared, the pump will not operate and the display will flash:
- - - -
The cell is clear only when the following display is shown for three seconds without interruption: 0.00
The instrument is now ready to take the next sample.
If the instrument does not clear after approximately 5 minutes, then refer to troubleshooting section of the manual.
3.3.3 Memory Full
Since the htV-m has a built-in memory system, every sample taken either manually or continuously will be recorded,
eventually after many samples (minimum 2000) have been taken the memory will become full and the display will show:
FULL
This means further samples cannot be taken since the memory is full. The display will continue to show: FULL, until the
memory is downloaded and cleared or the over write option is selected.
The memory is cleared using the download software included in your htV-m kit.
Option – Alternatively it is possible to set to over write the oldest sample in the memory with the latest. (See section 5.4 Stop
on Full Mode or use the download software to change the settings).

Formaldemeter htV-m
ENMET
Manual Revision Date – March 9, 2017
Page | 8
Manual Part No. – 80012-020
4.0 Calibration check and Adjustment
Please read this section thoroughly before attempting to check or adjust calibration. Users are strongly advised to familiarize
themselves with the instrument before attempting to adjust the calibration and should follow the instructions carefully.
General Information
Sensor sensitivity can change very gradually with time; so, periodic recalibration may be required. It is advisable to check calibration
regularly to ensure that the instrument is functioning correctly.
A quick calibration check can be carried out by drawing a formaldehyde vapor sample of known concentration into the instrument’s
sensor and noting whether the displayed reading agrees with the expected concentration value.
The PPM Formaldemeter™ htV-m -m is supplied complete with a formaldehyde calibration standard and has a built-in thermometer
essential for calibrating the instrument.
It is recommended that calibration check or adjustment be carried out at the approximate operational temperature.
4.1 Temperature & Humidity Sensor
1. Hold down the SAMPLE button and press the ON-OFF button once. Release the SAMPLE button.
2. The Instrument will briefly display: HEAt
3. The instrument will then show the temperature reading in oC, followed by: oC
4. The instrument will then display the humidity (in % RH), followed by: %rH
5.The instrument will cycle through these four screens until it is either switched off manually, or it will switch itself off after
30 seconds.
The Sensor used for the temperature and humidity readings is accurate to within ±3.0 %Rh for humidity, and ±0.4 oC for
temperature, within the operational limits for the instrument. To ensure the accuracy of the instrument the temperature & humidity
sensor is replaced with the instruments annual service.
4.2 The PPM Formaldemeter™ htV-m Calibration Standard
The PPM Formaldehyde Calibration Standard consists of formaldehyde absorbed on a substrate in a glass tube from which a
headspace vapor sample can be drawn. Each standard is carefully manufactured to a high tolerance.
Effect of Temperature
The concentration of formaldehyde vapor generated in the calibration standard varies with temperature and for this reason, the
instrument has a built-in thermometer and a temperature / concentration table is supplied.
Because of body temperature, handle the calibration standard only by the yellow end caps, to ensure temperature equilibrium.
Temperature Equilibrium
The calibration standard should always be allowed to stabilize within the recommended temperature range of 15-29°C for at least 1
hour before use.
Calibration Standard Expiration
Each calibration standard may be used for a maximum of 6 months (as indicated by the given expiry date), or a maximum of 100
samples. New calibration standards can be ordered from ENMET. See Section 8.4 for reorder part numbers.
Formaldehyde Calibration Standard
This End

Formaldemeter htV-m
ENMET
Manual Revision Date – March 9, 2017
Page | 9
Manual Part No. – 80012-020
4.2.1 Calibration Check Procedure
Place the instrument and calibration standard together in a place where the temperature is stable for at least one hour before
commencing the calibration check to allow thermal equilibration.
Before carrying out a calibration check, the sensor must be clear of formaldehyde vapor from any previous samples. The
Temperature sensor must be read (as described earlier) and a note taken as this is vital for the calibration procedure.
Procedure
1.Place the calibration standard and the instrument on a work surface. Handle the calibration standard as little as possible to
avoid heating the tube, holding it by the yellow caps. Remove both end plugs.
2.Switch the instrument on by pressing the ON-OFF button once. Wait for the display to show: 0.00
3.Insert the nozzle into the sampling end of the tube. Ensure a good seal around the instrument nozzle by pushing the
calibration standard tube firmly against the instrument when taking a sample.
4.Press the SAMPLE button and wait until the internal sampling pump stops before removing the standard from the
instrument. Replace the end plugs in the calibration standard securely.
5.The display will flash between the following two screens for 10 seconds:-. - - and 0.00
6.The display will then show a flashing, -. - - as the sample is analyzed. After 60 seconds, the display will show a non-
flashing value, which is held until the instrument is switched off. This indicates the formaldehyde concentration in ppm.
7.Refer to the Temperature/Concentration look-up table on the standard tube. If the reading is within 5% of the value
shown in the table, then no re-calibration is required.
8.If re-calibration is required, follow the calibration adjustment procedure that follows.
Leave the instrument switched off for approximately 5 minutes to recover before commencing another calibration check,
adjustment or taking a sample.
4.2.2 Calibration Adjustment Procedure
Please read this section thoroughly before attempting to check or adjust calibration. Users are strongly advised to familiarize
themselves with the instrument before attempting to adjust the calibration and should follow the instructions carefully.
Under normal operating conditions, instrument calibration should require only minimal periodic adjustment. To see whether a
full recalibration is required, perform a calibration check first. Leave the instrument and calibration standard in a room where
the temperature is constant for at least one hour before calibrating to allow thermal equilibration.
Procedure
1. Place the instrument and calibration standard on a work surface
2. Handle the calibration standard only by the yellow end caps.
3. Press the ON-OFF button to switch the instrument on.
4. Wait for the display to show: 0.00
5. Remove the yellow plugs from both ends of the calibration standard.
6. Insert the instrument nozzle into the sampling end of the calibration standard. To maintain airtight contact between the
nozzle and the standard, push the standard firmly against the instrument.
7. Simultaneously depress and release both Cal ▲ and ▼ buttons.
8. The pump will be heard drawing a vapor sample and the screen will briefly show: CAL
9. When the pump stops, remove the calibration tube and replace both yellow end plugs.
10. The display will show an increasing, flashing value for 60 seconds, followed by: SEt 1.750
11. Read the temperature noted down recently and determine the required concentration reading from the lookup table on
the calibration standard, for example:
Temperature: 21°C
Reading: 2.13 ppm
12. Now use the Cal ▲ and Cal ▼buttons to adjust the display reading to the required concentration.
13. Press the SAMPLE button to store this calibration value.
The display will show: CAL
Followed by: End
The Formaldemeter™ htV-m will then switch off automatically. The instrument has now been recalibrated.

Formaldemeter htV-m
ENMET
Manual Revision Date – March 9, 2017
Page | 10
Manual Part No. – 80012-020
4.3 Additional Features
4.3.1 Data Retrieval
This function enables the user to view the last 10 manual samples. Use the download software to retrieve all data required.
Accessing the Data
1.Hold down the SAMPLE button and press the ON-OFF button once. Release the SAMPLE button.
2.The Instrument will briefly display: HEAt
The instrument will then flash between displaying the following two screens: Temperature reading and °C
3.Once the instrument is in this mode press the Cal ▲ and Cal ▼ buttons at the same time and release. The display will
briefly show: dAtA
4.The display will then flash between the following two screens (as an example): run0 and 0.08
The first screen indicates which previous sample is being displayed, the most recent first,
from run0 (most recent), to run9 (the oldest).
Use the Cal▲ and ▼ buttons to move to the desired sample reading.
By pressing the SAMPLE button when viewing a reading,
the instrument will display the reading in mg/m3, as shown below:
ALt0 and 0.56
Press the ON-OFF button when done to turn the instrument off.
4.3.2 Clearing the Non-FRAM Memory
As with the older htV model, the htV-m has sufficient memory capacity
to log the last 10 samples as well as the FRAM memory.
While viewing the data, hold down both the Cal (▲ and ▼) buttons at the same time,
until the display has run through all the following screens:
CLr3 CLr2 CLr1 CLr0 [ ]
The non-FRAM memory will now be clear.

Formaldemeter htV-m
ENMET
Manual Revision Date – March 9, 2017
Page | 11
Manual Part No. – 80012-020
5.0 Using the Formaldemeter™ htV-m as a Continuous Monitor
The built-in memory and real time clock enables the instrument to log all 3 parameters at corresponding times, allowing improved
monitoring and analysis opportunities. A schedule must be set up using the download software enclosed for continuous monitoring.
Real Time Clock
The Real-Time clock is an internal clock, which can only be set up and viewed via a USB/RS232 link and using the download
software program. The clock cannot be displayed on the Formaldemeter™ htV-m screen. It is used internally.
Schedule Mode
For continuous monitoring to take place a Schedule must be set up. A schedule allows the user to control every aspect of the
monitoring e.g. set start time, how often you want to sample, for how long and on which days.
A schedule can only be set up via a PC using the download program software and USB/RS232 port to transfer the information to the
Formaldemeter™. However, once a schedule has been programmed into the instrument, it can be started at any time without a PC
being present.
5.1 Switching the Formaldemeter™ htV-m from a Handheld Device to a Continuous Monitor
Press POWER, SAMPLE and CAL at the same time, the screen will display:
ConF briefly, followed by Schn which means Schedule NO
Press the arrow key CAL to change to
Schy which means Schedule YES
Press SAMPLE to select.
If a schedule has been set in the memory using the download software program, the schedule has now been activated.
5.2 Starting a Schedule
Switching the htV-m on again, after activating a schedule (as done above), this will start the schedule. The screen will display:
0.00 until the set schedule begins as previously set by a PC.
Then run will be displayed when the schedule is set to take a sample.
Then Schd flashes intermittently with . . .
Until the instrument has finished analyzing the sample. The sample reading will then be displayed until the next scheduled sample.
During continuous sampling the display will show Schd flashing intermittently with the previous stored reading.
The schedule has now been set up and is running.
Once a schedule is running, all buttons on the Formaldemeter™ htV-m are disabled apart from the POWER button.
If no schedule has been set up on a PC, using the specialist software, the Default Schedule will run. The Default Schedule is set to
sample continuously for if the instrument is turned on, at intervals of every 2 minutes.
The instrument can be scheduled to sample as often as required: as soon as the instrument has cleared after taking the previous
sample; once a minute; once an hour and / or anything in between.

Formaldemeter htV-m
ENMET
Manual Revision Date – March 9, 2017
Page | 12
Manual Part No. – 80012-020
5.3 Ending a Schedule
If a schedule is running the instrument must be turned off first, then turned on again by pressing:
POWER, SAMPLE and CAL ▲ at the same time, the screen will display:
ConF briefly, followed by
Schy which means Schedule YES
Press arrows to selectSchn which means Schedule NO
Press the SAMPLE button to select then hold down the POWER button.
Schedule Mode is now off.
5.4 Stop On Full Mode
If Stop On Full Mode is on, and the internal FRAM htV-m memory is full, the htV-m will not sample until memory is cleared.
If Stop On Full Mode is off, and the internal FRAM htV-m memory is full, the oldest readings will be overwritten by the newest
readings.
Either mode may be selected by pressing:
POWER, SAMPLE and CAL ▲ at the same time, screen will display:
ConF briefly, followed by:
Sch Y or Sch n
Select the required setting by pressing SAMPLE to confirm choice. The display will now show:
SoF Y Stop On Full Yes or SoF n Stop On Full No
Use arrow keys to navigate between the two settings pressing SAMPLE to select the required option.
When the FRAM memory is full the message FULL is shown when the instrument is turned on and if a sample is taken. If Stop
On Full Yes is set, then sampling is prohibited when memory is full.
Various Instrument Modes, Limits and the Optional Alarms may also be set up in a similar way see detailed flow chart that
follows.
Formaldemeter htV-m
ENMET
Manual Revision Date – March 9, 2017
Page | 13
Manual Part No. – 80012-020
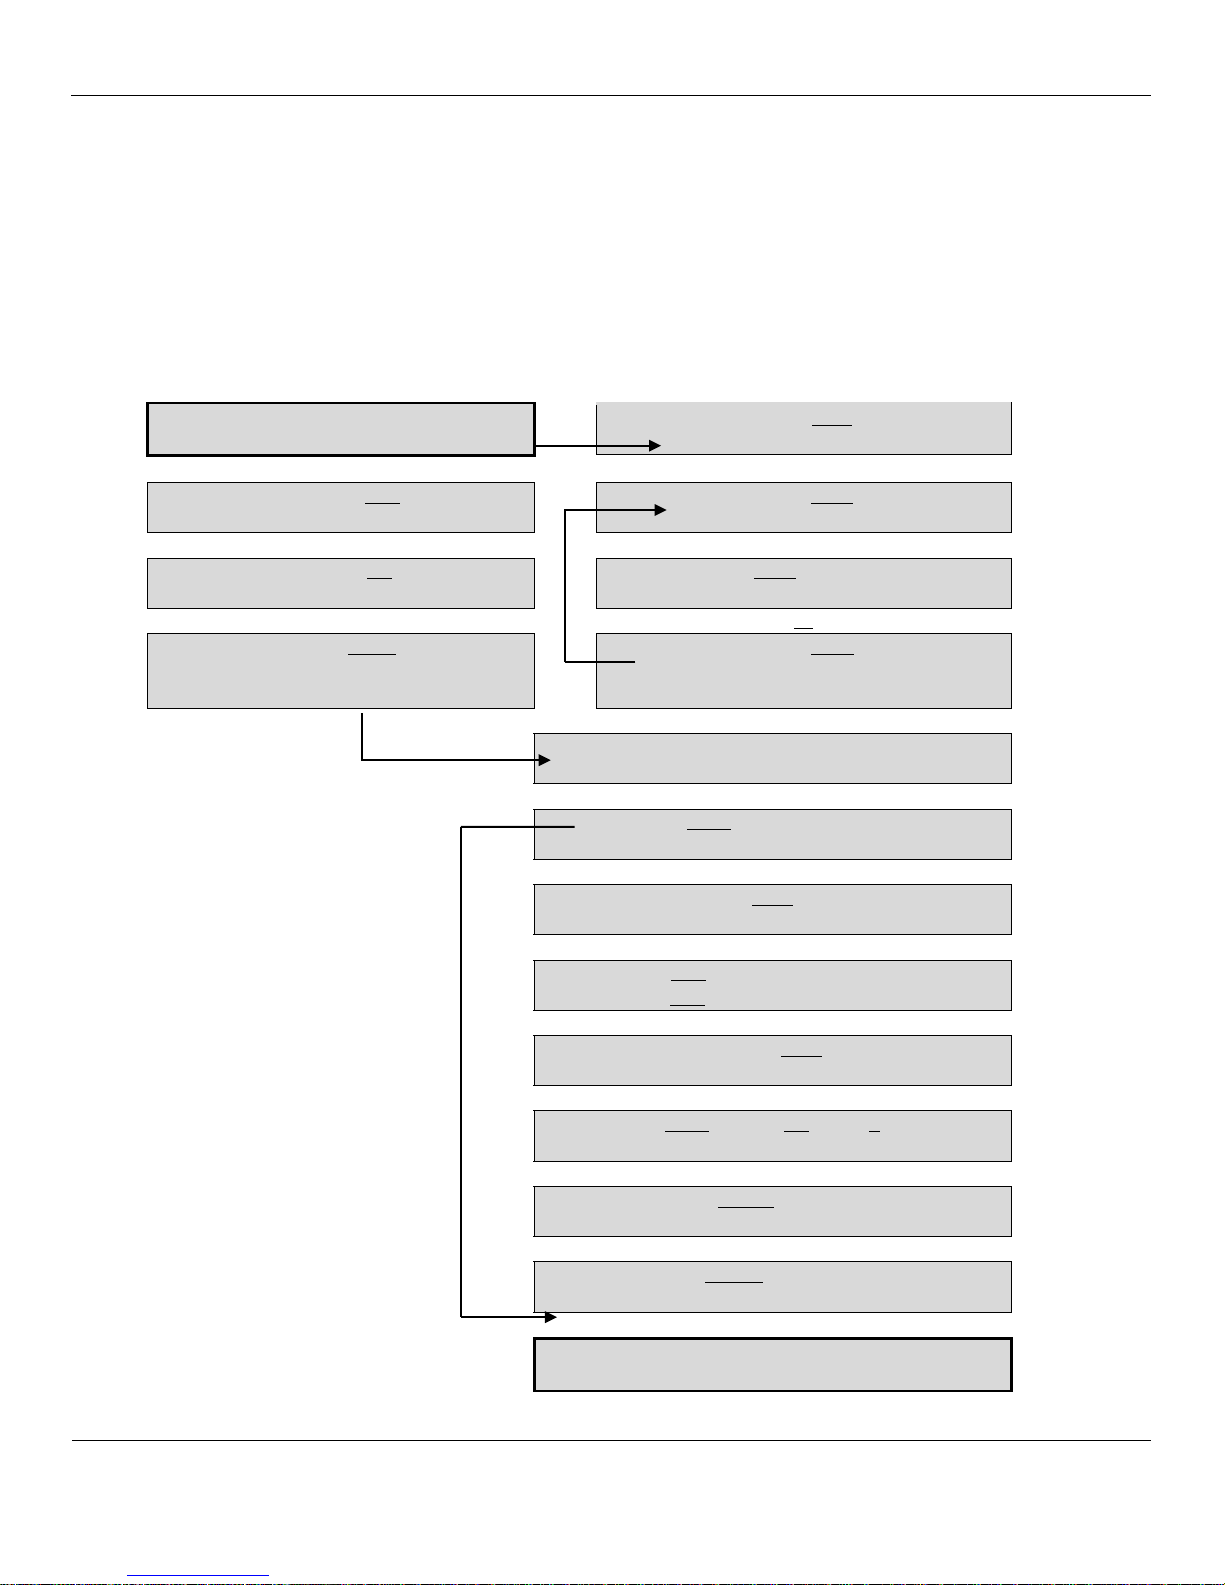
5.5 Flow Chart
PPM Formaldemeter htV-m
Press POWER, SAMPLE & CAL ▲ at the same to enter the menu.
Press SAMPLE to confirm your selection and to continue to the next step. CAL ▲ & ▼ allow you to navigate and adjust the
settings. Once option has been selected and you do not want to change any ore settings you may hold down the POWER button to
switch off.
Your settings will have been saved.
Default Settings are Underlined.
Enter Configuration menu
ConF
Schy Schn
Schedule enable
▼
ALrS 0.10
Alarm duration in seconds
SoFy SoFn
Stop on Full memory
▼
▼
ALrd 10
Alarm Duration in seconds
SbSy SbSn
Short between Samples
▼
▼
ALrL ALrG
Alarm if ‘Lower than’ or Alarm if ‘Greater
than’ the setting
ALry ALrn
Alarm module enable
▼
S=t S=P S=A
Instrument Mode (Time, Peak or Area)
▼
Lt= 1 Lt-2 Lt=3 Lt=4
Clearing Limits
▼
PGtn
Do not change this setting.
▼
L 10.0 Area Integration (low)
H 60.0 Area Integration (high)
▼
1n=Y 1n=n
Inverted integration enable
▼
GtnY GtNt 3.5 GtnP
Do not change these settings.
▼
A2t=YA2t=n
‘T Greater than A’ Gate enable
▼
Art=Y Art=n
‘Rising in Area’ Gate enable
▼
[ ]
End of Configuration menu.

Formaldemeter htV-m
ENMET
Manual Revision Date – March 9, 2017
Page | 14
Manual Part No. – 80012-020
5.5.1 Schedule Selection
• Schedule Yes – The user wishes to start a schedule (for using Formaldemeter™ htV-m as a continuous monitor).
• Schedule No – The user does not wish to start a schedule (for using the Formaldemeter™ htV-m as a handheld device)
Stop On Full Selection
See earlier section 5.4 for more detailed information.
5.5.2 Mode Selection
• Time Mode – The sample value is given at the calibration time to peak. For further details contact ENMET.
• Peak Mode – The sample value is given at the highest sensor output.
For further details contact PPM Technology.
• Area Mode - This is the Default Setting. The sample value given is at the higher area-time limit.
5.5.3 Limit Selection
This mode governs how quickly the instrument takes to clear before another sample can be taken. The default limit for the
Formaldemeter htV-m is Lt =1, which means that the fuel cell must be very stable before the instrument allows the user to
take another sample.
To change Limit, the htV-m must first be RE-SET (see section 6.3), before following the Flow Chart instructions on previous
page.
• Limit 1 (Lt=1)The normal Formaldemeter htV-m mode.
• Limit 2 (Lt=2)The normal Glutaraldemeter mode (do not use on htV-m).
• Limit 3 (Lt=3)The medium concentration Formaldemeter™ htV-m mode. If the Formaldemeter™ htV-m is used regularly
in atmospheres where the concentration of formaldehyde is often well over 2ppm, it is advised to change the limit to 3. This
will allow the user to sample at more regular intervals. Please note that when using limit 3, the readings at very low
concentration are less accurate, since some residual formaldehyde from the previous sample may still be present in the sensor.
• Limit 4 (Lt=4)The high ppm Formaldemeter htV-m mode.
Please contact the manufacturers regarding this limit as changing the limit to 4 require additional changes to settings.
5.5.4 Alarm Selection
• Alarm Yes – The user wishes to set alarms.
• Alarm No – The user does not want to set alarms.
• Alarm Greater Than – The alarm will sound if the reading is higher than the set threshold.
• Alarm Less Than – The alarm will sound if reading is lower than the set threshold.

Formaldemeter htV-m
ENMET
Manual Revision Date – March 9, 2017
Page | 15
Manual Part No. – 80012-020
5.6 How to use Data Mode with your Formaldemeter htV-m
Note Read and understand this section if you do not intend to use the PPM download software that was supplied with your kit. If
you intend using the PPM download software please ignore this section and read the help file/manual supplied with the CD.
You will need a PC with a USB/RS232 port; your htV-m and the USB or RS232 cable.
1.Connect the htV-m instrument to the PC port using the cable – you will need to know the port number you have connected,
to if you only have one then this is probably called “COM 1” – using the Device Manager tool will help. If in doubt, seek
the advice of your computer administrator.
2.Once the instrument has been connected enter the Operation Settings menu by holding down all three buttons at the same
time as turning the instrument on – release all the buttons and then use the sample button to scroll through the entries until
you get to 232 options which you must set to read 232Y. Press sample again to save your choice and the next item should be
dAt.... this needs to be set to dAtY to enable the Data Mode.
3.Pressing sample will save you choice and turn the instrument off as this is the last item.
Hyper Terminal
To receive the downloaded data, you will need a piece of software known as a Terminal Emulator or Serial Capture – there are
many available applications such as ProComm, WinComm & Minicom. However, most Windows installations come with a
Terminal Emulator preinstalled called HyperTerminal. It can be found on the Start menu under Accessories > Communications >
HyperTerminal.
Creating a new connection
Start the application and you will be prompted to enter a description for a new connection. Enter a useful name for the new
connection we’re about to create –something like ‘htvMData’ –and the click on OK. You will now be prompted to select the
connection type – from the dropdown list select the COM port connected to the instrument to and press OK.
You'll then be prompted for the connection properties for the connection – select a baud rate of 9600; 8 data bits; one stop bit and
no parity or flow control:
Click on OK to open the connection. You may optionally alter some of the more advanced settings for the connection. Use the
button at the top of the screen to disconnect before opening the Properties box and selecting the ASCII Setup button. Adjust the
settings so that there is a tick in each of the boxes.
Close all the property boxes and save the connection for use later. In future, you will find a new submenu in the Start menu which
contains all the previously saved connections: Accessories > Communication > HyperTerminal >.
Connecting to the htV-m
If you have previously created a connection for the htV-m and saved it then you may click either select it from the Start menu or
open HyperTerminal; cancelling the initial dialogue and then using the File menu to open your connection. If HyperTerminal does
not open the connection for you (check for a timer in the status bar) then you can click on the Call button at the top of the screen to
connect to your instrument.
Typing a single X into the screen will start the memory download – soon you will see the screen fill up with data. Type any
character into the screen to stop the transfer.
Saving Data to a File
HyperTerminal has the facility to save the downloaded data directly into a file – to use this make sure that any transfer has been
stopped and select Transfer > Capture Text... from the menu. This will bring up a dialogue where you may enter a file name to
save the data to – edit the path and file name to suit your system but ensure that you use a CSV extension as this will allow the data
file to be opened directly by applications that support the CSV data format. Click on Start to open the file and to return to the main
screen. Once they type in an X to start the transfer – which will be placed into the file. Once the transfer is over click through to
Transfer > Capture Text > Stop menu to close the file and save your data. You may now open the file you specified in, for
example, a spreadsheet package such as Excel or OpenOfficeCalc.

Formaldemeter htV-m
ENMET
Manual Revision Date – March 9, 2017
Page | 16
Manual Part No. – 80012-020
6.0 Troubleshooting
6.1 Diagnosing the problem
‘-- -- -- -- ‘flashes on display and the instrument will not sample.
The three main reasons for this problem are:
1.The instrument has been accidentally calibrated when no calibration standard was present.
2.The calibration standard used for calibration has expired.
3.The instrument has been damaged and will need to be repaired.
To determine which of the reasons applies to your case follow the procedures shown below
NOTE: Quoted values are for tests performed at 25oC:
1.Make sure that the instrument has been turned off for about 5-minutes.
2.Hold down the Left-hand calibration button whilst turning the htV-m on.
3.tESt will appear on the display. Release all the buttons.
4.A four-digit value will appear (#. ### ). Give the htV-m a few seconds to stabilize.
5.Note the initial value and an approximate rate of change over a minute. If the initial value or the rate of change is over 0.300
then it is likely that your sensor has been damaged - contact ENMET for further details.
If the readings look OK, then continue with the htV-m still in the tESt mode:
1.With the sample nozzle inserted into a valid calibration standard take a sample.
2.The display should be set to 0.000 as the pump starts to run and then rise to a maximum as the sample is drawn in.
3.Press and hold the Left-hand calibration button - the display will show a time value (t #. #). Make a note of this.
4.Press and hold the Right-hand calibration button - the display will show the peak value. Make a note of this too.
5.Turn the instrument off. Leave the instrument off for 5-minutes before repeating the tests.
If the peak value is less than 5.000 or has a time value less than 5 seconds, then there may be problem with the sampling system or
your sensor. Contact ENMET for further details.
6.2 Checking the Gain
1.Make sure that the instrument is turned off.
2.Hold down the Right-hand calibration button whilst turning the instrument on.
3.GA1n will appear on the display. Release all the buttons.
4.A four-digit value will alternate with a two-digit exponent on the screen: (#### 1E: ##)
5.Note both numbers. The instrument will power down after a few seconds.
If the Exponent value is between 1E:15 and 1E:13 then you may have used an expired standard - check your standard expiry date
and re-read Section 4.4 on how to calibrate the instrument. When you are ready carry out a RE-SET, as described below, and
recalibrate the instrument.
If the Exponent value is less than 1E:13 then you may have accidentally calibrated without a calibration standard being present.
Carry out a RE-SET as described below.
6.3 Performing a full re-set of the instrument
Make sure that you have a valid calibration standard to hand before performing this procedure as your current calibration will be
deleted, and there is no way of 'undoing' the RE-SET procedure once it has been performed.
1.Make sure that the instrument is turned off.
2.Hold down both Cal (▲ and ▼) buttons whilst turning the instrument on.
3.rSEt will appear on the display. Release all the buttons.
4.-no-will appear on the display. Change the -no-to a YES by pressing Cal ▲. To complete the re-set, press the SAMPLE
button.
5.rSEt will appear on the display.
6.SEt CAL will now appear on the display followed by the normal 0.00 display. Switch the instrument off and then back
to calibrate.
If, after a re-set, you are still experiencing problems then contact ENMET to arrange a service.

Formaldemeter htV-m
ENMET
Manual Revision Date – March 9, 2017
Page | 17
Manual Part No. – 80012-020
7.0 MAINTAINANCE
Except for the battery, your PPM Formaldemeter™htV-m has no user serviceable components. It is important that no attempt is
made to open the instrument other than to replace the battery. Any evidence of tampering with the instrument will invalidate the
warranty.
If you find that your instrument requires service or repair, please return it to ENMET. See Section 9.0 for warranty information and
return instructions.
7.1 Cleaning the Formaldemeter™ htV-m
On no account, should the Formaldemeter™ htV-m be immersed in liquid. Any fluid entering the instrument will destroy the
sensor and the electronic circuitry.
If the instrument’s enclosure requires cleaning, it should be wiped with a damp cloth. Never use abrasive or solvent based
cleaning agents.
7.2 Storage
When not in use, your Formaldemeter™ htV-m should be stored in the supplied carrying case in a clean, dry environment and
away from extremes of temperature.
7.3 Instrument Battery -Low battery indicator
When the battery voltage becomes too low, and the battery needs replacing the display will flash: bAt
7.4 Battery Replacement
The instrument requires a 9V PP3 type alkaline battery.
To replace the battery, simply remove the battery compartment cover at the bottom rear of the instrument by unscrewing the two
screws and place the battery in the compartment.
8.0 Replacement Part Numbers
8.1 Calibration Standard and Filter Replacements
ENMET replacement part numbers
Calibration Standard, Formaldehyde
02700-001
Filter, phenol (pack/10)
02700-002

Formaldemeter htV-m
ENMET
Manual Revision Date – March 9, 2017
Page | 18
Manual Part No. – 80012-020
Table 1: List of Known and Tested Interferents for the Formaldemeter™
The Formaldemeter™ is known to experience some cross-sensitivity by other volatile Aldehydes and Alcohols.
•Interference factors may differ between fuel cell sensor to fuel cell sensor.
•Never calibrate the Formaldemeter™ using interference gases.
Gas
Concentration required
to give a 1 ppm reading
Response
Removal of interfering gas
using a phenol filter
Acetaldehyde
12
Linear
60%
Ethanol
24
Linear
45%
Formic Acid
26
Linear
100%
Formaldehyde
1
Linear
15%
Glutaraldehyde
7
Linear
70%
Methanol
60
Linear
30%
Phenol
7
Linear
100%
Resorcinol
250
Linear
100%
•Phenol filters are extremely efficient at removing Phenol along with other Alcohols and Aldehydes from the air.
•Phenol Filters can be fitted over the sampling nozzle of the Formaldemeter™ prior to taking a sample. PPM Technology
recommends that phenol filters be changed around every 10 samples since they can become saturated which will give high
readings. Phenol filters can be ordered through your distributor.
•Users should be aware that phenol filters reduce the concentration of Formaldehyde by around 10% so should only be used in
conditions where there are suspected interferences.
•Please be aware that Ozone causes Formaldehyde to be broken down into Carbon Dioxide, Water and Oxygen therefore in
Ozone-rich environments Formaldehyde levels can be reduced.
Research carried out under controlled conditions in an incubator set at 25°C.
A wide range of suspected interfering gases have been tested including (NH3, CO, CO2, NO2, Acetone, Isobutylene) table shows only
those which caused interference below LEL levels.

Formaldemeter htV-m
ENMET
Manual Revision Date – March 9, 2017
Page | 19
Manual Part No. – 80012-020
9.0 Terms and Conditions
9.1 Ordering Information
Address orders to: ENMET
Attention: Customer Service Department
680 Fairfield Court
Ann Arbor, MI 48108
Phone: 734-761-1270
Fax: 734-761-3220
You may also contact our customer service department by email [email protected]. MINIMUM ORDER IS $50.00.
9.2 Shipping Terms
All shipments are F.O.B. ENMET’s facility in Ann Arbor, MI, USA or Bowling Green, KY, USA. Shipping and handling charges
are prepaid and added, and must be paid by the customer. Shipping and handling charges may be billed to VISA, MasterCard,
American Express, or to the customer’s preferred carrier account number. Delivery to the carrier constitutes delivery to the
customer, and risk of loss passes to the customer at that time, however, title shall remain with ENMET until payment is received in
full. Claims for shortages and damage must be made by the customer to the carrier within 5 days of receipt. Refer to section “1.1
Unpack” for more information on this matter.
A special service of $50.00, or more, may be assessed on expedited shipments.
NOTE: Calibration gases are classified as Dangerous Goods for transportation purposes, and shipping companies charge a
hazardous material fee for processing the documentation required for handling such items. Also, other restrictions apply to
shipment of Danger Goods by air. Check with ENMET for clarification and additional information.
9.3 Payment
Open accounts must be established in advance with ENMET’s Accounting department.
Address Payments to: ENMET
680 Fairfield Court
Ann Arbor, MI 48108
Phone: 734-761-1270
We accept payments by VISA, MasterCard, and American Express. Payment by credit card must be specified at time of order
placement. Your credit card will be charged on the date of shipment.
ENMET invoices for products that are shipped on open account are due and payable 30 days from the date of shipment from the
ENMET site. ENMET may institute collection services should any bona fide invoice remain unpaid with no payment schedule
negotiated by the customer with the ENMET Accounting Department. Any cost incurred by ENMET for professional collection
services or legal fees to collect on a customer invoice will be added to any future business conducted between ENMET and that
customer.
9.4 Warranty Information and Guidelines
Equipment must be returned prepaid to the point of origin, and ENMET will prepay the return transportation charges.
Transportation prepaid by ENMET will be by most economical means (e.g. FedEx Ground). If an expedient means of
transportation is requested during the warranty period, the customer must pay the difference between the most economical means
and the expedient mode. ENMET warrants new instruments to be free from defects in workmanship and material under normal
use for a calibration and expendable parts such as filters, detector tubes, batteries, etc. In addition, some oxygen cells and other
sensors are limited to a warranty period of six months from date of shipment. Refer to the instrument manual for specific warranty
details. If the inspection by ENMET confirms that the product is defective, it will be repaired or replaced at no charge, within the
stated limitations, and returned prepaid by FedEx Ground to any location in the United States. ENMET shall not be liable for any
loss or damage caused by the improper use or installation of the product. The purchaser indemnifies and holds harmless the
company with respect to any loss or damagers that may arise through the use by the purchaser or others of this equipment. This
warranty is expressly given in lieu of all other warranties, either expressed or implied, including that of merchantability, and all
other obligations, or liabilities of ENMET which may arise about this equipment. ENMET neither assumes nor authorizes any
representatives or other persons to assume for it any obligation or liability other than that which is set forth herein.
Table of contents
Other ENMET Measuring Instrument manuals

ENMET
ENMET MedAir 2200 User manual

ENMET
ENMET Recon/NH3-B User manual

ENMET
ENMET ISA-40 Series User manual

ENMET
ENMET ISA-60M User manual

ENMET
ENMET GSM-60 User manual

ENMET
ENMET AM-5150 User manual

ENMET
ENMET EX-5130-IS User manual

ENMET
ENMET ISA-300RAL User manual

ENMET
ENMET MED AIR 2000 User manual

ENMET
ENMET ISA-M Manual


Popular Measuring Instrument manuals by other brands

Stuart Turner
Stuart Turner MAINSBOOST MONOBLOC 22MM C Installation, operation & maintenance instructions

EDTM
EDTM GLASS-CHEK+ GC2001 manual

Extech Instruments
Extech Instruments MA150-T user manual

SPI
SPI 10G12 Operation manual

PQ Plus
PQ Plus UMD 97EVU Quick start manual

bluelab
bluelab Soil pH Pen Care and use guide


