YSI WE KNOW ProOBOD User manual

USER MANUAL
YSI Environmental
Professional Series Overlay Art
ProOBOD
linserpelle creative
513-831-1650
8.09

CONTENTS
Warranty ..............................................................................................................i
Introduction ....................................................................................................... 1
Getting Started ................................................................................................... 2
Unpacking the OBOD Probe............................................................. 2
POBOD Operation........................................................................................ 4
Connecting Probe/Cable Assembly to Instrument ......................... 4
Configuring the PODO Instrument............................................. 4
Powering the Stirrer............................................................................ 5
Calibration - Dissolved Oxygen ........................................................ 5
Temperature......................................................................................... 7
Taking Measurements......................................................................... 7
Maintenance and Storage .................................................................................. 8
Updating Instrument and Probe Firmware...................................... 8
Sensor Maintenance - Dissolved Oxygen......................................... 8
Sensor Maintenance - Temperature ................................................ 11
Sensor Storage ...................................................................................12
Troubleshooting ...............................................................................................12
Dissolved Oxygen Readings.............................................................12
Help ................................................................................................... 13
Error/Status messages ......................................................................13
Restore Default Calibration Values ................................................14
Probe Specifications......................................................................................... 15
Accessories / Parts List ....................................................................................16
Declaration of Conformity.............................................................................. 17
Recycling...........................................................................................................19
Contact Information........................................................................................20
Ordering and Technical Support.....................................................20
Service Information..........................................................................20
Appendix A-DO% Calibration Values........................................................... 21

i
THIS PAGE LEFT INTENTIONALLY BLANK
WA R R A N T Y
The YSI Professional OBOD®(ProOBODTM) probe and cable assembly is warranted
for two (2) years from date of purchase by the end user against defects in materials and
workmanship, exclusive of batteries and any damage caused by defective batteries.
ProOBOD sensor caps are wa rranted for one (1) year from date of purchase by t he end
user against defects in material and workmanship. ProOBOD systems (instrument
& cable/probe assemblies) are warranted for 90 days from date of purchase by the
end user against defects in material and workmanship when purchased by rental
agencies for rental purposes. Within the warranty period, YSI will repair or replace,
at its sole discretion, free of charge, any product that YSI determines to be covered
by this warranty.
To exercise this warranty, call your local YSI representative, or contact YSI
Customer Service in Yellow Springs, Ohio at +1 937 767-7241, 800-897-4151 or visit
www.YSI.com for a Product Return Form. Send the product and proof of purchase,
transportation prepaid, to the Authorized Service Center selected by YSI. Repair
or replacement will be made and the product returned, transportation prepaid.
Repaired or replaced products are warranted for the balance of the original warranty
period, or at least 90 days from date of repair or replacement.
LIMITATION OF WARRANTY
This Warranty does not apply to any YSI product damage or failure caused by:
Failure to install, operate or use the product in accordance with YSI’s written1.
instructions;
Abuse or misuse of the product;
2.
Failure to maintain the product in accordance with YSI’s written instructions3.
or standard industry procedure;
Any improper repairs to the product;
4.
Use by you of defective or improper components or parts in servicing or5.
repairing the product;
Modification of the product in any way not expressly authorized by YSI.6.
THIS WARRANTY IS IN LIEU OF ALL OTHER WARRANTIES, EXPRESSED OR
IMPLIED, INCLUDING ANY WARRANTY OF MERCHANTABILITY OR FITNESS
FOR A PARTICULAR PURPOSE. YSI’S LIABILITY UNDER THIS WARRANTY
IS LIMITED TO REPAIR OR REPLACEMENT OF THE PRODUCT, AND THIS
SHALL BE YOUR SOLE AND EXCLUSIVE REMEDY FOR ANY DEFECTIVE
PRODUCT COVERED BY THIS WARRANTY. IN NO EVENT SHALL YSI BE
LIABLE FOR ANY SPECIAL, INDIRECT, INCIDENTAL OR CONSEQUENTIAL
DAMAGES RESULTING FROM ANY DEFECTIVE PRODUCT COVERED BY
THIS WARRANTY.

ii
1
THIS PAGE LEFT INTENTIONALLY BLANK
INTRODUCTION
Thank you for purchasing the YSI Professional Optical Biochemical Oxygen
Demand (ProOBOD) probe. The ProOBOD is designed for use with a YSI
ProODO® instrument. The probe will not work with any other YSI instrument.
This manual provides information on the ProOBOD probe only. For more
detailed instructions on how to operate the ProODO instrument, please refer to
the ProODO User Manual (www.ysi.com/ProODO).
The ProOBOD is designed to fit in a standard 300 ml BOD bottle as well as other
international BOD bottles, depending on the version of the probe. YSI offers
two probe versions:
ProOBOD USA (Japan), YSI item number 626400 - This probe fits in•
standard USA and Japanese style BOD bottles. A power supply for
USA and Japanese style AC outlets is included.
ProOBOD International, YSI item number 626401 - This probe fits•
in standard BOD bottles used outside the USA and Japan. A funnel
adapter for fitting in standard UK BOD bottles and a switching power
supply with 3 international outlet adapters are also included.
The ProOBOD sensor measures dissolved oxygen in water using lifetime
luminescence technology and uses a digital signal to send information between
the instrument and probe. The probe features a stirrer and motor to aid in
sample movement, to keep solids from settling at the bottom of the sample bottle,
and to speed up the response of the sensor. Key advantages of the ProOBOD’s
use of optical technology for DO measurement over traditional electrochemical
methods include the elimination of sensor flow dependence and sensor warm-
up time, greater stability, the ability to zero the sensor for more accurate
measurements at low dissolved oxygen levels, and the elimination of frequent
membrane/electrolyte changes and electrode servicing.
For more information on the ProODO instrument and product specification,
please visit www.ysi.com/ProODO or contact Technical Support at 800-897-
4151 (+1 937 767-7241).
Reading the entire manual before use is recommended for an overall
understanding of the probe’s features.
Important: The ProOBOD is designed for laboratory use, not
field use. It is not waterproof and should never be immersed
in a sample past the taper on the stem of the probe.
u

2
3
GETTING STARTED
Throughout the manual, the term “probe” refers to the end of the cable where
the sensor, stir motor, and stirrer are located. The term “sensor” refers to the
Optical Dissolved Oxygen sensing portion of the probe assembly and the term
“sensor cap” refers to the removable sensing cap that is replaced about once per
year (Figure 1).
Figure 1.
Unpacking the OBOD prOBe
Each ProOBOD probe and replacement OBOD sensor cap
includes an instruction sheet with important information
unique and specific to each individual sensing cap.
Carefully unpack the instrument and accessories and inspect for damage.
Compare received parts with items on the packing list. If any parts or materials
are damaged or missing, contact YSI Customer Service at 800-897-4151 (+1 937
767-7241) or the authorized YSI distributor from whom the instrument was
purchased.
OBOD Sensor Cap,
shown here removed
from probe
Probe
Stir paddle
Optical DO sensor
Stirrer toggle switch,
turns stir paddle
on and off
Temperature sensor
i
Remove the ProOBOD cable/probe assembly from the shipping container and
locate the instruction sheet that is included. This instruction sheet is important
because it contains the calibration coefficients for your sensor cap. After using
this sheet for general probe setup, be sure to store it in a safe place in case you
need to reload these calibration coefficients in the unlikely event that they are
ever deleted from the instrument and probe.
Note - A new cable/probe assembly already has a
sensor cap installed and the sensor cap coefficients
are preloaded into the probe at the factory.
Preparing the probe for the first time:
A new ProOBOD probe will have a clear protective cover placed over the1.
sensor cap to ensure the cap remains moist during shipment. Carefully
remove this clear cover from the end of the probe by pulling it straight off
the sensor. Save the clear cover along with the sponge in case you want to
use it later for long term storage of the probe.
Place the probe in a standard BOD bottle that contains a small amount of2.
clean water (approximately 40 ml). The sensor should not be immersed in
water but rather in the air above the water. The purpose is to create a 100%
water-saturated air environment for the sensor which is ideal for calibration
and storage when not in use.
It is important to always keep your sensor in a moist
environment so the sensor cap does not dry out. (See
Maintenance and Storage for more information.)
u
i

4
5
POBOD OPERATION
cOnnecting prOBe/caBle assemBly tO instrUment
To connect the cable, align the keys on the cable connector to the slots on the
instrument connector. Push together firmly, then twist the outer ring until it
locks into place (Figure 2). This MS-8 (Military Spec) connection is water-
proof.
Figure 2. Note the keyed connector. The cable and instrument connectors
can only be mated once the keyed sections are properly aligned.
cOnfigUring the pr o ODO instrUment
On the ProODO instrument, press the Probe key. Highlight DO and press
enter. Enabled allows you to enable or disable the DO sensor. Highlight Enabled
and press enter to activate or deactivate the dissolved oxygen sensor.
The DO Setup menu also displays the OBOD probe’s SW Version and Serial #.
This information is programmed into the probe at the factory and digitally sent
to the instrument when the cable is connected.
Within the DO Probe Setup menu, the Sensor Cap submenu allows you
to view and enter information specific to the sensor cap installed on the
probe. Highlight Sensor Cap and press enter to view the sensor cap’s Serial #,
Temperature Coefficient, and Sensor Cap Coefficients. This information is also
programmed into the probe at the factory and sent to the instrument when the
cable is connected.
The Sensor Cap Coefficients need to be updated when the sensor cap is replaced.
The frequency of sensor cap replacement is dependent on use. For example,
when the probe is powered on for approximately 4 hours per day, 5 days a week,
the sensor cap will need replaced about once per year. If the probe is powered
on more than this, the sensor cap will need replaced more often. To extend the
sensor cap’s usable life, turn the instrument off when not in use. For example,
turn the instrument off over night, but not between readings. The sensor cap
will also need replaced if it is damaged or cracked. See the Troubleshooting
section of this manual for instructions on how to determine if the sensor cap
needs replaced. See the Sensor Maintenance - Dissolved Oxygen section of
this manual or the instruction sheet included with the replacement sensor cap
for instructions on updating the Sensor Cap Coefficients. When updating the
Coefficients, the sensor cap serial # will be updated automatically based on your
entries.
The Temperature Coefficient should not be modified unless instructed by YSI
Technical Support.
For additional information about the ProODO’s menus and operation, please
refer to the ProODO User Manual.
pOwering the stirrer
To power the stirrer, locate the power supply that was included with the
ProOBOD. The power supply for the USA/Japan probe is labeled model number
6260. The power supply for the international probe is labeled model number
6261. Next, connect the power supply to the probe’s power connector and then
plug the power supply into an outlet. The international ProOBOD is shipped
with outlet adapters to connect the power supply to a variety of outlets. The
stirrer can be turned on and off with the toggle switch located at the top of the
probe (Figure 1).
caliBratiOn - DissOlveD Oxygen
The ProOBOD sensor is an optical luminescent sensor which has greater stability
and is less susceptible to calibration drift than traditional electrochemical
sensors. This increased stability means that the instrument may hold its
calibration for many months. However, for the highest data accuracy, YSI
recommends verifying the instrument’s calibration on a daily basis. To verify
the instrument’s calibration, place the sensor in its calibration environment and
check to see that the DO% is reading its calibration value based on the current
barometric pressure. Refer to Appendix A for a list of DO% calibration values
and corresponding barometric pressure readings.
The ProODO instrument with ProOBOD probe offers several options for
performing a dissolved oxygen calibration. For both ease of use and accuracy,
YSI recommends performing a DO % water-saturated air calibration as described
below. For information on other acceptable calibration techniques, including
how to perform a 2-point calibration with a zero solution, please refer to the
ProODO User Manual.

6
7
It is not necessary to calibrate in both % and mg/L or ppm.
Calibrating in % will simultaneously calibrate
mg/L and ppm and vice versa.
CALIBRATING DO% IN WATERSATURATED AIR:
1POINT CALIBRATION
Make sure there are no water droplets on the OBOD sensor cap or temperature
sensor and then place the probe in a BOD bottle that contains a small amount
of clean water (approximately 40 ml). The BOD bottle should be clean since
bacterial growth may consume or produce oxygen which would interfere with
the calibration. Make sure the DO and temperature sensors are not immersed in
water. The purpose is to create a 100% water-saturated air environment. Next,
wait approximately 5 to 10 minutes or until the DO and temperature readings
are stable. This will allow for the air in the BOD bottle to become completely
water-saturated. The design of the probe ensures venting to the atmosphere
when placed in a typical BOD bottle which is required to create the 100% water-
saturated air calibration environment.
Press the Calibration key on the ProODO instrument. Highlight DO and
press enter. Highlight DO % and press enter to confirm.
The instrument will use the reading from the
internal barometer during calibration and will
display this value in brackets at the top of the
display. Highlight the barometer value and
press enter to adjust it if needed. Note - the
barometer should be reading “true” barometric
pressure. If the barometer reading is incorrect,
perform a barometer calibration. See the
Barometer section in the ProODO User Manual
for more information on “true” barometric
pressure and on how to perform a barometer
calibration. If the barometer reading is acceptable, there is no need to change it
or perform a barometer calibration.
Wait for the temperature and DO% values under “Actual Readings” to stabilize,
then highlight Accept Calibration and press enter to calibrate. If User Field 1
or 2 are enabled, you will be prompted to select the fields and then press Cal
to complete the calibration. The message line at the bottom of the screen will
display “Calibrating Channel...” followed by “Calibration Successful”. Press Esc
to cancel the calibration.
itemperatUre
All ProOBOD probes have built-in temperature sensors. Temperature calibration
is not required nor is it available. To set the units, press the Probe key on
the ProODO instrument and select Display. Highlight Temperature and press
enter. Highlight the desired temperature units of °F,°C, or Kand press enter to
confirm the selection.
taking measUrements
Important: The ProOBOD is designed for laboratory use, not
field use. It is not waterproof and should never be immersed
in a sample past the taper on the stem of the probe
To take readings, insert the probe into the BOD sample bottle. The DO and1.
temperature sensors should be immersed in the sample.
Turn the probe stirrer on with the toggle switch located on the top of the2.
probe (Figure 1). The stirrer helps keep solids from settling at the bottom
of the sample bottle and quickens the sensor’s response.
Allow the temperature readings to stabilize and wait approximately 20-253.
seconds for the DO readings to stabilize.
Log One Sample will be highlighted on the ProODO instrument when it is4.
in Run mode. Press Enter to open a logging submenu. Highlight Sites or
Folders and press Enter to select a site or folder to log the sample to.
Once the Site and/or Folder name is selected, highlight5. Log Now and press
Enter. The instrument will confirm that the data point was successfully
logged.
If you would like to log at a specific interval vs. logging one sample at a time6.
or vice versa, press the System key, then highlight Logging and press
Enter. Select Continuous Mode and adjust the time interval if necessary.
On the Run screen, the option to log will change from Log One Sample to
Start Logging based on the time interval entered in the Logging Menu.
Note – When utilizing the Manual sampling mode, the
Continuous Logging Interval must be set to 10 seconds or
greater. For additional information on logging data and the
sampling mode options, refer to the ProODO User manual.
u
i

8
9
MAINTENANCE AND STORAGE
This section describes the proper procedures for care, maintenance and storage
of the ProOBOD probe.
Important: Do not attempt to access the probe motor
assembly or open the probe body. Doing so will void
any remaining warranty. The probe body should only
be opened by a YSI Authorized Service Center.
UpDating instrUment anD prOBe firmware
The instrument and probe firmware can be updated via www.ysi.com/software.
There you will find the new firmware files and instructions on how to update the
instrument and/or probe.
sensOr maintenance - DissOlveD Oxygen
CLEANING THE OBOD SENSOR CAP
The Sensor Cap should be kept clean since some types of fouling may consume
or produce oxygen which could affect the dissolved oxygen measurements. To
clean the Sensor Cap, gently wipe away any fouling with a lens cleaning tissue
that has been moistened with water. Do not use a coarse towel or cloth or organic
solvents to clean the Sensor Cap. Using a coarse towel or organic solvent to clean
the Sensor Cap may cause permanent damage to the cap. For example, alcohol
will dissolve the outer paint layer and other organic solvents will likely dissolve
the dye in the cap. If the sensor cap is damaged, it must be replaced.
OBOD SENSOR CAP REPLACEMENT
The frequency of sensor cap replacement is dependent on use. For example,
when the probe is powered on for approximately 4 hours per day, 5 days a week,
the sensor cap will need replaced about once per year. If the probe is powered
on more than this, the sensor cap will need replaced more often. To extend the
sensor cap’s usable life, turn the instrument off when not in use. For example,
turn the instrument off over night, but not between readings. The sensor cap
will also need replaced if it is damaged or cracked. See the Troubleshooting
section of this manual for instructions on how to determine if the sensor cap
needs replaced.
When replacing a Sensor Cap, the Sensor Cap Coefficients must be manually
updated in the ProODO instrument. The instruction sheet shipped with the
replacement OBOD sensor cap includes the calibration coefficients that are
specific to your Sensor Cap.
u
IMPORTANT - Be sure to save the OBOD Sensor Cap instruction
sheet in case you need to reload the calibration coefficients.
The replacement OBOD Sensor Cap is shipped in a humidified container and
the package should not be opened until the cap is needed for use. Once the
sensor cap has been installed on the OBOD probe as described in this section, it
is important to keep the sensor in a 100% humid environment. Therefore, the
ProOBOD sensor should be stored in either a BOD bottle that contains a small
amount of clean water (approximately 40 ml) or in a BOD bottle that is filled
with clean water so the sensor cap is immersed in water, see Sensor Storage for
more information. If the sensor dries out, refer to the Rehydration procedure in
this manual for instructions on how to recondition the sensor cap.
Refer to Figure 3 below when following the instructions for replacing the cap.
Figure 3.
Caution: Avoid touching the sensing end of the sensor
cap during the following maintenance procedures.
Remove the stir paddle from the probe by pulling it straight out.1.
Remove the old sensor cap from the probe by grasping the probe body2.
with one hand and then rotating the sensor cap counterclockwise until it is
completely free. Do not use any tools for this procedure.
Carefully remove the o-ring and discard it. Do not use any tools to remove3.
the o-ring.
Clean the o-ring seat on the probe by first wiping off old o-ring lubricant4.
with a dry lens cleaning tissue. Next, clean away any build-up with a water-
moistened lens tissue and then dry with another lens tissue.
Locate the o-ring supplied in the Sensor Cap replacement kit and install it5.
on the probe. Do not use any tools to replace the o-ring. Be careful not to
touch the clear optical DO sensor window. Any fingerprints on the optical
u
O-ring
OBOD Sensor
Cap, shown
here removed
from probe
u

10
11
window will have to be cleaned off. After installing the o-ring, ensure it is
clean. If necessary, wipe clean with a lens tissue.
Locate the o-ring lubricant included with the new sensor cap. Apply a thin6.
coat of o-ring lubricant to the installed o-ring. After application, there
should be a thin coat of o-ring lubricant on the o-ring only. Remove any
excess o-ring lubricant from the o-ring and/or probe with a lens tissue.
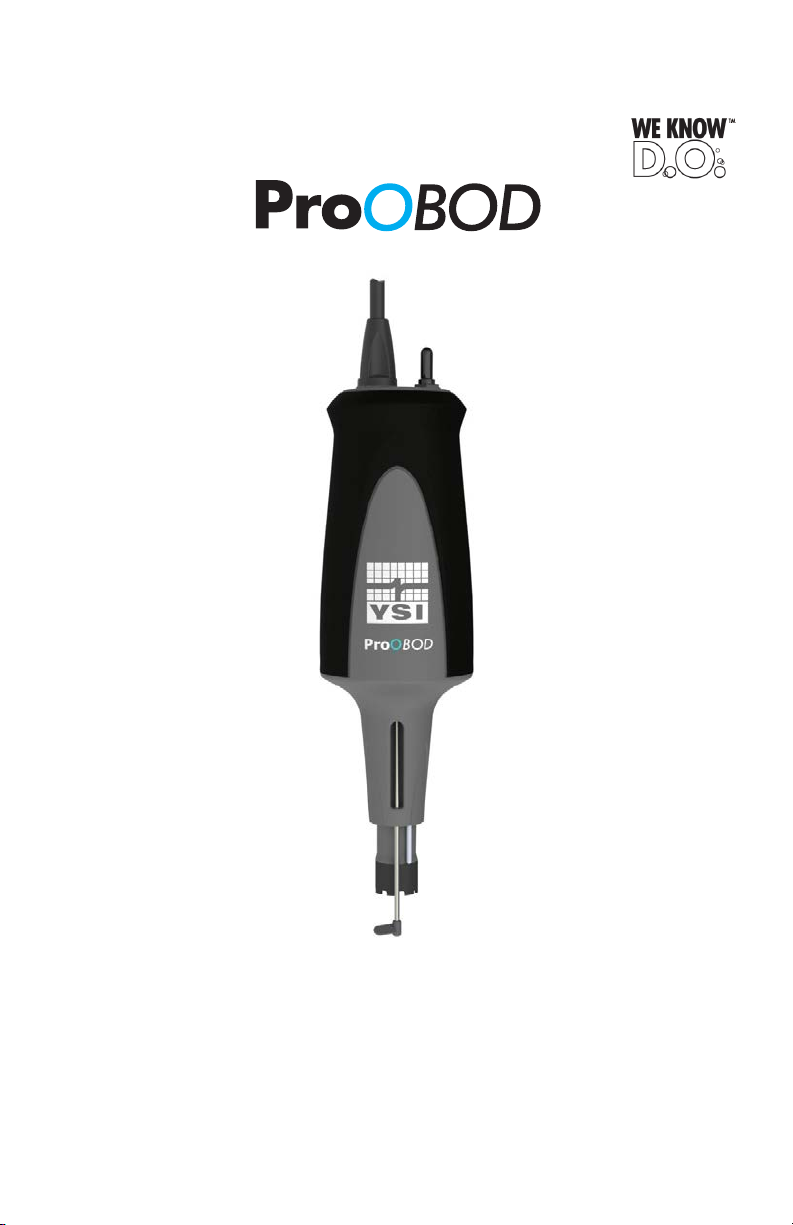
Clean the clear surface of the optical DO sensor window (figure 1) with a7.
lens cleaning tissue.
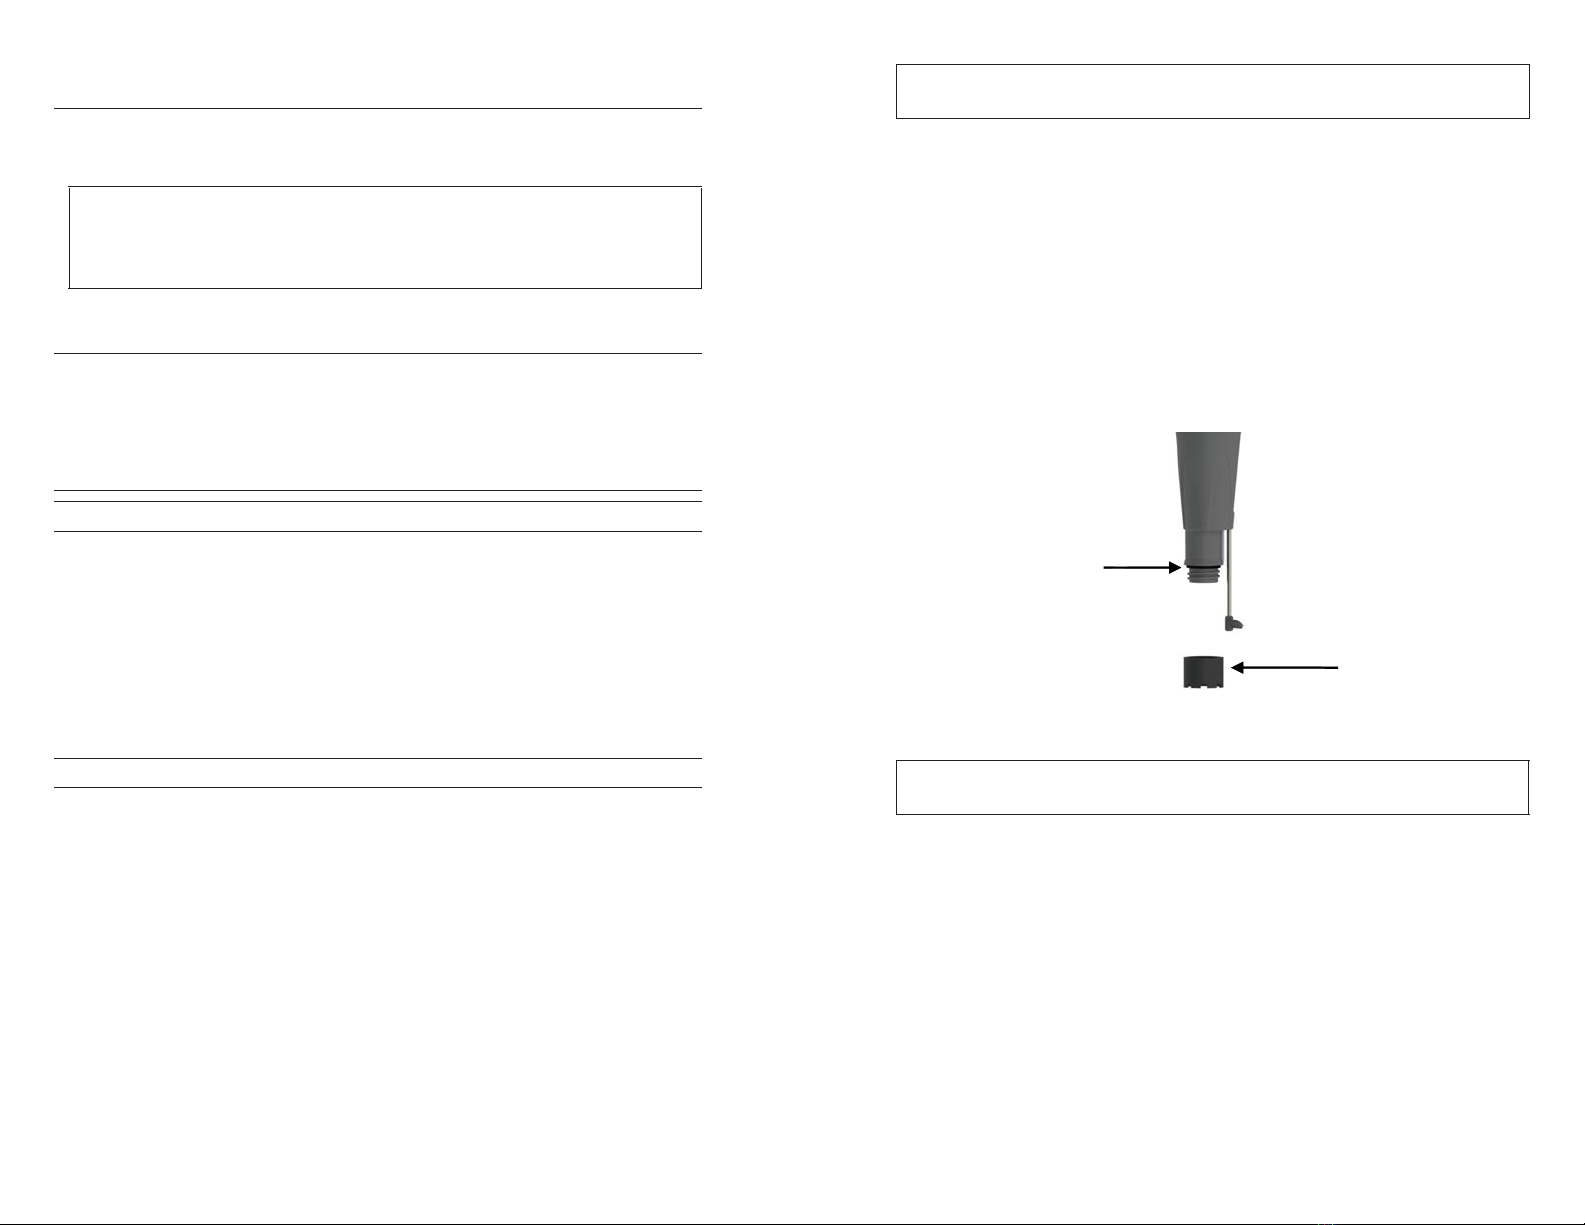
Remove the new sensor cap from its hydrated container and dry the inside8.
cavity of the sensor cap with lens tissue. Make sure that the cavity is
completely dry and clean before proceeding with the installation. Using a
clockwise motion, thread the new sensor cap onto the probe assembly until
it is finger-tight. The o-ring should be compressed between the sensor cap
and probe. Do not over-tighten the sensor cap and do not use any tools for
the installation process.
Clean the stir paddle and then reinstall it on the probe by pushing it straight9.
into place.
Store the sensor in a BOD bottle with a small amount of water (approximately10.
40 ml).
Follow the procedures below for configuring the ProODO instrument for11.
the new Sensor Cap’s coefficients.
Conguring ProODO Instrument for new Sensor Cap
After installing a new Sensor Cap, connect the probe/cable assembly to the
ProODO instrument and turn the instrument on. Locate the Calibration Code
label at the top of the Sensor Cap instruction sheet and note the six numbers
which are listed as K1 through K5 and KC. These six numbers contain the
calibration code specific to the sensor cap that was just installed. Follow the
instructions below to enter the new calibration coefficients into your ProODO
instrument.
Press the
1. Probe on the ProODO instrument, highlight DO, and press
enter.
Highlight2. Sensor Cap and press enter.
Highlight3. Sensor Cap Coefficients and press enter.
K1 will be highlighted. Press enter to access4.
the numeric entry screen. Enter the new K1
coefficient from the Calibration Code label.
After the Calibration Code has been entered
correctly, press enter to confirm.
Highlight K2 through KC in turn and use the5.
numeric entry screen to enter the corresponding
new coefficient from the Calibration Code label
as described in step 4. Press enter after each entry and then proceed to the
next K selection.
After all the new coefficients have been entered, highlight6. Update
Coefficients and press enter.
A message will appear warning that you will be overwriting the current7.
sensor cap coefficients and you should confirm that you wish to carry out
this action. Highlight Yes and press enter to confirm the new coefficients.
After updating the Coefficients, the Serial # in the Sensor Cap menu will be
updated automatically based on your entries.
If an error is made in entering the Sensor Cap Coefficients, the instrument
will block the update and an error message will appear on the display. If you
see this error message, re-enter the coefficients checking them carefully for
correct transcription from the Calibration Code label prior to selecting Update
Coefficients. If you continue to get an error message after several entry
attempts, contact YSI Technical Support for assistance.
After entering the new Sensor Cap coefficients, perform a 1-point DO
calibration.
REHYDRATING THE SENSOR CAP
The Sensor Cap must remain in a moist environment for proper operation; see
Sensor Storage for storage recommendations. If you inadvertently leave your
sensor exposed to ambient air for a period of more than approximately 8 hours
it may dry out. If the sensor cap is allowed to dry out, it is likely to drift slightly
at the beginning of your next study unless it is rehydrated. If the cap dries out,
you can rehydrate it by soaking the probe tip with the sensor cap installed in
warm (room temperature) tap water for 24 hours. After rehydration is complete,
perform a 1-point DO calibration and be sure to store the probe in a moist
environment.
sensOr maintenance - temperatUre
You must keep the temperature portion of the sensor free of build up. Other
than that, the sensor requires no maintenance. A soft bristle brush can be used
to scrub the temperature sensor if needed. While cleaning, be sure to only scrub
the temperature sensor and not the sensor cap. The sensor cap will be damaged
if cleaned with anything abrasive.

12
13
sensOr stOrage
SHORTTERM STORAGE
When the ProOBOD is not in use, it MUST BE STORED IN A MOIST
ENVIRONMENT, i.e., the sensor either immersed in water or in water-saturated
air. If the sensor cap is allowed to dry out by exposure to dry air, it is likely
to drift slightly at the beginning of its next use unless it is rehydrated. If this
occurs, follow the rehydrating instructions in this manual.
For short-term storage (<30 days), place the probe in a BOD bottle that contains
a small amount of clean water (approximately 40 ml). This will provide a 100%
water-saturated air environment.
LONGTERM STORAGE
For long-term storage (>30 days), remove the batteries from the instrument.
Moisten the sponge in the clear protective plastic cap that was originally provided
with the probe with clean water. Place the clear cap over the sensor with the
sensor cap installed. Inspect the sponge every 30 days to make sure it is still
moist. If you no longer have the clear protective cap, place the probe in a BOD
bottle that contains a small amount of clean water (approximately 40 ml).
Alternatively, you can place the sensor with sensor cap installed directly in water
in a BOD bottle, making sure that the water does not evaporate over time.
Recommended Long-term Storage ambient temperature: -5 to 50°C (23 to 122°F)
TROUBLESHOOTING
DissOlveD Oxygen reaDings
Erroneous dissolved oxygen readings typically indicate a need to clean the sensor
cap, replace the sensor cap, and/or recalibrate the instrument. First, verify the
sensor is properly setup in the Probe menu. Next, clean the sensor cap following
the instructions in the Maintenance and Storage section of this manual and
then perform a calibration. If erroneous readings persist, follow the steps on
the following page to inspect the sensor cap for damage and then attempt to
recalibrate the instrument. If the problem continues, try to rehydrate the sensor
cap and then recalibrate. If you are still getting erroneous dissolved oxygen
readings, try replacing the sensor cap and then recalibrate. If the erroneous
readings continue, contact YSI Technical Support to help determine the next
step.
INSPECTING THE SENSOR CAP FOR DAMAGE
Caution: Avoid touching the sensing end of the sensor
cap during the following maintenance procedures.
If DO measurements seem to be in error or are jumpy, remove the sensor cap
from the sensor by grasping the probe body with one hand and then rotating the
sensor cap counterclockwise until it is completely free. Do not use any tools for
the removal of the cap.
Inspect the sensor cap assembly for any cracks or damage. If damage has
occurred, contact YSI Customer Service to order a replacement sensor cap (YSI
item number 626458).
Inspect the o-ring on the probe for damage. If there is any indication of damage,
carefully remove the o-ring and contact YSI Technical Support to obtain a new
o-ring and/or gasket. Avoid using tools to remove the o-ring as damage to the
sealing surfaces could result.
Before reinstalling the sensor cap, make sure that the cavity is completely clean
and dry before proceeding with the installation. If water is found, dry the cavity
with lens tissue. Finally, clean and dry the clear optical DO sensor window on
the end of the sensor with a lens tissue.
After reinstalling the sensor cap, perform a calibration and then reevaluate
the quality of the dissolved oxygen measurements. If problems persist, try
rehydrating or replacing the sensor cap.
help
While using of the ProODO instrument, press the Question key from any
screen to view helpful messages directly on the display.
errOr/statUs messages
If readings for temperature or dissolved oxygen are over or under range, you
will see a series of +++++ or ----- respectively and an error message along the
bottom of the display. A series of ????? indicates that a parameter, for example
DO mg/L, cannot be calculated. This could be caused by a connection issue
between the cable and instrument. The following are some of the potential error
messages:
u

14
15
Message Description and Recommended Action
Probe Temp over range Temperature is over 50°C or reading
erroneously. Check cable connection
and ensure temperature sensor is clean.
Probe Temp under range Temperature is under -5°C or reading
erroneously. Check cable connection
and ensure temperature sensor is clean.
DO over range DO% saturation is over 550%. Check sensor
cap and recalibrate.
DO under range DO% saturation is under -5%. Check sensor
cap and recalibrate.
Barometer over range Barometric pressure is reading over 988
mmHg. Calibrate barometer.
Barometer under range Barometric pressure is reading under 375
mmHg. Calibrate barometer.
ODO Communications
Error
No communication between the instrument
and cable. Check cable connection.
Clock Battery Low Internal battery for real time clock has low
voltage. Contact Technical Support.
Measurements Locked! Measurements are held in Manual Sampling
mode. Select Update Measurements or Log
Held Data.
Illegal Value may appear during alpha/numeric entry on the message line. This
only appears if the values entered do not match the formatting. This will also
appear in the GLP security area if the password is incorrect.
restOre DefaUlt caliBratiOn valUes
Occasionally, the instrument may need to have the factory calibration default
values restored. To perform a factory reset, press Calibrate , highlight
Restore Default Cal and press enter. Select the parameter you wish to restore,
either DO or Barometer, and press enter. After selecting barometer or DO, you
will be asked to confirm the operation. Highlight Yes and press enter.
PROBE SPECIFICATIONS
The specifications listed below are system specifications for the ProOBOD probe
when used with a ProODO instrument. These specifications are subject to
change without notice. For the most recent specifications and for specifications
on the ProODO instrument, please visit www.ysi.com.
Probe (ProOBOD probe and cable Assembly)
Temperature
Operating Range
10 - 40°C
Water Resistance IP-65
Cable Length 2 meters (6.56 feet)
Dissolved Oxygen
Sensor Type Optical, Life-time Luminescent sensor
Range 0-50 mg/L
0-500 % Saturation
Accuracy (mg/L) 0 to 20 mg/L: ± 0.1 mg/L or ± 1% of•
reading, whichever is greater.
20 to 50 mg/L: ± 15% of the reading•
Accuracy
(% Saturation)
0 to 200% air saturation: ± 1% of the reading or ±• 1% air saturation, whichever is greater.
200 to 500% air saturation: ± 15% of the reading•
Resolution (mg/L) 0.01 or 0.1 mg/L (auto-scaling)
Resolution (%
Saturation)
0.1% air saturation
Response Time T95 = 20-25 seconds with stirring;
T95 = 40 seconds without stirring.
Temperature
Range -5 to 50°C
Accuracy ± 0.2°C
Resolution 0.1°C
Table of contents
Other YSI Measuring Instrument manuals

YSI
YSI Pro2030 User manual

YSI
YSI EcoSense pH100A User manual

YSI
YSI EcoSense ORP15A User manual

YSI
YSI MultiDO 5400 User manual

YSI
YSI ProDSS Use and care manual

YSI
YSI Pro30 User manual

YSI
YSI Pro30 User manual

YSI
YSI Pro 1020 Manual

YSI
YSI MultiLab 4010-1W User manual

YSI
YSI Professional Plus Use and care manual