Enttec DMX USB PRO Mk2 User manual

DMX USB PRO MK2 (70314)
Visit the ENTTEC website for the latest version.
..
USER MANUAL
1|
ID: 134658
Document Updated: Dec 2021
DMX USB PRO MK2 –User Manual
The ultimate DMX USB widget with 2 universes of input or output + standalone playback.
Content
Safety............................................................................................................................................................................................................................2
Electrical safety.............................................................................................................................................................................................................................2
System Planning and Specification....................................................................................................................................................................................2
Protection from Injury During Installation.....................................................................................................................................................................2
Installation Safety Guidelines...............................................................................................................................................................................................2
Functional features...............................................................................................................................................................................................3
Adjustable refresh rate.............................................................................................................................................................................................................3
RDM.....................................................................................................................................................................................................................................................3
Standalone......................................................................................................................................................................................................................................3
Hardware features.................................................................................................................................................................................................3
LED status indicator...................................................................................................................................................................................................................4
Out of the Box..........................................................................................................................................................................................................4
EMU................................................................................................................................................................................................................................4
Config.................................................................................................................................................................................................................................................5
Firmware...........................................................................................................................................................................................................................................5
DMX Send Test...............................................................................................................................................................................................................................6
Standalone......................................................................................................................................................................................................................................6
DMX receive.....................................................................................................................................................................................................................................8
MIDI (legacy feature)..................................................................................................................................................................................................................8
DMX ports...................................................................................................................................................................................................................9
DMX out.............................................................................................................................................................................................................................................9
DMX in................................................................................................................................................................................................................................................9
Servicing, Inspection & Maintenance........................................................................................................................................................ 10
Cleaning..........................................................................................................................................................................................................................................10
Package Contents................................................................................................................................................................................................ 10
Ordering Information........................................................................................................................................................................................ 10

DMX USB PRO MK2 (70314)
Visit the ENTTEC website for the latest version.
..
USER MANUAL
2|
ID: 134658
Document Updated: Dec 2021
Safety
Ensure you are familiarized with all key information within this guide and other relevant ENTTEC
documentation before specifying, installing, or operating an ENTTEC device. If you are in any doubt about
system safety, or you plan to install ENTTEC device in a configuration that is not covered within this guide,
contact ENTTEC or your ENTTEC supplier for assistance.
ENTTEC’s return to base warranty for this product does not cover damage caused by inappropriate use,
application, or modification to the product.
Electrical safety
This device must be operated in accordance with applicable national and local electrical and
construction codes.
This device can be damaged by excess voltage outside the operating range defined within this products
datasheet.
To reduce the risk of fire or electrical faults do not exceed the ratings and limitations defined in the
product datasheet or this guide.
Ensure there are no opportunities for cables to short circuit and cabling cannot be snagged or pulled.
Do not over stretch cabling to the device’s connectors and ensure that cabling does not exert force on
the PCB.
Isolate your installation from power immediately if accessories power cables or connectors is in any way
damaged, defective, shows signs of overheating or are wet.
Remove power from this product during cleaning or when it is not in use.
Do not connect this device to a dimmer pack or mains electricity.
Do not connect any of this device’s V- or GND connectors to earth.
Ensure your installation is protected from short circuits and overcurrent.
Ensure all connections are complete and secure before providing power to the device.
System Planning and Specification
To contribute to an optimal operating temperature, where possible keep this device out of direct
sunlight.
This unit has an IP20 rating and is not designed to be exposed to moisture or condensing humidity.
Ensure this device is only operated within the specified ranges within the product datasheet.
Protection from Injury During Installation
Always use suitable personal protective equipment when installing ENTTEC products.
Once installation is completed, check that all hardware and components are securely in place and
fastened to supporting structures if applicable.
Installation Safety Guidelines
The device is convection cooled, ensure it receives sufficient airflow so heat can be dissipated.
Do not cover the device with insulating material of any kind.
Do not operate the device if the ambient temperature exceeds that stated in the device specifications.
Do not cover or enclose the device without a suitable and proven method of dissipating heat.
Do not install the device in damp or wet environments.
Do not modify the device hardware in any way.
Do not use the device if you see any signs of damage.
Do not handle the device in an energized state.
Do not crush the device during installation.
Do not sign off a system without ensuring all cabling to the device and accessories has been
appropriately restrained, secured and is not under tension.

DMX USB PRO MK2 (70314)
Visit the ENTTEC website for the latest version.
..
USER MANUAL
3|
ID: 134658
Document Updated: Dec 2021
Functional features
Adjustable refresh rate
The DMX USB PRO Mk2 output settings can be configured using EMU. This allows for adjustments in refresh rate and
each DMX frames packet structure.
DMX Output Refresh Rate (per sec): This can be set between 0 and 40. 40 is the Default.
DMX Output Mark After Break (MAB in µsec): This can be set between 10 and 1355. 106 is the Default.
Break Time (µsec): This can be set between 96 and 1355. 181 is the Default.
RDM
RDM (E1.20) is supported as standard on the DMX USB PRO Mk2.
Remote Device Management (RDM) is a protocol enhancement to USITT DMX512 that allows bi-directional
communication between the DMX USB Pro Mk2 and RDM compliant devices over a standard DMX line. This protocol
will allow configuration, status monitoring, and management of these devices.
Not all control software which has implemented the DMX USB Pro Mk2 as a device support RDM.
Standalone
The standalone mode built into the DMX USB Pro Mk2 allows the recording and playback of a DMX sequence/show.
The DMX USB Pro Mk2 Standalone Mode is limited to 1 Universe only and can be configured using the EMU software.
Recordings can be made either by using the DMX USB Pro Mk2’s DMX input or Art-Net through the connected
computers internal loopback IP address (127.0.0.1) or network.
The DMX USB Pro Mk2 only records the changing frames, to maximum the length of the recording. With 512 channels
(1 Universe) being recorded, with a frame rate of 40 fps with each frame being unique from the previous, the
maximum record length will be 100 seconds. If the number of channels or unique frames per second are halved, this
will double the maximum recording length.
The playback of the Standalone sequence/show can be triggered from within EMU or on Power Up of the DMX USB
Pro Mk2. Note: Upon opening EMU to access DMX USB PRO MK2, the standalone show will stop automatically. User
will have to power cycle device or select PLAY option for standalone show to continue playing.
The DMX USB Pro Mk2 draws its power from the USB connection. The DMX USB Pro Mk2 doesn’t require a computer
connection during Standalone Playback. The DMX USB Pro Mk2 can be powered through a 5v USB power adaptor,
allowing the DMX USB Pro Mk2 to be powered from the mains.
Any DMX generated by software which will output on the DMX port that is outputting standalone mode will stop
playing the sequence/show and output DMX as directed by the software.
Hardware features
2.0 micro USB for connection to a computer
15-Pin breakout port
1* 5-Pin Male XLR for DMX Input
2* 5-Pin Female XLR for DMX Output
LED status indicator
DMX USB PRO MK2 (70314)
Visit the ENTTEC website for the latest version.
..
USER MANUAL
4|
ID: 134658
Document Updated: Dec 2021
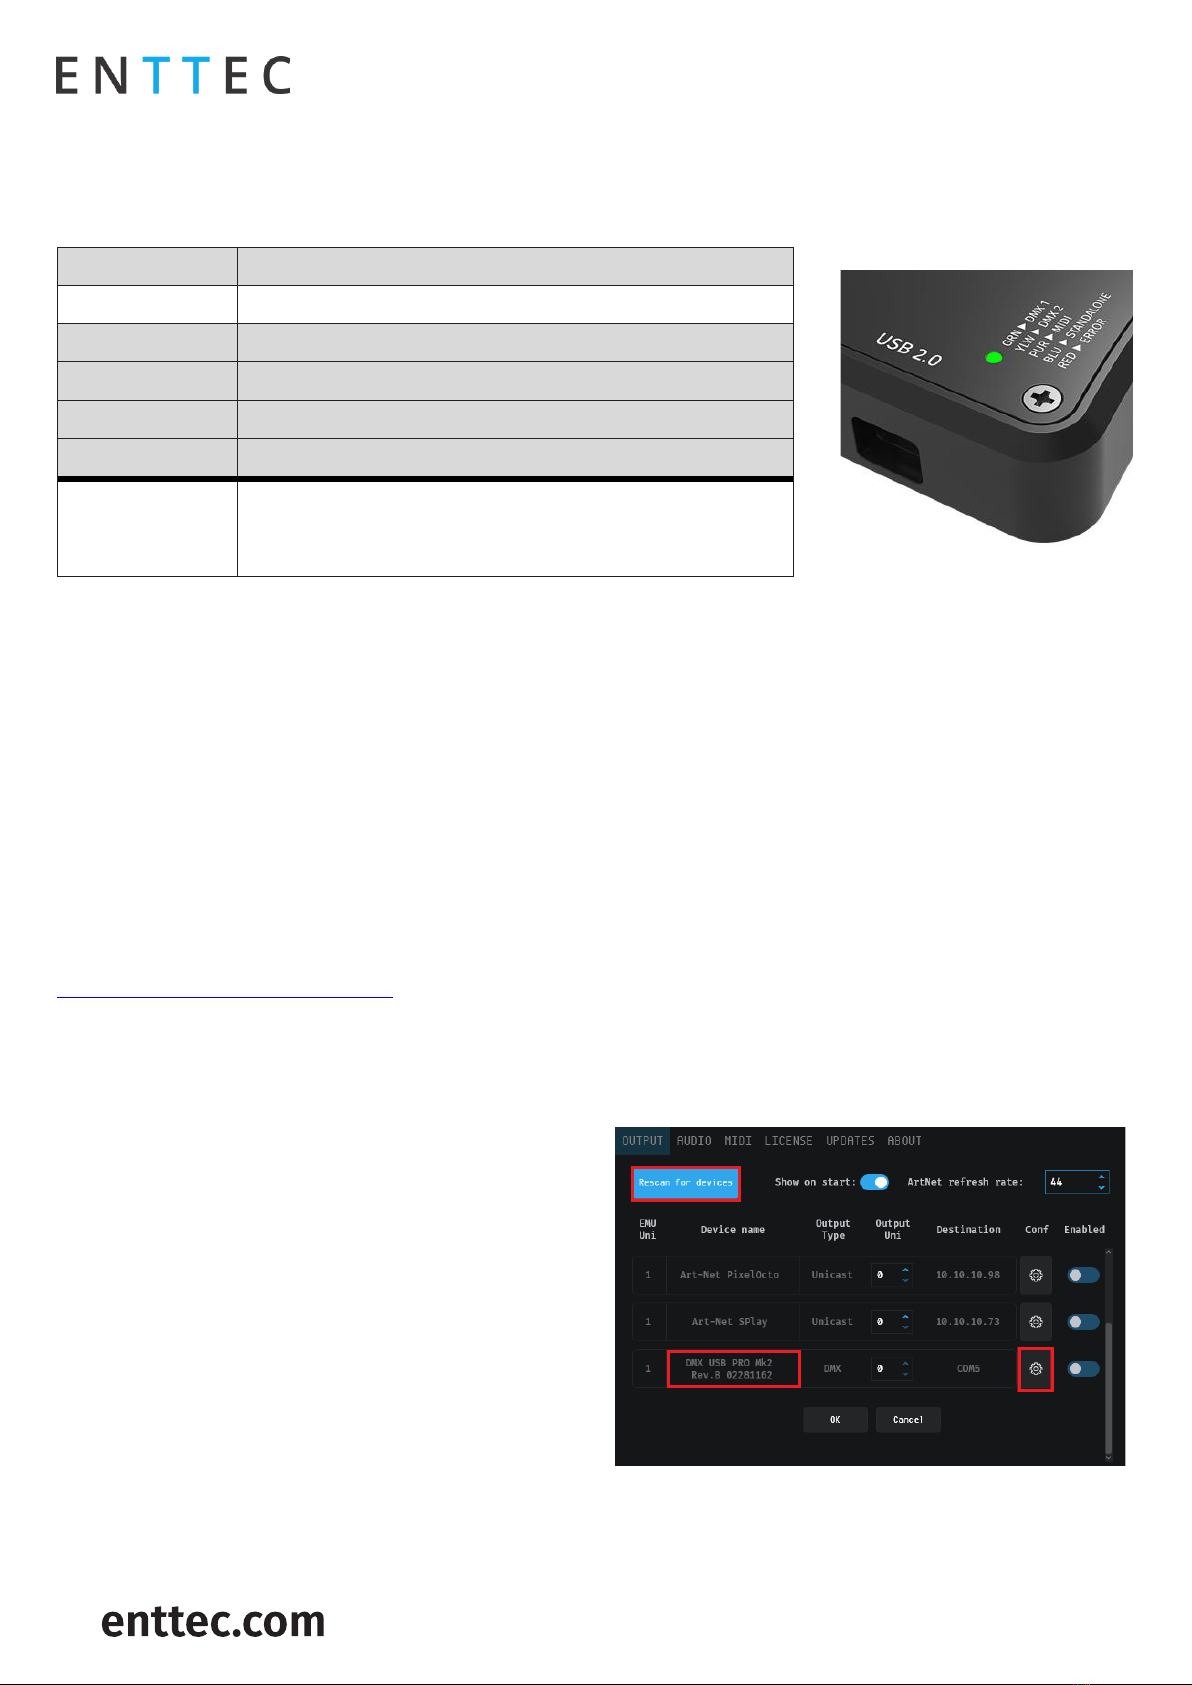
LED status indicator
DMX USB PRO Mk2 comes with a RGB LED indicator located on the top surface of the device (above the USB
connector). When in operation, the DMX USB PRO Mk2 led will change between a combination of these states. The
LED colour signifies the related activity:
Colour
Description
Flashing White
PRO Mk2 is powered on and idle
Red
Error Mode or unsupported request
Green
DMX/RDM packet sent/received on port 1.
Yellow
DMX/RDM packet sent/received on port 2.
Blue
Standalone show is playing.
Purple
MIDI data sent/received MIDI output port.
(MIDI Breakout accessory cable PN:79147 discontinued Q1
2021).
Error Mode: If the LED status Indicator is steady Red, please do the following:
1. Disconnect and re-connect the USB cable to the DMX USB PRO Mk2.
2. Use ENTTEC’s EMU software to restore the device.
Out of the Box
The DMX USB PRO MK2’s default parameter Settings are:
DMX Output Refresh Rate (per sec): 40
DMX Output Mark After Break (MAB in µsec): 10
Break Time (µsec): 96
EMU
DMX USB PRO MK2 communicates with a computer using FTDI D2XX drivers. These drivers enable the product to be
compatible with a range of operating system including Windows, Mac, and Linux (including Raspberry Pi).
Visit FTDI website for the latest drivers and operating system installation support:
www.ftdichip.com/Drivers/D2XX.htm.
EMU is ENTTEC’s software to configure, troubleshoot, test, and update the DMX USB PRO MK2. EMU is available to
download from the ENTTEC website - https://www.enttec.com/product/software-products/lighting-control-
software/emu-sound-to-light-controller/
Mac: In some cases, there might be a conflict with other drivers on the Mac, to resolve such conflicts, disable the
Mac “Serial drivers” or run FTDI’s ‘D2xxHelper’.
From the OUTPUT tab in EMU Settings Menu, click the
button (Rescan for devices) to search for DMX USB PRO
MK2 connected to the computer. When a device is
detected, select it from the dropdown list.
Serial Number will appear next to Device Name.
Once the DMX USB PRO Mk2 is connected to EMU, click on
the “Config” icon to access following info
Config
Firmware
Standalone

DMX USB PRO MK2 (70314)
Visit the ENTTEC website for the latest version.
..
USER MANUAL
5|
ID: 134658
Document Updated: Dec 2021
Config
Config tab allows the adjustment of DMX output parameters to accommodate for equipment that fall outside of the
USITT DMX512-A standard.
Following controls are available:
Set Parameters to Default: Selecting this will reset value
on both Port 1 & Port 2 to default value. Confirm update
by clicking on “Set DMX Parameters”
Get DMX Parameters: Retrieve and display latest settings
value.
Set DMX Parameters: Save settings
The following parameters can be adjusted:
Break Time (µsec): This can be set between 96 and 1355.
181 is the Default.
Mark After Break (MAB in µsec): This can be set between
10 and 1355. 106 is the Default.
Packet Refresh Rate (per sec): This can be set between 0 and 40. 40 is the Default.
Firmware
The Firmware update procedure can be used to:
Update to the latest feature set.
Reset DMX USB PRO Mk2 if it ever gets stuck or stops responding. (Error mode).
The following steps will explain firmware update procedure:
1. Within EMU Firmware Tab, you will find current firmware
version of connected device. Below that is a drop down to
select a default firmware option or download a version
from the ENTTEC website and locate it manually with
‘Choose File’.
2. After selecting the firmware file, click on the “Update
Firmware” button and let the update proceed. Do not
remove the USB until the update is complete.
3. Once Finished, the page will automatically refresh with
confirmation message, and firmware version information
will be updated to reflect the updated firmware.
DMX USB PRO MK2 (70314)
Visit the ENTTEC website for the latest version.
..
USER MANUAL
6|
ID: 134658
Document Updated: Dec 2021
DMX Send Test
EMU can also be used to test selected DMX channels by sending DMX through DMX USB PRO MK2.
First patch a ‘dummy’ fixture on any DMX channel of your choice.
EMU patching introduction video: https://www.youtube.com/watch?v=7EPm0vBPnNo&ab_channel=ENTTEC
Once done, return to homepage and drag the needed faders and click ‘Enabled’ on settings’ output tab to test DMX
output. USB logo will light up on the top left to indicate output to DMX USB PRO on EMU.
With your fixtures connected to the DMX output of the DMX USB PRO MK2, you will see the desired effect for the
value of the channel you change. For example, a fixture setup with intensity on Ch10, and R,G,B on Ch 1,2,3 - when
you change the values on these channels you will see the effect on your fixtures. This can be used to test that your
DMX USB PRO MK2 is working as expected.
After testing, you must close EMU, and then open any lighting control software to use DMX USB PRO MK2.
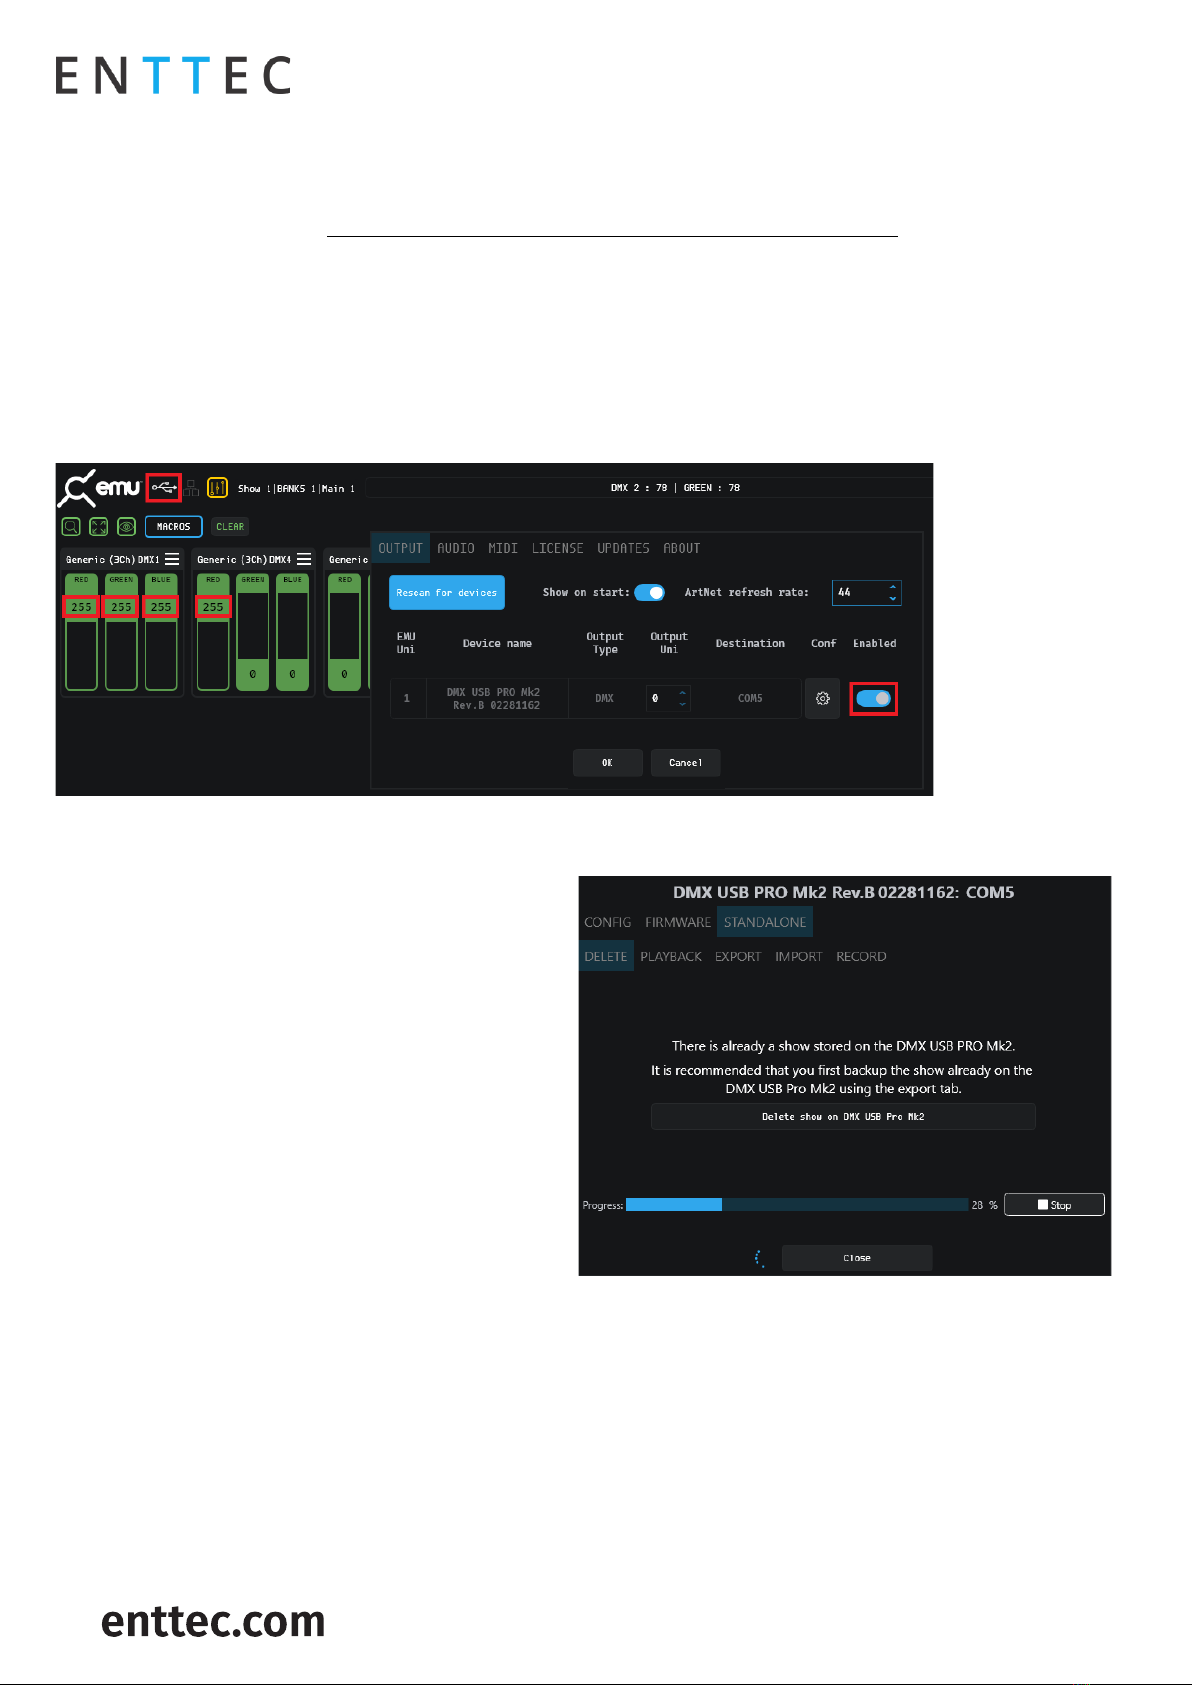
Standalone
Delete
DMX USB PRO MK2 comes with a default Standalone
show. To record and create new show, EMU will prompt
user to first delete stored show on DELETE tab.

DMX USB PRO MK2 (70314)
Visit the ENTTEC website for the latest version.
..
USER MANUAL
7|
ID: 134658
Document Updated: Dec 2021
Playback
PLAY or STOP standalone show in this tab.
Note: Upon opening EMU to access DMX USB PRO MK2,
the standalone show will stop automatically. User will
have to power cycle device or select PLAY option for
standalone show to continue playing.
Available info in this tab includes:
Storage size and limit (Frames)
Show Name
Play count
Loop Delay
Play on Powerup
DMX channels
Output DMX port
Export
ENTTEC recommend back up of standalone show.
Select location to export a copy of standalone show via
this tab in EMU.
Multiple DMX USB PRO MK2 can be programed for
uniform standalone output using same file.
Import
Import function will be unavailble if there is standalone
file on device.
Once stored file has been deleted, user may locate
standalone file manually via “Choose file”.
Details of standalone file is availble for preview once
selected.
User will be able to play the imported show once import
is complete.
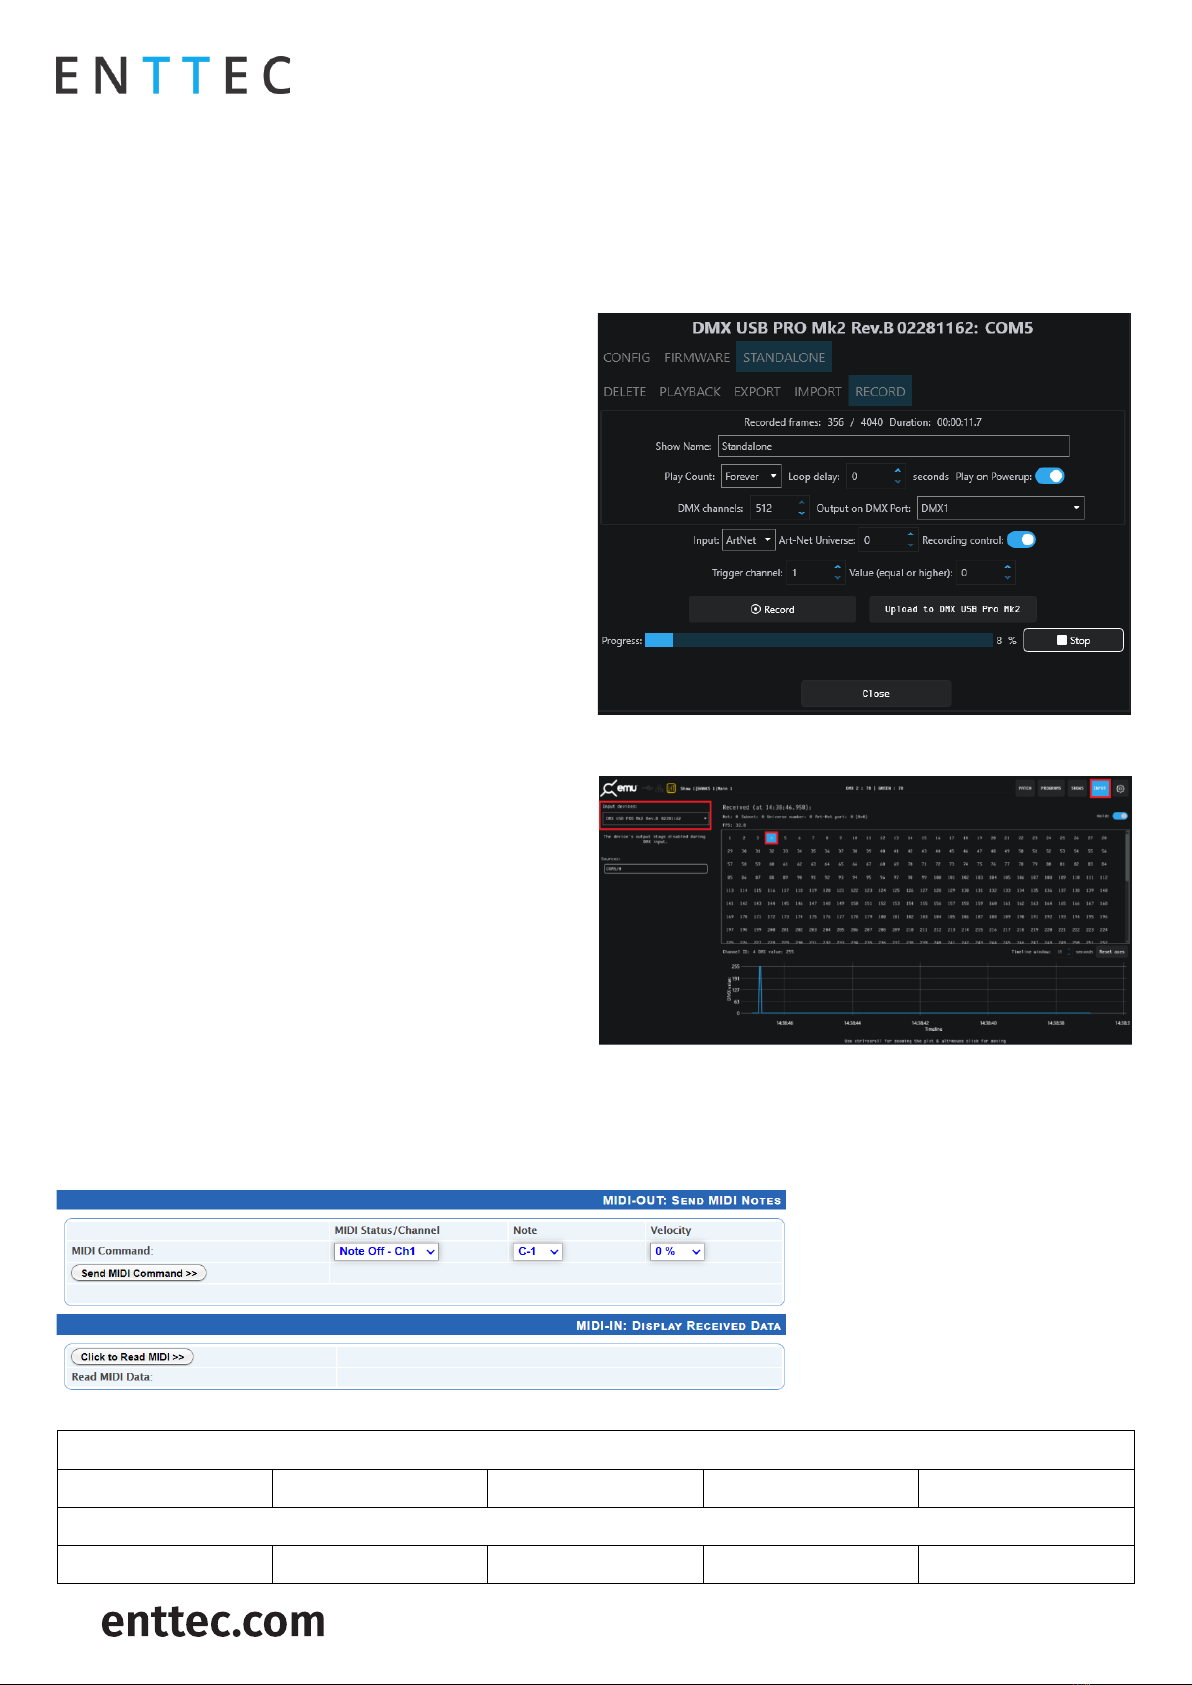
Record
Record function will be unavailble if there is standalone file on device.
Once stored file has been deleted, following options are available for setup:
Show Name: Name to identify the show being recorded
Play Count: Total number of times the show is played back (from 1 to Forever).
Loop Delay: The number of seconds delay, between each Loop playback.
Play on Power-Up: If selected as “YES”, recorded show plays on power-up (this option is required to be selected
for true standalone operation).
DMX Channels: The number of channels to record per DMX Frame (less channels = longer duration of recording)
DMX USB PRO MK2 (70314)
Visit the ENTTEC website for the latest version.
..
USER MANUAL
8|
ID: 134658
Document Updated: Dec 2021
Output Port: The DMX Port to output the show (Port 1, 2 or both).
Input: Choose between a DMX input using the DMX Male connector on the breakout cable, Art-Net through the
connected computers internal loopback IP address (127.0.0.1) or Artnet through network.
□Art-Net Universe: If Art-Net is set as the Input. Then an Art-Net Universe will need to be specified.
Recording Control: By enabling Recording Control, and selecting the Trigger Channel and respective value, it will
only record whilst the trigger is active. Once the selected trigger channel and value is not sent anymore, the
recording will stop automatically. It will still need to be manually stopped to proceed to next step of recording.
Recording begins, only when the first frame is captured.
Recorded frames as counted, are shown and an estimate
of the memory usage is also shown via the progress bar.
The recording will stop automatically if all memory has
been used.
There is no preview available during recording.
Once the recording process has finished, click on “Stop”.
Once the recording has been stopped, click on “Upload
to DMX USB PRO Mk2” button. This will then load the
show file onto memory of DMX USB PRO Mk2 and the
progress is shown on the page. It is important, not to
interrupt the memory load process, as it might corrupt
the show. Please wait till the upload progress finalises.
Once complete, the page will reload, and display
message of show stored on device. Head over to
PLAYBACK tab to play the standalone show.
DMX receive
User may inspect DMX data received by DMX USB PRO
MK2 via INPUT tab in EMU.
By selecting DMX USB PRO MK2 as the input device on
the left side dropdown list. Individual channel will light
up (light blue), indicating DMX data received.
By manually highlighting the channel, the DMX value
received will be displayed in the plot beneath the matrix.
MIDI (legacy feature)
The DMX USB PRO Mk2 has the capacity to support the legacy ‘DMX + MIDI accessory cable (PN: 79147)’. discontinued
Q1 2021. This is a non-class compliant MIDI implementation included as part of the DMX USB PRO Mk2’s MIDI API.
Legacy software (PRO-Manager) provides the ability to send test MIDI notes and display received MIDI data.
MIDI Connector pinouts
5pin MIDI OUT
Pin 1: NC
Pin 2: 0V
Pin 3: NC
Pin 4: Data +
Pin 5: Data -
5pin MIDI IN
Pin 1: NC
Pin 2: NC
Pin 3: NC
Pin 4: Data +
Pin 5: Data -

DMX USB PRO MK2 (70314)
Visit the ENTTEC website for the latest version.
..
USER MANUAL
9|
ID: 134658
Document Updated: Dec 2021
DMX ports
Send and receive DMX using the DMX USB Pro Mk2 breakout cable. The DMX USB Pro Mk2 has the hardware capabilities
to output 2 Universes of DMX whilst also inputting 1 Universe of DMX at the same time.
Depending on how your 3rd party software of choice has implemented the DMX USB Pro Mk2 API, the hardware
capabilities may be limited.
DMX out
The DMX USB Pro Mk2 breakout cable feature two DMX Female ports to allow the DMX USB PRO Mk2 to control DMX
Lights connected to it via DMX512.
It is not necessary to have any connection to the DMX Out socket (or a breakout cable connected) while programming
the DMX USB PRO Mk2.
Some software used with the DMX USB PRO Mk2 is limited and may not support 2 full universes.
DMX in
The DMX USB Pro Mk2 breakout cable features one DMX Male port, which can be used for DMX In. This socket should
be connected to the DMX512 controller or console whose output is to be captured by the DMX USB PRO Mk2. Input is
captured and sent to the software interfacing with the DMX USB PRO Mk2.
Some software used with the DMX USB PRO Mk2 is limited and may not support DMX Input.
Although there is only one DMX Input (DMX1) socket in the breakout cable, the other socket (DMX2) can also be
used as an input by using a Gender Changer
Each port can only be used as input or output at any single time.
Both ports are isolated and separated, so one can be used to receive DMX input, and the other to output DMX, as
long as the software supports this operation.
DMX USB PRO MK2 (70314)
Visit the ENTTEC website for the latest version.
..
USER MANUAL
10 |
ID: 134658
Document Updated: Dec 2021
Servicing, Inspection & Maintenance
The device has no user serviceable parts. If your installation has become damaged, parts should be
replaced.
Power down the device and ensure a method is in place to stop the system from becoming energized
during servicing, inspection & maintenance.
Key areas to examine during inspection:
Ensure all connectors are mated securely and show no sign of damage or corrosion.
Ensure all cabling has not obtained physical damage or been crushed.
Check for dust or dirt build up on the device and schedule cleaning if necessary.
Dirt or dust buildup can limit the ability for a device to dissipate heat and can lead to damage.
The replacement device should be installed in accordance with all steps within the installation guide.
To order replacement devices or accessories contact your reseller or message ENTTEC directly.
Cleaning
Dust and dirt build up can limit the ability for the device to dissipate heat resulting in damage. It’s important that
the device is cleaned in a schedule fit for the environment it is installed within to ensure maximum product longevity.
Cleaning schedules will vary greatly depending on the operating environment. Generally, the more extreme the
environment, the shorter the interval between cleanings.
Before cleaning, power down your system and ensure a method is in place to stop the system from
becoming energized until cleaning is complete.
Do not use abrasive, corrosive, or solvent-based cleaning products on a device.
Do not spray device or accessories. The device is an IP20 product.
To clean an ENTTEC device, use low-pressure compressed air to remove dust, dirt, and loose particles. If deemed
necessary, wipe the device with a damp microfiber cloth.
A selection of environmental factors that may increase the need for frequent cleaning include:
Use of stage fog, smoke or atmospheric devices.
High airflow rates (i.e., in close proximity to air conditioning vents).
High pollution levels or cigarette smoke.
Airborne dust (from building work, the natural environment or pyrotechnic effects).
If any of these factors are present, inspect all elements of the system soon after installation to see whether cleaning
is necessary, then check again at frequent intervals. This procedure will allow you to determine a reliable cleaning
schedule for your installation.
Package Contents
DMX USB PRO MK2
USB Type-A -> Micro USB Type-B Cable
DMX Breakout cable 0.1M - DB15 to 3x 5pin DMX
Ordering Information
For further support and to browse ENTTEC’s range of products visit the ENTTEC website.
Item
Part No.
DMX USB PRO Mk2
70314
Due to constant innovation, information within this document is subject to change.
Other manuals for DMX USB PRO Mk2
3
This manual suits for next models
1
Table of contents
Other Enttec Recording Equipment manuals


