Envirologic EVO Cleaner User manual

EVO Cleaner
EN User manual 4
SV Bruksanvisning 20
BGРъководствоза 36
експлоатация
DA Brugervejledning 52
DE Benutzerhandbuch 68
ES Manualdeusuario 86
Made in Sweden by Envirologic
FI Käyttäjän käsikirja 102
FR Manueld’utilisateur 118
HUFelhasználóikézikönyv 134
NL Gebruikershandleiding 150
NOBruksanvisning 166
PL Instrukcjaobsługi 182
ROManualdeutilizare 198


Rev: 2023-04-28

4
English
Original user manual
© Copyright: This manual may not be circulated to third parties, nor be copied or
quoted without authorization from Envirologic AB
Contents
1. Important informaon ������������������������������������������������������������������������������������5
Signs that are used in the manual � � � � � � � � � � � � � � � � � � � � � � � � � � � � � � � � � � � � � � � � � � � � � � � � � � � � � 5
Intended use � � � � � � � � � � � � � � � � � � � � � � � � � � � � � � � � � � � � � � � � � � � � � � � � � � � � � � � � � � � � � � � � � � � � � � 5
Robot type � � � � � � � � � � � � � � � � � � � � � � � � � � � � � � � � � � � � � � � � � � � � � � � � � � � � � � � � � � � � � � � � � � � � � � � � 5
� � � � � � � � � � � � � � � � � � � � � � � � � � � � � � � � � � � � � � � � � � � � � � � � � � � � � � � � � � � � � � � � � 5
2� Safety �������������������������������������������������������������������������������������������������������������6
� � � � � � � � � � � � � � � � � � � � � � � � � � � � � � � � � � � � � � � � � � � � � � � � � � � � � � � � � � � � � � � � � 6
Warnings � � � � � � � � � � � � � � � � � � � � � � � � � � � � � � � � � � � � � � � � � � � � � � � � � � � � � � � � � � � � � � � � � � � � � � � � � 6
Emergency stop switch � � � � � � � � � � � � � � � � � � � � � � � � � � � � � � � � � � � � � � � � � � � � � � � � � � � � � � � � � � � � � 6
� � � � � � � � � � � � � � � � � � � � � � � � � � � � � � � � � � � � � � � � � � � � � � � � � � � � � � � � � 6
Moving the robot � � � � � � � � � � � � � � � � � � � � � � � � � � � � � � � � � � � � � � � � � � � � � � � � � � � � � � � � � � � � � � � � � � 7
Cleaning and maintenance � � � � � � � � � � � � � � � � � � � � � � � � � � � � � � � � � � � � � � � � � � � � � � � � � � � � � � � � � � 7
Risk of overturning � � � � � � � � � � � � � � � � � � � � � � � � � � � � � � � � � � � � � � � � � � � � � � � � � � � � � � � � � � � � � � � � � 8
� � � � � � � � � � � � � � � � � � � � � � � � � � � � � � � � � � � � � � � � � � � � � � � � � � � � � � � � � � � � � � � � 8
Built-in safety devices � � � � � � � � � � � � � � � � � � � � � � � � � � � � � � � � � � � � � � � � � � � � � � � � � � � � � � � � � � � � � � � 8
3. Technical specicaons �����������������������������������������������������������������������������������9
Parts overview � � � � � � � � � � � � � � � � � � � � � � � � � � � � � � � � � � � � � � � � � � � � � � � � � � � � � � � � � � � � � � � � � � � � 9
Technical data � � � � � � � � � � � � � � � � � � � � � � � � � � � � � � � � � � � � � � � � � � � � � � � � � � � � � � � � � � � � � � � � � � � � � 9
Accessories � � � � � � � � � � � � � � � � � � � � � � � � � � � � � � � � � � � � � � � � � � � � � � � � � � � � � � � � � � � � � � � � � � � � � � 10
Reach � � � � � � � � � � � � � � � � � � � � � � � � � � � � � � � � � � � � � � � � � � � � � � � � � � � � � � � � � � � � � � � � � � � � � � � � � � � 10
4. General informaon ������������������������������������������������������������������������������������� 10
� � � � � � � � � � � � � � � � � � � � � � � � � � � � � � � � � � � � � � � � � � � � � � � � � � � � � � � � 10
� � � � � � � � � � � � � � � � � � � � � � � � � � � � � � � � � � � � � � � � � � � � � � � � � � � � � � � � � � � � � � � � � 11
Help system � � � � � � � � � � � � � � � � � � � � � � � � � � � � � � � � � � � � � � � � � � � � � � � � � � � � � � � � � � � � � � � � � � � � � � 11
Charging the robot � � � � � � � � � � � � � � � � � � � � � � � � � � � � � � � � � � � � � � � � � � � � � � � � � � � � � � � � � � � � � � � � 11
5. Manipulaon ������������������������������������������������������������������������������������������������ 12
Manual mode � � � � � � � � � � � � � � � � � � � � � � � � � � � � � � � � � � � � � � � � � � � � � � � � � � � � � � � � � � � � � � � � � � � � 12
Moving the robot � � � � � � � � � � � � � � � � � � � � � � � � � � � � � � � � � � � � � � � � � � � � � � � � � � � � � � � � � � � � � � � � � 12
� � � � � � � � � � � � � � � � � � � � � � � � � � � � � � � � � � � � � � � � � � � � � � � � � � � � � � � � � � � � � � � � � � � � � � � � � 12
6. Overview of the dierent moons ���������������������������������������������������������������� 13
7� Teach ������������������������������������������������������������������������������������������������������������ 14
Markers � � � � � � � � � � � � � � � � � � � � � � � � � � � � � � � � � � � � � � � � � � � � � � � � � � � � � � � � � � � � � � � � � � � � � � � � � 14
Recordings � � � � � � � � � � � � � � � � � � � � � � � � � � � � � � � � � � � � � � � � � � � � � � � � � � � � � � � � � � � � � � � � � � � � � � � 15
� � � � � � � � � � � � � � � � � � � � � � � � � � � � � � � � � � � � � � � � � � � � � � � � � � � � � � � � � � � � � � � � � � 16
� � � � � � � � � � � � � � � � � � � � � � � � � � � � � � � � � � � � � � � � � � � � � � � � � � � � � � � � � � � � � � � � � � � � � � � � 16
8� Teaching hints ����������������������������������������������������������������������������������������������� 16
9� Maintenance ������������������������������������������������������������������������������������������������ 18
10. European declaraon of conformity ������������������������������������������������������������ 19
5
EN
1. Important informaon
Signs that are used in the manual
warning sign
Intended use
The robot is designed to be safe to use provided it is operated in accordance with
ignored, this could lead to accidents and harm to people, the environment, or
animals�
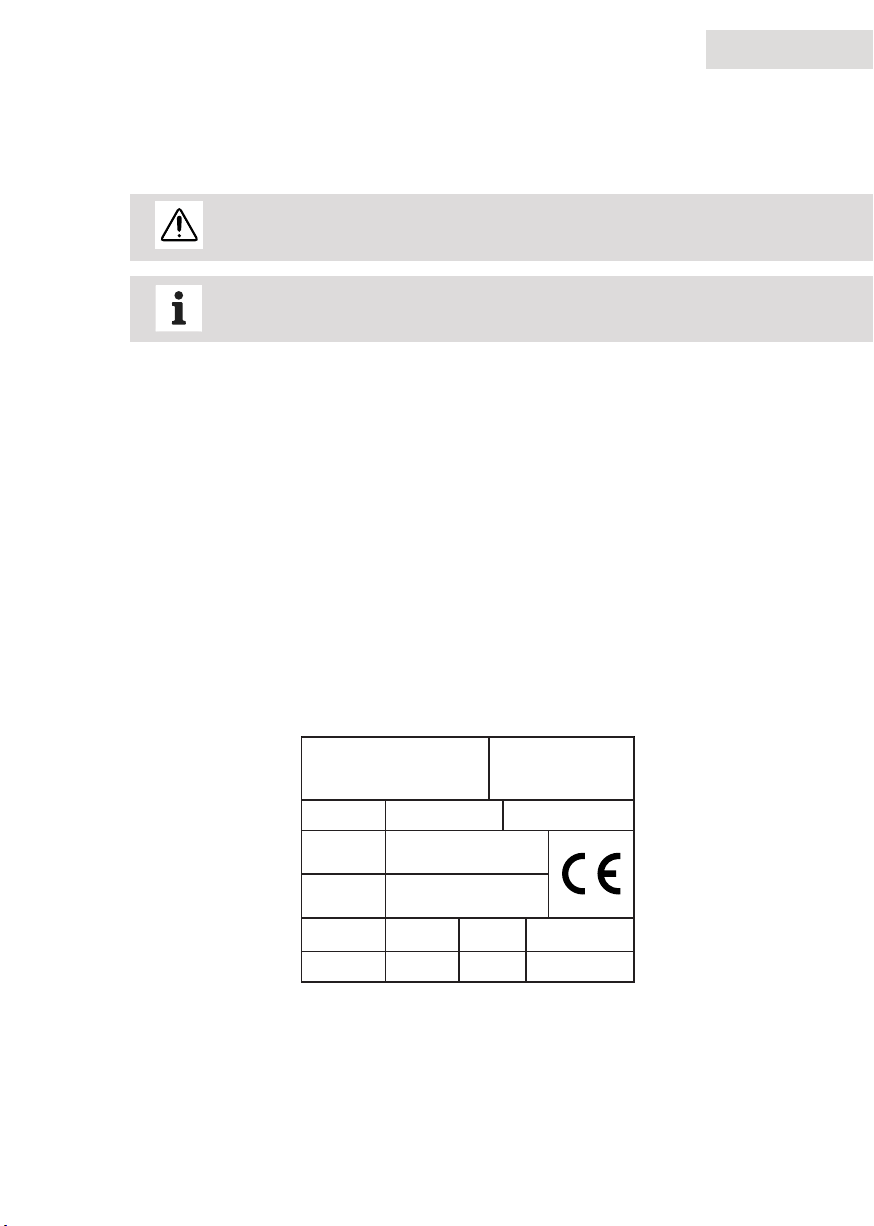
Robot type
Figure 1�
Figure 1, machine plate
Restricons on use
•
•
manual
Envirologic
Type
S/N
Manufact.
year
Max in
pressure
Voltage 24 VDC
210 bar
EVOCleaner
Ambient
temp.
Weight 270 kg
+1 - +55 °C
Envirologic AB (publ)
Rapsgatan33
754 54 Uppsala
Sweden
Cleaning robot
08xxxxxx
20xx
Original user manual
© Copyright: This manual may not be circulated to third parties, nor be copied or
quoted without authorization from Envirologic AB

6
English
2� Safety
Safety instrucons
It is important that the use of the robot complies with the safety
already familiar with the use of the robot�
maintenance of the robot� The user manual should be regarded as part of the
product and should be kept accessible� The robot is designed in conformity with
must be followed to ensure that the safety and performance of the robot will be
maintained�
• It is not permissible to remove or modify the design of safety
devices on the robot and accessories�
•
Warnings
The safety devices and warning labels on the robot are designed to prevent
accidents� The main responsibility for safe use lies with the persons that are using,
maintaining or carrying out repairs on the robot�
Emergency stop switch
reach below the operator panel� If the switch is pressed the robot and the water
jet will immediately stop�
Transportaon of the robot
• The robot must
other form of mechanical damage�
•
transport the robot must
into use�
7
EN
•
• During transport, secure the robot by the chassis�
Moving the robot
• The robot must only be moved when it’s turned on�
• The robot must only be moved with both hands on the handlebars
when the clutch is used�
• Methods for moving the robot must be adapted to the ground and
•
must be used, do not use the clutch or the transport wheel!
Recording (programming) and starng a robot program
•
must be clear of obstacles, doors and gates must be closed�
•
cleaning�
• The person carrying out the recording must use ear defenders,
respiratory mask and safety goggles� Other recommended
• During recording the operator must keep a safe distance from the
moving parts of the robot and the high-pressure water jet�
• During recording the robot must be manipulated in such a way that
the water jet or the moving parts of the robot are not in contact
•
•
correct valve in the double nozzle is open�
Cleaning and maintenance
• Do not use a high-pressure
water�
• must
• During maintenance the robot must

8
English
•
robot�
Risk of overturning
•
leans more than 20 degrees sideways�
•
• During cleaning behind the robot in the marked area in Figure 3,
there is a risk of overturning that is dependent on the ground and
• When using the transport wheel, the tower must be centered�
Baery short circuit
the robot� Consequently, always reconnect this pole last�
Built-in safety devices
• Protecon against current faults is provided by a fuse on the circuit
board�
• Protecon against low baery voltage is controlled by the
computer and generates an alarm if this occurs�
• Protecon against collision during operaon is detected by each
individual motor and generates an alarm if the motor does not

9
EN
3. Technical specicaons
Parts overview
Figure 2, parts of the robot
Technical data
1930 mm
1610 mm
4015 mm
up to 6 m from center of unit
270 kg
Rotor jet 0�55
E
V
O
C
l
e
a
n
e
r
M
a
d
e
i
n
S
w
e
d
e
n
b
y
E
n
v
r
i
o
l
o
g
i
c
Boom
Magnetic switch
Tower
Batteries
Antenna
Operator panel
Clutch handle
Transport wheel
Charger connector
Joystick connector
Hose reel
Emergency switch
Guidance wheel (front)
Nozzle
Arm
Telescope

10
English
15-18 l/min
Sound power level
Accessories
Measured on rotor with rotor jet nozzle and 190 bar water pressure
Reach
Figure 3, reach of the arm and safe tower working range
4. General informaon
Short funconal descripon
6 M INCL. WATER JET
(
Z
E
R
O
N
O
Z
Z
L
E
B
E
I
N
G
U
S
E
D
)
TELESCOPE RANGE: 4 M
working area

11
EN
50 m hose installed on a hose reel that is operated separately by the robot
according to how the robot moves� The cleaning is carried out by a telescopic arm,
Starng the robot
The main switch is found on the right-hand side of the operator panel� When the
robot is switched on, the startup process takes about 30 seconds� When the screen
in Figure 4 is shown the robot is ready to operate�
Figure 4, start screen
Help system
Charging the robot
to the robot before it is connected to the wall outlet� When the charger is
connected to the wall outlet only the orange status light should be turned on� See
the charger manual for details� The cleaning robot shall always be connected to the

12
English
5. Manipulaon
Manual mode
Manual mode means using the cleaning robot without a previous teaching process�
to the house to be cleaned� Before moving, the robot should be turned on� Manual
mode is reached from the start screen� When in manual mode, the cleaning robot
Moving the robot
The robot can be manually moved either by manpower or by using the motors for
transport� For unpowered transport, the robot is declutched using the clutch
handle on the right-hand side of the handlebar� The robot can also be manually
make it easier moving or turning the robot, the transport wheel can be used, see
Figure 2� This is also controlled on the manual screen�
If the ground is inclined towards or away from you the motor must be
used, do not use the clutch or the transport wheel!
Joysck
collision with the robot’s telescopic arm is avoided�
on the rear right-hand side of the cleaning robot, see Figure 2� The plug must be

13
EN
5. Manipulaon
Manual mode
Manual mode means using the cleaning robot without a previous teaching process�
to the house to be cleaned� Before moving, the robot should be turned on� Manual
mode is reached from the start screen� When in manual mode, the cleaning robot
Moving the robot
The robot can be manually moved either by manpower or by using the motors for
transport� For unpowered transport, the robot is declutched using the clutch
handle on the right-hand side of the handlebar� The robot can also be manually
make it easier moving or turning the robot, the transport wheel can be used, see
Figure 2� This is also controlled on the manual screen�
If the ground is inclined towards or away from you the motor must be
used, do not use the clutch or the transport wheel!
Joysck
collision with the robot’s telescopic arm is avoided�
on the rear right-hand side of the cleaning robot, see Figure 2� The plug must be
Figure 5, joysck
6. Overview of the dierent moons
behind the robot�
Forward/Backward
Move joysck sha forwards/
backwards, while pressing buons 1
and 2 simultaneously.
Telescope out/in
The telescope can run out of its
Move joysck sha forwards/
backwards, while pressing buon 1.

14
English
Boom up/down
The boom moves about 100° from
Move joysck sha backwards/
forwards.
Arm out/in
the ceiling�
Move joysck sha right/le,
while pressing buon 1.
Nozzle right/le
The nozzle can spin 360° in both
the arm is parked and nozzle points
downwards�
Move joysck sha right/le,
while pressing buon 2
Tower right/le
The tower can go about 200° in both
Move joysck sha right/le.
7� Teach
Markers
equipment before the cleaning process takes place� The cleaning robot reaches the
computer�
15
EN
•
• The programming should be done in a dirty pen with working water
pressure�
• Any pauses during the programming process will not appear during
Recordings
LOCATION, PROGRAM and RECIPE�
The LOCATION is a map of how the path, which the robot shall travel, looks like�
which side the guidance wheels are set and how many markers that have been
pressing start� The robot is now moving forward, recording where these markers
are� Follow the robot and make sure all markers are registered correctly and that
The PROGRAM
The RECIPE
You pick the program from a list, place it on the correct place on the screen and
The programs chosen on previous marker stays as default, if you need to make
changes you can delete or add programs�
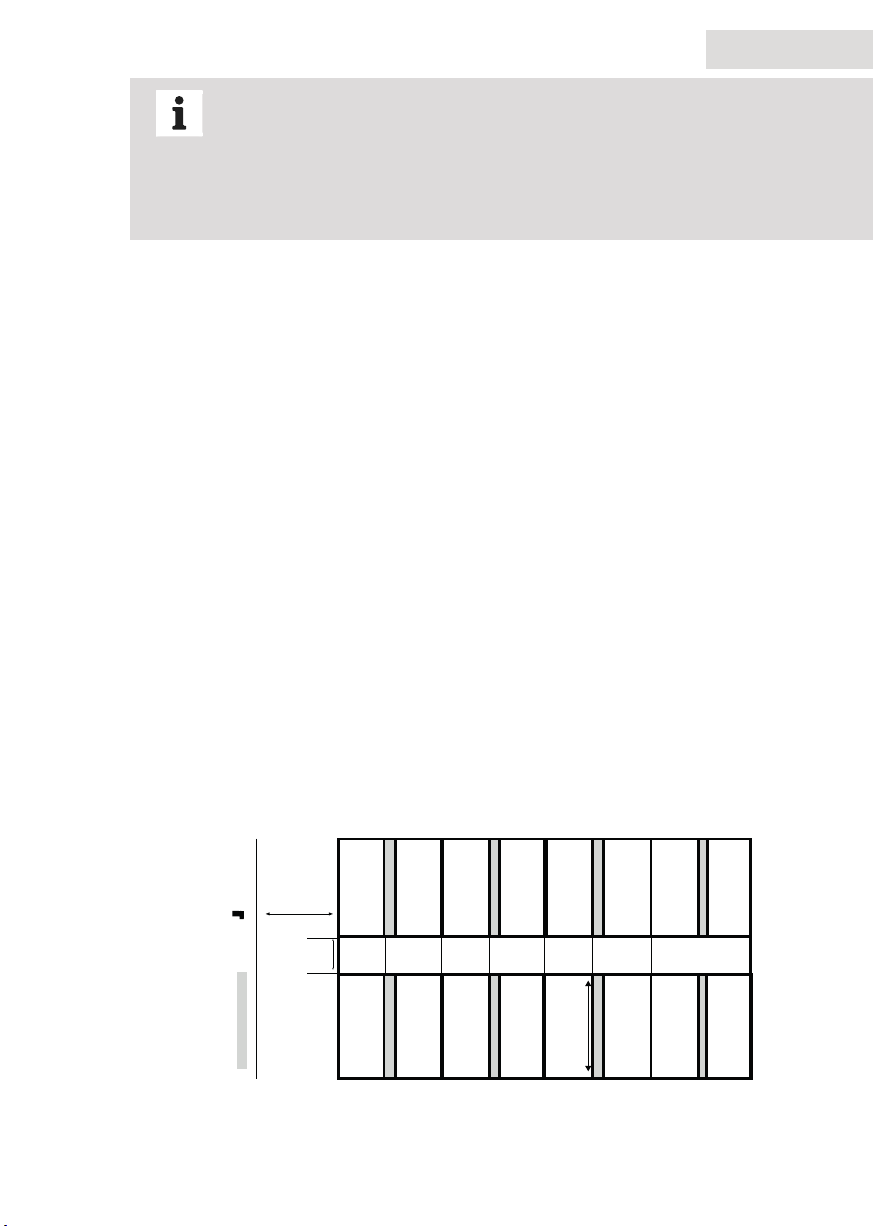
Figure 6, example of pig pen layout
FLOOR
L
LAST
FLOOR
RIGHT
With
good
result:
6 m
FLOOR
R
LAST
FLOOR
L
FIRST
FLOOR
LEFT
FLOOR
R
FIRST
AISLE
FLOOR
BEHIND
AISLE
FLOOR
AISLE FLOOR
LAST
MIN. 100 CM
MIN. 65 CM
Marker =
Food tray =

16
English
Automac wash
Before cleaning, check the following:
1�
missing
2�
3�
markers�
4� That the area to be cleaned is clear of obstacles, which can interrupt the
cleaning process
5� That the high pressure cleaning unit is powered up
6� That water is connected to the high pressure cleaner
7� That the high pressure hose is free to move and secured centrally behind
the hose reel
8� That the charger is disconnected
9�
10�
11� That the area to be cleaned is cleared of humans and animals
in contact with the wall on the side of the aisle where the markers are located�
listed recipes and programs� Between each recipe the robot will move back to the
Aborng
•
• When pressing pause or the Emergency stop switch, the program will be
if the stop switch is restored and the alarm is cleared on the screen�
8� Teaching hints
1� The teaching process should take place using working pressure, because the arm

17
EN
2�
3� The teaching of programs should be done in dirty pens to be able to observe the
track of the water jet�
4�
equipment, posts, etc� If so, the teaching process should take place in this pen to
avoid collisions�
5.
cleaning process� There can also be a discrepancy in the house equipment when
going from one pen to another�
6� If it is not possible to take point 5 into account, because of a lack of space or
similar problems, you should consider moving away from the area that could cause
due to collisions, even if some parts of the arm touch the equipment�
7�
distance�
8� Keep the nozzle at a distance where you have the water pressure and width
of the spray to manage the task you’ve planned for the program� Being closer to
the surfaces gives more pressure but also results in more movements due to the
narrower spray�
9�
the guidance wheel during movement in the cleaning process� This could cause
10� If you are using a double nozzle, be very careful in turning the water on, so the
or the machine in, for at least, 5 seconds and only then turn the water on�
11�
measurement for each pen is a good working tool� It is very important to divide the

18
English
Always do one program for coarse cleaning and one for ne cleaning!
and saved as a program� Limit yourself to the standard pens i�e� whatever type you
have many pens of� It is an obvious error to carry out teaching in a special pen or a
12�
in, you should redo the worst program� This means that it is useful for you to
the right-hand pen, so you re-teach that program� If you do it this way you will take
teaching on the rest�
13�
14�
those movements you taught the robot� The conclusion would be to always make
your nozzle movements a bit longer than necessary�
9� Maintenance
• Do not use high pressure for cleaning the robot
• When the robot is not in use it must be kept in an area that is
frost-free�

19
EN
10. European declaraon of conformity
We,
Envirologic AB, org nr 556572-1775
Rapgsgatan 33
SWEDEN
Telephone No� +46 18 39 82 30,
Envirologic AB

20
Svenska
Innehåll
1.Vikg informaon ������������������������������������������������������������������������������������������ 21
Symboler som används i bruksanvisningen � � � � � � � � � � � � � � � � � � � � � � � � � � � � � � � � � � � � � � � � � � � � 21
Avsedd användning � � � � � � � � � � � � � � � � � � � � � � � � � � � � � � � � � � � � � � � � � � � � � � � � � � � � � � � � � � � � � � � 21
� � � � � � � � � � � � � � � � � � � � � � � � � � � � � � � � � � � � � � � � � � � � � � � � � � � � � � � � � � � � � � � � � � � � � � � � 21
� � � � � � � � � � � � � � � � � � � � � � � � � � � � � � � � � � � � � � � � � � � � � � � � � � � � � � � � 21
2� Säkerhet ������������������������������������������������������������������������������������������������������� 22
� � � � � � � � � � � � � � � � � � � � � � � � � � � � � � � � � � � � � � � � � � � � � � � � � � � � � � � � � � � � � � 22
Varningar � � � � � � � � � � � � � � � � � � � � � � � � � � � � � � � � � � � � � � � � � � � � � � � � � � � � � � � � � � � � � � � � � � � � � � � � 22
Nödstopp � � � � � � � � � � � � � � � � � � � � � � � � � � � � � � � � � � � � � � � � � � � � � � � � � � � � � � � � � � � � � � � � � � � � � � � � 22
Transport av robot � � � � � � � � � � � � � � � � � � � � � � � � � � � � � � � � � � � � � � � � � � � � � � � � � � � � � � � � � � � � � � � � 22
� � � � � � � � � � � � � � � � � � � � � � � � � � � � � � � � � � � � � � � � � � � � � � � � � � � � � � � � � � � � � � � 23
Inlärning och uppspelning av robotprogram � � � � � � � � � � � � � � � � � � � � � � � � � � � � � � � � � � � � � � � � � � � � � � � � � � � � � � � � � � � 23
Rengöring och underhåll � � � � � � � � � � � � � � � � � � � � � � � � � � � � � � � � � � � � � � � � � � � � � � � � � � � � � � � � � � � 23
Tipprisk � � � � � � � � � � � � � � � � � � � � � � � � � � � � � � � � � � � � � � � � � � � � � � � � � � � � � � � � � � � � � � � � � � � � � � � � � 24
� � � � � � � � � � � � � � � � � � � � � � � � � � � � � � � � � � � � � � � � � � � � � � � � � � � � � � � � � � � � � 24
Inbyggda säkerhetssystem � � � � � � � � � � � � � � � � � � � � � � � � � � � � � � � � � � � � � � � � � � � � � � � � � � � � � � � � � � 24
3. Teknisk specikaon ������������������������������������������������������������������������������������� 25
Robotens delar � � � � � � � � � � � � � � � � � � � � � � � � � � � � � � � � � � � � � � � � � � � � � � � � � � � � � � � � � � � � � � � � � � � 25
Tekniska data � � � � � � � � � � � � � � � � � � � � � � � � � � � � � � � � � � � � � � � � � � � � � � � � � � � � � � � � � � � � � � � � � � � � � 25
Tillbehör � � � � � � � � � � � � � � � � � � � � � � � � � � � � � � � � � � � � � � � � � � � � � � � � � � � � � � � � � � � � � � � � � � � � � � � � 26
Räckvidd � � � � � � � � � � � � � � � � � � � � � � � � � � � � � � � � � � � � � � � � � � � � � � � � � � � � � � � � � � � � � � � � � � � � � � � � 26
4. Allmän informaon ��������������������������������������������������������������������������������������� 26
� � � � � � � � � � � � � � � � � � � � � � � � � � � � � � � � � � � � � � � � � � � � � � � � � � � � � � � � � � 27
Starta roboten � � � � � � � � � � � � � � � � � � � � � � � � � � � � � � � � � � � � � � � � � � � � � � � � � � � � � � � � � � � � � � � � � � � � 27
Hjälpsystem � � � � � � � � � � � � � � � � � � � � � � � � � � � � � � � � � � � � � � � � � � � � � � � � � � � � � � � � � � � � � � � � � � � � � � 27
Laddning av roboten � � � � � � � � � � � � � � � � � � � � � � � � � � � � � � � � � � � � � � � � � � � � � � � � � � � � � � � � � � � � � � 27
5� Styrning av roboten �������������������������������������������������������������������������������������� 28
Frikörning � � � � � � � � � � � � � � � � � � � � � � � � � � � � � � � � � � � � � � � � � � � � � � � � � � � � � � � � � � � � � � � � � � � � � � � 28
� � � � � � � � � � � � � � � � � � � � � � � � � � � � � � � � � � � � � � � � � � � � � � � � � � � � � � � � � � � � 28
� � � � � � � � � � � � � � � � � � � � � � � � � � � � � � � � � � � � � � � � � � � � � � � � � � � � � � � � � � � � � � � � � � � � � � � � � 28
6� Översikt över de olika rörelserna ������������������������������������������������������������������ 29
7� Inlärning ������������������������������������������������������������������������������������������������������� 30
Markörer � � � � � � � � � � � � � � � � � � � � � � � � � � � � � � � � � � � � � � � � � � � � � � � � � � � � � � � � � � � � � � � � � � � � � � � � 30
Filer � � � � � � � � � � � � � � � � � � � � � � � � � � � � � � � � � � � � � � � � � � � � � � � � � � � � � � � � � � � � � � � � � � � � � � � � � � � � 31
� � � � � � � � � � � � � � � � � � � � � � � � � � � � � � � � � � � � � � � � � � � � � � � � � � � � � � � � � � � � � � � � � � 32
Avbryta � � � � � � � � � � � � � � � � � � � � � � � � � � � � � � � � � � � � � � � � � � � � � � � � � � � � � � � � � � � � � � � � � � � � � � � � � 32
8� Tips vid inlärning ������������������������������������������������������������������������������������������� 32
9� Underhåll ������������������������������������������������������������������������������������������������������ 34
10� EG-försäkran om överensstämmelse ����������������������������������������������������������� 35
Bruksanvisning i original
©Copyright: Denna manual får inte spridas till tredje part, inte heller kopieras eller citeras utan
tillstånd från Envirologic AB
Other manuals for EVO Cleaner
1
Table of contents
Languages:


