Soniclean UW-3000 User manual

soniclean.com.au
Introducon
Thank you for purchasing a Soniclean Ultrasonic Washer. Soniclean washers are
designed to improve the quality and consistency of cleaning instruments using
ultrasonics and clean water rinsing. It is intended that the instruments shall be
gross-cleaned prior to loading into the Washer, and be sterilised in the usual
manner aer ultrasonic cleaning.
This manual will guide you through the safe and eecve operaon of your
device. Please also ensure you have familiarised yourself with specic instrucons
for installaon and rst use to avoid damage to the device and/or instuments or
harm to operators.
USRMAN-UW-180201-V3.0.1
+61 8 8234 8398

soniclean.com.au
USRMAN-UW-180201-V3.0.1
+61 8 8234 8398
1
Contents
1 Requirements 2
1.1 Environmental 2
1.2 Plumbing 2
1.3 Electrical 2
1.4 MachineReporngSystem(MRSmodelsonly): 2
1.5 Printer(oponal) 3
1.6 Detergent Container 3
2 Installaon 4
2.1 Plumbing 4
2.2 Electrical 4
2.3 MachineReporngSystem(MRSmodelsonly): 4
2.4 Printer(oponal) 5
2.5 Detergent Container 5
3 Operaon 6
3.1 Howtooperate: 6
4 Foil Test 10
4.1 PerformingaFoilTest 10
4.2 FoilTestProblemSolving 10
5 Keypad Descripon 11
6 Programmable Features 12
7 Program Mode 13
7.1 ProgramEntryPoints 13
7.2 ProgramParameters 13
8 Display Messages 16
9 Error Diagnosis 17
9.1 ProgramValuesLost:(FAIL) 17
9.2 LowLevelinTank:(LO) 17
9.3 DrainBlocked:(drnb) 18
9.4 OverowDetecon:(OFLO) 18
9.5 UltrasonicsOverheang:(HOT) 18
9.6 Real-TimeClock:(rtc) 18
9.7 Power-upwarning:(P-UP) 19
9.8 Waterleak:(H2OL) 19
9.9 SengdefaultIPvalues.(IP-?) 19
9.10 Slid—lidliedduringoperaon 19
A Operang Instrucons Summary (Washer) 20
B Specicaon 20
C Warranty 22

2
soniclean.com.au
USRMAN-UW-180201-V3.0.1
+61 8 8234 8398
1 Requirements
Note: The customer shall ensure the following requirements are met prior to installaon. This is
essenal for the machine to perform at opmum level and to full Australian Standards. If the
customer fails to provide this informaon, Soniclean will provide the informaon for a fee.
1.1 Environmental
i. Use hot and cold water.
ii. A tap or inlet must be dedicated to the Washer.
iii. Water Quality for cleaning as per AS/NZS 4187:2003 shall be used. (Water
hardness will determine the type of detergent to be used. It will also determine
the amount of detergent to be used in the cleaner.)
1.2 Plumbing
i. Maximum water pressure 150 psi, minimum water pressure 50 psi.
ii. Flow rate 10 litres/minute (minimum) to 20 litres/minute (maximum).
iii. This is a High Hazard applicaon and the inlet mains supply shall be ed with an
approved Reduced Pressure Zone Device and a line lter. (Please check with your
local Water Authority for the correct installaon informaon for your area.)
iv. Mains inlet connecon with ½” male BSP ng within 600mm from the machine.
v. Do not use any aeraon devices in the mains water supply.
vi. Outlet pipe of 25mm diameter for waste water within 600mm from the machine.
1.3 Electrical
i. Wall power socket 240 VAC 50-60 Hz rated at 10 amps.
ii. Wall power socket located within 600mm from the machine.
iii. Power supply circuit shall not be shared with life threatening or life support
electrical systems.
iv. Power supply circuit shall not be shared with computer electrical system or other
excessively large power devices, e.g. steriliser/washer disinfectors.
v. Earth leakage protecon shall be provided by user.
Note: The unit contains MOV surge arrestor—when carrying out insulaon resistance test, MUST
carry out test at 250v as per ASN/NZ3760:2003 (page 14) for Class 1 equipment with MOV surge
arrestor.
1.4 Machine Reporng System (MRS models only):
i. Local Area Network (LAN) outlet 1000mm from the machine.

3
soniclean.com.au
USRMAN-UW-180201-V3.0.1
+61 8 8234 8398
Printer (oponal)
Allow room on the le hand side of the machine for the printer unit.
1.5 Detergent Container
i. The detergent bole is supplied with your machine.
ii. The detergent bole shall be posioned in the compartment in the front of the
machine.
iii. When bole is empty replace with the same brand of detergent. It is important
that idencal detergent is used, as this is crical to the total cleaning process. If
other detergent is used the machine shall require re-programming.

4
soniclean.com.au
USRMAN-UW-180201-V3.0.1
+61 8 8234 8398
2 Installaon
2.1 Plumbing
Inlet Mains Supply
i. Screw supplied braided hoses on to the machine and inlet mains water supply.
ii. Hot connects to top inlet, cold to boom inlet.
iii. Hand ghtened only.
Outlet Waste Supply
i. Screw and hand ghten supplied black sink hoses onto the machine and insert
into drain.
ii. Ensure that the black sink hoses fall evenly away from the machine to the drain.
2.2 Electrical
i. Plug machine into mains supply. Socket is on RHS of unit near rear.
ii. Switch on when ready to operate.
Note: The unit contains MOV surge arrestor—when carrying out insulaon resistance test, MUST
carry out test at 250v as per ASN/NZ3760:2003 (page 14) for Class 1 equipment with MOV surge
arrestor.
2.3 Machine Reporng System (MRS models only):
i. LAN connecon; take the LAN cable provided and push the black plug into the
MRS socket provided on the Washer (just above mains socket). Plug the other
end (RJ45) into the LAN wall outlet.
ii. Contact your IT department and hand them the Machine Reporng Manual. The
appropriate informaon for connecng the machine to the Local Area Network
is found on page 10 “Network Hardware and Conguraon” of the Machine
Reporng System Manual.
iii. PC Connecon direct (no LAN): take the PC cable provided and push the black
plug into the MRS socket provided on the Washer. Plug the other end (RJ45) into
the appropriate outlet on the PC.
Cauon: Only use designated cables for accessing data from the Washer.
The cable marked ‘PC’ should be used for direct connecon to computers ethernet port .
The cable marked ‘LAN’ should be used for connecon to a LAN wall outlet.

5
soniclean.com.au
USRMAN-UW-180201-V3.0.1
+61 8 8234 8398
2.4 Printer (oponal)
i. Plug the machine into mains supply and turn on at the switch.
ii. Plug the printer cable into the machine (just above MRS socket) and the printer.
iii. Press the feed buon to progress the paper.
2.5 Detergent Container
i. Open door on front of wash unit.
ii. Place ltered end of detergent hose into container.
iii. Place detergent container into compartment.
iv. Ensure there is sucient detergent in container at all mes.
v. Check level of detergent regularly.

6
soniclean.com.au
USRMAN-UW-180201-V3.0.1
+61 8 8234 8398
3 Operaon
Note: Always ensure that strainer is ed in drain hole of wash tank to prevent small parts entering
drain and blocking valve.
3.1 How to operate:
3.1.1 Start Process
i. Turn on at power point.
ii. The machine will display 8.8.8.8, then SCx.x
iii. The machine will automacally open lid, drain, close lid, ush, drain the ush, ll
with water and detergent and perform a de-gassing cycle.
iv. When the degassing cycle is complete, the machine is ready for use.
v. During the above cycle, the machine with display the following:
Display Funcon
8.8.8.8 Internal program.
SCx.x Internal program process.
Lid Lid is being raised.
Drn Draining the water.
Lid Lid is closing.
Drnf Tank is ushing. (Drain is open.)
Drn Tank is draining the ush.
FILL
Tank is lling with water and detergent is au-
tomacally added at the programmed quanty.
(0.5%)
De-gas The soluon is degassing. (This takes approxi-
mately 10 minutes.)
---- The machine is ready to be loaded
with instruments.
vi. It is recommended that you perform a foil test daily to check the performance of
your Washer. (Refer Secon 4, Foil Test.)

7
soniclean.com.au
USRMAN-UW-180201-V3.0.1
+61 8 8234 8398
3.1.2 Conrm Parameters
To check or change the sengs or parameters of your washer:
i. Press the “Shi” and “Clean (Values)” keys together and hold for 3 seconds.
ii. Beep will sound when command has been recognized.
iii. The machine will display the “Clean Time” or “ct”.
iv. Scroll through the parameters using the “Enter” keys.
v. The parameters may be changed as required. (Refer Secon 7, Program Mode
Secon.)
3.1.3 Loading the Machine
i. Instruments may be loaded into tray with the tray located on a bench top.
ii. Dismantle the instruments and insert the nozzle end of the cannulated
instrument (standard sizes 2, 5 and 10mm) into the connector provided.
iii. With the ports vercal, place the connector, with instrument loaded, into the
port.
iv. Gently lay the instruments down and rest them on the moveable plasc rack.*
(Adjust the rack to support the instruments). The other parts of the instruments
may be placed on the boom of the tray or in the instrument holders provided.
v. The unused ports should be le in vercal posion (when the irrigator funcon is
turned o to that port).
vi. Place the tray onto the lier carriage and push backwards rmly.
vii. Ensure that the spigot on the carriage docks into the instrument tray.
*Note—with twin manifold baskets it is important to load the lower of the two manifolds rst with
the lower of the two instrument supports in place. The taller of the instrument supports can now
be ed and the higher manifold can be loaded.
3.1.4 Start Cleaning Cycle
i. Close the lid and press “CLEAN”.
ii. The machine will perform a cleaning cycle according to its program.
iii. The following table explains the various parameters of the clean funcon, which
are displayed during cleaning and are programmable to suit your requirements.
Cleaning Acvity Display Parameters* Explanaon
Clean No. C-01 10 Current clean cycle no.
Ultrasonics P-03 3 Displays poer level.
Time Remaining 03.48 5 minutes **Time remaining to
complete current clean.
*As set by the manufacturer. **Displayed in minutes and seconds (mm:ss).

8
soniclean.com.au
USRMAN-UW-180201-V3.0.1
+61 8 8234 8398
3.1.5 Stop Cleaning Cycle
i. Press “CLEAN” again during cycle. This will stop the cycle and clear current clean.
ii. To start new cycle, press “CLEAN” again.
3.1.6 Compleon of Single Clean Cycle
i. The machine will emit ve (5) beeps and display ‘----’.
3.1.7 Automac Drain and/or Shutdown
The Washer can be programmed to automacally drain aer a selected number of
cleaning cycles.
i. Manufacturer’s programmed number of cleans between draining is ten (10).
ii. When the tenth clean cycle is completed the machine will display “END”.
iii. The tank will automacally drain.
iv. To rell the tank press ‘shi’ & ‘rell’ together for three (3) seconds.
v. Washer will be ready for reuse when ‘--.--’ is displayed.
3.1.8 De-gas Funcon
i. The machine will automacally de-gas as programmed when started.
ii. If further de-gassing is required, press the “DEGAS” key.
iii. The red indicator light will light, indicang the machine is de-gassing.
iv. To stop de-gassing, press the “DEGAS” key again, the red indicator light will
exnguish, indicang the machine has stopped de-gassing.
3.1.9 Draining the Tank
i. Press the “SHIFT” key and “DRAIN” key together and hold for three (3) seconds.
ii. The machine will emit a beep.
iii. Release the keys and the machine will drain.
iv. Lid will park in topmost posion.
v. When drain complete display will show “o”.
3.1.10 Draining and Relling the Tank
i. Press the “SHIFT” key and “REFILL” key together and hold for three (3) seconds.
ii. The machine will emit a beep.
iii. Release the keys and the machine will drain and then rell with water and
detergent and perform de-gas cycle.

9
soniclean.com.au
USRMAN-UW-180201-V3.0.1
+61 8 8234 8398
3.1.11 Manual Shutdown Procedure
This enables the machine to be shut down at any me. It is recommended that this
procedure be done at the end of each day.
i. Press “SHIFT” and “DRAIN” together, and hold for 3 seconds.
ii. The machine will drain.
iii. The machine will display “OFF”.
iv. Turn o the power at the power point.
v. Wipe down surfaces of machine with detergent or disinfectant.

10
soniclean.com.au
USRMAN-UW-180201-V3.0.1
+61 8 8234 8398
4 Foil Test
Tip: Remove tray to ensure foil test is accurate.
4.1 Performing a Foil Test
i. Complete the usual start process.
ii. Use a strip of ‘home’ brand aluminium foil about 150mm long x width of roll
iii. Suspend foil from wire stretched between tray handles.
iv. Press TEST Key to switch on ultrasonic and unit will run for 30 sec as
programmed.
v. Remove the foil and compare the number and distribuon of perforaons with
the sample foil test provided with your machine.
Refer Australian Standard AS/NZ 2773.1-1998, page 16 for more details.
NOTE: It is important to always use the same type of foil. It is suggested that a test is performed,
on receipt of the machine, of such duraon as to give a result similar to the sample provided. This
will then become the foil test me for that type of foil.
4.2 Foil Test Problem Solving
If you are having diculty geng a foil test to perform to standard, work through the
following items, then try foil test again.
4.2.1 Machine may require further degassing.
4.2.2 Detergent Type and Diluon
Tip: Check detergent bole is full, check that same brand is being used, and check bole and hose
are connected and that there are no kinks in the line.
i. Always use a pH neutral or slightly alkaline detergent (pH 8 to 10.8) that is made
specically for ultrasonic machines.
ii. Extra detergent may be added to overcome water quality issues.
4.2.3 Contact your service agent if you cannot achieve a sasfactory foil test.
N.B. As per AS/NZ 2773.1-1998, it is acceptable to use alternave methods of tesng
the performance of your ultrasonic machine. Examples such as aluminium disc and pencil
test, Soniclean Ultrasonic Performance Meter (UPM) must be used as per manufacturer’s
instrucons.
11
soniclean.com.au
USRMAN-UW-180201-V3.0.1
+61 8 8234 8398
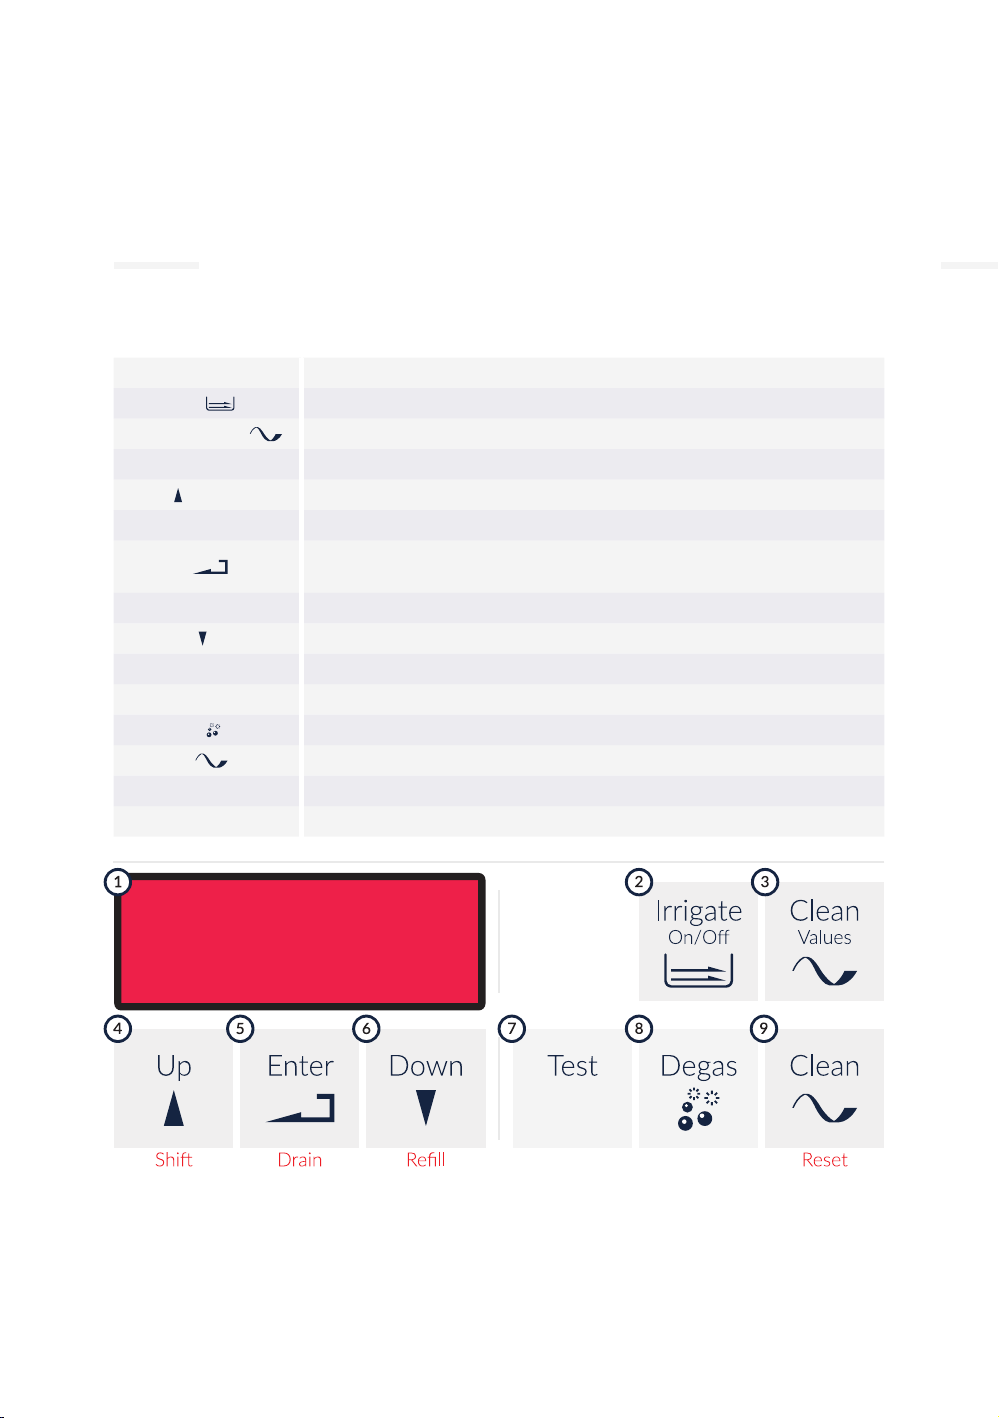
5 Keypad Descripon
Item Funcon
1. 7 segment display Provides feedback, incl. error messages, clean status, etc.
2. Irrigate ( ) Iniates irrigaon.
3. Clean Values ( ) Lid is being raised.
Program Iniates “program” mode, enables user to change operaon parameters.
4. Up ( ) Increases values in “program” mode.
Shi (hold) Secondary funcon key. Hold, then press required key, eg. Drain.
5. Enter ( ) Comrms changes to parameters in “program” mode. Iniates machine in
“operate” mode.
Drain (secondary) Drains machine (press while holding shi).
6. Down ( ) Decreases values in “program” mode.
Rell (secondary) Drains machine, then rells with fresh water. (press while holding shi).
7. Test Tank is draining the ush.
8. De-gas ( ) Removes gas from soluon. Press again to cease degassing.
9. Clean ( ) The soluon is degassing. (This takes approximately 10 minutes.)
Reset (secondary) Immediately aborts current operaon (press while holding shi).
Iniates “program” mode, enables user to change operaon parameters.
Program

12
soniclean.com.au
USRMAN-UW-180201-V3.0.1
+61 8 8234 8398
6 Programmable Features
When you receive your Soniclean Washer it will be set to funcon automacally.
The parameters are set in the factory. The features described below may be
altered as you require. The list includes the display you will see on the machine
when you are programming.
Item Funcon
Ct Length of cleaning mes.
PO Ultrasonic power levels.
Cn Clean number. This determines the number of cleaning cycles your ma-
chine will perform before automacally draining.
F° Wash ll temperature.
SP Detergent concentraon.
G1 Start up degassing me.
G2 Pre-wash degassing me.
Test me. Set me for foil test.
Id Irrigaon default - 1= irrigaon on at start up.
Ir Number of (5 second) rest periods between ushes.
To alter these parameters see Secon 7, “Program Mode.”

13
soniclean.com.au
USRMAN-UW-180201-V3.0.1
+61 8 8234 8398
7 Program Mode
The parameters can be altered by entering the program mode; there are three (3)
methods to enter this mode.
7.1 Program Entry Points
7.1.1 Alternave 1 – Program at Start Up
i. Press the “Clean Values” key then turn on the machine.
ii. Hold the “Program” down unl the machine displays “Ct.nn”.
iii. Release the “Program” key.
7.1.2 Alternave 2 - Program during Operaon
i. The machine will display “- - . - -”.
ii. Hold down the “SHIFT” key and then press the “Program” key and hold for three
(3) seconds.
7.1.3 Alternave 3 - Program during Operaon
i. The machine will display “- - . - -”.
ii. Hold the “Program” key for three (3) seconds.
iii. Ct, PO & rt parameters may be reset.
iv. Values will be held unl changed or unl machine is restarted.

14
soniclean.com.au
USRMAN-UW-180201-V3.0.1
+61 8 8234 8398
7.2 Program Parameters
To program the parameters, enter program mode per 7.1 above, then:
i. The machine will display a variety of parameters that you may recongure.
ii. Press the arrow “UP” key to increase the parameter and the arrow “DOWN” key
to decrease the parameter.
iii. To accept a value press “ENTER”. The display will scroll through the parameters.
iv. Refer the table on the next page for parameters and default values.

15
soniclean.com.au
USRMAN-UW-180201-V3.0.1
+61 8 8234 8398
7.2.1 Default Parameter Values
i. Key to Programming Display
Parameter Display Unit Min Max Default
Clean me. Ct mins 1 99 5
Ultrasonic power level. PO 1 63
Clean number. Cn 099 10
Fill temperature. F° 0 20
Detergent concentraon. SP % 0.0 5.0 0.5
Start-up degas me. G1 mins 099 5
Pre-wash degas me. G2 mins 099 1
Test me. sec 099 30
Irrigaon default. Id 01 1
Irrigaon rest. Ir 499 5
ii. Ultrasonic Power Level
Parameter Power
1low
2 medium
3 full
4 full power 25% duty cycle
5full power 50% duty cycle
6 full power 75% duty cycle
iii. Fill Temperature
This parameter determines the temperature of the wash water; the table below
shows the temperature for each seng.
Parameter Temperature
0cold
1 warm
2very warm

16
soniclean.com.au
USRMAN-UW-180201-V3.0.1
+61 8 8234 8398
8 Display Messages
These messages are displayed on the keyboard at various mes. This table
explains their meanings.
Display Explanaon
---- Together with 5 beeps indicates that a process has been completed. (The operator
does not need to wait for the beeps to complete before starng another process.)
04:58* Shows the me remaining of the funcon that is currently operang, i.e. clean/de-gas.
C-01* Indicates the current cleaning cycle number.
P-03* Indicates power level selected, e.g. P-02, P-03, etc.
dGAS Indicates the machine is de-gassing.
drn Machine is draining.
drnf Boom of the wash tank is ushed with clean water, and then drained.
FILL The machine is lling the wash tank.
OFF The machine has completed operaon and needs to be turned o at power point.
END End of nal clean.
Lid Lid is in moon.
tESt When the lid is open to maintain ultrasonic (foil/UPM) performance test.
Drnb This indicates sensors detect liquid when wash tank supposed to be empty.
FAIL Indicates that the operator programmed values have been lost and will need to be
re-programmed.
HOT Indicates an excessive heat condion.
LO Indicates a low level in the wash tank.
OFLO Indicates that liquid has been detected in an area of the machine that should always
be dry.
rtc Indicates the Real Time Clock (RTC) date/me in the system is considered invalid.
(MRS funcon only.)
P-UP Indicates a clean process was interrupted and did not complete the full cycle.
H2OL Indicates a water leak in the system or circuit/wiring failure.
IP-? Indicates the conguraon of the machine is not known. (MRS funcon only.)
SLid Lid has been opened during operaon.
N.B. Displayed when cleaning.

17
soniclean.com.au
USRMAN-UW-180201-V3.0.1
+61 8 8234 8398
9 Error Diagnosis
9.1 Program Values Lost: (FAIL)
This message indicates the operator programmed values have been lost and
will need to be re-entered. This error occurs when the machine loads the
programmed values stored in memory and an error is detected in the data. This
error may be caused by:
iv. The memory device has not been programmed or programming has been erased.
v. An error in the memory device.
vi. Electrical “noise” causing corrupon of data.
Correcve Acon
i. Press the “Shi” and “Program” keys to re-program the machine.
ii. If the “FAIL” message is displayed again it may a faulty memory device.
iii. Contact service agent.
IMPORTANT: When the following messages are detected, they are ashed on
the display together with rapid intermient beeps.
9.2 Low Level in Tank: (LO)
i. This message may occur aer a Fill Wash Tank Operaon has completed and a
low level is detected in the wash tank (below minimum level).
ii. This fault may be caused by a leaky drain valve or faulty minimum level sensor.
iii. This error will not be detected while the wash lid is up as the operator may cause
wave acon in the wash tank causing a false indicaon.
Correcve Acon
i. Turn o at power point.
ii. Contact service agent.

18
soniclean.com.au
USRMAN-UW-180201-V3.0.1
+61 8 8234 8398
9.3 Drain Blocked: (drnb)
i. This message occurs if the top, minimum, or empty level sensors detect liquid.
ii. This may be caused by a blocked drain, or a faulty level sensor.
iii. This may be caused by an incorrectly installed drain hose.
Correcve Acon
i. Turn o at power point.
ii. Check for blocked drain.
iii. Remove blockage if found.
iv. Re-start machine.
v. Check drain hose installaon
vi. If no blockage present contact service agent.
9.4 Overow Detecon: (OFLO)
i. This message occurs when liquid is in danger of overowing tank.
ii. When this condion occur all power to the machine shall be shut down.
Correcve Acon
i. Drain valve not working.
ii. Contact a service agent.
9.5 Ultrasonics Overheang: (HOT)
i. This message occurs when the ultrasonics board indicates an excessive heat
condion.
Correcve Acon
ii. Turn o the machine at power point.
iii. Allow to cool for at least one hour.
iv. Re-start machine.
v. If “HOT” display persists, contact a service agent.
9.6 Real-Time Clock: (rtc)
i. This message occurs if the Real Time Clock (rtc) date/me in the system is
considered invalid.
ii. This may be caused by the machine not being used for a long period of me.

19
soniclean.com.au
USRMAN-UW-180201-V3.0.1
+61 8 8234 8398
Correcve Acon
i. Replace the backup baery for the clock if discharged.
ii. Reset the date/me through the Web interface. (Read the Machine Reporng
Manual).
iii. Contact a service agent.
9.7 Power-up warning: (P-UP)
i. This message occurs at boot up me if a clean process was interrupted and did
not complete its cycle. This alerts the operator that instruments being cleaned in
the machine may not be completely clean.
ii. Power failure.
Correcve Acon
i. Press enter and connue with the clean cycle.
9.8 Water leak: (H2OL)
i. Water may have entered the internal red control box or blue ultrasonic box, or
there may be a circuit/wiring failure.
Correcve Acon
ii. Contact a service agent.
9.9 Seng default IP values. (IP-?)
Only for MRS models and IT sta use.
Correcve Acon
i. Contact the facilies IT department.
ii. Refer to the Machine Reporng Manual.
iii. Contact a service agent.
9.10 Slid—lid lied during operaon
Correcve Acon
i. Restart unit.
This manual suits for next models
1
Table of contents
Other Soniclean Cleaning Equipment manuals

Popular Cleaning Equipment manuals by other brands


De Witte
De Witte Black Booster3 operating instructions

Nilfisk-Advance
Nilfisk-Advance Food Ecolab Penguin Foam 1P-CA Directions for use

BeviClean
BeviClean Bevi Handy operating instructions

Sani Sport
Sani Sport DefenX Double owner's manual

Forterra
Forterra Bio Clean ARS installation manual

TECAi
TECAi coilbox user manual

Clarus Technologies
Clarus Technologies PCS-35 Operator's manual

John Downey
John Downey Steamin Demon Classic operating manual

Elma
Elma Elmasonic xtra ST operating instructions

Microdyn Nadir
Microdyn Nadir MICRODYN BIO-CEL XS-1 manual

Cold Jet
Cold Jet Aero2 PCS 60 Operator's manual

Jaxmotech
Jaxmotech CB 102 Instructions for use