Epic Cycles BlueRev Ultra User manual
ULTRA
USER MANUAL

Introduction
Thank you for purchasing the BlueRev Ultra. We take great pride in bringing you a quality product that will offer you years of enjoyment.
The Ultra is a one of a kind electric tricycle that has it all. With a powerful 500w front motor ona 24 inch wheel, the electric trike will get you moving
places fast. This tricycle hA mplw eoom to carry your belongings or other cargo with a large rear and front carrier. The Ultra comes equipped with a
thumb throttle, pedal assist sensor, powerful hydraulic disc brakes and plenty more amazing features!
This manual contains details of the product, its equipment, and information on its operation and maintenance. Please read it carefully and familiarize yourself
with the e-bike before using it, in order to ensure safe use and prevent accidents. Be sure to retain this manual as reference to product knowledge and safe
riding.
The manual includes many warnings and cautions concerning the safe operation and consequences if safe operation is not performed in respect to operation
and maintenance of this product. All information in the manual should be carefully studied. If you have any questions, please contact us immediately.
The notes/warnings/cautions included within the dotted red boxes as shown to the left should be given special care when reviewing as they are directly
related to hazardous or dangerous situations if not avoided.
Because it is impossible to anticipate every situation or condition which can occur while riding, this manual makes no representation about the safe use of the
bicycle under all conditions. There are risks associated with the use of this bicycle that cannot be predicted or avoided. These risks are the sole responsibility
of the rider.
You should save this manual, along with any other documents that were included with your bicycle, for future reference. However, all content in this manual is
subject to change or withdrawal without notice. The maunfacturer makes every effort to ensure the accuracy of its documentation and assumes no responsibility
or liability for any errors or inaccuracies that may appear herein.
Using This Manual
02ULTRA USER MANUAL
03
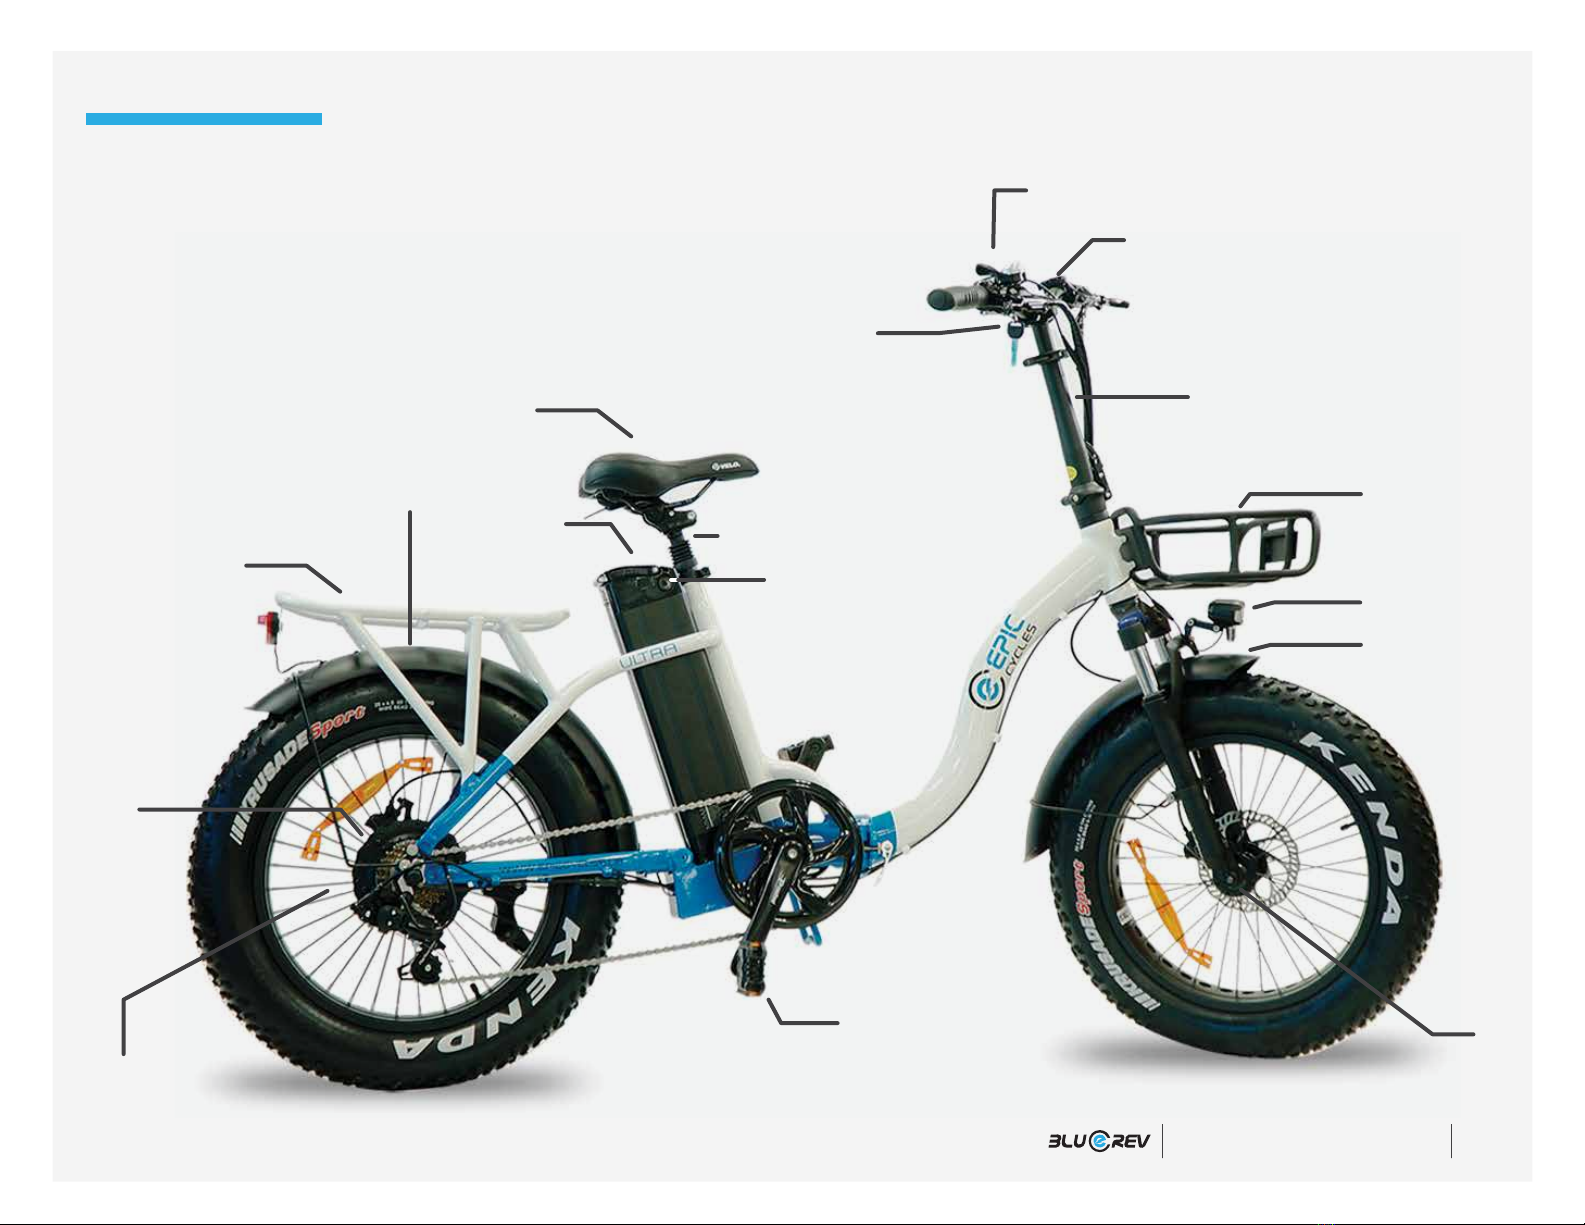
Parts Description
Handlebars
Seat/Saddle
Seatpost
Battery
Fork
Pedals
Display
Adjustable Stem
Rear carrier rack
Disc brakes
Brakes
Battery lock
& keys
Fenders Front carrier rack
Front light
Front fender
Motor
ULTRA USER MANUAL
To ensure your safety, make the following functional checks before driving:
1 - Normal operation of the light, brake and power cut system.
2 - Tire pressure (low pressure, will influence both autonomy and speed).
3 - Wheel axle tightening.
4 - Battery charging level.
5 - Braking system adjustment and free operation.
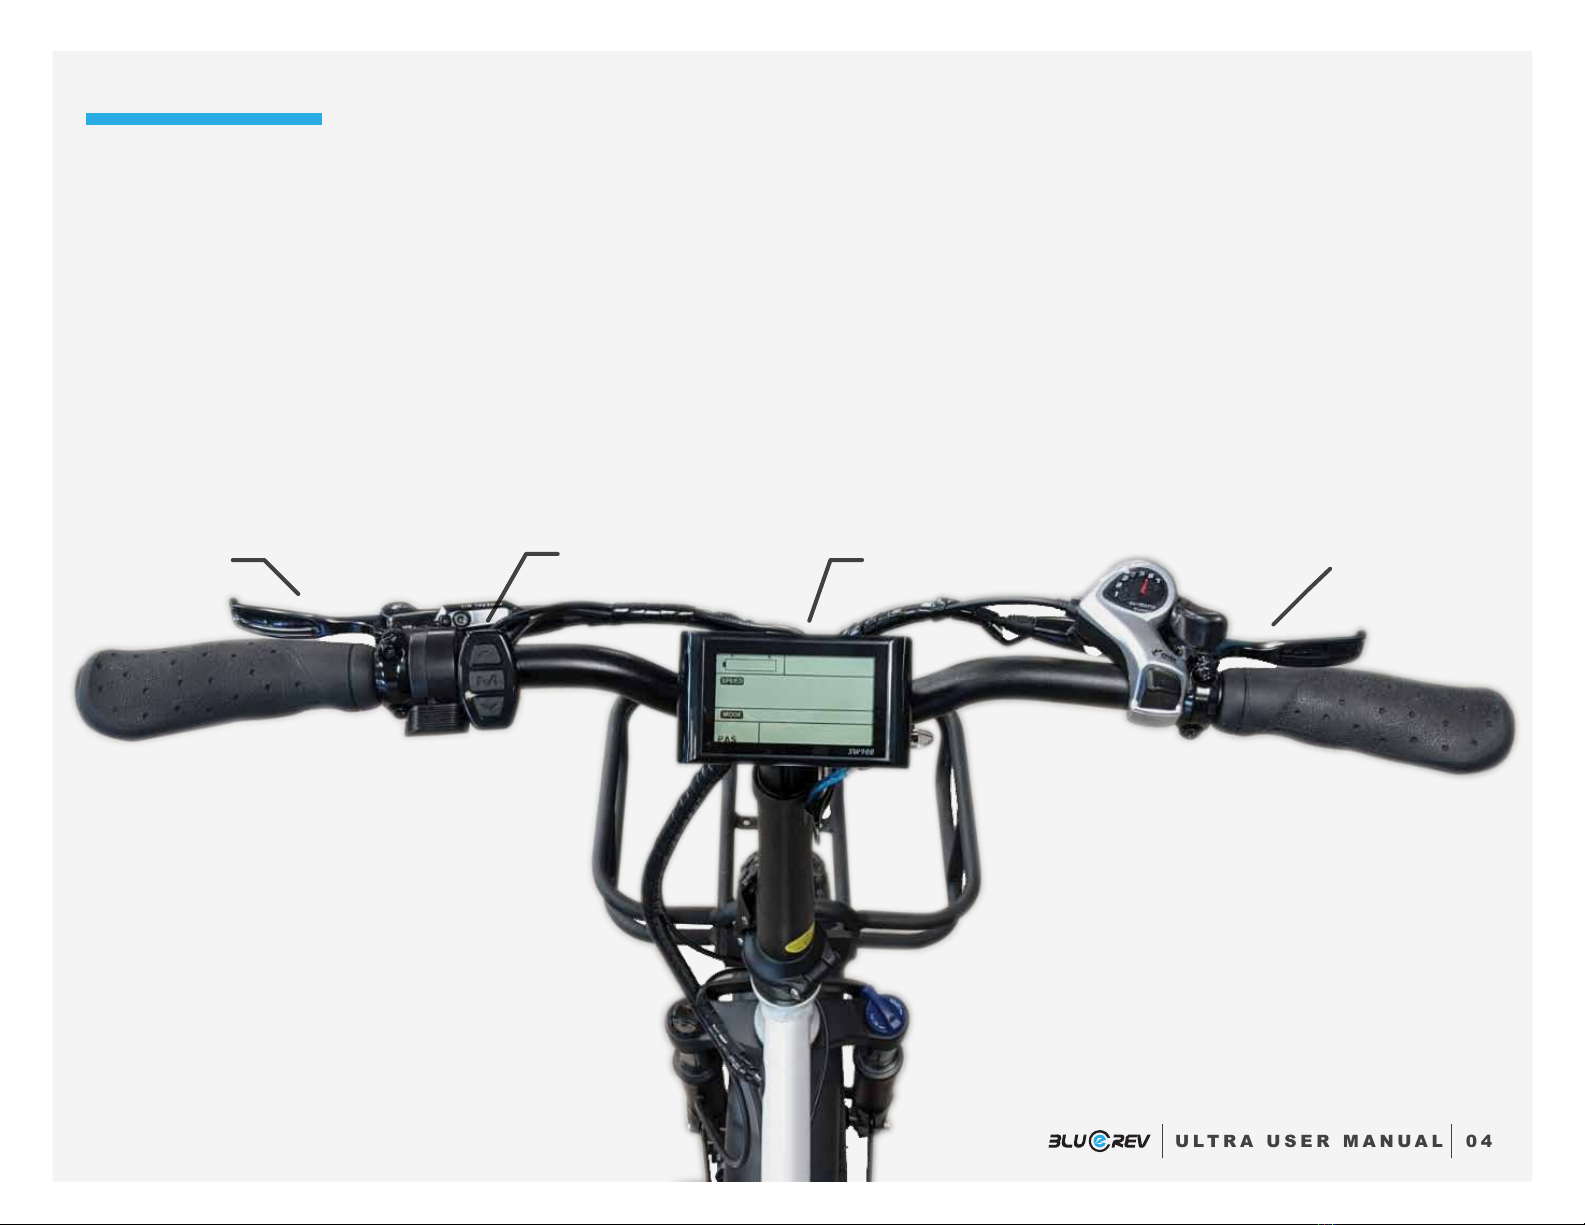
04
Display
Motor control
Front brake (North America) Rear brake (North America)
Daily Checks
ULTRA USER MANUAL

05
Charging tips
• The battery pack should be recharged after each use. There is no memory effect so you can charge the battery after short
periods of use without damage.
• The battery can be recharged on or off the bike.
• Remove the battery by turning the key and than pulling forwards and upwards carefully until the pack lifts off.
• The charger will automatically stop once the battery pack is full.
• Always charge in dry conditions and indoors away from direct sunlight.
• Check charger cables, charger, and battery for damage before beginning each charge.
With the battery removed
1. When the battery is removed, do not touch the “+”and“-”contacts, especially with wet hands or metallic objects.
2. Do not recharge the battery in the inverted position. If you do, you drastically reduce it’s lifespan.
3. Place the charger in a flat, secure place and connect the output plug to the socket in the battery box.
4. Then, connect the input plug (110V/220V terminal) to the power outlet, and the charging will start.
5. After the charging has finished, first, unplug the input plug (terminal 110V/220V), and then the output plug.
Battery Charging
ULTRA USER MANUAL

06
Additional Charging Info
When the battery is charging on the bike
1. Switch off the power. The battery can be charged on or off the bike.
2. Plug the output lead of the charger into the socket of the battery case.
3. Plug the AC power input plug into the 110/220 volt household power socket to start charging.
4. After charging unplug from the wall outlet first and than from the bike charger socket.
NOTE: Always charge your battery at temperatures between 10 and 26 degrees celsius.
Duration of charging
1. When the input and output terminal are connected, the red indication light of the charger will be turned on, showing that
the power is being connected.
2. When the battery is charged for the first time, 8-10 hours should be spent for charging. When the yellow indication light of the
charger is turned on, showing that the battery basically full and it will switch to trickle charge mode to ensure that
over-charging will not occur, it takes 2-8 hours for normal charging.
3. This charger has a protection device for over-charging. Long time charging should not be more than 24 hours without
affecting the life time of the battery.
ULTRA USER MANUAL

07
About Charging
If charging with the battery removed
1. Keep the charger in a safe place, away from children.
2. Do not use the battery when not fully charged. That will decrease its lifespan.
3. Do not charge the battery with any other charger than the original one provided.
4. The charger works with 110/220V. Please do not open it.
5. Avoid charger contact with liquids and/or metal objects. Always be sure it is safely stored/placed so that it can not
suffer damage from a fall/impact.
6. When in use, the charger should not be covered to prevent overheating, damage, or fire.
7. The charger is only for indoor use. Please keep it in dry and ventilated place.
8. If you notice a strange smell from the charger, or it is too hot, stop charging immediately, and contact the manufacturer.
ULTRA USER MANUAL

08
Driving
Important tips while driving
1. In order to reduce consumption, increase autonomy, and extend the motors lifespan, use the pedals during the startups
and climbs.
2. Do not twist the throttle too fast. The vehicle should be accelerated slowly, to reduce consumption and the risk of
damage to the electrical system. It’s better to use the pedals to avoid sudden stops and startups, rather than only using
the throttle.
3. To increase security and reduce power consumption, is advised to avoid sudden stops and startups.
4. The vehicle controller has charge overload protection. If on overload, energy will be cut automatically and
restored when it returns to normal.
5. While driving, avoid using the throttle as your brake, as it may damage the motor.
6. The maximum load is 300-440lbs. Avoid driving with overload.
7. Do not drive too fast.
Important tips when parking
1. Turn off the power when pushing the vehicle manually, to avoid accidental acceleration and accidents.
2. It is recommended to park your Ultra indoors. Do not forget to switch off the power and remove the key.
3. In a public place, the e-bike must be parked in accordance with local traffic rules. Do not forget to switch off
the power and remove the key.
How to start up the vehicle
A. Press the battery ON/OFF button and battery power LED display to see the power capacity.
B. Hold down center button (M) on the handlebar until LCD screen turns on.
battery
button
on top
center button (M)
ULTRA USER MANUAL

09
Average distance from one charge:
Standard battery: 14.5 Ah - 60-90Km; Upgrade: 17.5 Ah - 80-120km; Upgrade: 21Ah - 100-140km
Conditions of testing: wind speed: level 2-3, normal atmosphere temperature: 25 degrees,
Load: 90kg; Atmospheric pressure: 3.5kg/cm; Flat concrete surface; Battery: full.
Power consumption of one time charge: ≤0.5kWh
Economical speed: 18km/h
Rated load: 90 kg
Dead load: ≤30kg
Variables such as the load haul, road conditions, road surface, times of
start-up, times of stopping, wind direction, atmospheric temperature,
tire pressure and correct way of charging all affect range.
Driving Range
Safety Notes
1.4 ON/OFF the screen
Long press to turn off the screen.
1.5 Change data in multi-function Area
Shortly press to change data.
1.6 Parameters setting
Long press + to start setting parameters, such as
wheel size (inch), and background lighting (Refer to P01-P16).
On the setting interface, shortly press , or
to plus/minus value. Values will be flashing after modifying,
choose the ones you want:
A. Long press to save the value, the shining would stop.
B. Short press to shift to the next parameter, and to
save current values at the same time.
C. Press + to exit setting parameters and to save
values. If not press these buttons, it would exit and save
parameters modified automatically 10s later.
1.1 Change PAS (Pedal Assist Sensor) grade
Suppose it’s PAS mode now,
shortly press , for PAS grade -1
shortly press , for PAS grade +1
1.2 Shift the speed display
Long press + , to shift the mode of speed unit to be
displayed (KM or Miles)
1.3 ON/OFF 6KM/H cruising, ON/OFF Headlight, Reset ODO
When e-bike stops, long press to enter 6KM/H cruising
mode. Stop pressing to exit the cruise mode;
Long press to turn ON/OFF
Headlight;
At P16, long press for 5 seconds to
reset ODO.
ULTRA USER MANUAL

10
SW900 Computer Display
Three buttons on the left controls operation on the display
Additional setup notes
Up arrow:
1. Battery level - Displayed in blocks of five.
2. Odometer - Total mileage driven on the vehicle.
3. Speed - Current operating speed.
4. Current Power Mode (Eco, Standard, Power), depending on PAS
5. Pedal Assist Level (1 through 5) - the amount of assist you will receive, the
greater the number, the greater the assist.
6. Current power in watts - pay attention to this so you don’t run the battery empty.
M (multi-function center button): long hold will turn on the display.
Down arrow:
1 2
3
4
5 6
ULTRA USER MANUAL
Press Up and Down arrows together to enter Program Modes:
P01 - LCD display Brightness (3 levels)
P02 - Units in Miles or Kilometers - 0 is Kilometers; 1 is Miles.
P03 - Voltage of battery and motor that you are using, 48V is default.
P04 - Sleep time on display, choose between 0 and 60 minute. (0 means no sleep time)
P05 - Pedal Assist Mode, 0is for three grades of pedal; 2is for nine grades of pedal assist.
five assist modes has a higher sensitivity to your pedal inputs versus the work outputs.
P06 - Wheel size, in this case set to 24” for Trio, important to correctly track speed
and mileage.
P07 - Speed measuring magnet, ranges from 1to 100. For the Trio it is set at factory for
500 watt motor, do not change this.
P08 - Speed limit. Important depending on where you live, to adhere to local e-bike bylaws.
Europe - 15mph; USA - 28mph; Canada - 20mph (33kph). Speed can be set from
0-100, so maximum speed can be achieved, but observe local regulations is
recommended.
P16 - Displays your total odometer.
P18 - Will restore your display to factory settings by pressing and holding down the Up button
for 5 seconds. When the speed position displays 5555, the setting parameter has been
restored to the factory setting values.

11
Basic Maintenance
To ensure safe riding conditions you must properly maintain your bike. You should follow the basic guidelines below
and see your certified local bike shop seasonally to ensure your bike is safe to ride.
Routine checks
1. Ensure that wheels, frame, handlebars, stem and front fork are secure and in correct operation.
2. Tire pressure and condition of the tire.
3. Gearshift indexing and correct operation.
4. Bell and reflectors condition and correct operation.
5. Braking system for correct stopping and operation.
6. If you do not use the vehicle for long periods of time, charge the battery at least once a month, to avoid reducing its lifespan.
Maintenance and cleaning tips
1. Do not pressure wash to avoid getting water into the electrical system. Only hand wash your bicycle.
Waterless bike wash is preferred.
2. Dirt on painted surfaces should be removed with a neutral, low acid product (such as mild dish soap).
Then wipe clean with a dry cloth.
3. Lubricate the chain with bike specific chain lubes after washing.
4. Do not apply lubricant on the brake rotors, brake calipers, brake levers, rims, tires, battery or controller.
ULTRA USER MANUAL

12
Troubleshooting
Symptoms
It doesn’t work
Irregular acceleration
and/or reduced top speed
When powered on, the
motor doesn’t respond
Reduced range
The battery won’t charge
Drive wheel makes
strange noises
1. Charger not well connected
2. Battery cases fuse blown
3. Battery wiring disconnected or damaged
1. Charger not well connected
2. Battery cases fuse blown
For your safety, do regular maintenance and tightening checks. If you find any faults or damage, repair immediately.
1. Replace the motor bearings
2. Check tension in spokes, true if
necessary and/or replace the rim
1. Adjust the connections
2. Replace the fuse
3. Reconnect/repair the wiring
1. Insufficient battery power
2. Loose throttle magnet
3. Damaged throttle spring
1. Loose wiring
2. Loose throttle magnet
3. Loose or damaged motor wiring plugs
1. Low tire pressure
2. Low or faulty battery charge
3. Driving with too many hills, braking,
departures, and/or excessive load
4. Battery discharged for long period of time,
without regular charges, aged or damaged
1. Adjust the tire pressure
2. Check the connections and/or fully
charge the battery
3. Help with the pedals
4. Replace the battery
5. Make a prolonged battery charge
1. Charge the battery
2. Weld and adjust
3. Contact authorized bike shop
1. Repair or reconnect
2. Weld and adjust
3. Contact authorized bike shop
1. Insufficient battery power
2. Faulty connections
3. Key in wrong position
1. Charge the battery
2. Clean the battery connections
3. Turn the key to the correct position
1
2
3
4
5
6
Possible causes Most common solutions
ULTRA USER MANUAL

13
Recommended torque values for threaded fasteners
Number
1
Parts
Handlebar 18-20 NM
2Handlebar and stem 18-20 NM
3Saddle 18-20 NM
4Seatpost 18-20 NM
5Front wheel 16-25 NM
6Rear wheel 25-35 NM
7Bottom bracket-crank 35-55 NM
Torque Required (nm)
ULTRA USER MANUAL
14
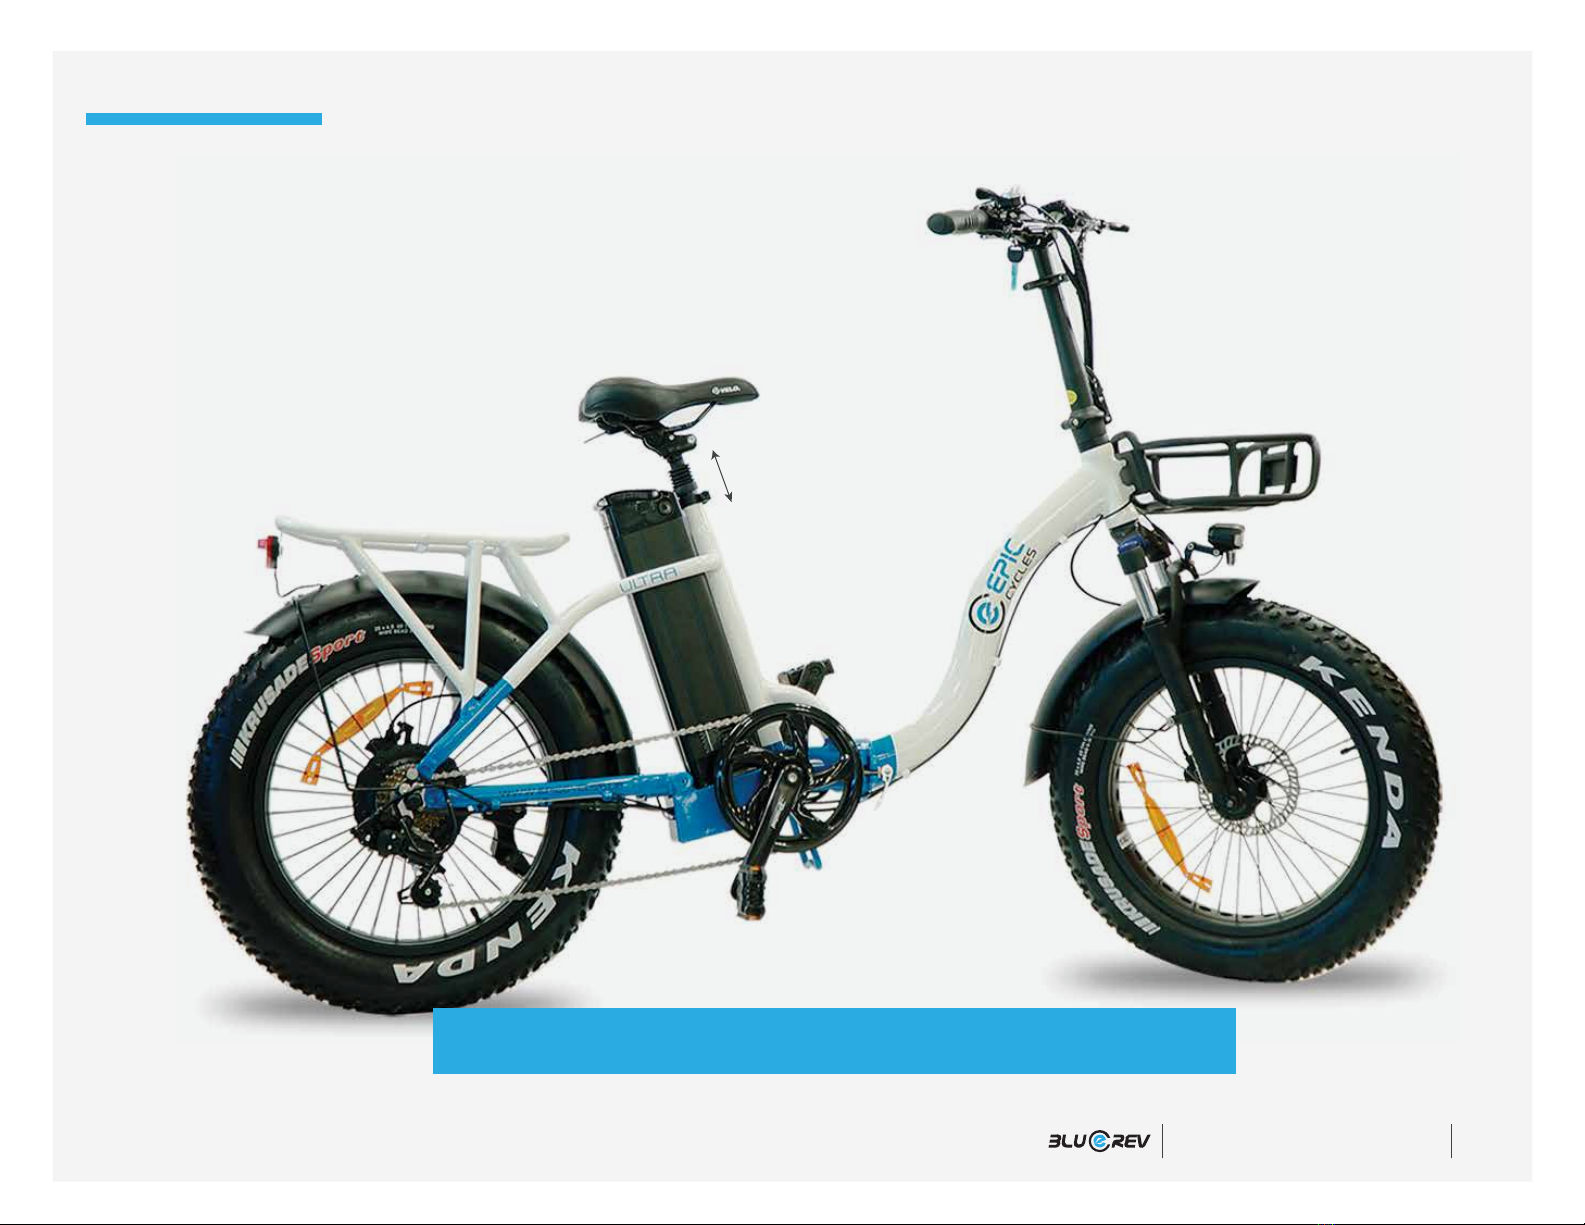
Minimum saddle height and the way to measure
Minimum insertion
into frame should
be 4 inches
To adjust seat height, use the quick release lever to set free the seat
post and pull upwards or push downwards to reach desired height.
ULTRA USER MANUAL
15
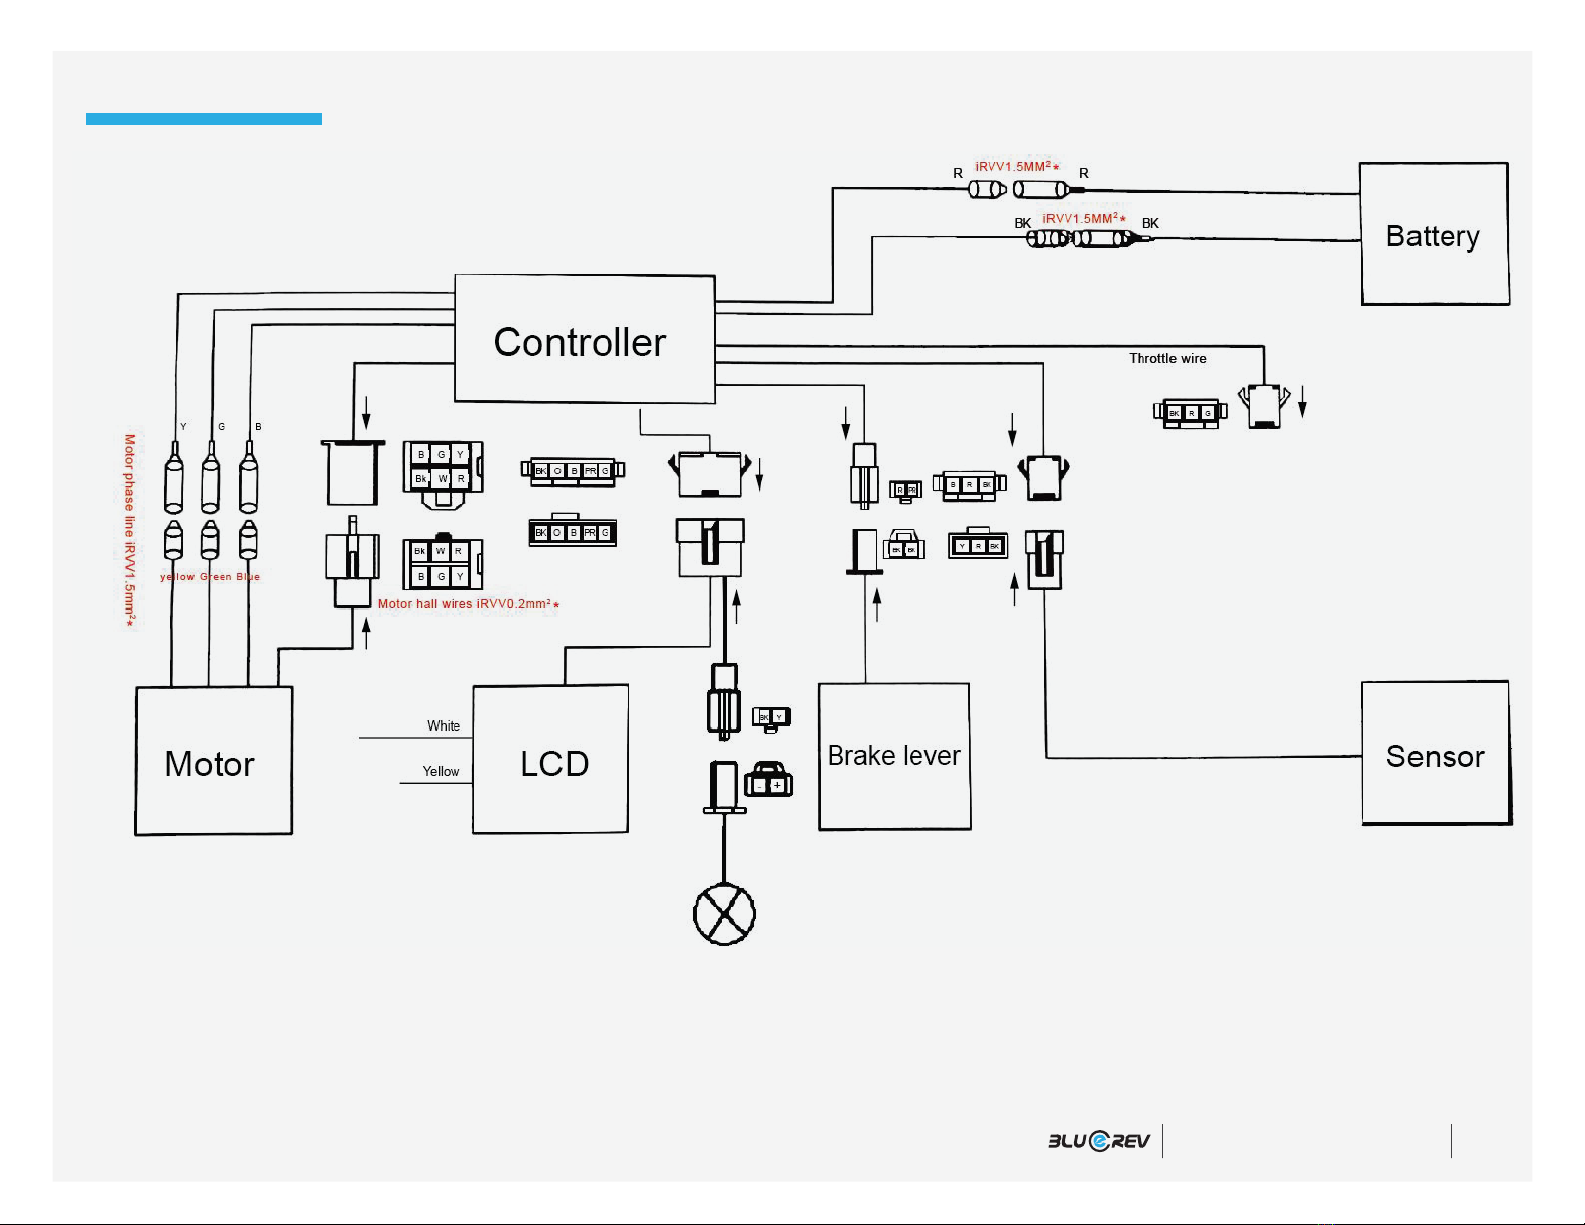
Wiring diagram with LCD display
Notes:
1: Except label wire diameter, other=0.30mm2.
2: All connector terminal is electrolytic tinning.
3: All wires are national standard wires.
R=red, B=blue, Bk=black, G=green, Y=yellow, Pr=purple, W=white, Pink=pink, O=orange, Cam blue=Cambridge blue
ULTRA USER MANUAL

16
The following scenarios will consumer extra battery power and shorten the range:
• Frequent braking and starting,
• Riding uphill against a strong wind,
• Starting from a standstill and riding on rough or muddy roads,
• Carrying more than one person, or heavy loads
A few tips to prolong the battery life during these condition is as frequently.
1. Frequent braking: try to look ahead and coast rather than stop and go frequently.
2. Riding uphill or against a stiff wind: pedal to make supplement to the battery power.
3. When starting from a standstill-use the pedals to help bring you up to speed.
4. When the battery meter indicators the voltage is low: switch to manual power and avoid using the
battery so you don’t shorten the battery life.
5. If the battery is being stored: remove the battery from the bicycle and recharge it every month.
Saving power and extending your range
1. This user manual should be used only to reference use and functions but should not be used as a reference
for inspection.
2. The images shown may differ from the actual model to technical improvements.
3. We reserve the right to change the model without prior notice due to technical improvements.
4. The vehicle has a top speed limiter. For safety purposes, its removal is strictly prohibited.
5. Ensure pre-ride checks are performed before each and every ride.
6. Only allow others to ride who have already been adequately trained on the use and operation of this product.
Useful tips
ULTRA USER MANUAL

17
Like any sport, bicycling involves risk of injury and damage. It is important know—and to practice—the rules of safe and
responsible riding and proper bike maintenance. Proper use and maintenance of your bicycle reduces risk of injury. Your
bicycle is designed for use by persons 16 years old and above.
Riders must have the physical coordination, reaction time and mental capability to ride and manage traffic, road conditions,
sudden situations and also respect the laws governing bicycle use where they ride, regardless of age.
If you have an impairment or disability such as a visual impairment, hearing impairment, physical impairment,
cognitive/language impairment, or a seizure disorder, consult your physician before riding any bicycle.
The water resistance rating for electrical components is IPX5 - protection against low pressure water, drips and light rain.
General precautions
Note on Helmets
Make sure that you always wear an approved bicycle helmet when riding. Also make sure that you understand that a bicycle
helmet is for bicycling only, and must be removed when not riding. A helmet must not be worn while playing, in play areas, on
playground equipment, while climbing trees, or at any time while not riding a bicycle. Failure to follow this warning could result
in serious injury or death. Do not let a child younger than 16 years old ride the bicycle.
Additional notes for parents
As a parent or guardian, you are responsible for the activities and safety of your child. This includes making sure that the
bicycle is properly fitted to the child; that it is in good and safe operating condition; that you and your child understand the safe
operation of the bicycle; and that you and your child have learned, understand and obey vehicle, bicycle and traffic laws, but
also the common sense rules of safe and responsible bicycling. As a parent, you should read this manual, as well as review
its warnings and the bicycle functions and operating procedures.
A note for parents and guardians
ULTRA USER MANUAL

18
All users must read this manual before first use. Ensure that you comprehend with all instruction and safety notes.
Ensure the bikes fits you properly before first use. You may lose control or fall if your bike is too big or too small.
Always wear an approved bicycle helmet while using this product and ensure that the helmet manufacturers instructions for fit and care
followed.
Ensure correct tightening and setup is performed on your bicycle before first use and checked regularly.
It is your responsibility to familiarize yourself with laws and requirements for the operation of this product in the area(s) where you ride.
Safety notes before first use
ULTRA USER MANUAL

19
Ensure handlebar and grips are not damaged and improperly installed. Loose or damaged grips can cause you to lose control and fall.
Failure to wear a helmet when riding may result in serious injury or death.
Do not use this product with standard bicycle trailers, stands, or vehicle bicycle racks. Contact the manufacturer to check if your
equipment will work with the bicycle.
Off-road riding requires close attention and specific skills and present variable conditions and hazards which accompany the conditions.
Wear appropriate safety gear and do not ride alone in remote areas.
Take extra care while riding in wet conditions. Feet or hands can slip in wet conditions and lead to death or serious injury from a fall.
Do not remove front or rear reflectors.
Lights should and must be used in addition to reflectors in most locations. You can purchase additional safety products like lights,
mirrors and a bell or a horn.
Engaging in extreme riding is very dangerous and should be avoided. Although many articles/advertisements/catalogue depict riders in
extreme terrain, this not recommended nor permitted and you can be seriously injured or killed if you perform extreme riding.
Bicycles and bicycle parts have strength and integrity limitations and extreme riding should not be performed or you risk damaging the
components or becoming seriously injured or killed.
Failure to confirm proper installation, comparability, proper operation, or maintenance of any component or accessory can result in
serious injury or death.
After any incident you must consider your bike unsafe to ride until you consult with a certified bicycle service provider for a
comprehensive inspection.
Failure to properly charge, store, or use your battery will void the warranty and may cause a hazardous situation.
Extreme care should be taken when using the pedal assistance sensor on this product. Ensure you understand and are prepared for
the power assistance to prepare you as soon as pedaling is underway.
Additional safety notes
ULTRA USER MANUAL

20ULTRA USER MANUAL
You should check the operation of the brake inhibitor switches before each side. The brake system is equipped with an inhibitor which
shuts down power to the electric motor whenever the brakes are engaged. Check proper operation slowly while in a controlled
environment by riding slowly with the motor engaged and applying the brake levers are engaged.
User must understand the operation of the twist throttle and pedal assist sensors before using, and take care in their usage in respect to
traveling at speeds appropriate for usage area and user experience level. Always use the lowest assist level until you are comfortable
with the bike and feel confident in controlling the power.
Any changes to the product not expressly approve by original manufacturer could void warranty and care while riding.
Because electric bikes are heavier and faster than normal bicycles, they require extra caution and care while riding.
To avoid shock never submerge the electrical components in water or subject to salt water environments.
Additional safety notes
Table of contents
Other Epic Cycles Bicycle manuals


Popular Bicycle manuals by other brands

Cyclamatic
Cyclamatic Power Plus CX1 operating manual

Worksman
Worksman WTX Assembly instructions, parts list, and owners manual

Cannondale
Cannondale F-SI owner's manual

EG
EG Athens 250 owner's manual

Trojan
Trojan PURSUIT 320 Care instructions and assembly manual

RAMBO
RAMBO ROOSTER R750R-ST-B Assembly instructions


