epiphan av.io hd User manual

Epiphan AV.io HD
User Guide
Release 2.1.1
January 21, 2016
UG107-04

Terms and conditions
This document, the Epiphan web site, and the information contained therein, including but not limited to the
text, videos and images as well as Epiphan System Inc.’s trademarks, trade names and logos are the property
of Epiphan Systems Inc. and its affiliates and licensors, and are protected from unauthorized copying and
dissemination by Canadian copyright law, United States copyright law, trademark law, international
conventions and other intellectual property laws.
Epiphan, Epiphan Video, Epiphan Systems, Epiphan Systems Inc., and Epiphan logos are trademarks or
registered trademarks of Epiphan Systems Inc., in certain countries. All Epiphan product names and logos are
trademarks or registered trademarks of Epiphan. All other company and product names and logos may be
trademarks or registered trademarks of their respective owners in certain countries.
Copyright © 2016 Epiphan Systems Inc. All Rights Reserved.
THE SOFTWARE LICENSE AND LIMITED WARRANTY FOR THE ACCOMPANYING PRODUCT ARE SET FORTH IN
THE INFORMATION PACKET OR PRODUCT INSTALLATION SOFTWARE PACKAGE THAT SHIPPED WITH THE
PRODUCT AND ARE INCORPORATED HEREIN BY REFERENCE. IF YOU ARE UNABLE TO LOCATE THE SOFTWARE
LICENSES OR LIMITED WARRANTY, CONTACT YOUR EPIPHAN REPRESENTATIVE FOR A COPY.
PRODUCT DESCRIPTIONS AND SPECIFICATIONS REGARDING THE PRODUCTS IN THIS MANUAL ARE SUBJECT
TO CHANGE WITHOUT NOTICE. EPIPHAN PERIODICALLY ADDS OR UPDATES THE INFORMATION AND
DOCUMENTS ON ITS WEB SITE WITHOUT NOTICE. ALL STATEMENTS, INFORMATION AND
RECOMMENDATIONS ARE BELIEVED TO BE ACCURATE AT TIME OF WRITING BUT ARE PRESENTED WITHOUT
WARRANTY OF ANY KIND, EXPRESS OR IMPLIED. USERS MUST TAKE FULL RESPONSIBILITY FOR THEIR
APPLICATION OF ANY PRODUCTS.
LIMITATION OF LIABILITY
UNDER NO CIRCUMSTANCES SHALL EPIPHAN BE LIABLE FOR ANY INCIDENTAL, SPECIAL, CONSEQUENTIAL,
EXEMPLARY OR OTHER INDIRECT DAMAGES THAT RESULT FROM THE USE OF, OR THE INABILITY TO USE,
THIS PRODUCT OR THE INFORMATION CONTAINED IN THIS DOCUMENT OR PROVIDED ON EPIPHAN’S WEB
SITE, EVEN IF EPIPHAN HAS BEEN ADVISED OF THE POSSIBILITY OF SUCH DAMAGES. IN NO EVENT SHALL
EPIPHAN’S TOTAL LIABILITY TO YOU FOR ALL DAMAGES, LOSSES, AND CAUSES OF ACTION RESULTING FROM
YOUR USE OF THIS PRODUCT, WHETHER IN CONTRACT, TORT (INCLUDING, BUT NOT LIMITED TO,
NEGLIGENCE) OR OTHERWISE, EXCEED THE AMOUNTS YOU PAID TO EPIPHAN DURING THE MOST RECENT
THREE-MONTH PERIOD IN CONNECTION WITH AMOUNTS WHICH YOU PAID FOR USING THIS PRODUCT.
INFORMATION AND DOCUMENTS, INCLUDING PRODUCT SPECIFICATIONS, PROVIDED IN THIS DOCUMENT
OR THE EPIPHAN WEB SITE ARE PROVIDED “AS IS”. SPECIFICALLY, BUT NOT WITHOUT LIMITATION, EPIPHAN
DOES NOT WARRANT THAT: (i) THE INFORMATION IS CORRECT, ACCURATE, RELIABLE OR COMPLETE; (ii) THE
FUNCTIONS CONTAINED ON THE EPIPHAN WEB SITE WILL BE UNINTERRUPTED OR ERROR-FREE; (iii) DEFECTS
WILL BE CORRECTED, OR (iv) THIS WEB SITE OR THE SERVER(S) THAT MAKES IT AVAILABLE ARE FREE OF
VIRUSES OR OTHER HARMFUL COMPONENTS. EPIPHAN SPECIFICALLY DISCLAIMS ALL REPRESENTATIONS,
WARRANTIES, AND CONDITIONS, EITHER EXPRESS, IMPLIED, STATUTORY, BY USAGE OF TRADE OR
OTHERWISE INCLUDING BUT NOT LIMITED TO ANY IMPLIED WARRANTIES OF MERCHANTABILITY, NON-
INFRINGEMENT, TITLE, SATISFACTORY QUALITY OR FITNESS FOR A PARTICULAR PURPOSE.
For additional terms and conditions, please refer to additional sections in this document.

Thank you for choosing EpiphanVideo!
At EpiphanVideo, product function and quality are our top priority. We make every effort to make sure that
our products exceed your expectations.
Product feedback
Your feedback is important! We regularly contact our customers to ensure our products meet your
performance and reliability requirements. We strive to continually enhance our products to accommodate
your needs. Please let us know how you think we can improve our products by emailing your suggestions to
info@epiphan.com.
Specifications
Go to the USB Video Grabbers page of the EpiphanVideo website to get the most recent product
specifications and additional information about AV.io HD.
Warranty
All EpiphanVideo products are provided with a 100% return to depot warranty for one year from the date of
purchase.
Technical support
Epiphan’s products are backed by our professional support team. If you are having issues with your product,
please gather details about your system and contact our team by:
lE-mailing support@epiphan.com
lLive chat via the link on our support site
lPhone toll free at 1-877-599-6581 or call +1 613-599-6581
Be sure to include as much information about your problem as possible, including:
lProblem description
lDetails of the video or audio source (type, resolution, refresh rate, etc.)
lProduct serial number
lYour operating system and version number
Copyright © 2016 Epiphan Systems Inc. All Rights Reserved

Firmware 2.1.1 release notes
Firmware 2.1.1 brings enhanced capture optimization to AV.io HD, allowing optional customization of VGA-
specific capture settings.
What's new
This section provides detail on the main features included in firmware release 2.1.1.
VGA capture customization
You can now adjust the camera controls (horizontal and vertical shift) and image filter settings (brightness and
contrast) of your captured VGA source.

vi
Table of contents
Thank you for choosing EpiphanVideo! iv
Firmware 2.1.1 release notes v
What's new v
Table of contents vi
Quickstart 1
Getting started 2
What's in the box? 2
System requirements 4
Technical specifications 4
Hardware 6
Hardware diagrams 6
Indicator LED details 8
Capture 9
Set up your AV.io HD for capture 10
How AV.io HD works 11
Resolutions, capture rates and aspect ratios 12
Automatic image scaling & audio resampling 13
Third-party applications 13
Configuration options 14
Input signal resolution (disabled by default) 14
Preserve aspect ratio (enabled by default) 14
Performance mode (enabled by default) 15
Audio selector for multichannel inputs 15
Install the AV.io Config tool 16
Configure settings using AV.io Config tool 20
Update firmware using the AV.io Config tool 22
Advanced settings for VGA capture 25
Limitations and known issues 32

vii
Troubleshooting 33
Releases and features 36
Software and documentation license 37
AV.io HD User Guide Quickstart
Quickstart
Setting up your AV.io HD device to capture live video and audio content couldn’t be easier!
Before you begin the connection process, you will require:
1. An HDMI, DVI or VGA video source (with or without audio)
2. Your AV.io HD device
3. A capture computer, laptop or notebook
4. A USB 3.0 cable (included with purchase) to connect to your AV.io HD to your capture computer
5. A DVI cable, VGA to DVI cable, or HDMI adapter (all three included with purchase)to connect your video
source to your AV.io HD
Once you have these things ready to go, you can now begin the simple process of hooking up your AV.io HD
so you can start capturing!
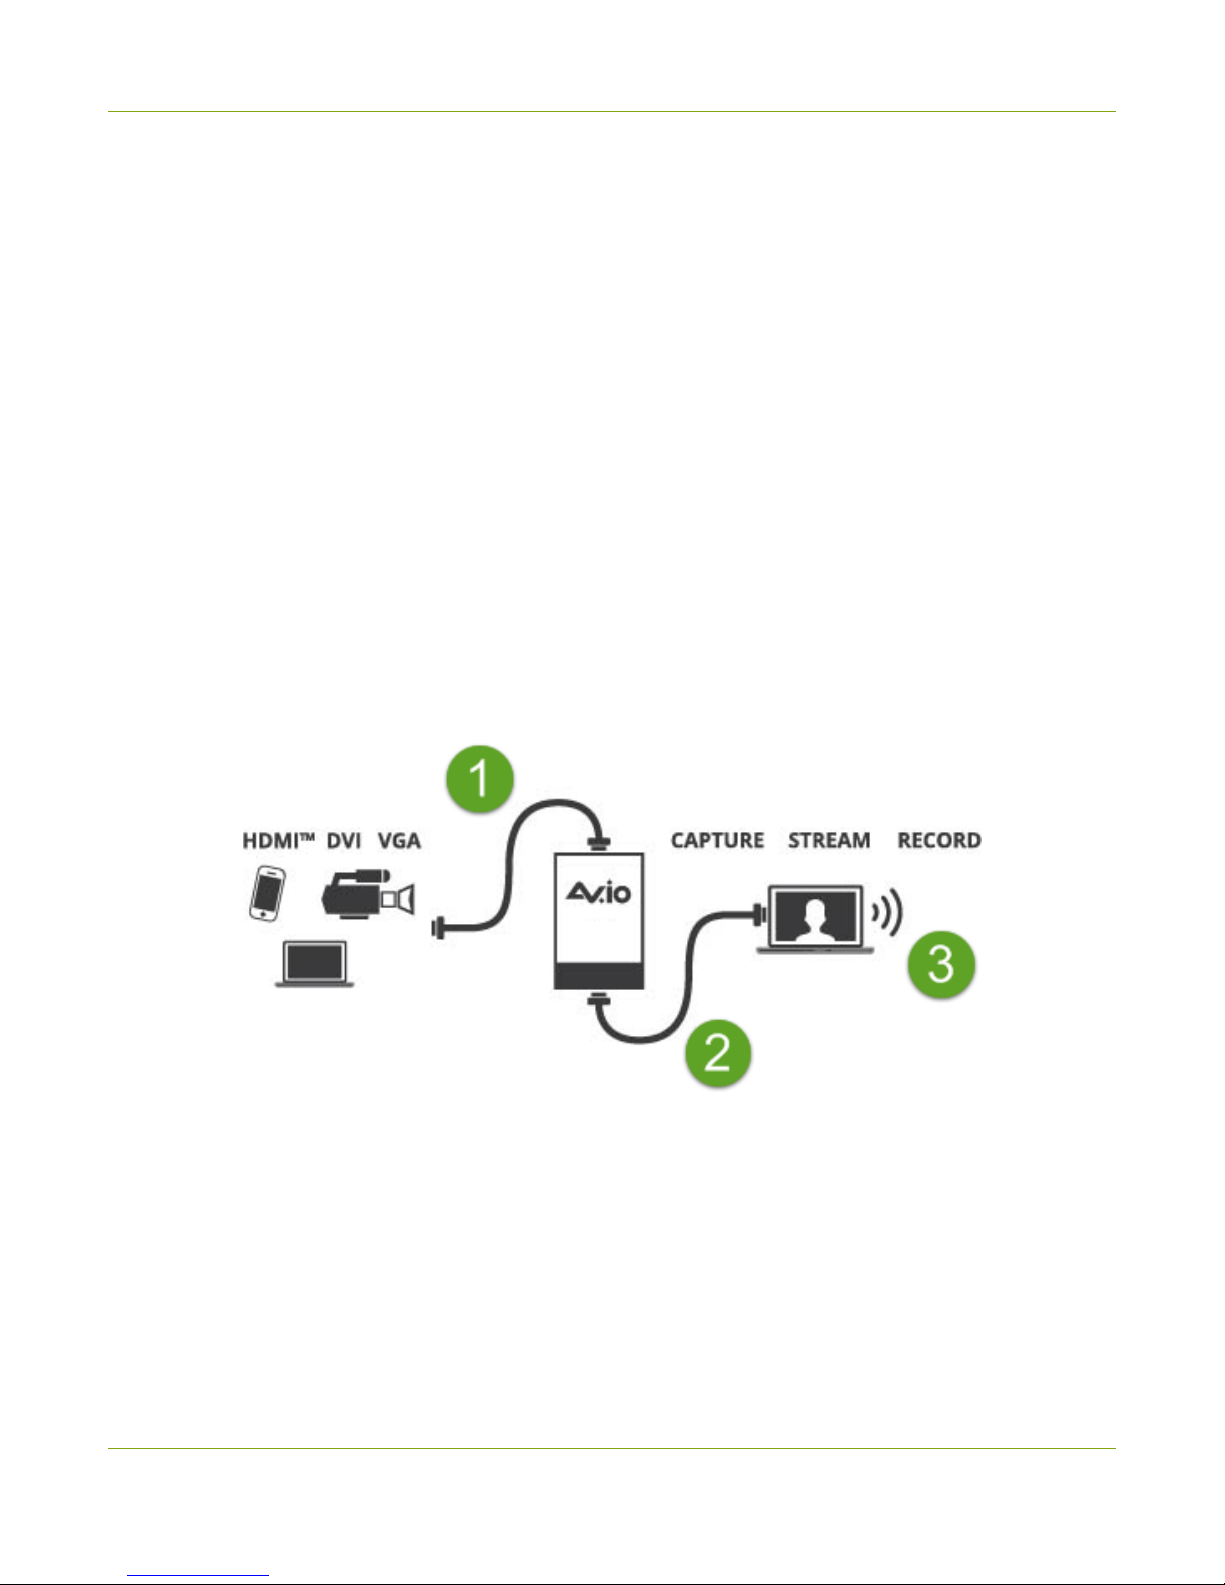
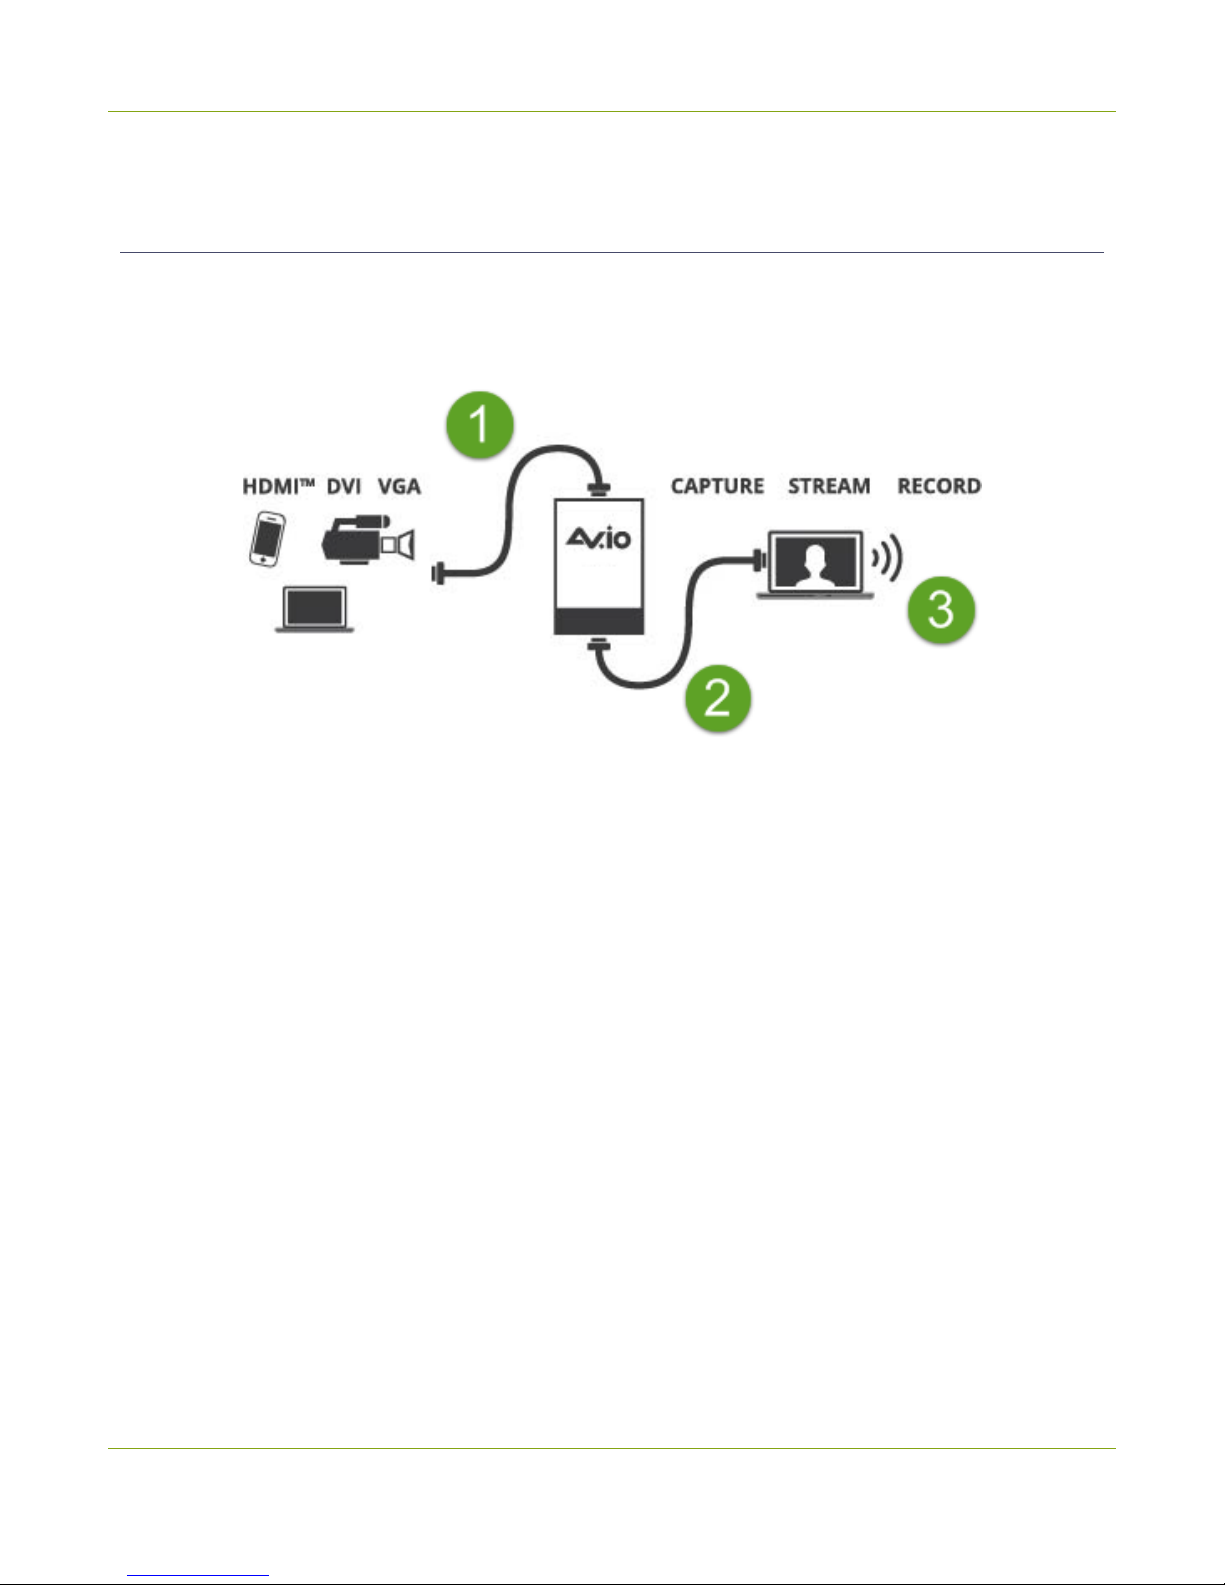
To connect your AV.io HD for capture:
1. Connect your AV.io HD device to your video source
2. Connect your AV.io HD device to your computer
3. Open your favorite third-party application, select AV.io HD from the list
of available cameras and start capturing!
And that’s it! No drivers to install and no extensive set-up! Just connect the cables and you’re ready to go!
1

AV.io HD User Guide Getting started
Getting started
Welcome and thank you for buying Epiphan Video’s AV.io HD!
This guide contains all the information necessary to successfully use AV.io HD to quickly and easily capture live
video content without any configuration – simply connect the cables and you’re ready to go!
This guide starts off by jumping right into it by showing you how to start capturing video, then we’ll take you
through how AV.io HD works, followed with some technical reference material, and we’ll conclude with a
walkthrough of some optional video capture configuration.
Let’s get started!
What's in the box?
Your AV.io HD product contains everything you need to easily capture live video content with minimal setup.
Your purchase includes the following:
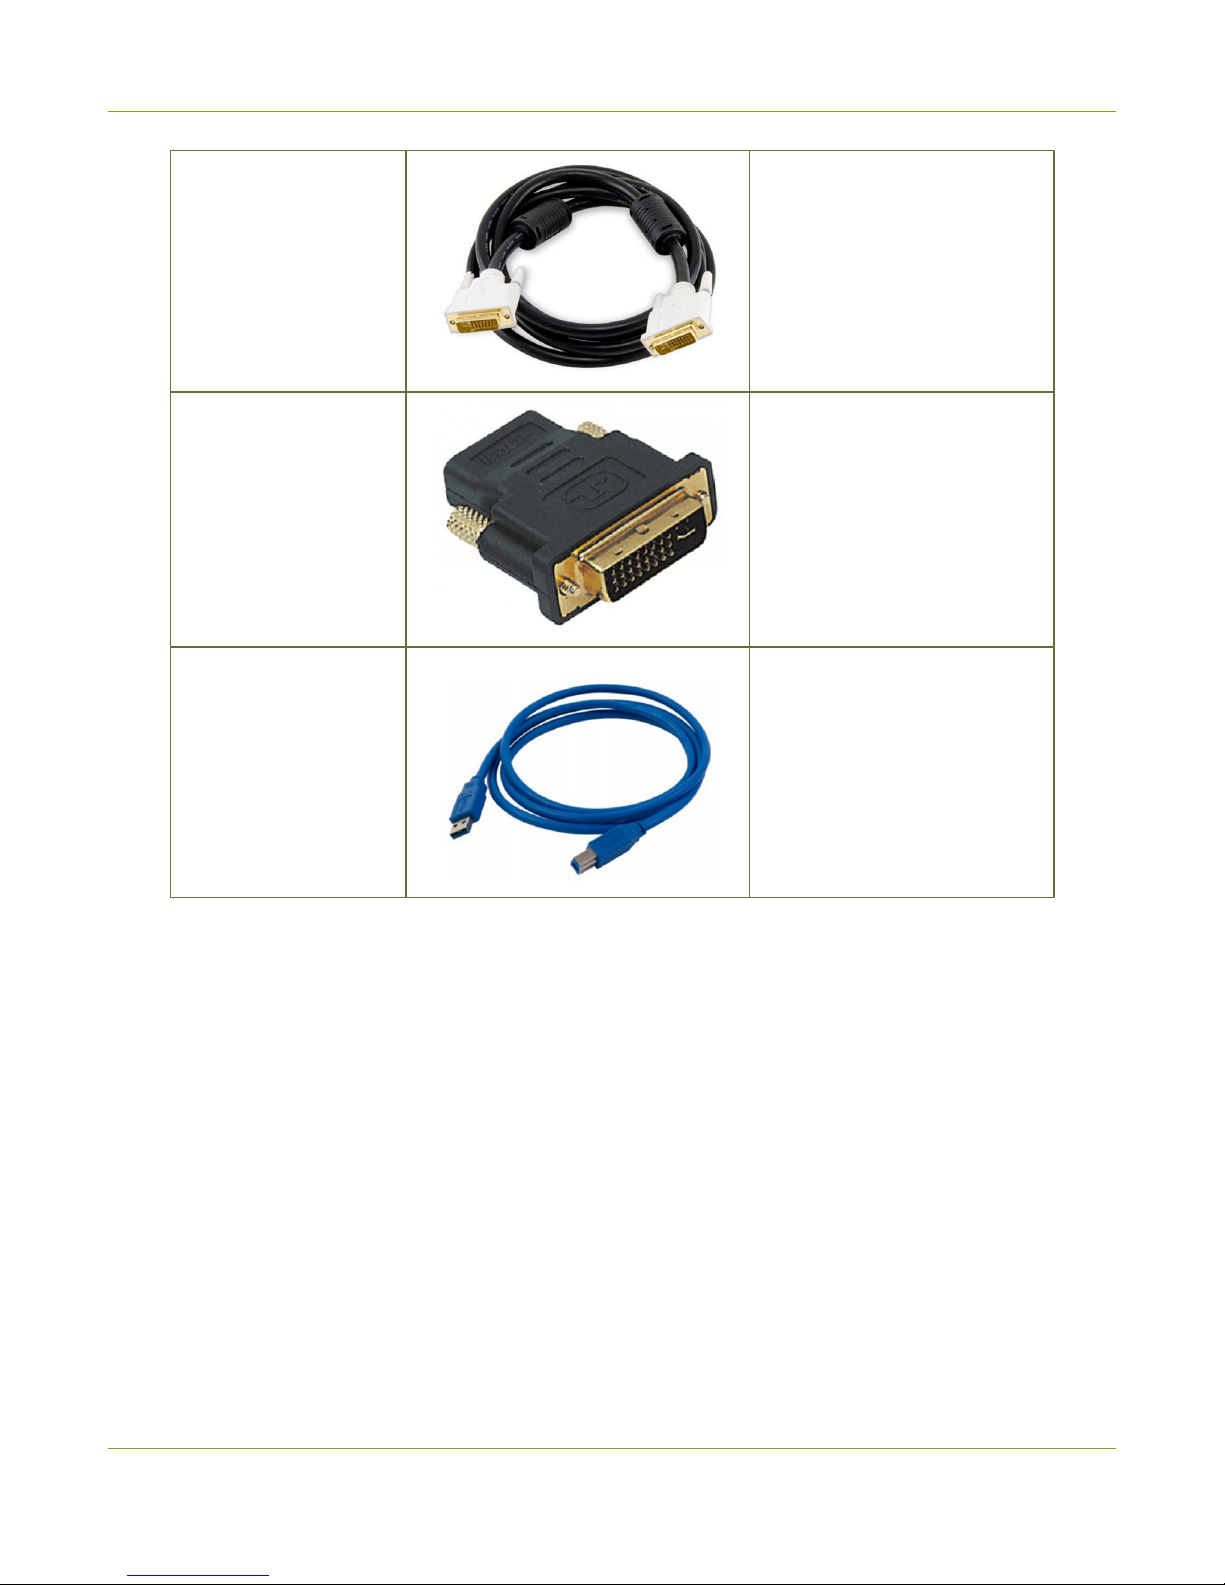
Table 1 Description of included purchase contents (for identification only, color and appearance of individual
cables/adapters may vary).
AV.io HD video grabber Your video capture device!
DVI-to-VGA cable
Connects a video source with a
VGA port to your AV.io HD’s
DVI port. This cable is included
with your AV.io HD purchase.
2
AV.io HD User Guide What's in the box?
DVI single link cable (1
m)
Connects a DVI source to your
AV.io HD’s DVI port.
HDMI-to-DVI adapter Connects an HDMI source to
your AV.io HD’s DVI port
USB 3.0 cable (1 m)
The USB 3.0 cable connects
your AV.io HD video grabber
with your computer’s USB 3.0
or 2.0 port.
3

AV.io HD User Guide System requirements
System requirements
System requirements are the barebones technical essentials your computer needs to work with AV.io HD.
System requirements to use AV.io HD include:
Video source Any VESA-compatible VGA, DVI or HDMI source. (AV.io HD
cannot capture from HDCP encrypted sources)
Video capture workstation
Any computer (laptop/desktop/other format) with:
la compatible USB 3.0 host controller for SuperSpeed
operation; or,
la USB 2.0 controller
Video capture workstation
operating system
Windows 7, Windows 8.1, Windows 10
Mac OS X 10.10 and up
Linux distribution with kernel 3.5.0 or higher
Processor frequency Minimum recommended value: 2.4 GHz
RAM Minimum recommended value: 4 GB
Technical specifications
Technical specifications for AV.io HD are included in the table below.
Connectors
DVI-I (integrated, digital and analog)
USB standard B type
Input HDMI (audio compatible)
VGA and DVI
Audio (HDMI) Input
16-bit and 24-bit PCM encoded
audio at 32 kHz, 44.1 kHz and 48
kHz
Audio (UAC) output 16-bit 48 kHz stereo audio
Output color space YUV 4:2:2
Supported output resolutions
(at 15, 30 or 60 fps) 640×360 640×480
4

AV.io HD User Guide Technical specifications
848×480 960×540
1024×768 1280×720
1280×1024 1600×1200
1920×1080 1920×1200
Capture delay
Near-zero latency, although certain
third-party applications may
contribute to delay
OS support
(32-bit and 64-bit)
Windows 7, Windows 8.1, Windows
10
Mac OS X 10.10 and up
Linux distribution with kernel 3.5.0
or higher
USB support USB 3.0 and 2.0
5
AV.io HD User Guide Hardware
Hardware
This section describes the physical features of your AV.io HD, including diagrams and hardware feature
descriptions.
Topics covered include:
lHardware diagrams; and,
lIndicator LED details
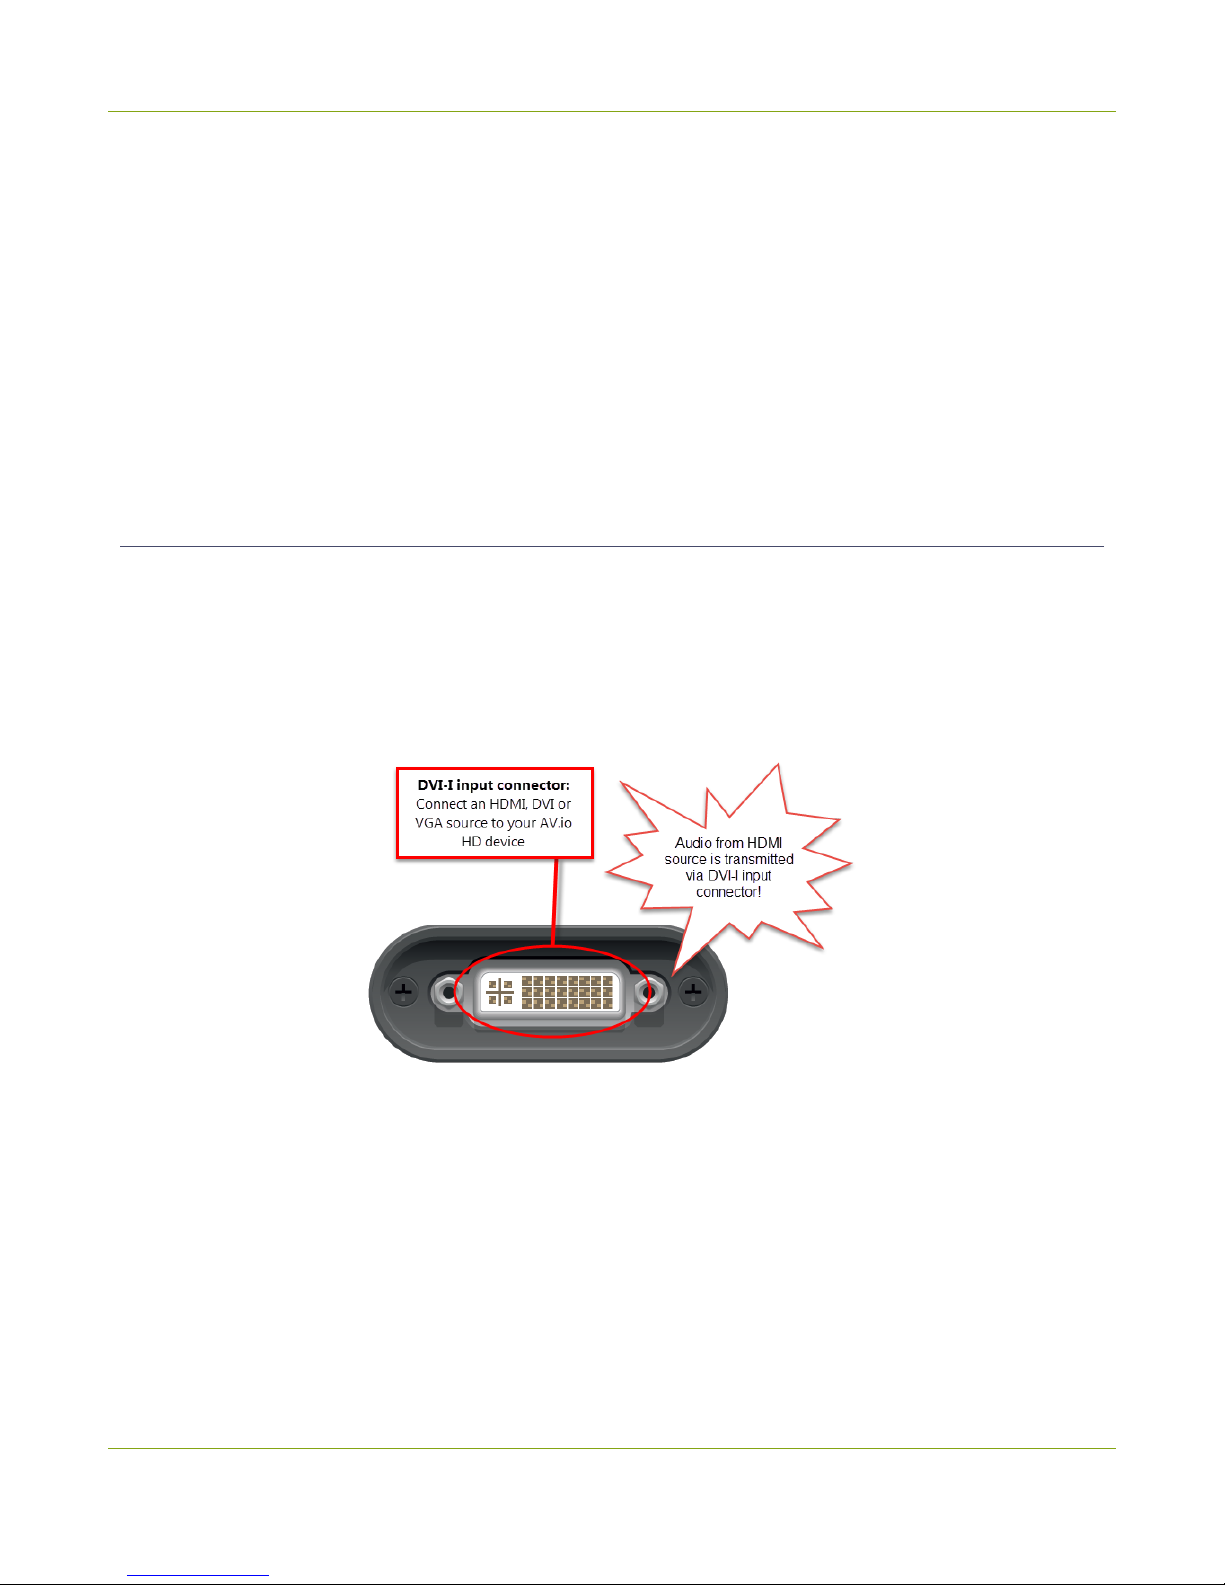
Hardware diagrams
Your AV.io HD device includes an input, an output and an indicator light.
Input/output ports and indicator lights are identified and explained in the top and bottom cap view AV.io HD
images below. Indicator light details are explained in the proceeding section.
Top cap view:
6
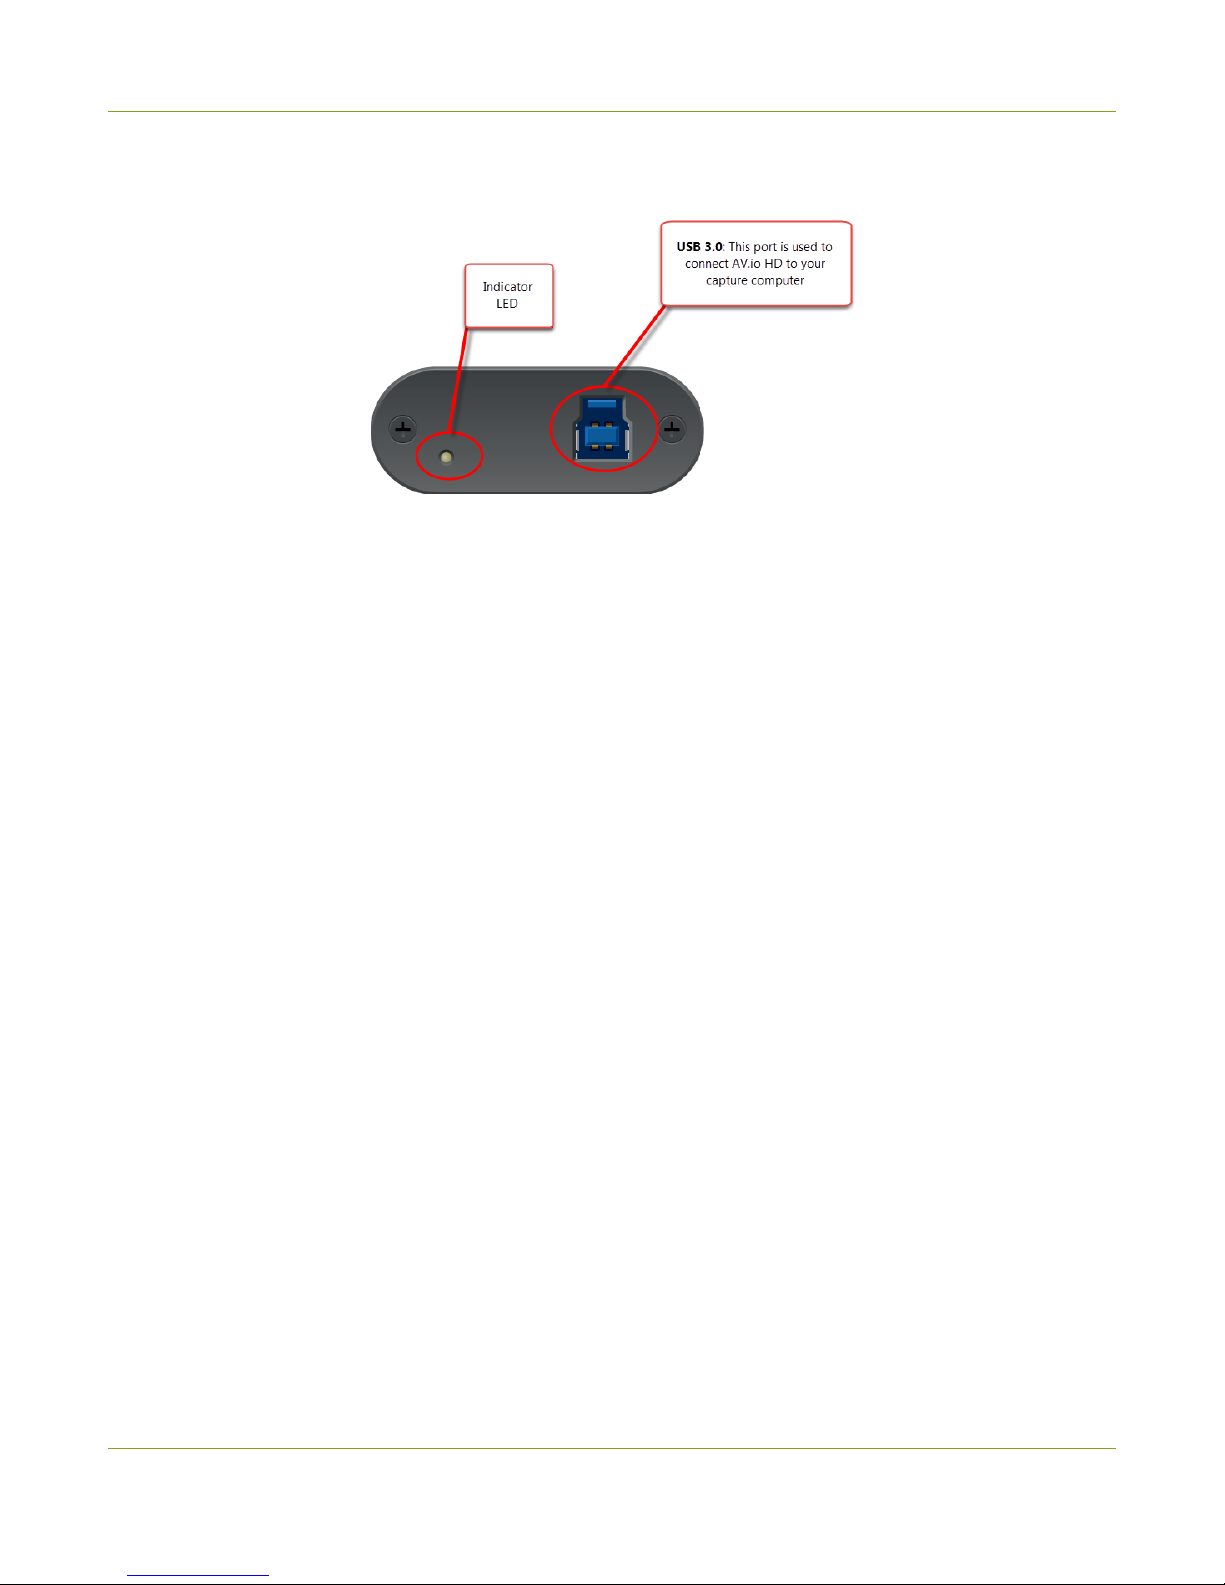
AV.io HD User Guide Hardware diagrams
Bottom cap view:
7

AV.io HD User Guide Indicator LED details
Indicator LED details
The color and action of the indicator LED depends on whether you are connected by USB 3.0 or USB 2.0. For
maximum performance, always use a USB 3.0 port and the included USB 3.0 cable. Note that frame capture
rate will be reduced when connected via USB 2.0.
If you’re not sure if your controller is USB 3.0 or USB 2.0, plug AV.io HD into the capture computer and look
at the indicator LED. After initial boot up(red LED), blue is used for USB 3.0 and green is used for USB2.0:
Blue LED means USB 3.0 Green LED means USB 2.0
Connection type/LED color USB 3.0 connection USB 2.0 connection
Solid red
lFirmware update in
progress
lAV.io HD initializing
lFirmware update in
progress
lAV.io HD initializing
Blinking red Adjustment to VGA input in
progress
Adjustment to VGA input in
progress
Solid green – USB 2.0 connection active
Blinking green - Video and/or audio
transferring successfully
Solid blue USB 3.0 connection active –
Blinking blue Video and/or audio
transferring successfully -
8

AV.io HD User Guide Capture
Capture
Setting up your AV.io HD device to capture live video content couldn’t be easier!
Before you begin the connection process, you will require:
1. An HDMI, DVI or VGA video source
2. Your AV.io HD device
3. A capture computer, laptop or notebook
4. A USB 3.0 cable (included with purchase) to connect to your AV.io HD to your capture computer
5. A DVI cable, VGA to DVI cable, or HDMI adapter (all three included with purchase) to connect your video
source to your AV.io HD
Once you have these things ready to go, you can now begin the simple process of hooking up your AV.io HD
so you can start capturing!
9
AV.io HD User Guide Set up your AV.io HD for capture
Set up your AV.io HD for capture
Connecting your AV.io HD to your capture computer is simple and is accomplished in three easy steps.
To connect your AV.io HD for capture:
1. Connect your AV.io HD device to your video source
2. Connect your AV.io HD device to your desktop computer, laptop or
notebook
3. Open your favorite third-party application, select AV.io HD from the list
of available cameras and start capturing!
And that’s it! No drivers to install and no extensive set-up! Just connect the cables and you’re ready to go!
10

AV.io HD User Guide How AV.io HD works
How AV.io HD works
Once you’re ready to start capturing, you’ll need either a built-in or third-party application to capture video
and audio content with AV.io HD.
The application communicates with AV.io HD and negotiates a frame rate (frequency at which frames in a
video sequence are displayed) and frame size (size of a single video frame in pixels). Higher frame rate means
smoother video capture while frame size determines the aspect ratio of the video output as well as its size and
degree of crispness.
With the help of AV.io HD, the content from your video source is automatically configured and captured on
your computer through your selected application. If the application requests a frame size that is smaller or
larger than your video source, AV.io HD automatically scales the video for you. For consistent output, audio is
automatically resampled to 16-bit 48 kHz stereo audio.
No configuration required!
11

AV.io HD User Guide Resolutions, capture rates and aspect ratios
Resolutions, capture rates and aspect ratios
The resolution (also known as frame size or display mode) of a video signal, digital image, TV screen,
computer monitor or other display device is a count of the number of pixels displayed horizontally and
vertically. For example the resolution 1920×1080 (which is 1080p) creates an image that is 1920 pixels wide
and 1080 pixels tall.
AV.io HD generates a list of the following possible resolutions for your capture application to select for output
display:
640×360 848×480 1024×768 1280×1024 1920×1080
640×480 960×540 1280×720 1600×1200 1920×1200
Captured video content is output to your application at 15, 30 or 60 frames per second (your application
chooses one of these frame rates) when captured over USB 3.0.
The aspect ratio of an image describes the proportional relationship between its pixel width and height. The
resolution 1920×1080 (1080p) is quite a bit wider than it is tall. The ratio of its width to height is 16 to 9,
represented as an aspect ratio 16:9.
AV.io HD outputs resolutions in commonly supported aspects ratios, color-coded according to table of
resolutions above and described in the table below:
Aspect Ratio Common Use
4:3 Standard letterbox TV display and non-widescreen computer displays
16:9 Widescreen (HD) TV displays (1080p, 1080i, 720p etc)
16:10 (8:5) Widescreen computer displays
5:4 Sometimes used in larger format computer monitors
12
AV.io HD User Guide Automatic image scaling & audio resampling
Automatic image scaling & audio resampling
If your source content is larger or smaller than the frame size chosen by the application, AV.io HD
automatically scales your source to match the desired frame size! No user configuration required!
AV.io HD also automatically performs audio resampling, meaning that no matter the bit depth or frequency
of audio through an HDMI audio source, AV.io HD automatically resamples your audio so that your
application gets a consistent audio sample rate and bit depth, even if you change the video source!
Third-party applications
AV.io HD uses pre-installed drivers on your OS (called UVC drivers and UAC drivers) to communicate with
third-party applications and capture content. Due to AV.io HD's use of UVC/UAC technology, there is no need
for driver installation. Just like a webcam, your AV.io HD device is immediately recognized as a camera device
(like a web cam) and can be used to capture content via any UVC-compatible third-party application.
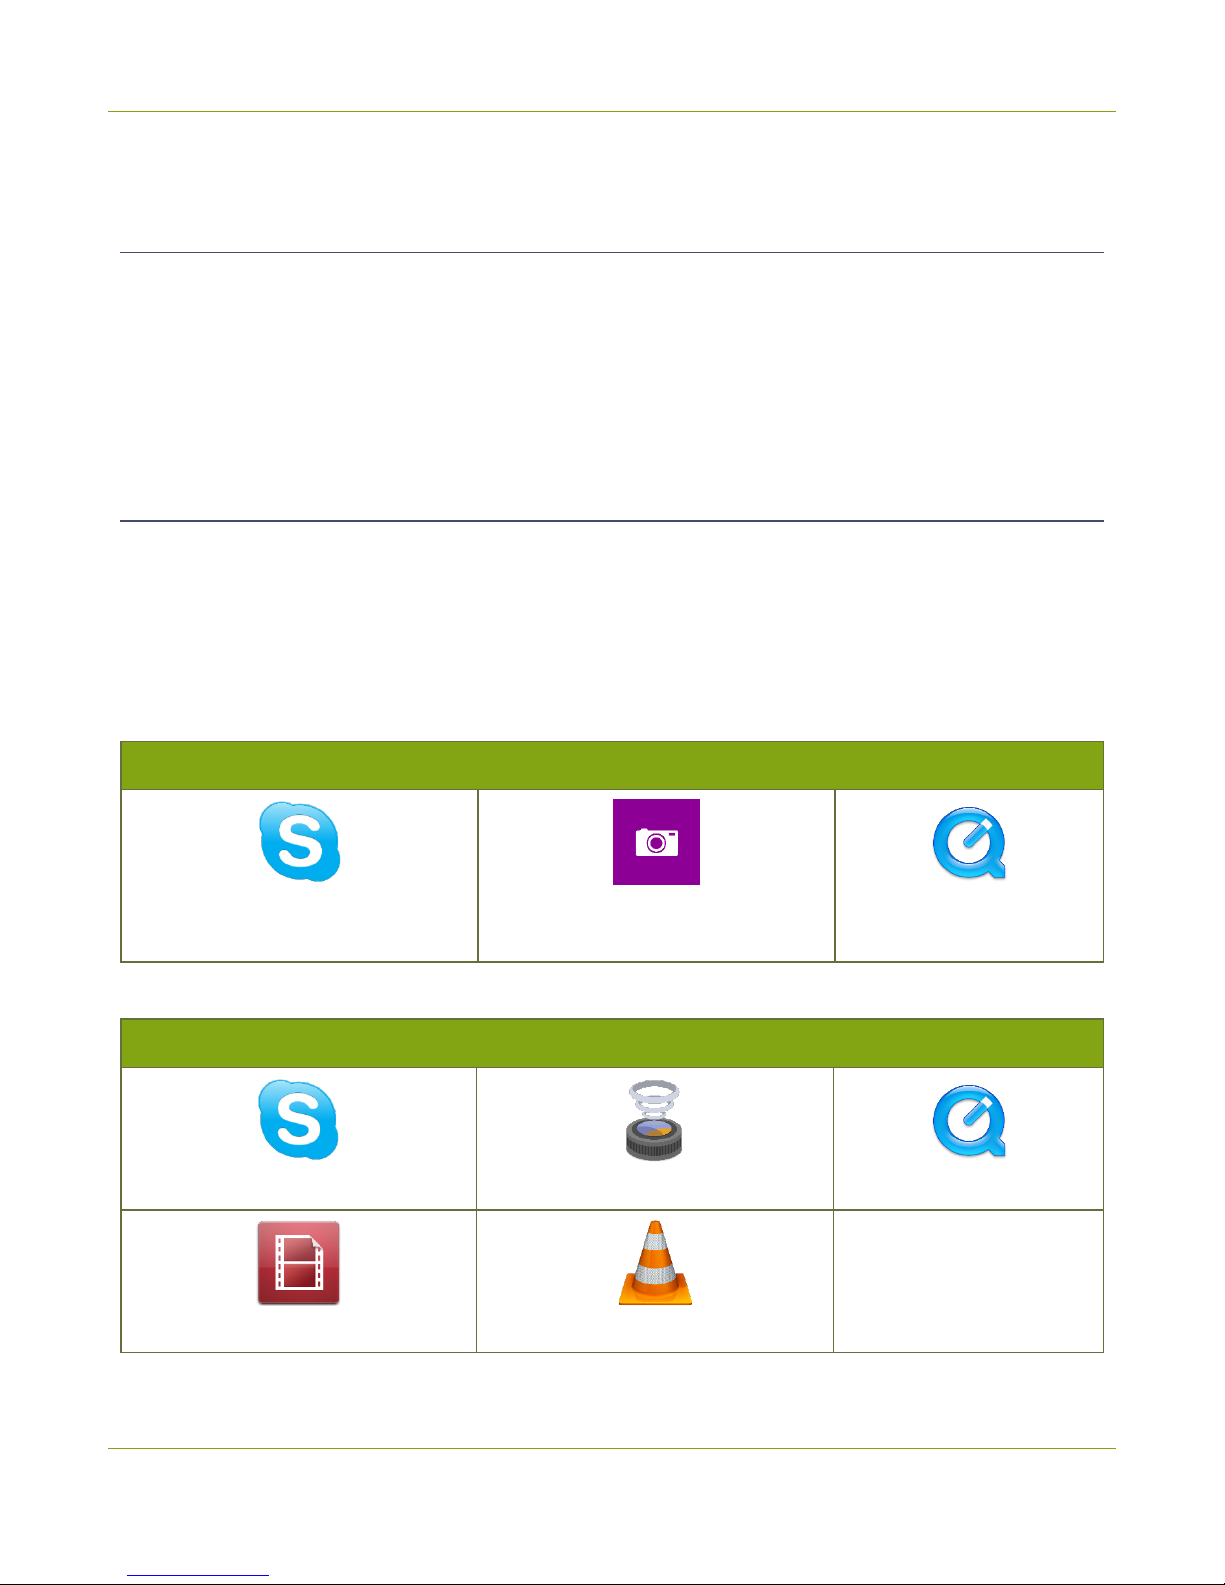
Third-party applications that work with AV.io HD include, but are not limited to the following list. Try your
favorite capture application!
Zero-install applications (included with your OS)
Skype
(with Windows 8.1 and Windows 10)
Windows Camera app
(with Windows 8.1 and Windows 10)
Quicktime
(with Mac OS X)
Popular applications available for download
Skype Wirecast Quicktime
Adobe FMLE VLC media player
13

AV.io HD User Guide Configuration options
Configuration options
Your AV.io HD device is ready to use right out of the box; however, there is support for additional
configuration should you need it.
AV.io HD allows you to make adjustments to a captured VGA source and save the new capture settings to
your AV.io HD for future use. For detail on how to adjust VGA capture settings, see Advanced settings for VGA
capture.
Firmware updates and changes to default capture settings can be applied your AV.io HD using Epiphan’s AV.io
Config tool.
Detailed instructions on how to use AV.io Config can be found using the links below:
lInstall the AV.io Config tool
lConfigure settings using AV.io Config tool
lUpdate firmware using the AV.io Config tool
The AV.io Config tool allows you to change several settings to make changes to your video capture experience
if necessary. Most users won’t need to use this utility for anything other than firmware updates, but advanced
users may find these tweaks help them get the most out of their AV.io HD.
These settings include: input signal resolution,aspect ratio preservation and performance mode.
Input signal resolution (disabled by default)
When enabled, your AV.io HD adds the exact resolution of your input signal to the list of supported output
resolutions. This is the only way to enable 1:1 capture for special frame sizes. However it is important to note
that the capture resolution is still dictated by the third-party application and this application can override any
AV.io HD custom capture settings. Also note that in selecting this mode, any change in input signal
(programmatic or by connecting a different input) causes AV.io HD to renegotiate its resolution with the
application. This can cause an interruption in the captured stream.
Preserve aspect ratio (enabled by default)
When enabled, your AV.io HD preserves the aspect ratio of your input signal by adding black bars to the sides
or top and bottom of the frame (only for cases when the application using the signal requests a frame size
with a different aspect ratio). For example, with this option enabled, a 4:3 input signal gets black bars added
to the sides of the image when viewed in an application that requests a 16:9 aspect ratio. With this option
disabled, the 4:3 image is instead stretched to fit the full 16:9 size.
14
Table of contents
Other epiphan DVR manuals


