Equus 8200 User manual
INSTALLATION INSTRUCTIONS
1-1/2" & 2" GAUGE KITS VOLTMETER
AMMETER
OIL PRESSURE
TEMPERATURE
1. Read instructions completely before installation.
2. Install gauges only when engine is cool and ignition is off.
3. Make sure all necessary tools, materials, and parts are on hand.
4. Disconnect negative (–) battery cable before installing gauges.
NOTE: It may be necessary to reprogram your radio, clock,
etc. after reconnecting the battery.
5. Make sure mounting location does not impair visibility or
interfere with driving. Also check behind the mounting location
for any wiring or components before drilling.
6. Refer to your vehicle's service manual for the location of sensor
port, and/or charging system.
BEFORE YOU START
1NOTES:
• Some vehicles use temperature and pressure sensors for
engine control functions. Use a T-fitting if necessary when
installing gauge sensors.
• Whenever a T-fitting is used for temperature, gauge reading
will be lower than actual water temperature.
7. When connecting electrical wires, install and crimp or solder
terminals (purchased separately) and make wire splices as
needed. ALWAYS insulate wire splices with shrink tubing or
electrical tape to prevent shorting.
8. Follow all necessary safety procedures for protection.
WARNING: Check and maintain your engine regularly, and be
aware of any irregularities. Never rely on the gauges as the
ONLY means of protection.
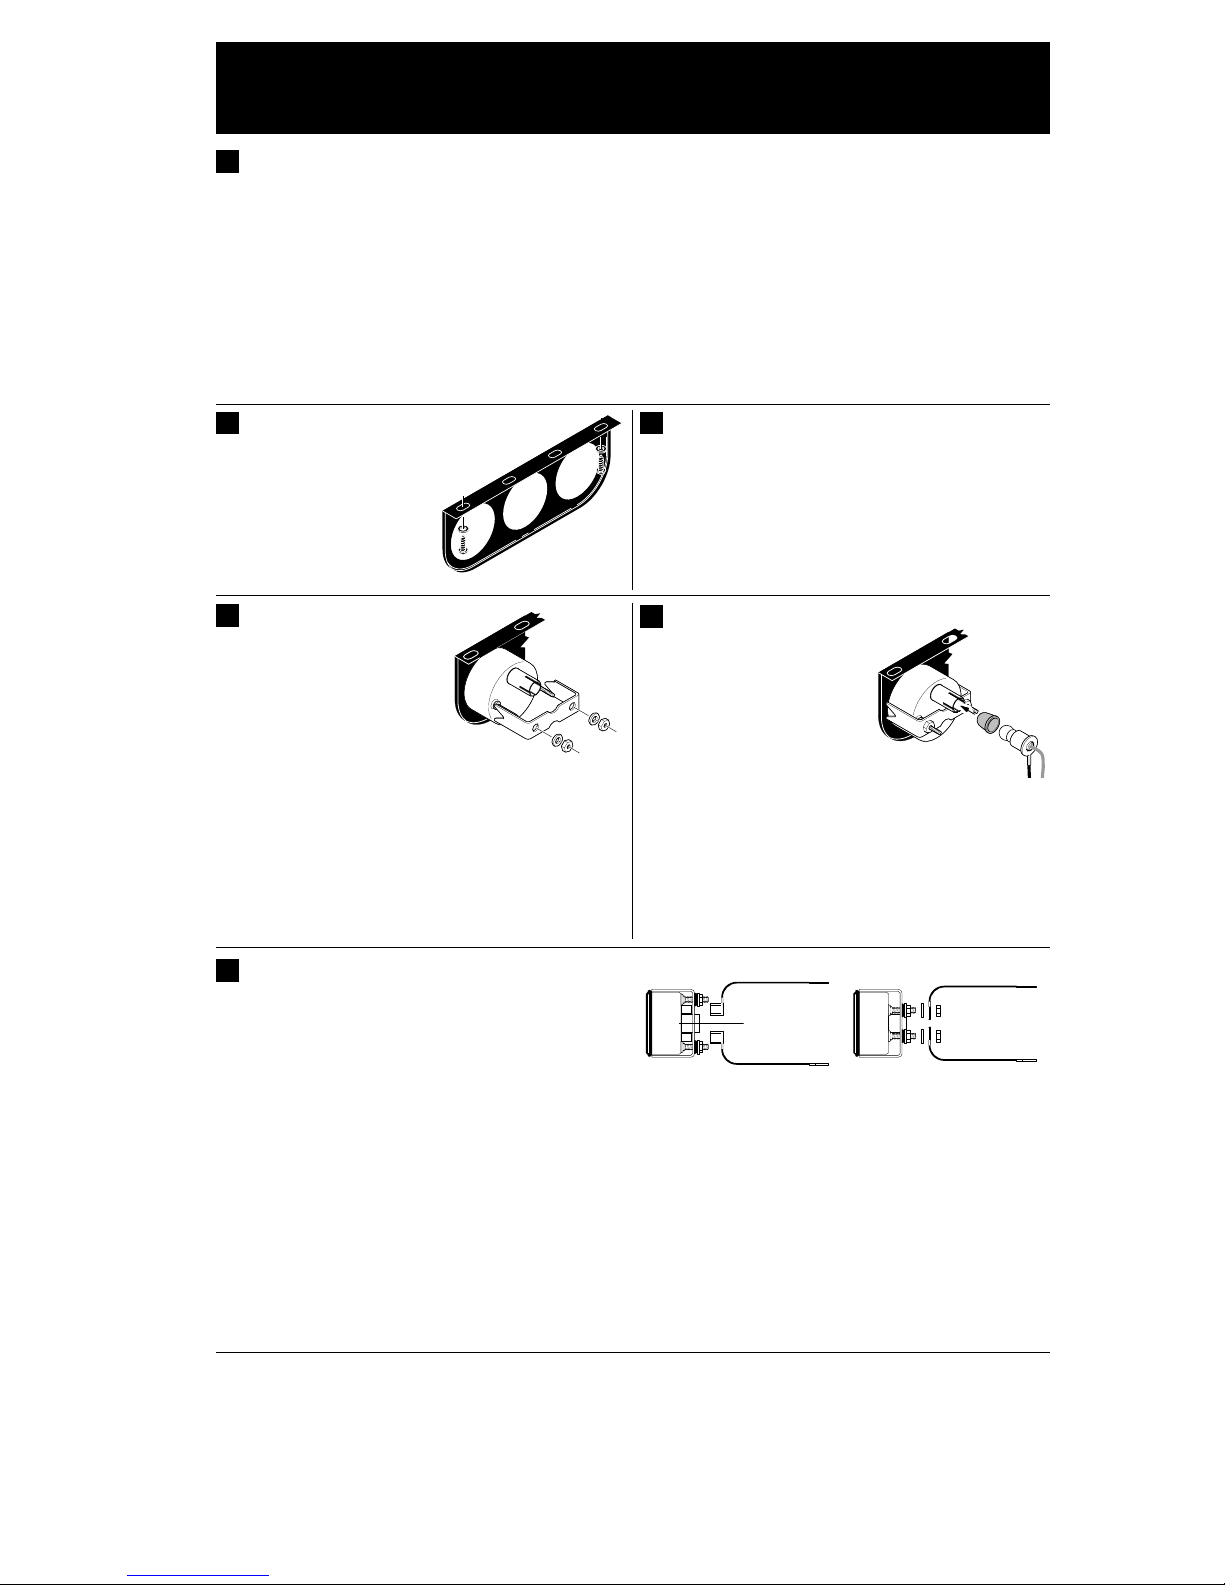
For on-dash or under-dash mounting.
1. Determine mounting location.
2. Using panel as a template, mark
locations for screws.
3. Drill small holes for the screws.
4. Hold panel in place and secure
with the screws and flat
washers provided.
PANEL INSTALLATION
21. Locate a position on the dashboard that can be cut out without
striking any objects from behind the dash.
2. Using a hole template, cut a 1-1/2" or 2" hole, as necessary,
through the dashboard.
3. Using a round file, smooth out the rough edges around the
drilled hole.
4. Install the gauge as described in step 4, GAUGE
INSTALLATION.
IN-DASH INSTALLATION
3
1. Insert gauge through front of
PANEL or hole in dashboard.
2. Install U-bracket over gauge
mounting studs and secure with
two nuts and flat washers
provided. TIGHTEN NUTS
FINGER-TIGHT ONLY.
NOTE: Ammeters and the 1-1/2"
voltmeter gauge utilize U-brackets which have two black
insulators installed in the mounting holes. MAKE SURE THESE
INSULATORS ARE PRESENT BEFORE INSTALLING THE
U-BRACKET.
3. Hold gauge case and rotate gauge, as needed, until gauge face
is positioned properly on front of panel.
4. After positioning, tighten mounting nuts securely to prevent
gauge movement. DO NOT OVERTIGHTEN NUTS OR U-
BRACKET MAY WARP.
GAUGE INSTALLATION
4
NOTE: Gauge backlighting color may
be changed to red or green by installing
the optional color filter over the bulb (not
available for all gauge kits).
1. Press snap-in light socket into
collar on back of the gauge.
2. Splice free end of light socket RED wire into an existing
hot wire from any vehicle instrument panel lamp controlled
by the headlight switch. Insulate splice with shrink tubing or
electrical tape to prevent shorting.
3. Connect light socket BLACK wire to a good chassis ground
(additional wire purchased separately).
4. The gauge lights are now connected to the lighting circuit
controlled by the headlight switch. If the vehicle is so equipped,
gauge light brightness will be controlled along with the
instrument panel lights.
GAUGE LIGHT INSTALLATION AND
CONNECTION
5
GAUGE CONNECTION
6
A. VOLTMETER
1. Using a multimeter or test light, find a 12 volt positive (+) location
which is hot ONLY when the ignition key is in the "ON" position
(possible locations: fuse panel accessory, radio and cigarette
lighter circuits).
NOTE: Voltmeter wiring must be purchased separately. Use 18
– 20 AWG wire.
2. Crimp or solder 1/4" female spade/ring terminals (purchased
separately) on one end of voltmeter positive (+) and negative (–)
wires, and connect wires to voltmeter positive (+) and negative (–)
terminal posts.
3. Splice positive (+) wire to an accessory location or line as
described in step 1 (route wires away from sharp edges and
mechanical moving parts to prevent electrical shorts).
4. Connect voltmeter negative (–) wire to a good bare metal
electrical chassis ground on the vehicle.
5. Reconnect negative (–) battery cable. With the ignition switch in
the "ON" position (and engine NOT RUNNING), voltmeter should
read on the lower half of green area (if color coded) or between
12.5 and 13.2 volts. A lower reading indicates a low battery, a
poor connection or defective battery cables.
6. Start and run engine. Voltmeter should read on the upper half of
green area (if color coded) or between 13.3 and 15.2 volts
(specifications vary, consult your vehicle's service manual). A
lower reading can indicate a faulty voltage regulator, slipping
belts, faulty alternator/battery, a poor connection or excessive
loads. A higher reading can indicate a faulty voltage regulator.
NOTE: If voltmeter fails to read, make sure positive (+) and
negative (–) connections on rear of gauge match. If voltmeter still
fails to read, recheck and tighten all connections.
–
+
BOTTOM
VIEW
TO ACCESSORY LINE (+)
"S" TERMINAL
(NOT USED)
S
TO GROUND (–)
–
+
BOTTOM
VIEW
TO ACCESSORY LINE (+)
TO GROUND (–)
2" VOLTMETER 1-1/2" VOLTMETER
Innova 1999 MRP #93-0161
WARRANTY AND SERVICE
The Manufacturer warrants to the original purchaser that this unit is free of defects in materials and workmanship under normal use and maintenance for a period of one (1)
year from the date of original purchase. If the unit fails within the one (1) year period, it will be repaired or replaced, at the Manufacturer's option, at no charge, when
returned prepaid to the Service Center with Proof of Purchase. Installation labor is not covered under this warranty. The sales receipt may be used for this purpose. All
replacement parts, whether new or re–manufactured, assume as their warranty period only the remaining time of this warranty. This warranty does not apply to damage
caused by improper use, accident, abuse, improper voltage, service, fire, flood, lightning, or other acts of God, or if the product was altered or repaired by anyone other
than the Manufacturer's Service Center. The Manufacturer, under no circumstances shall be liable for any consequential damages for breach of any written warranty of this
unit. This warranty gives you specific legal rights, and you may also have rights which vary from state to state. THIS WARRANTY IS NOT TRANSFERABLE. For service,
send (prepaid) via U.P.S. (if possible) to: EQUUS PRODUCTS INC., 17291 Mt. Herrmann St., Fountain Valley, CA 92708 Attn: Service. Allow 3–4 weeks service time. If
you have any questions, please contact your local store, distributor or the Manufacturer's Service Center. USA & Canada: (800) 544–4124; All others: (714) 241–6802
(8:00–4:00, Monday–Friday PST); FAX: (714) 432–7910 (24 hr.)

Innova 1999
B. AMMETER
WARNING: Make sure the maximum capacity of your charging
system does not exceed the ammeter's dialface capabilities.
NOTE: We strongly recommend professional installation or
assistance when installing an ammeter.
1. Determine routing for ammeter wiring. Use an existing firewall
grommet, or drill a hole through firewall to accommodate wires.
Install a rubber grommet (purchased separately) in hole, use
shrink tubing, or wrap with electrical tape to protect wiring from
chaffing or other damage.
NOTE: Ammeter wiring must be purchased separately. Use 10
AWG wire minimum.
2. Crimp or solder ring terminals (purchased separately) on ammeter
positive (+) and negative (–) wires. Connect wires to ammeter using
two nuts and flat washers. TIGHTEN NUTS SECURELY.
PROPERLY INSULATE ALL CONNECTIONS.
NOTE: This is an "in–line" attachment gauge. NEVER GROUND
GAUGE STUDS OR WIRES.
3. Route wiring through grommet in firewall.
4. Connect ammeter wiring to charging system:
■For magnetic starter switch systems (Ford/Chrysler), see Wiring
Diagram A. Remove nut and washer from starter solenoid switch
battery connection post "A". Remove all wires except wire going
to battery. Connect ammeter positive (+) lead to post "A";
reinstall washer and nut. Connect ammeter negative (–) wire to
wire(s) removed from post "A" using screw, lockwasher, and nut
(purchased separately).
■Insulate terminal lug connection using shrink tubing or
electrical tape to prevent shorting.
+
–
BOTTOM
VIEW
NUT
WASHER TERMINAL
LUG
TO
BATTERY
TO
STARTER
NUT
WASHER TERMINAL
LUG
SCREW
EXISTING WIRE(S) REMOVED FROM
STARTER SOLENOID SWITCH TERMINAL "A"
AMMETER
NEGATIVE (–)
WIRE
AMMETER
POSITIVE (+)
WIRE
AMMETER CONNECTION DIAGRAM A(FORD/CHRYSLER)
STARTER
SOLENOID
SWITCH
"A"
+
–
■For voltage regulator/horn relay circuit systems (GM/Chrysler)
see Wiring Diagram B. Splice ammeter positive (+) and
negative (–) wires into wire from battery positive (+) to voltage
regulator.
■For most starter solenoid circuits (GM/AMC), see Wiring
Diagram C. Remove nut and washer from starter solenoid
battery connection post "A". Remove all wires except wire
going to battery. Connect ammeter positive (+) wire to post
"A"; reinstall washer and nut. Connect ammeter negative (–)
wire to wires removed from post "A" using screw, lockwasher,
and nut (purchased separately).
■Insulate terminal lug connection using shrink tubing or
electrical tape to prevent shorting.
5. Reconnect negative (–) battery cable. Turn on headlights and
observe ammeter. Ammeter should indicate "–". If ammeter
reads backwards, reverse the positive (+) and negative (–)
connections. If ammeter fails to read, turn off headlights and
recheck connections.
NOTE: If none of the diagrams matches your vehicle's system,
consult your vehicle's service manual or a qualified mechanic.
+
–
BOTTOM
VIEW AMMETER
NEGATIVE (–)
WIRE
AMMETER
POSITIVE (+)
WIRE
AMMETER CONNECTION DIAGRAM B(GM/CHRYSLER)
BATTERY POSITIVE
(+) CABLE TO
STARTER
SPLICE
SPLICE
CUT AND
REMOVE
TO VOLTAGE
REGULATOR
BATTERY
TERMINAL
+
–
X
+
–
BOTTOM
VIEW
NUT
WASHER TERMINAL
LUG
TO
BATTERY
NUT
WASHER TERMINAL
LUG
SCREW
EXISTING WIRES REMOVED FROM
STARTER SOLENOID
AMMETER
NEGATIVE (–)
WIRE
AMMETER
POSITIVE (+)
WIRE
AMMETER CONNECTION DIAGRAM C(GM/AMC)
STARTER
SOLENOID
+
–
"A"
GAUGE CONNECTION (Continued)
6
1/4"
TRIM INSULATION INSTALL TERMINAL
C. MECHANICAL OIL PRESSURE
NOTE: Before installation, use shop cloths and drip pans to protect
vehicle interior from potential leaks.
1. Determine routing for nylon tubing. Use an existing firewall
grommet, or drill a 3/8" (9.5 mm) diameter hole through firewall to
accommodate nylon tubing. Install a rubber grommet (purchased
separately) in hole, use shrink tubing, or wrap with electrical tape to
protect nylon tubing from chaffing or other damage.
NOTE: Some gauges (i.e. #6520) require tubing kit #6801 for
installation.
2. Connect nylon tubing to gauge using compression sleeve and
compression nut. Tighten compression nut until tubing is secure.
3. Route nylon tubing through grommet in firewall.
4. If necessary, install adapter in appropriate pressure port on
engine.
5. Connect nylon tubing to pressure port adapter using tube
connector, compression sleeve and compression nut. Tighten
compression nut until tubing is secure.
6. Secure tubing along its route to prevent damage from sharp
edges, moving parts or hot engine components.
7. Reconnect negative (–) battery cable. Start and run engine for
approximately 30 seconds. Turn off engine and check gauge
installation for leaks. Tighten or reseal joints as needed and
retest.
OPTIONAL
GROMMET
COMPRESSION
SLEEVE COMPRESSION
NUT
COMPRESSION
NUT COMPRESSION
SLEEVE
TUBE
CONNECTOR*
OPTIONAL
ADAPTER*
*USE TEFLON SEALING TAPE ON NOTED THREAD JOINTS.
NYLON
TUBING
ENGINE
BLOCK
GAUGE
PORT*
1/8"
1/8"
D. MECHANICAL TEMPERATURE
1. Determine routing for temperature sensor. Use an existing
firewall grommet, or drill a 7/8" (22 mm) hole through firewall to
accommodate capillary tube with sensor. Install a rubber
grommet (purchased separately) in hole, use shrink tubing, or
wrap with electrical tape to protect capillary tube from chaffing or
other damage.
2. Route capillary tube through grommet in firewall.
3. Remove existing temperature sensor. Install adapter in sensor
hole and tighten securely. Insert temperature sensor in adapter
and tighten sensor nut securely. DO NOT ROTATE SENSOR OR
CAPILLARY TUBE WHILE TIGHTENING NUT OR CAPILLARY
TUBE MAY BE DAMAGED.
4. Secure capillary tube along its route to prevent damage from
sharp edges, moving parts or hot engine components. DO NOT
CRIMP THE CAPILLARY TUBE.
5. Reconnect negative (–) battery cable. Start and run engine and
check gauge installation for leaks. Tighten or reseal joints as
needed and retest.
NOTE: An adapter must be used to seat the sensor.
OPTIONAL
GROMMET SENSOR
NUT*
TEMPERATURE
SENSOR ENGINE
BLOCK
OPTIONAL
ADAPTER*
*USE TEFLON SEALING TAPE ON NOTED THREAD JOINTS.
GAUGE
TEMPERATURE
SENSOR
ENGINE
BLOCK
OPTIONAL
TEE FITTING*EXISTING
TEMPERATURE
SENSOR/SWITCH
ALTERNATE CONNECTION DIAGRAM
SENSOR
NUT*
NOTE: The capillary tube is under pressure and filled with ether.
NEVER CUT THE TUBE OR ATTEMPT TO REMOVE FROM
GAUGE PORT.
Table of contents
Popular Automobile Accessories manuals by other brands


ULTIMATE SPEED
ULTIMATE SPEED 279746 Assembly and Safety Advice

SSV Works
SSV Works DF-F65 manual

ULTIMATE SPEED
ULTIMATE SPEED CARBON Assembly and Safety Advice

Witter
Witter F174 Fitting instructions

WeatherTech
WeatherTech No-Drill installation instructions

TAUBENREUTHER
TAUBENREUTHER 1-336050 Installation instruction