erc Shark-100N User manual

Currency Reader Counter

content
1、USER MENU
1-1 REJECT LED
1-2 CURRENCYSELECT
1-3 DEFAULT
1-4 DUALUSAGE
1-5 AUTOSTART
1-6 REPEATSTART
1-7 BUZZER
1-8 OFF LCD LIGHT
1-9 MODEKEYSWITCH
1-10 SPEED
1-11 REJECTFULL
1-12 REJECTCHECK
1-13 CNTMODE
1-14 CNTCFCHECK
1-15 ASSIGNOPERATOR
1-16 CURRENCYCF
1-17 MANUALINPUT
1-18 PORT L MODE
1-19 PORT R MODE
1-20 PORT L RATE
1-21 PORT R RATE
1-22 CISSELECT
1-23 SELECTDIGIT
1-24 EXTEMALDISPLAY
1-25 TIMECHECK
1-26 STACKERFULL
1-27 ADDMODE(SDC)
1-28 BATCHMODE(MDC)
1-29 PRINTERCONTROL
1-30 RESERVE
2、Reject note Message

INTRODUCTION
Introduction
Thank you for purchasing our products. The instruction manual contains the
operating procedure precautions for using machine, please read this manual
in detail before use
Hopper
Set notes in this
compartment
Auxiliary Hopper Plate
Guide plates for feeding
the notes to the note
feeding mechanism.
Operation keys
Used to set each
partmenters
Display Panel
The LCD Panel
Reject Stacker
The rejected
notes are stacked
Stacker
The count notes are
stackeed
Interface Connector
Used to connect a
computer or printer(Right
and Left).
USB
Extemal Dis
p
la
y
Power Switch
Power Supply Socket
Gate Adjustment Screw
Adjustment Screw to
help the counting
smooth.

Precautions for Setting Notes
Operation Ke
y
s:
Used to move the next column ,change the value and menu selection
at the user setup or used to change the BATCH value,menu selection
at theuser setup,and move between the setup menu.
Used to select BATCH quantity in
[BATCH Value] 0 5 10 20 25 50 100 200
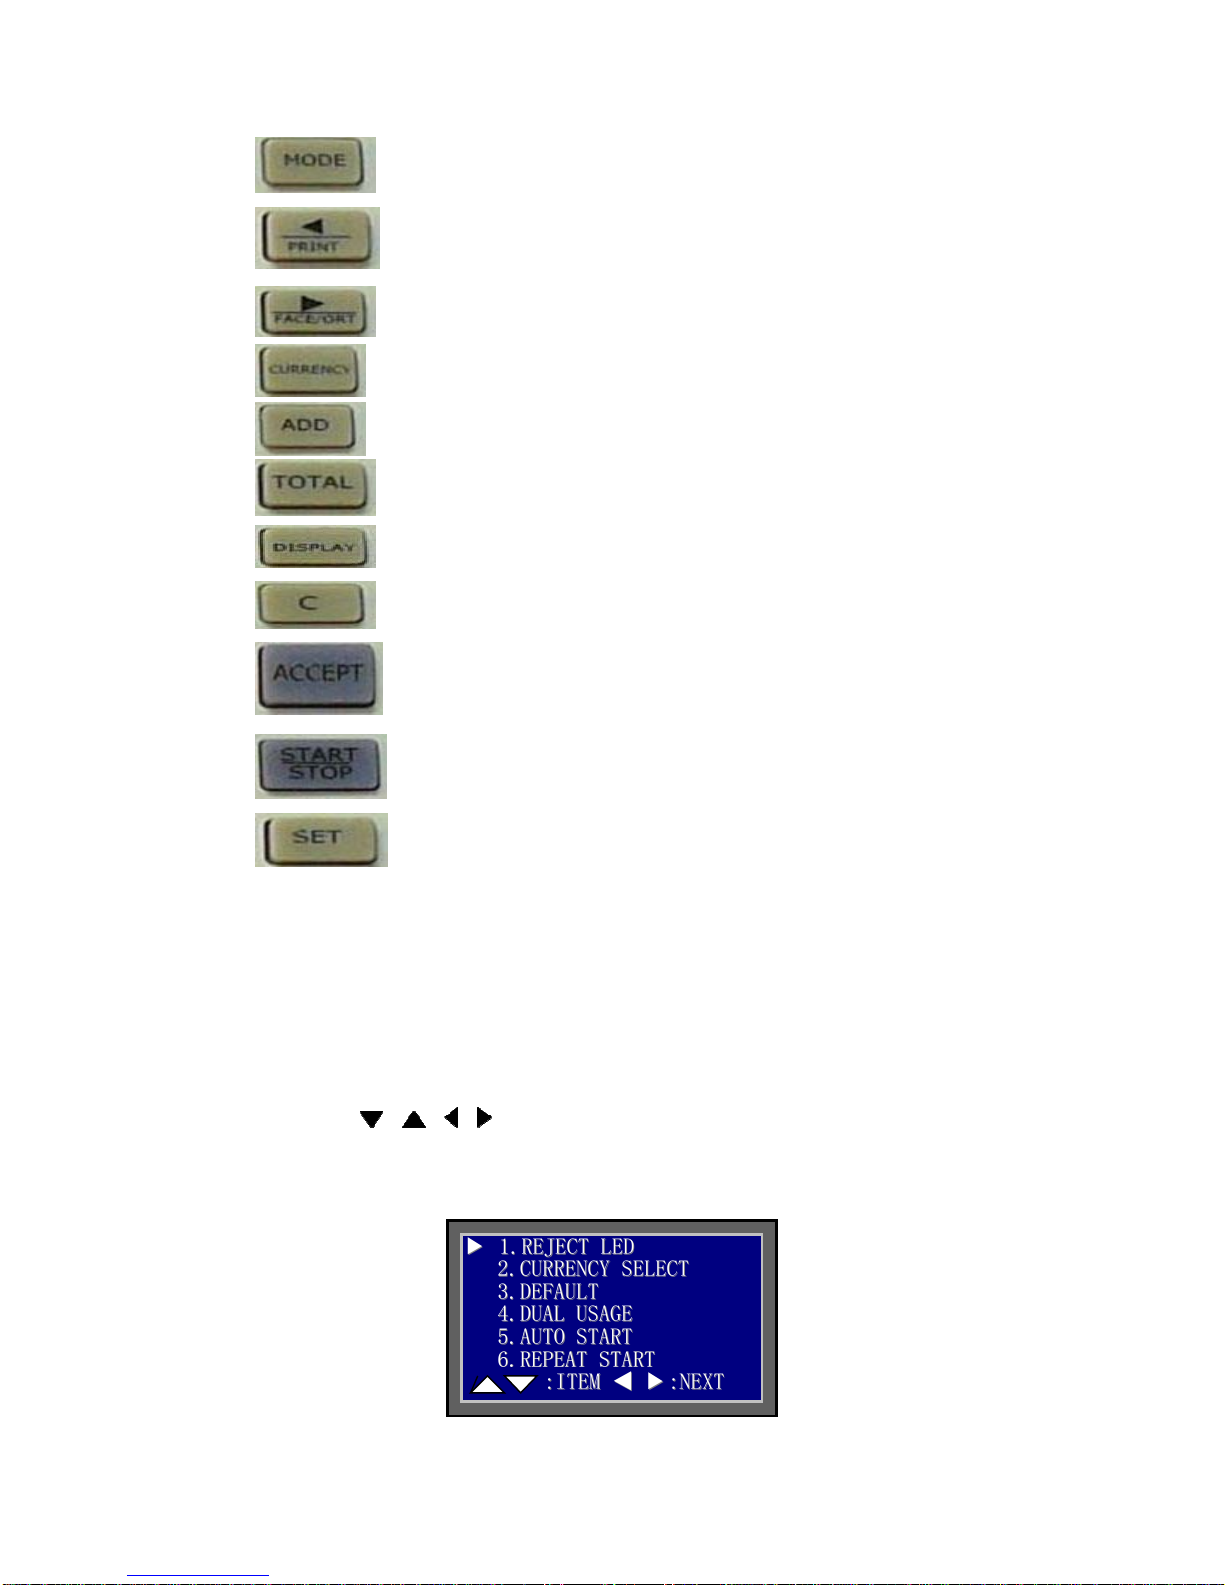
1、USER MENU
Any change to an item in the menu will take the effect only after pressing
ACCEPT button to confirm. Press button C to return to upper level setting.
Press STAR/STOPbutton to exit USER MENU。
Press and hold SET button till User Menu screen shows up
Use , , , buttons to move or change
PressACCEPT to enter each item setting
▼
▼
1
1.
.R
RE
EJ
JE
EC
CT
TL
LE
ED
D
2
2.
.C
CU
UR
RR
RE
EN
NC
CY
Y
S
SE
EL
LE
EC
CT
T
3
3.
.D
DE
EF
FA
AU
UL
LT
T
4
4.
.D
DU
UA
AL
L
U
US
SA
AG
GE
E
5
5.
.A
AU
UT
TO
O
S
ST
TA
AR
RT
T
6
6.
.R
RE
EP
PE
EA
AT
T
S
ST
TA
AR
RT
T
:
:I
IT
TE
EM
M
▲
▲
▼
▼
:
:N
NE
EX
XT
T
Used select from MDC、SDC and CNT Mode.
When a printer is connected,the unit printstheconfirmend data and
grand total value by pressing this key.
Used to select Face/Direction arrangement
Used to select Currency
Used to Add the quantity
Used to display the grand total
Used change the screen between normal and detail screen
Used to clear error or counting data are cleared to 0
Used to confirm the counting value and setup changes
Used to start and stop the counting or finish the user setting
Used to enter the user setup mode, press this key 6
seconds to enter the setting menu

1、Enable/Disable Reject LED on/off Press Accept key to confirm
2、Currency can be selected/de-selected through Left Arrow or Right Arrow button.
Press Accept key to confirm
3、Reset to factory default, Press Accept key to confirm
4、Enable two operators’ sharing
5、Enable/disable Auto or Manual start
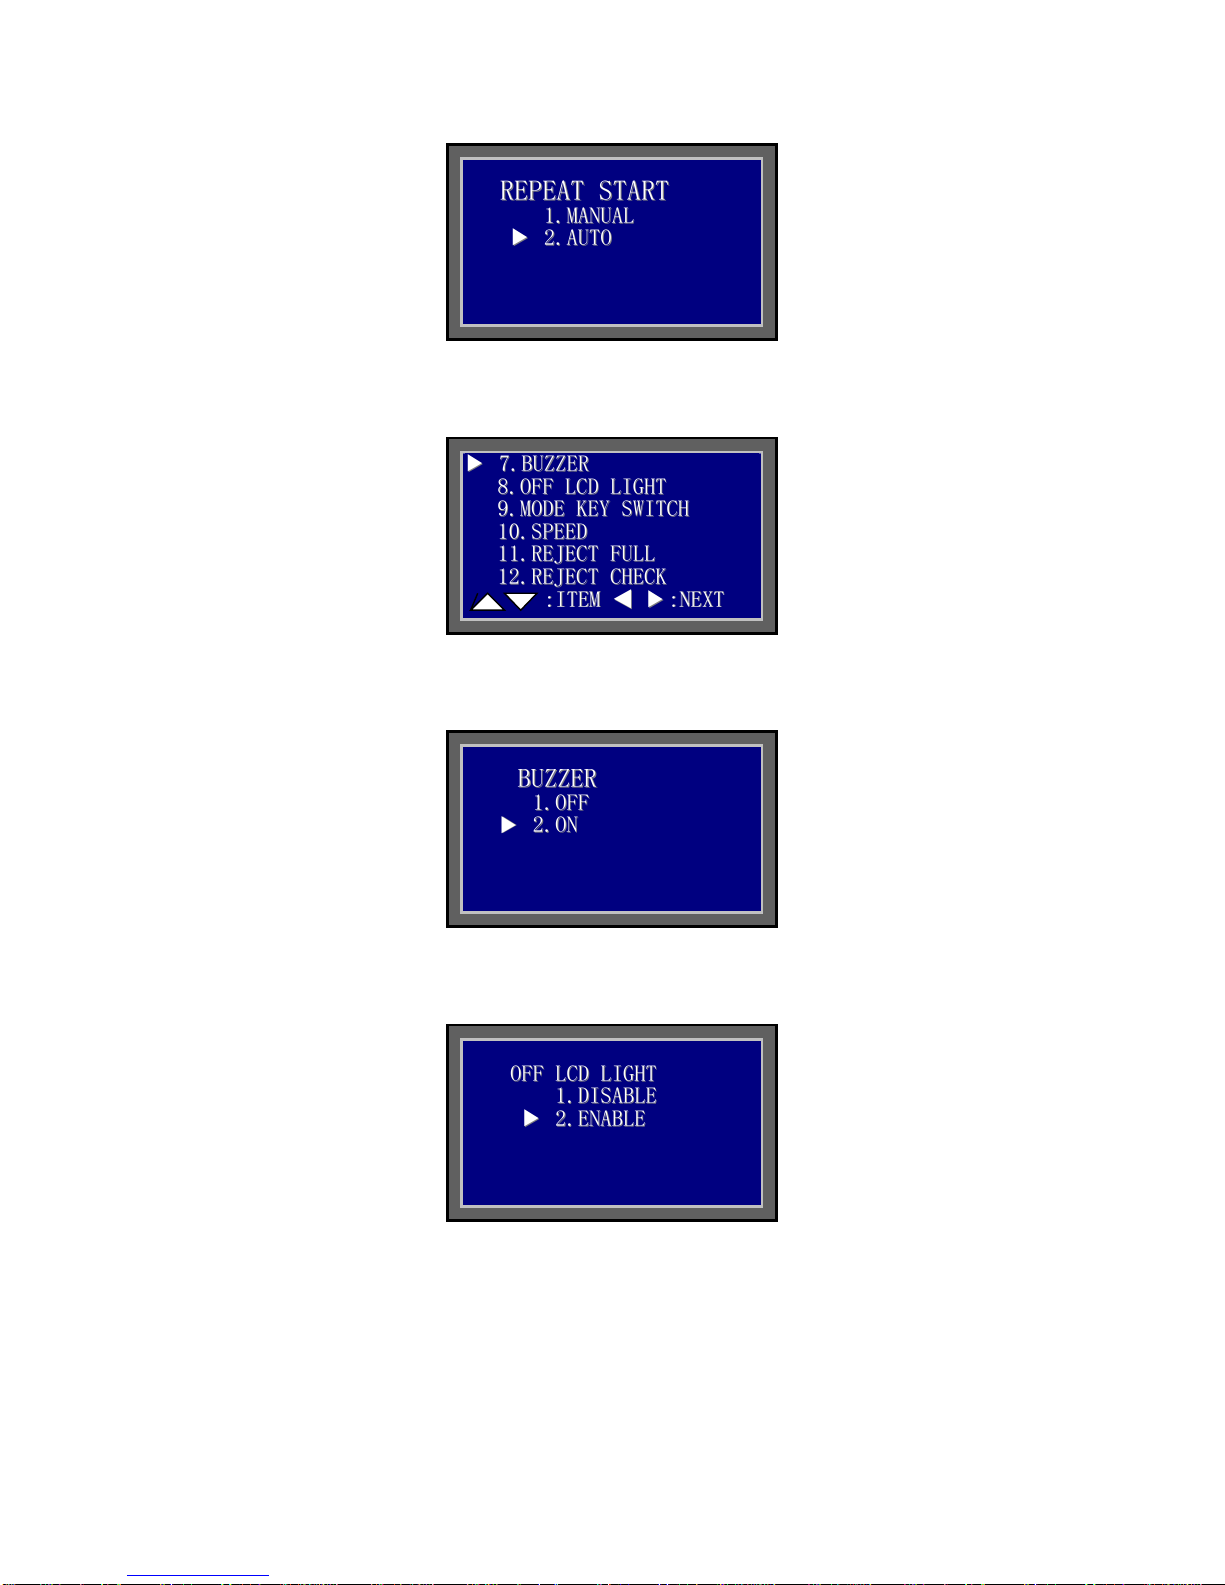
6、At Batch count, enable/disable Auto/Manual repeat start
R
RE
EJ
JE
EC
CT
T
L
LE
ED
D
▼
▼
1
1.
.D
DI
IS
SA
AB
BL
LE
E
2
2.
.E
EN
NA
AB
BL
LE
E
C
C
U
UR
RR
RE
EN
NC
C
Y
YS
S
E
EL
LE
EC
C
T
T
▼
▼
1
1.
.U
US
SD
D
:
:O
ON
N
2
2.
.E
EU
UR
R
:
:O
ON
N
3
3.
.R
RU
UB
B
:
:O
OF
FF
F
D
DE
EF
FA
AU
UL
LT
T
▼
▼
1
1.
.D
DI
IS
SA
AB
BL
LE
E
2
2.
.E
EN
NA
AB
BL
LE
E
A
AU
UT
TO
O
S
ST
TA
AR
RT
T
▼
▼
1
1.
.O
OF
FF
F
2
2.
.1
10
00
0M
MS
S
3
3.
.2
20
00
0M
MS
S
4
4.
.4
40
00
0M
MS
S
7-12
I
IT
TE
EM
M
7、Buzzer On/Off, Press Accept key to confirm
8、LCD backlight On/Off ENABLE – After 5 minutes, enter into sleep mode to
save engergy,Press Accept key to confirm
9、Mode button Lock/Unlock, Press Accept key to confirm
R
RE
EP
PE
EA
AT
T
S
ST
TA
AR
RT
T
1
1.
.M
MA
AN
NU
UA
AL
L
▼
▼
2
2.
.A
AU
UT
TO
O
▼
▼
7
7.
.B
BU
UZ
ZZ
ZE
ER
R
8
8.
.O
OF
FF
F
L
LC
CD
D
L
LI
IG
GH
HT
T
9
9.
.M
MO
OD
DE
E
K
KE
EY
Y
S
SW
WI
IT
TC
CH
H
1
10
0.
.S
SP
PE
EE
ED
D
1
11
1.
.R
RE
EJ
JE
EC
CT
T
F
FU
UL
LL
L
1
12
2.
.R
RE
EJ
JE
EC
CT
T
C
CH
HE
EC
CK
K
:
:I
IT
TE
EM
M
▲
▲
▼
▼
:
:N
NE
EX
XT
T
B
BU
UZ
ZZ
ZE
ER
R
1
1.
.O
OF
FF
F
▼
▼
2
2.
.O
ON
N
O
OF
FF
F
L
LC
CD
D
L
LI
IG
GH
HT
T
1
1.
.D
DI
IS
SA
AB
BL
LE
E
▼
▼
2
2.
.E
EN
NA
AB
BL
LE
E
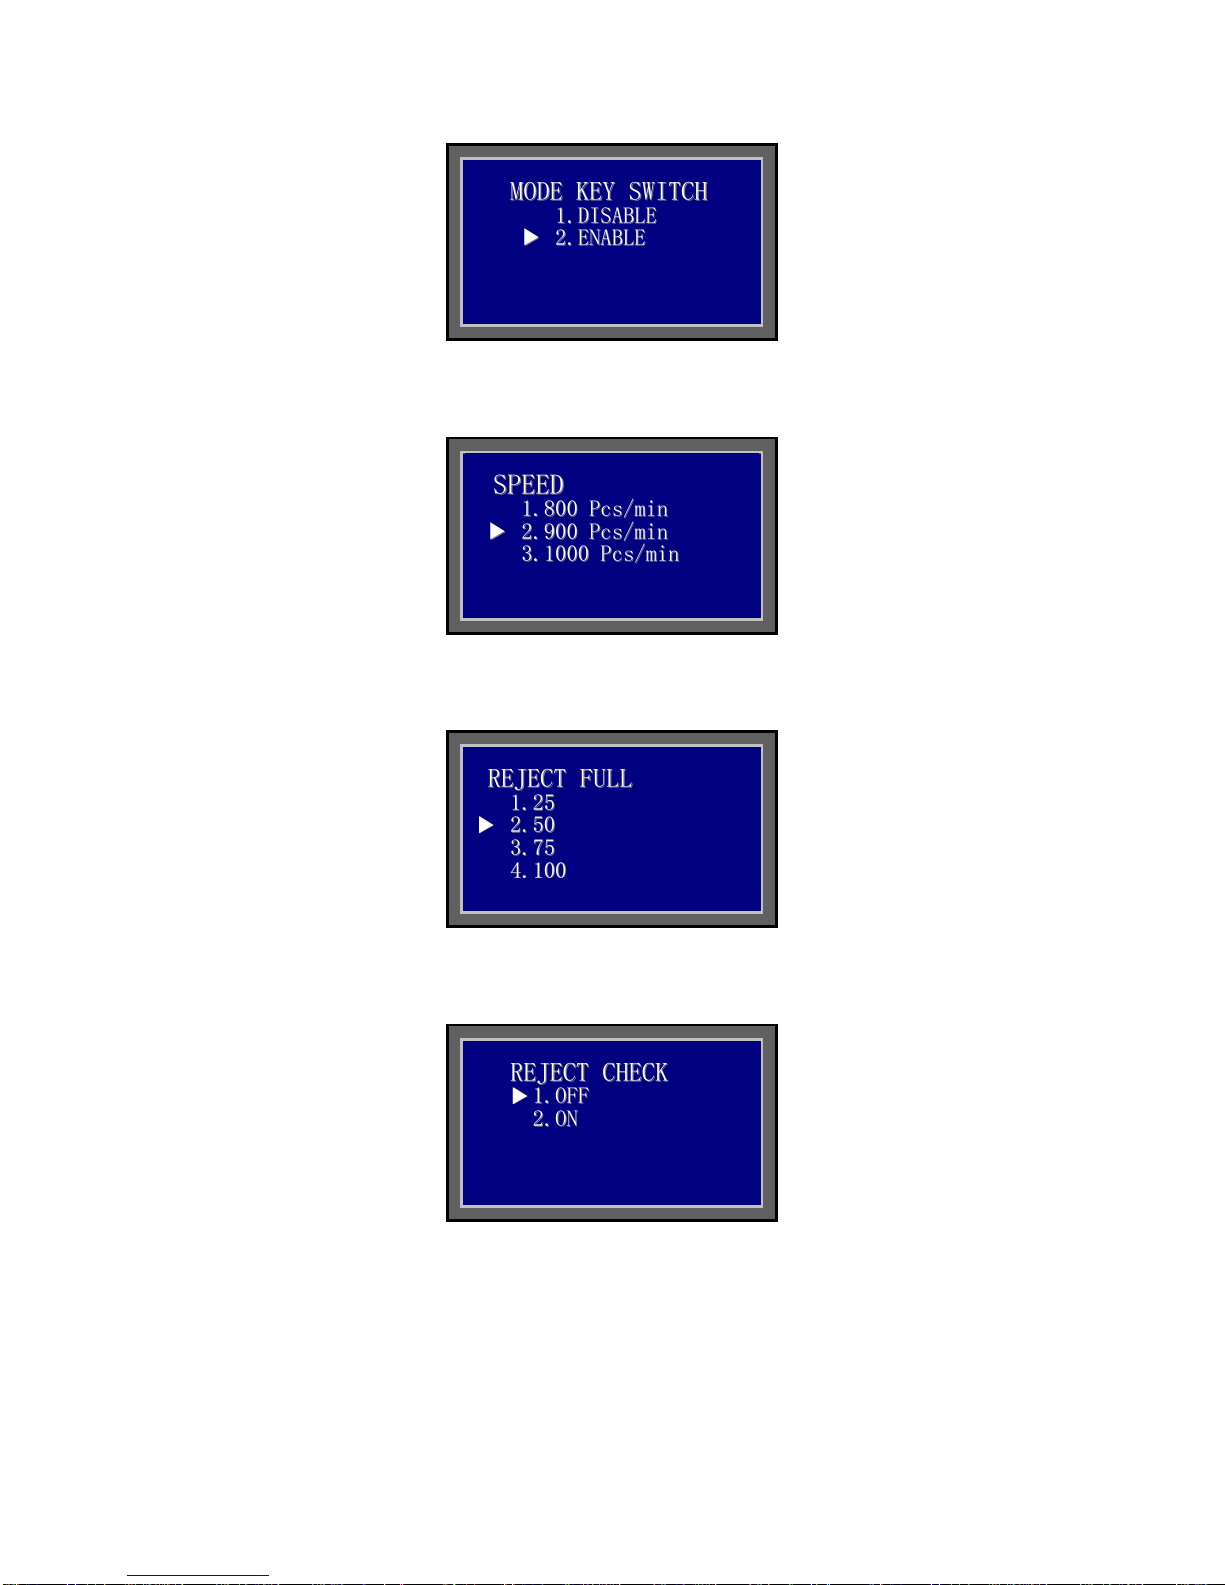
10、Counting Speed Selection, Press Accept key to confirm
11、Select notes to be accommodated in Reject Pocket, Press Accept key to
confirm
12、When enable this function, if there is a note inside of Reject Pocket, the
machine can’t be operated till empty Reject Pocket, Press Accept key to confirm
13-18
I
IT
TE
EM
M
M
MO
OD
DE
E
K
KE
EY
Y
S
SW
WI
IT
TC
CH
H
1
1.
.D
DI
IS
SA
AB
BL
LE
E
▼
▼
2
2.
.E
EN
NA
AB
BL
LE
E
S
SP
PE
EE
ED
D
1
1.
.8
80
00
0
P
Pc
cs
s/
/m
mi
in
n
▼
▼
2
2.
.9
90
00
0
P
Pc
cs
s/
/m
mi
in
n
3
3.
.1
10
00
00
0
P
Pc
cs
s/
/m
mi
in
n
R
RE
EJ
JE
EC
CT
T
F
FU
UL
LL
L
1
1.
.2
25
5
▼
▼
2
2.
.5
50
0
3
3.
.7
75
5
4
4.
.1
10
00
0
R
RE
EJ
JE
EC
CT
T
C
CH
HE
EC
CK
K
▼
▼
1
1.
.O
OF
FF
F
2
2.
.O
ON
N

13、PIECE COUNT MODE enable/disable, Press Accept key to confirm
14、Counterfeit detection On/Off at CNT mode, Press Accept key to confirm
15、Assign Left and Right Operators, Press Accept key to confirm
16、Counterfeit detection sensitivity level setting for current currency count
There are the following 2 settings:
1) Switch On/Off Detections: DD/DF/UV/MG/MT/IR
▼
▼
1
13
3.
.C
CN
NT
TM
MO
OD
DE
E
1
14
4.
.C
CN
NT
T
C
CF
F
C
CH
HE
EC
CK
K
1
15
5.
.A
AS
SS
SI
IG
GN
N
O
OP
PE
ER
RA
AT
TO
OR
R
1
16
6.
.C
CU
UR
RR
RE
EN
NC
CY
Y
C
CF
F
1
17
7.
.M
MA
AN
NU
UA
AL
L
I
IN
NP
PU
UT
T
1
18
8.
.P
PO
OR
RT
T
L
L
M
MO
OD
DE
E
:
:I
IT
TE
EM
M
▲
▲
▼
▼
:
:N
NE
EX
XT
T
C
CN
NT
T
M
MO
OD
DE
E
1
1.
.D
DI
IS
SA
AB
BL
LE
E
▼
▼
2
2.
.E
EN
NA
AB
BL
LE
E
C
CN
NT
T
C
CF
F
C
CH
HE
EC
CK
K
▼
▼
1
1.
.O
OF
FF
F
2
2.
.O
ON
N
A
AS
SS
SI
IG
GN
N
O
OP
PE
ER
RA
AT
TO
OR
R
▼
▼
L
LE
EF
FT
T
:
:
O
OP
PT
T1
1
R
RI
IG
GH
HT
T
:
:
O
OP
PT
T2
2

Press ACCEPT button,
Press ACCEPT button,
The above screen shows the following detections’status:
0-On 1-Off
Apply to all denominations:
1. DD: Length and Width detection
2. DF: Double notes detection
3. UV: Ultra violet detection
4. MG: Magnetic detection
5. MT: Metal Thread detection
6. IR: Infrared
2) Set Each Denomination’s Sensitivity Level of Detections:
DD/DF/UV/MG/MT/IR
D
De
en
no
om
mi
i:
:A
Al
ll
lU
US
SD
D
D
De
en
no
om
mi
i:
:A
Al
ll
lU
US
SD
D
1
1.
.D
DD
D
1
1
2
2.
.D
DF
F
1
1
3
3.
.U
UV
V
1
1
4
4.
.M
MG
G
1
1
5
5.
.M
MT
T
0
0
6
6.
.I
IR
R
0
0
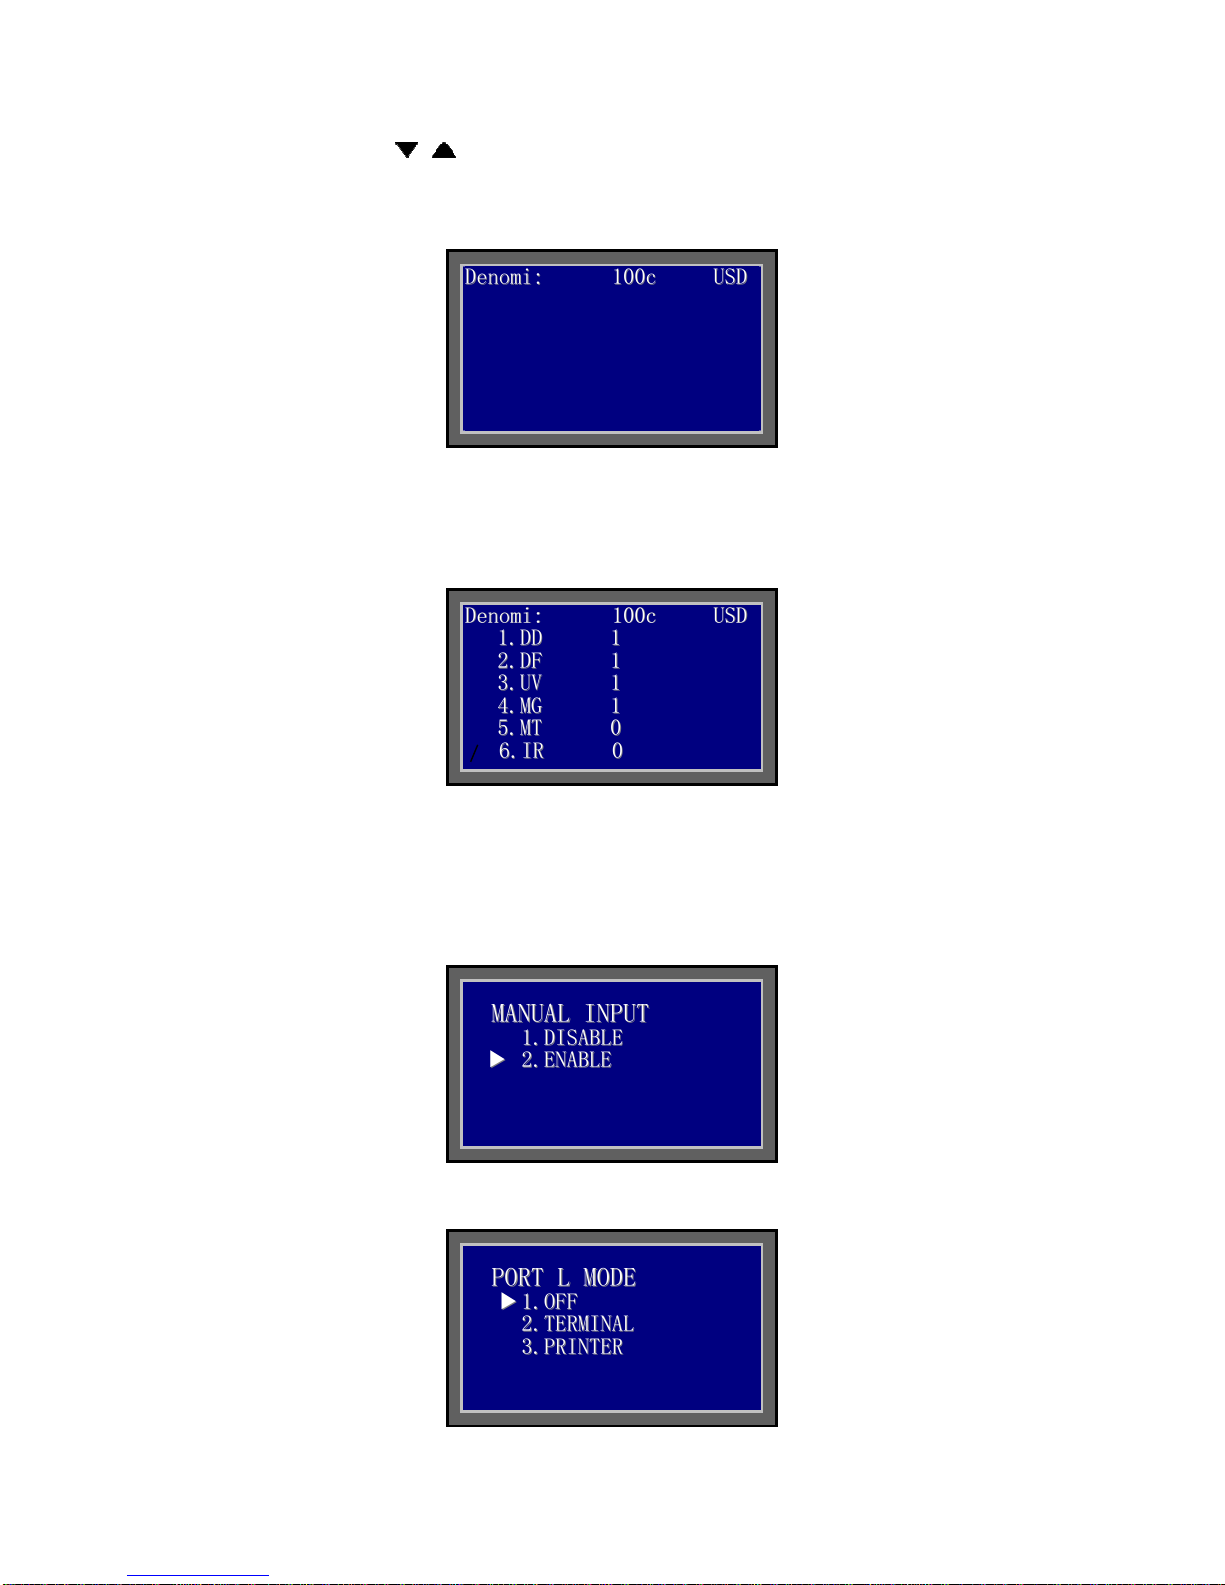
Press button to choose denomination
Press ACCEPT button,
SensitivityLevel: 0 to 9, 0 – off, 1 – less sensitive, 9 – most sensitive
Finally, press ACCEPT button to confirm change
17、Manual Input press ACCEPT button to confirm, Press Accept key to confirm
18、RS232 Left Port Mode: Off/PC, Press Accept key to confirm
D
De
en
no
om
mi
i:
:1
10
00
0c
cU
US
SD
D
D
De
en
no
om
mi
i:
:1
10
00
0c
cU
US
SD
D
1
1.
.D
DD
D
1
1
2
2.
.D
DF
F
1
1
3
3.
.U
UV
V
1
1
4
4.
.M
MG
G
1
1
5
5.
.M
MT
T
0
0
6
6.
.I
IR
R
0
0
M
MA
AN
NU
UA
AL
L
I
IN
NP
PU
UT
T
1
1.
.D
DI
IS
SA
AB
BL
LE
E
▼
▼
2
2.
.E
EN
NA
AB
BL
LE
E
P
PO
OR
RT
T
L
L
M
MO
OD
DE
E
▼
▼
1
1.
.O
OF
FF
F
2
2.
.T
TE
ER
RM
MI
IN
NA
AL
L
3
3.
.P
PR
RI
IN
NT
TE
ER
R
19-24
I
IT
TE
EM
M
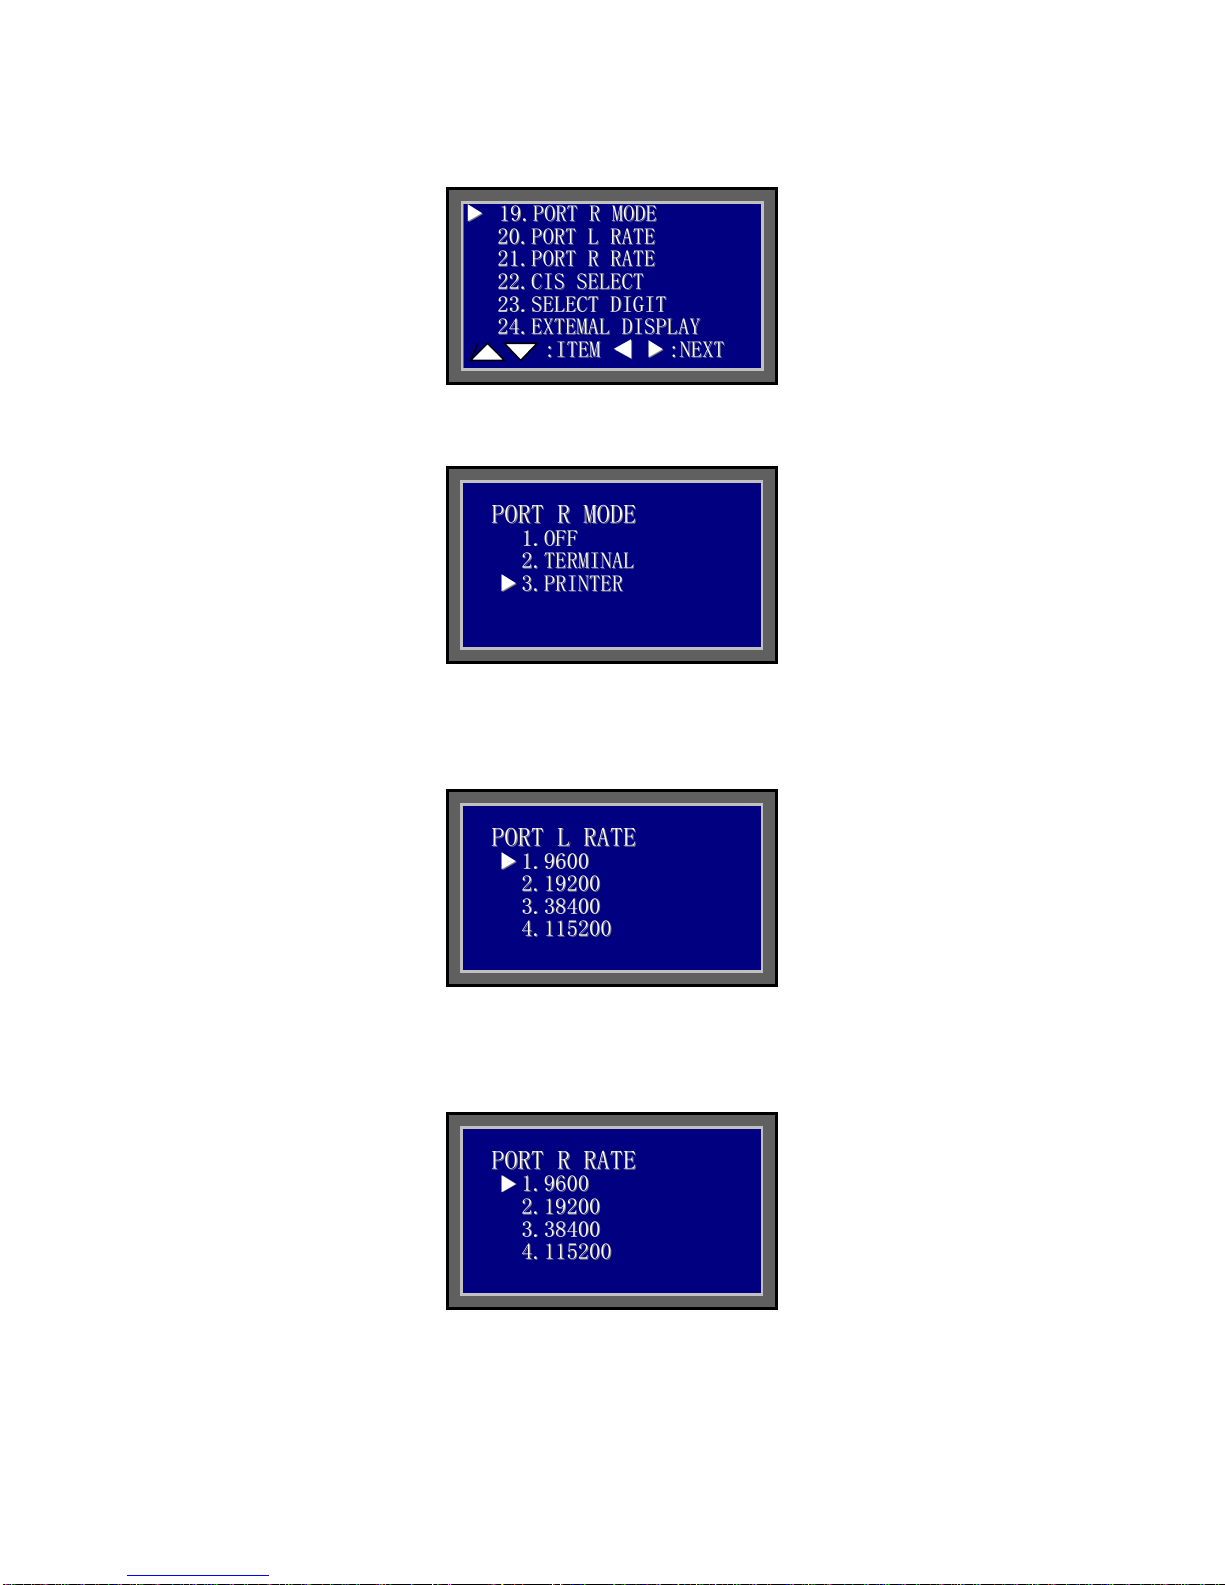
19、RS232 Right Port Mode: Off/Printer, Press Accept key to confirm
20、RS232 Left Port Baud Rate:9600/19200/38400/115200
Print: Data bits:8, Stop bits:1, Parity: none
PC: Data bits:7, Stop bits:1, Parity: none
21、RS232 Right Port Baud Rate: 9600/19200/38400/115200
Print Data bits:8, Stop bits:1, Parity: none
PC: Data bits:7, Stop bits:1, Parity: none
▼
▼
1
19
9.
.P
PO
OR
RT
TR
RM
MO
OD
DE
E
2
20
0.
.P
PO
OR
RT
T
L
L
R
RA
AT
TE
E
2
21
1.
.P
PO
OR
RT
T
R
R
R
RA
AT
TE
E
2
22
2.
.C
CI
IS
S
S
SE
EL
LE
EC
CT
T
2
23
3.
.S
SE
EL
LE
EC
CT
T
D
DI
IG
GI
IT
T
2
24
4.
.E
EX
XT
TE
EM
MA
AL
L
D
DI
IS
SP
PL
LA
AY
Y
:
:I
IT
TE
EM
M
▲
▲
▼
▼
:
:N
NE
EX
XT
T
P
PO
OR
RT
T
R
R
M
MO
OD
DE
E
1
1.
.O
OF
FF
F
2
2.
.T
TE
ER
RM
MI
IN
NA
AL
L
▼
▼
3
3.
.P
PR
RI
IN
NT
TE
ER
R
P
PO
OR
RT
T
L
L
R
RA
AT
TE
E
▼
▼
1
1.
.9
96
60
00
0
2
2.
.1
19
92
20
00
0
3
3.
.3
38
84
40
00
0
4
4.
.1
11
15
52
20
00
0
P
PO
OR
RT
T
R
R
R
RA
AT
TE
E
▼
▼
1
1.
.9
96
60
00
0
2
2.
.1
19
92
20
00
0
3
3.
.3
38
84
40
00
0
4
4.
.1
11
15
52
20
00
0

22、Switch CIS On/Off at CNT mode, Press Accept key to confirm
23、Select digit mark for display and print, Press Accept key to confirm
24、Switch external display On/Off, PressAccept key to confirm
25-30
I
IT
TE
EM
M
25、Set date and time: plus/minus, move cursor, Press Accept key to
confirm
`
C
CI
IS
S
S
SE
EL
LE
EC
CT
T
1
1.
.O
OF
FF
F
▼
▼
2
2.
.O
ON
N
S
SE
EL
LE
EC
CT
T
D
DI
IG
GI
IT
T
▼
▼
1
1.
.O
OF
FF
F
2
2.
.
.
.
3
3.
.,
,
4
4.
.
E
EX
XT
TE
EM
MA
AL
L
D
DI
IS
SP
PL
LA
AY
Y
▼
▼
1
1.
.O
OF
FF
F
2
2.
.O
ON
N
▼
▼
2
25
5.
.T
TI
IN
NE
EC
CH
HE
EC
CK
K
2
26
6.
.S
ST
TA
AC
CK
KE
ER
R
F
FU
UL
LL
L
2
27
7.
.A
AD
DD
D
M
MO
OD
DE
E
(
(S
SD
DC
C)
)
2
28
8.
.B
BA
AT
TC
CH
H
M
MO
OD
DE
E
(
(M
MD
DC
C)
)
2
29
9.
.P
PR
RI
IN
NT
TE
ER
R
C
CO
ON
NT
TR
RO
OL
L
3
30
0.
.Reserve
:
:I
IT
TE
EM
M
▲
▲
▼
▼
:
:N
NE
EX
XT
T
T
TI
IM
ME
E
C
CH
HE
EC
CK
K
2
20
01
13
3-
-0
05
5-
-1
15
5
0
08
8:
:4
45
5
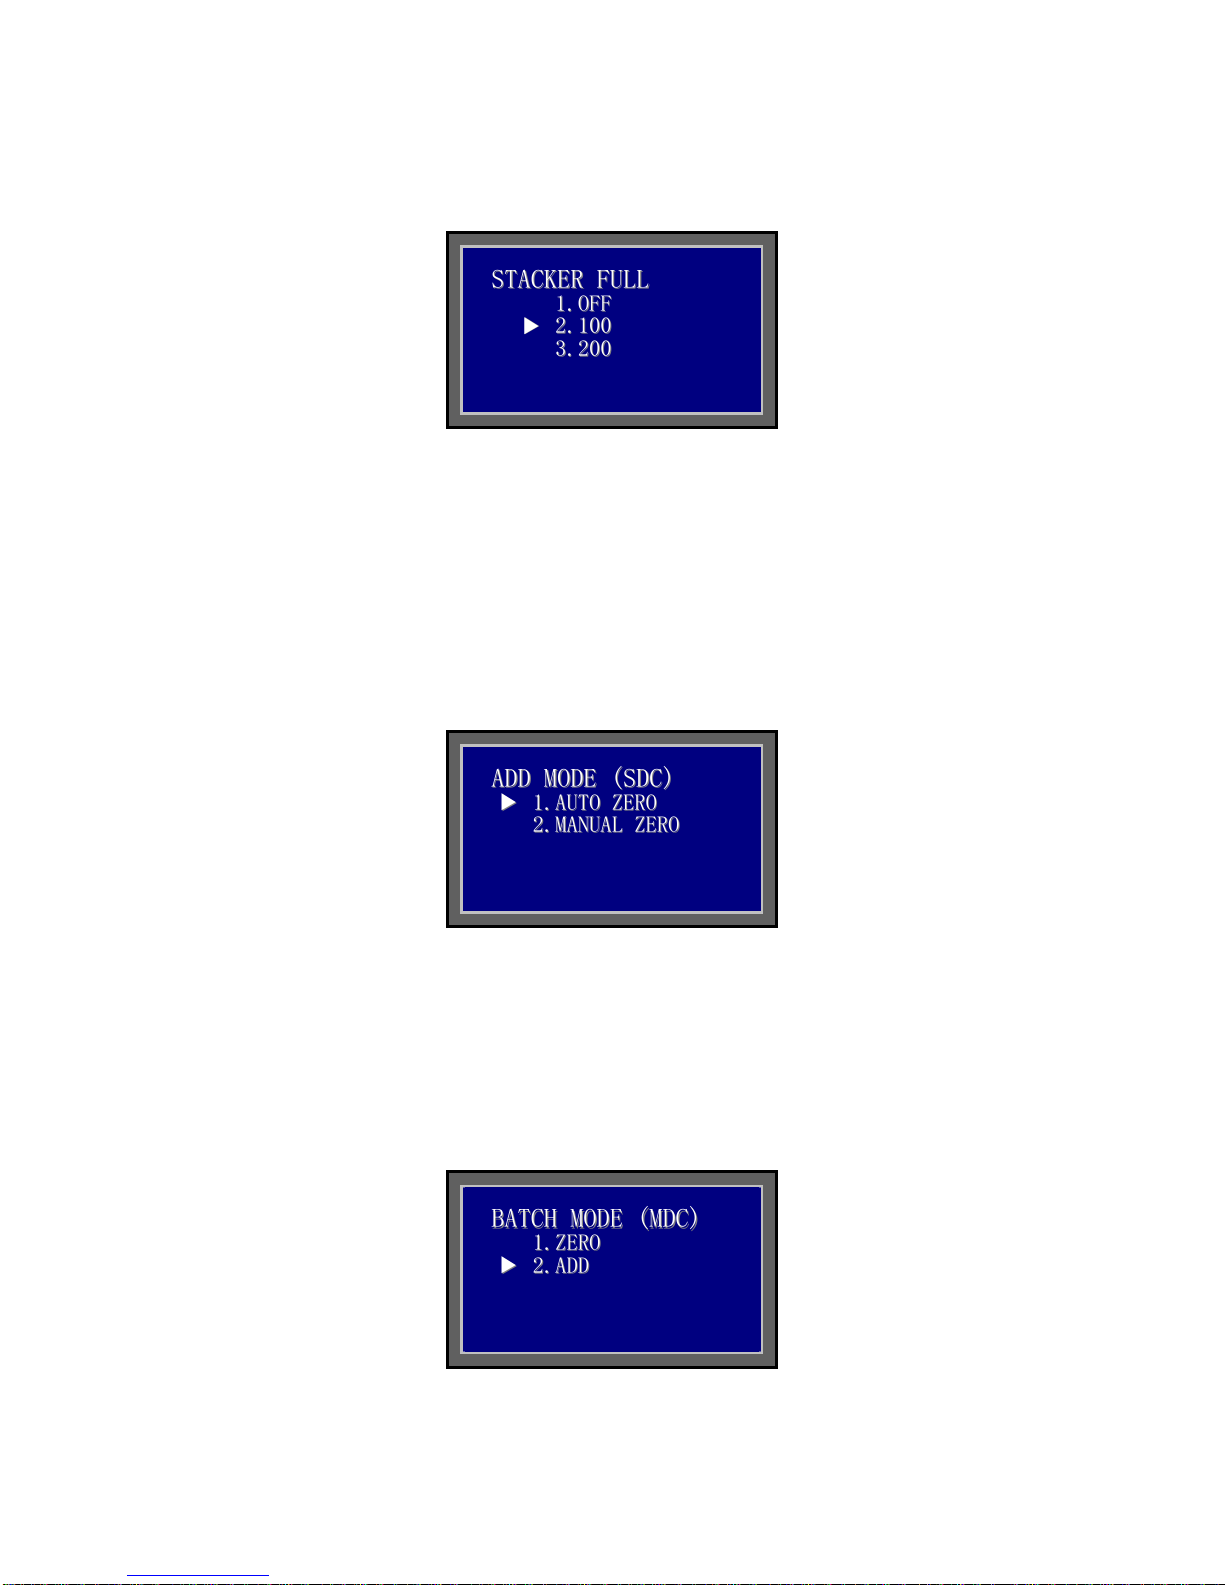
26、When Batch = 0, counting stops when coutning figure reaches stackker full
figure set by this item.
27、ADD mode (SDC)
AUTO ZERO
At SDC mode, ADD function is On, when the following counting
denomination is different to previous counting denomination, the
counting figure showed on the screen is reset to Zero
MANUAL ZERO
At SDC mode, ADD function is On, when the following counting
denomination is different to previous counting denomination, the
counting figure is accumulated until is reset to zero manually
28、BATCH MODE (MDC)
ZERO
At MDC mode, ADD function is on, when doing Batch count, if there is/are note (s)
in Feed Table, the counting figure is rest to zero for each Batch count.
ADD
At MDC mode, ADD function is on, when doing Batch count, if there is/are note (s)
in Feed Table, the counting figure is accumulated for each Batch count.
S
ST
TA
AC
CK
KE
ER
R
F
FU
UL
LL
L
1
1.
.O
OF
FF
F
▼
▼
2
2.
.1
10
00
0
3
3.
.2
20
00
0
A
AD
DD
D
M
MO
OD
DE
E
(
(S
SD
DC
C)
)
▼
▼
1
1.
.A
AU
UT
TO
O
Z
ZE
ER
RO
O
2
2.
.M
MA
AN
NU
UA
AL
L
Z
ZE
ER
RO
O
B
BA
AT
TC
CH
H
M
MO
OD
DE
E
(
(M
MD
DC
C)
)
1
1.
.Z
ZE
ER
RO
O
▼
▼
2
2.
.A
AD
DD
D

29、PRINTER CONTROL
-MODE:
Manual: Press PRINT button to print
AUTO 1: Print stack totals from every good bundle whenever the stacker is
emptied.
AUTO 2: Print bundle totals from every good bundle whenever the
stacker and feed hopper are emptied. (Default)
-REPEAT: 2 – Duplicate, 3 - Triplicate
-LINES: Number of blank lines after each print block (default =5)
-LIST: Print all denominations, or used denominations. By default
only the used denominations are printed.
-LF: Y - LF after CR.
2、Reject note Message
Press key,Enter Rejrct message display, you can know
why the notes were be rejected.
TYPE1: Failure Communication between Image Firmware and Main
Control Firmware or Tine out.
IMAGE: CIS sensor can’t recognize the note rejected at RJ pocket.
MT: Reject due to MT abnormal.
UV: RejectduetoUVabnormal.
MG: Magnetic.
P
PR
RI
IN
NT
TE
ER
R
C
CO
ON
NT
TR
RO
OL
L
1
1.
.M
MO
OD
DE
E
:
:A
AU
UT
TO
O
2
2
▼
▼
2
2.
.R
RE
EP
PE
EA
AT
T:
:1
1
3
3.
.L
LI
IN
NE
ES
S
:
:5
5
4
4.
.R
RE
EP
PE
EA
AT
T:
:A
AL
LL
L
5
5.
.R
RE
EP
PE
EA
AT
T:
:Y
Y
E
ER
RR
R:
:I
IM
MA
AG
GE
E1
1
T
TY
YP
PE
E1
1
1
1
S
SH
HE
EW
W
2
2
C
CH
HA
AI
IN
N
1
1
I
IR
R
2
2
M
MT
T
1
1
M
MG
G
1
1
MG1: Reject due to MT abnormal.
IR: Reject due to change color ink abnormal.
DOUBLE: Reject due to double feed.
CHAIN: Reject due to chain feed. Please Adjust the knob
SKEW: Reject due to skew feed.
TYPE2: Reject when reaching Batch Number
RejDeno: RejectDenomination
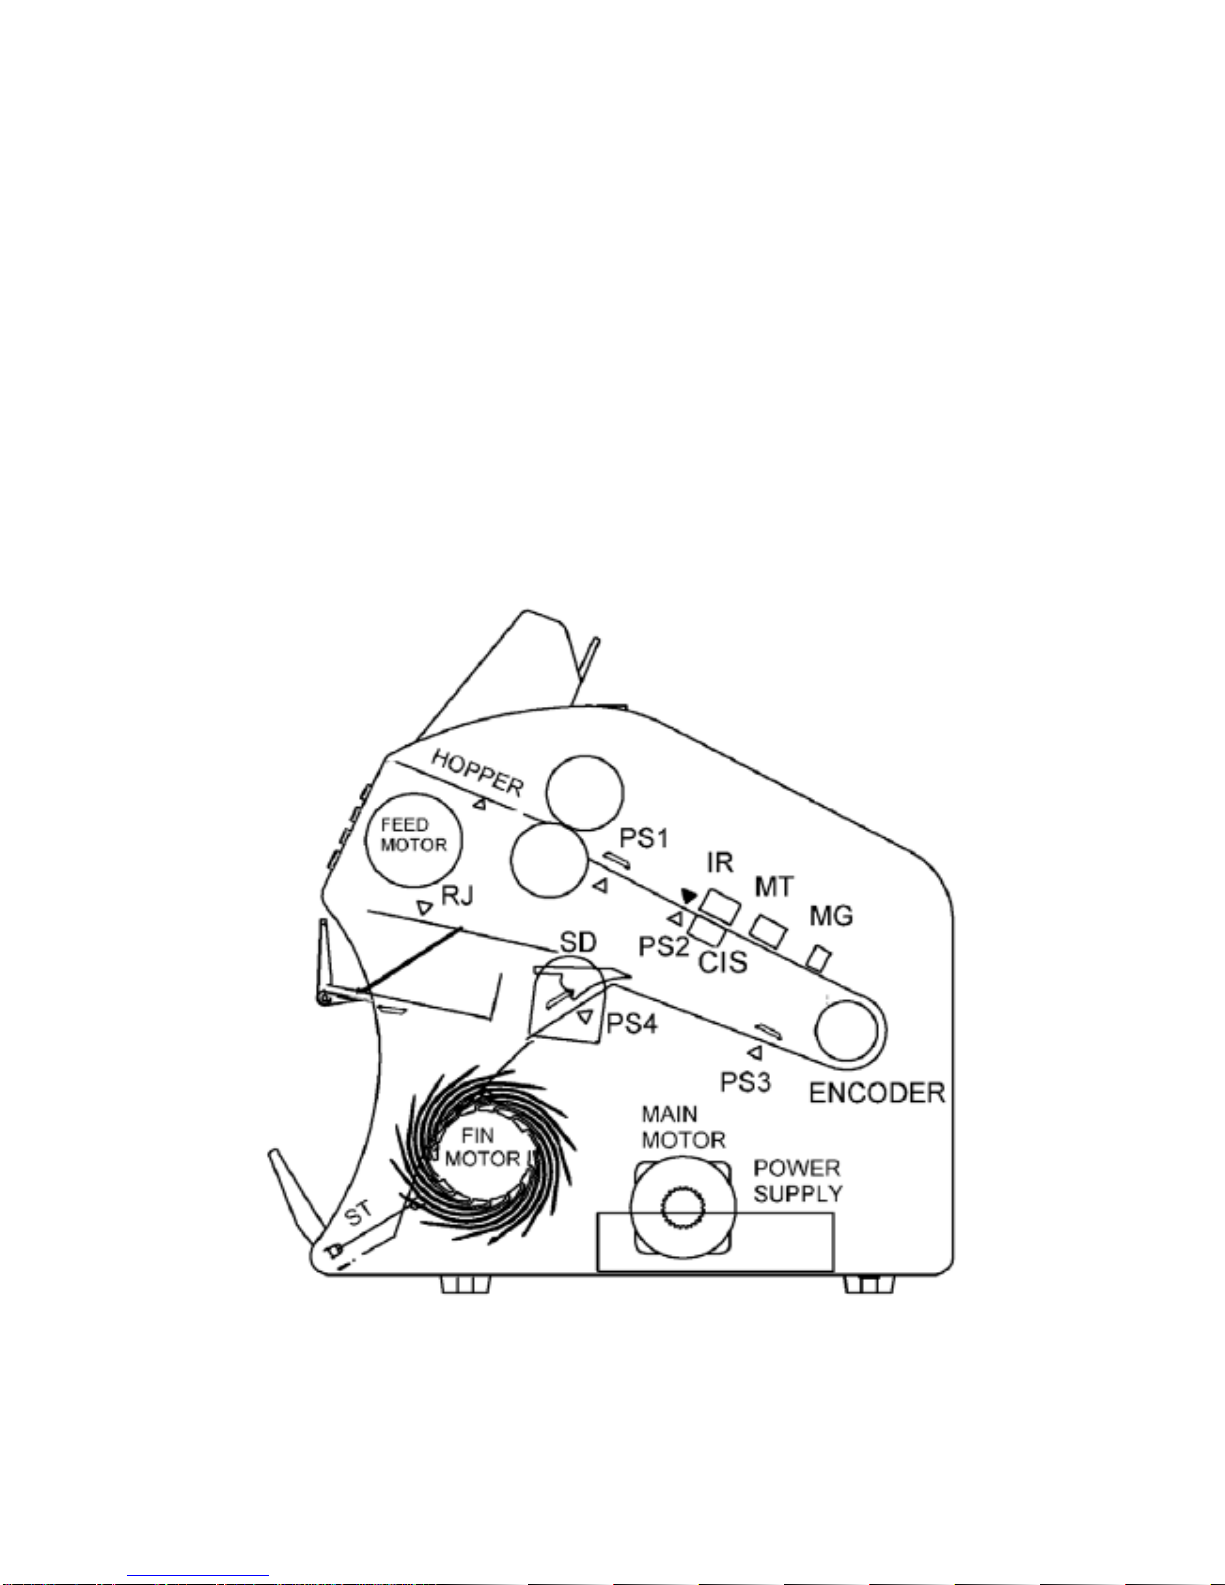
JAM:PS1 Jam at PS1
JAM:PS2 Jam at PS2
JAM:PS3 Jam at PS3
JAM:PS4 Jam at PS4
JAM:CIS Jam at CIS or duty ,please clean the CIS sensor
Table of contents


