eroline MP527JF User manual

V1.0
MP527JF
User’s Manual
Digital Music Player/MP3 Playe
r

i
Table of Contents
Introduction ........................................................................................................................................................................4
Precautions........................................................................................................................................................................5
Product Features ...............................................................................................................................................................8
System Requirements........................................................................................................................................................9
Connecting to a PC..........................................................................................................................................................10
Install Device Driver for Windows 98SE ....................................................................................................................10
Operation Procedure.................................................................................................................................................10
Removing Hardware ................................................................................................................................................. 11
Battery charge..................................................................................................................................................................12
Copy Music Files to the Player.........................................................................................................................................13
Diagram of the Player ......................................................................................................................................................14
Basic Operations..............................................................................................................................................................15
Power On/Off ............................................................................................................................................................15
Power On...........................................................................................................................................................15
Power Off...........................................................................................................................................................15
Key lock ....................................................................................................................................................................15
Music (MSC) ....................................................................................................................................................................17

ii
LCD display ..............................................................................................................................................................17
Key instructions.........................................................................................................................................................17
The submenu in the playing state .............................................................................................................................18
The submenu in the pause state ...............................................................................................................................21
Lyric Display..............................................................................................................................................................22
Record (REC) ..................................................................................................................................................................23
LCD display ..............................................................................................................................................................23
Key instructions.........................................................................................................................................................23
The submenu of the Record mode............................................................................................................................24
Voice (RPL)......................................................................................................................................................................26
LCD display ..............................................................................................................................................................26
Key instructions.........................................................................................................................................................26
The submenu in the playing state .............................................................................................................................27
The submenu in the pause state ...............................................................................................................................28
FM Radio (FM).................................................................................................................................................................30
LCD display ..............................................................................................................................................................30
FM ............................................................................................................................................................................30
FM submenu instructions ..........................................................................................................................................31
FM record .................................................................................................................................................................32

iii
The submenu of the FM Record mode......................................................................................................................32
Settings (SYS) .................................................................................................................................................................35
Folder Navigation (NAV)...................................................................................................................................................37
Firmware upgrade instructions.........................................................................................................................................38
Troubleshooting ...............................................................................................................................................................46
Product Specifications......................................................................................................................................................48

4
We make no representation
for the errors, omissions or updates of this document. We
also make
no representation for the data or music files lost of the player.
Microsoft Windows Media and Windows are trademarks of Microsoft Corporation.
Trademarks of other products mentioned in this user's manual are owned by their respective
companies
or organizations.
Introduction
Congratulations for purchasing the Digital Music Player.
Before operating the unit, please read this manual thoroughly and keep it for future reference. This manual will help you to
use many of the exciting features and to better enjoy your digital music player.
This manual contains important safe measurements and correct operational information, so please read all the information
carefully before using the device in order to avoid any unexpected accident.

5
Precautions
In order to safely use this player, please follow the precautions depicted in this manual. Before using this player, please
thoroughly read and keep it for future reference.
zNever use the player during driving or operating other vehicles to avoid traffic accident, which also be written in the
law in some districts. Even in walking especially crossing the street.
zEven as a pedestrian especially when crossing the street do not listen with a high volume to avoid any danger.
Basically.stop using the player for safety purpose whenever needed.
zPlease plug the earphones prior to turn on the player, to keep the player and earphones in good condition.
zKeep the player clean and never store it close to a heat source or to a dirty, humid or rainy place. Avoid any direct
sunlight contact.
zIf the surface is dirty, please clean it with a soft cloth and clean water. Never clean the case with alcohol or diluents.
zDon't press the screen or the buttons too hard to avoid damages to the player.
zNever use the player in extremely dry environment to avoid static.
zNever disconnect abruptly the player from a PC during downloading, uploading and formatting to avoid program
failure.
zThe step of the folder should be lower than or equal to 8, and a single file can only support 99 files.
zIn order to provide the best access performance, it is not possible to format in FAT-32 in PC if your MP3 flash
memory capacity is equal to or lower than128MB.

6
zAttention: Because of the different memory calculating methods and the storage of the player software in the device
flash memory, it will cause a difference between flash memory marked capacity and real capacity. The real flash
memory capacity is lower than the marked memory capacity. Due to different firmware size, it will have a different
free flash memory capacity. Please refer to the table below for more details.
Marked
capacity Real capacity range Free capacity range
after stored firmware
128MB 122MB~128MB 73MB~127MB
256MB 244MB~256MB 191MB~255MB
512MB 488MB~512MB 428MB~511MB
1GB 953MB~1000MB 879MB~999MB
2GB 1907MB~2000MB 1804MB~1999MB

7
Attention:
1. We are trying to perfect everything on this manual when writing the descriptions, however we cannot ensure there is not
any miss or loss.
2. We take the responsibility to keep in good repair this player; however we cannot take the responsibility for everything
damaged by software operations due to manipulations errors, or even for any data missing during product repaired or
other mistakes.
3. The software, hardware or instruction manual is subject to change and improvements can occur without notice.
All rights reserved.

8
Product Features
zSupports MP3 / WMA audio playback and voice with WAV file format
zSupport voice recording function
zSupport FM Radio function; allow you to set the favorite channel and to record your favorite program.
zSupport multiple languages
zFolder navigation
zPlug and play portable storage
zUSB 2.0 high-speed transmission
zBuild-in Li-Polymer rechargeable battery

9
System Requirements
System requirements of this player:
1. Microsoft® Windows 98SE/2000/Me/XP/Vista™
2. Pentium II 450MHz CPU or higher level CPU
3. Minimum 128MB RAM
4. Available USB port
5. 100MB hard disk free space
6. CD-ROM drive

10
Connecting to a PC
Install Device Driver for Windows 98SE
1. Execute setup.exe in driver CD and complete the driver installation.
2. Reboot the PC.
3. Connect the MP3 player to the USB port of the PC
Operation Procedure
To upgrade firmware or copy music to the player, please shut down the player before connectingt it to the PC via the USB
port.
After connecting to a PC, the system will create a removable drive in “My Computer” and from which the data stored on the
player becomes accessible. The word “Ready” will be shown on the player if successfully connected.
Note: Please do not use USB hub or USB extension lead.
The files stored on the player can be managed through Windows File Explorer or “My Computer” to copy favorite music
files or data to the player; or to delete files stored in the player.
After file access is completed, please follow the steps below to remove the player to prevent file damages.

11
Removing Hardware
Use the left button on the mouse to double-click on the icon for removing hardware that is
located on the lower right corner of the screen. Please refer to the right picture:
When the following screen appears, click “Stop” and then “OK” button to safely remove the hardware. The USB cable can
then be removed from the player, please refer to the picture below:

12
Battery charge
This product adopts build-in Li-Polymer rechargeable battery.
You can connect the MP3 player to the PC or use a USB adapter to charge the battery. The following pictures indicate the
charging status of the battery when connecting to the PC:
Æ
When the battery is charging, the icon will be changing from an empty battery to a full one to indicate the process.
It’s normal that the player gets warmer than usual while being charged.
The battery can be fully charged in approximately 2.5 hours and 80% charged in 2 hours.
Please don’t charge the battery more than 12 hours consecutively.
Note: The MP3 player only accepts the standard USB 2.0 output voltage and current to charge the built-in
Li-Polymer battery: 5-Volt voltage and less than 500mA current. If the charging voltage and current are out of
the compass, it will damage the battery and the MP3 player. It will not be guaranteed in this case. Please
check the output voltage and current of the USB port of your PC or USB adapter before charging this player.
13
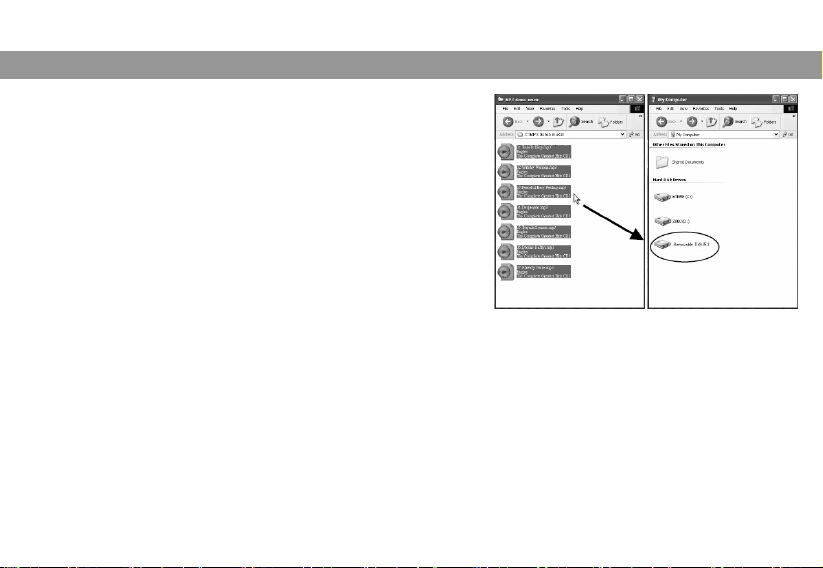
Copy Music Files to the Player
If the connection is successful, a removable drive icon will appear in
“My Computer”.
First, find out your favorite MP3, WMA or WAV audio files in “My
Computer”.
Second, use the mouse to select those audio files and click those files
with the right button of the mouse to select “Copy”.
Third, find Removable Drive in “My Computer” and enter it, then right click on the mouse to paste those files to the
Removable Drive.
After the file copy is completed, safely remove the player from the PC.
14
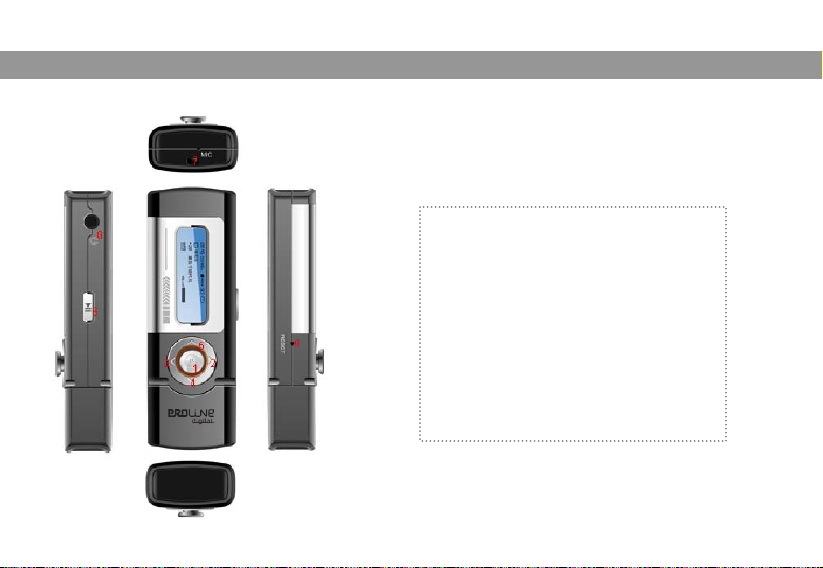
Diagram of the Player
1. MENU button (Five-direction button)
2. Volume Up (Push Upwards)
3. Volume Down (Push Downwards)
4. Forward (Push Rightwards)
5. Rewind (Push Leftwards)
6. Play/Pause/Power button
7. Microphone
8. Earphones jack
9. Reset button

15
Basic Operations
Power On/Off
Power On
The player can be turned on by pressing and holding the Play/Pause/Power button. Then you can enter into the main
menu mode by default after the power-on animation.
Power Off
Press and hold Play/Pause/Power button until the player is fully turned off.
The system will power off automatically if the battery is very low.
Key lock
Key lock is controlled by the software in this player. For details about “key lock”, please refer to the section “Lock time” in
the Settings chapter.
To unlock the buttons, press and hold the Play/Pause/Power button for about 2 seconds.

16
Basic operations
Function Action
Power On Press and hold the Play/Pause/Power button.
Power Off Press and hold the Play/Pause/Power button.
Unlock the button Press and hold the Play/Pause/Power button for about 2 seconds.
Play or pause Press the Play/Pause/Power button.
Enter the menu Press Menu button.
Exit current folder Press Play/Pause/Power button or Press and Hold Menu button.
Navigation within the menu Push leftwards or rightwards the Menu button.
Confirm selection Press the Menu button.
Skip to the previous track/file or
next track/file
Push leftwards or rightwards the Menu button.
Fast forward or rewind Push rightwards or leftwards and hold the Menu button.
Volume up Push upwards the Menu button.
Volume down Push downwards the Menu button.

17
Music (MSC)
LCD display
Key instructions
1. Select “MSC” (Music)
You can enter the music mode by selecting the MSC option from the main menu, and then press Play/Pause/Power button
to begin playing.
2. Play and Pause
During playback, you can press the Play/Pause/Power button to pause or press it again to resume.

18
3. Previous/ Next/ Rewind/ Forward
zPush leftwards the Menu button to skip to the previous track.
zPush rightwards the Menu button to go to the next track.
zPush leftwards or rightwards and hold the Menu button to rewind or fast forward.
4. Volume Up/Down
zPush upwards the Menu button to increase the volume by one unit.
zPush downwards the Menu button to decrease the volume by one unit.
zPush upwards or downwards and hold the Menu button to keep increasing or decreasing the volume.
5. Enter the menu
Press the menu key to open the menu.
The submenu in the playing state
If you press the Menu button during playing, the submenu will appear and includes: Repeat, EQ, Tempo Rate, Replay,
Replay times, Replay gap and Exit.

19
1. Repeat
Seven Repeat methods are supplied in this player.
Normal Play the tracks in normal order.
Repeat One Repeat the current track.
Folder Play all the tracks in the current directory, and then stop.
Repeat Folder Repeat playing all the tracks in the current directory.
Repeat All Repeat playing all the tracks in the player.
Random Play the tracks in the current directory randomly.
Intro Play the first ten seconds of the tracks in the current directory.
2. EQ
Seven equalizer modes are available in this player: Normal, Rock, Pop, Class, Soft, Jazz, DBB.
3. Tempo Rate
The scope of the Tempo Rate is from level -8 to level +8. Level 0 is by default (normal rate).
Note: this function is only for the MP3 files, not for the WMA files, and this setting is only for the current file.
Table of contents
Languages:


 Service manual")