ESDEC CLICKFIT BASIC User manual

EN
MOUNTING SYSTEM FOR PITCHED ROOF WITH TILES
MANUAL
© ESDEC BV 2016
Rev. 09.02.16
mounting system for pitched roof with tiles
for solar panels in landscape setup

Rev. 09.02.16 MANUAL MOUNTING SYSTEM FOR PITCHED ROOF WITH TILES
TABLE OF CONTENT
pag
1. Introduction 1
2. General installation conditions 1
3. Product description 3
4. Parts overview 3
4.1 Exploded-view 3
4.2 Bill of materials 4
5. Mounting preparation 5
5.1 Monitoring tools and accessories 5
5.2 Determining position of solar panels and measuring 6
5.3 Cleaning roof 6
6. Installation 7
6.1 Preinstall connecting strips 7
6.2 Attaching roof hooks 8
6.3 Attaching mounting rail 9
6.4 Mounting 1ste solar panel onto the rail 10
6.5 Mounting other solar panels onto the rail 11
6.6 Final assembly / multiple rows under each other 12
7. Annex 13
THIS INSTALLATION MANUAL SHOULD BE RETAINED WELL FOR FUTURE REFERENCE!
For the duration and conditions regarding warranty we recommend contacting your dealer. Furthermore, we refer to our General
Terms and Conditions of the sale which are available on request.
The manufacturer declines all responsibility for damage or injury resulting from failure to strictly follow this installation manual and
failure to observe normal caution in handling, installation and use of the ClickFit mounting system.
As a result of constant efforts to improve it may happen that the product differs in detail from what is described in this manual. For
this reason the given instructions serve only as a guideline for installing the product mentioned in this manual.
This manual has been prepared with all due care, but the manufacturer can not be held responsible for any errors in this manual or
the consequences thereof.
In addition, all rights are reserved and nothing may be reproduced from this manual in any way.

01
Rev. 09.02.16 MANUAL MOUNTING SYSTEM FOR PITCHED ROOF WITH TILES
1. Introduction
This manual describes the installation of the ClickFit mounting system for a pitched roof with tiles (for solar panels in
landscape setup).
Read the manual carefully so you are fully informed of the contents of the manual. Follow the instructions in the manual
carefully. Perform the operations in the correct order.
Keep the manual in a safe and dry place. Should the manual get lost then there is the possibility to request a new one from
Esdec BV.
2. General installation conditions
In general
Non-compliance with the requirements mentioned in this document may result in invalidation of all warranty and product liability claims.
The data, comments and opinions in this document are binding and must be checked for completeness and timeliness.
Esdec BV reserves the right to modify this document without notice.
Stability and condition of the roof
The roof should be in good condition and strong enough to bear the weight of the solar panels incl. the additional materials, wind and
snow loads. Check the stability of the roof and adjust the roof / construction where necessary, in in doubt contact a manufacturer. Ensure
that the load reserve of the roof is exceeded not locally or in its entirety.
Safety Warnings
• The installation of the ClickFit mounting system should standard be performed by qualied technical personnel (at least 2 skilled
people).
• Adding or removing parts may have an adverse effect on the functioning and is not advised!
• For placement of the solar panels the roof should be clean, dry, at and free from algae etc.
• Avoid mounting with strong winds and a slippery wet roof surface.
• Work on a pitched roof always with fall protection, and if necessary with safety nets and edge protection.
• Slide the tiles up so recesses arise, in where you can place your feet. Be aware: Never stand in the gutter.
• Wear shoes with reinforced toe and sturdy non-slip soles.
• Always wear proper protective clothing when performing the work.
• Always use a lifting aid / lift installation when moving the equipment (solar panels, etc).
• Always place a ladder on a rm stable surface.
• Always place the ladder at an angle of about 75º and leave it sticking out about 1m above the roof edge.
• If possible, secure the ladder to the top with a rope or strap.
• Preferably work according to manual “work safely on roofs”.
Scope ClickFit
• Wind zone (1 t/m 3)
• Roof height (3-9m) When your roof is higher you should contact your supplier.
• Type of roong: Pitched roof with tiles
• Roof pitch: Between 15 - 60 degrees (35 degrees is best)
Edge zone
The distance from the solar panels to the ridge and gutter should be at least 30 cm due the wind load.
The distance from solar panels to the side of the roof should be at least 30 cm. There shouldn’t be solar panels in this area, in its entirety
nor in part.
Dimensioning
All dimensions and sizes are in cm unless stated otherwise.

Standards, requirement and regulations
Upon installation of the mounting system, it is important to follow the installation instructions and the related standards for
the prevention of accidents. In particular, observe the following standards, requirements and regulations:
• Building Decree Construction
• PPE Personal Protective Equipment
• KEMA Testing of Electrotechnical Materials
• DIN 1055 Design loads for buildings
• DIN 18299 General rules for all construction sectors.
• DIN 18451 Scaffolds
Removal and disassembly
Remove the product according to local laws and regulations.
Warranty
Warranty according to warranty conditions and terms of Esdec BV. These can be found on the website www.esdec.nl.
Liability
The manufacturer accepts no liability for damage or injury caused by
not (strictly) observing the safety regulations and instructions in this manual or by
carelessness during installation of the product described in this document and any related accessories.
• subject to misprints
02
Rev. 09.02.16 MANUAL MOUNTING SYSTEM FOR PITCHED ROOF WITH TILES

3. Product Description
The ClickFit mounting system consists of patented roof hooks, mounting rails and the necessary installation materials to
mount the solar panels in landscape setup onto the mounting rails.. The ClickFit mounting system for a tiled roof can be
used for all types of tiled roofs regardless of the type of tile. For the different tiles 3 types of hooks are available: standard
(30-39 mm) / medium (40-50 mm) / wide (51-63 mm).
Roof fastening
The roof hooks are attached to the battens. Because the roof hooks are not attached to the roof spars or rafters, one can
determine freely the location of the solar panels on the roof. Differences in height in the roof can easily be lled by means of
the adjustable roof hook.
Attachment of the mounting rail
The mounting rail is attached to the roof hooks by means of a screw connection.
Attachment of the panels
The solar panels are attached by means of universal module clamping plates, end clamps and mounting screws. The
mounting screws are screwed directly into the mounting rail in which is a special thread is installed.
4. Parts overview
4.1 Exploded-view
03
Rev. 09.02.16 MANUAL MOUNTING SYSTEM FOR PITCHED ROOF WITH TILES
7
5
4
3
2
11
10
8
1
6
9
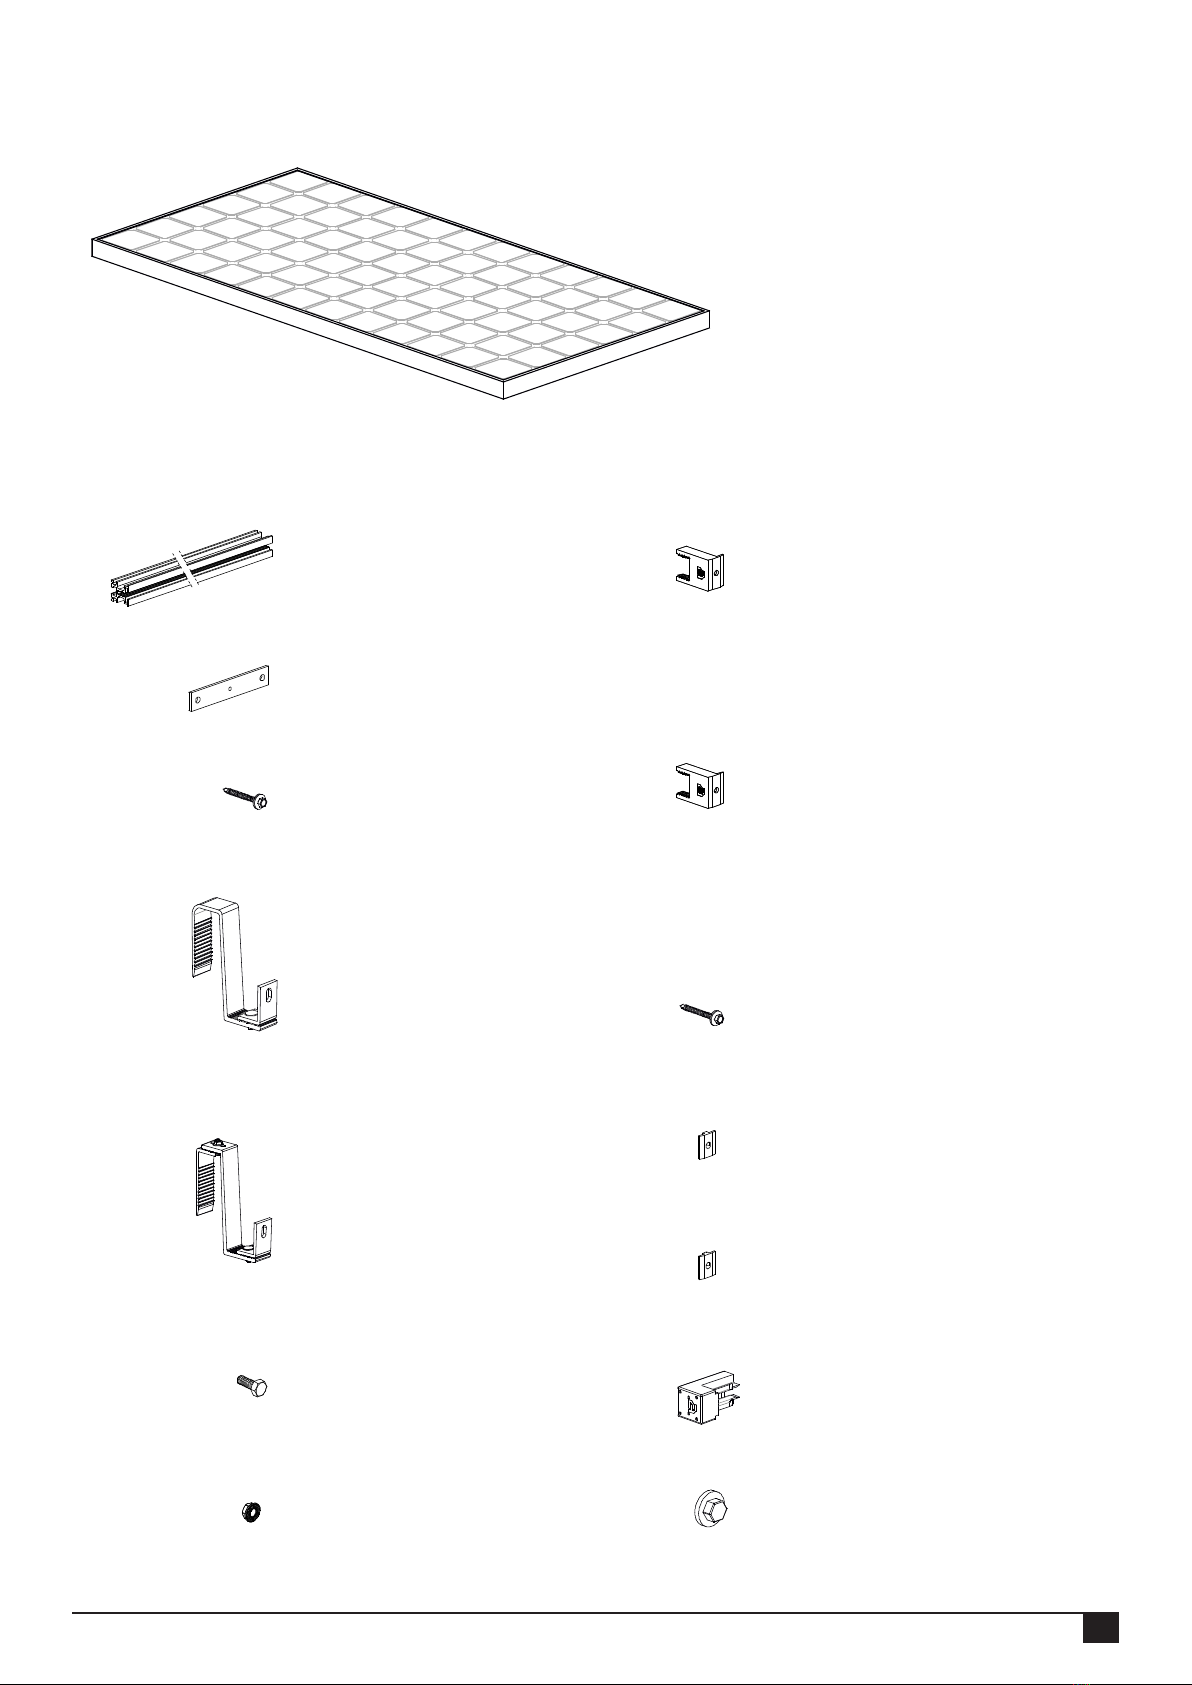
4.2 Bill of materials
04
Rev. 09.02.16 MANUAL MOUNTING SYSTEM FOR PITCHED ROOF WITH TILES
1. Solar panel
5. RVS Hex bolt M8 x 20
Article nr: 100-0820
6. RVS Hex ange bolt M8
Article nr: 100-0721
2. Mounting rail
Article nr: 100-1001
3. Connection strip pro
Article nr: 100-3040
7. End clamp
End clamp CFA
Article nr: 100-3003
End clamp CFB
Article nr: 100-3004
For type see annex ch. 7
8. Mounting screw 6,5 x__
Article nr: 100-65__
For type see annex ch. 7
9. Module clamping plate
Article nr: 100-3020
4. Roof hook adjustable
Roof hook standard HVG (30-39mm)
Article nr: 100-2003
Roof hook medium HVG (40-50mm)
Article nr: 100-2012
Roof hook wide HVG (51-63mm)
Article nr: 100-2022
10. End cap Black (optional)
Article nr: 100-3030
11. Color cap Black (optional)
Article nr: 100-6500
7A. End clamp Black (optional)
End clamp CFA Black
Article nr: 100-3013
End clamp CFB Black
Article nr: 100-3014
For type see annex ch. 7
9A. Module clamping plate Black
(optional)
Article nr: 100-3021
3A. Mounting screw 6,5 x 19
Article nr: 100-6519
4A. Roof hook Multi HVG (30-63mm)
(optional)
Article nr: 100-2033
1
2
3
4
5
6
5. Mounting preparation
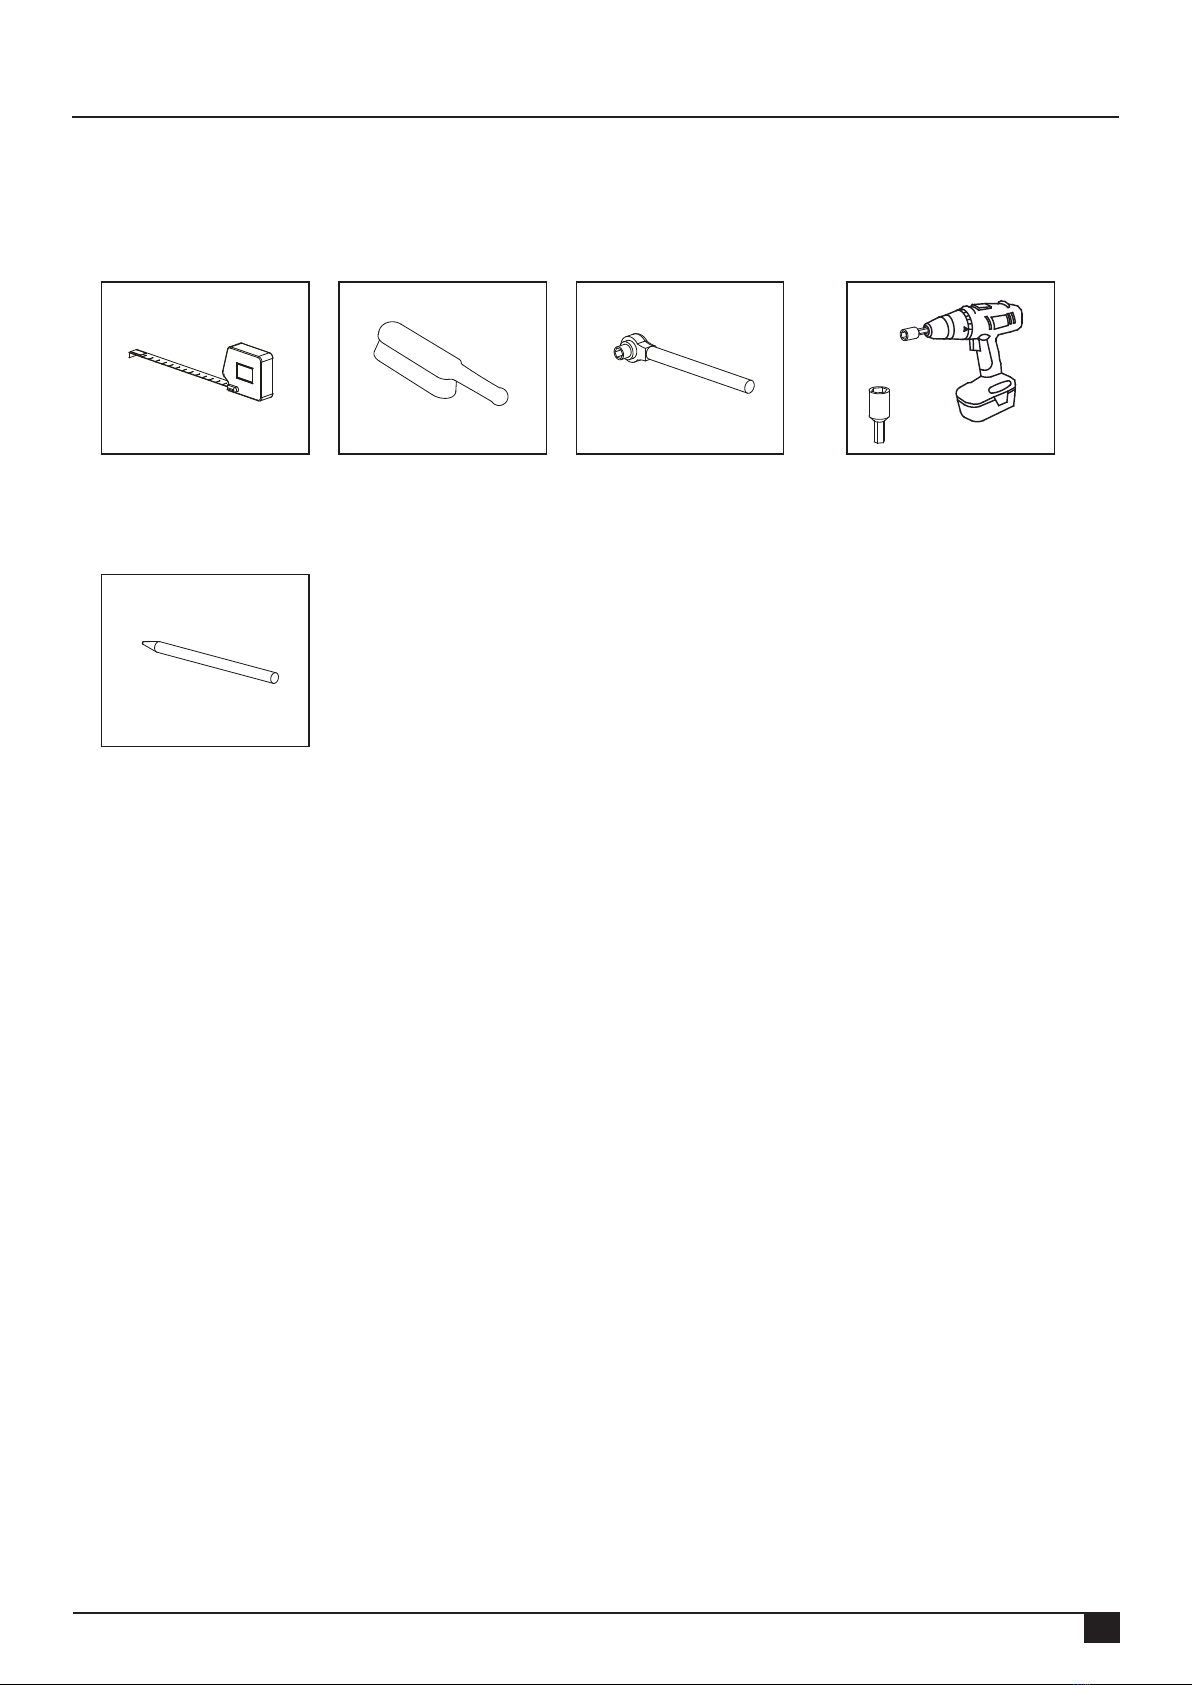
5.1 Monitoring tools and accessories
or
S10 / S13 S10 / S13
Scaffold or stable safe
ladder
Here is a list of necessary tools / utilities:
Measuring tape Brush Ratchet with hex cap Cordless Screwdriver
Marker / chalk
05
Rev. 09.02.16 MANUAL MOUNTING SYSTEM FOR PITCHED ROOF WITH TILES

5.2 Determining position of solar panels and measuring
In the determination of the position of the solar panels on the sloping roof, it is very important to pay attention to the sunlight
coming in throughout the day and throughout the year. Place the solar panels on a roof surface which has no shadow.
Shadow of a chimney, dormer, trees and nearby buildings have an adverse effect on the amount of energy generated by the
solar panels.
Measuring and marking
For the placing of the solar panel (in landscape setup), you need approximately an area of 160x80 cm or 160x100 cm or
200x100 cm per panel (depending on the type of solar panel).
Make sure that around the solar panels on the roof 1 tile is kept free. This equates to approximately 30 cm from the ridge
and the gutter and 30 cm from the sides in connection with wind load.
Mark the contours of the panel surface onto the tiles with chalk or a marker. Mark the lines where the hanger bolts should
be placed (on 1 / 4th of the side border of the panel). Then mark where the roof hooks should be placed.
06
Rev. 09.02.16 MANUAL MOUNTING SYSTEM FOR PITCHED ROOF WITH TILES
5.3 Cleaning roof
Clean the tiles of the pitched roof with a brush.
Remove algae, moss, etc. to reduce imperfections to a minimum during installation!
min. 30 cm
min. 30 cm
min. 30 cm
min. 30 cm
6. Installation
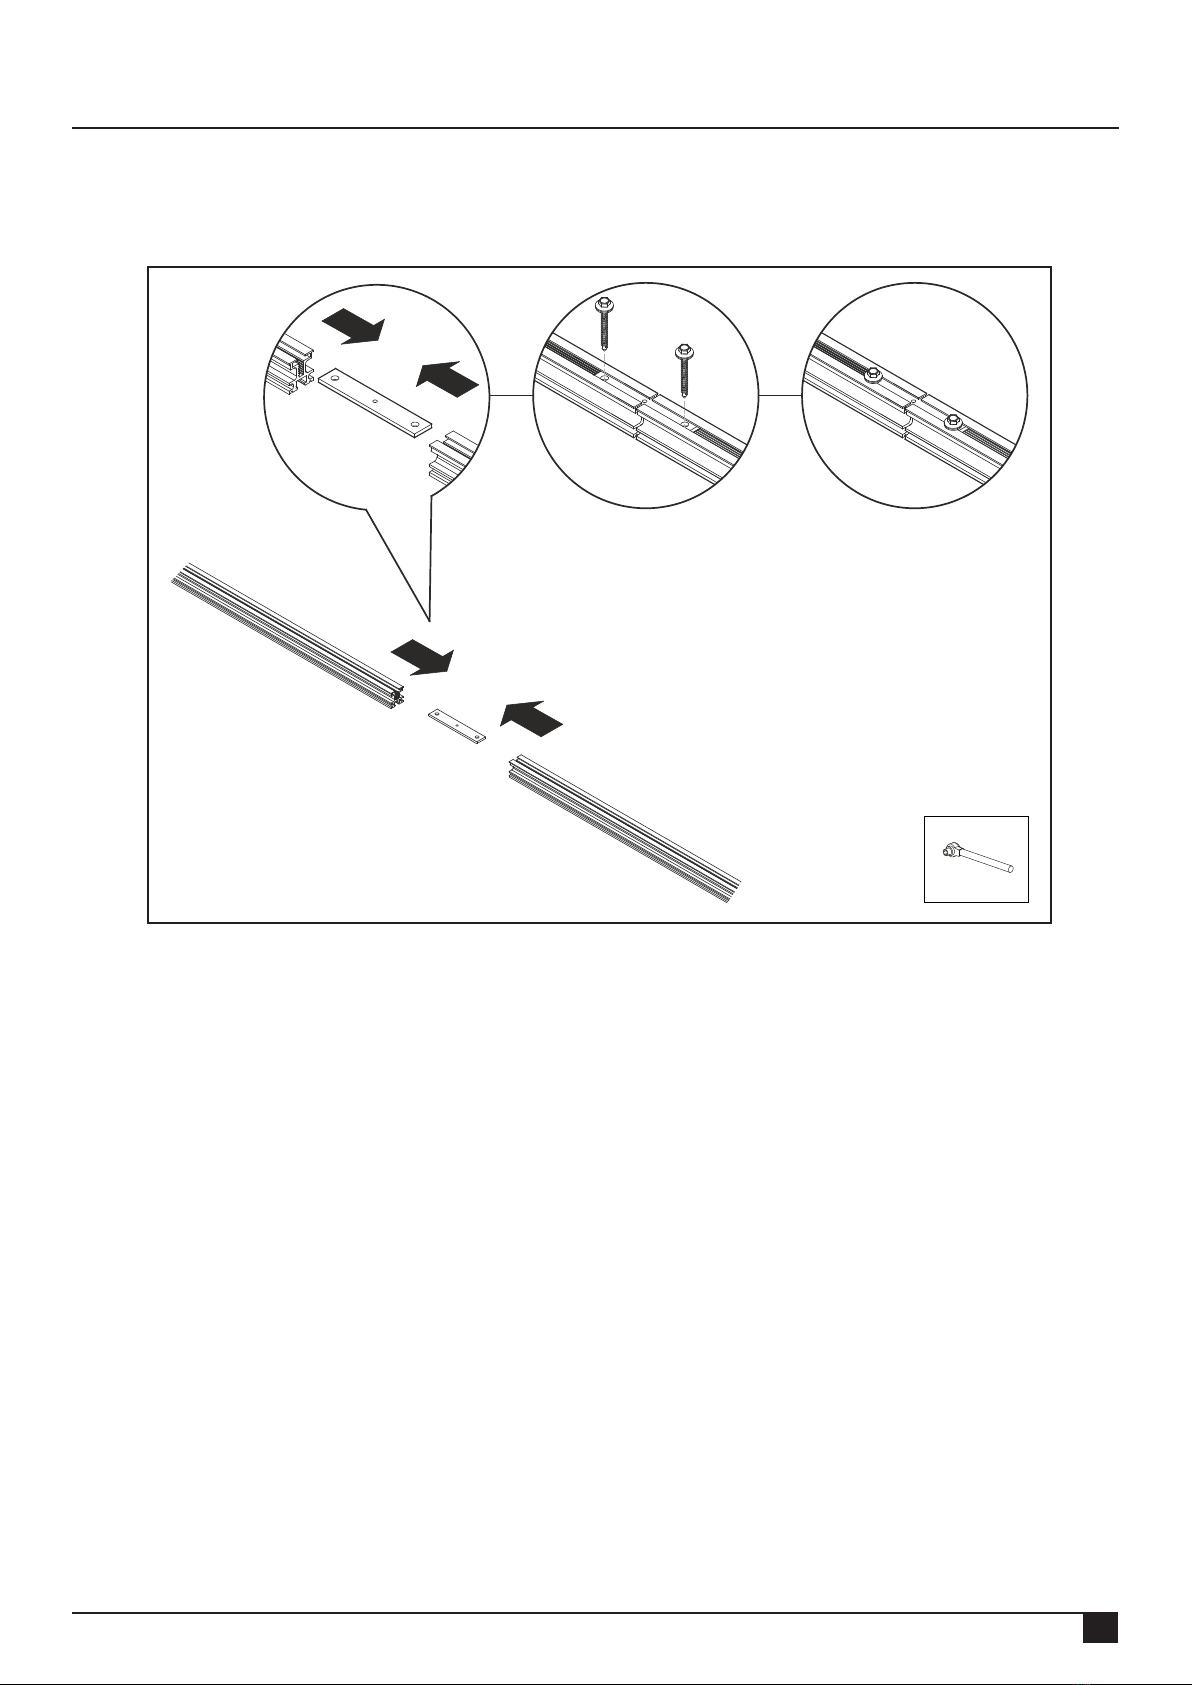
6.1 Preinstall connecting strips
You can attach the mounting rails to each other with the supplied connection strips.
Slide the connection strip into the side of the mounting rail and x this using the supplied mounting screws 6.5x19.
The tightening torque of the screw connections is 4,5Nm.
07
Rev. 09.02.16 MANUAL MOUNTING SYSTEM FOR PITCHED ROOF WITH TILES

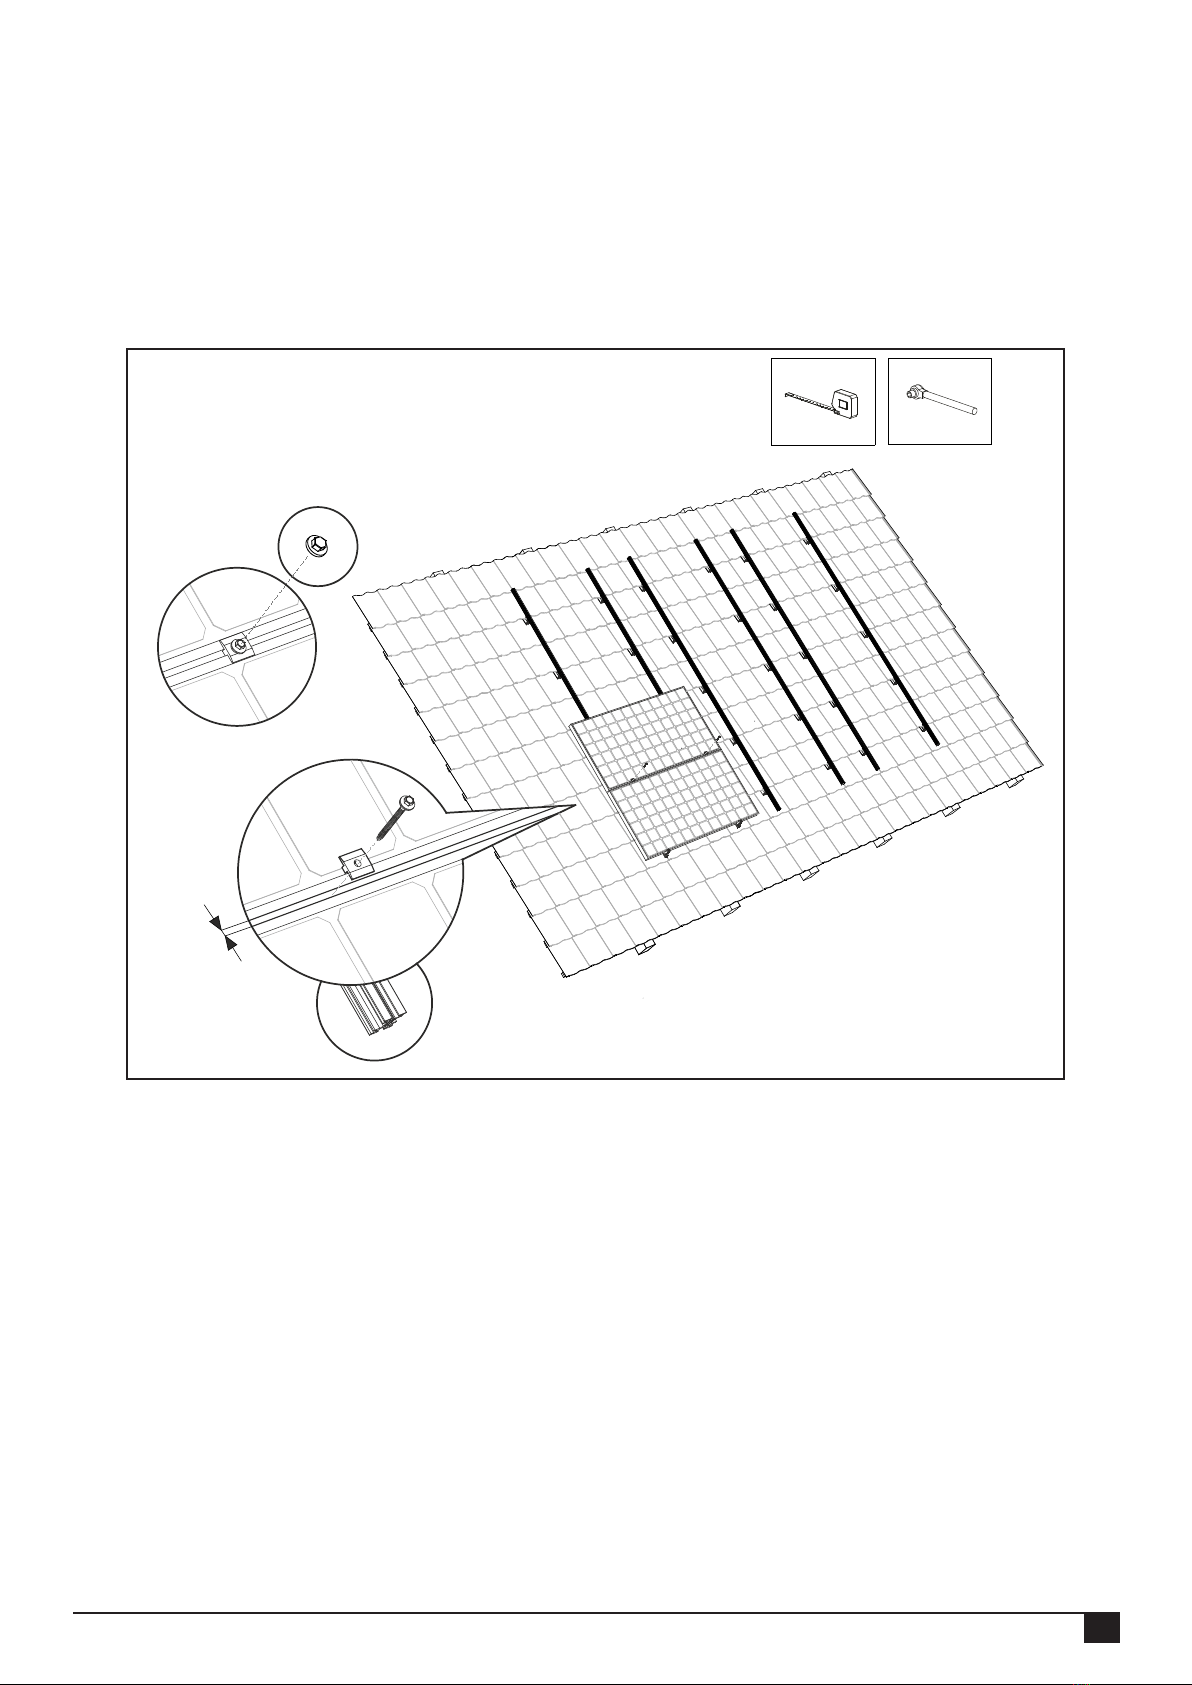
6.2 Attaching roof hooks
On the basis of the position of the solar panels on the roof, you determine the position of the roof hooks.
The roof hooks are attached at 1/4 B of the side edges of the panel. Consequently, a mutual distance 2/4 B, which is about
3 roof tiles (et al depending on type of tile).
Divide the roof hooks equally in the line where the mounting rails will come. The roof hooks may be placed up to 30-60 cm
apart. (see calculator for distance) Place on the ends an additional roof hook at a mutual distance of about 30 cm.
1. Draw with chalk or marker the place down where the roof hooks should come. Do this on the tile under the roof hook.
This tile continues to lie when mounting the roof hook.
2. Slide the row of tiles above the roof hooks up under the roof tile above. Place the roof hook in the concave groove (valley)
of the underlying tile over the tile and the batten. In some tiles, the tile must be adjusted, with an angle grinder or a le, to
the roof hook so the tiles are again closing properly.
3. Slide the row of tiles above the roof hook down again
4. Make sure that the roof hooks are mutually aligned.
Optional Roof hook Multi can also be used. Adjust the upper part of the roof hook to the correct width. Adjustment is based
on width of the tile and batten. Slide the row of tiles above the roof hooks upwards and underneath the top roof tile. Place
the roof hook into the cavity (valley) of the underlying roof tile over the roof tile and batten. With some roof tiles the tile must
be adjusted to the roof hook with an angle grinder or a le so that the roof tiles close properly again to ensure weather
tightness of the roof.
08
Rev. 09.02.16 MANUAL MOUNTING SYSTEM FOR PITCHED ROOF WITH TILES
30 -60 cm
30 - 60cm
1
2
3
4
2/4 B
2/4 B
2/4 B
1/4 B
2/4 B
2/4 B
2/4 B
2/4 B
30-63 mm
OPTION

1
2
3
4
min. 30 cm
min. 30 cm 4 cm
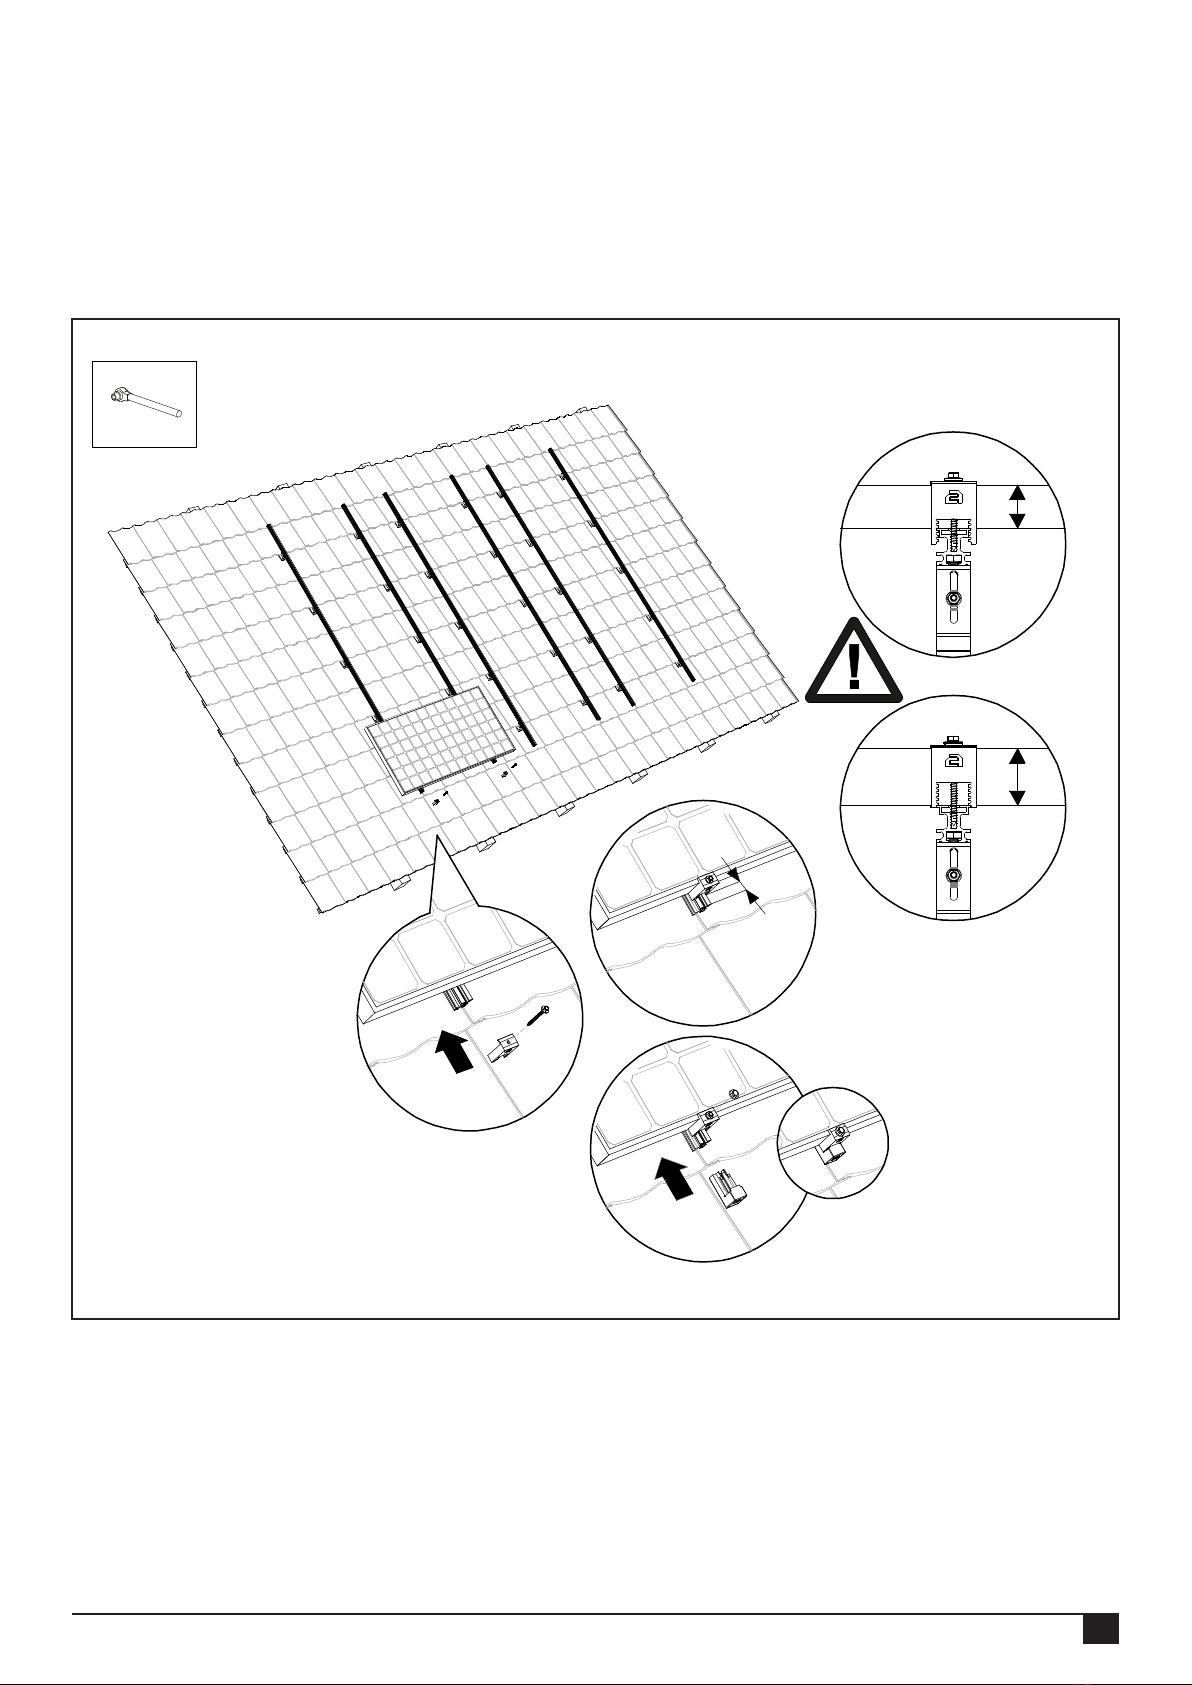
6.3 Attaching mounting rail
1. Disassemble the hex bolts M8x20 of the roof hooks and slide them with the head into the mounting rails.
2. Make sure that the end of the mounting rails protrudes min. 5 cm compared to the last roof hook and place the mounting
rail with hexagon bolts M8x20 onto the roof hooks.
3. Then screw the mounting rail onto the roof hooks using hex ange bolts M8. Make sure these are tight properly.
(tightening torque 4,5Nm)
4. Make sure that the mounting rail and the hook bolt are well aligned in comparison with each other and that the mounting
rail is properly positioned on the roof hook.
* See also Tips and Techniques.
Make sure the mounting rails are straight next to each other in connection with the alignment
of the solar panels!
09
Rev. 09.02.16 MANUAL MOUNTING SYSTEM FOR PITCHED ROOF WITH TILES
10
Rev. 09.02.16 MANUAL MOUNTING SYSTEM FOR PITCHED ROOF WITH TILES
6.4 Mounting 1st solar panel on mounting rail
Slide the end clamps on the underside of the mounting rails. Choose the correct recess so that the end clamp connects to
the solar panel. Leave about 1 cm rail visible protrude next to the end clamp. Then slide the rst solar panel to the underside
of the mounting rail. Tighten the end clamp using the mounting screw. The tightening torque of the screw connections is
4,5Nm.
Option: Slide the black end caps in the side in the underside of the mounting rails and place the color caps over the
mounting screws.
1
2
OPTION
X
Y
1 cm
6.5 Mounting other solar panels on the rail
Place the second solar panel on the mounting rail and slide it towards the rst, until a gap remains of about 7mm. Then
screw the mounting screw with a module clamping plate module into the mounting rail. The tightening torque of the screw
connections is 4,5Nm.
Make sure the solar panels are aligned before you tighten the screw! Repeat this with the remaining solar panels.
Option: Place the black color caps over the mounting screws.
11
Rev. 09.02.16 MANUAL MOUNTING SYSTEM FOR PITCHED ROOF WITH TILES
7 mm
OPTION

12
Rev. 09.02.16 MANUAL MOUNTING SYSTEM FOR PITCHED ROOF WITH TILES
6.6 Final assembly / multiple rows under each other
1. Place the top solar panel on the mounting rail and screw the mounting screws using a module clamping plate into the
mounting rail. (tightening torque 4,5Nm)
2. Slide the end clamp onto the mounting rail. Choose the correct recess so that the end clamp connects to the solar panel.
3. Then tighten the end clamp using the mounting screw. Make sure these are tight properly. (tightening torque 4,5Nm)
4. In order to obtain a contiguous solar panel surface, you slide the adjacent solar panels against the row of solar panels
with a gap of 1-2 cm. Then you secure the solar panels rmly using the mounting screws, end clamps and module clamping
plates to the mounting rails.
Option: Slide the black end caps in the underside and top of the mounting rails and place the color caps over the mounting
screws.
23
1
OPTION
OPTION
OPTION
4

13
Rev. 09.02.16 MANUAL MOUNTING SYSTEM FOR PITCHED ROOF WITH TILES
7. ANNEX
13
Frame height End clamp Screw length
29mm CFA 55 mm
30mm CFA 55 mm
31mm CFB 55 mm
32 mm CFB 55 mm
33 mm CFA 60 mm
34 mm CFA 60 mm
35 mm CFB 60 mm
36 mm CFB 63 mm
37 mm CFA 63 mm
38 mm CFA 63 mm
39 mm CFB 63 mm
40 mm CFB 63 mm
41 mm CFA 70 mm
42 mm CFA 70 mm
43 mm CFB 70 mm
44 mm CFB 70 mm
45 mm CFA 70 mm
46 mm CFA 70 mm
47 mm CFB 75 mm
48 mm CFB 75 mm
49 mm CFA 75 mm
50 mm CFA 75 mm
51 mm CFB 75 mm
52 mm CFB 75 mm
Other manuals for CLICKFIT BASIC
3
Table of contents
Other ESDEC Inverter manuals


Popular Inverter manuals by other brands

SMA Regelsysteme GmbH
SMA Regelsysteme GmbH Sunny Boy 2800i installation guide

SimpliPhi
SimpliPhi Outback AccESS installation manual

Micno
Micno 3kW DC24V user manual

Hoymiles
Hoymiles MI-500 user manual

Solectria Renewables
Solectria Renewables PVI 23TL Installation and operation manual

Toshiba
Toshiba PDP002Z Function manual

Goodwe
Goodwe ABD Series Quick installation guide

Aybey Elektronik
Aybey Elektronik AE-LIFT Series user manual

Robin America
Robin America RGX3510 Service manual

SEW-Eurodrive
SEW-Eurodrive MOVITRAC B operating instructions

Briggs & Stratton
Briggs & Stratton 1768-0 installation manual

Chicago Electric
Chicago Electric 95519 Assembly and operation instructions


