ESICAM HN03 User manual


1
EN Introduction
Please read these instructions carefully in their entirety before using the product, and keep them handy for
future reference.
Thank you for your interest in our product and for ordering the IPCam. It can be controlled using any PC/laptop via the
Intranet or Internet via a common web browser (recommended: Internet Explorer or Safari), via smartphone (iPhone, iPad,
Android phone and pad) or via the client software installed on the PC. It can be easily integrated into your LAN or WLAN
environment via a user-friendly installation process and intuitive interface. We are certain that you will value the quality
and features of this product.
Note
This product can interfere with other wireless devices that
use the 2.4 GHz ISM band. Please turn off these devices to
avoid interference.
Product safety
This product transmits electromagnetic waves just like
other wireless products. Its signal power, however, is less
than other wireless devices, for example, mobile phones.
During operation, IPCam meets the safety standards for
radio frequencies and the recommended indices.
Restrictions
1. Do NOT use this product to violate the privacy rights
of others. Monitoring the activities of other people wi-
thout their consent is unlawful. This product was not
designed or manufactured for this purpose.
2. Do NOT place this product in proximity to medical
devices. Radio waves can cause the malfunction of
electronic medical devices.
3. This product should be kept at least 30 cm away
from all pacemakers. Radio waves can interfere with
pacemakers.
4. Do NOT use this product for unlawful activities. The
user must ensure that the camera is only used in ac-
cordance with the law.
Care and maintenance
1. Make sure that the camera and its power supply has
sufficient ventilation;
2. Do not shake, hit or allow the product to fall to the
ground;
3.
4.
Do not place this product in proximity to magnetic
objects;
5.
Do not place the product in locations that have con-
stant temperature or humidity fluctuations;
6.
Keep the product away from heat sources;
7.
Do not use this product in proximity to aggressive
chemicals;
8.
Do not use this product in proximity to water;
9.
Do not place this product in rooms that are surroun-
ded by metal. The surrounding metal can shield elec-
tromagnetic waves so that no signal is received;
10.
Please note the local environmental protection regula-
tions of your area;
11.
Please turn the device off when not in use;
Do not take the product apart and do not attempt to
repair it. This can damage the product.

2
Main features
Easy installation
The camera comes with an integrated wireless capability
(IEEE802.11b/g/n) and web server function. Therefore, dri-
ver installation is not necessary. Thanks to P2P technology
(peer-to-peer), the user can view the IPCam stream easily
via a PC/smartphone/client software by simply entering
the UID/password. The router and firewall do not need to
be configured. The camera can automatically speak to the
router via the network cable or WLAN. You can see images
and hear noises picked up by the camera in the remote
stall as soon as the connection is made.
802.11 b/g/n WLAN connection available
The camera was designed to work with both wired net-
works as well as standard 802.11 b/g/n wireless networks.
The camera has SSID filtering, powerful 64/128 bit encryp-
tion and the latest security standard for WPA encryption in
order to protect against illegal access.
3GPP mobile surveillance
The camera allows you to view images on your mobile
phone as a live video stream. It supports the telecommu-
nication standard for the 3GPP streaming format. All 3G-
capable mobile devices and most 2G mobile phones that
support the 3GPP standard are compatible. This means
that the images can be viewed via your mobile phone's
browser.
Simultaneous high-speed MPEG-4 and Motion JPEG
The camera enables the simultaneous live streaming of
MPEG-4 and Motion JPEG. The camera has H.264/MPEG4
compression that compresses the video to make the trans-
mission faster and more efficient. The H.264/MPEG4 and
MJPEG image can be transmitted at 30 frames per second.
Simultaneous HTTP and RTSP streaming
The camera supports the HTTP and RTSP/RTP/RTCP proto-
col and supplies several HTTP and RTSP streams simulta-
neously.
Snapshot and record function
You can take a snapshot from the images sent to your PC
by the camera and then save the image in JPG or BMP
format. In addition, you can also record the video and
audio stream sent from the camera to your PC and save it
in ASF format.
Motion sensor function
The camera can detect changes to the image being
viewed. As soon as a change occurs, it sends an e-mail to
e-mail addresses with a video file or a snapshot as an at-
tachment. The video file or snapshot can also be uploaded
to an FTP server. In addition, the camera can also be confi-
gured so that it sends images at regular intervals.
OSD function
The OSD function (on screen display) can show the system
name, date and time, and user-defined info on the screen.
Authentication
You must enter your user ID and password in the authenti-
cation window. The password prevents unregistered users
access to your camera. Users can select between the basic
authentication method or the direct access authentication
method.
Multiple access
The camera enables access for up to 4 users simulta-
neously. Please note that the output of moving images
can decrease as more users connect to the camera simul-
taneously.
Infrared night vision
The camera uses infrared LEDs. When the environment is
dark, the LEDs activate automatically via a light sensor.
The video switches from colour to black & white. The
range is approx. 11 m. It is possible to switch the LED ope-
ration from "auto" to "manual".
Adapter
When using the power adapter, make sure that the nomi-
nal voltage matches that of the device to avoid damage
due to incorrect use of the power supply.

3
Main features
PC system requirements
The PC and network must meet the following
technological specifications in order for the camera to
function.
Processor: Intel Pentium III, 1GHz or higher
(Pentium IV, 2 GHz or higher recommended)
RAM: 256 MB or more
Colour monitor: We recommend at least 800 x 600
and the latest driver for the display adapter
Operating system: Microsoft Windows 98 /
Windows ME / Windows 2000 / Windows XP /
Windows Vista / Windows 7 / Windows 8
Web browser: Internet Explorer Version 5.0 or higher,
DirectX 9.0c or higher, Safari, Firefox (requires
QuickTime), Google Chrome (requires QuickTime)
Network protocol: TCP/IP network protocol installed
Interface: 10/100 Mbps Ethernet connection or
wireless network connection (WLAN)
Technical data #HN03
Imagesensor: 1/4" Progressive CMOS sensor
Displayresolution: 1280x720Pixels
Lens: 3,6 mm fixed lens
Viewingangle: 56,14°
min.illumination: 1.0 Lux / F1.2
Video
Imagecompression: H.264, MJPEG/JPEG
Imageresolution: HD 720p (1280x720 Pixels) /
VGA (640x480 Pixels) / QVGA (320x240 Pixels)
Framerate: 720p/VGA/QVGA15 fps
Bitrate: CBR/VBR, outputrange: 32 kbps ~ 40 Mbps
Infraredmode: Automatic/DualFilter
Night vision: 30IRLEDs,ca. 15 m distance
Network
Ethernet: 10/100 Mbps, RJ-45
Supportedprotocols: TCP/IP, HTTP, RTSP, TCP, UDP, SMTP,
FTP, DHCP, DNS, DDNS, NTP, UPnP, P2P, etc.
Wirelessstandard: Wi-Fi (IEEE802.11b/g/n)
SupportIPaddress: static, dynamic
max. number concurrent users: 4
HardwareInterface
Storage: MicroSD card(max. 32 GB, not included)
Power supply: DC12V/1.0A
Others
Waterproof level : IP65
Operatingtemperature: -20 ~50 °C
Operatinghumidity: 10~ 80 %
Weight: 620 g
Accessory: Camera, power adapter, Wi-Fi antenna,
network cable, user Manual
Warranty: 1 year
Technical data #HN11
Image sensor: 1/4“ Progressive CMOS sensor
Display resolution: 1280x720 pixels
Lens: 3,6 mm
Viewingangle: 51 ~ 24 ˚
min.illumination: 0.8 Lux / F1.4 (color mode), 0.3 Lux /
F1.4 (B&W mode)
Video
Imagecompression: H.264
Imageresolution: HD 720p (1280x720 Pixels) / VGA
(640x480 Pixels) / QVGA (320x240 Pixels)
Frame rate: 720p/VGA/QVGA0-15 fps
Bitrate: CBR/VBR, outputrange: 32 kbps ~ 40 Mbps
Infraredmode: Automatic/DualFilter
Night vision: 22 IR LEDs, IR distance: 10m
Network
Ethernet: 10/100Mbps, RJ-45
Supported protocols: TCP/IP, HTTP, RTSP, TCP, UDP, SMTP,
FTP, DHCP, DNS, DDNS, NTP, UPnP, P2P, etc.
Wireless standard: Wi-Fi (IEEE802.11b/g/n)
Support IP address: static, dynamic
max. number concurrent users: 4
HardwareInterface
Storage: MicroSD Card(max. 32 GB, not included)
Power supply: DC5V/2.0A
Power consumption: Typical: 3.5 W (IR LED turned on) /
max: 7 W (P&T turned on)
Pan/Tilt angle: Horizontal: 355°,Vertical:85°
Others
Waterproof level: IP65
Operatingtemperature: -20 ~ 50 °C
Operatinghumidity: 10 ~ 80 %
Weight: 1200 g
Accessory: Camera, power adapter, Wi-Fi antenna,
network cable, user Manual
Warranty: 1 year

under the relevant icon.
2.1.3 Scan the QR code as bellow:
2.1.1 Enter the www.eyecloud.so website, and click
IOS Android
4
Camera setup and configuration
1. Connecting the camera to the network
When using for the first time, please connect the camera
and the computer to a router using network cables.
Ensure that the router is switched on and that, when the
RJ-45 cable is connected to the camera, the yellow and
green light illuminates (network control lights). Only use
the cable supplied to provide power to the camera so as
to avoid damaging the device!
The camera can be returned to the factory settings by
pressing the „Reset“ button (for at least 10 seconds).
The „Reset“ button is located on the underside of the
device.
2. Connect the camera with an Android /
iOS device (smartphone, tablet, etc.)
2.1 Software download
The software needed (EyeCloud) can be downloaded via :
„Download“
2.2 Registration
Register as detailed in the instructions contained in the
application with your e-mail address and password
2.1.2 The AppStore/Google Play by search "EyeCloud"
5
Camera setup and configuration
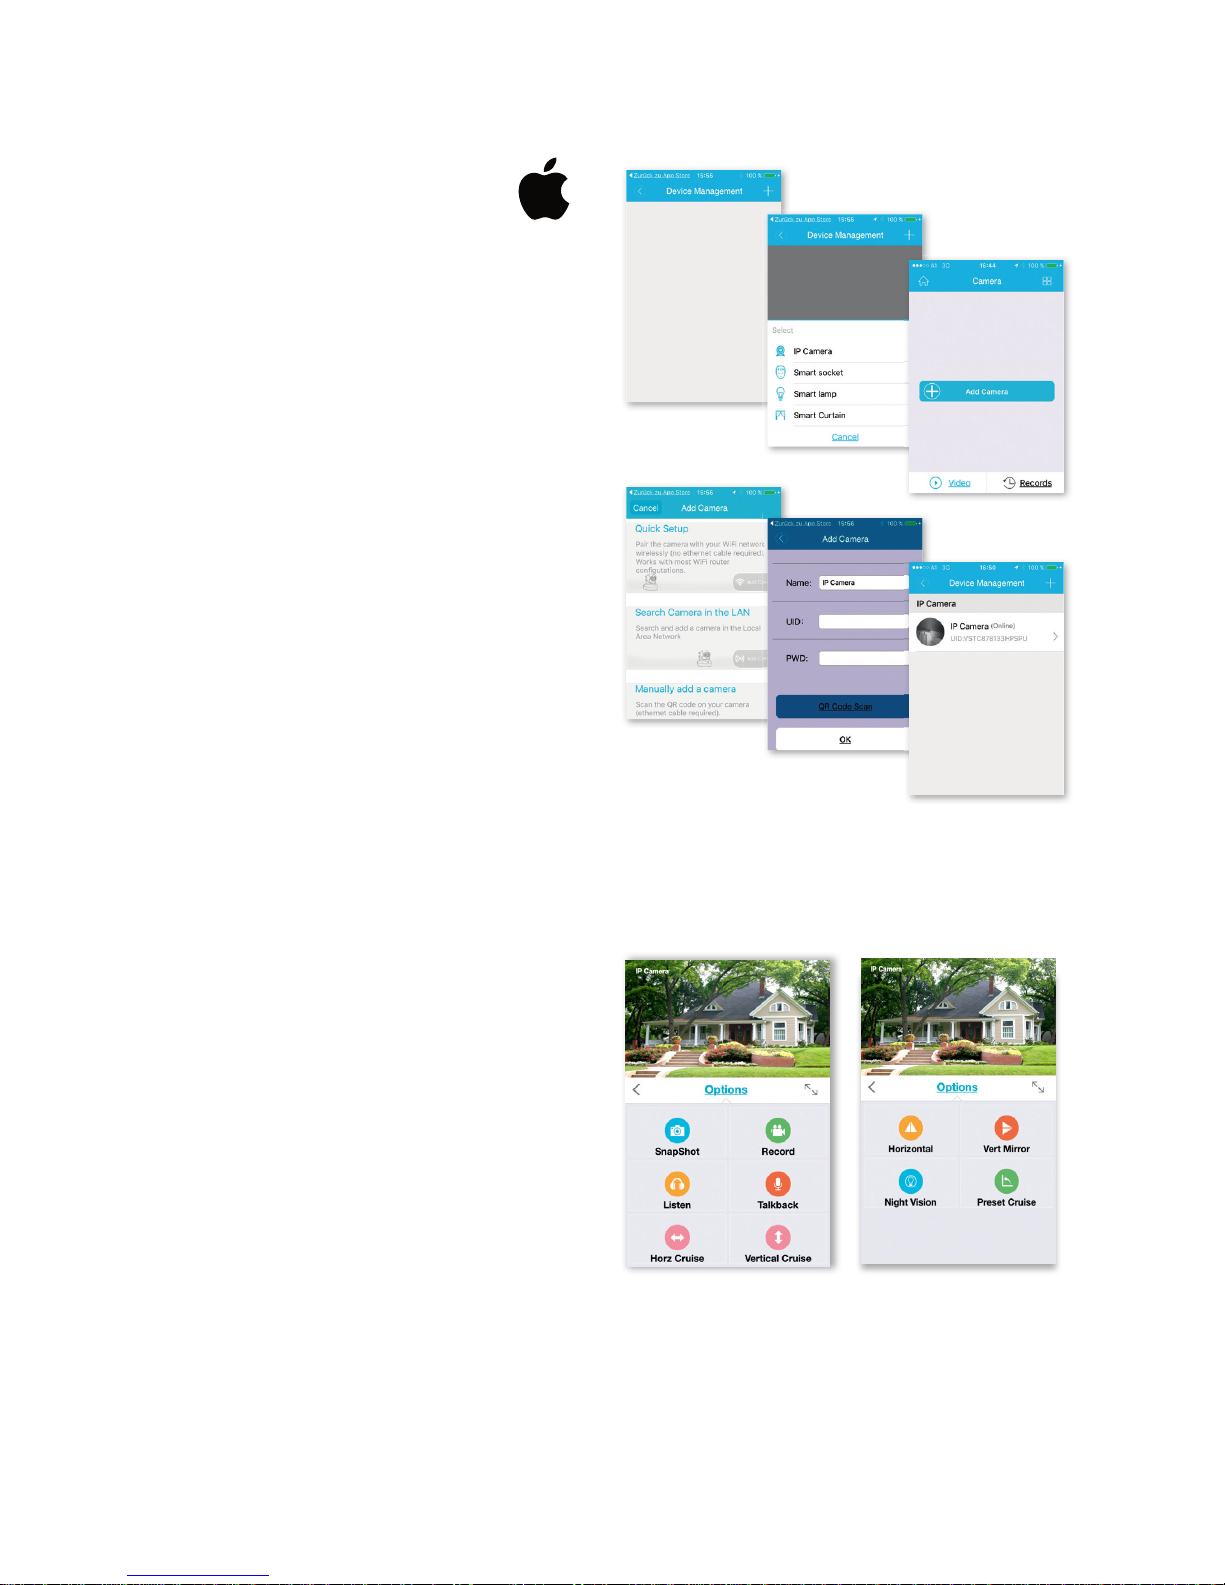
2.3 Add a camera with the software
from the App store
Click „+“ at the top right to add a new camera, and
select „IP Camera“. There are four options for choosing
a camera:
Quick Setup: Pressing the WPS button on the camera and
router links the camera automatically (does not work with
every router)
LAN search: Click „Search“ to find the camera on the
network. The default password is 888888 and the user-
name is admin. Change these details as soon as you find
the camera in order to protect your privacy as effectively
as possible
Scan: Click „Scan“ and allow your smartphone to scan
the QR code. If you hear a beep, the code has been scan-
ned in and the unique camera number (UID) appears in
the relevant field.
Manual entry of the UID code: You can also enter the
UID manually. Please note that the entry is case-sensitive.
Once you have successfully installed the camera, click the
relevant icon and the camera appears.
2.4 Video options
Snapshot
Record
Listen
Talkback
Horz Cruise
Vertical Cruise
Horizontal
Vert Mirror
Night Vision
Preset Cruise

6
2.5 WLAN setup
Click the „House“ icon at the top left and the main menu
appears. Clicking „Device Management“ gives you a list
of all the cameras that have been installed on the network
via LAN cable.
Click the „>“ symbol on the right next to the camera to
activate the settings. Click the blue „WiFi“ icon to display
the WLAN networks available.
Choose a router and enter the password (WPA or WPA2).
Once you have confirmed this by clicking the „OK“ sym-
bol, the WLAN network is set up.
Now disconnect the camera from the RJ-45 cable.
The camera will dial in and connect automatically
to your network.
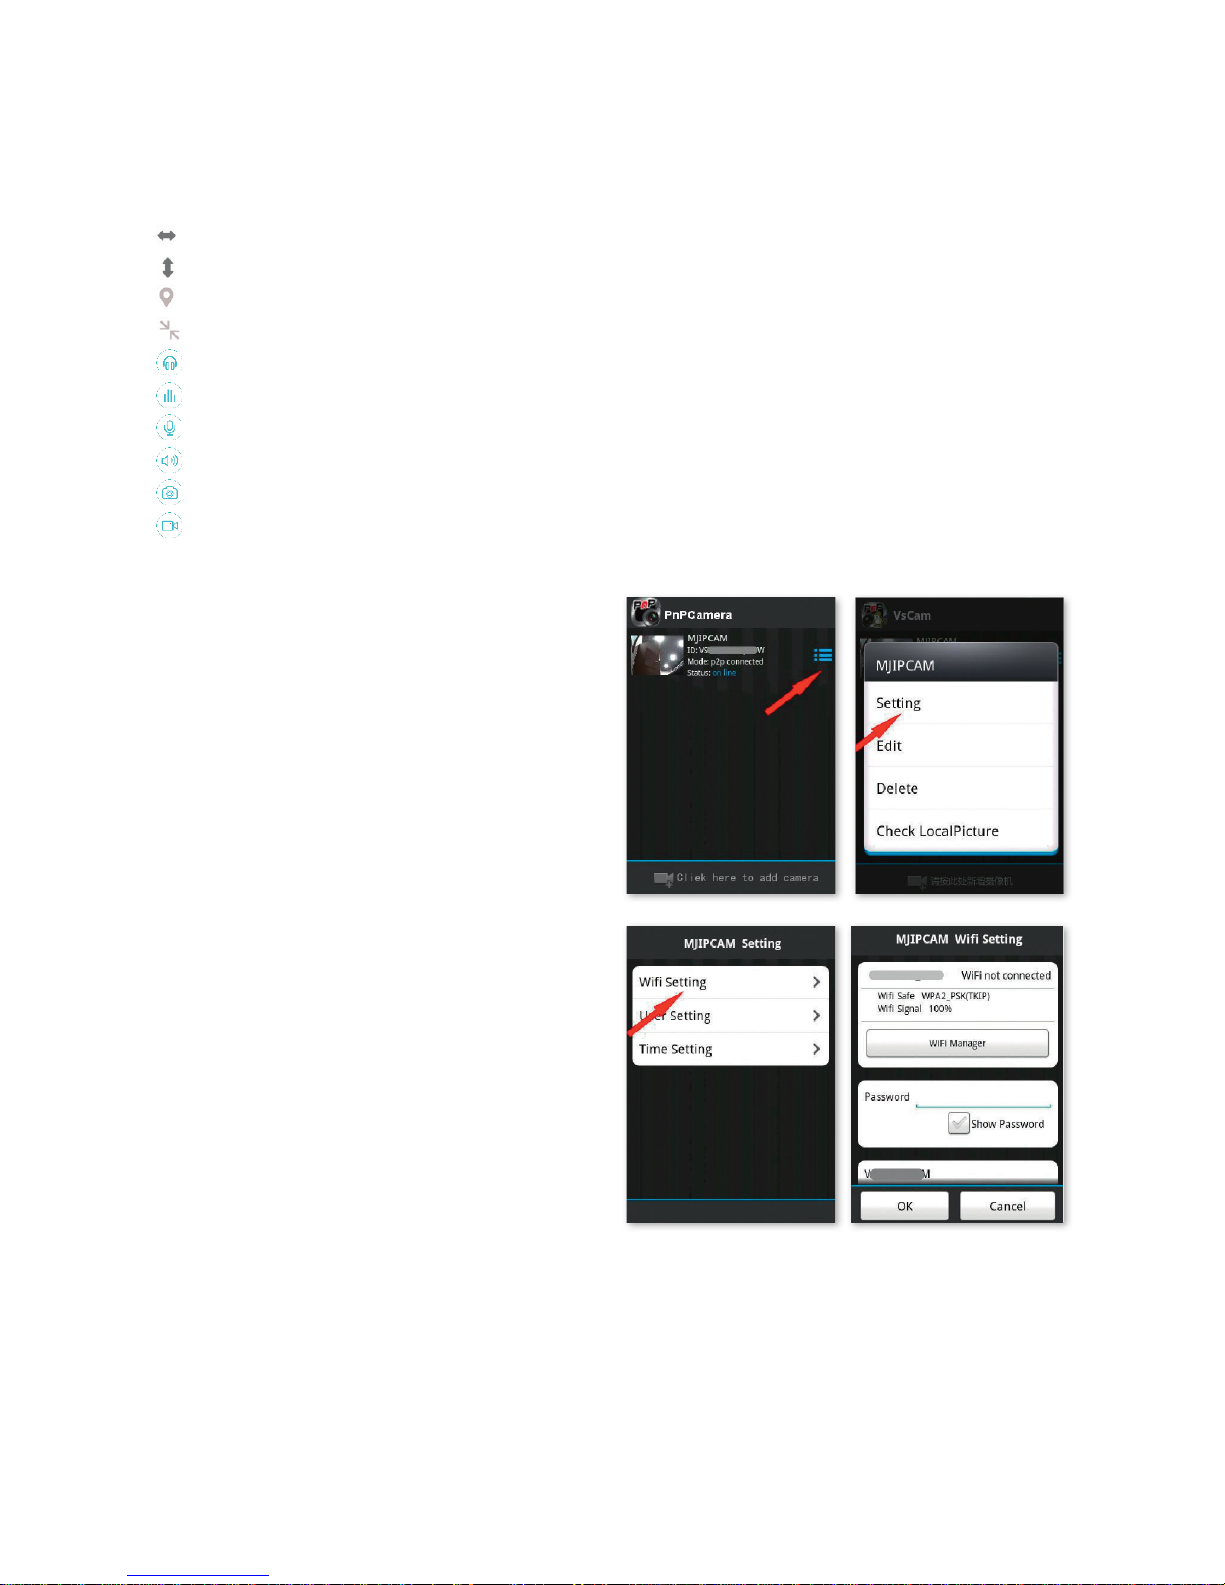
2.6 Add a camera with the software
from the Google Playstore
Scan: Click „Scan“ and allow your smartphone to scan
the QR code. If you hear a beep, the code has been scan-
ned in and the unique camera number (UID) appears in
the relevant field.
LAN search: Click „Search“ to find the camera on the
network. The default password is 888888 and the user-
name is admin. Change these details as soon as you find
the camera in order to protect your privacy as effectively
as possible
Manual entry of the UID code: You can also enter the
UID manually. Please note that the entry is case-sensitive.
Once you have successfully installed the camera, click the
relevant icon and the camera appears.
7
2.7 Video options
Horizontal cruise
Vertical cruise
Preset position
Full screen
Sound off
Sound on
No communication
Communication
Snapshot
Record
The application supports settings for the alarm, saving,
password changes, firmware updates, image quality
(brightness, contrast, mirroring, infra-red options).
The commands are self-explanatory thanks to the icons
and are easy to understand.
2.8 WLAN setup
Click the symbol on the right next to the camera to activa-
te the settings. Click „Setting“ and „WiFi Setting“.
The available WLAN routers are listed. Choose a router
and enter the password (WPA or WPA2). Once you have
confirmed this by clicking the „OK“ symbol, the WLAN
network is set up. Now disconnect the camera from the
RJ-45 cable. The camera will dial in and connect automati-
cally to your network.
2.9 Other settings
Delete camera: Select the camera and sliding it with the
finger on the touchpad to the left causes „Delete“ to ap-
pear. Tap it and the camera is deleted.
Reset to factory settings: Hold the reset button for
around 15 seconds.
Video history: Tapping „history records“ allows you
to list videos that have been stored locally and on the
SD card.
Version update: Tapping „Firmware upgrade“ searches
for new versions of the software.

8
3. Camera setup via PC software
Proceed in the same way as with downloading for smart-
phones and go to the www.eyecloud.so website.
Click „Download“ under the Windows icon.
Run the „app-Smart.exe“ file and allow the program
to install. The following icon appears on your desktop
following successful installation:
After double-clicking the icon, the following window
appears:
Recover: Forgotten password and request a new one
Register: New registration (tip: Use your e-mail address
as the account)
After entering the details successfully, the program inter-
face appears. Pressing „+“ allows you to add cameras.
Name: Assign a unique name so that you know which ca-
mera you want to control if you have multiple cameras.
UID: Here, you can either enter the camera‘s unique code
that can be found on a separate sticker or click „Find“.
All of the cameras on the network are displayed (see Setup
via smartphone).
Click „Refresh“ if not all of the cameras on the network
are listed. Check during initial installation that all of the
cameras are connected with the RJ-45 network cable to
the router or that the cameras were linked correctly to the
WLAN.
Password: For security reasons, change your password
promptly and follow the instructions under „Modify
passwords“

9
Select WiFi: Clicking this button allows you to list the
WiFi networks available with a click on „Search signal“.
Select the appropriate network, click „Set“ and enter, if
requested, the WPA or WPA2 key. This is often found on
the underside of the router. After successfully setting up
the WLAN network, the following message appears
Confirm with „OK“. The camera is now successfully set
up! Now disconnect the camera from the RJ-45 cable.
The camera will dial in and connect automatically to your
network.
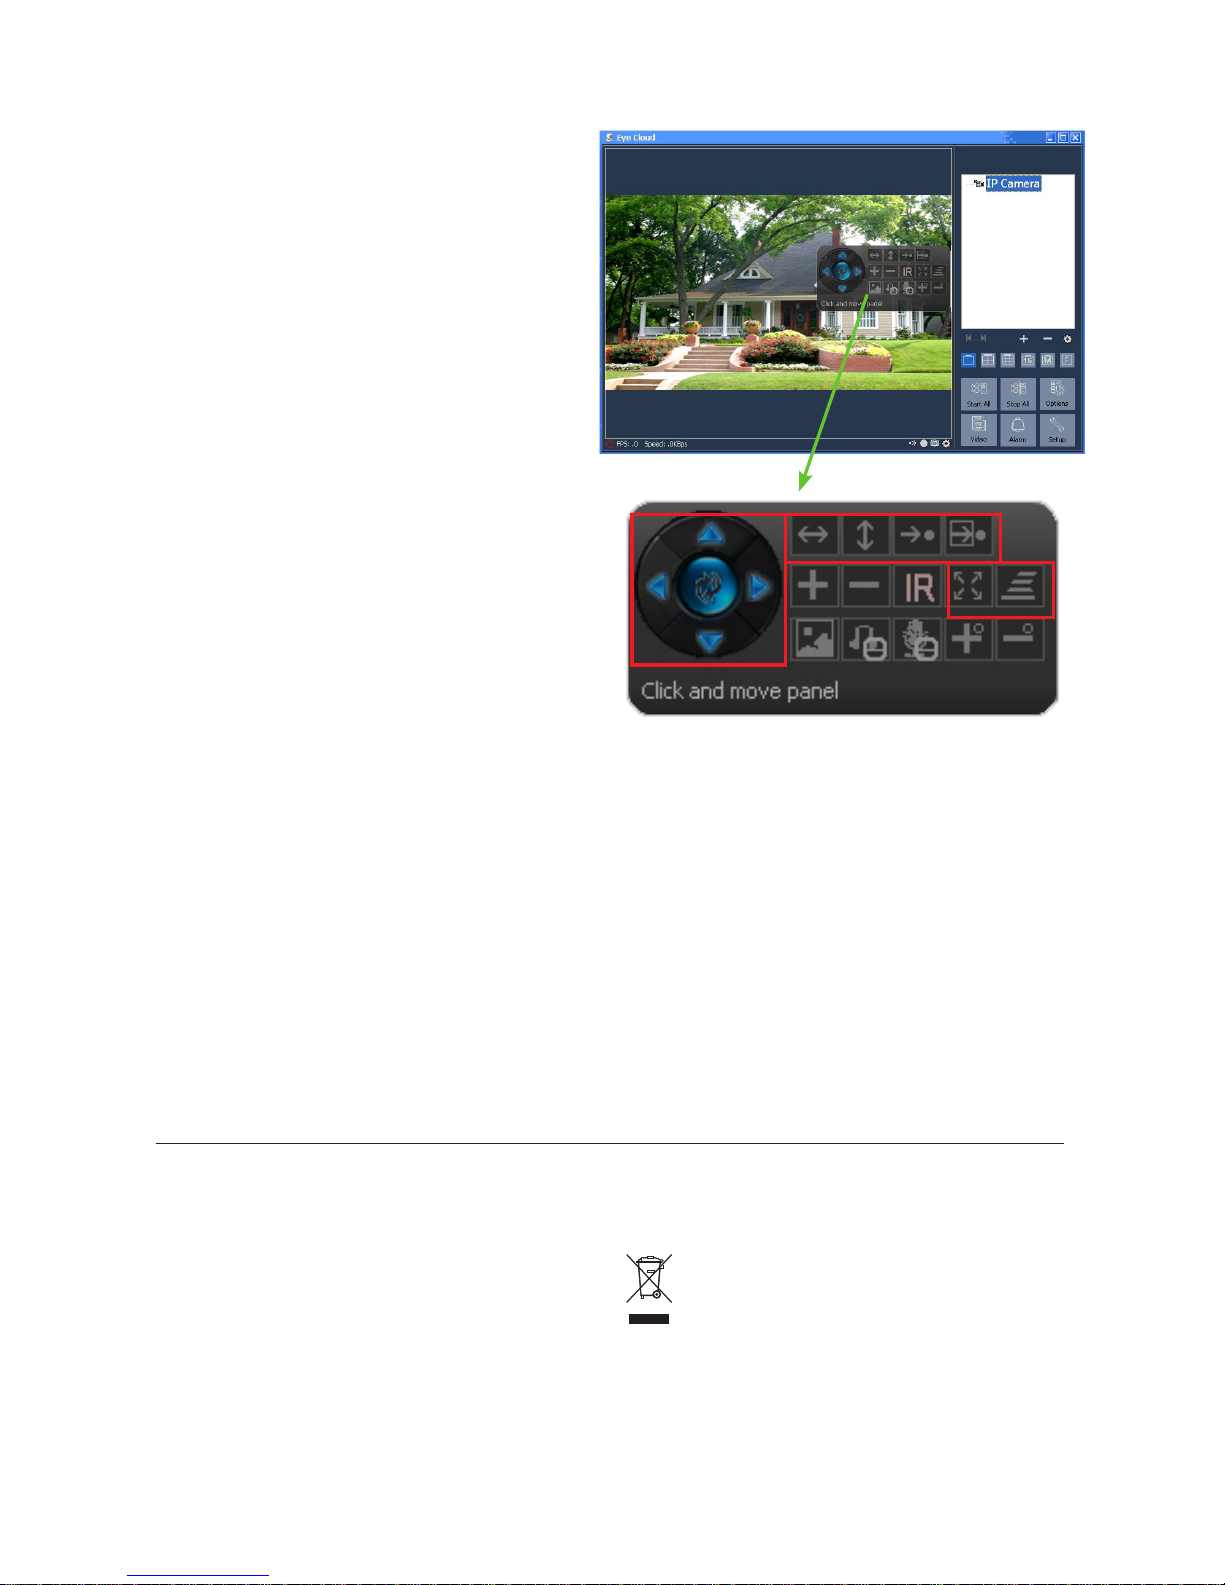
3.1 Operating the camera
• Display of the added cameras
• „+“: Add camera
• „-“: Delete camera
• „Cogwheel“: This is where you can set recording
and alarm functions
• Select menu for the number of cameras that are to be
displayed in the summary window. The setting from left to
right: Single camera, 4 cameras, 8 cameras, 16 cameras,
manual setting, full screen
• Start all: Bring all cameras online simultaneously
• Stop all: Take all cameras offline simultaneously
• Options: Settings for memory functions,
on-screen display and other details
• Video: Access to saved videos
• Alarm: Access to videos that were triggered due
to an alarm
• Settings: Change password, search for software
updates
E-Mail: [email protected]
10
3.2 Control elements
Clicking with the left-hand mouse button on the window
of the camera in question displays a control element with
various control options:
The control options framed in red only apply to
HD Pan & Tilt IP Cam (#HN11). These functions relate
to the movement of the camera via remote control.
The explanation of the function can be made to appear
by briefly holding the mouse point over the icon.
The menu is clear and self-explanatory.
Further information and assistance in the event of
installation problems can be obtained here:
Tel: 001-626-560-3456
Electrical waste
It is up to the operator to dispose of the IPCam responsibly in accordance
with local regulations. Consult the relevant regulations for your country. The
device must not be disposed of in household waste. Under the terms of the
EU Directive on the disposal of old electrical and electronic equipment, the
device can be taken to local authority-run refuse sites or recycling plants free of charge,
or returned to dealers who offer a returns service. Correct disposal protects the environ-
ment and prevents any possible harmful impacts on humans and the environment.
Warranty card
Based on our General Terms and Conditions of Business, we offer a 1 YEAR WARRANTY
for this device covering damage caused by material or manufacturing defects. This
warranty begins on the date of purchase.
The warranty does not cover:
1. damaged caused by natural wear and tear (wear parts, sliding parts), excessive
strain and incorrect use (non-compliance with operating instructions).
2. Damage caused by force majeure or sustained during transport.
3. Damage to rubber parts, e.g. on connecting lines. Warranty repairs are only carried
out by the manufacturing plant or an authorised contracted workshop. The manufac-
turer reserves the right to reject any warranty claims in the event of non-compliance.
The device must for this purpose be returned to the point of sale, at the risk of the
device owner, complete, packaged and with sufficient postage, including the original
invoice and the warranty card. (address see dealer stamp). Please provide as much
information as possible on the nature of the problem. Costs incurred as a result of
unjustified defect claims will be invoiced to the device’s owner.

Ocean Electric Co. Ltd.
200 Centreport Dr.Suite 365,Greensboro, NC 27409, USA
Tel.: 001-626-560-3456
E-Mail: [email protected]
Other manuals for HN03
1
This manual suits for next models
1
Table of contents


