ESICAM EH05 User manual
User's Manual
Portable WiFi Camera viewed by mobile phone
Infrared Night Vision white Flashlight
Water Resistant
Magnetic base
Model: EH05
Please read carefully and thoroughly this manual before any attempt to
operate this product and retain it for your future reference.

INTRODUCTION 1-2
Notice 1
Warranty 1
Restrictions 2
Maintenance 2
PRODUCT 3
Included Parts 3
Feature Locations 3
HOW TO USE 4-18
Charging the Camera 4
Using the Camera 5
Using the Camera with smart phone 6-14
Manage cameras on PC (optional) 14-17
Night Vision 18
Water Resistant 18
Install TF memory card 18
SPECIFICATIONS 19
TROUBLESHOOTING 20
APPROVAL INFORMATION 21

1
INTRODUCTION
Thank you for purchasing this wireless camera kit. This product works at ISM-
2.4GHz frequency band, which can be legally used worldwide without
permission. We feel confident that you will be pleased with the quality and
features of this product. The camera has CMOS image sensor and a
transmitting module to capture the image and wirelessly transmits the image
to your Smart phone. It use WiFi digital transmission and is interference free.
The receiver can be any type of Smart phone with Android/IOS system.
Notice
Notice: This product may cause interference with other wireless equipment
that operates at 2.4GHz ISM band. Please turn off the equipment to eliminate
the interference.
Product Assurance: This camera will emit electromagnetic waves, just like
other wireless products. But its transmitting power is less than other wireless
products such as mobile phones. The WiFi camera meets wireless frequency
security standards and recommended indexes while working. These
standards and indexes are certificated by academic organizations and
represent the cogitative research of the scientific workers who continuously
explore and annotate the involved fields. So we believe that our products are
safe for our customers.
Warranty
This product has a one year limited warranty with an effective date that
begins the date of purchase. Refer to the troubleshooting guide at the end of
this manual for help. Please retain proof of purchase receipt for verification.
Any attempted disassemble of the product will void the warranty. Do not
return defective product to the retailer.

2
FCC Warnning:
This equipment has been tested and found to comply with the limits for a
Class B digital device, pursuant to part 15 of the FCC Rules. These limits are
designed to provide reasonable protection against harmful interference in a
residential installation. This equipment generates, uses and can radiate radio
frequency energy and, if not installed and used in accordance with the
instructions, may cause harmful interference to radio communications.
However, there is no guarantee that interference will not occur in a particular
installation. If this equipment does cause harmful interference to radio or
television reception, which can be determined by turning the equipment off
and on, the user is encouraged to try to correct the interference by one or
more of the following measures:
•Reorient or relocate the receiving antenna.
•Increase the separation between the equipment and receiver.
•Connect the equipment into an outlet on a circuit different from that to which
the receiver is connected.
•Consult the dealer or an experienced radio/TV technician for help.
Caution: Any changes or modifications to this device not explicitly approved by
manufacturer could void your authority to operate this equipment.
This device complies with part 15 of the FCC Rules. Operation is subject to
the following two conditions: (1) This device may not cause harmful
interference, and (2) this device must accept any interference received,
including interference that may cause undesired operation.
To comply with FCC RF exposure compliance requirements, this grant is
applicable to only mobile configurations. The antennas used for this
transmitter must be installed to provide a separation distance of at least 20 cm
from all persons and must not be co-located or operating in conjunction with
any other antenna or transmitter

3
Restrictions
1. DO NOT use this product to violate one's privacy. Monitoring one's activities without
consent is illegal and this product is not designed and manufactured for such purposes;
2. DO NOT put this product near any medical equipment. Radio waves might potentially
cause breakdown of electrical medical equipment. So this product should be placed at
least 1 foot away from any heart pacemaker. Radio waves might potentially influence
the heart pacemaker and lead to respiratory disturbance;
3. DO NOT use this product for any illegal activities. We are not be responsible for any
consequences of illegal acts committed by the user.
Maintenance
1. Do not shake or strike the product;
2. Keep product away from heat sources such as electric heaters;
3. Do not use the camera near caustic chemicals;
4. Do not use the camera in the places which are enclosed by metal.
5. Please obey the local government's environment protection policy;
6. Please turn off the power when unused
7. Do not disassemble or repair the camera. Doing so might cause damages to the product
and also VOID THE WARRANTY.

4
PRODUCT
Included Parts
This package comes with the following items. Please check whether they are all included in
the box, if one or some is missing, contact the retailer for replacement.
①Camera x1
②AC power charger x1
③Antenna x1
④USB Charging Cable x1
⑤Power extension cable ×1
⑥User manual x1
Feature Locations
HOW TO USE
1. Download the Camera App

5
You can scan the QR code on the side of product box or on the label of Quick Guide (Or
search APP from Google play for Android phone, Apple store for iPhone). Please refer
Quick Guide for QR code image.
2. Charging the Camera
Connect the camera with automobile’s cigarette lighter charging cable( 5V DC
output). AC adapter with 5V DC output can be used as well. Full charge will
take about 6 hours for the camera.
Camera can work when charging.
Notes for camera:
•If the battery is exhausted, please recharge it with the charging cable.
CAMERA LED INDICATOR
STATUS
Red on
Charging when power off
Red
off
P
Finish charging
Green on Power on
Green off Power off/Work in STA mode
Green blinking Work in AP mode

6
3. Mount the Camera
Mount the camera on the trailer tailgate, and then adjust a suitable angle to see
the htich bolt you want to see.
Camera can be attached by strong magnetic base or Gopro compatible holder
4. Power On the Camera
After the camera is fully charged, press the camera power button to turn on your
camera
(Option) You can turn on the white LED to use it as a flash in darkness, or make the
background of the video from your camera more clear. Press the camera Flash
ON/OFF button to turn on white LED.
Note:
1) Press and hold flash ON/OFF button for about 10 seconds can reset the camera.
2) Camera will enter AP mode after reset and reboot
7
5. Viewing the Camera With Smart Phone
a) AP Mode (Access camera directly without wireless router)
Note: AP mode: Camera can function as a WiFi access point(hotspot). Smart phone can
connect with camera directly.
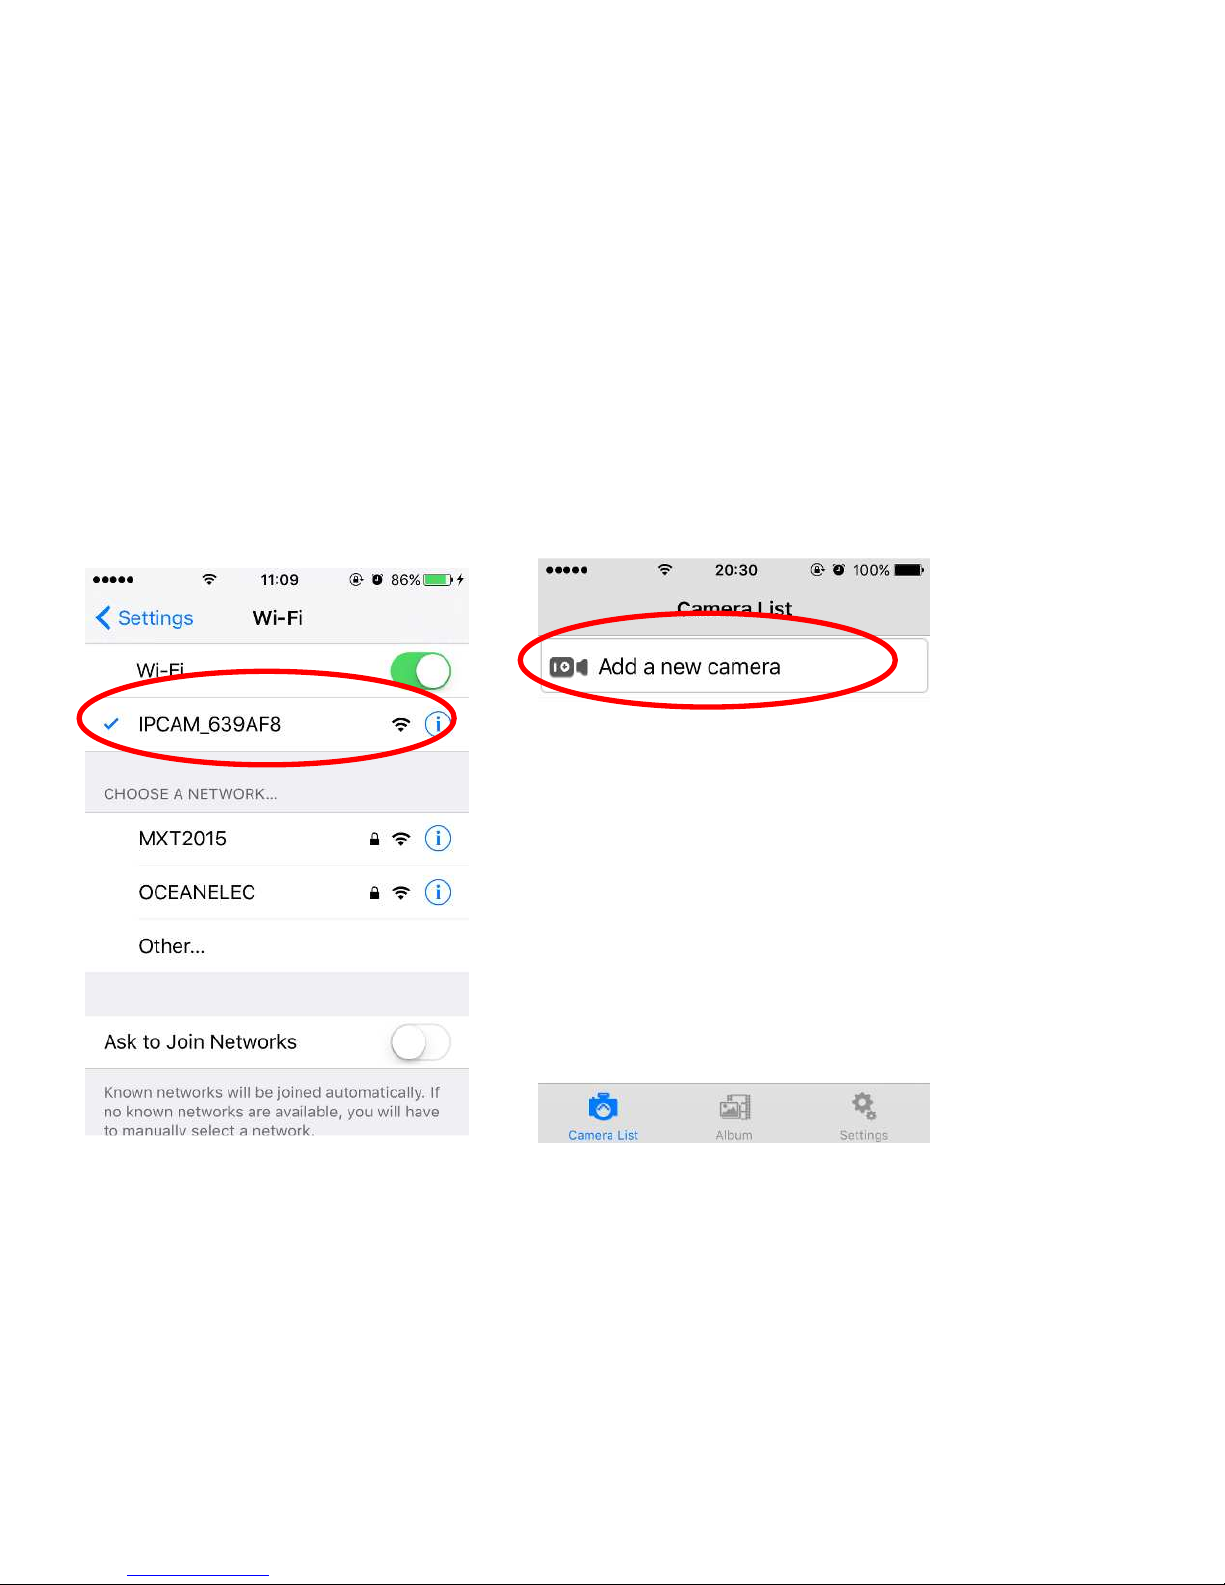
Chose the WiFi SSID named" IPCAM_xxx" on smart phone WiFi access list(FIG-01)
FIG-01 FIG-02
1) Enter WiFi password: leave it as blank or enter “88888888”
2) Run downloaded APP on smart phone
3) Tap on camera icon to add the camera (FIG-02).
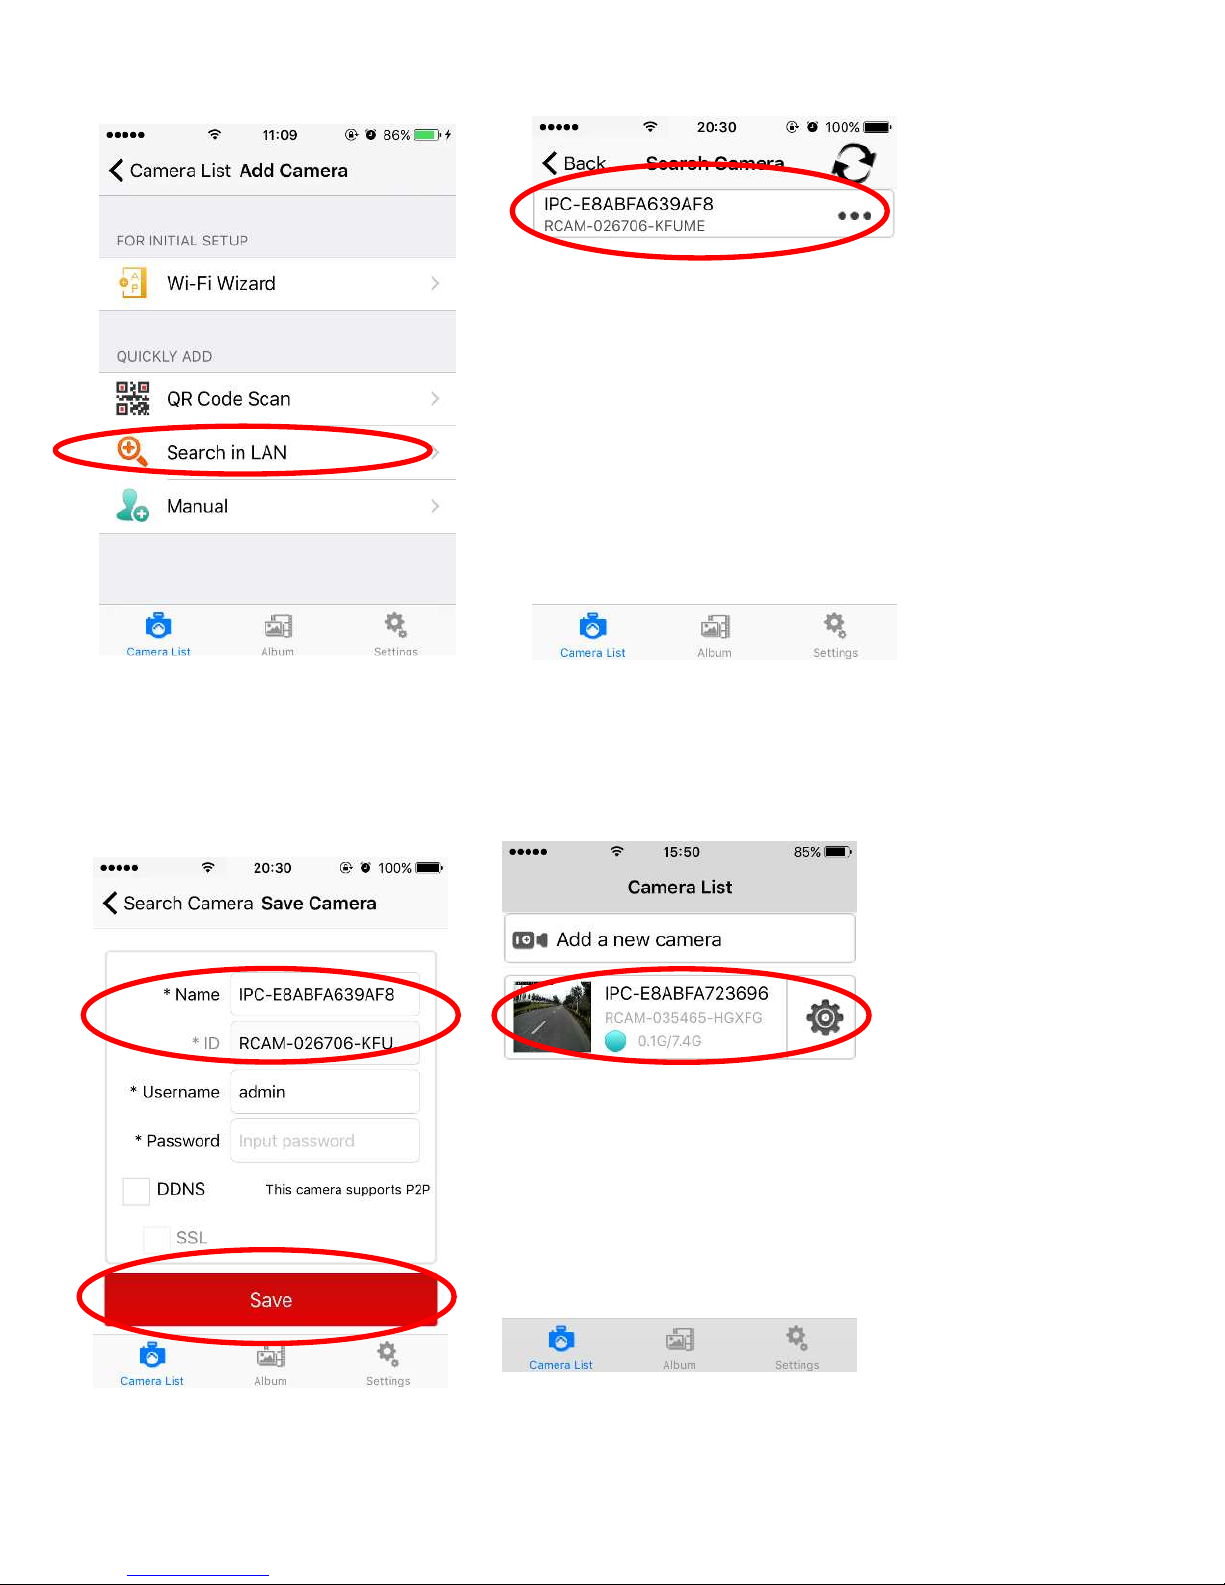
4) Tap on “Search in LAN“(FIG-03).
8
FIG-03 FIG-04
5) Camera will search and display with ID code. (FIG-04)
6) Click the ID code and enter the camera setup menu. You can edit your camera name
and then click “Save “ (You can leave password blank) (FIG-05), and you will see the
“Camera List” interface (FIG-06)
FIG-05 FIG-06

9
7) The camera which has a Bright Blue point icon show that the camera has connected to
your Smart phone.(FIG-06)
8) Tap on the camera which you want to see,(FIG-06), and you can start enjoying camera
lives. (FIG-07)
FIG-07 FIG-08
2. STA Mode(Access camera via wireless router ,optional)
Note: STA mode: Camera works as a device which can connect with wireless router, Smart
phone view camera via this router.
If you have a wireless router nearby where the camera is installed, you can connect your
camera to the WiFi network of this router, and then view the camera either in LAN or WAN
network.
This can extend the wireless transmission distance of the camera, as long as your smart
phone connects to this wireless router, you can see the video from your phone. If your router
is connected to the internet, you can view the video on smart phone or PC at any place
having the internet access.
1) Enter the main menu of the camera list, Tap on the icon of the camera which you want to
set. You will see pop up setting menu, Tap on “Router” on the menu(FIG-08) . You will see

10
a List of WiFi SSID nearby(FIG-09):
FIG-09 FIG-10
2) Choose the WiFi SSID of your wireless router, input the correct password, click “OK”,
(FIG-10) Your camera will be rebooted and shift to STA mode. The wifi icon will be
displayed as bright blue color as below.
If wrong password is input, you camera will not be able to establish valid WiFi connection
to router and camera waits another 30 seconds to go back AP mode and then you need
setup camera again with correct password to function in STA mode.
Note:Reset the camera will make the camera go to AP mode
3. Switch from STA Mode to AP Mode
If you want your camera to disconnect with the wireless router, you can switch the camera
from STA to AP mode again:
1) Enter the main menu of the camera list,
tap on icon, then click
“Setting”
icon (FIG-08) ,
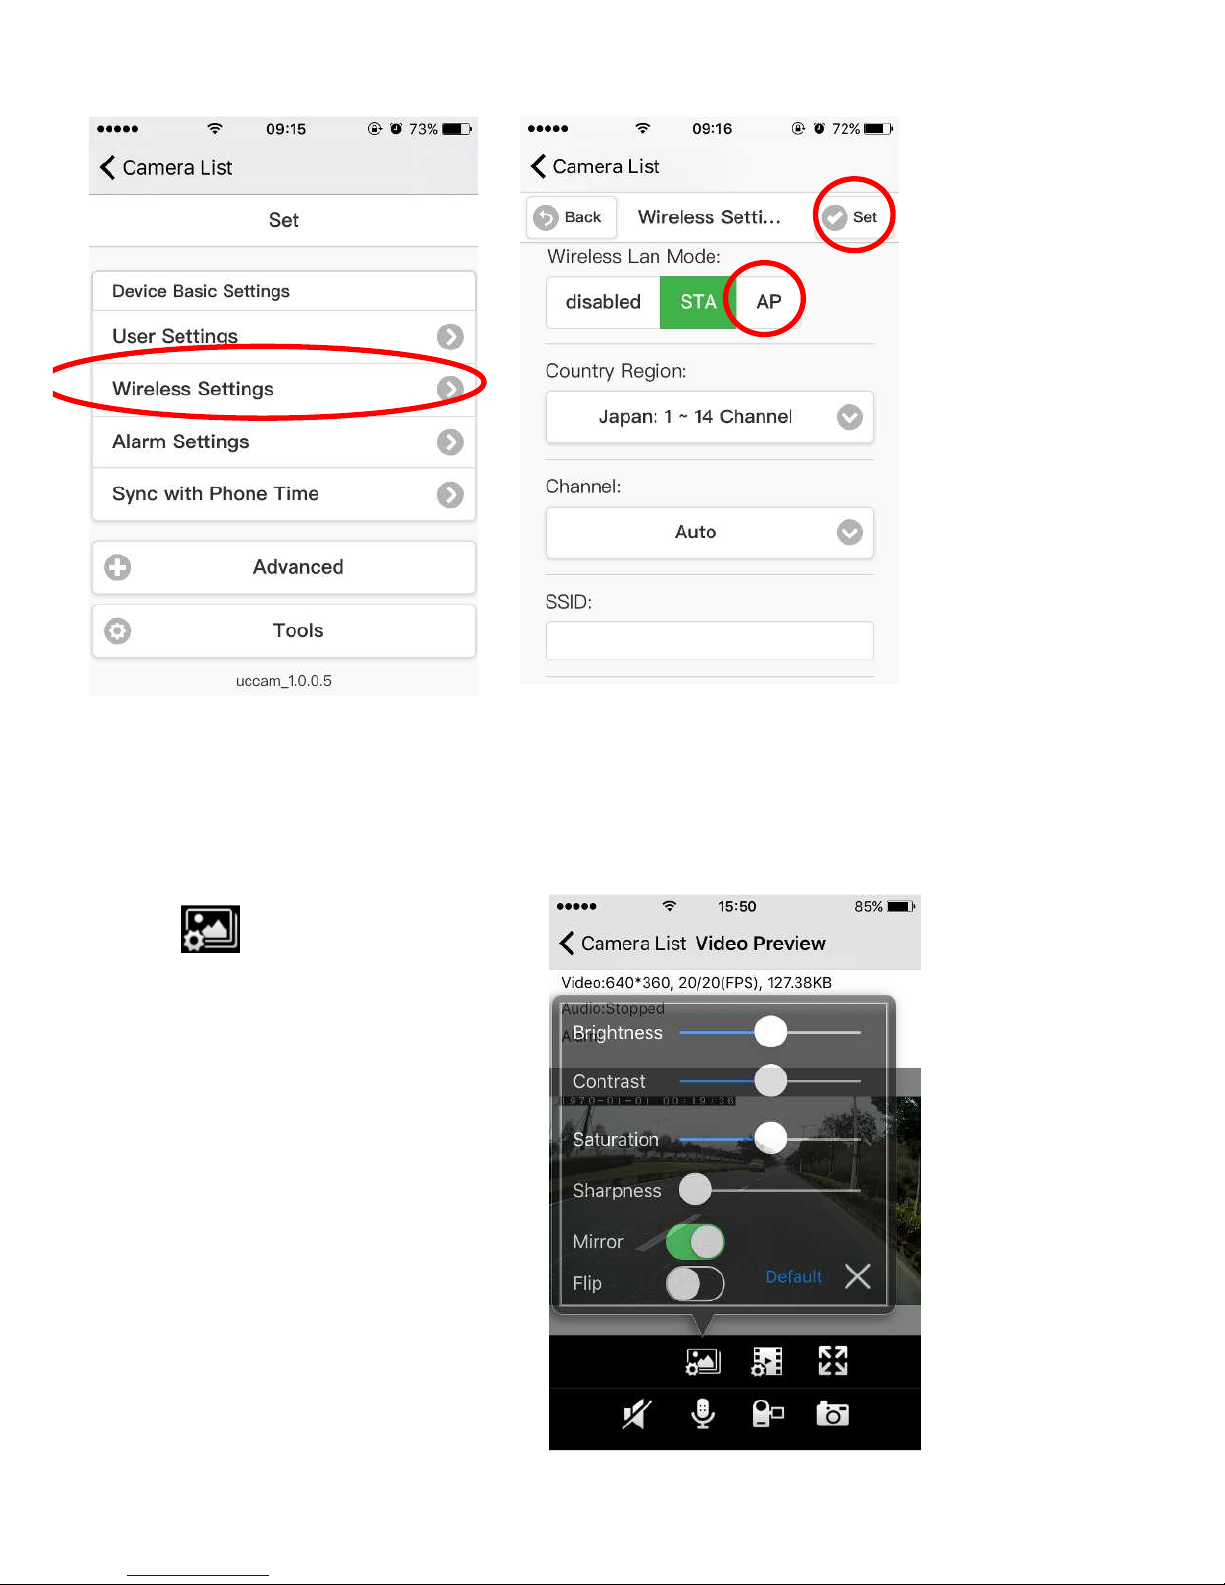
you can enter camera setting menu(FIG-11):
2) Click “ wireless settings”, You will see wireless LAN Mode setting button, click “AP” mode,
and click “Set”(FIG-12), there will appear a dialog box, click “Sure”, Your camera will be
rebooted and disconnect from the WiFi network of your wireless router and back to the AP
mode which can view video directly from smart phone.
11
FIG-11 FIG-12
4. Main Function of Camera APP
When you enter the video interface. (FIG-07), you can operate the main function of the APP
as following:
1) Click to set image
parameter (FIG-13)
such as brightness, contrast,
saturation, sharpness, mirror and flip.
Mirror function can exchange the left
and right of the image when you put
your camera facing to the tail of your
Car/Truck/RV so you can see the
video as normal direction).
Video can also be turned upside
down by choose check box ”Flip”
( exchange the Up side and Down
side)

12
FIG-13
2) You can change the video quality by choose your prefer quality level by click icon :
IOS APP selection:
Standard: VGA 640x480 resolution
HD: 1280x720 resolution
Android APP selection:
High definition: 1280x720 resolution
Standard definition: VGA 640x480 resolution
Smooth: keep the video steam faster and fluent ( less delay)
3) You can take a picture directly by clicking and save its in local memory storage
of smart phone.
4) You can record videos directly by clicking and save its in local memory storage
of smart phone.
5) You can open the camera voice by clicking (If the camera as built-in microphone)
6) You can zoom to full screen of the image by clicking and you can back to normal
display by change the smart photo orientation from horizontal to vertical. (Portrait orientation
lock must be set to off for Smart phone )
7) Video record playback and photo review
You can review and playback the picture
and video that you have taken and
saved in local memory storage of
smart phone.
8) Enter the camera list interface.
Refer to FIG-06
9) Click , Click the camera
which you want to see.
Then select the record files(FIG-14)
Note: Android APP icon is
10) Click the files you want to see.
Then you can see the video or photo.
11) You can share these video/photo
to your friends on Facebook/Twitter FIG-14
5. Advance Function & Setting On Home Security Application

13
1) Scheduled recording function:
When you use the camera for home security, you can set as following:
Enter the main menu of the camera list, tap on icon, then tap on “Setting” icon (FIG-
08), then enter camera setting menu.
Click “ Advanced”, then select “Record Setting” and click. (FIG-15)
FIG-15 FIG-16
Set “Enable Recording” to “ON” (FIG-16), click “Edit Schedule” , you will enter record
schedule setting sub menu , select the specific date & time you want to record, then click
“Set”
2) Alarm function
You can set alarm and record video into the built in TF card of the camera after the alarm
is triggered and let you check the alarm event by viewing video on your phone or download
recorded video to your phone.
The alarm can be triggered by motion detection or sound
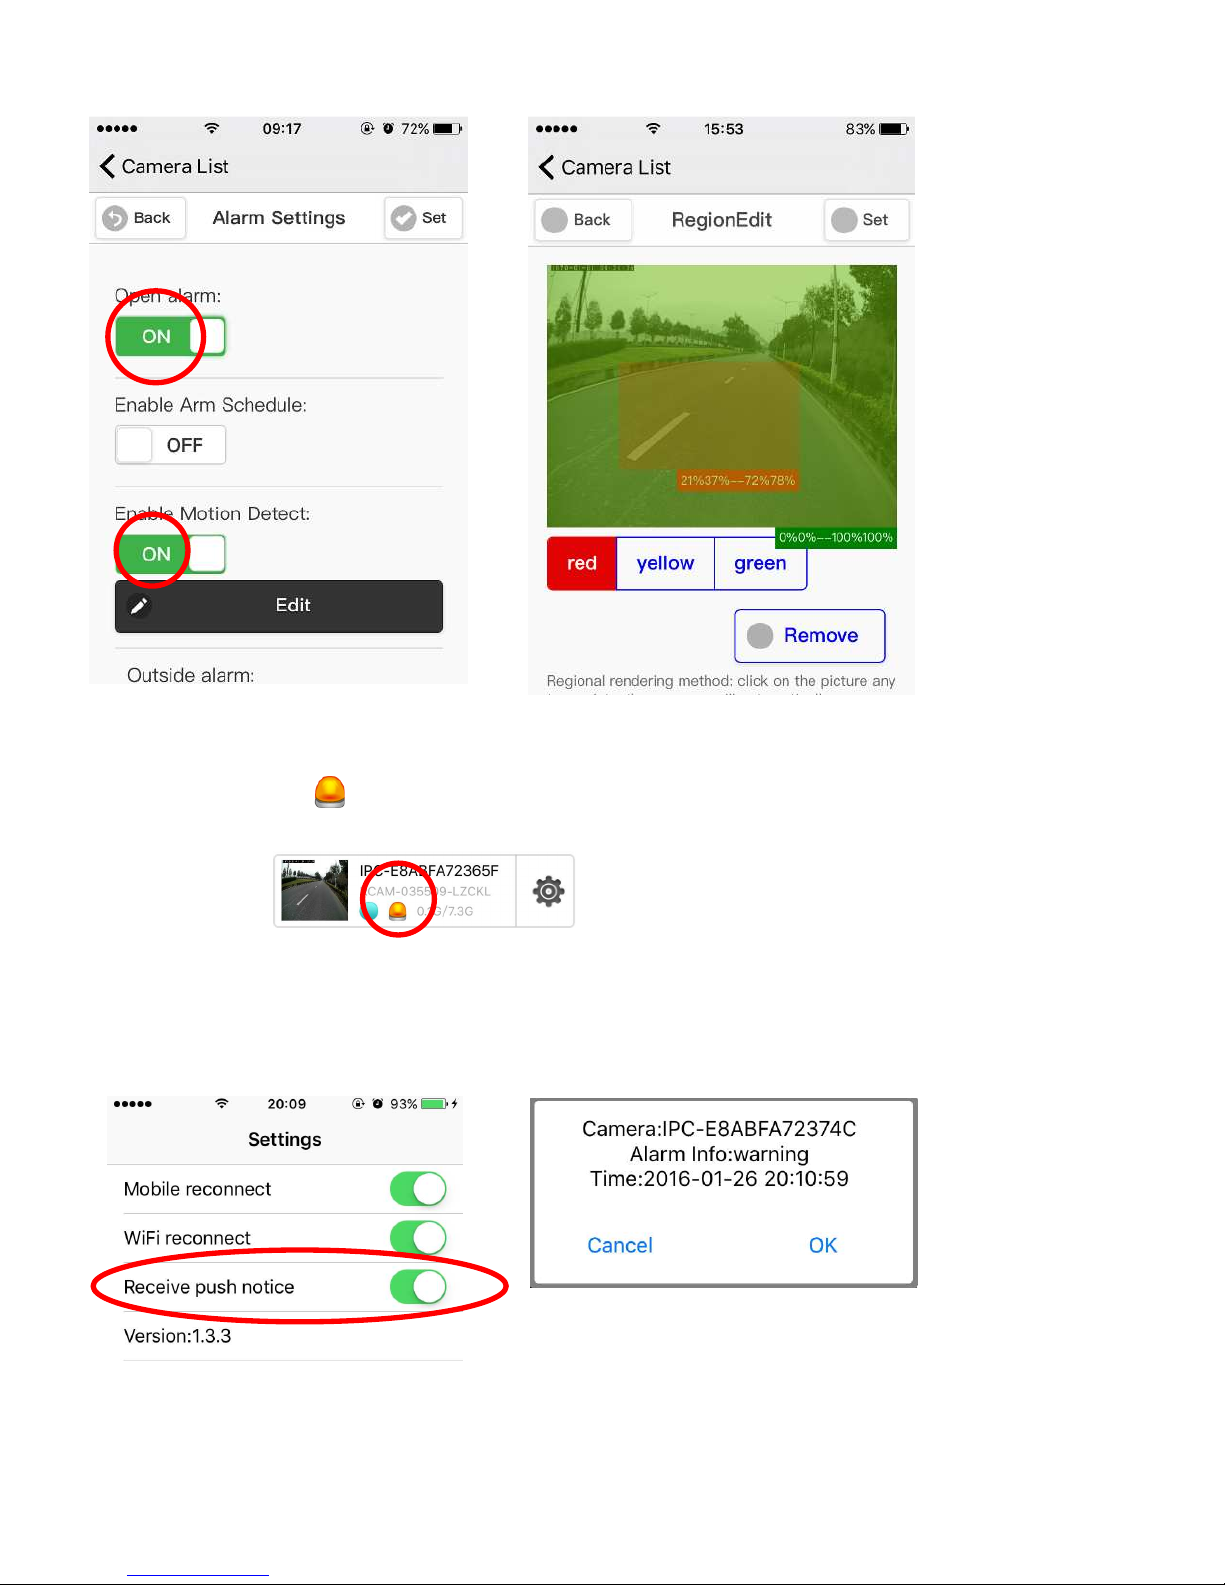
Enter camera setting menu, select and click “Alarm Setting”.
On the setting menu, set “Open Alarm” button to “ON “ to let the alarm is triggered when
the alarm condition happen such as motion detection, object missing , sound etc. (FIG-17).
Set “ Enable Arm Schedule” to “ON” and click “Edit Schedule”, you can set the alarm
schedule by specifying date & time which alarm can be triggered.
Set “ Enable Motion Detect” to “ON” and click “Edit ”, you can set the motion detect area
which you want. (FIG-18)
14
FIG-17 FIG-18
Click “Set” to complete alarm settings and back to the camera list, you will
see the alarm
icon when alarm is triggered to remind you to check the recorded alarm video on TF card of
the camera :
If the camera is connected to internet by router, and you set the receive push notice to
ON(FIG-19)you will get a push notification for warning message when the alarm is
triggered (FIG-20), click “OK” , you can view the alarm picture on your phone.
FIG-19 FIG-20
15
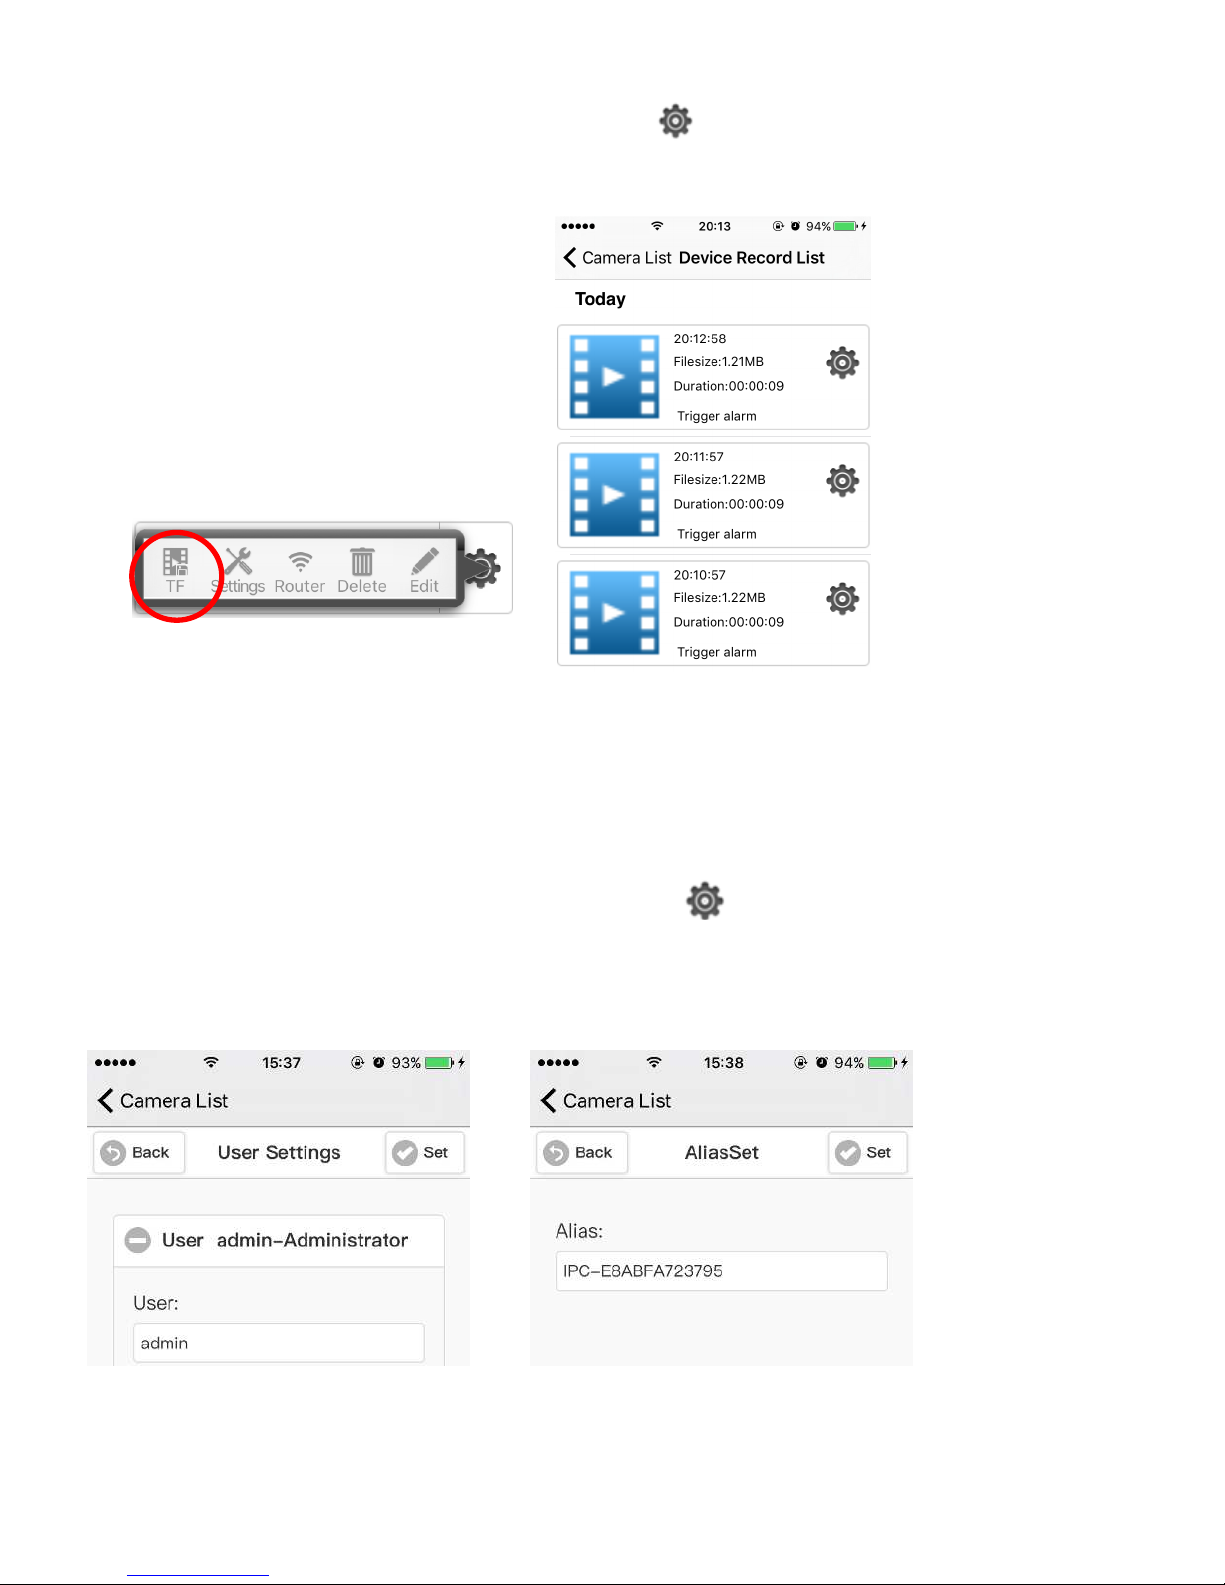
Enter the main menu of the camera list, Click icon (FIG-08), then click the TF icon as
following(FIG-21) to check the recorded video in TF card (FIG-22). Select a video file to
open. you can play video right away. Or download it to your phone
FIG-21 FIG-22
3) User name and authorization setting:
You can set the user name of the account to mange the camera, different user can have
different authorization to control the camera , alias of the camera could also be set.
Enter the main menu of the camera list, Click icon, then click “Setting” icon (FIG-08),
then enter camera setting menu.
Click “ User Setting”, then you can set the user information(FIG-23)
Alias setting: Enter “Advanced” menu, select and click “Alias Settings”, you can set
camera alias.(FIG-24)
FIG-23 FIG-24
16
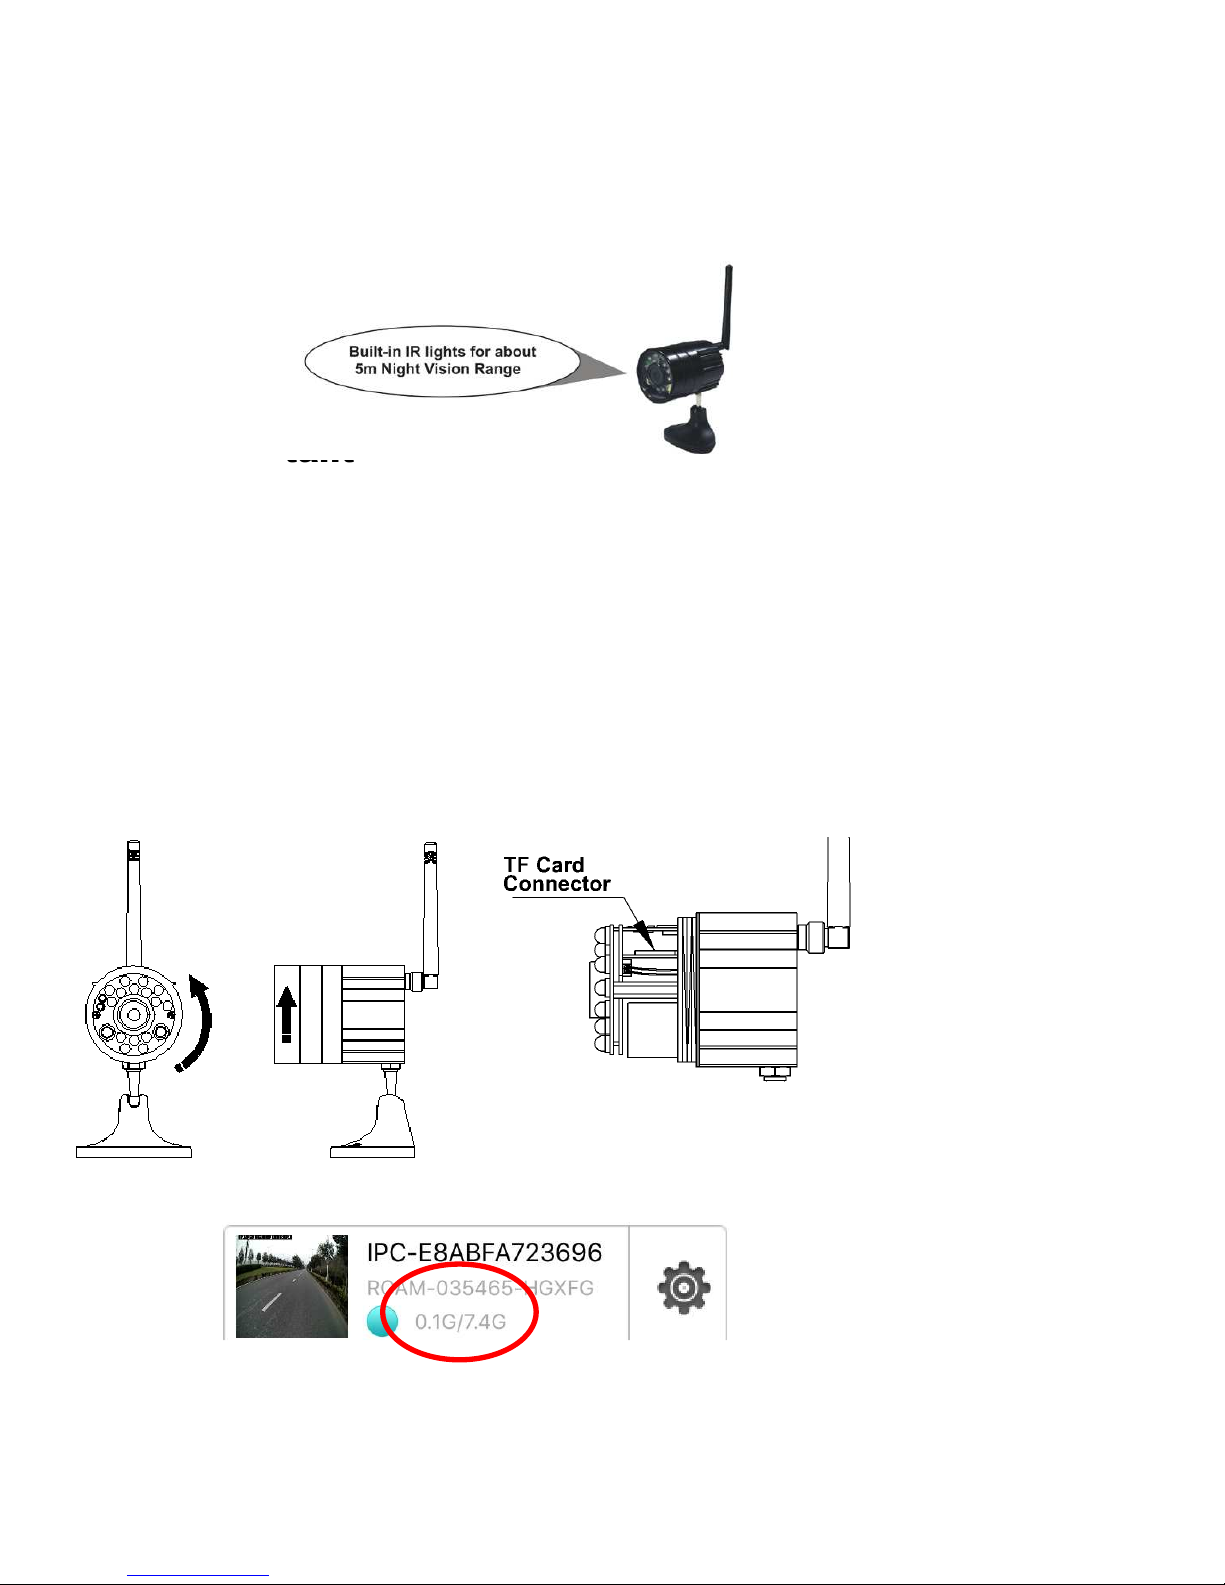
Night Vision
The built-in Infra-red lights in your camera provides night vision for low light conditions. The
Infra-red lights will be automatically activated at night. The picture will turn to Black & White
(monochrome) in Night Vision status.
Water Resistant
The water resistance feature is for the camera only. The camera can be used in rain but we
do not recommend submerging the entire camera.
Install TF Memory Card
You can insert TF memory card into camera by yourself.
1)
Take off the front cover of camera by rotating counter-clockwise (Fig-25)
2)
Inset TF card into the card tray with correct direction (FIG-26)
3)
Put back the front cover of camera
4)
You can see the memory size information of TF card on the phone.(FIG-27), including
total space and used space.
FIG-25 FIG-26
FIG-27

17
SPECIFICATIONS
Item Description Specification/Parameter
Working Mode P2P/AP/STA
Transmission
standard/Protocol WiFi-------IEEE 802.11B/G/N CSMA/CA
ACK
Modulation Mode OFDM/DBPSK/DQPSK/CCK
Transmission Distance 50m(open area site)
Receiving Sensitivity -85dBm@11M
Transmission Power 17dBm (Max.)
Wireless
Antenna 2dBi /External
Imaging Sensor 1/4″CMOS
Total Pixels(Max) 1280x720 ( 1 Mega)
Resolution 1280x720/640x480/320x240
Compression Mode H.264
Frame Rate 25bps/VGA; 15bps/720P
View Angle 100°
Video
Minimum Illumination 2.0Lux/F2.0 & 0Lux (IR ON)
Power Supply Input DC+5V
Battery Type Li- battery 3.7V/3000mAH
Consumption Current 330mA (IR & white LED off)
Charge Time Up to 6 hours (Power off)
7 hours(IR OFF)/ 5 hours(IR ON)
Power
Working Time 3hours(White LED ON)
LED Quantity IRLED 14pcs/White LED 2pcs
Night
Vision IR LED Light Range 5m /60°
Waterproof Grade IP66
Magnet base 8kg (Vertical)attaching strength
Weight 320g
Outline Dimension
(W × H × T) MAX 70x 54 x 504mm (W/O base stand)
Store temperature -40°C~85°C / -40°F~185°F
Operation temperature -10°C~50°C / 14°F~122°F
Others
Operation humidity 0%~90%
i. Actual transmission range may vary according to weather, location, interference or
building construction.
ii.
All the specifications are subject to minor change without prior notice.

18
TROUBLESHOOTING
If you experience operation problems, please check and try the following yourself before claiming that
it is the defective product or consulting the experienced technician.
Abnormal Phenomena
Possible/Solutions
Can not find camera
WiFi
Check if the camera is power on
Check the distance & blocks.
Check if there is stronger wifi
signals from other routers
Camera is hooked to wireless router first but
router don’t work
Tried both AP and STA mode,but still
could not find camera, please reset the camera
Disconnect with camera
1. Check the distance & blocks
2. Re-power on/off or reset camera
Low frame rate
video 1. Interference signal from other source
2. Check the distance & blocks
3. Check the video quality setting
Thank you for using the EsiCam
Phone: 626-560-3456
Email: sales1@oceanelec.cn
Ocean Electric Co. Ltd.
200 Centreport r.Suite 365,Greensboro, NC 27409
Other manuals for EH05
1
Table of contents
Other ESICAM Security Camera manuals


Popular Security Camera manuals by other brands


Digital Watchdog
Digital Watchdog MEGAPIX DWC-MV94Wi36T quick start guide

Genie
Genie WIPX2LBVLPR user manual

LIBERTY AV SOLUTIONS
LIBERTY AV SOLUTIONS DL-USB-PTZ20-W quick guide

Direct IP
Direct IP Idis DC-S6286HRXL-A Operation manual

Clinton Electronics
Clinton Electronics CE-PTZ10X user manual

OpenEye
OpenEye OE-C3012T4B-S user manual


