Esko CDI CRYSTAL TOUCH 20.1 User manual

CDI CRYSTAL TOUCH 20.1
USER MANUAL
31.08.2021

CDI Crystal Touch 20.1 –Operating Manual
2
© Copyright 2021
Esko-Graphics Imaging GmbH, 25524 Itzehoe, Germany
All rights reserved. This document and all information and instructions contained within are the property
of Esko-Graphics. These documents contain the product descriptions according to their current state at
the time of publication, but no responsibility whatsoever is taken for the correctness of this information.
No guarantees are granted or expanded upon by this document. Furthermore, Esko-Graphics does not
guarantee the illustrations relating to the usage of the products, or for the results from using the software
or the use of the information contained herein. Esko-Graphics is not responsible for direct or indirect
damages caused by the logical consequences or latent damages which may result from the use of the
software, or from the impossibility of software use or of the information contained herein.
The technical data contained herein and the content of this manual are subject to change without prior
notification. Revisions which point out such changes and/or supplements may be issued from time to
time.
Without express written consent, no part of this document may be reproduced, transferred, electronically
stored or published, irrespective of the reasons and irrespective of the method or means used, i.e.
electronic, mechanical, by printing, microfilm, etc.
These documents replace all previous versions.
Grapholas® is a registered trademark of Esko-Graphics Imaging GmbH.
Cyrel®, Cyrel® Digital Imaging System and Cyrel® Digital Imager (CDI) are registered trademarks of
DuPont.
Microsoft and the Microsoft Logo are registered trademarks of Microsoft Corporation in the USA and
other countries.
Esko-Graphics software may include the "RSA Data Security, Inc. MD5 Message-Digest Algorithm".
JDF and the JDF Logo are trademarks of the CIP4-Organisation. Copyright 2001 The International
Cooperation for the Integration of Processes in Prepress, Press and Postpress (CIP4). All rights
reserved.
Java and all Java-based trademarks and logos are trademarks or registered trademarks of Sun
Microsystems in the U.S. and/or other countries.
Some parts of this software use technologies of JGoodies, Barbecue (Copyright 2003, International
Barcode Consortium), and Jakarta (licensed by Apache: www.apache.org/licenses/LICENSE-2.0.txt).
All other product names are trademarks or registered trademarks of their respective owners.

CDI Crystal Touch 20.1 –Operating Manual
3
TABLE OF CONTENTS
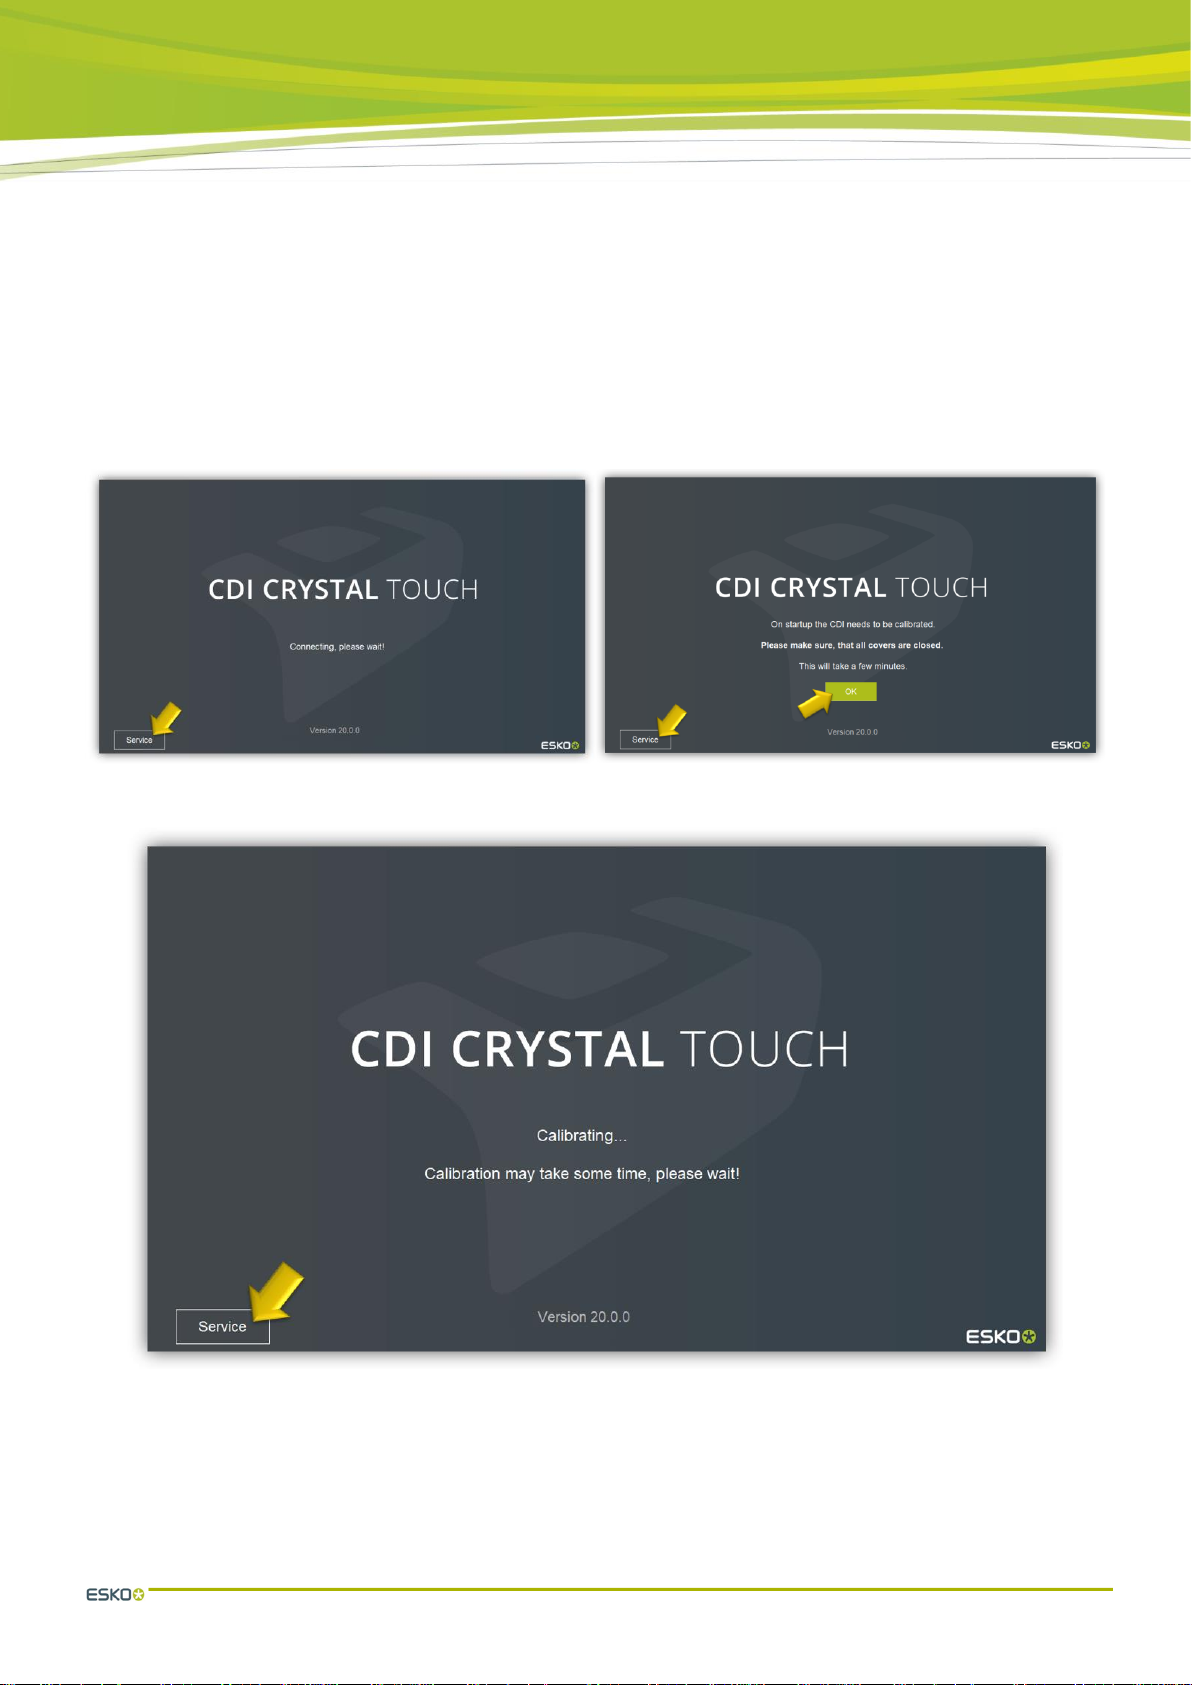
1First Start-up of the Software................................................................................ 4
2Operation of the CDI Crystal Touch Software ...................................................... 5
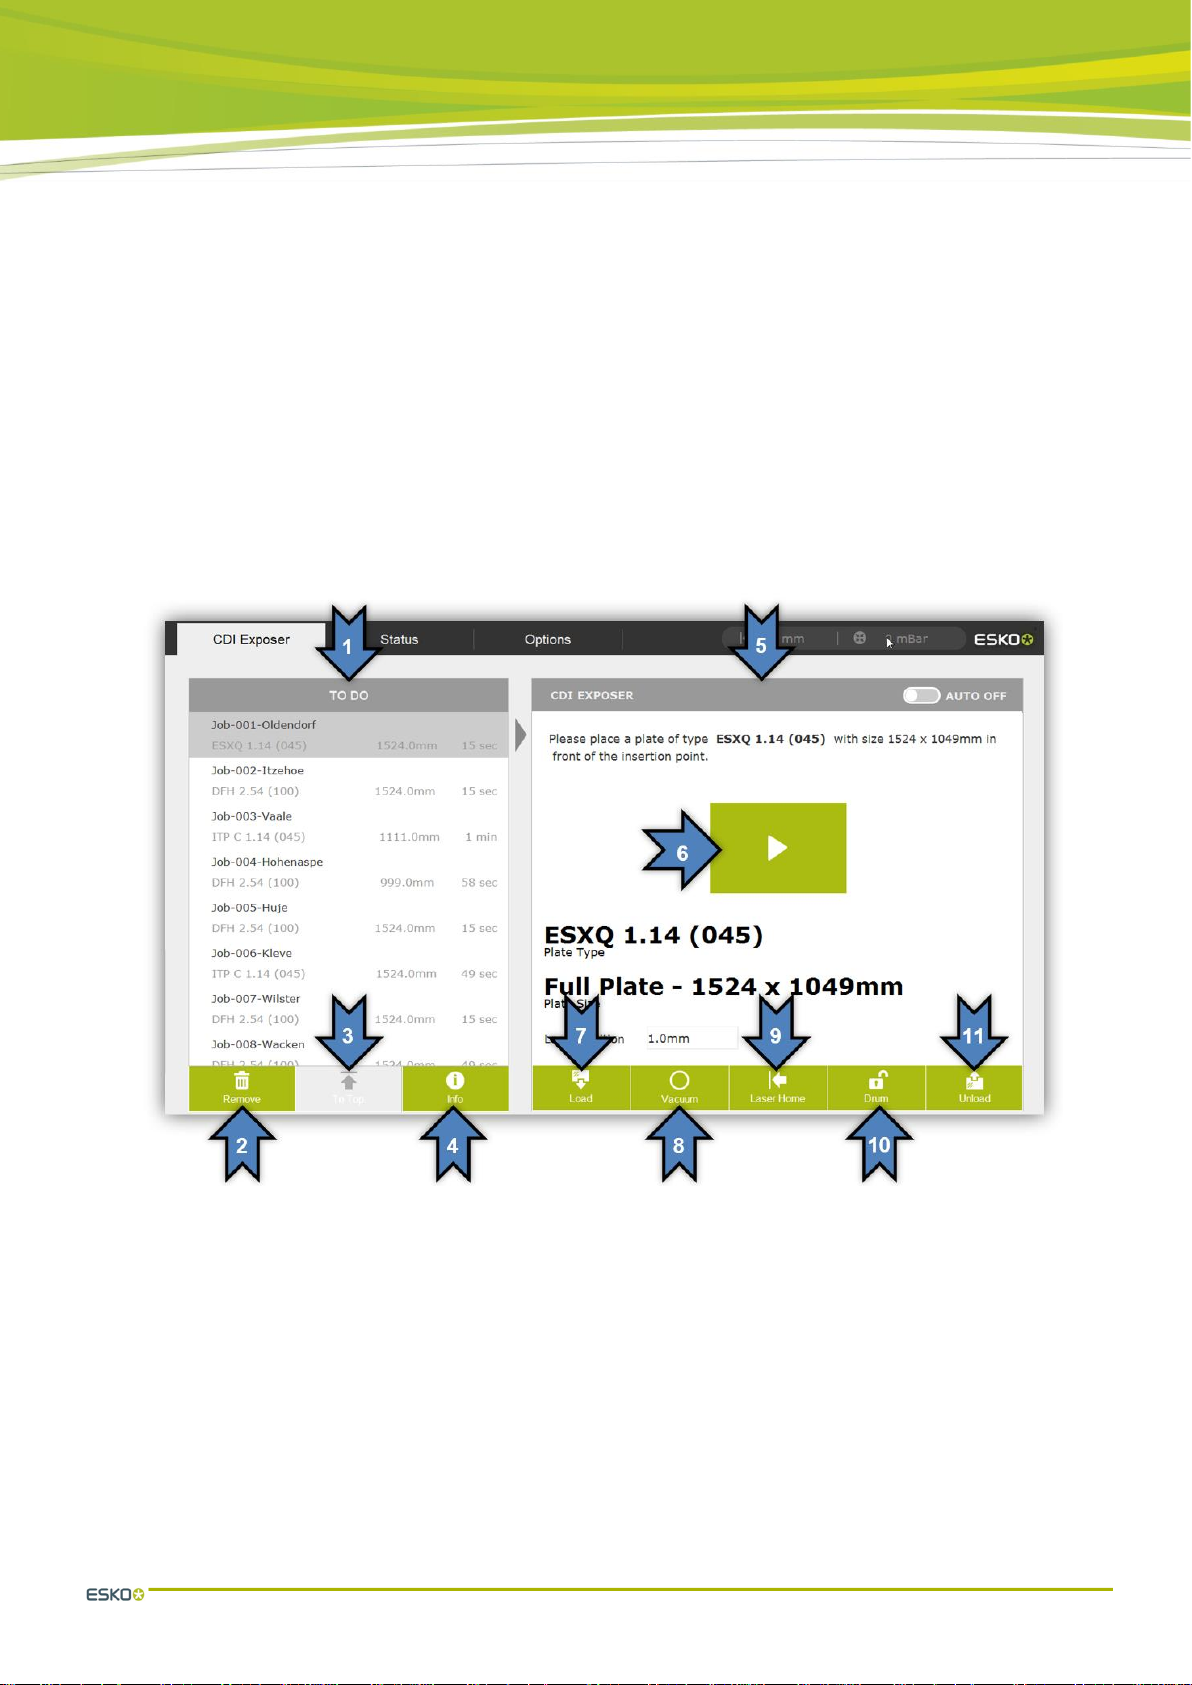
2.1 The user interface.........................................................................................................5
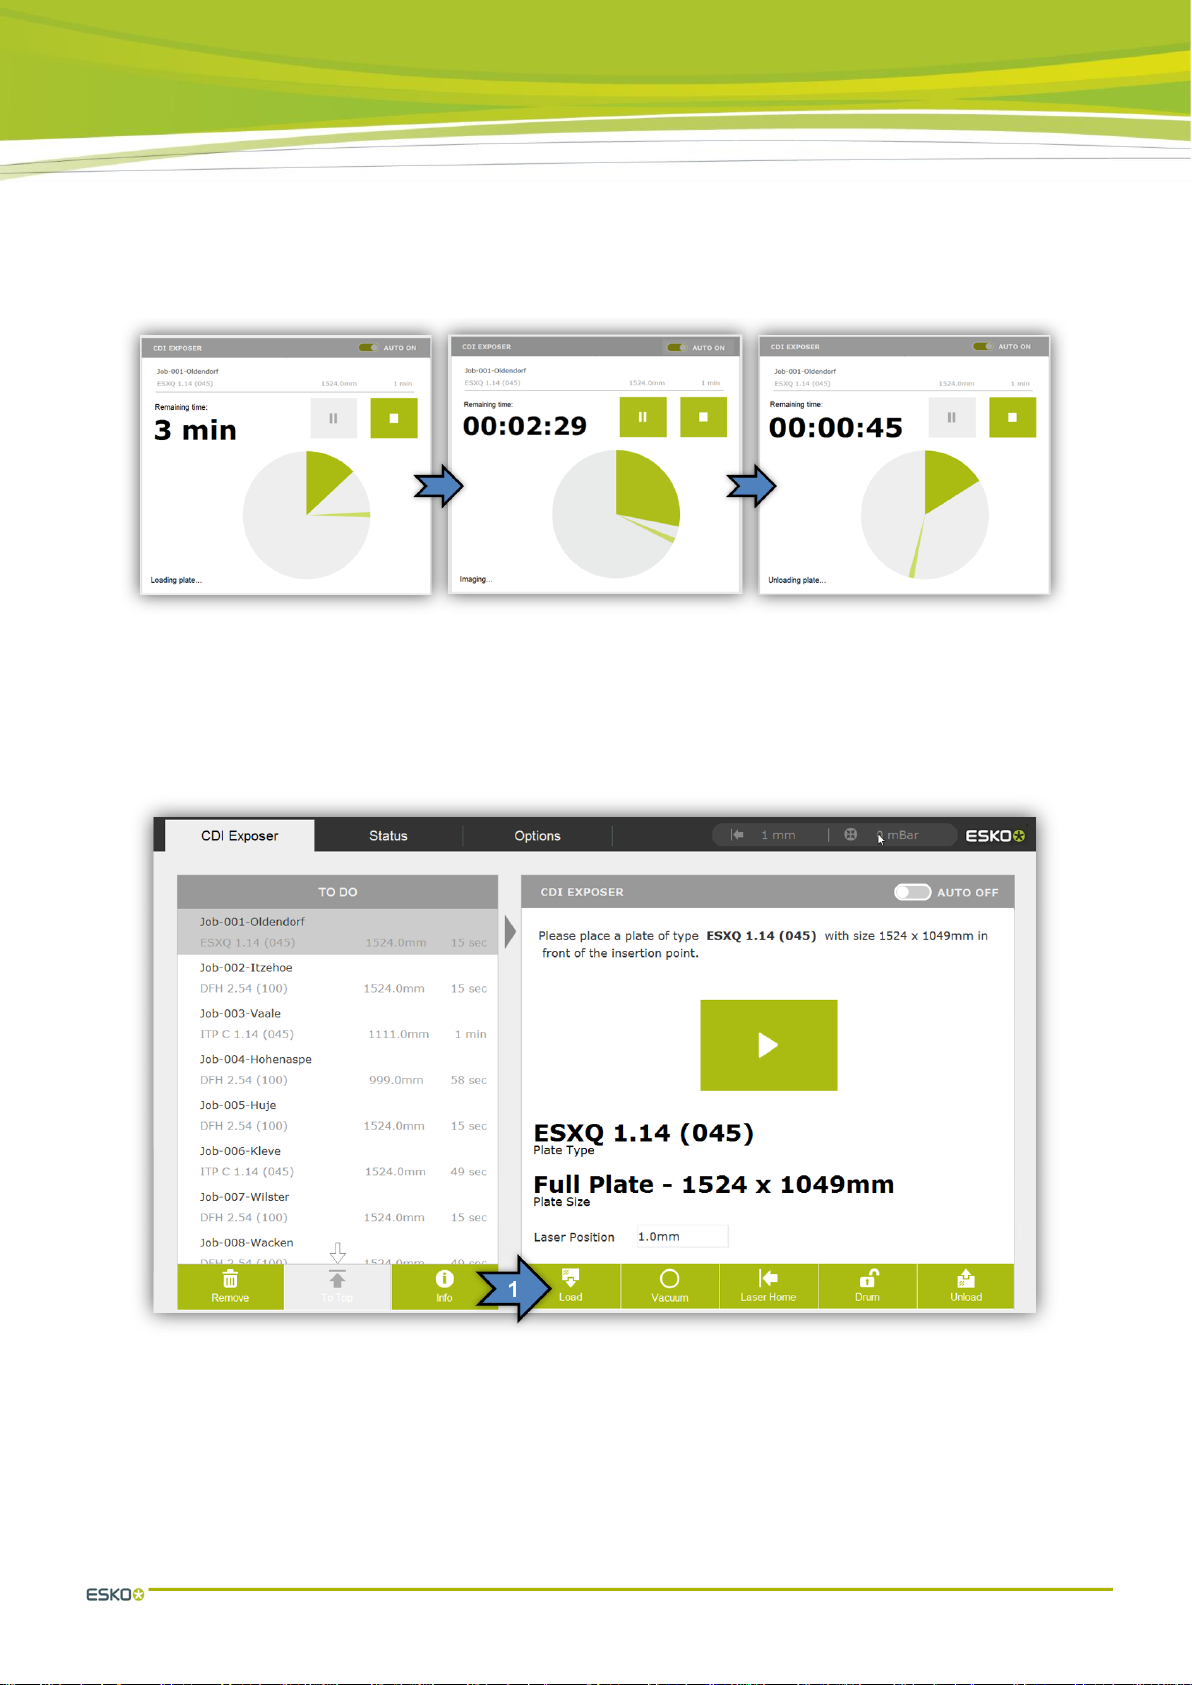
2.2 Automatically starting a job...........................................................................................6
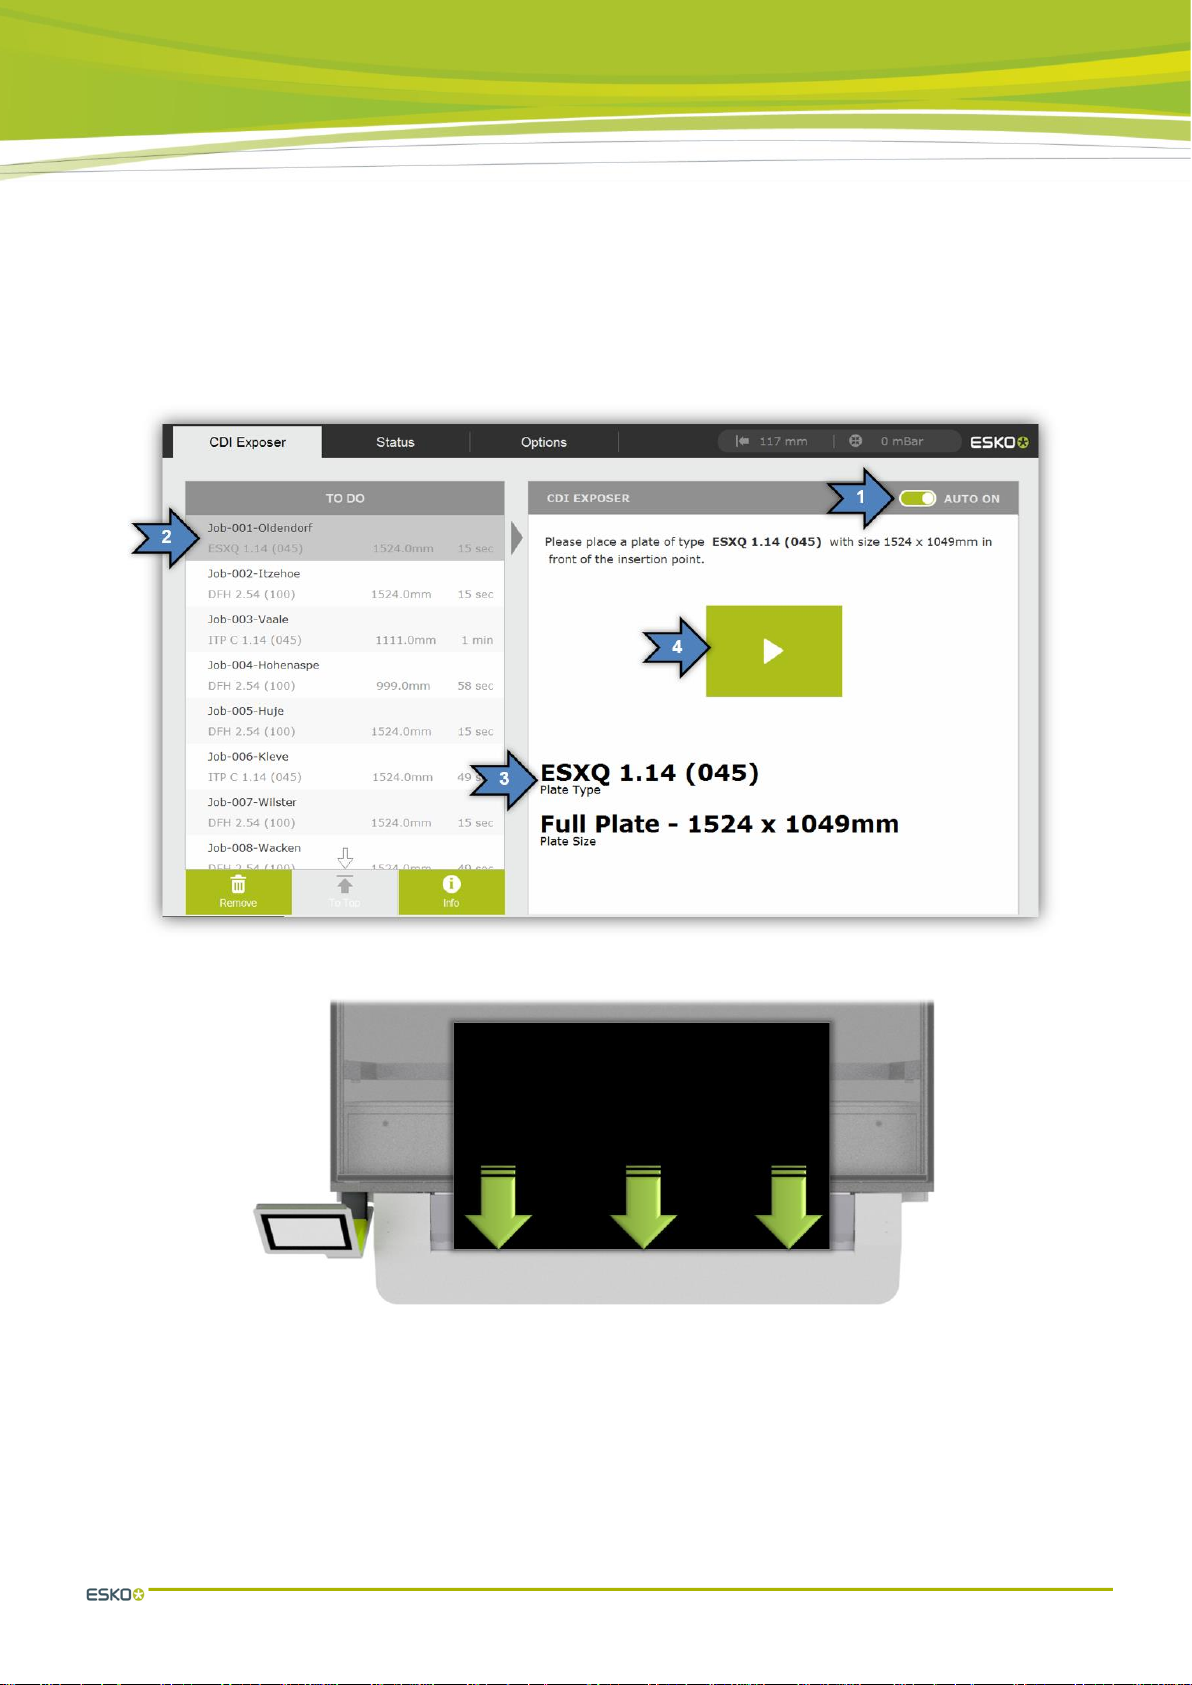
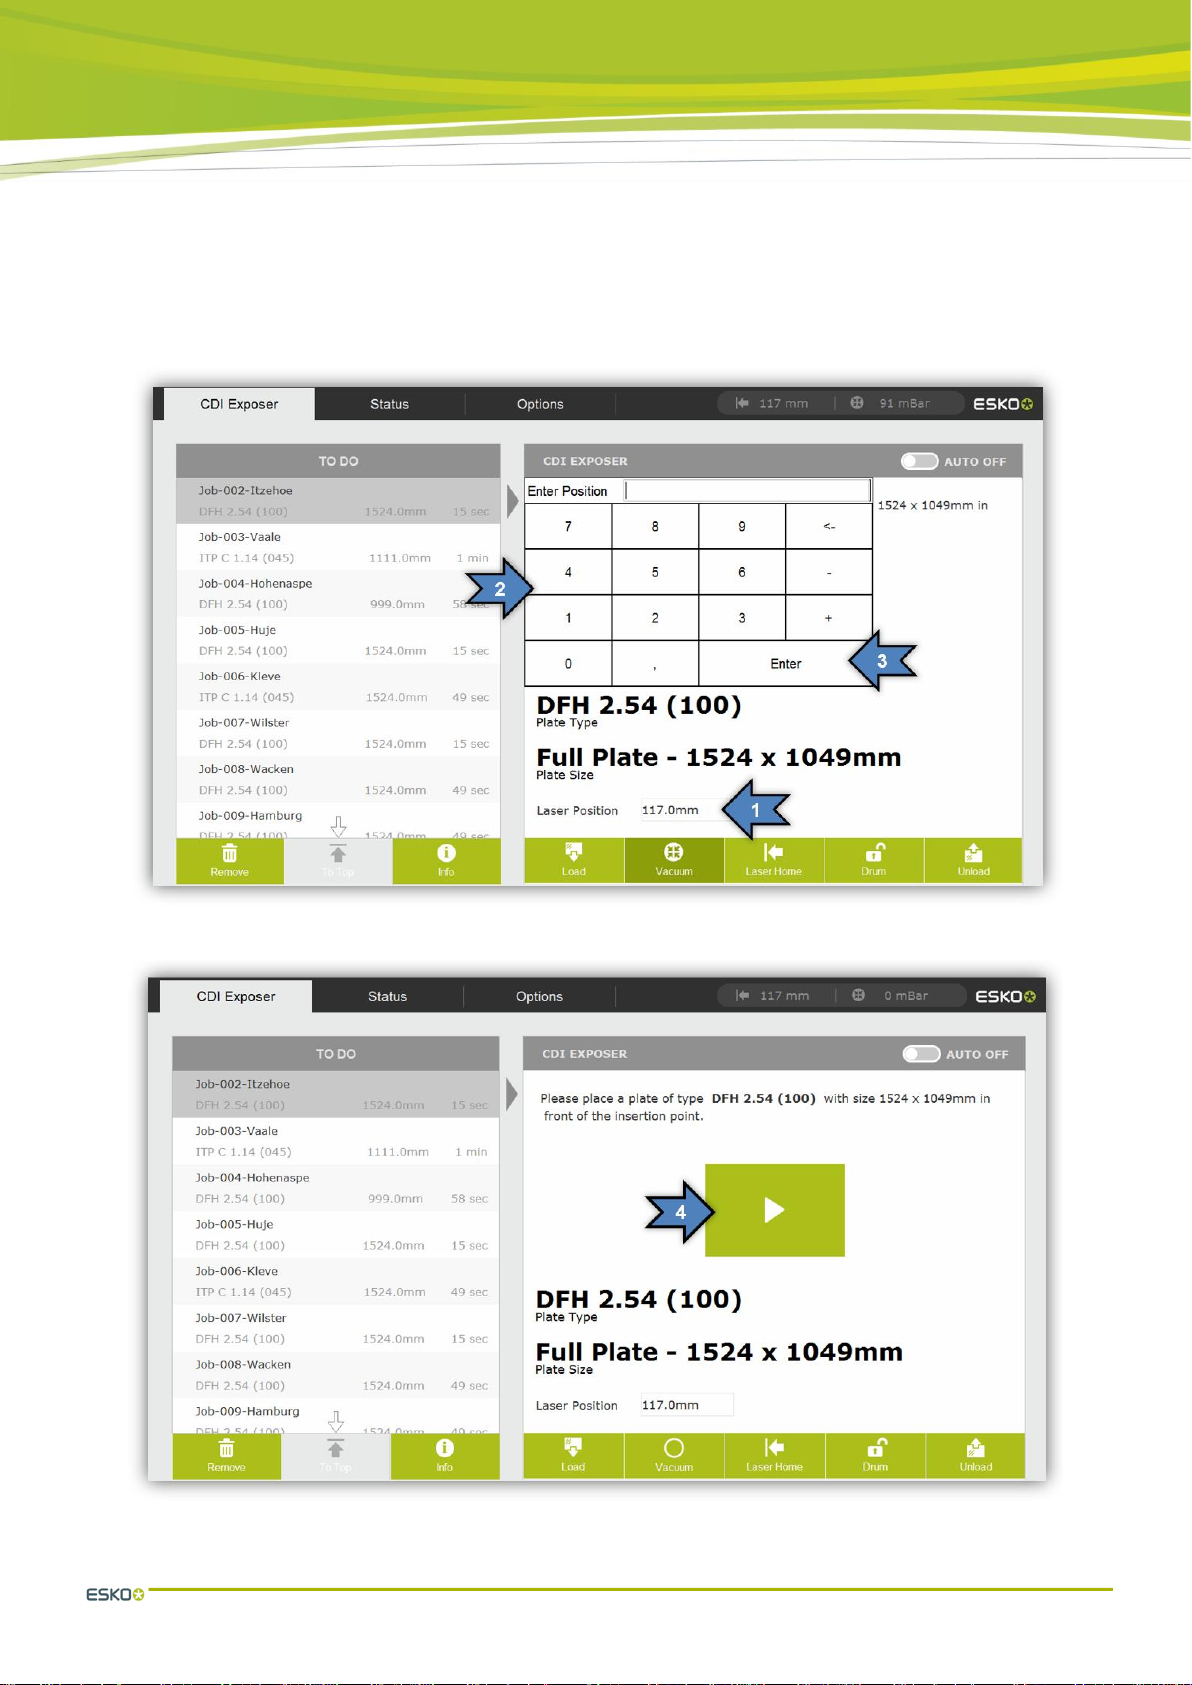
2.3 Automatically loading a plate ........................................................................................7
2.4 Automatically unloading a plate ....................................................................................8
2.5 Manually starting a job................................................................................................10
2.6 Deleting the job...........................................................................................................11
2.7 Re-ordering the job.....................................................................................................12
2.8 Displaying the information for a job.............................................................................12
2.9 Shutting down the CDI................................................................................................13
3Focus Search..................................................................................................... 13
3.1 Advanced settings ......................................................................................................15
3.2 Evaluation of the regular focus search........................................................................16
3.3 Evaluation of the simple focus search.........................................................................17
4Adjusting the Pixel-Boost parameters................................................................. 18
5Managing the plate list........................................................................................ 19
5.1 Adding a New Plate....................................................................................................20
6Operation of the CDI Crystal Touch Software with Plate Feeder........................ 22
6.1 The user interface with Plate Feeder ..........................................................................22
6.2 Selecting the loading level..........................................................................................23
6.3 Automatically starting a job from the "Plate Feeder" ...................................................23
6.4 Parallel operation with the "Plate Feeder"...................................................................24
7Machine status and data .................................................................................... 24
8Changing the basic settings ............................................................................... 25
8.1 Change language .......................................................................................................25
8.2 Show time...................................................................................................................26
8.3 Set date and time........................................................................................................26
8.4 Switch units (inch/mm)................................................................................................27
8.5 Changing the laser park position.................................................................................28
8.6 Changing the laser position for the automatic process................................................28
8.7 Changing the Pixel-Boost values for the "Step Test"...................................................29
9Support............................................................................................................... 29

CDI Crystal Touch 20.1 –Operating Manual
4
1 First Start-up of the Software
When the CDI is restarted, the interface will wait for the System-Service to start.
If this takes too long, the "Service" button can be used to access a different interface so that
TeamViewer can be started for ESKO Service.
Once System-Service is connected, the axes of the CDI must be calibrated. Click on "OK" to
start the process.
The process may take several minutes.
If this takes too long, the "Service" button can be used to access a different interface so that
TeamViewer can be started for ESKO Service.

CDI Crystal Touch 20.1 –Operating Manual
5
2 Operation of the CDI Crystal Touch Software
"CDI Crystal Touch" is a user interface for touch-sensitive screens. The user interface is
intentionally kept simple.
The enqueuing of new jobs is performed from a PlatePrep, a Digital Flexo Suite or the Device
Manager.
This software is designed for a touch-sensitive screen.
2.1 The user interface
The software starts in the "CDI Exposer" view.
The exposure jobs can be found in the "TO DO" list (1). Selected jobs can be deleted (2) or
moved upwards (3). A summary of the selected job can be opened by using the "Info" button
(4).
The uppermost job "Job-001-Oldendorf" is displayed in the "CDI EXPOSER" section (5) and can
be started with the Start button (6).
A plate can be loaded onto or unloaded from the drum with "Load" (7) and "Unload" (11).
If the plate is loaded manually, (8) can be used to switch the drum vacuum on or off.
The position of the laser can be moved to a pre-set value with "Laser Home" (9).

CDI Crystal Touch 20.1 –Operating Manual
6
To mask thick partial plates, the drum can be fixed with "Drum" (10) and released again.
2.2 Automatically starting a job
1 Automatic mode switch-on with "AUTO ON" (1).
2 The first job (2) in the "TO DO" list is used.
3 Place the desired plate (3) on the loading edge of the cover.

CDI Crystal Touch 20.1 –Operating Manual
7
4 Start the job with the Start button (4).
5 The plate is fed in automatically, exposed and ejected again automatically.
6 The active job is removed from the "TO DO" list.
2.3 Automatically loading a plate
1 Place the desired plate on the loading edge of the cover.
2 Load the plate with "Load" (1).

CDI Crystal Touch 20.1 –Operating Manual
8
3 An estimation of the loading time is displayed (2).
4 The loading process can be interrupted with Stop (3).
2.4 Automatically unloading a plate
1 Unload the plate with "Unload" (1).

CDI Crystal Touch 20.1 –Operating Manual
9
3 In some cases, the plate thickness may need to be entered manually.
4 An estimation of the unloading time is displayed (2).
5 The unloading process can be interrupted with Stop (3).

CDI Crystal Touch 20.1 –Operating Manual
10
2.5 Manually starting a job
1 Fit the plate manually or with the automatic loading function.
2 The starting position of the drum is changed by tapping the current position "Laser
Position" (1). The new position is entered (2) and confirmed with "Enter" (3).
3 Start the job with the Start button (4).
4 The job can be paused (5) or cancelled (6).

CDI Crystal Touch 20.1 –Operating Manual
11
2.6 Deleting the job
1 Select the desired job.
2 "Remove" (1) deletes the job.

CDI Crystal Touch 20.1 –Operating Manual
12
2.7 Re-ordering the job
1 Select the desired job.
2 "To Top" (1) moves the job to the first position.
2.8 Displaying the information for a job
1 Select the desired job.
2 "Info" (1) opens a new window displaying detailed information.

CDI Crystal Touch 20.1 –Operating Manual
13
2.9 Shutting down the CDI
Tap the "Shutdown CDI" button under "Options" (1). Please wait for Windows to shut down
completely before pressing the main switch on the CDI.
3 Focus Search
1 Switch to the options menu (1).
2 "Focus Search" (2) opens a new window for the focus search.

CDI Crystal Touch 20.1 –Operating Manual
14
3 Select the plate (1). In the case of partial plates, activate the "Partial Plate" option (2).
4 Select the focus search type. The left-hand option is the regular focus search (3).
Simple focus search (4) is used with the right-hand field.
5 Adjust the position, if necessary (5).
6. Tap "OK" (6) to enqueue the focus search as a job.
7 The focus search is performed as a manual job.
Please see the respective section.
8 "Advanced Settings" (7) opens an additional window containing advanced settings.

CDI Crystal Touch 20.1 –Operating Manual
15
3.1 Advanced settings
If "Advanced Settings" (7) has been tapped, a new window with various focus search
parameters will be shown.
With regular focus search, the lines found under "Dimensions" (8) can be used to adjust the
height and the distance between the lines.
The start value of the focus search can be adjusted in the "Exposer Options" (9) under "Focus
Offset:". For each exposed line the focus will be changed. The focus distance between each line
can be modified under "Focus Advance:".
"Speed" changes the speed of the exposure. It must be noted that for partial plates, this speed
value must not exceed the permissible partial plate speed. Excessive RPMs will cause errors.
The output power of the laser is adjusted under "Laser Power". Normally, these values won't
have to be adjusted.

CDI Crystal Touch 20.1 –Operating Manual
16
3.2 Evaluation of the regular focus search
In the regular focus search, lines with different foci are being exposed. Once exposure has
concluded, a new window will open showing the best focus:
The thinnest line on the plate is always the one being selected (10).
ATTENTION: Some microscopes show a mirrored image!
The plate can be taken off the drum for evaluation (11). The vacuum is switched on and off with
the button (12).
The black line above the numbers (10) indicates the current selection. It can be changed by
using the left-right buttons (13), in order to select the thinnest line.
Line number 10 is the current focus!
"Finish" (14) ends the selection process and the focus is saved.

CDI Crystal Touch 20.1 –Operating Manual
17
3.3 Evaluation of the simple focus search
The simple focus search with Pixel-Boost exposes seven test fields (15):
Information on operating the buttons is provided in the previous section.
To identify the focus, the plate is taken off the drum. The fields are measures using a
densitometer.
The field with the lowest density is selected and the new focus is saved with "Finish" (16).
Field number 4 is the current focus!

CDI Crystal Touch 20.1 –Operating Manual
18
4 Adjusting the Pixel-Boost parameters
The "Pixel-Boost" parameters must be set and tested for each plate.
First, the desired test job is lined up in the CDI Exposer. This job must be sent with the "Pixel+"
option activated.
This job is enqueued accordingly with "Step-Test" (1) under "Options".
The same image is repeatedly produced but with different "Pixel-Boost" values. Later on, it will
be determined which "Pixel Boost" parameter delivers the desired results.
This value can now be modified in the plate list.

CDI Crystal Touch 20.1 –Operating Manual
19
5 Managing the plate list
1 Go to the options menu.
2 "Manage Plates" opens a new window.
In this view, all installed plates are displayed on the left (3). The parameters for the selected
plate are displayed on the right (4).
The "Add" button (5) is used to add a new plate from the database. A new window opens.

CDI Crystal Touch 20.1 –Operating Manual
20
"Remove" (6) removes the currently selected plate.
The parameters for the currently selected plate can be modified as soon as they have been
released with the "Modify" button (7). The changes are saved by pressing "Save" (8).
5.1 Adding a New Plate
Pressing the "Add" button (5) opens a new window containing the plate database:
The plate manufacturers are displayed in the "Brands" column (9). After selecting the desired
manufacturer, the available plates are displayed in the "Plates" column (10).
If the plate is not listed in the database, it is either already installed or not yet available. "other"
may be selected for new plate manufacturers or plates. The requisite performance should be
requested from the plate manufacturer or Esko in advance.
"OK" (11) opens a keyboard so that the name of the plate can be amended:
Table of contents
Other Esko Industrial Equipment manuals
Popular Industrial Equipment manuals by other brands

Grundfos
Grundfos PowerAdapt Installation and operating instructions

Trox Technik
Trox Technik X-AIRCONTROL FAM-RD Installation and operating manual

Blastrac
Blastrac 1-8DPS30 220V-SP operating instructions

Nexen
Nexen AIR CHAMP FMCBE 110-14 user manual

Veeder-Root
Veeder-Root HydrX manual

VALSTEAM ADCA
VALSTEAM ADCA FLT14I Series Installation and maintenance instructions

GPS
GPS GPS-iRIB-18 Installation, operation & maintenance manual

OSO HOTWATER
OSO HOTWATER SX 150 manual

Rego-fix
Rego-fix TORCO-BLOCK operating manual

GL
GL ECO450 Assembly & fitting instructions

ABB
ABB eVM1 Installation and service instructions

ATS
ATS ULTIMATE CHUCK UC2 Installation, operation and maintenance manual