Essential Medical Supply B5040 User manual

E
March 2023, ESSENTIAL MEDICAL SUPPLY, INC.®
B5040 Toilet Safety Rails
AB C D
F
Included in box:
USER WEIGHT LIMIT: 300lbs.
ATTENTION: • Please verify that all components are included as shown above, before proceeding
with assembly.
• Make sure to read and follow these instructions and warnings carefully. Failure to
do so may result in an injury.
• Persons with severe disabilities or persons who are unable to walk without an aide
should not attempt to use this product without assistance. Consult a healthcare
professional for advice and instructions specific to your needs before use.
• Check after installation to make sure the rail is secure.
• Inspect all parts carefully for cracks or breaks and ensure all push buttons are
properly engaged in position before use.
• Evenly distribute weight between armrests during use.
• Periodically check and maintain the condition of the toilet seat bolts to ensure that
they are not damaged. If there is a concern about the strength and condition of the
current toilet seat’s hardware, replace it with an appropriate new set.
x 2
G
ArmrestMounting Bracket Curved Bar #1
Leg
x 2
Bolt
x 2
Wingnut
x 2
Curved Washer
x 2
H
Curved Bar #2
B5040 Toilet Rails Assembly Instructions, March 2023.indd 1B5040 Toilet Rails Assembly Instructions, March 2023.indd 1 4/14/23 3:36 PM4/14/23 3:36 PM

1
Remove the existing
seat and lid from
the toilet; clean
around the toilet’s
mounting holes.
Make sure to save
the existing toilet
seat’s hardware as
they will be needed
in Step 3.
4
2Take the Mounting Bracket (A) and place its at side down onto the toilet bowl;
align the two slotted holes in the Mounting Bracket (A) with the toilet’s seat
mounting holes. The two sets of 3 holes in the tubular portion of the Mounting
Bracket (A) should be facing forwards.
3Install the toilet seat over the Mounting Bracket (A) by using the existing toilet seat’s hardware. Ensure the
hardware is securely fastened.
Assembly Instructions
Take Curved Bar #1(B) and insert the tubing with the push button into the Mounting Bracket (A) until the push
button protrudes from one of the three slotted holes. Make sure the push button is fully protruding from one of
the slotted holes and is facing forwards.
Repeat with Curved Bar #2 (C) and insert it into the other side of the Mounting Bracket (A).
Mounting Bracket (A)
Curved Bar #1 (B)
Curved Bar #2 (C)
B5040 Toilet Rails Assembly Instructions, March 2023.indd 2B5040 Toilet Rails Assembly Instructions, March 2023.indd 2 4/14/23 3:36 PM4/14/23 3:36 PM
5
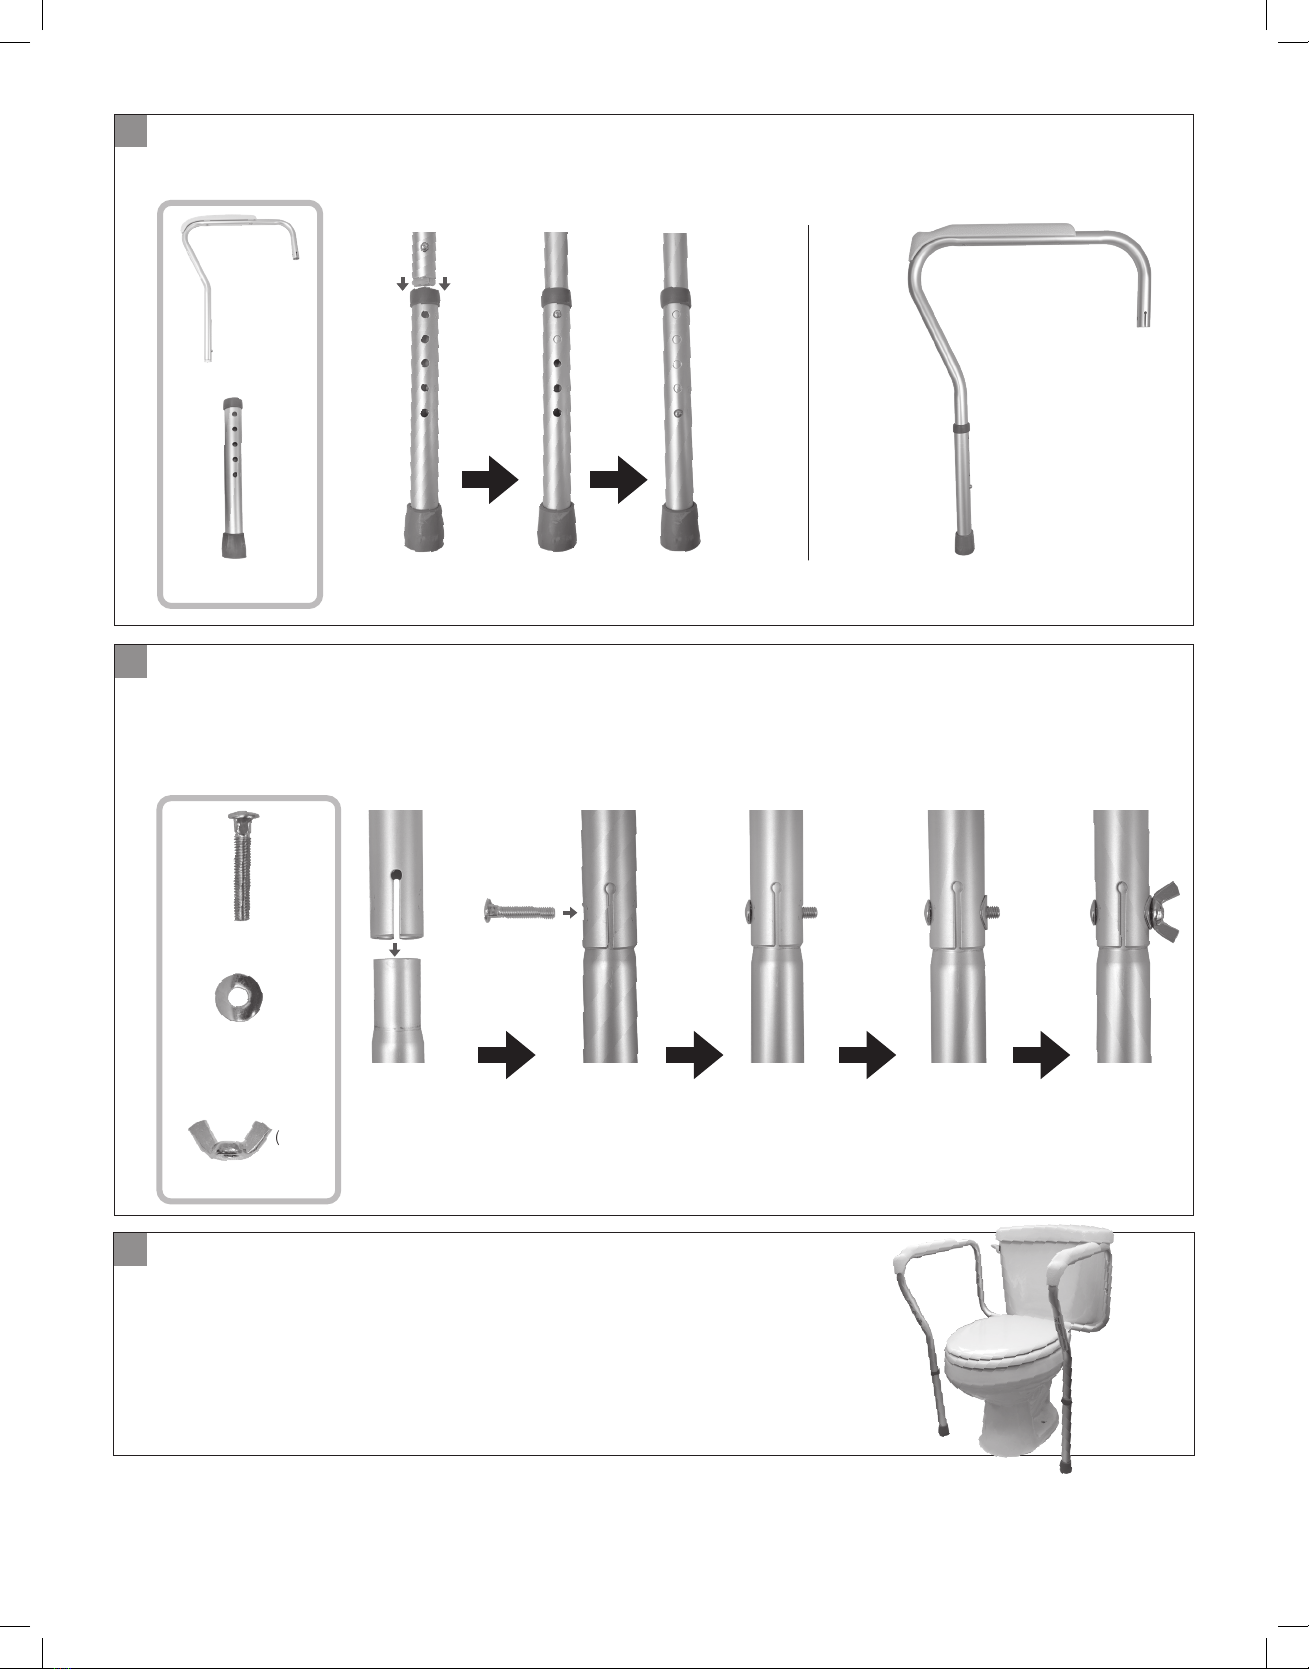
6Take one of the Armrests (D) [with the Leg (E) installed] and place the open end over one of the Curved Bars (B or C).
Make sure to align the square-shaped holes in each part.
Insert one of the Bolts (F) into the square-shaped hole, so that the Bolt’s (F) head is facing forwards. Take the
Curved Washer (G) and install it over the end of the Bolt (F) so that its curvature aligns with the tubing. Take a
Wingnut (H) and thread it onto the end of the Bolt (F).
Take one of the Armrests (D) and one of the Legs (E). Press in the push button found towards the bottom of the
Armrest (D) and slide the Leg (E) over the Armrest (D) tubing until the push button protrudes from adjustment hole
number 1 [the height of the Leg (E) can be adjusted at a later time].
7If needed, adjust the Legs (E) so that the Armrests (D) are level and
at a comfortable level.
Also, adjust the Armrests (D) inwards or outwards to desired width
by sliding the Curved Bar (B/C) + Armrest (D) assemblies to the
slotted holes in the Bracket (A).
You have now completed the assembly of your Toilet Safety Rails.
Armrest (D)
Leg (E) Repeat assembly with the other Armrest (D) and Leg (E).
Repeat installation onto the other Curved Bar (B
or C) with the other assembled Armrest (D) and
Leg (E). Ensure the Wingnuts (H) are tight.
Bolt (F)
Curved
Washer (G)
(x2)
(x2)
(x2)
(x2)
(x2)
Wingnut (H)
B5040 Toilet Rails Assembly Instructions, March 2023.indd 3B5040 Toilet Rails Assembly Instructions, March 2023.indd 3 4/14/23 3:36 PM4/14/23 3:36 PM

B5040 Toilet Rails Assembly Instructions, March 2023.indd 4B5040 Toilet Rails Assembly Instructions, March 2023.indd 4 4/14/23 3:36 PM4/14/23 3:36 PM
Table of contents
Other Essential Medical Supply Bathroom Aid manuals


