ETC Tools 95-211 User manual

95-211
R
(GB) Slide compound mitre saw
(SE) Kap- & Geringssåg med teleskop
(NO) Kapp- og gjæringssag med teleskop
(SF) Katkaisu- ja jiirisaha teleskoopilla
45°x0°
Technical Data Teknisk Data
Voltage: 230 V~/50 Hz Spänning: 230 V~/50 Hz
Input: 1600 W Effekt: 1600 W
Speed: 4600 r.p.m Varvtal: 4600 v/min
Blade diameter: 210 mm Diameter sågklinga: 210 mm
Number of Teeth: 30 Antal tänder på klinga: 30
Total cutting area Kapstorlek
Straight cut at
90°x0°
65x300 mm Rak sågning vid 90°x0° 65x300 mm
Miter cut at 90°x45° 65x215 mm Geringssågning vid 90°x45°65x215 mm
Bevel cut at 35x300 mm Horisontell sågning vid
45°x0°
35x300 mm
90°x0°
Compound miter cut
at 2x45°
35x215 mm Geringssågning vid 2x45° 35x215 mm
Insulation class: II Double insulated Isoleringsklass: II Dubbel isolerad
Tekniske Data Tekniset tiedot
Spenning: 230 V~/50 Hz Jännite: 230 V~/50 Hz
Effekt: 1600 W Teho: 1600 W
Turtall: 4600 v/min Kierrosluku: 4600 kierr./min.
Diameter sagblad: 210 mm Terän halkaisija: 210 mm
Antall tenner sagblad: 30 Terän hampaiden
lukumäärä:
30
Kapasistet kapping Leikkauskoko
Rett saging 90°x0° 65x300 mm Suora sahaus 90°x0° 65x300 mm
Gjæring 90°x45° 65x215 mm Kulmasahaus 90°x45° 65x215 mm
Rett saging 45°x0° 35x300 mm Vinosahaus 45°x0° 35x300 mm
Gjæring 2x45° 35x215 mm Yhdistelmäsahaus 2x45° 35x215 mm
Isoleringsklasse: II Dobbel isolert Eristysluokka: II Kaksoiseristys
2x45°
45°x0°
NO SF
SEGB
1

General safety hints for work with electric tools
Dear Customer!
Please read and take note of the following comments that regard you protection against electrical shock
and risk of injury and fire.
§ Verify that the power supply in your area is compatible with the voltage listed on machine.
§ Connect the power lead to the mains only with the tool turned off.
§ Always turn on the tool before setting it against the piece you are working on.
§ Adopt protective measures against electric shock. Avoid bodily contact with earthen parts, such as metal
pipes, radiators, cooking ranges, refrigerators and the like.
§ Large variations in temperature can lead to condensation inside. Before use: Give the machine time to
adjust to the temperature of work area.
§ Do not use machines, attachments and chargers for other works than those that they are designed for!
§ Secure the work-piece. Use clamping devices or a vise to hold the work-piece securely.
§ To avoid accidents, do not wear jewelry or loose clothing that could be caught up by moving parts. For
outdoor use, it is recommended to wear protective footwear. Long hair should be tired up.
§ When dust splinters or shavings become a problem while working, please wear protective eyewear and
if necessary a protective mask.
§ Wear ear protection.
§ Be sure you always having sure footing, especially when working on ladders and scaffolding.
§ Keep electric tools away from humidity and rain. Do not immerse.
§ When working outdoors, only use approved tools and extension cables marked for outdoor use.
§ Do not use the equipment in areas where the danger of explosion exists.
§ When passing this device over to a third person, these instructions must be handed out too.
§ Only have repairs done by specialists using original parts.
§ WARNING: Some situations, such as the consumption of alcohol, medication or drugs, plus states of
illness, fever or fatigue, will affect your ability of reaction. Do not use electric tools in any of these
situations.
§ Keep electric tools away from children.
§ Store electric tools in the original box in a safe place and cut of the reach of children.
§ When not in use, during breaks, packing up, changing accessories of during repair always unplugs the
cable or remove the batteries from the tool.
§ Never carry the tool by the cable. Never unplug the tool by pulling on the cable.
§ When working: Do not allow the motor to stall under the load.
§ Keep your workplace tidy: Untidiness can cause accidents!
§ Avoid abnormal body postures while working.
§ Avoid switching on or starting up the machine unintentionally.
§ Do not leave keys, spanners and adjusting tools inserted in the machine.
Safety hints for work with mitre saw
§ Do not expose the machine to rain or damp.
§ Check that the machine is in a fault-free condition before use.
§ Do not use saw blades of high-alloy high-speed steel (HSS).
§ Do not use saw blades with characteristics that do not comply with those specified in these instructions
for Use.
§ Make sure that all the moving parts of the saw-blade safety equipment function without sticking.
§ Use only sharp, undamaged saw blades and suitable accessories.
§ Clamp work-pieces firmly before machining.
2
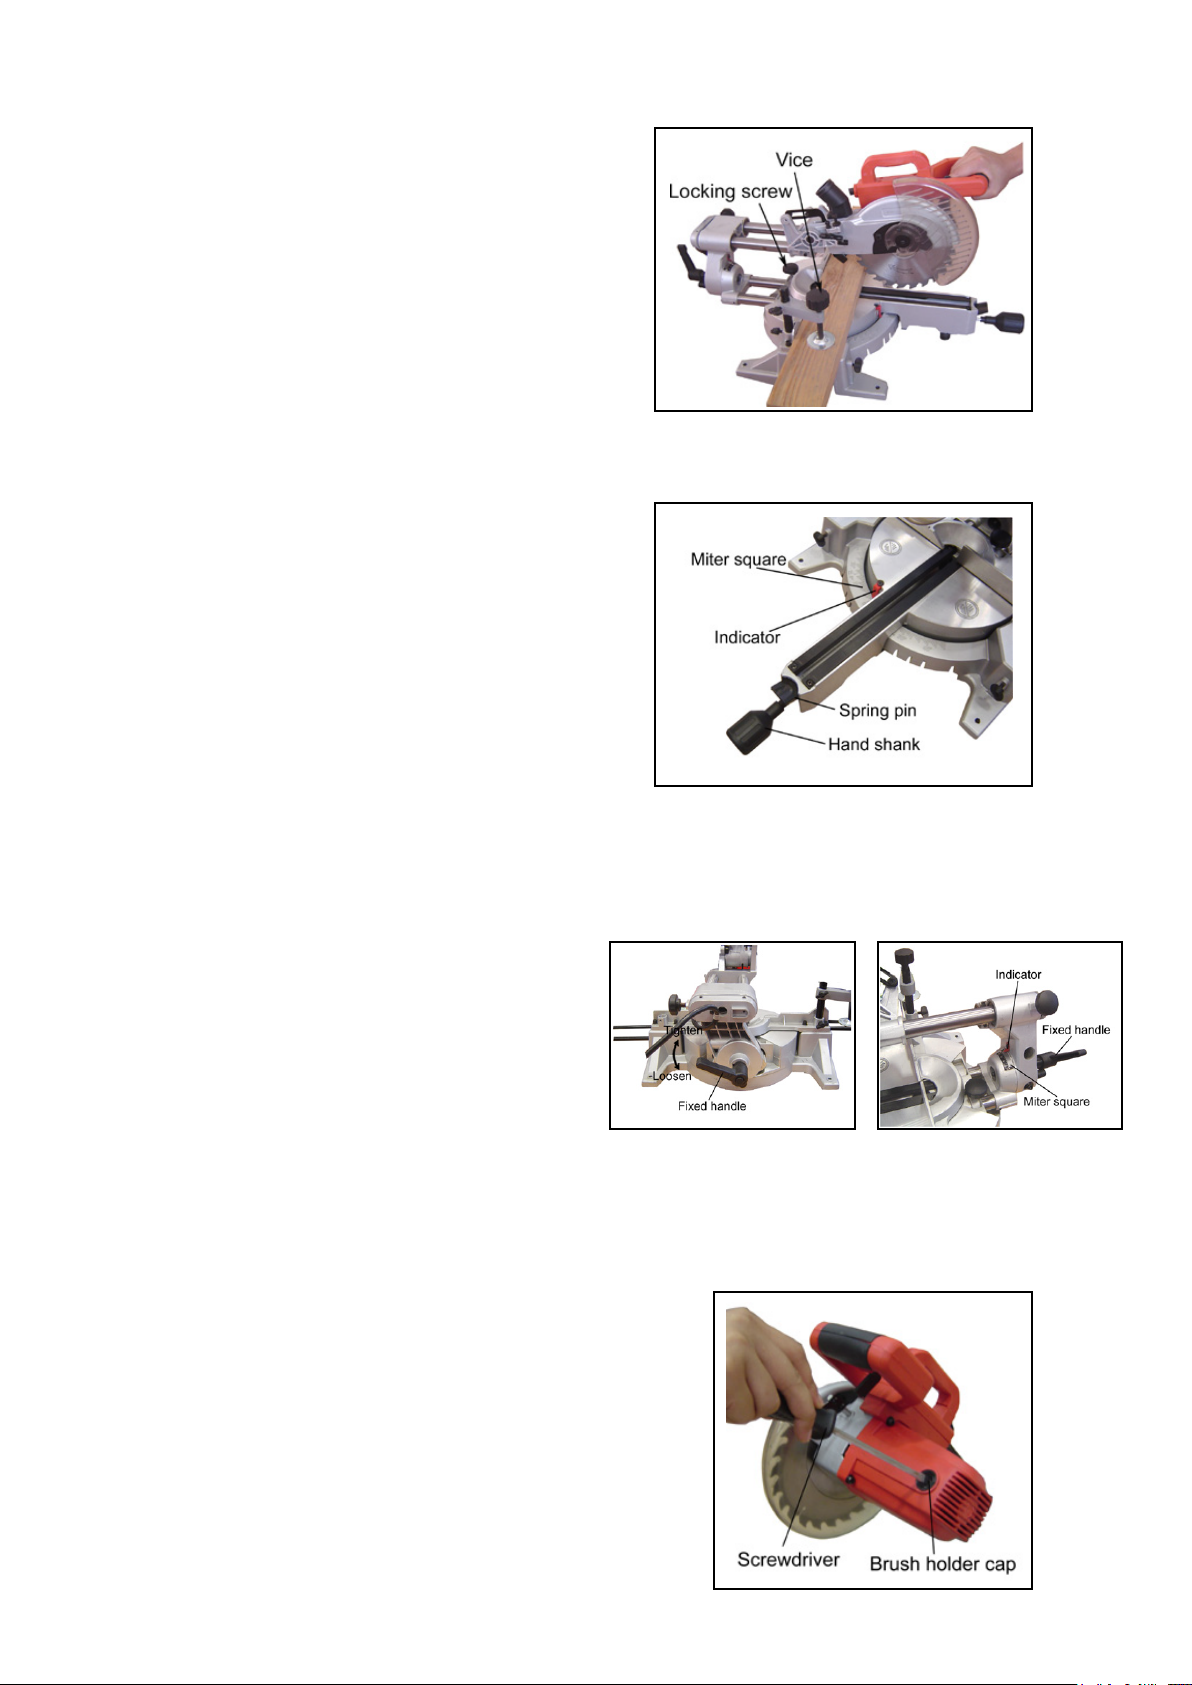
§ Do not use flanges or flange nuts with bores larger or smaller than those of the saw blade.
§ Do not try to slow down the rotating saw blade by hand.
§ Fasten the machine down to a stable base before use.
§ The saw head must be able to move freely and return to its upper starting position after it
is released.
§ Do not jam the On/Off switch in position.
§ After the switch is released, the machine must come to a stop within 10 seconds.
§ When doing work that generates dust, wear a breathing mask and protective goggles, do
not smoke and avoid naked flame.
Care! Use the saw blade supplied with the tool for machining wood and wood-
derivative materials only.
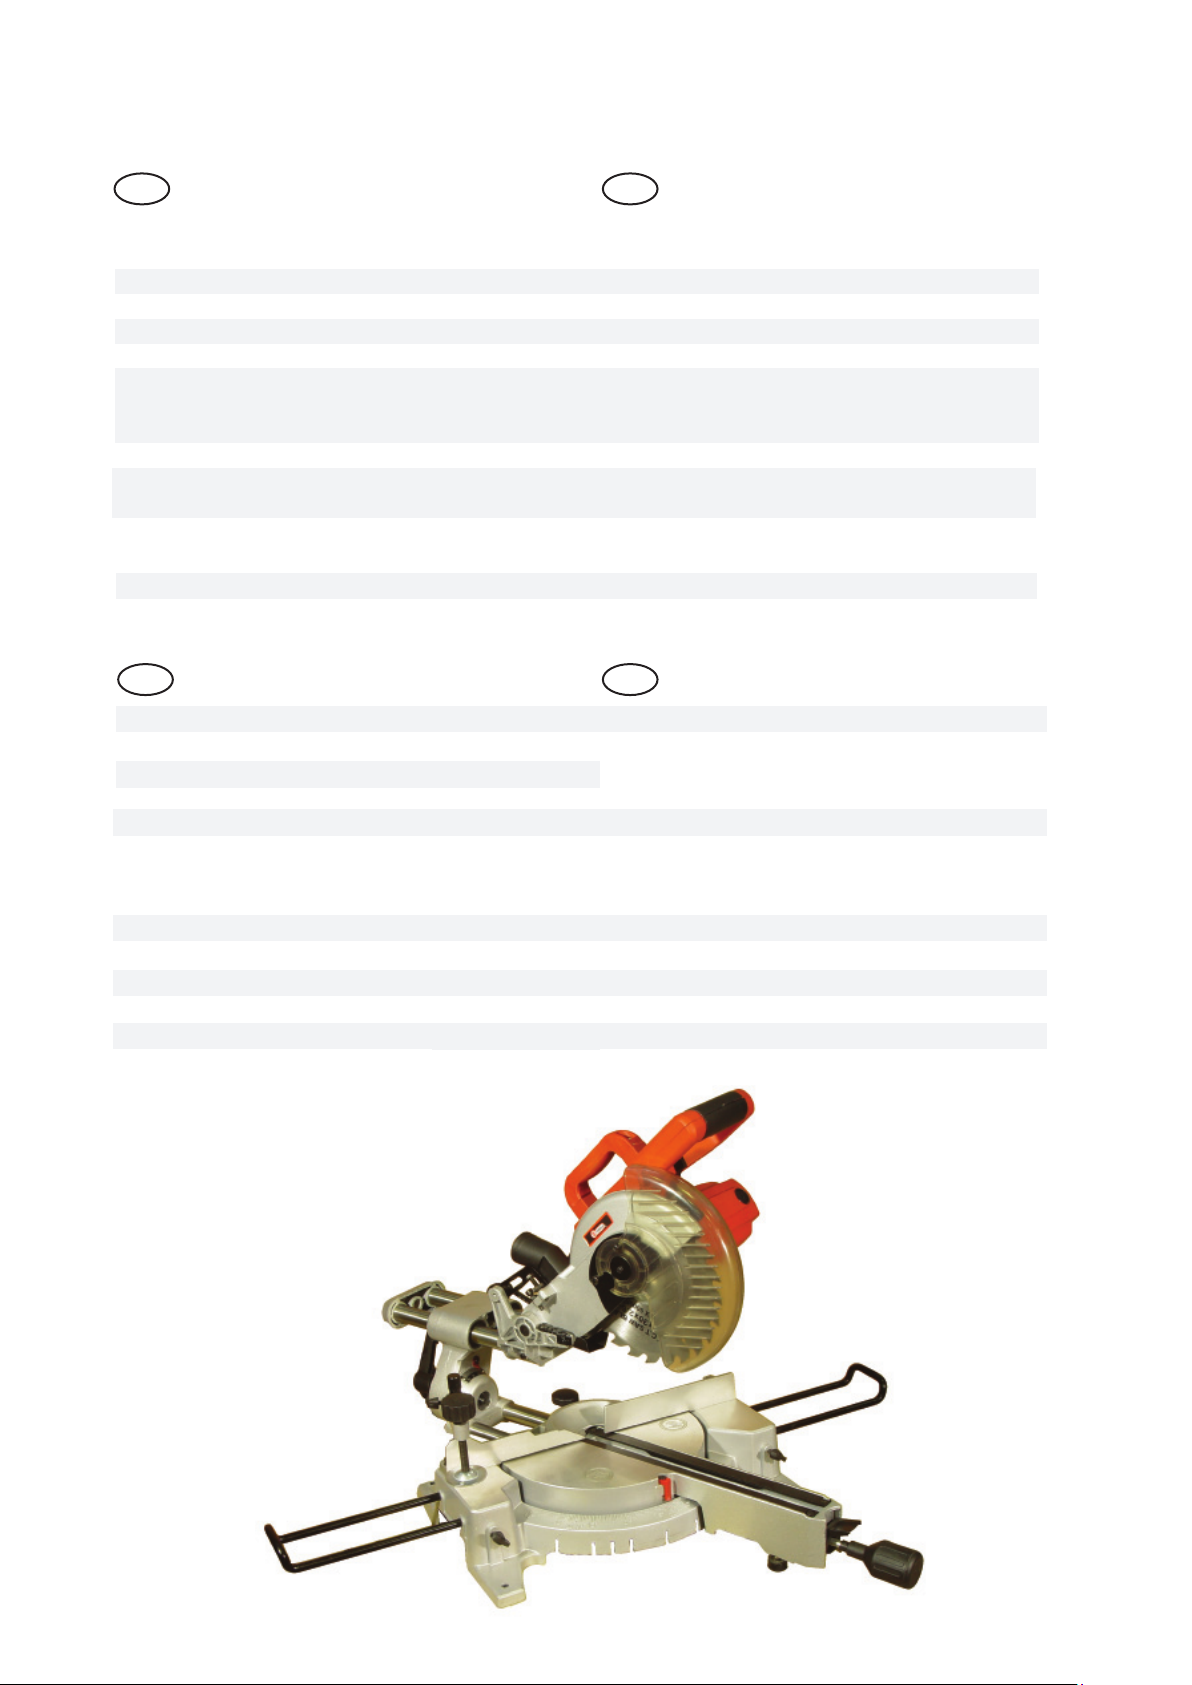
Changing sawblade
When removing sawblade, first raise the
lowest position handle, press down the
shaft locking arm to lock the sawblade,
and loosen the hex bolt by turning clock-
wise using the socket wrench. Then
remove the hex bolt outer flange and
sawblade.
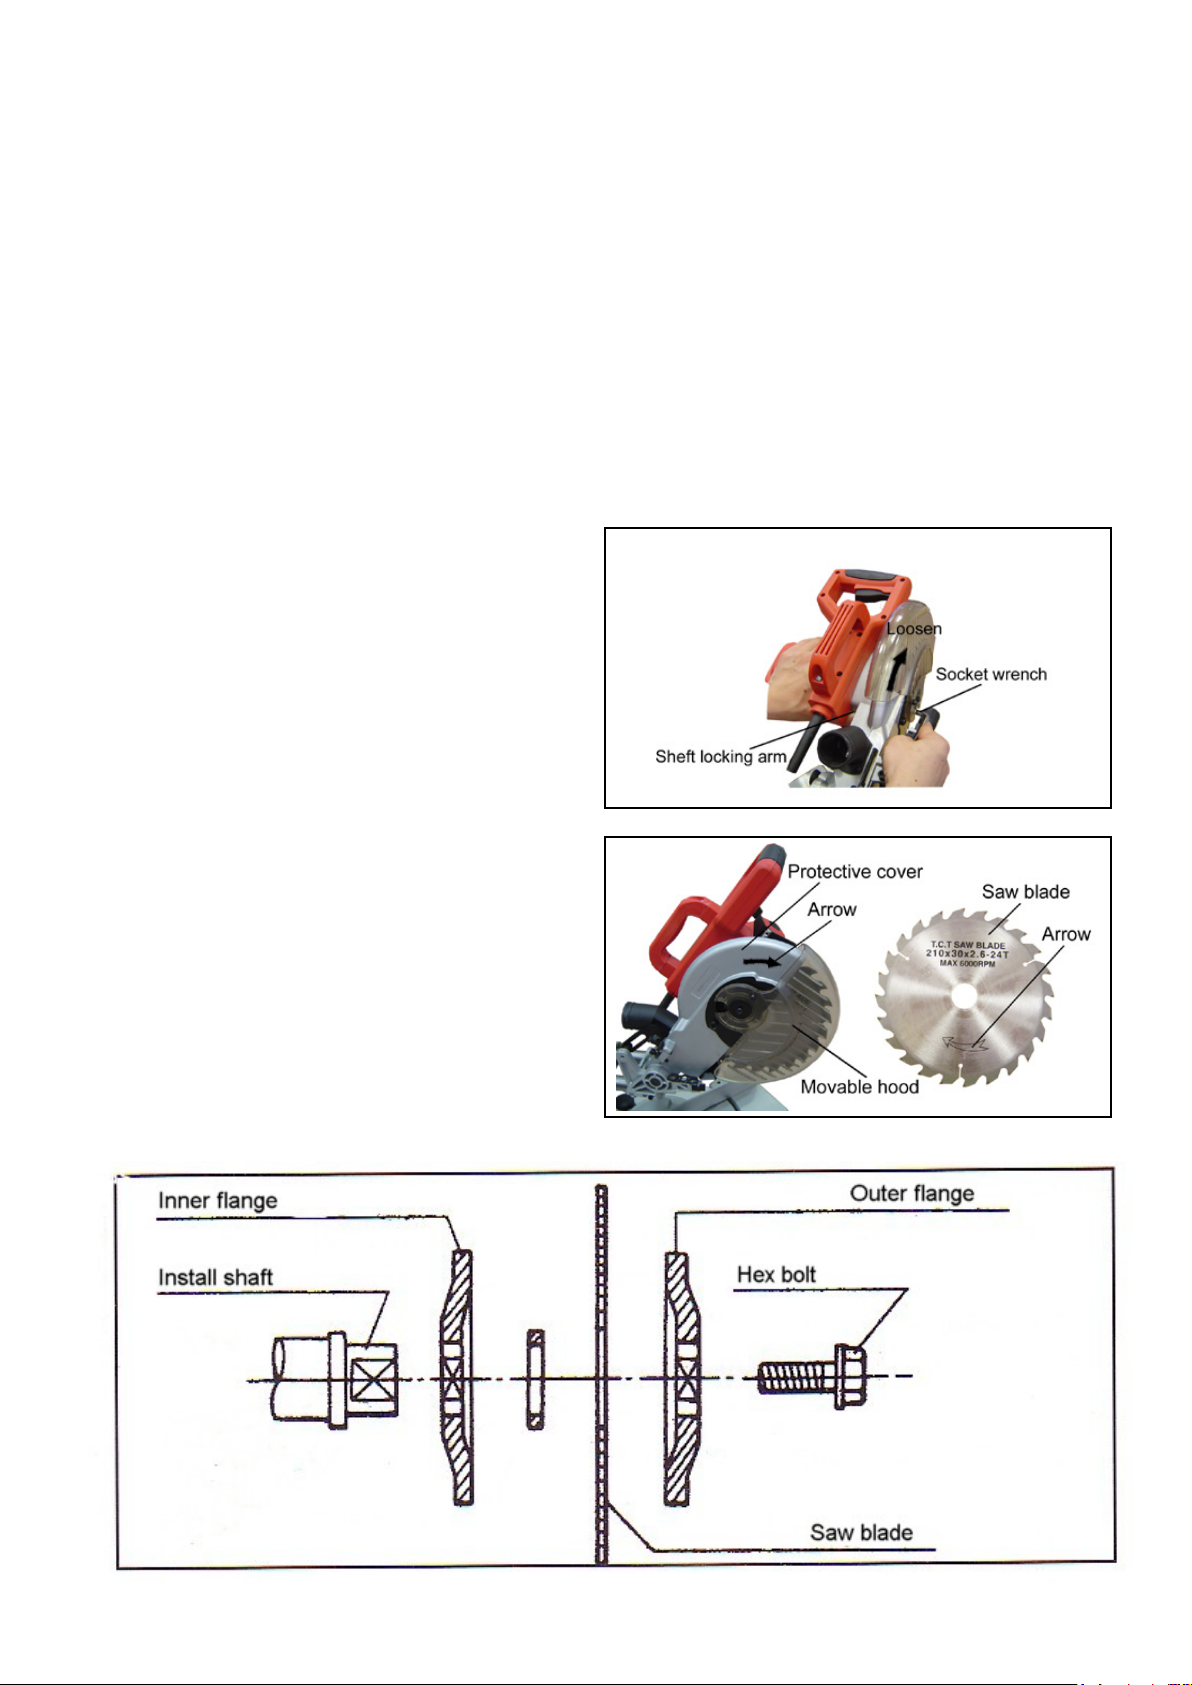
Install the new sawblade. Check that the
teeth point in the direction of the arrow
(See protective cover).
3

Install the outer flange and the hex bolt .
Then press down the shaft locking arm,
and tighten the hex bolt firmly by turning
it counterclockwise using the socket
wrench.
When removing sawblade, lift up movable
hood and central cover, loosen the hex
bolt with the socket wrench and remove
the hex bolt outer flange and sawblade.
Movable hood
When sawing the movable hood will be
lifted up by the workpiece. After you
finished cutting the movable hood will
be reset to original position automatically
with the handle raised. Never abandon
or remove the movable hood.
Sawdust collector
You can operate this machine more
conveniently with the sawdust collector.
Connect the adapter of the collector to the
nozzle of the protective cover, then fix the
collector inlet to the adapter of the collector.
When the sawdust collector is half full, take
the collector off from the protective cover
and open the collector door at the bottom.
Clean the sawdust completely.
4
Operating the switch
To prevent accidental starting, the tool
is equipped with a protective switch.
To start the tool, first press the protective
switch and press down the trigger switch.
Release the trigger switch and the tool
is switched off.
Operation
When cutting small workpieces, push
the carriage to the end towards the
cross bar and tighten the locking screw to fix
the carriage. Then use the vice to secure
the workpiece.
When cutting wide workpieces, release
the locking screw to slip the carriage freely and
pull the carriage towards the operator.
Before cutting always wait until the sawblade
reaches it´s maximum speed.
After finished cutting turn the switch off and
wait until the sawblade stops completely,
then raise the handle.
Set a bevelled joint angle
Loosen the hand shank by turning it in
counterclockwise, press down the spring
pin so the rotary table is free to turn.
When desired angle is set on the miter
square, turn the shank clockwise to
tighten it.
Set a bevelling angle
Only when the auxiliary stopper is fixed
on the left side as shown on the drawing,
the sawblade can be bevelled to 45° angle.
To adjust the bevelling angle loosen the
fixed handle, then incline the sawblade to
the left until the indicator reaches the desired
angle on the miter square.
Tighten the fixed handle firmly.
5
Replacing the carbon brushes
Check and replace the carbon brushes
regularly. Replace when they are worn
down to the limit mark. Keep the carbon
brushes clean and free to slip in the holders.
Both carbon brushes should be replaced at
the same time.
Use a screwdriver to remove the brush holder
caps. Take out the worn carbon brushes, insert
the new ones and secure the brush holder caps.

6
SE
Bruksanvisning och säkerhetsanvisningar
Användningsområde
Stationär kapning av lister och profiler av trä och trämaterial. Med anpassade sågklingor även
lämplig för kapning av plast och ickejärnmetaller. Använd maskin och tillbehör (beakta
tillverkarens anvisningar) endast för deras respektive användningsområden. All annan
användning är uttryckligen förbjudna.
Allmänna säkerhetsanvisningar vid hantering av elverktyg
Bäste kund!
Var vänlig beakta nedanstående anvisningar som skydd mot elektriska stötar,
brand och skaderisker.
§ Kontrollera att nätspänningen överensstämmer med uppgiften på typskylten
§ Anslut nätkabeln till vägguttaget endast med frånslagen motor.
§ Starta alltid maskinen innan den får kontakt med det material som skall bearbetas.
§ Skydda Dig mot elektriska stötar. Undvik kroppskontakt med jordade föremål såsom
metallrör, radiatorer, spisar, kylskåp etc.
§ Stora temperaturvariationer kan leda till kondensbildning på strömförande delar. Vänta
med att använda maskinen tills den uppnått rumstemperatur.
§ Använd maskiner, verktyg och rekommenderade tillbehör enligt bruksanvisningen endast
för deras avsedda användningsområden.
§ Lås fast arbetsstycket. Använd spännanordningar eller ett skruvstycke för att ordentligt
hålla fast arbetsstycket.
§ Bär inte smycken eller vida klädesplagg som kan fångas in av rörliga delar. Skydda lång
hår med pannband eller hårnät. Använd halksäkra skor och skyddshandskar.
§ Vid arbeten som alstrar splitter, spån eller damm liksom vid arbeten under-upp, skall alltid
skyddsglasögon användas och vid behov dessutom andningsskydd.
§ Använd hörselskydd vid hög ljudnivå.
§ Se till att stå stadigt på golv, stegar och ställningar.
§ Skydda elverktyg mot fukt och regn. Doppa dem aldrig i vatten.
§ Vid arbeten utomhus använd endast godkända verktyg och förlängningskablar.
§ Använd inte elverktyg i utrymmen där explosionsrisk föreligger.
§ Vid överlåtelse till tredje part måste denna anvisning medfölja.
§ Låt reparationer endast utföras av fackmän och med originalreservdelar.
§OBSERVERA: Er reaktionsförmåga kan försämras genom intagning av alkohol, mediciner
och droger. Liksom genom sjukdom, feber och trötthet. Använd inte elverktyg i sådana
fall!!
§ Håll elverktyg borta från barn.
§ Förvara elverktyg i originalförpackning och utom räckhåll för barn.
§När elverktyget inte används, vid pauser i arbetet, inställningsarbeten och byte av tillbehör
samt vid underhåll skall alltid nätkontakten dras ur resp. batteriet tas ut ur apparaten.
§Bär aldrig elverktyg i nätkabeln. Drag aldrig ur nätkontakten ur vägguttaget genom att dra i
nätkabeln.
§Undvik att motorn stannar under belastning.
§Håll ordning på arbetsplatsen: Oordning medför risk för olycksfall!!
§Undvik onormal kroppsställning vid arbetet.
§Undvik oavsiktlig tillslagning resp. start av elverktyget.
§Låt inga verktygsnycklar eller inställningshjälpmedel sitta kvar.

Säkerhetsanvisningar vid hantering av Kap- & Geringssåg
§ Utsätt inte maskinen för regn eller fukt.
§ Innan arbete påbörjas kontrollera att maskinen ej är skadad.
§ Sågklingor av höglegerat snabbstål (HSS-stål) får ej användas.
§ Sågklingor som ej motsvarar I denna anvisning angivna märkdata får ej användas.
§ Kontrollera att klingskyddet löper fritt och ej är skadat innan arbete påbörjas.
§ Använd endast skarpa och oskadade klingor, tillbehör.
§Spänn fast arbetsstycket ordentligt innanarbete påbörjas. Arbetstycket får under
ingaomständigheter hållas med bara händerna.
§ Använd inte flänsar/flänsmuttrar vars hål är större eller mindre än kapklingans.
§ Sågklingan får ej bromsas för hand.
§ Fäst maskinen ordentligt i underlaget före användning.
§ Såghuvudet måste kunna röra sig fritt och gå tillbaka till sitt övre utgångsläge när det släpps.
§ Kläm inte fast strömbrytaren.
§ När strömbrytaren släpps måste maskinen stanna inom 10 sekunder.
§ Vid arbeten som genererar mycket damm skall andningsskydd och skyddsglasögon användas. Rök
ej och undvik öppen låga.
Observera! Använd medföljande sågklinga endast för kapning av trä och trämaterial.
Byte av sågklinga
Lås motoraxeln genom att trycka
in låsknappen. Skruva därefter lös
låsbulten med hjälp av den fasta nyckeln.
Avlägsna bulten, flänsbrickan och sågklingan.
Vid montering av den nya sågklingan,
kontrollera att sågtänderna pekar åt samma
håll som pilen på klingskyddet.
Kontrollera även att inte sågklingan går emot
sågbordet vid sågning.
Skruva lös centrumskyddet på maskinen med
hjälp av den medföljande fasta nyckeln.
Avlägsna därefter skyddet.
7

Montera yttre flänsbricka och bult efter det att
den nya sågklingan har monterats på motor-
axeln.
Tryck därefter ner låsknappen för motoraxeln
och drag fast bulten med hjälp av den fasta
nyckeln.
Skruva fast centrumskyddet.
Fjädrande klingskydd
Sågen är utrustad med ett fjädrande kling-
skydd. Vid arbete med sågen fjädrar kling-
skyddet automatiskt upp.
Montera aldrig bort klingskyddet under
arbetets gång.
Dammuppsamlare
Till sågen medföljer en dammpåse som
monteras på sågens dammutsug.
För ett effektivt resultat bör påsen tömmas
när den är halvfull.
Rengör alltid påsen ordentligt.
8
På- och avslagning
För att förhindra ofrivillig påslagning är sågen
zutrustad med en startspärr.
För att starta sågen, tryck först in start-
spärren och därefter strömbrytaren.
Vid avstängning, släpp strömbrytaren.

Användning
Vid bearbetning av mindre arbetsstycken låses
sågens teleskopfunktion med hjälp av låsskruven
(enligt bild).
Vid bearbetning av större arbetsstycken behöver
ej låsskruven dras åt, utan sågen
får glida fritt i teleskopet.
Detta medför att bredare arbetsstycken kan
bearbetas.
Spänn alltid fast arbetsstycket med hjälp av sågens
tvingar.
Starta sågen och låt motorn nå fullt varvtal innan
arbete påbörjas.
Vid avslutat arbete låt alltid klingan stanna helt innan
sågen fälls upp.
Geringssågning
För att ställa in önskad vinkel på sågen, börja med
att skruva lös låsratten (moturs). Tryck därefter ner
den fjädrande sprinten så att sågbordet löper fritt.
Justera sågbordet till önskad vinkel enligt
geringsskalan och lås bordet genom att skruva åt
låsratten (medurs).
9
För att ställa in önskad horisontell vinkel på
sågen, börja med att skruva lös låshandtaget.
Justera därefter till önskad vinkel enligt
skalan.
Byte av kol
Kontrollera och byt ut sågens kol regelbundet.
Byt kolen när de är nedslitna till markeringen
(enligt bild).
Vid byte av kol skall båda kolen bytas samtidigt.
Använd en skruvmejsel för att skruva lös hållaren
till kolen. Byt kolen och skruva tillbaka hållaren.
Table of contents
Languages:
Other ETC Tools Saw manuals


