Eteros TRIMINATOR XL User manual

USER GUIDE
©2021 ETEROS TECHNOLOGIES INC. | ALL RIGHTS RESERVED. | THETRIMINATOR.COM

CONTENTS

This User Guide is a comprehensive manual covering the operation and maintenance of the M9 Sorter machine as of the
date of publication. ETEROS TECHNOLOGIES reserves the right to make updates to the machine from time to time. In the
event of an update, this User Guide will remain appropriate for the safe operation and maintenance of your unit. This User
Guide, as well as any documentation supplied by component manufacturers, are to be considered the information package
associated with this device. Every operator must read and understand the User Guide. The manual should be located within
easy access for periodic review.
5
5
6
6
7
4
9
10
11
8
13
13
14
15
16
12
18
18
18
20
21
24
26
17
23
NOTES:

SAFETY

5
INTRODUCTION
SAFETY MESSAGES
Congratulations on your selection of the Triminator commercial leaf trimmer! We want to help you to get the best results
from your new trimmer and to operate it safely. This manual contains the information on how to do that; please read it
carefully before you set up and use your trimmer.
We suggest you read the LIMITED WARRANTY to fully understand coverage and your responsibilities of ownership. Keep
this owner’s manual handy, so you can refer to it at any time. This owner’s manual is considered a permanent part of the
trimmer and should remain with the trimmer if resold. The information and specifications included in this publication are
those that were in eect at the time of approval for printing. Eteros Technologies, (Eteros) reserves the right, however, to
discontinue or change specifications or design at any time without notice and without incurring any obligation whatever.
No part of this publication may be reproduced without written permission.
Your safety and the safety of others are very important. We have provided important safety messages in this manual
and on the Triminator. This information alerts you to potential hazards that could hurt you or others. Please read these
messages carefully. Of course, it is not practical or possible to warn you about all the hazards associated with operating or
maintaining a trimmer. You must use your own good judgment.
You will find important safety information in a variety of forms:
Safety Labels - located on the trimmer.
Instructions - how to use this trimmer correctly and safely.
Safety Messages - preceded by a safety alert.
A symbol and one of two signal words: DANGER, CAUTION. These signal words mean:
©2021 ETEROS TECHNOLOGIES INC. ALL RIGHTS RESERVED. | THETRIMINATOR.COM

TRIMINATOR XL DRY OWNER'S GUIDE
6
WARNING LABELS
SERVICE & REPAIRS
Indicates a hazardous situation that, if not avoided, will result in serious injury and /
or death. This signal word is to be limited to the most extreme situations; typically for
machine components that, for functional purposes, cannot be guarded.
Indicates a potentially hazardous situation that, if not avoided, could result in serious
injury and / or death. It includes hazards that are exposed when guards are removed.
It may also be used to alert against unsafe practices.
Indicates a potentially hazardous situation that, if not avoided, may result in minor or
moderate injury. It may also be used to alert against unsafe practices.
Repairs may only be carried out by Eteros Technologies or a designated authorized agent (service technician).
Should the need arise, please notify us:
ETEROS TECHNOLOGIES
26 Industrial Ave.
Carleton Place, Ontario, Canada
K7C 3T2
www.eteros.com
Improper interfacing, improper repair, or unauthorized modification could result in void warranty claims.
CAUTION:
WARNING:
DANGER:

7
TRIMMER SAFETY
IMPORTANT SAFETY INFORMATION
Triminator commercial trimmers are designed to trim excess plant material from a variety of herbal material. Other uses
could result in injury to the operator or damage to the trimmer and other property. Injuries and property damage from
trimmers can be prevented by following all instructions in this manual and on the trimmer. The most common hazards
are discussed below, along with the best way to protect yourself and others.
©2021 ETEROS TECHNOLOGIES INC. ALL RIGHTS RESERVED. | THETRIMINATOR.COM
AVOID ROTATING SLOTTED DRUM
The Triminator’s slotted drum can cause serious damage, cuts and even amputate fingers or hands. Keep hands, arms,
and body away from the slotted drum whenever the drum drive motor is running. Keep hair, clothing, and jewelry away
from the drum. If you need to work around the trimmer to clear or clean plant material for any reason, always shut o the
electric motor and disconnect the trimmer’s power cord from the AC outlet. Use a wooden stick to remove any obstruction
or debris. Never put your hand into the slotted drum while the machine is running; serious personal injury could result.
AVOID SHEAR BAND
The Triminator’s shear band can cause serious cuts and even amputate fingers and hands. Keep the diamond plate covers,
red name plate and clear end cap in place at all times while machine is operating. If you need to work around the trimmer
to clear or clean plant material for any reason, always shut o the electric motors and disconnect the trimmer’s power cord
from the AC outlet.
CLEAR OPERATIONS AREA
Before operating the trimmer, carefully inspect the surrounding area and remove all obvious hazards that could cause you
to trip, slip, or fall into the trimmer.
KEEP GUARDS AND SHIELDS IN PLACE
Guards and shields are designed to protect you from touching moving components. For your safety and the safety of
others, keep all shields in place when the trimmer is running.
TURN ELECTRIC MOTOR OFF WHEN NOT OPERATING THE TRIMMER
If you need to leave the trimmer for any reason, always turn the electric motor o.
OPERATE ON FLAT SURFACE
To avoid overturning, only operate the trimmer on flat surfaces. Control the trimmer carefully when transporting it across
uneven ground or slopes. Do not push the trimmer down or across steep slopes: the trimmer could overturn, causing injury
to the operator or bystanders.
OPERATOR RESPONSIBILITY
Know how to stop the trimmer quickly in case of emergency. Understand the use of all trimmer controls. Never permit
anyone to operate the trimmer without proper instruction. Do not let children operate the trimmer.

INITIAL SETUP
9
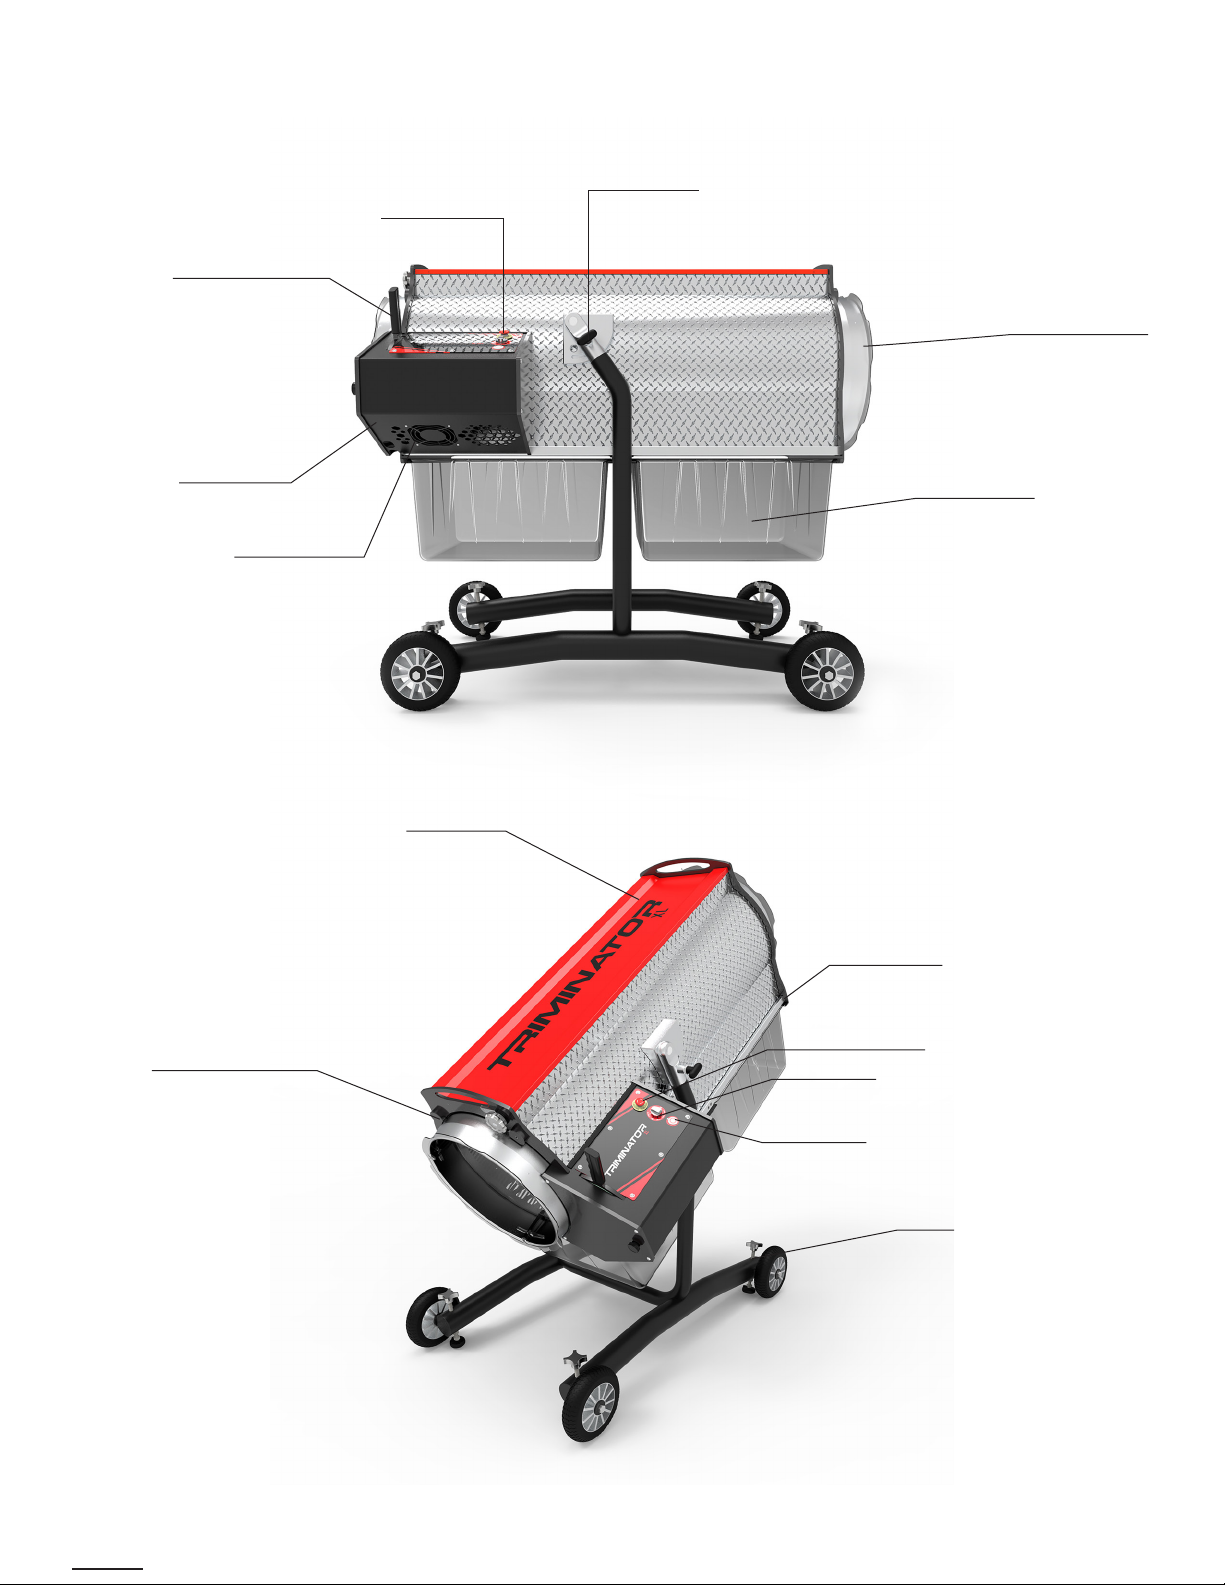
GET TO KNOW YOUR XL TRIMMER
EMERGENCY STOP
GRADING BAY DIVIDER
GRADING TABLE
CASTER W/ BRAKE
7" HMI SCREEN
ADJUSTMENT BLOCK
INLET ROLLER
SAFETY SENSOR
ADJUSTMENT PLUNGER
DRIVE ROLLER
DRIVE ROLLER
BELT TENSIONER
MOTOR
INLET POLYCARBONATE
©2021 ETEROS TECHNOLOGIES INC. ALL RIGHTS RESERVED. | THETRIMINATOR.COM

TRIMINATOR XL DRY OWNER'S GUIDE
10
YOUR NEW TRIMMER SETUP
UNPACKING
TOOLS REQUIRED
• Machine Body, qty (1)
• Floor Stand, qty (1)
• Pull Pin, qty (1)
Triminator Dry comes in two separate boxes and requires basic assembly.
Upon unpacking you should have the following components:
• 3/4” wrench
• 7/8” wrench
• 5/16 hex wrench (allen wrench)
1. To begin, unpack the machine body and floor stand from the packaging
2. Set the machine body in the vertical position with the motor facing up and the drum opening on the floor
3. Remove the wheels from the inside of the floor stand by unscrewing the bolts. Next, reinstall the wheels on the
outside of the floor stand.
4. Roll the floor stand towards the machine body and align the bolt holes in the floor stand with those in the machine
body, insert and tighten the screws.
5. Lift the floor stand slightly so that the wheels are slightly elevated from the floor. Next begin to screw the pull pin into
the pull pin hole, and elevate or lower the floor stand until the pull pin holes and pull pin align. Tighten the pull pin.
6. Verify all screws are tight and pull pin is securely in a pull pin hole.
7. Rotate the machine up until it sits in the orientation.

11
INITIAL ASSEMBLY & INSPECTION
1. Inspect the crate and crate contents to ensure no damage occurred during shipping.
2. Carefully remove M9 Sorter from crate
3. Insert hopper Pins into Adjustment Blocks to lock hopper in position
4. Attach Shelf on the outfeed side of the Sorter by inserting holes on shelf onto pins and pushing down on shelf to
wedge in place.
5. Attach Slide-outs by hooking them onto the edge of the Slide Out Table. This will allow Slide-outs to be adjustable
6. Once initial assembly is complete, inspect the M9 Sorter to confirm that it is ready to operate:
• Confirm the power cord is in good condition
• Ensure the Sorter Belts are placed properly within pulley grooves
• Ensure Rear Tailgate is properly closed
• Ensure Casters are in the locked position
• Attach Slide-Outs to desired distance for sorting into totes
• Ensure Polycarbonate end covers are in place and Safety sensors activated
• Place a Tote under Slide-outs and on Outfeed Shelf to collect sorted material
©2021 ETEROS TECHNOLOGIES INC. ALL RIGHTS RESERVED. | THETRIMINATOR.COM

OPERATION

13
Read and understand this manual. Know what the controls do and how to operate them. Familiarize yourself with the
trimmer and its operation before you begin using it. Know how to quickly shut o the machine in case of an emergency.
For your safety, and to maximize the service life of your equipment, it is very important to take a few moments each time
before you operate the trimmer to check its condition. Be sure to take care of any problem you find before you operate the
trimmer.
Improperly maintaining this trimmer, or failing to correct a problem before operation, could cause a malfunction which
could cause you to be seriously injured.
Always perform a pre-operation inspection before each operation, and correct any problem.
Before beginning your pre-operation checks, be sure the trimmer is on a level surface, the motor timer switch is in the OFF
position, and all power cords are unplugged.
YOUR SAFETY IS YOUR RESPONSIBILITY.
KEEP ALL SHIELDS AND COVERS IN PLACE WHILE OPERATING THE TRIMMER.
BEFORE OPERATION
• Check the General Condition of the Trimmer
• Clean the slotted drum, shear band, and tension system. Look for signs of damage.
• Check each control for proper operation.
• Check parts for wear. Replace if necessary.
• Check that all nuts, bolts, and clamps are tightened appropriately.
BEFORE OPERATION
IS YOUR TRIMMER READY FOR OPERATION?

TRIMINATOR XL DRY OWNER'S GUIDE
14
Connect the Triminator Dry’s power cord to a 15 amp 120 vac AC circuit. Do not connect and disconnect the power cord with
wet hands. Do not operate in the rain.
Before operating the trimmer for the first time, please review both the TRIMMER SAFETY section (page 2) and the BEFORE
OPERATION section above.
• Even if you have operated other trimmers, take time to become familiar with how the Triminator works.
• Never tamper with or alter any of the controls or safety devices on the trimmer.
• Do not operate on slopes.
• Never operate Triminator while under the influence of drugs, alcohol or prescriptions, including over-the-counter cold/
flu medications and allergy medications.
• Protective clothing and eye and/or hearing protection should be worn during operation.
• For your safety, do not operate while wearing loose-fitting clothing, jewelry, etc..
• Long hair should be secured in a manner that keeps it away from mechanical parts.
• Rotating machinery parts can entangle loose clothing, long hair or dangling jewelry resulting in serious injury or death.
STARTING YOUR TRIMMER
CONNECT POWER CORDS
SAFE OPERATING PRECAUTIONS
NOTICE The Triminator machine draws a max of 5 amps.
For your safety and the safety of others, always inspect the area before operating the trimmer.
Objects: Anything which can be grabbed by the rotating slotted drum is a potential hazard to you and others. Look for
hazards and remove them from the work area. Tie back loose clothing and long, loose hair. Remove any jewelry.
OPERATION
CHECK YOUR WORK AREA

15
Turn the Triminator Dry motor timer switch clockwise until the switch is aligned with the desired trimming duration.
To stop the Triminator in an emergency, or at any other time, turn the motor switch to the OFF position.
Disconnect the trimmer’s power cord.
STARTING THE MACHINE
STOPPING THE MACHINE
DISCONNECT POWER CORDS
NOTICE Be sure to hold the plug when disconnecting the power cord from the electrical outlet. Do not disconnect
by pulling on the power cord.
Remove clear end cap from front of drum. Pull out Pull-Pin and pivot drum into a vertical and upward facing position. Load
dried, prepped, untrimmed plant material into the drum. For best eciency run batches of similar material.
Pull out Pull-Pin and pivot Drum into a horizontal position. Turn machine ON and allow to run for 1-15 minutes. Check
material every 2-5 minutes. For a closer trim, continue running the Triminator Dry until desired trim is accomplished.
Empty Drum: Once desired trim is accomplished, remove clear end cap, position separate container (not included) to
capture processed material, pull out Pull-Pin and pivot drum to a downward facing position. Processed material will be
deposited in the container when correctly positioned.
Empty Trim Bin: Toggle black tabs on front or back of machine to a horizontal orientation. Slide Trim Bin out of slots, empty
bin and replace.
TRIMMING PLANT MATERIAL
LOAD
RUN
EMPTY

TRIMINATOR XL DRY OWNER'S GUIDE
16
REMOVING OBSTRUCTIONS
SERVICING YOUR TRIMMER
TRIMMING TIPS
For best eciency, run batches of similar material through the machine. For a closer trim, run batches for longer
durations until desired trim is accomplished.
If the rotating slotted drum becomes restricted or clogged:
Proper maintenance is essential for safe, economical, and trouble-free operation.
To help you properly care for your trimmer, the following pages include a maintenance schedule. Other service tasks that
are more dicult, or require special tools, are best handled by professionals and are normally performed by a Triminator
technician or other qualified mechanic.
The maintenance schedule applies to normal operating conditions. If you operate your trimmer under severe conditions,
such as sustained high-load or high-temperature operation, or use it in unusually wet or dusty conditions, consult your
servicing dealer for recommendations applicable to your individual needs and use.
Remember that an authorized Triminator servicing dealer knows your trimmer best and is fully equipped to maintain and
repair it. To ensure the best quality and reliability, use only new, Triminator Genuine parts or their equivalents for repair
and replacement.
1. Stop the motor.
2. Make sure that all rotating parts have come to a complete stop.
3. Disconnect the trimmer’s power cord.
4. Use a wooden stick to clear the obstruction.
NOTICE Improper maintenance, or failure to correct a problem before operation, can cause a malfunction in which
you can be seriously hurt or killed. Always follow the inspection and maintenance recommendations and
schedules in this owner’s manual.
NOTICE Trim Bin serves as a collection mechanism and a safety guard. Machine shall not be run without Bin in
place and tabs oriented in the vertical position.

CLEANING &
MAINTENANCE

TRIMINATOR XL DRY OWNER'S GUIDE
18
MAINTENANCE SAFETY
DISASSEMBLE FOR CLEANING
MAINTENANCE SCHEDULE
Some of the most important safety precautions follow. However, we cannot warn you of every conceivable hazard that can
arise in performing maintenance. Only you can decide whether or not you should perform a given task. Failure to properly
follow maintenance instructions and precautions can cause you to be seriously hurt or killed. Always follow the procedures
and precautions in this owner’s manual.
When to Clean: Depending on the material being processed and the frequency of use, the slots of the drum may need to
be cleaned after each use or periodically.
Indications that machine requires cleaning
• Reduced trim quality
• Visible build-up of material in the drum slots which obscure the sharp edge of the slots
• Visible evidence of material on shear band
• Excessive noise (machine should run quietly so that you may converse normally when it is running)
Make sure all motors are o and power cords are unplugged before you begin any maintenance or repairs. Read the
instructions before you begin, and make sure you have the tools and skills required.
SAFETY PRECAUTIONS
CLEANING
INTERVAL ITEM
BEFORE EACH USE
Check that shear band is snug, and in contact with slotted drum and is tightened appropri-
ately. Check that machine is free of excessive debris. Ensure that machine is clean and the
drum can be rotated without power under manual force.
DURING USE Although not required, application of a food grade lubricant can help reduce resin build up
and keep slotted drum clean.
AFTER EACH USE For best performance and longevity, clean trimmer after every use or if plant material is
visibly aecting the trim quality or speed of the trimmer.
EVERY 10 HRS OF
OPERATION
For maximum wear life, rotate orientation of shear band every 10 hours or when visible signs
of wear are identified. Although not required, this will extend the life of the shear band.

19
©2021 ETEROS TECHNOLOGIES INC. ALL RIGHTS RESERVED. | THETRIMINATOR.COM
Disassemble for Cleaning:
Cleaning:
• Turn the tension adjustment knob clockwise slightly to release tension on the ratchet.
• While turning the tension adjustment as described above flip the pawl o of the ratchet so it is no longer
in contact.
• Release the tension knob; the shear band will now hang freely within the trimmer.
• With motor o, power cords unplugged, and the machine in a vertical or45 degree position, reach in the
drum and flip lever to the open position.
• Slide the drum gently from the machine and set it on a non-abrasive surface.
• (Tip: If the drum does not come out easily check that the shear band has been released as described in
step 2.)
• Reach inside the machine and remove the shear band by gently lifting the shear band o of the metal
tabs which hold it in place.
• Gently remove the sheet from the machine and place it on a non-abrasive surface.
1. Shut o motor. Unplug power cords.
2. Release tension on the shear band:
1. Cover entire drum and shear band with a thick coat of cooking oil (olive, vegetable, etc). Let it sit for 3-12hrs.
2. Using warm/hot water, concentrated dish soap and a non-metallic dish scrubber,clean the drum and other machine
components by hand.
3. Remove drum:
4. Remove Shear band:
NOTICE
NOTICE
For best results use hot water whenever possible. Be careful when selecting the degreaser that it will not
damage the painted or anodized components of the trimmer. Always follow the operating instructions
provided using the pressure washer.
If you choose to use a pressure washer take care not to damage the trimmer’s finish by holding the nozzle
excessively close to the machine or by focusing the spray onto the motor or timer. These components are
not intended to be waterproof and water damage is excluded from warranty cover

TRIMINATOR XL DRY OWNER'S GUIDE
20
• Reach inside the machine and install the shear band by gently placing the sheet on the metal tabs until
all holes are resting evenly on metal tabs on both sides of the machine.
• With motor o, power cord unplugged, and the machine in a vertical or 45 degree position, slide the
drum gently into the machine.
• Flip the pawl so it is in contact with the ratchet and prevents the ratchet from moving in a counter
clockwise direction.
• Turn the tension adjustment knob clockwise slightly until you encounter minor resistance and the shear
band has come in full contact with the drum.
1. Verify motor is in the O position and power cord is unplugged.
2. Install Shear band
3. Install Drum
4. Re-tension the Shear band
DO NOT OVER TIGHTEN. DO NOT USE TOOLS OR OTHER MECHANISMS TO TIGHTEN TENSION.
REASSEMBLE FOR CLEANING
NOTICE Very little tension is needed to create an eective cutting surface. As soon as full contact between drum
and shear band has been achieved, release the tension knob.
Table of contents
Other Eteros Industrial Equipment manuals


