Eteros MOBIUS M60 User manual

M60 USER GUIDE
©2022 ETEROS TECHNOLOGIES INC. ALL RIGHTS RESERVED | MOBIUSTRIMMER.COM

TABLE OF
CONTENTS

4
5SERVICE & REPAIRS
Eteros Technologies Contact Information
6SAFETY INSTRUCTIONS
General Safety
8
GENERAL OPERATION
CONTROL PANEL
CLEANING & MAINTENANCE
TROUBLESHOOTING
SPECIFICATIONS
Small Batch, Dry Milling
Operating The Controls
How To Get The Most Out Of Your Mobius M60 Mill
Basic Steps To Ensure Proper Machine Performance
Performance and Tech Specs
9
10
11
12
14
15
WELCOME
Mobius M60 Mill
GET TO KNOW
ASSEMBLY & INSPECTIONS
Your Mobius M60 Mill
Setup The Mobius M60 Mill

4
INTRO
This User Guide is a comprehensive manual covering the operation and maintenance of
the Mobius M60 Mill as of the date of publication. ETEROS TECHNOLOGIES reserves the
right to make updates to the machine from time to time. In the event of an update, this
User Guide will remain appropriate for the safe operation and maintenance of your unit.
This User Guide, as well as any documentation supplied by component manufacturers,
are to be considered the information package associated with this device. Every operator
must read and understand the User Guide. The manual should be located within easy
access for periodic review.
WELCOME TO THE
MOBIUS M60 MILL

1.866.874.6244 | INFO@MOBIUSTRIMMER.COM | MOBIUSTRIMMER.COM
Repairs may only be carried out by Eteros Technologies or a designated authorized agent
(service technician).
Should the need arise, please notify us:
ETEROS TECHNOLOGIES
26 Industrial Ave. Carleton Place, Ontario, Canada K7C 3T2
www.eteros.com
1.866.874.6244
Improper interfacing, improper repair, or unauthorized modification could result in void
warranty claims.
SERVICES & REPAIRS

6
To ensure operator safety while in use, this device includes decaling, guarding, and other
safety features. Operators are encouraged to use caution and best judgment when using
equipment. Equipment should be serviced when required.
To avoid possible damage to the machine and risk of injury to the operator, consult with
an ETEROS TECHNOLOGIES representative to answer any questions.
All operators must read and understand this User Guide and be trained in safe operation
and use of the machine. We recommend the owner of this equipment develop a standard
operating procedure specific to each worksite to address any local hazards or other conditions
not outlined in this User Guide. The machine must be inspected regularly for damage,
component failure, and wear. Results of inspection activity should be documented.
ETEROS TECHNOLOGIES makes every effort to ensure the machine is compliant with
all current safety standards. It is the responsibility of the owner to ensure all municipal,
provincial, state, county, territorial, and federal codes, regulations, and standards have
been met in each working location.
Do not lend or rent your machine without providing the User Guide. A first-time operator
should receive practical instruction before using the machine.
This machine is not to be used for any purpose other than those expressly stated in the
User Guide, advertising literature, or other ETEROS TECHNOLOGIES written material
pertaining to the machine.
SAFETY INSTRUCTIONS

1.866.874.6244 | INFO@MOBIUSTRIMMER.COM | MOBIUSTRIMMER.COM
General Safety Precautions
READ and become familiar with the entire User Guide. Learn the equipment
applications, limitations, and possible hazards.
1
2
3
8
4
5
6
7
DO NOT USE THE MACHINE IN A DANGEROUS ENVIRONMENT or damp or
wet locations. Never expose the control panel directly to rain or water. Keep
the work area well illuminated.
DO NOT use the device in the presence of flammable liquids or gases.
ALWAYS WEAR EYE PROTECTION.
KEEP WORK AREA CLEAN. Cluttered areas and workspaces invite accidents.
WEAR PROPER APPAREL. Do not wear loose clothing, gloves, neckties, rings,
bracelets, or other jewelry which may get caught in moving parts. Non-slip
footwear is recommended. Wear protective hair covering to contain long hair.
POWER DOWN AND DISCONNECT EQUIPMENT before washing or servicing
and when changing accessories.
CHECK FOR DAMAGED PARTS PRIOR TO OPERATION. The equipment should
be inspected prior to use to ensure proper operation when performing its
intended function. Check for alignment of moving parts, binding of moving
parts, breakage of parts, mounting, and any other conditions that may affect
its operation. Any damaged part including guards should be properly repaired
or replaced.

8
GET TO KNOW YOUR
MOBIUS M60 MILL
HOPPER
ROTOR
ROTOR SHAFT
SCREEN
CHUTE
LATCH
CONTROL PANEL
DOOR
HANDLETOTE
Your M60 Arrives With The Following Components:
M60 Machine1
1
1
1
1
1
366 cu. in / 1.58 gal / 6L
Tote Lid
1/8" Perforated Screen
1.6mm Rasp Screen
Hopper
WHAT'S IN THE
BOX

1.866.874.6244 | INFO@MOBIUSTRIMMER.COM | MOBIUSTRIMMER.COM
INITIAL
ASSEMBLY &
INSPECTION
To set up the Mobius M60, follow these steps:
1.
Inspect the package and package contents to ensure no damage occurred during
shipping
2. Remove the machine from the package
3. Confirm the power cord is in good condition
4. Remove the HOPPER from the TOTE and fasten to the machine using both HOPPER
SCREWS
5. Ensure the ROTOR is properly installed with the spring-pin latch in place
6.
Ensure that the equipment is in a clear and tidy workspace and that all controls are
accessible and clearly visible

10
The M60 is washdown rated and features easily removable components. With the
exception of the motor and control panel, the M60 can be washed, cleaned, and wiped
down with normal detergents, degreasers, and disinfectants.
The door, rotor, screen, and hopper can all be removed to facilitate cleaning. The door can
be removed by simply lifting it off the hinges. To remove the rotor, lift up and hold the
pin on the spring plunger while sliding the rotor off of the shaft. To remove the hopper,
unfasten both hopper screws.
If necessary, the door gasket can also be removed for cleaning. The gasket is pressed by
hand into the groove around the circumference of the door.
Take care to not spray water directly onto the control panel.
The M60 is largely maintenance-free. The door gasket is the only wear component within
the M60. The condition of the door gasket should be inspected prior to each use. A faulty
or worn door gasket will not affect the operation of the machine, however it is necessary
for dust mitigation.
This User Guide does not include instructions for machine repair. For your safety, repairs
must be completed by ETEROS TECHNOLOGIES or an authorized service technician.
1. Ensure the power switch is in the off position, the power cord is unplugged, and the
emergency stop has been pressed.
2. Tilt the machine onto its back.
3.
Twist the fuse holder cap protruding from the bottom of the electrical box
counterclockwise. The cap will have white lettering that says “FUSE.”
4. Remove and safely discard the expended fuse. Insert the new fuse into the cap.
5.
Insert the new fuse and cap back into the electrical box and twist clockwise to secure.
Should the need arise, the 3A fuse can be replaced without any tools. To replace the fuse:
CLEANING THE MOBIUS M60
FUSE REPLACEMENT
PREVENTATIVE MAINTENANCE
CLEANING &
MAINTENANCE

1.866.874.6244 | INFO@MOBIUSTRIMMER.COM | MOBIUSTRIMMER.COM
MILLING
GENERAL OPERATION
The M60 is designed to be hand fed for small batch, dry milling. To begin milling product:
When all product has been fed into the machine, you can check if product is still being
milled by looking through the tote to see if ground product is being pressed through the
screen.
Once satisfied that milling is complete, turn the machine off. The tote can now be safely
removed and stowed away with the lid.
1. Install either the ⅛” perforated screen, or 1.6mm rasp screen depending on how fine
or coarse of a grind you prefer by sliding the screen into the groove of the milling
chamber. Additional screen sizes are available by request, please contact your dealer
or Eteros Technologies for availability and pricing.
2. Slide the tote into the milling chamber until bottomed out.
3.
Seal the milling chamber by closing the door of the machine, turning the latch one
quarter turn clockwise, and flipping the latch down. You will hear a click and the latch
will snap into place when properly engaged.
4.
Ensure the emergency stop is not pressed. If you are unsure, rotate the e-stop
counterclockwise. If depressed, it will reset when turned counterclockwise. The machine
will not start unless the door is sealed and the e-stop is in the default position.
5.
Ensure the power cord is plugged into a 120 V (North America) or 240 V (international)
outlet.
6. Start the rotor by switching the rotor switch to the ON position.
7.
Look down the chute and ensure the rotor is rotating clockwise (when viewed from
the front of the machine). If it isn’t, flip the direction switch to the opposite position.
8. Feed product one handful at a time into the hopper.
9.
Adjust the speed of the rotor as necessary to maintain a consistent feed rate and output.
1.866.874.6244 | INFO@MOBIUSTRIMMER.COM | MOBIUSTRIMMER.COM
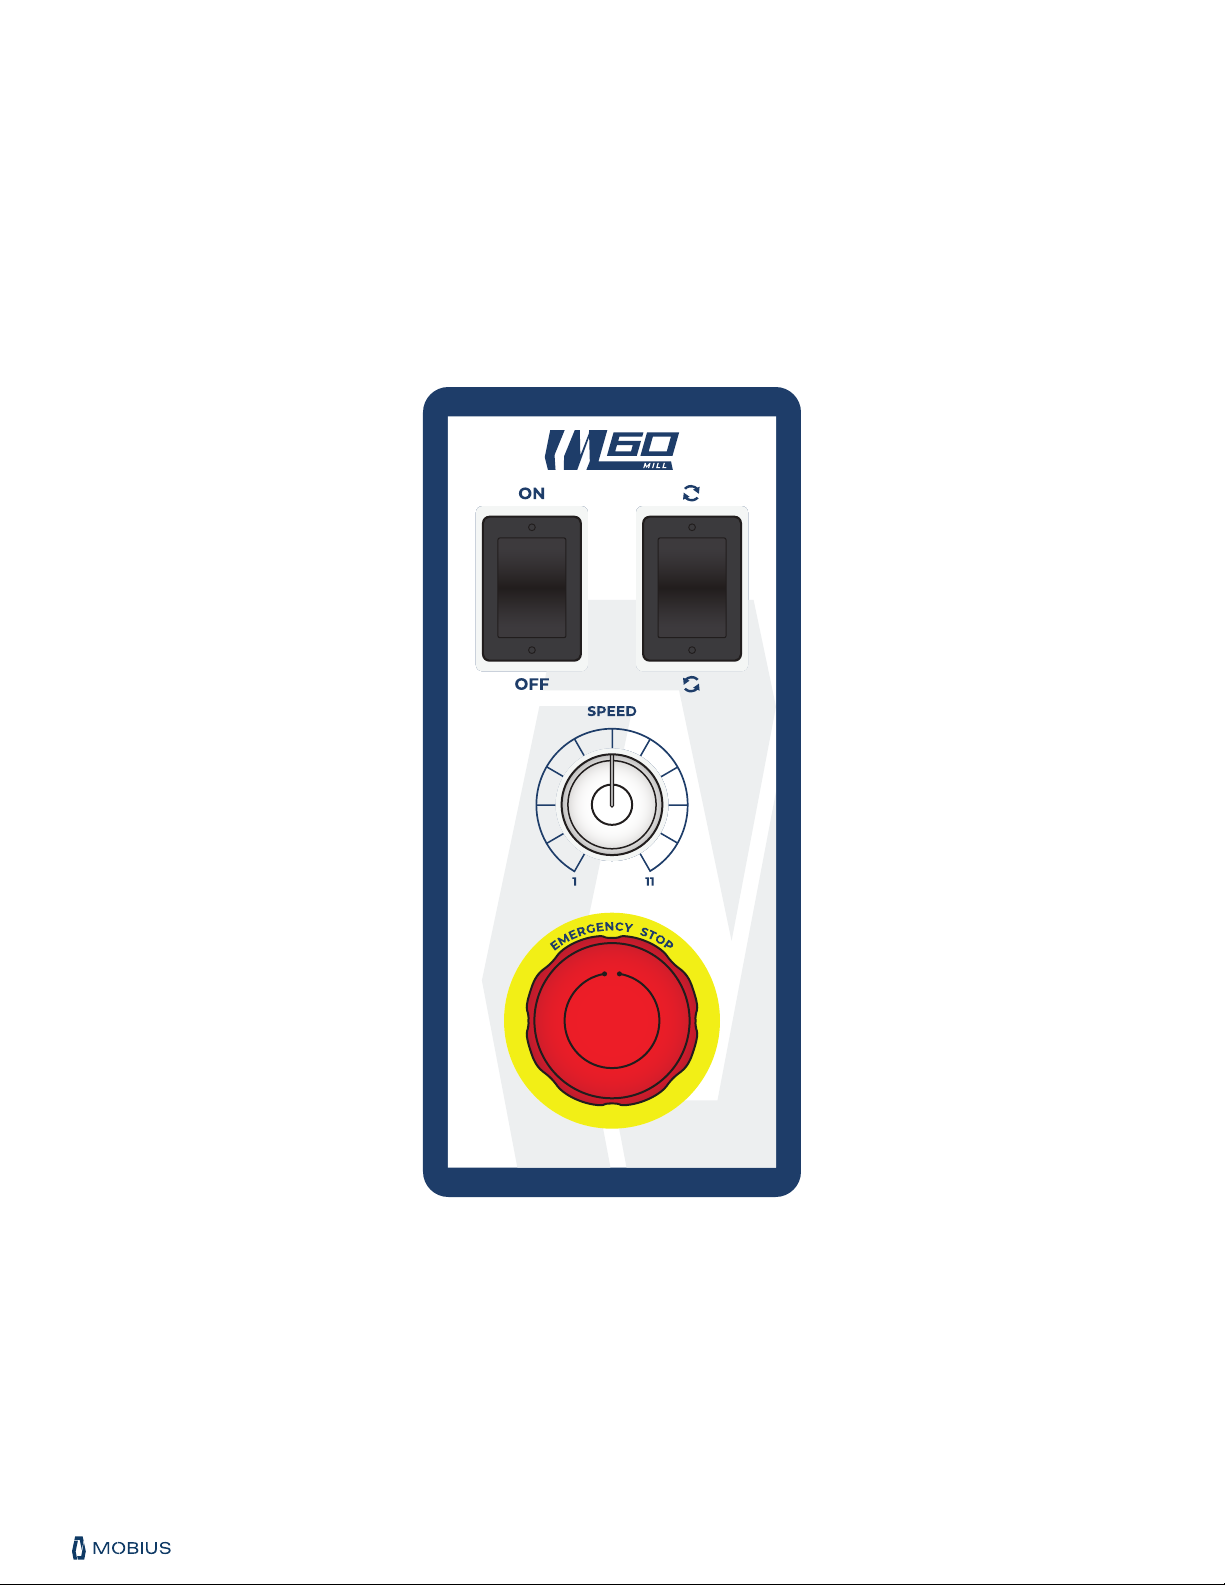
MOBIUS M60 MILL
CONTROL PANEL

13
LIFTING & MOVING
The M60 is easily moved using the aluminum handles on either side of the machine.
Exercise proper ergonomics and lifting technique when moving the machine. When setting
the machine down, ensure that all four rubber feet are firmly planted on the work surface.
TOP LEFT - POWER ON/OFF:
In the on position, the rotor will immediately begin rotating at the set speed and direction.
In the off position, the motor is disabled and the rotor is stationary.
MIDDLE - SPEED CONTROL:
Rotate the knob clockwise or counterclockwise to reduce the rotor speed.
TOP RIGHT - DIRECTION CONTROL:
Initiating the switch in the up position, will spin the rotor clockwise, which is the forward
position. Selecting the down position, you will initiate the rotor to spin counter-clockwise
(the reverse position).
BOTTOM - EMERGENCY STOP:
Pressing the e-stop will immediately disable all power to the machine and stop the
rotor. Power will remain disabled until the e-stop is reset by turning the red knob
counterclockwise and the power button is cycled off and back on.

1.866.874.6244 | INFO@MOBIUSTRIMMER.COM | MOBIUSTRIMMER.COM
SPECIFICATIONS
Milling Chamber Dimensions
Tote Dimensions
Screen/Rasp Size
Screen/Rasp Options
Power Requirements
Motor
Throughput
Rotor Speed
Speed Adjustment
7 ¾” diameter x 5” depth
7 ¼” tall x 8 ⅜” wide x 8 ⅜” deep
60 sq. in (387 sq.cm)
⁄” perforated screen
⁄” perforated screen
1.6 mm rasp screen
115 VAC, 1.5 A or 230 VAC, 0.75 A
1 / 10 HP
20 lbs / hour
0 - 110 RPM
1 - 11
Length
Tote Volume
Weight
Width
Hopper Volume
Height
13" / 33 cm
76 cu. in / 0.3 gal / 1.25L
22 ¼" / 57 cm
16" / 41 cm
366 cu. in / 1.58 gal / 6L
60 lbs
MOBIUS M60 MILL

1.866.874.6244 | INFO@MOBIUSTRIMMER.COM | MOBIUSTRIMMER.COM
TROUBLESHOOTING
Device is Abnormally Noisy / Rotor Rubbing
Mobius M60 Will Not Start
Ensure the machine is plugged in
Ensure e-stop is disengaged (pulled out)
Ensure the door is closed and sealed
Cycle the power button off then on
Ensure the rotor is not jammed or lodged
Ensure the rotor is properly seated and the spring pin is engaged to
the shaft
Inspect upper milling chamber for product / resin build up, clean as
required
Contact ETEROS TECHNOLOGIES to discuss different milling screen
options
Contact ETEROS TECHNOLOGIES to discuss milling screen options
Remove the rotor, wipe/wash down rotor, shaft, and milling chambers
Milled Material is Over / Under-Processed vs. Desired Consistency
Debris & Product Buildup on the Rotor and/or Milling Chambers

1.866.874.6244 | INFO@MOBIUSTRIMMER.COM | MOBIUSTRIMMER.COM

©2022 ETEROS TECHNOLOGIES INC. ALL RIGHTS RESERVED | MOBIUSTRIMMER.COM
Table of contents
Other Eteros Industrial Equipment manuals


