Raychem TDUX User manual

INSTALLATION INSTRUCTION
TDUX
Inflatable duct seal for telephone cable ducts
Selection table
(dimensions in mm/inches)
Maximum cable diameter for duct with 1
cable or sum of 2 cables.
Each TDUX size will seal vacant ducts for
the duct range shown in the table.
* Note: in case 3 or more cables have to be sealed, the cable bundle diameter needs to be determined. Substract 5 mm/0.2 inches for
each clip used from max. cable diameter shown in table, to determine the max. cable bundle diameter. TDUX-clips must be ordered
as a separate item. TDUX-CL clips are not to be used with TDUX-35. They are applicable to TDUX-45 and larger. TDUX-35 is suitable for
use in vacant ducts or ducts with 1 cable.
TDUX-CL-80
TDUX-CL-60
TDUX-CL-40
TDUX-CL-20
Product description
To seal 3 or more cables,
Duct Ø TDUX-35 TDUX-45 TDUX-60 TDUX-75 TDUX-90 TDUX-100 TDUX-125
use TDUX-CL clip (*)
mm inch mm inch mm inch mm inch mm inch mm inch mm inch mm inch Clip size
125 4.9 103 4.0
120 4.7 95 3.7
115 4.5 91 3.6
110 4.3 90 3.5 83 3.3
105 4.1 85 3.3
100 3.9 83 3.3 80 3.1
95 3.7 76 3.0 74 2.9
90 3.5 70 2.8 66 2.6
85 3.3 62 2.4 60 2.4
80 3.1 54 2.1 52 2.0
75 2.9 56 2.2 50 2.0 45 1.8
70 2.8 46 1.8 42 1.6
65 2.7 40 1.6 30 1.2
60 2.4 45 1.8 30 1.2 22 0.9
55 2.2 38 1.5 28 1.1
50 2.0 30 1.2
45 1.8 32 1.3 18 0.7
40 1.6 27 1.1
35 1.4 25 1.0 18 0.7
30 1.2 19 0.7
25 1.0 12 0.5
should be considered. The gas pressure
in the cylinder is approximately 60 bar
(900 p.s.i.) at room temperature. Max.
operational temperature is 50°C/122°F.
Keep cool and dry.
Use only as instructed in operating manual
of TDUX-IT-16 inflator. Misuse can be dan-
gerous. Do not handle the cylinder with
unprotected hands
immediately after filling a TDUX duct seal.
Frostbite can result.
1 Safety rules
Lubricant
Protect from frost. In case of eye contact,
flush with clean water during 15 minutes,
holding eyelids open.
Seek medical attention if irritation persists.
Wash with mild soap and water if skin
irritation occurs.
Gas cylinders
If the carbon dioxide gas cylinders are
used to inflate TDUX, following safety rules
2 Application
TDUX will seal ducts with/without cable(s)
and can be installed even while water is
flowing out of the duct. Avoid exposure of
the installed TDUX duct seal to direct
sunlight.
3 Unit packaging
TDUX duct seals are packed per 10
pcs/box, including 1 lubricant dispenser
and 1 installation instruction.
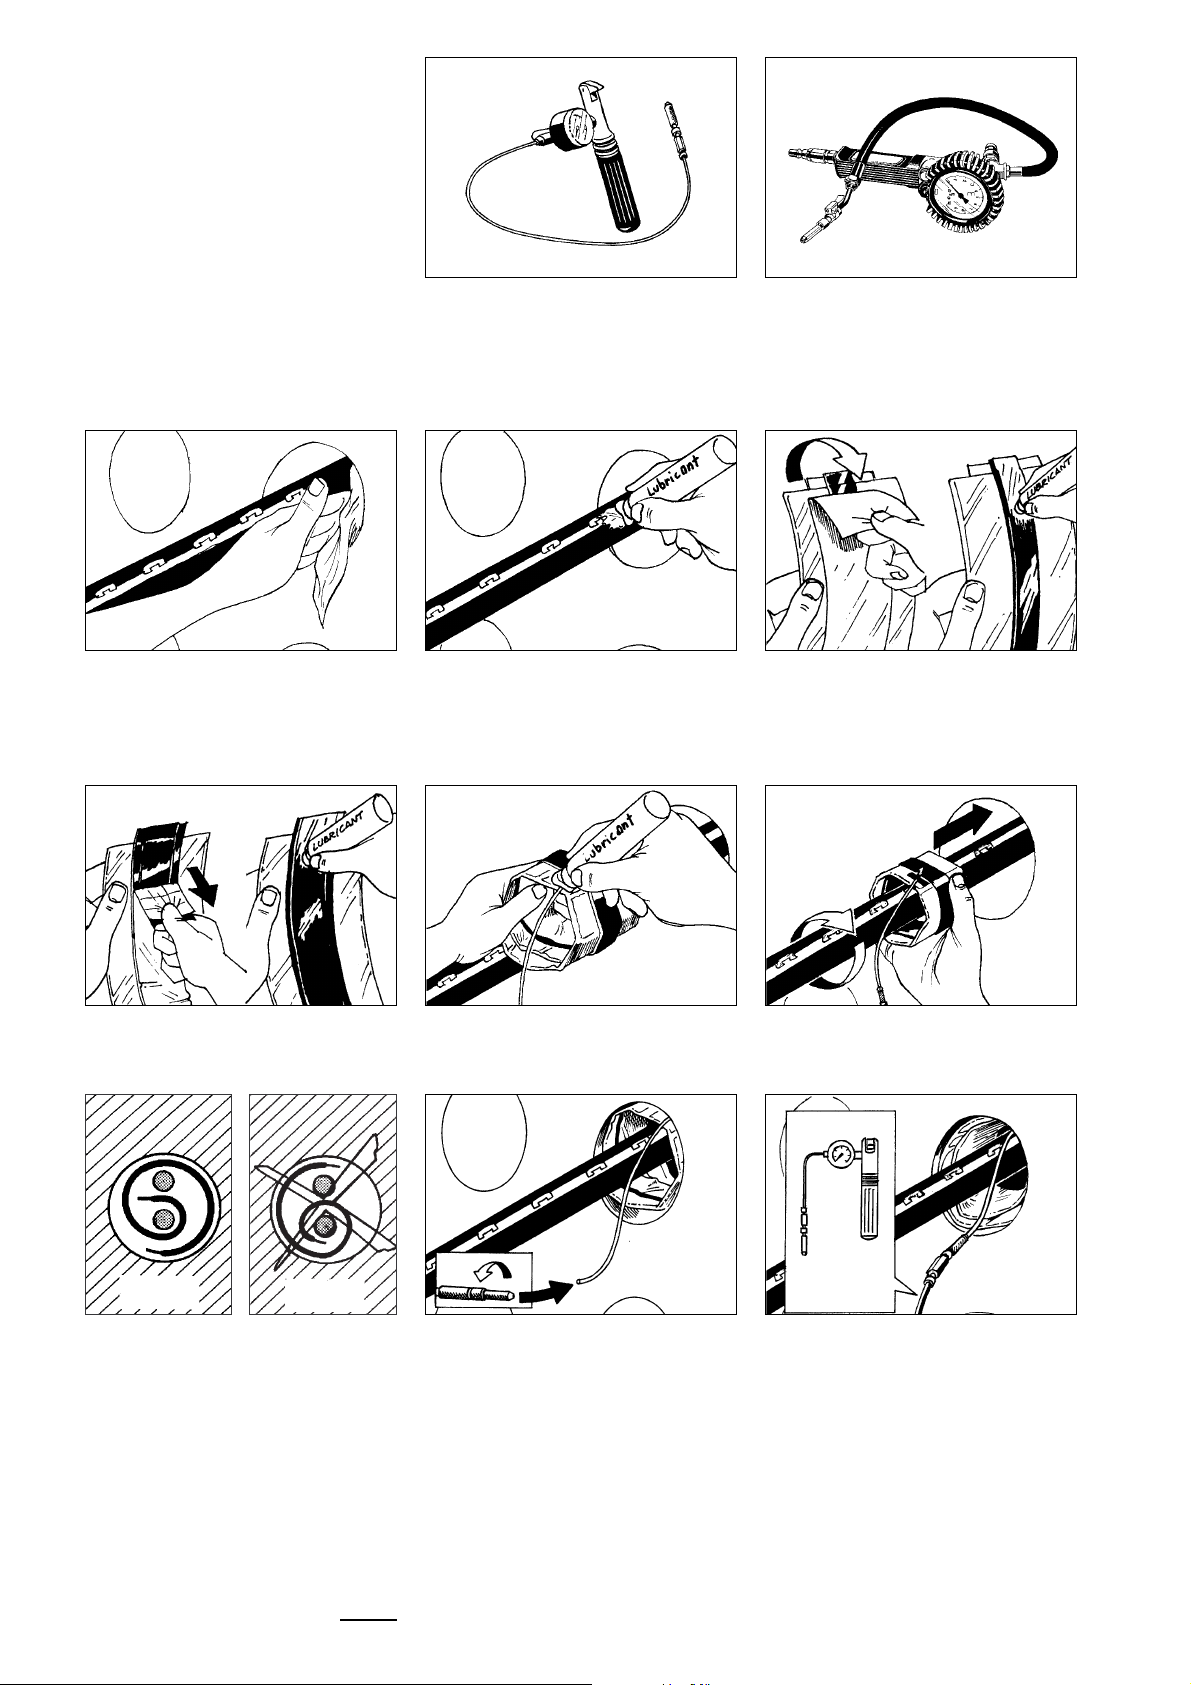
A Inflation tool using compressed CO2
gas cylinders (to be ordered separately)
equiped with a manometer and safety
relieve valve.
4 Tooling
TDUX duct seals can be installed with a
variety of inflation tools, having the
capability to inflate TDUX to
3,0 ± 0,2 bar/45 ± 3 p.s.i. of pressure.
Following tools are available from
Raychem.
B Inflation gun to be connected to
pressurised air bottle, pump or
compressor. The inlet pressure to the
inflation gun should be min. 4 bar/60 p.s.i.
and max.10 bar/150 p.s.i..
5.1 It is recommended to wet clean the
duct and cable sheath.
5.2 For ease of installation, lubricate the
cable sheath.
5.3 Remove the protective paper from the
outside of the sealing strip and lubricate
abundantly. Lubricate also outside of
TDUX: • in case of PE or concrete ducts
• when using TDUX-35
5.4 Remove the protective paper from the
inside of the sealing strip.
Lubricate abundantly.
5.5 Lubricate the filling tube on the TDUX
section.
5.6 Wrap TDUX around the cable and slide
completely into the duct.
5.7 In case of 2 cables, wrap TDUX
around the cables as shown, starting with
the largest cable.
5.8 Connect the filling tube to the tube-
snap of the inflation tool.
5.9 Inflate TDUX up to the pressure of
3,0 bar/45 p.s.i. and keep the pressure at
3.0 ± 0,2 bar/45 ± 3 p.s.i. during
30 seconds after which the tool must be
shut-off.
Note: please refer to the operating manual
for the specific inflation tool being used.
TDUX-IT-16 TDUX-IG-SR-AS
5 Installation procedure
Right Wrong
2

3
5.10 Pull-out the filling tube in one gentle
move in the direction of the cable.
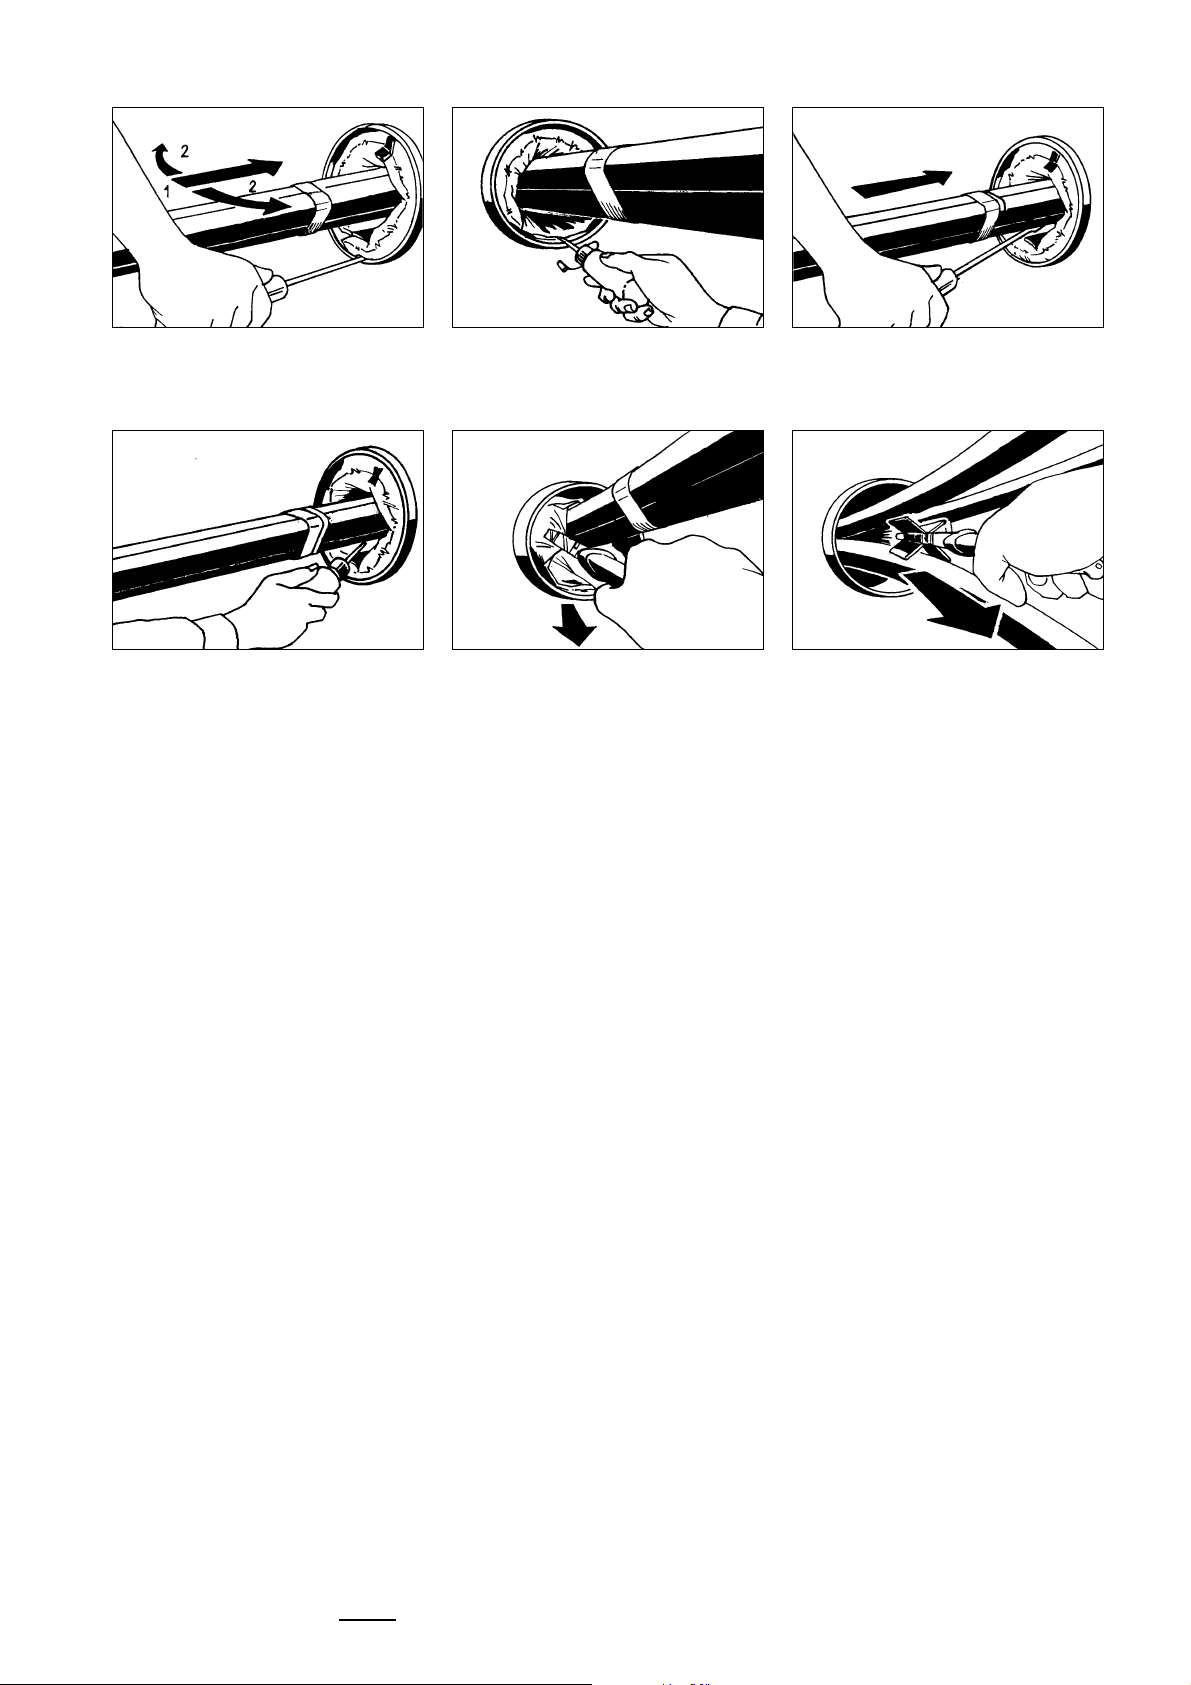
6.1 Deflate the TDUX seal by piercing with
a screw-driver. Release the TDUX from the
duct wall by using a blunt tool.
6 Removal
Where use of accessory is required, refer
to separate installation procedure which is
provided.
6.2 Apply lubricant on the released areas
to facilitate removal of the TDUX from the
duct wall with the removal lubricant bottle.
6.3 Release TDUX from the cable bundle.
6.4 Apply lubricant on the released areas. 6.5 Pull TDUX out of the duct with a pair
of pliers.
Lubricant for removal E4540-1436 is
separately available.

4
A Examples for different multiple cable
configuration.
TDUX-CL
Sealing system for multiple telephone cable configurations,
to be used in combination with TDUX inflatable duct seals
Application
TDUX-CL duct seal clip is used in
combination with TDUX inflatable duct
seal, if the duct is occupied with 3 cables
or more.
TDUX-CL duct seal clips must be ordered
as a separate item.
For sizing information, please refer to
selection table on the front page.
One TDUX-CL clip can seal up to 4 cables.
If more cables are to be sealed, use
1 extra clip per 3 additional cables.
1Open clip wings on one side. Lubricate
the wings abundantly, to ensure that they
don’t stick together.
2Remove one protection paper and
lubricate abundantly the larger surface of
the clip wing
3Repeat steps 1 and 2 for the other clip
wings. Remove protection paper only after
lubricating at least one wing side.
4Abundantly lubricate the cables in the
crunch area as much as possible.
5Insert the clip in between the cables,
assuring that there is only one cable
between each clip wing (see picture A
“configurations). Make sure that the central
part of the clip is well positioned in the
crunch area (mark flush with duct
entrance).
6If necessary use a tie-wrap to hold the
clip in place. Cut off the excess of the tie-
wrap and position the locking part
between the cables. Tape all cables
together close to the duct.
7. Install the TDUX duct seal following the
standard TDUX installation procedure.
Installation instruction
5
8Deflate the TDUX duct seal by piercing
with a screwdriver. Release the TDUX from
the duct wall by using a blunt tool.
9Apply lubricant on the released areas
to facilitate removal of TDUX from the duct
wall.
10 Release TDUX from the cable bundle.
11 Apply lubricant on the released areas. 12 Remove TDUX out of the duct with a
pair of pliers.
13 If necessary, remove tape (and tie
wrap) from the cable bundle. Spread
cables and apply lubricant in the crunch
area.
Remove clip core and sealant as much as
possible with a pair of pliers.
Removal
This manual suits for next models
7
Table of contents
Other Raychem Industrial Equipment manuals


