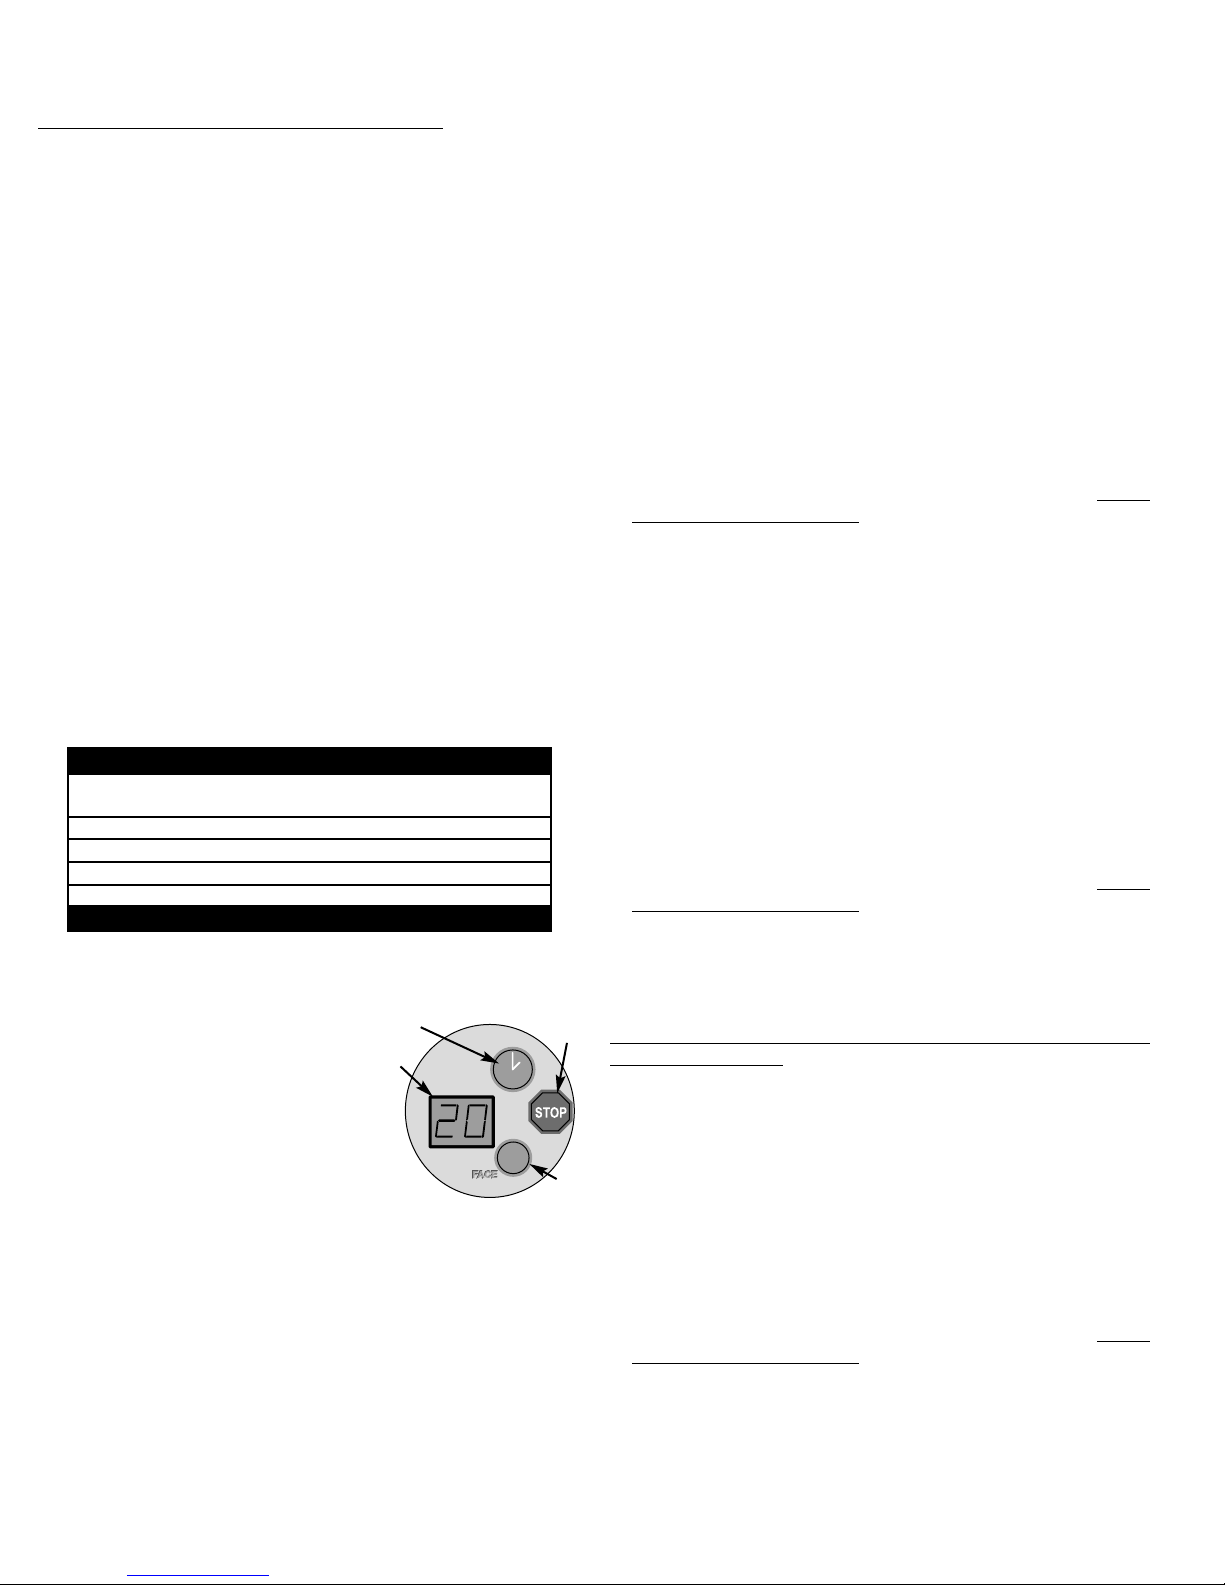
A Timer display - Displays remaining time.
B Timer button - Turns bed on. Timer dis-
play shows remaining time. If a lesser
time is desired, press timer button
until desired time is displayed.
C Stop button - Interrupts tanning session.
D Face button - Turns Lumagen™ facial lamps on and off.
27771-01A - Page 5
Operation
A
BC
Using Your Sunbed
Before using your sunbed, please note the following:
• Your skin should be free of cosmetics, tanning oils, or other body
lotions prior to tanning except for those specifically made for use
with tanning devices. However, do not remove natural body oils by
bathing or showering immediately before tanning.
• Keep treated hair from contacting sunbed surfaces. Many hair prod-
ucts can damage the sunbed acrylic. Wear a shower cap or towel if
you use gels, mousses, sprays, or other hair products.
• Your sunbed is designed for individual use. Always wear the safety
goggles supplied with your sunbed or another approved pair of gog-
gles, as defined under 21 CFR 1040.20. Regular sunglasses do not
provide adequate protection from ultraviolet light.
Exposure Times
Follow the guidelines for skin type and exposure times as shown in the
table below. Untanned persons should not tan on consecutive days
during their first week of tanning. Never tan more than once a day.
Tanning normally appears after the first few sessions and maximizes
after approximately four weeks. Tan once or twice per week thereafter
to maintain appearance. Persons already having a base tan may begin
at advanced levels corresponding to the extent of their base tan.
Skin Type:
ISensitive Skin (Burns easily and severely and does not tan.)
II Light Skin (Burns easily and severely and tans minimally.)
III Normal Skin (Burns moderately and tans average.)
IV Dark Skin (Burns minimally, tans easily and above average.)
(When used without remote or when connected to a remote system
using a control relay)
When used without T-Max® remote systems you may decide to use
the tanning lamps alone, tanning with Lumagen, or Lumagen alone.
Operation is very simple for any of the three modes.
Tanning with or without Lumagen™
1Press the timer button (B) to begin a tanning session. The timer dis-
play (A) displays the remaining time. All lamps will turn on and the
timer will begin to count down from the maximum tanning session
time. If a tanning time less than the displayed time is desired repeat-
edly press the timer button (B) to decrease the remaining time.
Simply press the face button (D) to turn Lumagen off if desired.
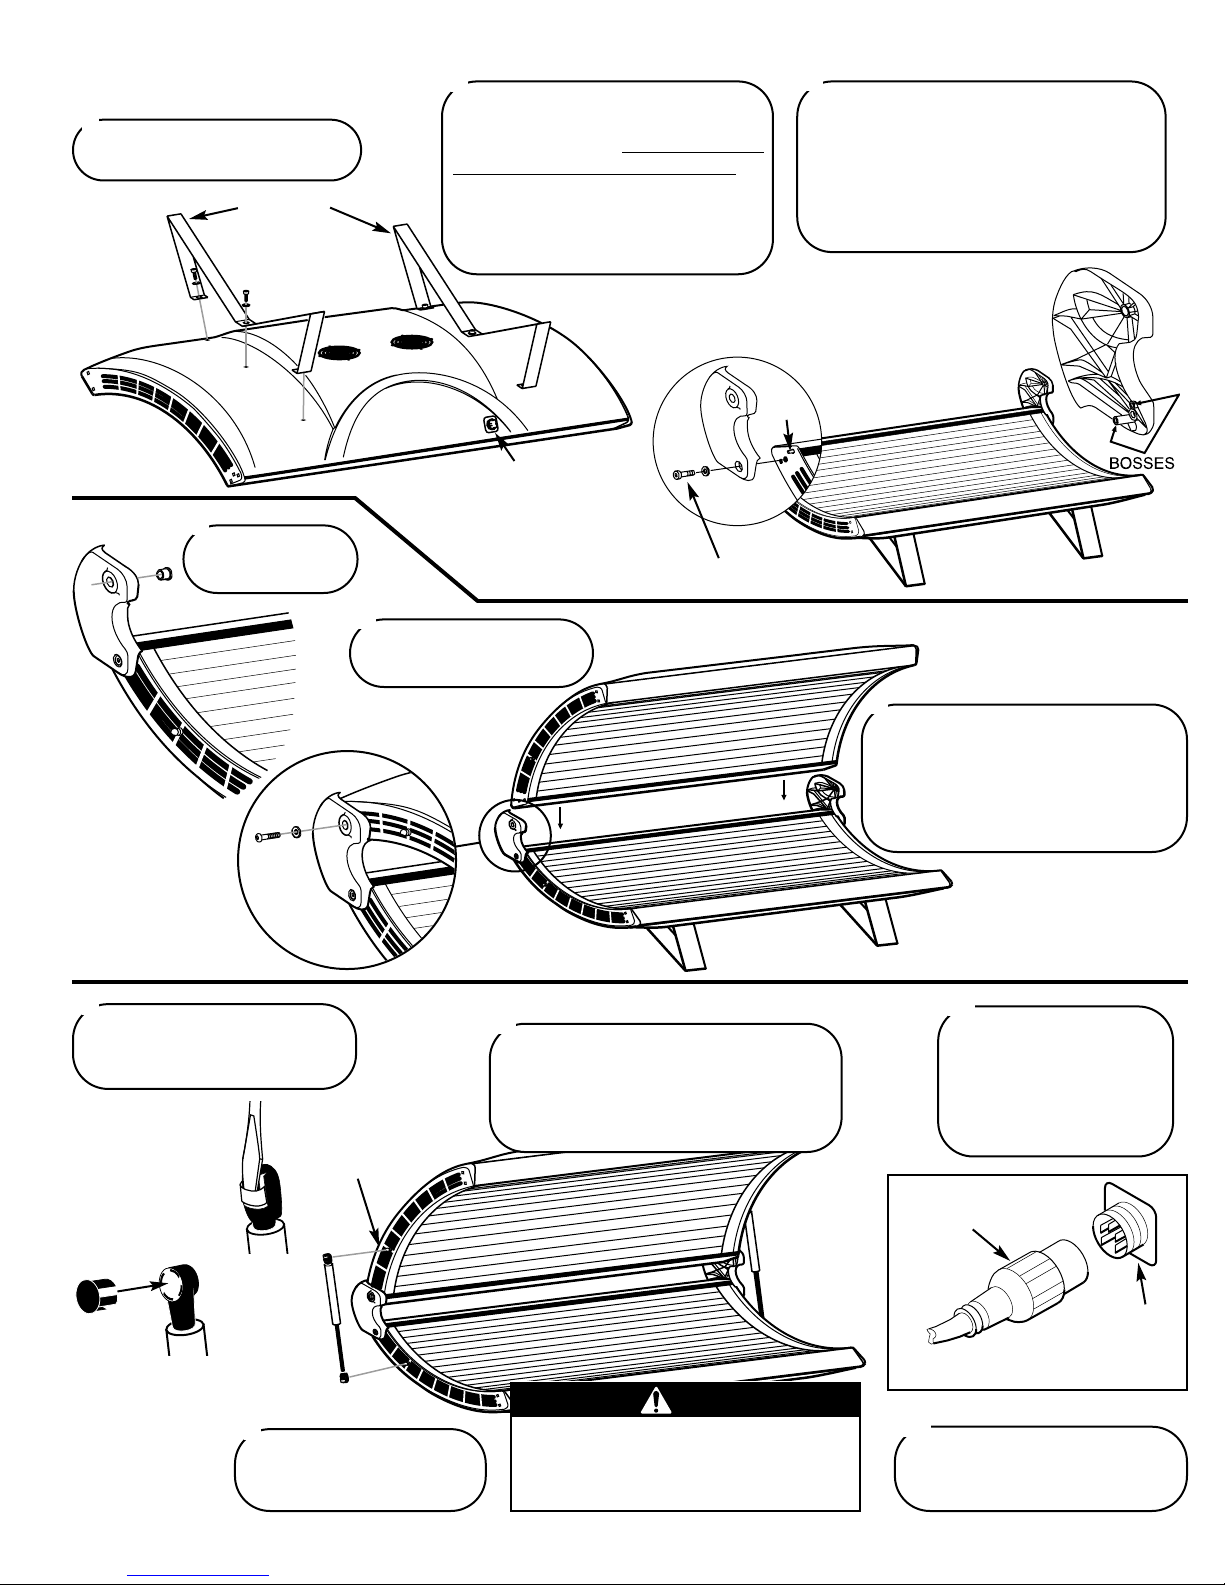
2Lift the canopy, lie down on the bench (face up), lower the canopy
as close to your body as possible, with no less than 2” between the
canopy acrylic and your body.
3When the timer reaches “0” the lamps turn off. If you want to stop
your session before time expires, press the stop button (C).
4Raise the canopy by using the outer edge of the canopy, do not
push up on the acrylic shield as it may crack. The cooling fans run
for three minutes after the lamps shut off to aid in cooling the
sunbed.
Lumagen™ only
1Press the face button (D) to begin a Lumagen session. The timer dis-
play (A) displays the remaining time. Only the Lumagen lamps will
turn on and the timer will begin to count down from the maximum
Lumagen session time of 20 minutes. If a lesser time is desired
repeatedly press the timer button (B) to decrease the remaining
time.
2Lift the canopy, lie down on the bench (face up), lower the canopy
as close to your body as possible.
3When the timer reaches “0” the lamps turn off. If you want to stop
your session before time expires, press the stop button (C).
4Raise the canopy by using the outer edge of the canopy, do not
push up on the acrylic shield as it may crack. The cooling fans run
for three minutes after the lamps shut off to aid in cooling the
sunbed.
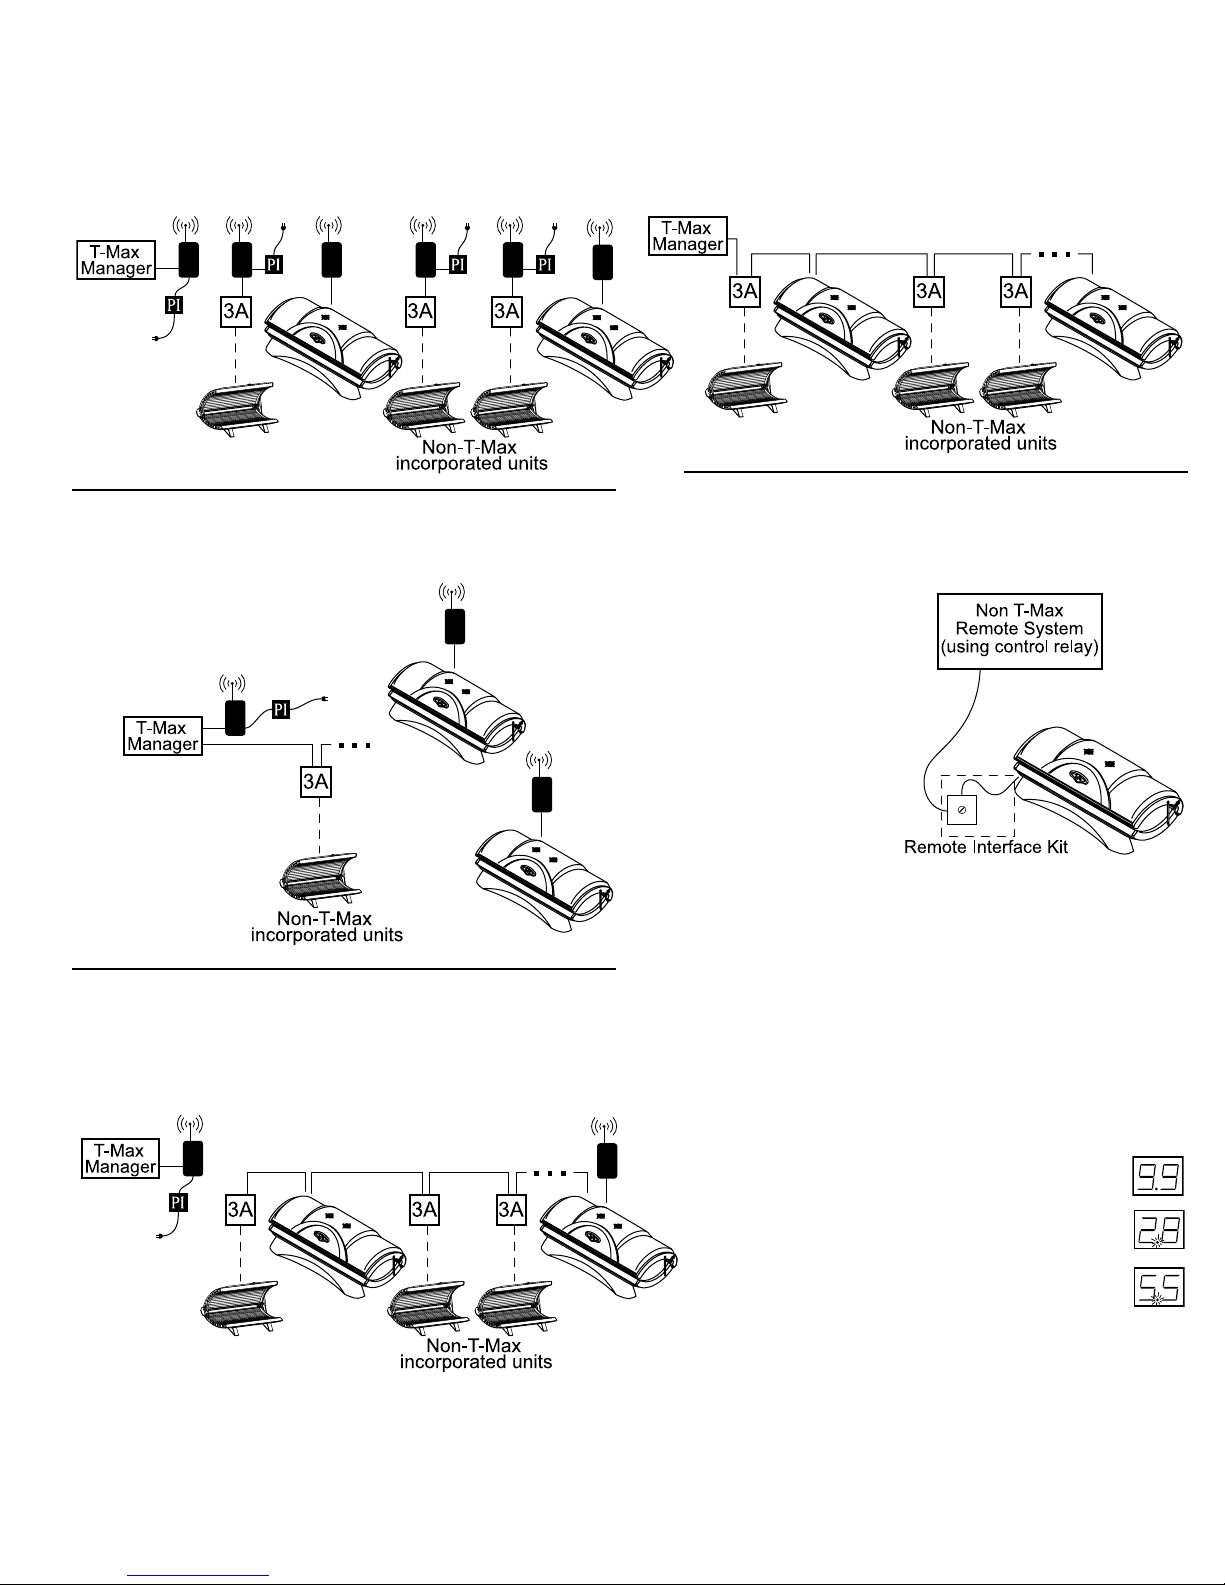
(When connected to the T-Max® Manager Pro)
Note: See Remote Connections for important information about the
T-Max remote system.
1If the remote system has been set to allow a pre-tanning delay time,
the timer display (A) will repeatedly flash the delay symbol “dL” and
then the remaining delay time. Press the timer button (B) or wait until
the delay time has expired to begin the tanning session. The lamps
will turn on and the timer will begin to count down.
2Lift the canopy, lie down on the bench (face up), lower the canopy
as close to your body as possible, with no less than 2” between the
canopy acrylic and your body.
3When the timer reaches “0” the lamps turn off. If you want to stop
your session before time expires, press the stop button (C).
4Raise the canopy by using the outer edge of the canopy, do not
push up on the acrylic shield as it may crack. The cooling fans run
for three minutes after the lamps shut off to aid in cooling the
sunbed. The timer will indicate “..” as a reminder to clean the
sunbed. After the sunbed is cleaned press the timer button and the
display will return to “0”.
D
RECOMMENDED EXPOSURE TIMES IN MINUTES
Level 1/Week 1 Level2Level3Level4Level5
Skin Type: 1st-3rd Sessions
I Sensitive NOT RECOMMENDED FOR TANNING
II Light 4 8 12 16 20
III Normal 6 10 15 20 20
IV Dark 8 12 16 20 20
MAXIMUM EXPOSURE TIME IS 20 MINUTES