HAPRO Luxura V10 User manual

Per l'italiano, vedete il CD-ROM
Para Español, consulte el CD-ROM
Českou verzi naleznete na disku CD-ROM
Wersja polska znajduje się na płycie CD-ROM
A magyar változat a CD-ROM-on található
Для русской версии см. CD-ROM
For dansk version, se CD-ROM
Suomenkieltä varten katso CD-ROM
For den norske versjonen se vedlagte CD
För svenska, se CD-ROMskivan
ITA
ESP
CZE
POL
HUN
RUS
DNK
FIN
NOR
SWE
Manual
Anleitung
Handleiding
Mode d’emploi

2
Headquarters
Hapro International
P.O.Box 73
4420 AC Kapelle,
The Netherlands
Tel.: +31(0)113-362362
Fax.: +31(0)113-362399
Office Germany
Hapro Deutschland GmbH
Graf-Zeppelin-Str. 1
56410 Montabaur
Germany
Tel.: +49(0)2602-9400-0
Fax.: +49(0)2602-9400-49

3
This manual provides the required information on warnings, instructions and assembly.
You should use this manual for more than just the necessary sunbed assembly and/or
maintenance instructions; you need to familiarize yourself with all of the information
provided. Persons who use the sunbeds need to be informed and supervised, and it is
your duty to make sure they receive proper assistance.
Dieses Handbuch stellt alle notwendigen Informationen - Warnungen, Anweisungen
und Zusammenbauanleitung - bereit. Sie sollten dieses Handbuch nicht nur für die
erforderlichen Anweisungen zum Zusammenbau der Sonnenbank und/oder für
Wartungsanweisungen verwenden, sondern Sie sollten sich mit allen bereitgestellten
Informationen vertraut machen. Personen, die eine Sonnenbank nutzen, müssen
informiert und beaufsichtigt werden und es liegt in Ihrer Verantwortlichkeit, dass sie
die notwendige Hilfe erhalten.
Deze handleiding geeft alleen de noodzakelijke informatie mbt waarschuwingen,
instructie en opbouw. Gebruik deze handleiding niet alleen voor de noodzakelijke
opbouw en/of onderhoud van de zonnebank, u dient zich te op de hoogte te stellen
van alle gegeven informatie. Personen die gebruik maken van de zonnebank dienen
geïnformeerd en begeleid te worden. Het is uw verantwoordelijkheid ervoor te zorgen
dat dit gebeurd.
Vous trouverez dans ce manuel les informations nécessaires concernant les mises en
garde, les instructions et le montage. Nous vous recommandons de ne pas utiliser ce
manuel uniquement pour les instructions élémentaires de montage du banc solaire/
ou pour les instructions d’entretien ; vous devez vous familiariser avec les informations
fournies. Les utilisateurs de banc solaire doivent être informés et encadrés, et il est de
votre devoir de vous assurer qu’ils reçoivent une assistance appropriée.
Manual ... 4
Anleitung ... 28
Gebruiksaanwijzing ...54
Mode d’emploi ... 80

4
Congratulations on the purchase
of your Hapro sunbed. Your new
sunbed has been manufactured with
the utmost care and attention and
consists of high-quality parts. All Hapro
sunbeds have been developed to give you the
best possible tan, whilst complying with the
strictest applicable European standards.
Note:
Please consult enclosed tanning schedule for advised tanning times.
Repairs may only be carried out by qualied personnel.
Always disconnect the main power at the circuit breaker before servicing or repairing the unit.
Read this rst
1 Contact your authorised Hapro dealer
immediately if this unit does not
function as outlined in this manual.
2 Do not operate this unit in humid
spaces.
3 Always make sure the fuses can carry
the load. This unit has to be protected
by ground fault circuit interrupter
(GFCI) of 0.03A.
4 Always disconnect the power to the
unit at the wall breaker (isolator)
when servicing or cleaning the in-
side construction of the cabine.
Maintenance for which the procedure
is not described in this manual should
only be carried out by a qualied
electrician. Never clean the electrical
components with uids.
5 Ensure that the canopy does not touch
the wall when opened.
6 Prevent the acrylic sheets from coming
into contact with sharp objects.
7 This unit may not be operated if:
• the user is not wearing protective uv-
goggles
• the blue or white facial glass is cracked
or broken
• the acrylic panel in the canopy and/or
bench is missing
• one or more of the fans in the unit are
not functioning properly
• the timing mechanism is not
functioning properly
• the temperature inside the cabin is
30°C or higher
8 To ensure maximum tanning
eectiveness, change the acrylic sheet
after every 1200 hours of operation.
9 To ensure maximum tanning
eectiveness, replace the lamps and
the facial tanning lamps according to
manufacturer´s instructions.
10 Check local regulations to nd out the
proper procedure for lamp disposal.
11 Note: only a special acrylic cleaner
may be used to clean the acrylic sheet.
Never use cleaners that contain alcohol,
as these can damage the acrylic sheet.
12 The UV-type of the tanning unit is
indicated on the specication sticker.
13 Ultraviolet radiation from the sun
or UV appliances can cause skin or
eye damage. These biological eects
depend upon the quality and quantity
of the radiation as well as the skin and
eye sensitivity of the individual.
14 Excessive exposure may cause skin to
burn. Excessive repeated exposure to
ultraviolet radiation from the sun or
UV appliances may lead to premature
ageing of the skin as well as increase
risk of skin tumours.
15 The unprotected eye may develop
surface inammation and in some
cases, after a cataract operation
for example, damage may accur to
the retina after eccessive exposure.
Cataracts may develop after prolonged
exposures.
16 If the supply cord is damaged, it must
be replaced by the manufacturer or
service agent or a similarly qualied
person in order to avoid a hazard.
17 To replace lamps and starters, remove
by turning a quarter turn to the left.
Placement of new lamps and starters
is done in the reverse to the above
mentioned procedure.
18 When installing the equipment, follow
the recommended minimum distances
listed in the “Dimensions / Placement”
chapter.
19 Clean the dust lters after every 50
hours of use. Regularly check the dust
lters.
20 Children should be supervised to
ensure that they do not play with the
tanning unit.
21 Non-users, especially children, must
not be present when the appliance is
being operated.
‘The information contained in this manual regarding assembly and operation should be
followed in full. Failure to do so may render the product warranty or liability on behalf
of the supplier null and void. If there is any uncertainty as to whether the instructions
contained in this manual have been followed properly and entirely, you should contact
the supplier of the sunbeds.
Contents
Read this rst ............................................5
Golden rules for sensible tanning in the tanning unit......6
Tanning tables ...........................................7
Tanning Instructions displayed on the cubicle wall ........8
Information on lamps ....................................9
Decorative lighting. . . . . . . . . . . . . . . . . . . . . . . . . . . . . . . . . . . . . .10
Operation ..............................................11
Qsens (optional) ........................................23
Symbols ................................................25
Warranty policy .........................................26
Declaration of conformity ...............................27
Removing the acrylic sheets ............................106
Tanning unit assembly .................................108
Dimensions............................................152
Technical data .........................................153
Electrical diagrams .....................................155

5
ENGLISH
Congratulations on the purchase
of your Hapro sunbed. Your new
sunbed has been manufactured with
the utmost care and attention and
consists of high-quality parts. All Hapro
sunbeds have been developed to give you the
best possible tan, whilst complying with the
strictest applicable European standards.
Note:
Please consult enclosed tanning schedule for advised tanning times.
Repairs may only be carried out by qualied personnel.
Always disconnect the main power at the circuit breaker before servicing or repairing the unit.
Read this rst
1 Contact your authorised Hapro dealer
immediately if this unit does not
function as outlined in this manual.
2 Do not operate this unit in humid
spaces.
3 Always make sure the fuses can carry
the load. This unit has to be protected
by ground fault circuit interrupter
(GFCI) of 0.03A.
4 Always disconnect the power to the
unit at the wall breaker (isolator)
when servicing or cleaning the in-
side construction of the cabine.
Maintenance for which the procedure
is not described in this manual should
only be carried out by a qualied
electrician. Never clean the electrical
components with uids.
5 Ensure that the canopy does not touch
the wall when opened.
6 Prevent the acrylic sheets from coming
into contact with sharp objects.
7 This unit may not be operated if:
• the user is not wearing protective uv-
goggles
• the blue or white facial glass is cracked
or broken
• the acrylic panel in the canopy and/or
bench is missing
• one or more of the fans in the unit are
not functioning properly
• the timing mechanism is not
functioning properly
• the temperature inside the cabin is
30°C or higher
8 To ensure maximum tanning
eectiveness, change the acrylic sheet
after every 1200 hours of operation.
9 To ensure maximum tanning
eectiveness, replace the lamps and
the facial tanning lamps according to
manufacturer´s instructions.
10 Check local regulations to nd out the
proper procedure for lamp disposal.
11 Note: only a special acrylic cleaner
may be used to clean the acrylic sheet.
Never use cleaners that contain alcohol,
as these can damage the acrylic sheet.
12 The UV-type of the tanning unit is
indicated on the specication sticker.
13 Ultraviolet radiation from the sun
or UV appliances can cause skin or
eye damage. These biological eects
depend upon the quality and quantity
of the radiation as well as the skin and
eye sensitivity of the individual.
14 Excessive exposure may cause skin to
burn. Excessive repeated exposure to
ultraviolet radiation from the sun or
UV appliances may lead to premature
ageing of the skin as well as increase
risk of skin tumours.
15 The unprotected eye may develop
surface inammation and in some
cases, after a cataract operation
for example, damage may accur to
the retina after eccessive exposure.
Cataracts may develop after prolonged
exposures.
16 If the supply cord is damaged, it must
be replaced by the manufacturer or
service agent or a similarly qualied
person in order to avoid a hazard.
17 To replace lamps and starters, remove
by turning a quarter turn to the left.
Placement of new lamps and starters
is done in the reverse to the above
mentioned procedure.
18 When installing the equipment, follow
the recommended minimum distances
listed in the “Dimensions / Placement”
chapter.
19 Clean the dust lters after every 50
hours of use. Regularly check the dust
lters.
20 Children should be supervised to
ensure that they do not play with the
tanning unit.
21 Non-users, especially children, must
not be present when the appliance is
being operated.
‘The information contained in this manual regarding assembly and operation should be
followed in full. Failure to do so may render the product warranty or liability on behalf
of the supplier null and void. If there is any uncertainty as to whether the instructions
contained in this manual have been followed properly and entirely, you should contact
the supplier of the sunbeds.

6Note: If your customers are using any medication, ask them to consult their doctor before starting a series of tanning sessions.
Golden rules for sensible
tanning
These rules are in accordance with the European regulations concerning safe use of
tanning equipment. We advise you to inform your clients about these rules.
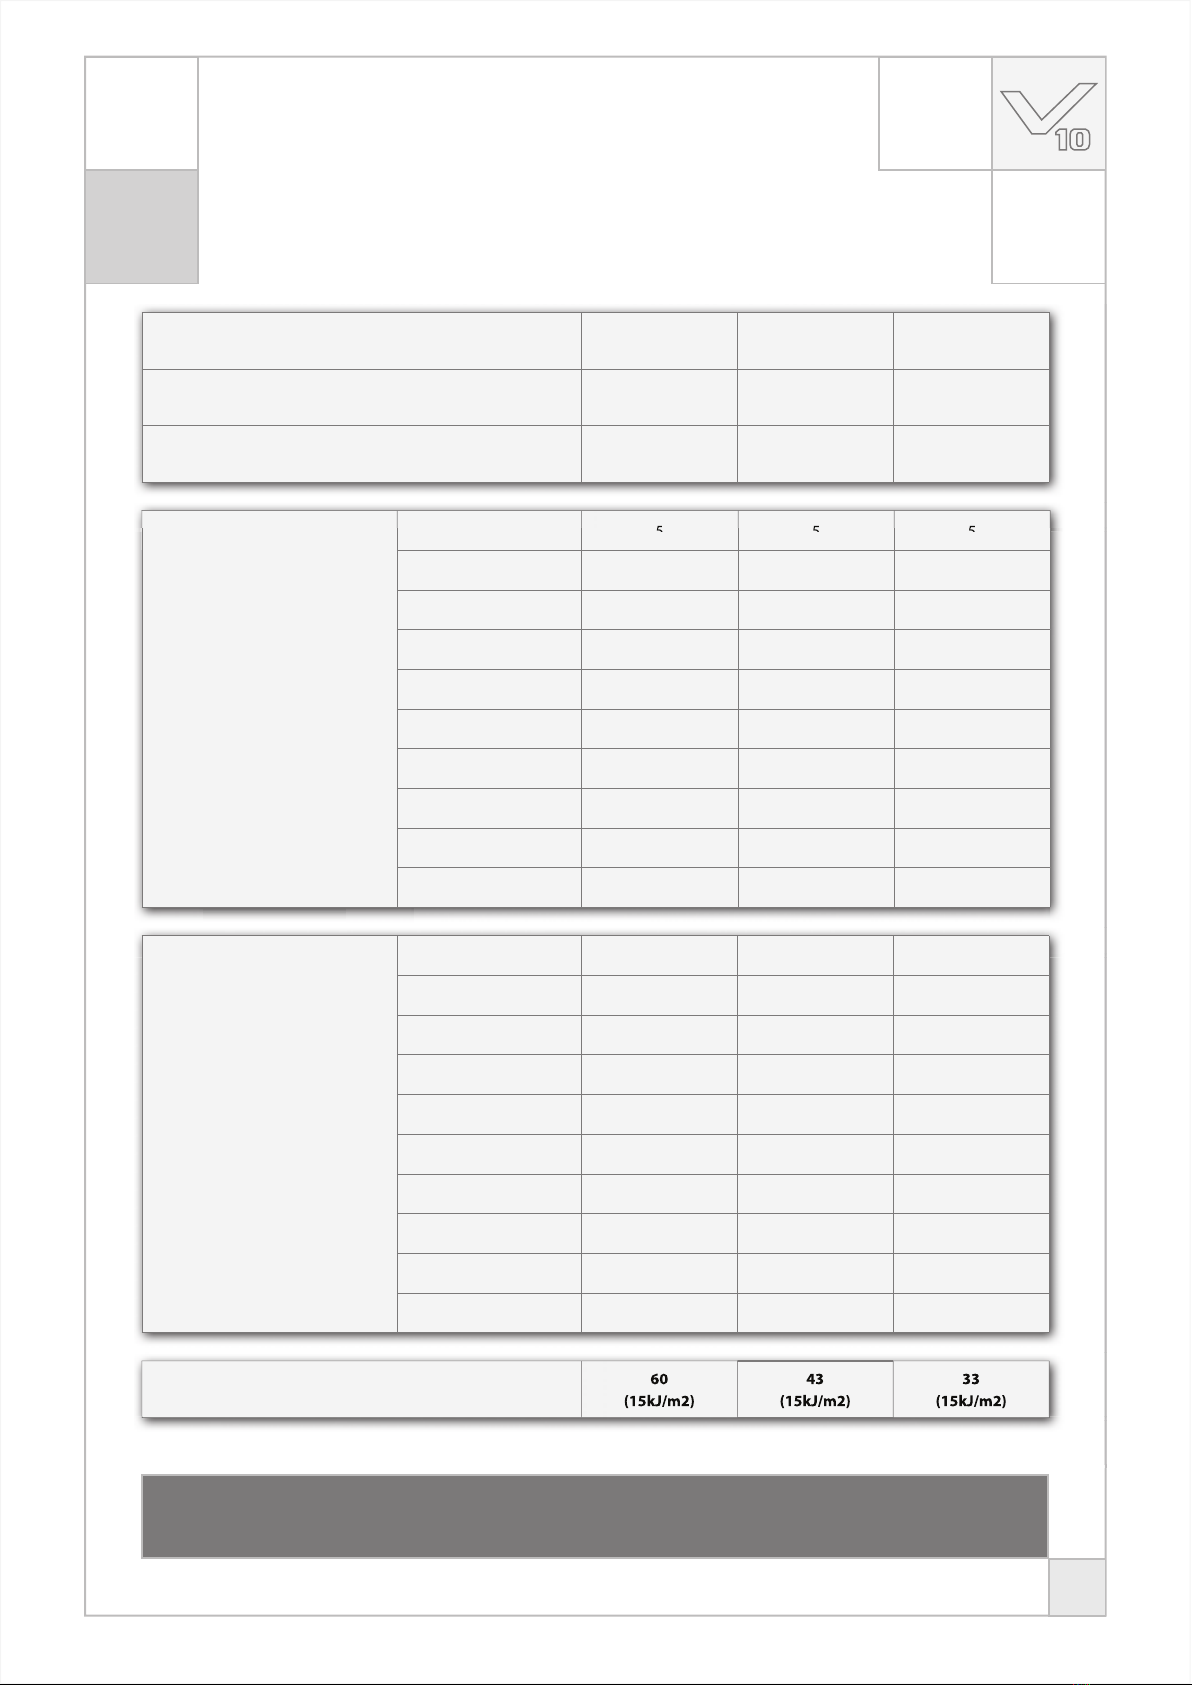
1 Before your client starts tanning, rst
thoroughly consult the tanning table
included in this book and follow the
recommendation given.
2 This sunbed is not suitable for use by:
• Persons with reduced sensory and/or
mental capacity
• Persons lacking knowledge of or
experience with sunbeds, with the
exception of individuals who are being
supervised or have received instructions
regarding the use of the sunbed by a
person who assumes responsibility for
their safety.
3 Sunbeds are not suitable for use by:
• Persons whose skin is prone to burn
without being exposed to sunlight
• Persons whose skin is already sunburned
or has been burned in a tanning bed
• Persons who have been diagnosed with
skin cancer or precursors of skin cancer
• Persons without a medical advice who
experience unexpected symptoms such
as itching within 48 hours of using a
sunbed for the rst time.
• persons who tend to freckle
• persons with a natural red hair colour
• persons having abnormal discoloured
patches on skin
• persons having more than 16 moles (2
mm or more) on the body
• persons having atypical moles (defi ned
as asymmetrical moles larger than 5 mm
in diameter with variable pigmentation
and irregular borders; in case of doubt,
seek medical advice)
• Seek medical advise if persistent lumps
or sores appear on the skin or if there are
changes in pigmented moles.
• persons with a family history of
melanoma.
• persons under a doctor’s care for diseases
that involve photosensitivity and/or
receiving photosensitising medications
• persons who burn easily when exposed
to the sun, or having a history of frequent
severe sunburn during childhood
• persons who are not able to tan at all
or able to tan without burning when
exposed to the sun
• Persons younger than 18
4 Make sure that upon commencing a
series of tanning sessions your customers
have a rest day following their rst
tanning session. If there is no sign of any
undesirable skin reaction they can then
continue with the series of sessions.
5 Make sure that your customers do not
tan more than once a day. This applies to
tanning using an appliance and tanning
in natural sunlight. The skin does not
make a distinction between the two.
Take exposure to natural sunlight into
account.
6 Some medicines and beauty products
contain substances which can cause
certain undesirable reactions when
combined with exposure to UV radiation.
Other substances may also sometimes
have a similar eect. Below you will
nd a list of substances which can react
when combined with exposure to UV
radiation:
• Sulphonamide - in various medications,
including antibiotics
• Tetracyclines - in antibiotics and acne
medication
• Nalidexine acid - in urinary tract infection
medication
• Chlorothiazide - in diuretics
• Sulphonylurea - in diabetes medication
• Phenothiazines - anxiety medication
• Triacetyldiphenylisatine - in laxatives
• Psoralenes - in tanning accelerators
• Cyclamates - in sweeteners
• Para-aminobenzoic acid (PABA) - in
sunscreen creams/oils
• Musk ambrette, musk oil - in perfumes
• Bleaching agents - in washing powders/
liquids
• Eosine - in colourings
• Halogenated salicylamide - in antifungal
substances
7 When combined with exposure to
ultraviolet light, cosmetic products, e.g.
perfumes and make-up can cause the
skin to react. Ensure that your customers
skin is clean before they start tanning.
Some products penetrate deep into the
skin. Advise your customers to make
sure that their skin is clean during their
tanning session. Recommend that they
cleanse their skin thoroughly a few hours
before each tanning session, or better
still, recommend that they wear no
make-up at all the day before. Also tell
your customers to remove any jewellery
before tanning.
8 Make sure that your customers do
not use cream or oil that contains a
sun block or self-tanning lotion when
using the tanning equipment. These
products contain substances which
inuence tanning times and thus make
the prescribed times unreliable. Also
make sure that your customers do not
use tanning pills in combination with a
series of tanning sessions or exposure
to natural sunlight. The combination of
tanning pills and UV light can increase
the possibility of skin irritation and
sunburn.
9 If the skin is red and taut shortly after the
tanning session it is likely sunburned.
Wait one week for these symptoms to
disappear before tanning again, revise
the tanning plan and reduce the length
of the individual tanning sessions for the
customer in question. If tanning gives
rise to undesirable reactions that you
cannot explain, stop the series of tanning
sessions and advise your customer to
see their doctor if the symptoms do not
disappear within a short space of time.
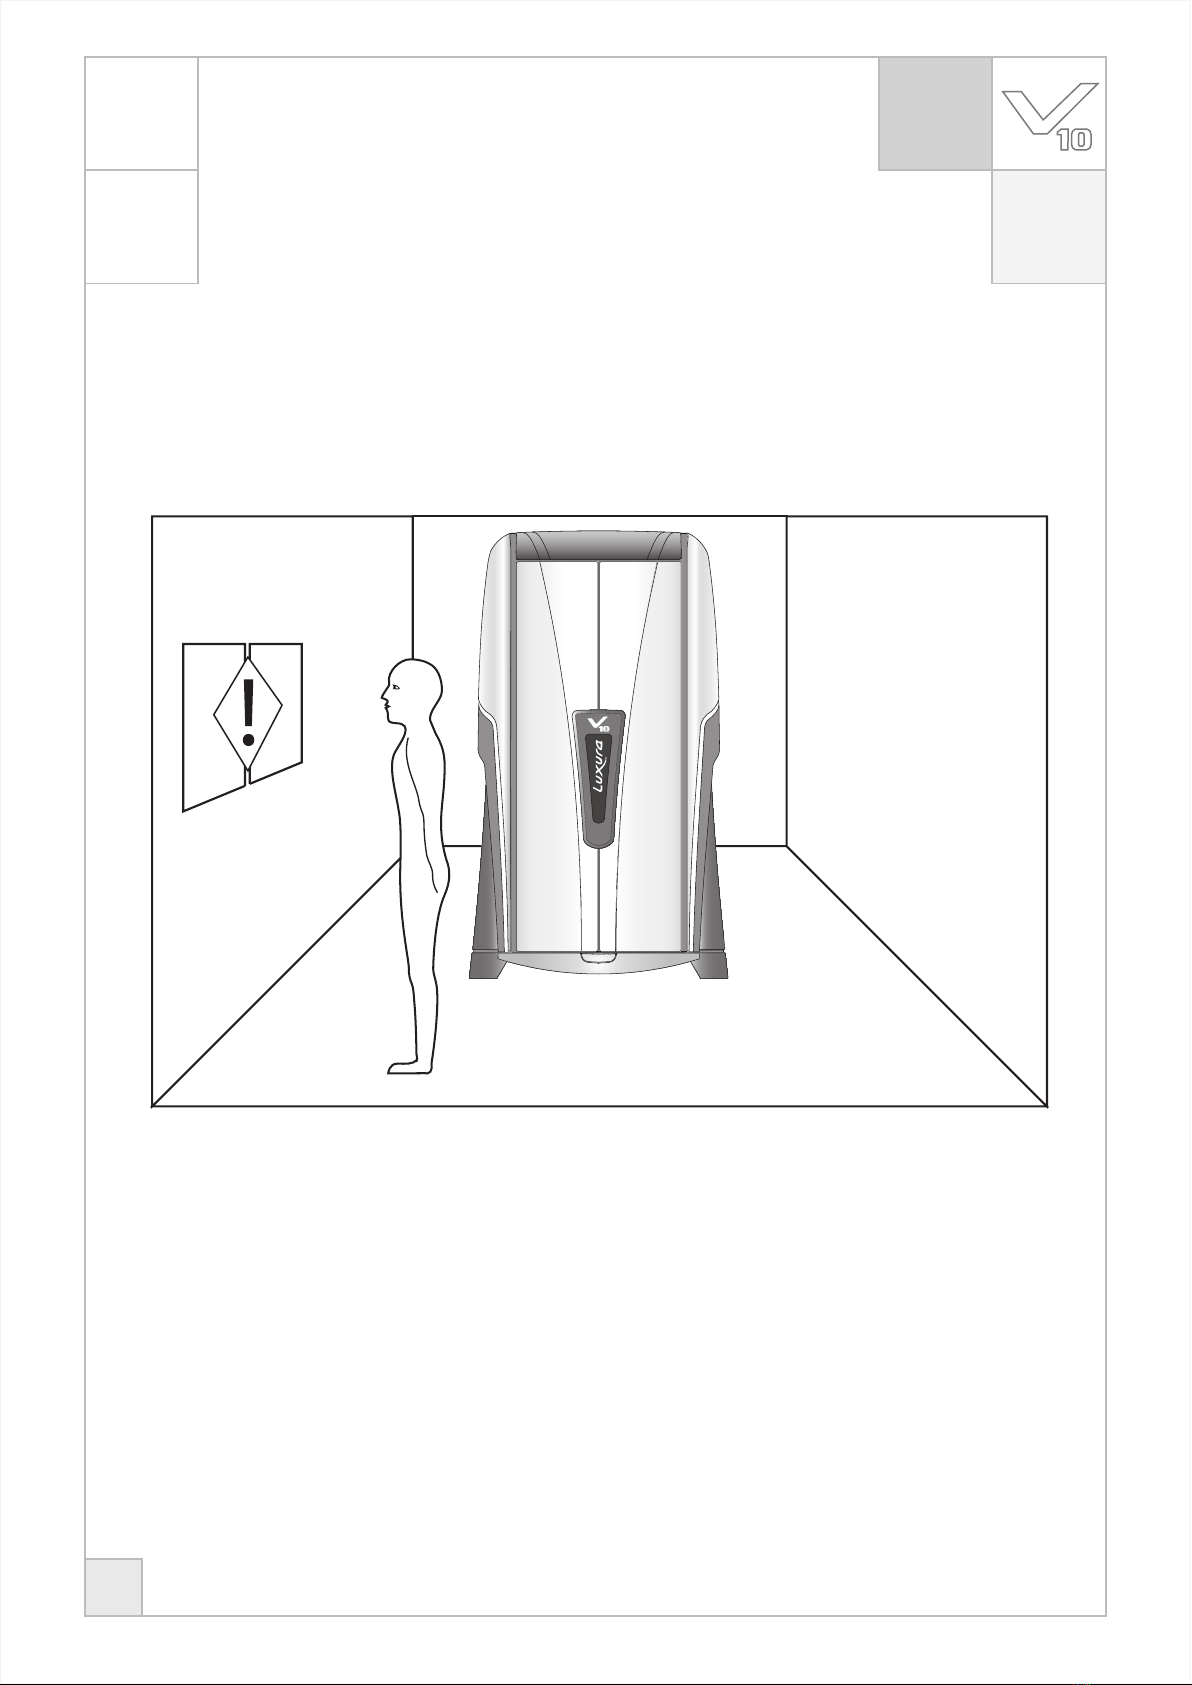
10 Make sure that your customers always
wear protective goggles to protect their
eyes - even if you may have seen pictures
of people tanning without using these
goggles. UV light which directly enters
the eyes can cause eye disorders (snow
blindness, actinic conjunctivitis or
cataracts). Contact lenses and sun glasses
are not a substitute for goggles.
11 Reduce tanning time by 20% during the
rst 50 hours when using new lamps.
During these 50 hours, the lamps emit
120% power instead of the usual 100%.
After the rst 50 hours, lamps will supply
the usual 95% to 100% power for approx.
450 hours.
12 Protect sensitive skin parts such as scars,
tattoos and genitals from exposure.
13 In cases of pronounced individual
sensitivity or allergic reaction to
ultraviolet radiation, medical advice is
recommended before starting exposure

7
ENGLISH
5 5 5
6 7 7
7 8 9
8 10 12
9 11 14
10 13 16
11 14 18
12 15 20
12 17 22
13 19 25
5
5
5
5
5
5
60
(15kJ/m2)
43
(15kJ/m2)
33
(15kJ/m2)
60
(15kJ/m2)
43
(15kJ/m2)
33
(15kJ/m2)
555
677
789
8 10 12
9 11 14
10 13 16
11 14 18
12 15 20
12 17 22
13 19 25
Skin Types fair-skinned (II) average (III) dark-skinned (IV)
Tanning eect normal tanning fast tanning fast tanning
Sunburn mostly rarely rarely
Tanning tables
All lamps are
0,3 W/m2
Important: Times
listed apply to the
specied lamps only,
see specication sticker
on the back of the
appliance.
For replacing UV lamps,
see specication sticker
on the back of the
appliance.
1st session (minutes)
2nd session (minutes)
3rd session (minutes)
4th session (minutes)
5th session (minutes)
6th session (minutes)
7th session (minutes)
8th session (minutes)
9th session (minutes)
10th session (minutes)
All lamps are
UV-type 3
Important: Times
listed apply to the
specied lamps only,
see specication sticker
on the back of the
appliance.
For replacing UV lamps,
see specication sticker
on the back of the
appliance.
1st session (minutes)
2nd session (minutes)
3rd session (minutes)
4th session (minutes)
5th session (minutes)
6th session (minutes)
7th session (minutes)
8th session (minutes)
9th session (minutes)
10th session (minutes)
Maximum tanning sessions a year
Warning!
Allow at least 48 hours between the rst two exposures.

8
The documents ‘Tanning Instructions’ and ‘Tanning table’, which are supplied with the
sunbed, include information that every user should read prior to using the sunbed.
Therefore these documents should be displayed in a place where they can be easily read.
This is required by law.
Tanning Instructions displayed
on the cubicle wall

9
ENGLISH
maxlight HP 400W D
300W SPS Parabolic UV 3
400W SPS Parabolic 0,3 W/m2
400W HPS Parabolic 0,3 W/m2
V10
maxlight 80W-R CE III UV 3
maxlight 120W-R CE III UV 3
maxlight 120W-R CE 0,3 0,3 W/m2
maxlight 120W-R Combi CE III UV 3
maxlight 120W-R Combi CE 0,3 0,3 W/m2
maxlight 140W-R CE III UV 3
maxlight 180W-R CE III S UV 3
maxlight 180W-R CE 0,3 S 0,3 W/m2
maxlight 180W-R Combi CE III S UV 3
maxlight 180W-R Combi CE 0,3 S 0,3 W/m2
Maxlight........
Ballast: ....W
Filter: .......
Reflector: .......
Mode
Type
Serialnumber
Ratedvoltage
Ratedpower input
HaproInternational B.V.
POBox 73
4420AC Kapelle, Netherlands
Manufacturedby:
xxxxx_xx
UVTYPE....
50x Maxlight .......
Ballast: ..... W
:Luxura V10
:50 ....
:00 xx 001000
:400V/3N~/PE/50Hz
:.... kW
ForUK only
Ratedvoltage
Ratedpower input
:420V/3N~/PE/50Hz
:.... kW
Face TannersLamps Type
Power
Filter combination
Filter reector
Type
The lamps listed below are a summary of the types suitable for use in tanning equipment.
Please refer to the lamp sticker on the back of your sunbed to determine which lamps
should be used. You should not use lamps which are not listed on the lamp sticker.
Information on lamps

10
Decorative lighting

11
ENGLISH
2. <START>
3. <MIN>
4. <PLUS>
5. <STOP>
7. <BODY COOLER>
8. <XSENS>
9. <QSENS>
6. <FACE TANNER>
10. <CHANNEL>
11. <VOLUME>
12. <LIFT>
1
5
3
7
2
6
4
89
10 11
12
13
1. Display
13. MP3 Line-in (optional)
General
Operation
start / conrm
decrease / down
increase / up
stop / cancel / pause
Face tanner (only SLi)
Body cooler
Xsens (optional)
Qsens (optional)
Music channel selection (optional)
Music volume
Lift (optional)

12
Control functions
The appliance will switch on automatically if there is no remote start on the
external timer or coin-op. Your dealer can set the remote start.
Coin-op mode + remote start
Press <START> 1x to start the appliance.
Stand alone mode
Press <START> 1x.
The display shows the maximum tanning time (start time). Use the <MIN> and
<PLUS> keys to change the tanning time.
Pause mode
Press <STOP> 1x during a tanning session to put the appliance into pause mode.
The lamps will switch o. The body cooling will continue operating (maximum
4 minutes). Xsens (optional) and Qsens (optional) will pause. The lift (optional)
will lower.
Press <START> 1x to conrm the chosen time.The appliance will switch on and the
tanning time will start.
While in pause mode press <START> 1x to switch the sunbed on again or press
<STOP> 1x to switch the sunbed o.This will stop the tanning session and the
sunbed wil start the mandatory 3-minute cooling o period.
The display will continue to show the tanning time left and the message “PRESS
START TO RESUME”will scroll across the bottom.
Note:
Tanning time will continue to elapse when the appliance is in pause mode.
If the sunbed is switched back on within 4 minutes after pressing <STOP>, the face tanner (only SLi) will
not switch on. The face tanner will restart automatically after a mandatory 4-minute cooling o period.
Face Tanner (only SLi)
Press <FACETANNER> 1x to activate the function. The level of intensity will appear
at the top of the display, and“FACIAL TANNER”will scroll across the bottom.
Use the <MIN> and <PLUS> keys to adjust the level of intensity.
Body Cooling
Press <BODY COOLER> 1x to activate the function.The level of intensity will appear
at the top of the display, and“BODY COOLER”will scroll across the bottom.
Use the <MIN> and <PLUS> keys to adjust the level of intensity.
Xsens (optional)
Press <XSENS> 1x to switch the function on or o. The level will appear/scroll at
the top of the display, and“XSENS” will scroll across the bottom.
Note:
If you do not press any key for 3 seconds, you will exit the function mode automatically. The (remaining)
tanning time will appear in the display.
Setting “1” = face tanner minimum
Setting “2”= face tanner maximum
Press <MIN> for 3 seconds to switch o the face tanner.
Setting “1” = body cooling minimum
Setting “2” = body cooling maximum
Setting “ON”= Xsens is on
Setting “OFF”= Xsens is o

13
ENGLISH
Control functions
The appliance will switch on automatically if there is no remote start on the
external timer or coin-op. Your dealer can set the remote start.
Coin-op mode + remote start
Press <START> 1x to start the appliance.
Stand alone mode
Press <START> 1x.
The display shows the maximum tanning time (start time). Use the <MIN> and
<PLUS> keys to change the tanning time.
Pause mode
Press <STOP> 1x during a tanning session to put the appliance into pause mode.
The lamps will switch o. The body cooling will continue operating (maximum
4 minutes). Xsens (optional) and Qsens (optional) will pause. The lift (optional)
will lower.
Press <START> 1x to conrm the chosen time.The appliance will switch on and the
tanning time will start.
While in pause mode press <START> 1x to switch the sunbed on again or press
<STOP> 1x to switch the sunbed o.This will stop the tanning session and the
sunbed wil start the mandatory 3-minute cooling o period.
The display will continue to show the tanning time left and the message “PRESS
START TO RESUME”will scroll across the bottom.
Note:
Tanning time will continue to elapse when the appliance is in pause mode.
If the sunbed is switched back on within 4 minutes after pressing <STOP>, the face tanner (only SLi) will
not switch on. The face tanner will restart automatically after a mandatory 4-minute cooling o period.
Face Tanner (only SLi)
Press <FACETANNER> 1x to activate the function. The level of intensity will appear
at the top of the display, and“FACIAL TANNER”will scroll across the bottom.
Use the <MIN> and <PLUS> keys to adjust the level of intensity.
Body Cooling
Press <BODY COOLER> 1x to activate the function.The level of intensity will appear
at the top of the display, and“BODY COOLER”will scroll across the bottom.
Use the <MIN> and <PLUS> keys to adjust the level of intensity.
Xsens (optional)
Press <XSENS> 1x to switch the function on or o. The level will appear/scroll at
the top of the display, and“XSENS” will scroll across the bottom.
Note:
If you do not press any key for 3 seconds, you will exit the function mode automatically. The (remaining)
tanning time will appear in the display.
Setting “1” = face tanner minimum
Setting “2”= face tanner maximum
Press <MIN> for 3 seconds to switch o the face tanner.
Setting “1” = body cooling minimum
Setting “2” = body cooling maximum
Setting “ON”= Xsens is on
Setting “OFF”= Xsens is o

14
+
+
+
+
Qsens (optional)
Press <QSENS> 1x to switch the function on or o. The level will appear/scroll at
the top of the display, and“QSENS”will scroll across the bottom.
Setting “ON” = Qsens is on (during tanning, water mist will be sprayed every 2
minutes)
Setting “OFF”= Qsens is o
Music channel selection (optional)
Press <CHANNEL> 1x to activate the function. The number of the music channel
will appear at the top of the display, and “CHANNEL”or “MP3” will scroll across
the bottom. Use the <MIN> and <PLUS> keys to select a dierent channel
(0-8).
Music volume
Press <VOLUME> 1x to activate the function. The volume level will appear at the
top of the display and “VOLUME”will scroll across the bottom. Use the <MIN>
and <PLUS> keys to increase / decrease the volume (0-14).
Channel“0” = MP3 Line in
Channel“1”- “8” = music channel
Volume “0” = music volume o
Volume “14” = music volume maximum
Note:
If you do not press any key for 3 seconds, you will exit the function mode automatically. The (remaining)
tanning time will appear in the display.
Attention:
The lift will lower automatically when:
You press <STOP>•
You open the door•
The tanning time has ended•
Lift (optional)
Press <LIFT> 1x to activate the function. The symbol for the neutral mode will
appear at the top of the display, and“LIFT” will appear at the bottom.
Reading the lamp hour counter
Press the <MIN> and <LIFT> keys at the same time for 3 seconds to read the lamp
hour counter.
Reading the appliance hour counter
Press the <PLUS> and <LIFT> keys at the same time for 3 seconds to read the
appliance hour counter.
Use the <MIN> key to lower the lift.
Use the <PLUS> key to raise the lift.
Other functions
3 sec.
3 sec.

15
ENGLISH
+
+
+
+
Qsens (optional)
Press <QSENS> 1x to switch the function on or o. The level will appear/scroll at
the top of the display, and“QSENS”will scroll across the bottom.
Setting “ON” = Qsens is on (during tanning, water mist will be sprayed every 2
minutes)
Setting “OFF”= Qsens is o
Music channel selection (optional)
Press <CHANNEL> 1x to activate the function. The number of the music channel
will appear at the top of the display, and “CHANNEL”or “MP3” will scroll across
the bottom. Use the <MIN> and <PLUS> keys to select a dierent channel
(0-8).
Music volume
Press <VOLUME> 1x to activate the function. The volume level will appear at the
top of the display and “VOLUME”will scroll across the bottom. Use the <MIN>
and <PLUS> keys to increase / decrease the volume (0-14).
Channel“0” = MP3 Line in
Channel“1”- “8” = music channel
Volume “0” = music volume o
Volume “14” = music volume maximum
Note:
If you do not press any key for 3 seconds, you will exit the function mode automatically. The (remaining)
tanning time will appear in the display.
Attention:
The lift will lower automatically when:
You press <STOP>•
You open the door•
The tanning time has ended•
Lift (optional)
Press <LIFT> 1x to activate the function. The symbol for the neutral mode will
appear at the top of the display, and“LIFT” will appear at the bottom.
Reading the lamp hour counter
Press the <MIN> and <LIFT> keys at the same time for 3 seconds to read the lamp
hour counter.
Reading the appliance hour counter
Press the <PLUS> and <LIFT> keys at the same time for 3 seconds to read the
appliance hour counter.
Use the <MIN> key to lower the lift.
Use the <PLUS> key to raise the lift.
Other functions
3 sec.
3 sec.

16
ERROR
“Not present”
If an option is not available on the appliance, the message “NOT PRESENT” will
scroll across the bottom of the display.This means that the function in question
is not available to use.
Cooling down (appliance / face tanner)
When the appliance or the face tanner is switched o, a mandatory cooling o
period will start automatically.
An hourglass will appear at the top of the display and a number will appear at the
bottom (indicating the remaining cooling o time in seconds).
Doors open
Opening the doors during tanning will activate the pause mode:
• The lamps will switch off automatically.
• The body cooling will remain on (4 minutes).
• Xsens and Qsens will be paused.
• The lift will lower automatically.
The message“PLEASE CLOSE DOORS”will scroll across the display.
If an error occurs, “ERROR” will scroll across the top of the display, and a code will
appear at the bottom.
E1 = Overrule error
E2 = Communication breakdown with the switch mechanism
E3 = Relay error
Attention:
If one of the error messages appears on the display, you should stop using the sunbed, unplug the
appliance and contact your dealer.
Messages
GENERAL
Press the following keys successively:
<STOP> <STOP> <PLUS> <STOP> <MIN>
The appliance comes set up for use with an external timer or coin-op. To change
this, the following procedure applies.
The main parameter“P1”will appear at the top of the display, and the name of the
main parameter“UNIT” will scroll across the bottom.
Press <START> 1x.
Choose a number between“1” and “30” for stand alone use.
Choose“0” to use the sunbed with a coin-op.
Press <START> to save the chosen number.
The parameter “1” will appear at the top of the display, and the name of the
parameter“START TIME” will scroll across the bottom.
Press <START> 1x.
The number “1” appears at the top of the display and the current parameter
number appears at the bottom. This number is the maximum tanning time (in
minutes) per session.
Use the <MIN> and <PLUS> keys to adjust the number accordingly.
Choose coin-op or stand alone

17
ENGLISH
ERROR
“Not present”
If an option is not available on the appliance, the message “NOT PRESENT” will
scroll across the bottom of the display.This means that the function in question
is not available to use.
Cooling down (appliance / face tanner)
When the appliance or the face tanner is switched o, a mandatory cooling o
period will start automatically.
An hourglass will appear at the top of the display and a number will appear at the
bottom (indicating the remaining cooling o time in seconds).
Doors open
Opening the doors during tanning will activate the pause mode:
• The lamps will switch off automatically.
• The body cooling will remain on (4 minutes).
• Xsens and Qsens will be paused.
• The lift will lower automatically.
The message“PLEASE CLOSE DOORS”will scroll across the display.
If an error occurs, “ERROR” will scroll across the top of the display, and a code will
appear at the bottom.
E1 = Overrule error
E2 = Communication breakdown with the switch mechanism
E3 = Relay error
Attention:
If one of the error messages appears on the display, you should stop using the sunbed, unplug the
appliance and contact your dealer.
Messages
GENERAL
Press the following keys successively:
<STOP> <STOP> <PLUS> <STOP> <MIN>
The appliance comes set up for use with an external timer or coin-op. To change
this, the following procedure applies.
The main parameter“P1”will appear at the top of the display, and the name of the
main parameter“UNIT” will scroll across the bottom.
Press <START> 1x.
Choose a number between“1” and “30” for stand alone use.
Choose“0” to use the sunbed with a coin-op.
Press <START> to save the chosen number.
The parameter “1” will appear at the top of the display, and the name of the
parameter“START TIME” will scroll across the bottom.
Press <START> 1x.
The number “1” appears at the top of the display and the current parameter
number appears at the bottom. This number is the maximum tanning time (in
minutes) per session.
Use the <MIN> and <PLUS> keys to adjust the number accordingly.
Choose coin-op or stand alone

18
+
+
The hour counter for the lamps should be reset after replacing the lamps.
The parameter “1” will appear at the top of the display and “SAVED” will scroll
across the bottom to conrm that the number has been saved.
Press <STOP> 2x to exit the conguration mode.
The message“LUXURA, IT’S YOUR BODY”will appear on the display.
The parameter “1” will appear at the top of the display, and the name of the
parameter“START TIME” will scroll across the bottom.
The main parameter“P1”will appear at the top of the display, and the name of the
main parameter“UNIT” will scroll across the bottom.
Press <START> 1x.
Press the following keys successively:
<STOP> <STOP> <PLUS> <STOP> <MIN>
Reset hour counter for the lamps
The parameter “4” will appear at the top of the display, and the name of the
parameter“RESET LAMP HOUR COUNTER”will scroll across the bottom.
Press <START> 1x.
The parameter “1” will appear at the top of the display, and the name of the
parameter“START TIME” will scroll across the bottom.
Use the <MIN> and <PLUS> keys to navigate to parameter “4”. (Press <PLUS> 3x.)
The number “4” will appear at the top of the display and the message “LAMPS
HOUR COUNTER RESET” will scroll 1x across the bottom. After this de message
“RESET LAMP HOUR COUNTER” will scroll across the bottom.
The number “4” will appear at the top of the display and “OFF” will appear at the
bottom.
Press <PLUS> 1x to change “OFF” to “ON”.
Press <START> to reset the hour counter.
Press <STOP> 2x to exit the conguration mode.
The message“LUXURA, IT’S YOUR BODY”will appear on the display.
Check
Press the <MIN> and <LIFT> keys at the same time for 3 seconds to read the lamp
hour counter.
The code “HL” will appear at the top of the display and the number “0” will scroll
at the bottom.
3 sec.

19
ENGLISH
+
+
The hour counter for the lamps should be reset after replacing the lamps.
The parameter “1” will appear at the top of the display and “SAVED” will scroll
across the bottom to conrm that the number has been saved.
Press <STOP> 2x to exit the conguration mode.
The message“LUXURA, IT’S YOUR BODY”will appear on the display.
The parameter “1” will appear at the top of the display, and the name of the
parameter“START TIME” will scroll across the bottom.
The main parameter“P1”will appear at the top of the display, and the name of the
main parameter“UNIT” will scroll across the bottom.
Press <START> 1x.
Press the following keys successively:
<STOP> <STOP> <PLUS> <STOP> <MIN>
Reset hour counter for the lamps
The parameter “4” will appear at the top of the display, and the name of the
parameter“RESET LAMP HOUR COUNTER”will scroll across the bottom.
Press <START> 1x.
The parameter “1” will appear at the top of the display, and the name of the
parameter“START TIME” will scroll across the bottom.
Use the <MIN> and <PLUS> keys to navigate to parameter “4”. (Press <PLUS> 3x.)
The number “4” will appear at the top of the display and the message “LAMPS
HOUR COUNTER RESET” will scroll 1x across the bottom. After this de message
“RESET LAMP HOUR COUNTER” will scroll across the bottom.
The number “4” will appear at the top of the display and “OFF” will appear at the
bottom.
Press <PLUS> 1x to change “OFF” to “ON”.
Press <START> to reset the hour counter.
Press <STOP> 2x to exit the conguration mode.
The message“LUXURA, IT’S YOUR BODY”will appear on the display.
Check
Press the <MIN> and <LIFT> keys at the same time for 3 seconds to read the lamp
hour counter.
The code “HL” will appear at the top of the display and the number “0” will scroll
at the bottom.
3 sec.

20
Navigating in the conguration menu
You must enter a code in order to enter the conguration menu.
Press the following keys successively:
<STOP> <STOP> <PLUS> <STOP> <MIN>
Note:
If you do not press any key for 60 seconds, you will exit the conguration mode automatically. Changes
that have not been saved (“SAVED”) will be ignored. The standby message “LUXURA, IT’S YOUR BODY” will
appear on the display.
The main parameter“P1”will appear at the top of the display, and the name of the
main parameter“UNIT” will scroll across the bottom.
The rst parameter “1” will appear at the top of the display and the name of the
parameter will scroll across the bottom.
Use the <MIN> and <PLUS> keys to navigate to the following main parameters:
P1. Unit P2. Display P3. Qsens P4. Xsens
P5. Facial P6. Body fan P7. Audio P8. Coin
(see also“Conguration menu overview” )
Use the <MIN> and <PLUS> keys to navigate to the various parameters within the
main parameter.
Press <START> 1x to select a main parameter.
(If you press <STOP> 1x you will exit the conguration mode.The standby message
“LUXURA, IT’S YOUR BODY”will appear on the display.)
Press <START> to select the parameter.
(If you press <STOP> 1x you will return to the main parameters. If you press
<STOP> again, you will exit the conguration mode. The standby message
“LUXURA, IT’S YOUR BODY”will appear on the display.)
Configuration menu
Note:
If you do not press any key for 60 seconds, you will exit the conguration mode automatically. Changes
that have not been saved (“SAVED”) will be ignored. The standby message “LUXURA, IT’S YOUR BODY” will
appear on the display.
The parameter“1” will appear at the top of the display and the current parameter
setting will appear at the bottom (number /“ON” / “OFF”).
(see “Conguration menu overview” for the default, minimum and maximum
settings for the adjustable parameters)
Use the <MIN> and <PLUS> keys to adjust the number accordingly.
Press <START> to save the chosen number.
(If you press <STOP> 1x, you will delete any changes that may have been made
and you will return to the parameter selection.)
The parameter “1” will appear at the top of the display and “SAVED” will scroll
across the bottom to conrm that the setting has been saved. You will now
return to the parameter selection automatically.
The parameter “1” will appear at the top of the display and the name of the
parameter will scroll across the bottom.
You can change the other parameters using the same procedure described
above.
Press <STOP> 2x to cancel the parameter selection and to exit the conguration
mode. The standby message “LUXURA, IT’S YOUR BODY” will appear on the
display.
Other manuals for Luxura V10
1
Table of contents
Languages:
Other HAPRO Tanning Bed manuals
Popular Tanning Bed manuals by other brands

Dr. Kern
Dr. Kern Atlantic 24/0 manual

ergoline
ergoline Prestige 1150 Intelligent Performance operating instructions

KBL
KBL megaSun 7900 Alpha operating instructions

Heartland
Heartland SUNDAZZLER 2M owner's manual

JK
JK Ergoline PRESTIGE 990-S DYNAMIC POWER installation instructions

KBL
KBL megaSun 5600 manual