ETT ET-Mini Clock4 User manual

MANUALOFBOARDET-MiniClock4
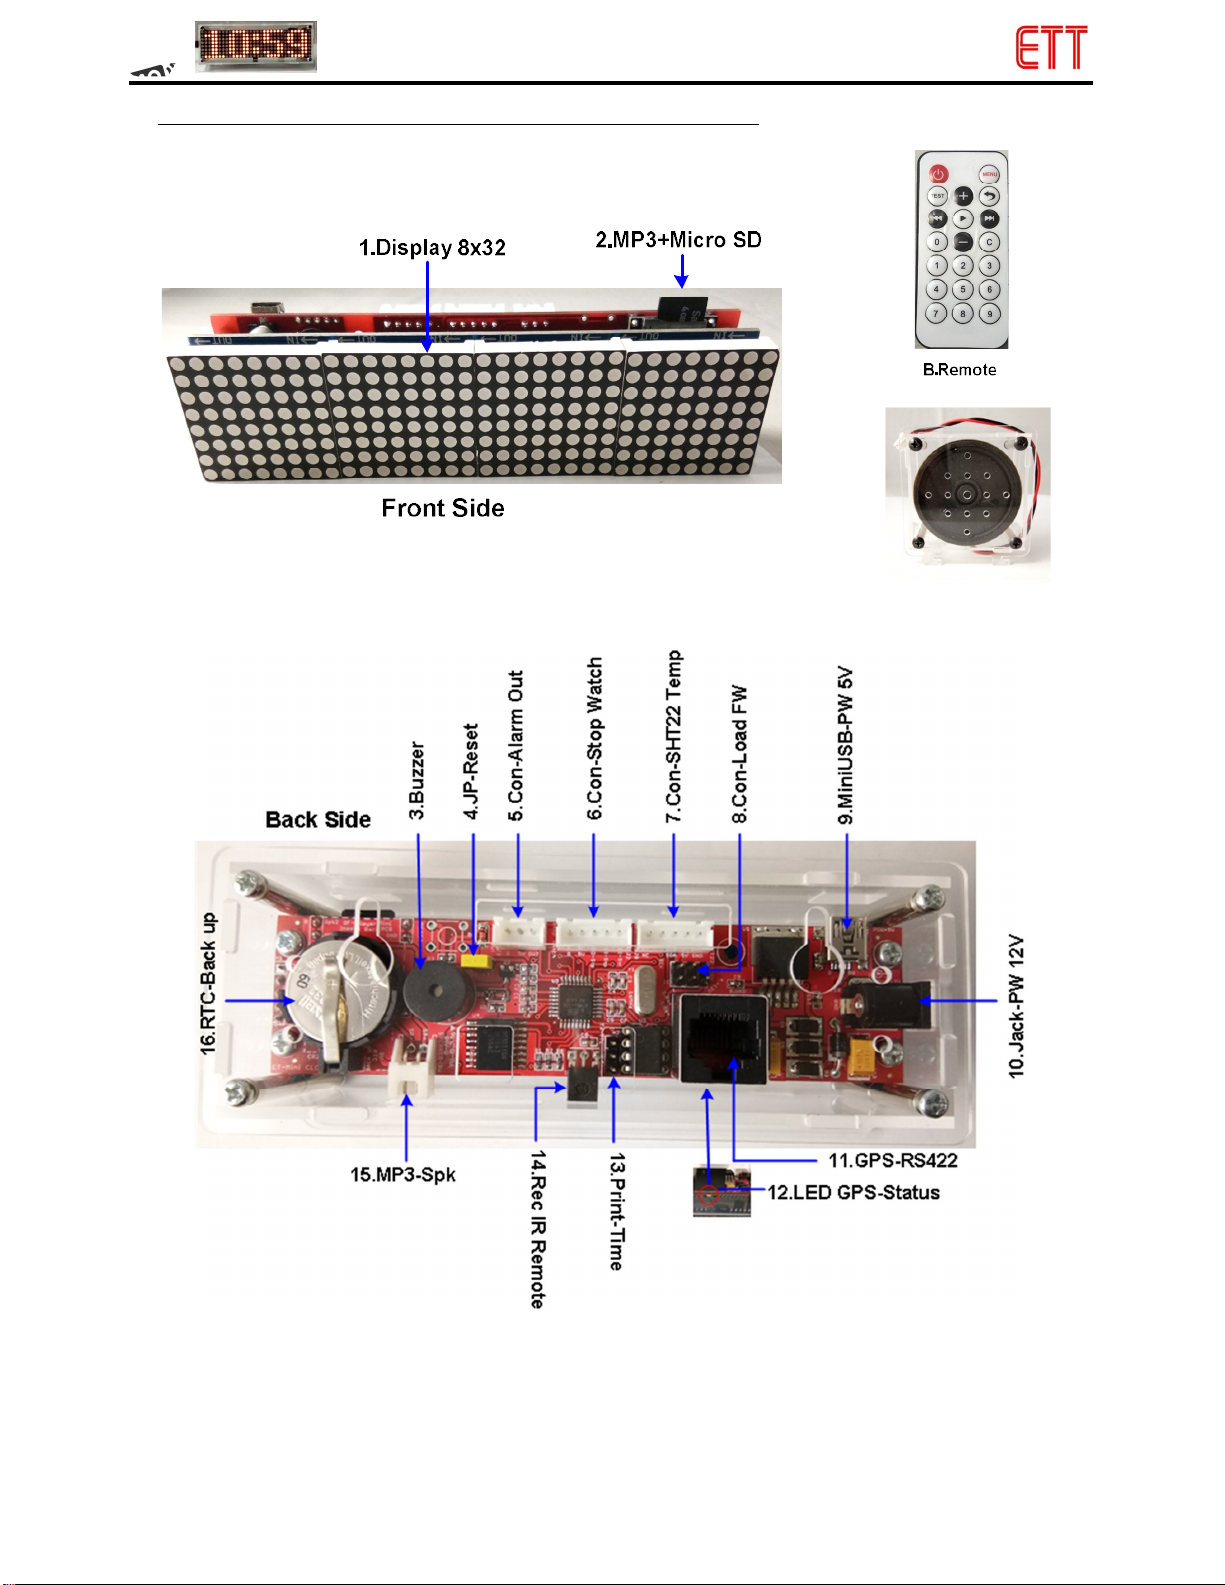
ET-MINICLOCK4isDigitalClockwith4-DIGITDOTMATRIX(8x32DOT),andanumeralsizepereachdigitis3cmwide.
It can show theTime, Date, andTemperature;moreover it canbe usedas Timer internal Clock. This Clocksupports 2 sourcesof Time
Base. Firstly, Time Base from internal Clock is RTC DS3231; and secondly, Time Base from External Clock is Module GPS that is
connected via Connector RJ45 (OPTION: ET-GPS-RS422). In the part of GPS, it cansetup Time Zone intherange of ± (TimeZone
forThailandis+7).
Itcansetupandchoosevariousdisplayformatsfor thisET-MINICLOCK4;itcanshowDate,Time,Temperature,Humidity(it
has to additionally connect ET-SENSOR AM2302); or, it is used as Timer; or, it shows flashing message “Open” or “Close”; or, it is
used as Alarm Clock to ring at a particular time in the range of 0-23 hours. There is Buzzer to produce a sound of alarm and there is
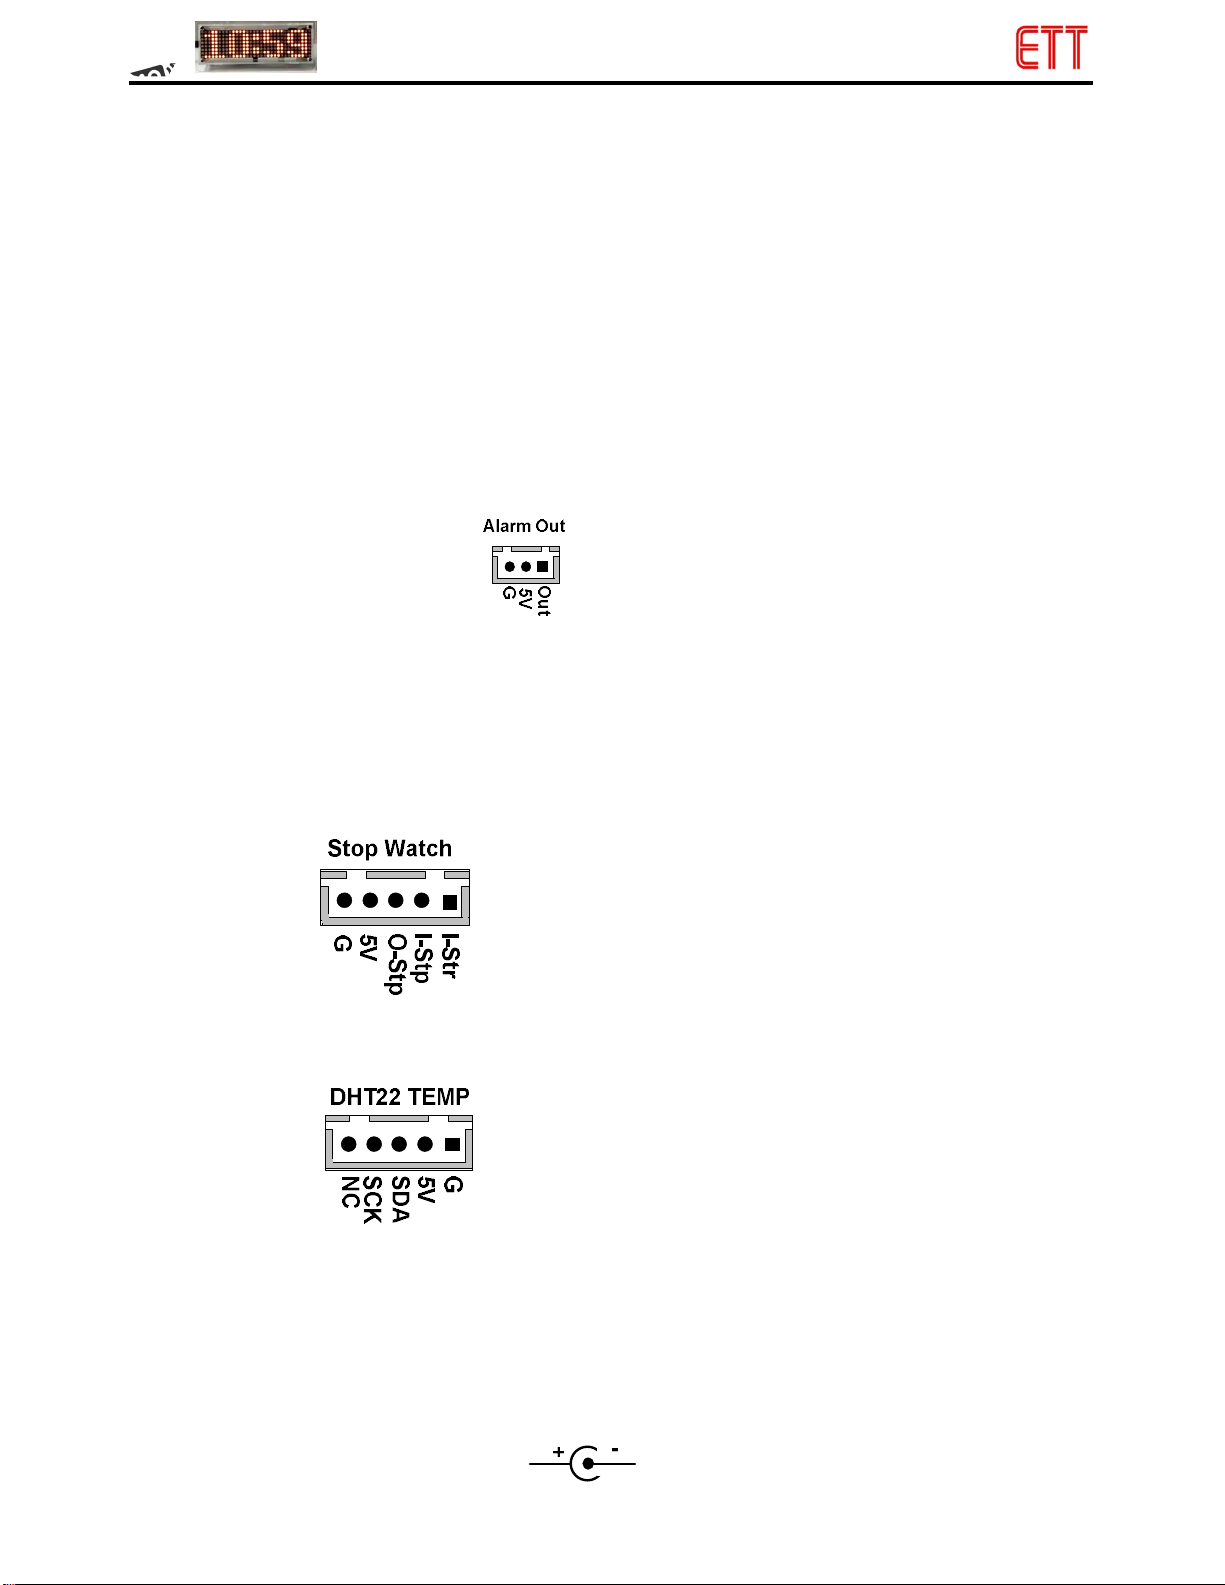
ChannelofAlarmOUTinordertocontroloperationofexternaldevicewhenAlarmhappens.
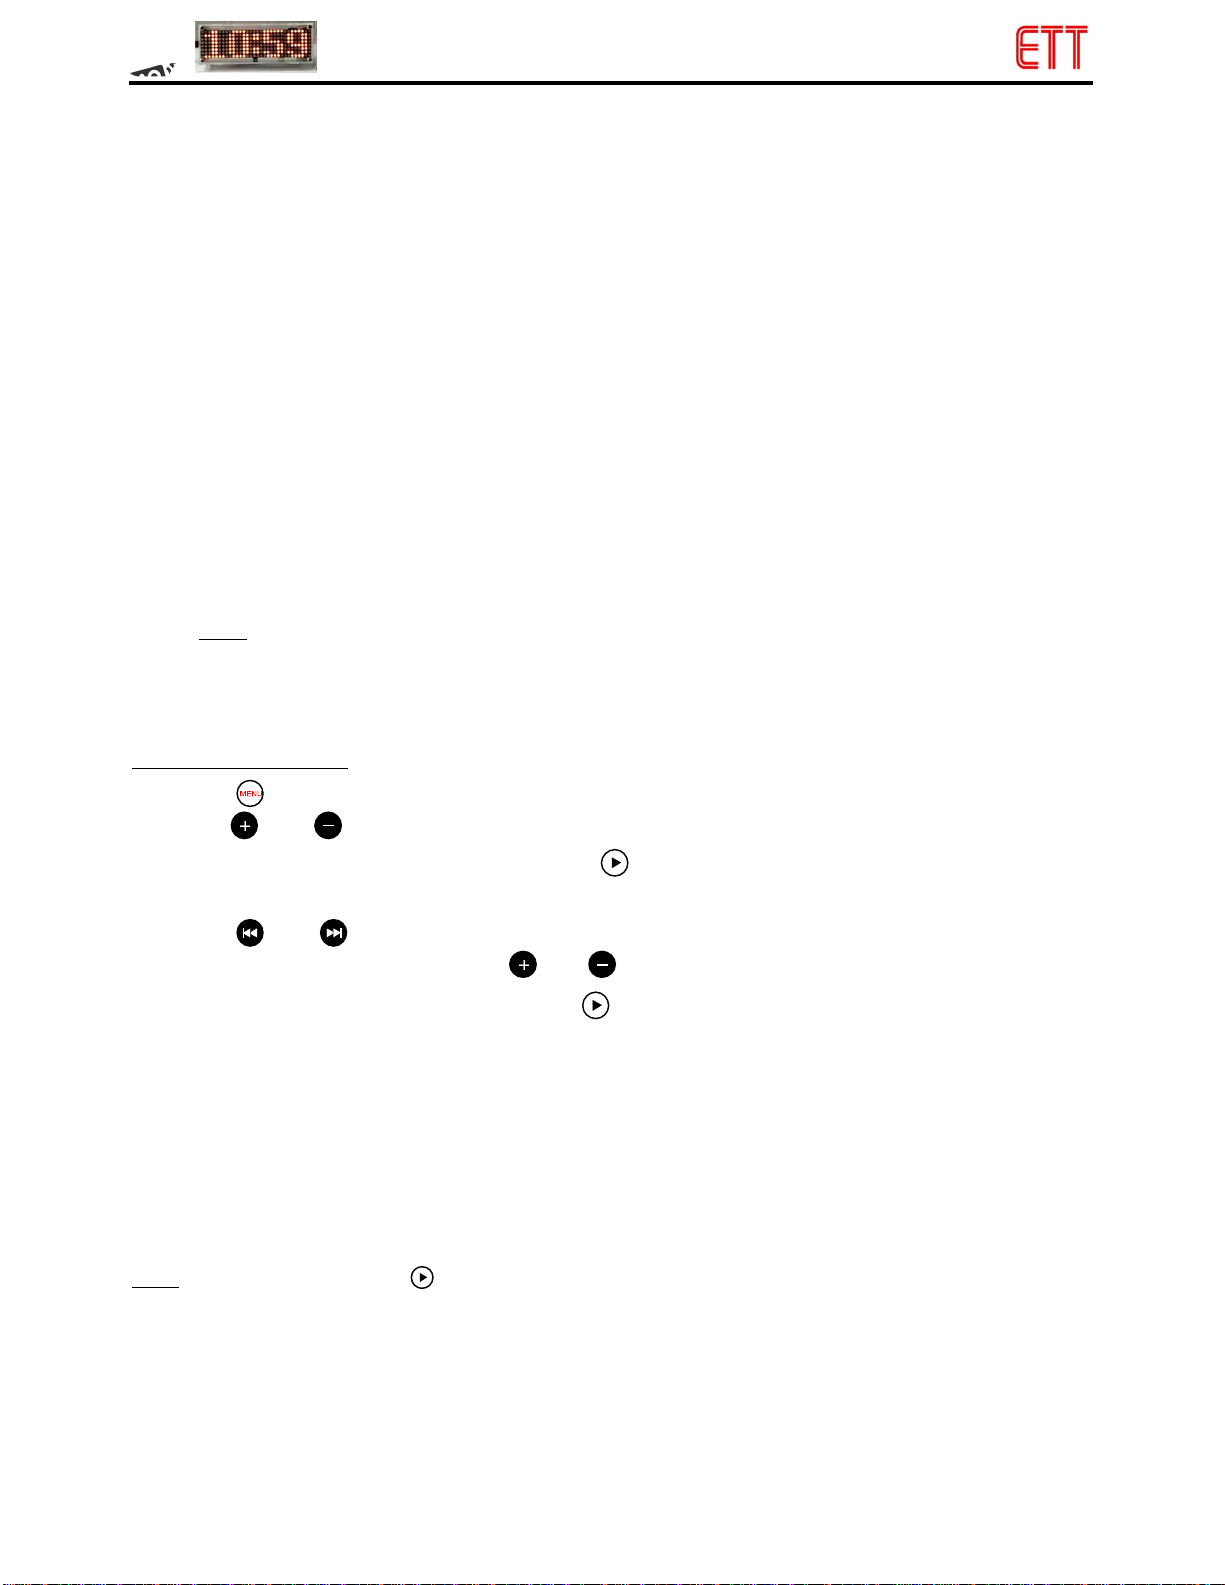
ET-MINICLOCK4iscontrolledviaIRRemotethatisprovidedwithClock.Thereare4modelsaslistedbelow;
-ET-MiniClock4 :WithLegoStandbutNobox,novoicefortelling time
-ET-MiniClock4Box :Aboxwithtransparentacrylic,butnovoicefortellingtime
-ET-MiniClock4Plus :WithLegoStand,voicefromMP3fortellingtime,butnobox
-ET-MiniClock4BoxPlus :AboxwithtransparentacrylicandvoicefromMP3fortellingtime
For the model Plus, Box Plus,there are additional features suchas Speaker andModule MP3; so, user canhear the sound ofAlarm for
everyhour,orusercanpressakeytolistentothecurrenttime.Thereare2languagesfortellingtime;ThaiandEnglish.
1) SPECIFICATIONSOFET-MINICLOCK4
-SPECIFICATIONSOFALLMODELS
ClockusesPOWERSUPPLYDC5VMINIUSBorDC12VTypeJ(POWERSUPPLY12VissuppliedtoClockandGPSfrom
external).Forgeneraluse,theCurrentthatissuppliedatthefulloflightofDisplayis300mAapproximately;andthemaximum
CurrentatFullLoadis450mAapproximately.
ClockiscontrolledbyMCUAVREASYMEGA328
GPS(ET-GPS-RS422)isconnectedviaConnectorRJ45;itisusedasTimeBasetodisplaydata.ItcansetTimeZoneintherageof
±;or,itusesTimeBaseofRTCDS3231internalClockinstead.TheClockalwayschoosesTimeBasefromGPSautomatically
afterPower-ONifitisconnected.
Clockreceivesalluser’sCommandsviaIRRemote(providedwithdevice)
IRRemoteusesBattery3V#CR2025(includedinset);andClockusesBatteryBackup3V#CR2032(includedinset)
Displayisintheformatof4-DigitDotMatrix(8x32DOT)anditonlyshowsthetimein24-hourclock.
ChoosevarioustypesofDisplayMode;Date,Time,Temperature,andHumidity(OPTION:ET-SENSORAM2302).Or,itisused
tobeTimerordisplayflashingmessage“Open’or“Close”;eachdisplaymodeusesdifferentFont.
BeusedasAlarmClockthatcanbesettoringataparticulartime(0-23hours).ThereisBuzzertoproduceringingsound;andthere
is1-CHAlarmOutputthatwillbeSignalLogic“1”whenAlarmhappens(DefaultLogic“0”).Itcanbeconnectedtocontrol
externaldevices.
IfusingTimeBasefromGPS,italwaysautoupdatesDate/TimeofRTC(DS3231)internalClockafterPower-ON.Or,ifusing
TimeBasefromRTC(DS3231)internaldevice,usercanmanuallysetupTime/DatebyIR-Remote.
ON/OFFandadjust16-LevelofbrightnessofDisplay(0-15),andincludingResetClockbyIR-Remote
ET
-
MiniClock4

MANUALOFBOARDET-MiniClock4
ChoosetheChristianEra(A.D.)ortheBuddhistEra(B.E.)(onlydisplaythelast2-Digit)
ChooseandsetuppreferabledisplayofKeyafterPower-ON
TemperaturevaluecanbedisplayedbypositivequantityonlyandtheTemperaturevaluethatisreadbyRTCDS3231internal
ClockhasErrorat±degreesCelsius.
ConnectorcanbeconnectedtoexternalSensortomeasuretemperatureandhumidity;itsupportsET-SENSORAM2302
ConnectorreceivesSignalfromSensororSW.TTLtocontrolStartandStopofTimer
Connector3PINsendsDataofthecurrentDateandTimeintheformatofRS232TTL;usercanreadandusethisDatainstantly.
-ADDITIONALFEATURESOFMODELBOX
Theboxismadeoftransparentacrylic,thedimensionsare14x5.8x4.8cm(WidthXHeightX Depth);itcanbehangedonthe
wall.
-ADDITIONALFEATURESOFMODELPLUS
AddexternalSpeakerwithCable(ET-SPMini)andClockprovidesConnector2Pintoconnectwithspeaker
AddModuleMP3toplayaudiofilefortellingtimewithMicroSDCardincluded2languagesofaudio file(TH,EN)
-ADDITIONALFEATURESOFMODULEMP3
SupportFileMP3,FAT16andFAT32
Haveinternalextensionwith3W,30levelsofVolumeAdjustment(adjustingthevolumeatMenuConfoftheClock)
Clockcantelltimebyvoiceeveryhour,includingafterPower-ON
Choose2Languages;ThaiandEnglish.Anddisableallaudiofilesfortellingtime(Mute)
30levelsof volumecanbeadjustedfortellingtimeandalarmthatis generatedbyModuleMP3
PressIR-Remotetolistentothecurrentdateortime
Play/Stop/NextallaudiofilesofMP3inMicroSDCard(allfilesmustbesavedinFolder03)
Menucanbesettoringonthespecifiedbirthdayofeachyear(Date,Month,Time(clock)) byplayingtheparticularaudiofileof
AlarmMP3
ChangeaudiofileofAlarm(MP3)asrequired;inthiscase,thedefaultAlarmClockiscock-a-doodle-doosanddefaultofbirthday
alarmisHappyBirthdaysong

MANUALOFBOARDET-MiniClock4
2) STRUCTUREANDCONNECTORSOFBOARDET-MINI-CLOCK4
A.ET-SPMini:It isspeakersetwithtransparentacrylicboxtotell timeandother audiofilesthatareplayedbyModuleMP3;itisonly
availableformodelPlusandBoxPlus.IthastoconnectatConnectorNo.15.MP3-SpkofClock.
B. Remote:Itis IRRemotetocontrolDisplay Modeand setting valuesforClock;itusesBattery3V#CR2025. ThisRemoteisavailable
foreverymodel.Moreinformationofkeys,pleasereadTopic4FunctionsofKeysonRemote.
A. ET-SP Mini

MANUALOFBOARDET-MiniClock4
.Display x:Displayis8x8DotMatrixwith4-Digits;thisDisplayistotally8x32=256DOT.Therearevarious typeofdisplayofthe
ClockthatusercanchoosethepreferabledisplaymodefromIR-RemoteKey0-9,C,andTest.
2.Mp3+MicroSD:ItisModuleMP3withMicroSDCardthatcontainsaudio filefortellingtimecompletely;itisonlyavailableforthe
model Plus and Box Plus. The main function is to produce sound to tell time or play audio files in Micro SD Card and it is
connected to Speaker at Connector No.15. User can change or modify some part of audio file in Micro SD Card, please read
Topic6HowtouseEt-MiniCLOCK4formoreinformation.
3.Buzzer:ThisBuzzerproducesBeepsoundwhenAlarmClockrings,orwhenKeyRemoteispressedeachtime.
4.Jp-Reset:ThisJumperisconnectedbetweenPinRESETandPinI/OofMCU;itcanresettheClockbyRemote.
5. Con-Alarm Out: It isConnector Alarm Output. When Alarm doesnot happen yet, PinOUT is Logic “0”; but, when Alarm happens
accordingtothespecifiedtime,PinOUTbecomesLogic“1”(TTL=5V)instead.ItbecomesLogic0 againwhenuser presses
theKeyPlay(|>)tostopAlarm.Pinsarearrangedasfollows;
Out : SignalAlarmActiveLogic1(5V)
5V,G: PowerSupply5VforExternalDevice
6. Con-Stop Watch: This Connectorreceives Signal InputLogic (TTL=5V)from external tocontrol Start andStopof StopWatch when
usingModeKey9.WhentheDisplayshowsdatainModeKey9as00:00:00anditsendsSignalLogic“0”to PinI-Str,itstarts
timing.WhiletheClockistiminganditsendsSignalLogic0toPinI-Stp,itstopstiminginstantly. WhenstateofStophappens,
it also sends Logic “1” (TTL=5V) to Pin O-Stp of this Connector and this Pin O-Stp becomes Logic “0” when user presses
RemoteKey9toclearthedisplaymodetobe00:00:00again.SignalPinsarearrangedasfollows;
I-Str:InputreceivesSignalLogic0tostarttiming.
I-Stp:InputreceivesSignalLogic0tostoptiming.
O-Stp:OutputsendsSignalLogic1whenitstopstiming.
5V,G:PowerSupply5Vforexternaldevice
7.Con-DHT22Temp:ThisConnectorisconnectedtoSensortomeasuretemperatureandhumidityofETT“ET-SENSORAM2302”.
Signalpinsarearrangedasfollows;
5V,G:PowerSupply5Vforexternaldevice
SDA:DataSignal
SCK:Unused
NC:Unused
8.Con-LoadFW:ItdownloadsFirmwareintotheClock;usercanignorethispart.
9.MiniUSB-Pw5V:ThisConnectorPOWERMINIUSBisconnectedtoPOWERSUPPLY5Vfor theClock;itcanusePOWER
SUPPLYformPORTUSBofPC;orfromAdapter5VwithMiniUSBHeader.
10.Jack-PW12V:ThisConnectorPowerTypeJisconnectedtoPowerSupply12VforsupplyingtheClockanditsuppliestoGPS
thoughConnectorRJ45.WhenusingthisConnector,ithastothinkofanodeheaderandcathodeheader.FeatureofConnector
isshowsbelow(itsupportsPowerSupplyfromETT).

MANUALOFBOARDET-MiniClock4

MANUALOFBOARDET-MiniClock4
3) HOWTORUNET-MINI-CLOCK4
It starts supplying Power Supply DC 5V or DC 12V to the Clock, the system reads Setting values from EEPROM internal
MCU;forexample,brightnessofDisplay,DisplayMode,TimeZone;andnext,itchecksifGPSisconnected.IfGPSisconnectedandit
isreadytorun(GPSstarts runningafterPOWER-ONfor40seconds),itshowsthemessage“GPS”ontheDisplay forawhile and user
canheartheaudiofilesay“GPSisready”(itisonly available forthemodelPlus,Box Plus). Next, programreads TimeBasefromGPS
and it updates this Time Base for RTC DS3231 (it only updates the Time Base after Power-ON or Reset the Clock); and finally, the
Display shows the message according to the chosen Mode Display of Key. If GPS is disconnected, the Display shows the message
“RTC”forawhileandusercanheartheaudiofilesay“RTCworks”(itisonlyavailableforthemodelPlus,BoxPlus);nexttheprogram
readsTimeBasefromRTCDS3231instead.
Next, program loopsand waits for user topress Remote. If it is not pressed yet, it reads Time Base fromGPS or RTCthat is
activated in orderto updatetheDisplay value. If it is in DisplayModeoftemperature or humidity, program reads value of temperature
and humidity from Sensor. Or, if Alarm is enabled, program always checks if it reaches the specified time of Alarm. If yes, Alarm
commandsBuzzertoproduceintervalBeepanditplaysaudiofileofMP3viaSpeaker(OnlyavailableforModelPlus,BoxPlus).
Whilerunningin anyDisplayMode, user canpressRemote to changethe display modeto different formatsas preferable. For
moreinformation,pleasereadTopic4HowtouseKeysonRemote.
NOTE:WhenconnectingtoGPS,thereisaneffectonresponseofRemotebecauseitissometimesslower.EverytimeResetorPowerON
theClockof themodelPlus, BoxPluswhileplayingtheaudiofiletotelltime, allnumbersthatshows timeonthedisplay arenotchanged
untilthevoiceends.
4) FUNCTIONSOFKEYSONREMOTE
AllmodelsofET-MINI-CLOCK4onlysupportsCommandviaIRRemote.StructureofRemote
isshownontherightpicture.FunctionofeachKeyisdescribedbelow;
1)Key-Power [ ]:ON/OFFDisplaybyToggleKeySwitch;whenpressingtheKeyeachtime,
italternatesbetweenONandOFFDisplay.WhiletheDisplayisinthestateofOFF,systeminternal
theClockstillrunsasnormalbutusercannotuseanyKey,exceptthisKeyPOWER.
AftertheDisplayisON,otherKeyscanbeusedasnormal.
2)Key-Menu [ ]:EnterSetupModetosetupvaluesandexitSetupModetoenterthenormal
displayscreeninstantly.(PleasereadmoreinformationinTopic5MenuModeSetup).
3)Key-Test [ ]:Showtheflashingmessage“Open”or“Close”.KeyisToggleSwitchtype;
whentheKeyispressedeachtime,italternatesbetween2messagesabove.
4)Key-Up [ ]:PlayaudiofileMP3inMicroSDCardcontainedinFolder‘03’(onlyavailableforthemodelPlus,BoxPlus).
WhenitisinstateofthisModeSetupKey,itmoves1MainMenuor1SetupValuesupeachtime,respectively.
5)Key-Return[ ]:ResettheClockthatlookslikestartthedevice,ithasnoanyeffectonuser’sSetup.WhenitisinthisModeSetup
Key,itisusedtoreturnstoapreviousMenuuntilitexitsModeSetupandbecomesKeyResetagain.

MANUALOFBOARDET-MiniClock4
6)Key-Left [ ]:PresstheKeytolistentothevoicetellingthecurrenttime(onlyavailableforthemodelPlus,BoxPlus).Whenit
isinthisModeSetupKey,itisusedtoshift1Sub-Menutotherightside.
7)Key-Play [ ]:-StopAlarmthatisproducedbyBuzzer(Beep)andSpeakerofModuleMP3(onlyavailableforthemodelPlus,
BoxPlus),includingResetPinAlarmOutfromLogic“1”tobeLogic“0”.
-StopAlarmofbirthdaysongfromSpeakerofMP3(onlyavailableforthemodelPlus,BoxPlus).
-StopplayingsongfileMP3(containedinFolder‘03’)thatisplayedbyKey-Up(onlyavailableforthemodelPlus,
BoxPlus).
-WhenitisinSetupMode,thisKeyisusedtosaveallusers’SetupinEEPROMandthesevaluesareusedlater.
8)Key-Right [ ]:PresstheKeytolistentothevoicetellingthecurrentDate/Month/Year(onlyavailableforthemodelPlus,Box
Plus).WhenitisinSetupMode,thisKeyisusedtoshifts1Sub-Menutotheleftside.
9)Key–Down[ ]:WhileplayingsongfilebyMP3inFolder‘03’containedinMicroSDCard(onlyavailableforthemodelPlus,
BoxPlus)ifuserpressthisKey,itwillplaythenextsongfile(Next).WhenitisinSetupMode,thisKeyisusedtomovea
MainMenuorSetupdown,respectively.
10)Key-C [ ]:ShowTemperatureontheDisplayintheunitofdegreeCelsius,itsformatis“TT.T“C”.Thevalueoftemperature
ismainlyreadfromtheexternalSensorthatisconnectedwithfirst(ET-SensorAM2302).Ifitisnotconnectedwithany
externalSensoryet,itreadsthevaluefromSensorinternalRTCDS3231oftheClockinstead.
11)Key-0 [ ]:ShowpercentageofHumidityonDisplay,itsformatis“HH.H%”.ItneedstoconnectET-SensorAM2302from
externaltoreadthevalue.Ifitisnotconnectedyet,itshowsthevalueas“----“ontheDisplayinstead.
12)Key-1 [ ]:ShowTimeintheformatofHour,MinuteontheDisplay,itsformatis“HH:MM”.IfusingAlarmClock,the
displaymodealwaysbesetinthisKeyModeonlyandusercanhearthealarm.
13)Key-2 [ ]:ShowTimeintheformatofHour,Minute,andSecondontheDisplay;itsformatis“HH:MMss”
14)Key-3 [ ]:ShowTimeintheformatofHour,Minute,andSecondontheDisplay;itsformatis“hh:mm:ss”
15)Key-4 [ ]:ShowDateintheformatofDate,Month,YearontheDisplay;itsformatis“dd.mm.yy”.
16)Key-5 [ ]:ShowDateintheformatofDate,Month,DaysoftheweekontheDisplay;itsformatis“DD.MMdd”
17)Key-6 [ ]:ShowTime,Date,TemperatureontheDisplay;theDisplayloopsandit alternatelyshowseachdatasetfor10
seconds,itsformatis
Time “HH:MM” , Date “dd.mm.yy” , Temperature “TT.T ºC”,respectively
18)Key-7 [ ]:ShowTime,Daysoftheweek-Date,Month-YearontheDisplay;theDisplayloopsanditalternatelyshowseach
datasetfor10seconds,itsformatis
Time “HH:MM” , Day-Date “Day,DD” , Month-Year “Mon,YY” ,respectively

MANUALOFBOARDET-MiniClock4
19)Key-8 [ ]:ShowTemperatureindegreeCelsius,percentageofhumidity;theDisplayloopsandit alternatelyshowseach
datasetfor10seconds,itsformatis
Temperature “TT.T ºC” , Humidity “HH.H% ” ,respectively
ForHumidity,itneedstoconnectET-SensorAM2302fromexternalinordertoreadthevalue,otherwise,itshowsthevalueas
“----“ontheDisplayinstead.
20)Key-9 [ ]:ThisKeyentersTimerModetoStart,Stop,andResetTimerallinone.ThearrangementofrunningtheKeyis
mentioned.Formoreinformation,pleasereadtheTopic6HowtouseET-MINIClock4.
NOTE:FunctionsofeachKeycanberunwhenitisnotinModeSetup(itentersmodewhenpressingKeyMenu).ForKeyMenu,Key
Up,KeyDown,KeyLeft,KeyRight,KeyPlayandKeyReturn,thesekeysisbeusedtogetherwithModeSetup.
5.MENUSOFMODESETUPANDHOWTOUSEMENUS
This Setup Mode isto set values forusing the Clock.When enteringthis SetupMode, the available Keysare KeyMenu, Key
Up,KeyDown, KeyLeft,KeyRight, Key Playand Key Return. Functionof each Key isdescribed above. This Setup Modeconsists of
menusasshowninthediagrambelow;
PleaselookatthediagramofMenuabove,itconsistsof5mainMenusandsub-menusofeachMainMenuareusedtosetup
values.Abbreviationofsub-menuthatisusedtosetupvaluesmeansasfollows;
MainMenu
Time:SetTimeasHour,MinuteforTimeBaseRTCDS3231(IfusingGPS,thisMenuisautosetupafterPowerON). Setting
valuesarelistedbelow;
Sub-Menus(ValueofSecondissetas0whensavingthevalue)
Hr:xx (Hour) =SetTimeintheformatof24-hourclockintherangeof0-23hours
Mn:xx(Minute)=SetTimeasminuteintherangeof0-59minutes
Time
ผังเมนูSetup
Date
Alam
Bday
(รุ่น Plus)
Conf
กด Key
+
MENU
Sub-Menu
Hr:xx
SETUP
Mn:xx
กดKey เข้าเมนู
กด Key
Dy:xx Dt:xx Mt:xx Yr:xx
25xx
20xx
EN
TH
กด Key กด Key
เลือน Sub-Menu
Ah:xx Am:xx Ae:xx
Md:xx Br:xx Tz:xx Pt:xx
Bd:xx Bm:xx Bh:xx Be:xx
กด Key +
*กด Key Save ค่า Setup XX *กด Key ออกจาก Sub-menu 1 Step *กด Key ออกจาก Menu Setup to Display
MENU
กด Key
เลือกค่า Setup XX
La:xx VL:xx
รุ่น Plus รุ่น Plus
ชัวโมง:00-23 นาที:00-59
ตังเวลา
ตัง วัน-เดือน-ปี
ตังเวลาปลุก
ตังเวลาเตือนวันเกิด
ตังค่าการใช้งาน
วัน: Su-Sa วันที :01-31 เดือน:01-12 ปี:TH-EN พ.ศ.
ค.ศ.
25: 00-99
20: 00-99
(use:43-99)
(use:00-56)
เวลาปลุก:00-23 นาทีปลุก:00-59 การตังปลุก: ON-OF
วันทีเกิด:01-31 เดือนเกิด:01-12 เวลาเกิด:00-23 เตือนวันเกิด:ON-OFF
การแสดงผล:K0-K9,KC,KT ความสว่างหน้าจอ:00-15 TimeZone: -9 to +9 เสียงภาษา:TH-EN-OF ความดังเสียง:00-30 Print Time : ON-OF

MANUALOFBOARDET-MiniClock4
Date: SetDaysoftheweek,Date,Month,andYear(canbeusedeither theChristianEra(AD)ortheBuddhistEra(BE))for
TimeBaseofRTCDS3231(IfusingGPS,thismenuisautosetupafterPowerON).Settingvaluesarelistedbelow;
Sub-Menus
Dy:xx(Day) =SetDaysoftheweekfromSu-Su;whenSu:Sunday,Mo:Monday,Tu:Tuesday,We:Wednesday,
Th:Thursday,Fr:Friday,Sa:Saturday
Dt:xx(Date) =SetDateofMonthintherangeof1-31
Mt:xx(Month)=SetMonthintherangeof1-12
Yr:xx(Year) =SetYear;inthiscase,itcanbeeithertheChristianEra(AD)ortheBuddhistEra(BE),thevaluethat
ischosenisdisplayformatoftheClock.
TH:SetYeartobetheBuddhistEra25xx(Default);thelast2-digitofBEcanbesetas00-99
(shouldsetthevalueas43-99)
EN:SetYeartobetheChristianEra20xx;thelast2-digitofADcanbesetas00-99(shouldset
thevalueas00-56)
NOTE:Whensettingvalueofyear,RTCDS3231canrunfromAD2000-2100orBE2543-2643.However,itshouldsetyearin
therangeofAD2000-2056orBE2543-2599becauseRTCrunscorrectlyandthedisplayformatofboththeChristianEraand
theBuddhistErawillbeaccordant.
Alam:(Alarm)TosetTimeorgivealarmtoringataparticulartimeineachday;settingvaluesarelistedbelow;
Sub-Menus(ValueofSecondissetas0whensavingthevalue)
Ah:xx(AlarmHour) =SetTimeashourintherangeof0-23hourstoalarm
Am:xx(AlarmMinute)=SetTimeasminuteintherangeof0-59minutestoalarm
Ae:xx(AlarmEnable) = SetstatusofAlarm.When
ON:SetAlarmas“Enable”togiveanalarm,
OF: SetAlarmas“Disable”(Default)
Bday:(Birthday)ThisMenuisonlyavailableforthemodelPlus,BoxPlus;itisusetosetAlarmofbirthdayineach year.
Settingvaluesarelistedbelow;
Sub-Menus(ValueofMinute,Secondissetas0whensavingthevalue)
Bd:xx(BirthDate) =Setbirthdateintherangeof1-31
Bm:xx(BirthMonth) =Setbirthmonthintherangeof1-12
Bh:xx(BirthHour) = SetTimeofbirthashourintherangeof0-23hours
Be:xx(BirthdayEnable) = SetstatusofAlarmforBirthday.When
ON:SetAlarmofBirthdayas“Enable”,
OF: SetAlarmofBirthdayas“Disable”(Default)
Conf:(Configuration)ThisMenuisusedtosetupthenecessaryvaluesfortheClock;settingvaluesarelistedbelow;
Sub-Menus
Md:xx(ModeDisplay)=ChoosedisplaymodeontheDisplayaccordingtoKeysonRemote;itcanbesetasK0-K9,
KC,KT.AfterPower-ON,theDisplayalwaysshowsthechosenKey(Default=K1).
Br:xx(Brightness) =SetthebrightnessofDisplayintherangeof00-15(00:dullest,15:brightest),Default=03

MANUALOFBOARDET-MiniClock4
Tz:xx(TimeZone) =SetTimeZonethathasaneffectonoperationwhenusingTimeBasefromGPSonly;itcan
setthevalueintherangeof-9to+9(TimeZoneofThailandis+7(Default)).
La:xx(Language) = ThisMenuisonlyavailableforthemodelPlus,BoxPlustochooselanguagetotelltimevia
Speaker.When
TH:ThaiLanguage(Default)
EN:EnglishLanguage
OF:Mute,especiallyPower-ON,pressingRemotetolistenvoiceandeveryhour
VL:xx(Volume) = ThisMenuisonlyavailableforthemodelPlus,BoxPlustoadjustvolumeofSpeakerin
therangeof00-30(00:Silent,30:Loudest)(Default=25)
Pt:xx(PrintTime) =SetvalueforrunningtheCommandPrinttoprintthevalueofTimeandDateviaConnector
Tx-TTL.When
ON:PrintvalueofTimeandDateaccordingtothesettingCommand’sformatthroughout
theoperation.
OF:DonotprintanyvalueofTimeandDatethroughouttheoperation(Default)
NOTE:ThevaluesthataresetupineachMenu,somevaluesarestoredinEEPromofMCU;itremainsafterPower-OFFand
itwillbecalledafterPower-ON.SomevaluesaresetupforRTCDS3231anditwillbecalledafterPower-ON.So,itneedsto
insertBatteryBack-UpintotheClockandtheallvaluesthataresetupforRTCstillruncorrectly althoughPower-OFF.
HowtouseMenuSetupMode:ReferredtothediagramofMenusabove,itcansummarizemenusofSetupModeasfollows;
1) PressKey toenterSetupMode;theDisplayshowsmessage“SETUP”forawhileandenterthefirstMainMenu“Time”.
2) PressKey orKey tochoosethepreferableMainMenutosetvalue.
3) AfterchosetheMainMenutosetvaluecompletely,pressKey toenterthesub-menuofthechosenMainMenu;theDisplay
showsthefirstchosensub-menuoftheMainMenu.
4) PressKey orKey tochoosethepreferablesub-menutosetvalue.
5) Afterchosenthesub-menucompletely,pressKey orKey tochooseandsetthepreferablevalueforthesub-menu.
6) Aftersetthevaluesforthesub-menucompletely,pressKey tosavethevalue;next,theDisplayshowstheticksignatthesetting
positionforawhileanduserwillhearBeepsoundtwice,itmeansitcansavethevaluesuccessfully.Next,usercanreturntostep
No.4tochoosetheothersub-menusandusercandothesameasdescribedabove.
Aftersetvaluesforthesub-menucompletelybutuserdoesnotpressanyKeySave,allsettingvalueisunchangedandnotused
afterexitedthisSetupMode.Ifusermovestoothersub-menuandreturntheoldone,allvaluesisnotupdated,itisstilltheold.
Summarily,everytimeusersetupnewvalueforanysub-menubutuserdoesnotpressanyKeySave,thisisnoanyeffectonthe
operationoftheClock.
NOTE: WhenpressingKey tosaveanysub-menu,itonlysavestheparticularvalueofthesub-menu;itdoesnotsave
wholesub-menusofMainMenu.So,everytimeuserssetupthepreferablevalueforeachsub-menucompletely,italwayspress
theKeytosavethevaluefortheparticularsub-menucompletely.
ThevaluethatisrelatedtoConfigwillbesavedandstoredinEEProm,itremainsalthoughPower-OFF;itwillbe
calledandusedafterPower-ON.ForthevalueofTime,Date,Alarmthatisrelatedto SettingTime(exceptsettingBirthday),it
willsetupforRTCDS3231;inthiscase,ithastoinsertBatteryBack-UpandRTCrunscorrectlyalthoughPower-OFF.

MANUALOFBOARDET-MiniClock4

MANUALOFBOARDET-MiniClock4
6.2) HOWTOUSETIMEBASEFROMRTC
1) IfitisconnectedtoCableRJ45andGPSisused,pleaseremovefirst.
2) Provide Power to the Clock at Connector MiniUSB-PW5 (for 5V POWER SUPPLY) or Jack-PW 12V (for 12V POWER
SUPPLY),chooseonlyoneconnector.
3) TheClockinitiatesandtheDisplayshowsthemessage“.RTC.”forawhile;itmeansthat RTCisused.
4) PressKey toenterSetupModetosetupvaluesforTimeandDatecorrectly.
6.3) HOW TO SETUP TIME: This Setting Time has an effect on the use of Time Base from RTC DS3231, please follows these
instructionsasfollows;
1) PressKey toenterSetupMode
2) PressKey toenterMainMenu:Time
3) PressKey orKey tosetvalueofHour(Hr:xx) intheformatof24-hour
4) PressKey tosavethevalueofHour
5) PressKey togotothenextSub-MenutosetMinute
6) PressKey orKey tosetvaluesofMinute(Mn:00-59)
7) PressKey tosavethevalueofMinute
8) PressKey toexitSetupMode
6.4) HOW TO SETUP DATE: This Setting Date has an effect on the use of Time Base from RTC DS3231, please follows these
instructionsasfollows;
1) PressKey toenterSetupMode
2) PressKey tosetvalueofMainMenu:Date
3) PressKey toenterMainMenu:Date
4) PressKey orKey tosetvalueofdaysoftheweek(Dy:Su-Sa)Sunday-Saturday
5) PressKey tosavethevalueofdaysoftheweek
6) PressKey togotothenextSub-MenutosetDate
7) PressKey orKey tosetvalueofDate(Dt:01-31)
8) PressKey tosavethevalueofDate
9) PressKey togotothenextSub-MenutosetMonth
10) PressKey orKey tosetvalueofMonth(Mt:01-12)
11) PressKey tosavethevalueofMonth
12) PressKey togotothenextSub-Menutosetyear
13) PressKey orKey tosetvalueofyear(Yr:TH=theBuddhistEra–EN=theChristianEra)
14) PressKey tosavetheformatofyearandtheDisplayautoentersmodeofsettingyear
15) PressKey orKey tochooseandsetthelast2-digitofyear
TheBuddhistEra(25xx);thevalueofxxshouldbesetintherangeof43-99
TheChristianEra(20xx);thevalueofxxshouldbesetintherangeof00-56
16) PressKey tosavethevalueofthelast2-Disgitofyear
17)
Press
Key
toexitSetupMode

MANUALOFBOARDET-MiniClock4
6.5) HOWTOSETUPCONFIGURAION:Itsetsconfigurationsfor theClock;pleasefollowtheseinstructionsasfollows;
1) PressKey toenterSetupMode
2) RepeatedlypresstheKey untilitfoundMainMenu:Conf
3) PressKey toenterMainMenu:Conf
4) PressKey orKey tosettheformatofdisplay(Md:K0-K9,KC,KT)
5) PressKey tosavethevalueofdisplayformat;itwillalwaysbeusedafterPower-ONorRESET.
6) PressKey togotothenextSub-Menutoadjustbrightnessofdisplay
7) PressKey orKey tosetthebrightnessofDisplay(Br:00-15);when00=Min,15=Max
8) PressKey tosavethevalueofdisplay’sbrightness
9) PressKey togotothenextSub-MenutosetTimeZone;ithasaneffectontheuseofTimeBasefromGPS
10) PressKey orKey tosetvalueofTimeZone(Tz:-9to+9).ForThailand,TimeZoneis+7(referringtotheGreenwich
MeanTime)
11)PressKey tosavethevalueofTimeZone
12)PressKey togothenextSub-Menutosetlanguagefortellingatime(onlyavailableforthemodelPlus,BoxPlus).
13)PressKey orKey tosetlanguage(La:TH-EN-OF);whenTH=Thai,EN=English,OF=Mute
14)PressKey tosavethevalueoflanguagefortellingatime.
15)PressKey togotothenextSub-MenutoadjustvolumeofSpeaker(onlyavailableforthemodelPlus,BoxPlus).
16)PressKey orKey tosetvolumeofSpeaker(VL:00-30);when00=Min,30=Max.
17)PressKey tosavethevalueofvolumeviaSpeaker.
18)PressKey togotothenextSub-MenutosetvaluesforPrintTime(sendingDataTime,DataviaConnectorTx-TTL).
19)PressKey orKey tosetthevalueofPrintTime(Pt:ON-OF);whenON=Sendingdata,OF:Notsendanydata.
20)PressKey tosavethestateofrunningPrintTime
21)PressKey toexitSetupMode
6.6) HOWTOON/OFFDISPLAY
ItcandobypressingtheKey ;whenpressingtheKeyfirsttime,itisOFFDisplay;but,whenpressingtheKeyagain,itis
ON Displayinstead. Moreover, when using this Key, theDisplaymust be in thenormal display mode according toKey-Display.While
OFF Display, internal system of the Clock still runs normally but user cannot press any key, except Key to ON Display only.
However, it does not recognize any state of ON/OFF after theblackout. If anyAlarm happens while it is OFFDisplay, there is no any
AlarmviaBuzzer,SpeakerorrelatedConnector.
6.7) HOWTOSETUPDISPLAYFORMAT
User can set preferable values to be shown on the Display and the Display will show setting values after Power-ON. The
displayformatissetupaccordingtoKeysonRemote;Key0-Key9,Key-Test,Key-C.UsercansetupKeysforthisdisplayformat,please
gotoMainMenu-Conf/SubMenu-Md:xx(pleasereadmoreinformationatConfiguration).

MANUALOFBOARDET-MiniClock4
6.8) HOWTOCOPYFILEMP3INTOMICRO SDCARD(FORMODELPLUS,BOXPLUS)
It isonlyavailablefor the model Plus,Box Plus. Normally,the audiofile thattells time hasalready beencopied toMicro SD
Cardcompletelyanditisreadytouse.Thereare3FoldersinMicroSDCardaslistedbelow;
Folder‘01’:StoreaudiofilesfortellingatimeinThai,Alarm,andbirthday’ssong;filesurnameis.mp3.
Folder‘02’:StoreaudiofilesfortellingatimeinEnglish,Alarm,andbirthday’ssong;filesurnameis.mp3.
Folder‘03’:Storefavoritelistsofsong;filesurnameis.mp3.
Pictureshows Folders inMicroSDCard.
NOTE: -NotalloweditinganyFoldernames,otherwisetheseaudiofilesareplayedincorrectly.
- Notallow deletingandchanging any filenameinFolder01,02. However, it canchange soundof Alarmandalarm
of birthday as requires; for more information, please read the topic How to setup Birthday Alarm and How to use
Alarm.
- For Folder 03, there is an example audio file song, user can delete and copy the favorite audio file song into the
folder,withoutmodifying.
IfMicroSDCardisdamaged;or,userrequireschangingnewMicroSDCard,pleasecopyall3Folderandpastethemintothe
newCD.Pleasefollowtheseinstructions.
1) InsertMicroSDCardwith1G-16GintoPCandformatitasFAT32.
2) CopyFolder “01”,“02”and“03”intoMicro SD.Pleasecheckif internalFolder“01”and“02”hasfile mp3asshown in
thepicturebelow;
ExamplefilesinternalFolder“01” ExamplefilesinternalFolder“02”

MANUALOFBOARDET-MiniClock4
3) If user requires adding more favorite file songs, please copy songs into Folder “03” instantly. The example song files
internal Foldercan be deleted. Thefirstfilethatis copiedinto this Folderwill beplayedfirst whenthe Command Playis
enabled.
4) RemoveMicroSDCardfromPC;insertintothesocketofClock;andfinally,resettheClock.
6.9) HOWTOPLAYSONGFILEMP3(MODELPLUS,BOXPLUS)
It isonlyavailableforthemodelPlus, BoxPlus. Beforeusingthedevice, it hastoconnect to Speaker,insert SDCardinto the
Clockcompletely;andFolder“03”must havefilesongfor playing. Ifno,ithasto copyandpastefilesongintothefoldercompletelyas
describedabove.Pleasefollowtheseinstructionstoplayfilesong;
1) Power-ONtheClockandsetupittobeinnormaldisplaymodeaccordingsettingKeysonRemote.
2) PressKey ,thefirstfilesongthatiscopiedandpastedinFolder“03”willbeplayedfirst. Remember,everytimeuser
pressesthisKey ,italwaysstartsplayingthefirstfilesong,notplayatanypausedor stoppedfilesong.
3) PressKey toplaythenextfilesong(Next).
4) PressKey tostopplayingthecurrentfilesong.
5) AdjustvolumeofSpeaker,gotoModeSetup--->MainMenu-Conf --->SubMenu-VL:xx
6) Allfilesareplayedrepeatedly;afterthelastfilesongisplayedcompletely,itloopsandrestartsplayingthefirstfilesong.
NOTE: While Alarm or birthday song happens, user cannot play any file song, it has to press Key to stop the Alarm first.
WhileplayingfilesongandAlarmhappens,itstopsplayingthecurrentfilesongandAlarmcontinuesplayinginstead.
6.10)HOWTOLISTENTOTIME&DATE(MODELPLUS,BOXPLUS)
ItisonlyavailableforthemodelPlus,BoxPlus.IthastoconnecttoSpeaker;insertMicroSCCardthatcontainedaudiofilefor
tellingtimecompletely(theaudiofileisincludedintheFolder“01”and“02”);andClockhastobeinthenormaldisplaymodeaccording
tosettingKeyonRemote.ForthevalueofConfigintheSub-MenuLa:xx,itmustbesetasTHorEN;andVL:xxmustnotbesetas0.
Next,presstheKey tolistenthecurrenttime,orpress Key tolistentothecurrentDate/Month/Year(ifAlarmsuddenly
happens,itcannotusethispart;inthiscase,ithastostopstheAlarmfirst).
6.11)HOWTOSETUPALARMFORBIRTHDAY (MODELPLUS,BOX PLUS)
Itisonlyavailableforthe modelPlus,BoxPlusbecauseAlarmisplayedviaModuleMP3andSpeakeronly. Firstofall,it has
to connectto Speaker and insertMicro SD Cardthatcontained audiofileof Alarm for Birthdaycompletely (normally,itiscontained in
the Folder“01”and“02”[file name0150_BirthDay.mp3] completely;itismelodyofHappy Birthdaysong). Next,pleasefollowsthese
instructions;
1) PressKey toenterSetupMode
2) RepeatedlypresstheKey untilitfoundMainMenu:Bday
3) PressKey toenterMainMenu:Bday
4) PressKey orKey tosetupbirthdate(Db:01-31)
5) PressKey tosavethebirthdate
6) PressKey togotothenextSub-Menutosetbirthmonth
7) PressKey orKey tosetupbirthmonth(Bm:01-12)
8)
Press
Key t
osavethebirthmonth

MANUALOFBOARDET-MiniClock4
9) PressKey togotothenextSub-Menutosetbirthtime
10)PressKey orKey tosetupbirthtime(Bh:00-23)
11)PressKey tosavethebirthtime
12)PressKey togotothenextSub-MenutosetupstateofrunningAlarmBirthday
13)PressKey orKey tosetupstateofrunningAlarmBirthday(Be:ON-OF);chooseON=EnableAlarm
14)PressKey tosavethestateofrunningAlarmBirthday
15)PressKey toexitSetupMode
16)After exited the Setup Mode, the Clock must be in any display mode of Key1-Key7 in order to hear the Alarm. If Alarm
happensbuttheClockisinotherdisplaymodes,userdoesnothearanyAlarmuntiltheClockreturnsthisdisplaymode.
17)ItcanstopthisAlarm,pressKey .IfuserdoesnotpressanykeytostoptheAlarm,itissoundedforanhourandautostops.
NOTE:
-While AlarmBirthdayhappens but thereis notificationof tellingtime (everyhour); or,thedisplay modeischangedto other
mode that isnot Key1-Key7, the voice of Alarm Birthday is suddenly paused. It will be soundedagain when the interrupted
soundendsorthedisplaymodeischangedtoKey1-Key7.
-While Alarm Birthday happens but Alarm suddenly happens, Alarm Birthday stops immediately and it is not sounded on
anymoreuntilitreachesthespecifieddateinnextyear.
-TheSettingValueofAlarmBirthdaystillremainsalthoughitisblackout.
HOWTOCHANGEAUDIOFILEFORALARMBIRTHDAY
PleasefollowtheseinstructionstochangeaudiofileforAlarmBirthdayasrequired;
1) EditandrenamenewaudiofileMP3as 0150_BirthDay.mp3first;alllettersmustbestrictlywrittenlikethepattern.
2) RemoveMicroSDCardfromtheClockandtheninsertintosocketofPC.
3) CopytheaudiofileMP3asmentioninstepNo.1andpastes it into theFolder01or02inMicroSDCard.Thenewaudio
FileMP3thatiscopiedwillbereplacedtheoldoneinFolder01or02.
4) InserttheMicroSDCardintosocketoftheClockandresettheClock
6.12)HOWTOSETUPALARMCLOCK
When Alarm Clock reaches the specified time, there are 2 ways that the Clock can produce a sound; firstly, Beep sound is
sounded via Buzzer; and secondly, cock-a-doodle-doo issounded viaModule MP3 Speaker. So, if using Clock of the model Plus,Box
Plus,usercanhearthesoundfrombothchannels;but,ifusingClockofthenormalmodel,usercanhearBeepsoundviaBuzzeronly.For
the model Plus, Box Plus, it needs to connect Speaker and insert Micro SD Card that contained the audio file for Alarm completely
(normally, it is contained in the Folder “01” and “02” in the File name 0140_Alarm.mp3). Moreover, while Alarm happens, the Clock
sendsstateofAlarmasLogic1(5V-TTL)to PinOut ofConnector AlarmOutanditremainsthisstateforawhile;itcanusethissignal
tocontrolexternaldevices.PleasefollowtheseinstructionstosetupAlarmClock;
1) PressKey toenterModeSetup
2) RepeatedlypressKey untilitfoundMainMenu:Alam
3) PressKey toenterMainMenu:Alam
4) PressKey orKey tosetupAlarmashour(Ah:00-23)
5)
Press
Key
tosave
the
valueofhourforAlarm

MANUALOFBOARDET-MiniClock4

MANUALOFBOARDET-MiniClock4

MANUALOFBOARDET-MiniClock4

MANUALOFBOARDET-MiniClock4
This manual suits for next models
4
Other ETT Clock manuals
Popular Clock manuals by other brands

Bodet
Bodet Profil 730 Hospital Installation and operation manual

La Crosse Technology
La Crosse Technology 515-1419 manual

Modern Home Products
Modern Home Products 208288 user guide

La Crosse Technology
La Crosse Technology WT-3122H Quick setup instructions

Clatronic
Clatronic MRC 832 P instruction manual

Velleman
Velleman K8089 Illustrated assembly manual