Euro Cuisine ICM26GR User manual
Automatic Ice Cream,
Sorbet & Frozen Yogurt Maker
Sorbetière et yaourtière automatique
Máquina para hacer helado, nieve y yogurt congelado
Model: ICM26GR & ICM26RD
Home-Made
Ice Cream in
Less than
30 minutes
4 Glass Ice
Cream Cups
Included

2
Thank you for choosing our product. We hope you will enjoy using it.
READ CAREFULLY BEFORE USE
SAVE THESE INSTRUCTIONS FOR FUTURE REFERENCE
FOR HOUSEHOLD USE
IMPORTANT SAFEGUARDS
When using your electrical appliances, basic safety precautions should always be taken to
reduce the risk of fire, electric shock, and/or injury, including the following:
1. Read all instructions before using.
2. To protect against the risk of electric shock, do not place cord, plug, or motor unit of appliance
in water or in any other liquids.
3. This appliance is not intended for use by persons (including children) with reduced physical,
sensory, or mental capabilities, or lack of experience and knowledge, unless they are closely
supervised and instructed on the use of the appliance by a person responsible for their safety.
Close supervision is necessary when any appliance is used by or near children.
Children should be supervised to ensure that they do not play with the appliance.
4. Always unplug the appliance from the outlet when not in use, before putting on or taking
o parts, and before cleaning.
5. Avoid contact with moving parts. Keep hands, hair and clothing, as well as spatulas and other
utensils, away during operation to reduce the risk of injury and/or damage to the appliance.
6. Do not operate any appliance with a damaged cord or plug, after the appliance malfunctions,
or is dropped or damaged in any manner. Return the appliance to Euro CuisineInc. Consumer
Service Department for examination, repair, and electrical or mechanical adjustment.
7. The use of attachments not recommended by Euro CuisineInc. may cause fire, electric shock
or injuries.
8. Do not use outdoors.
9. Do not let the cord hang over the edge of a table or counter, or touch hot surfaces.

3
10. To reduce the risk of injury to persons or to the appliance itself, keep hands and utensils out
of the freezing bowl while in use. DO NOT USE SHARP OBJECTS OR UTENSILS INSIDE
THE FREEZING BOWL! Sharp objects will scratch and damage the inside of the freezing
bowl. A rubber spatula or wooden spoon may be used when the appliance is in the OFF position.
11. This appliance is for household use. Any service other than cleaning and user maintenance
should be done only by the Euro Cuisine Inc. Consumer Service Department.
12. Do not use the freezing bowl near flames, hot plates or stoves. Do not expose to a heat source.
Do not wash in a dishwasher; doing so may cause risk of fire, electric shock or injury.
13. While the appliance is not in use, before assembling or disassembling parts, and before
cleaning, turn the appliance OFF and unplug it from the outlet. To unplug, grasp the plug
and pull it from the outlet. Never pull from the power cord.
NOTICE
This appliance has a polarized plug (one blade is wider than the other). To reduce the risk of
electric shock, this plug fits in a polarized outlet only one way. If the plug does not fit fully in the
outlet, reverse the plug. If it still does not fit, contact a qualified electrician. Do not attempt to
disable this safety feature.
SPECIAL ELECTRICAL CORD INSTRUCTIONS
A short power-supply cord is provided to reduce the risks resulting from becoming entangled in or
tripping over a longer cord. Longer extension cords may be used if care is exercised in their use.
If a long, polarized extension cord is used, the marked electrical rating of the extension cord
should be at least that of the appliance, and the longer cord should be placed so that it will not
hang from the countertop or tabletop, where it could be pulled on by children or animals, or
tripped over.
CAUTION
• Do not immerse the motor unit in water.
• To reduce the risk of fire or electric shock, do not disassemble the motor unit. NOTE: The
motor unit does not contain any user-serviceable parts.
• Repairs should be made only by the Euro Cuisine Inc. Consumer Service Department.
•
Check the voltage to be sure that the voltage indicated on the rating label corresponds to your voltage.
• Never clean the motor unit with scouring powders or hard metal implements.

4
With your new Euro Cuisine’s Ice Cream, Sorbet & Frozen Yogurt Maker you can create unlimit-
ed ice cream flavors, whip up luscious sorbets, frozen yogurt – even your favorite frozen drink, in
just 20-30 minutes!
SPECIFICATIONS:
Power supply: 120 VAC, 60Hz Power consumption: 15 W
1
2
4
5
6
3
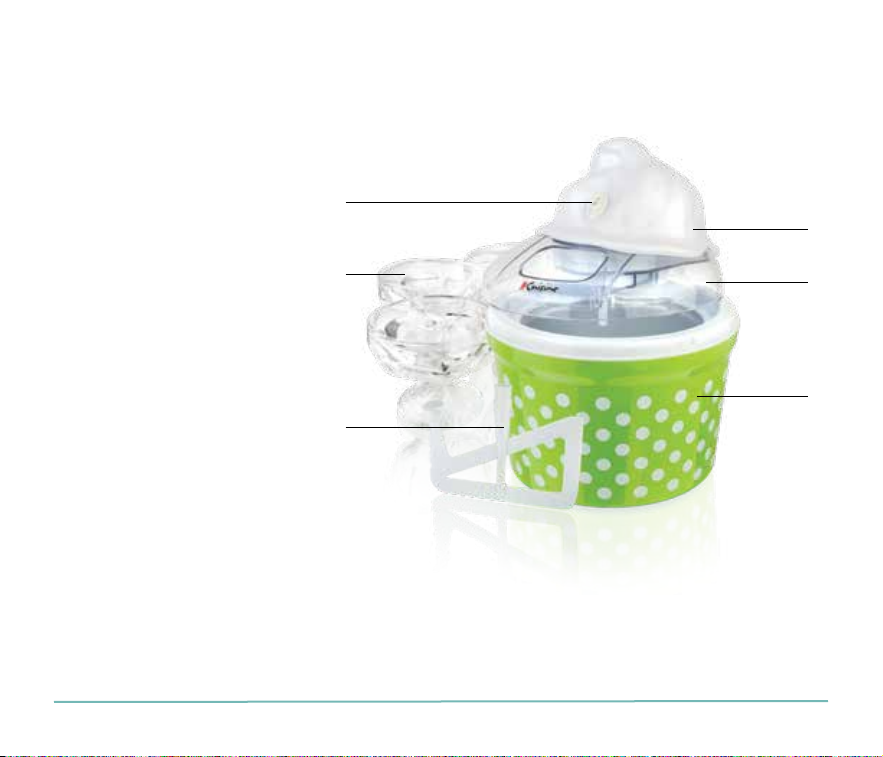
1. Motor unit with
On/O indicator
2. See-through lid
with spout
3. Mixing paddle
4. Freezing bowl
5. On/O switch
6. 4 glass ice cream cups
7. All parts that come
in contact with food
are BPA free

5
The Euro Cuisine’s Ice Cream, Sorbet & Frozen Yogurt Maker
has the following features:
• Double Insulated Freezing Bowl
Double walls keep the freezing bowl colder longer, for better results. Liquid between the
walls assures thorough and even freezing. Anti-slip rubber feet prevent movement during use.
• See-Through Lid with Spout
Allows you to conveniently keep an eye on the freezing process. The spout permits you to
add ingredients without disturbing the freezing process.
• “On/O” Switch
Easy to use and fully automatic. Takes all the guesswork out of preparing frozen desserts.
BEFORE USING FOR THE FIRST TIME
DO NOT immerse the motor unit in water. Wipe it with a moist cloth. Wash the see-through lid,
freezing bowl and mixing paddle in warm, soapy water to remove any dust or residues from the
manufacturing and shipping processes.
DO NOT clean any parts with abrasive cleaners or hard metal implements.
PREPARING THE FREEZING BOWL
The most important step in making frozen desserts is to make sure that the freezing bowl is
properly frozen. Euro Cuisine Inc. features a double insulated freezing bowl that requires thor-
ough freezing. For best results, make sure that the freezing bowl is washed and thoroughly dried.
Wrap the freezing bowl in a plastic bag and place it in the back of the freezer or where the freezer
compartment is the coldest. Wrapping your freezing bowl in a plastic bag will prevent freezer
burn. The time necessary to properly freeze the freezing bowl will depend on the temperature of
the freezer. Generally, freezing time is between 16 and 24 hours when the freezer temperature is
set at 0°F (-18°C) or less.

6
As there is liquid between the freezing bowl walls, shake it to verify if it is completely frozen.
You should not hear any liquid moving between the walls.
NOTE: Storing continuously the freezing bowl in the freezer gives you the flexibility to make
your favorite frozen dessert at a moment’s notice.
MAKING ICE CREAM
Prepare ice cream mixture according to the recipe (see Recipes). Any recipe can be used for ice
cream, sorbet, frozen yogurt, etc., so long as the recipe does not yield more than ½ quart (500ml).
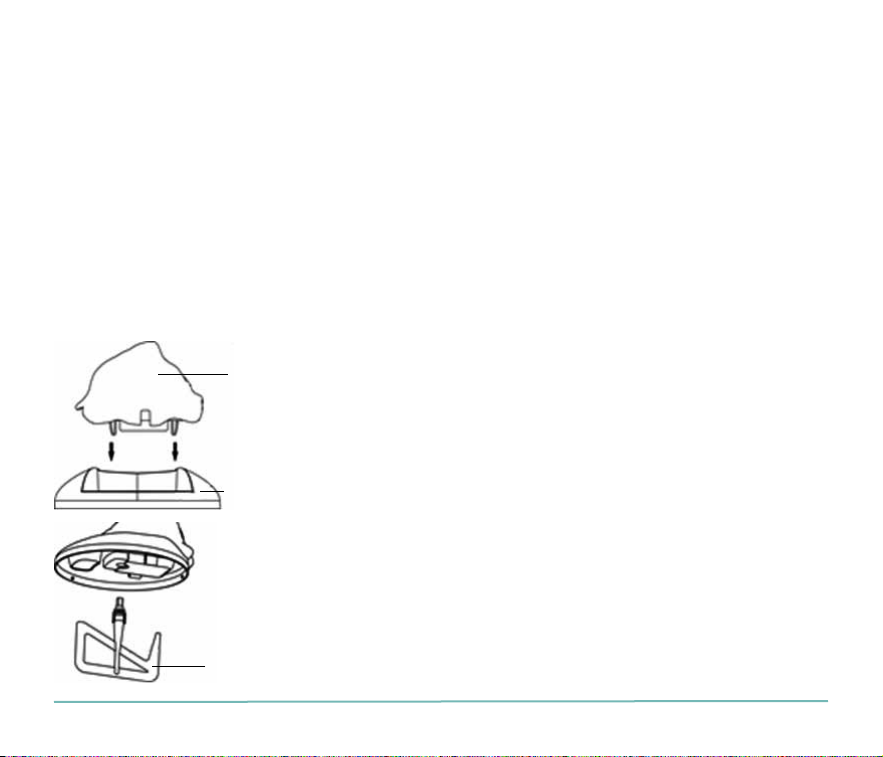
A. Place the motor unit (1) on the see-through lid
with spout (2), aligning the two brackets on the
motor unit with the holes on the see-through lid.
Press down firmly to engage the motor unit on
the see-through lid; you should hear a click
B. Insert the mixing paddle (3) into the motor
unit (1).
C. Remove the frozen freezing bowl (4) from the
freezer. As there is liquid between the freezing
bowl walls, shake it to verify if it is completely
frozen; you should not hear any liquid moving
between the walls. (Note: Make sure your recipe
is already prepared prior to removing the freezing
bowl from your freezer.)
1
2
3

7
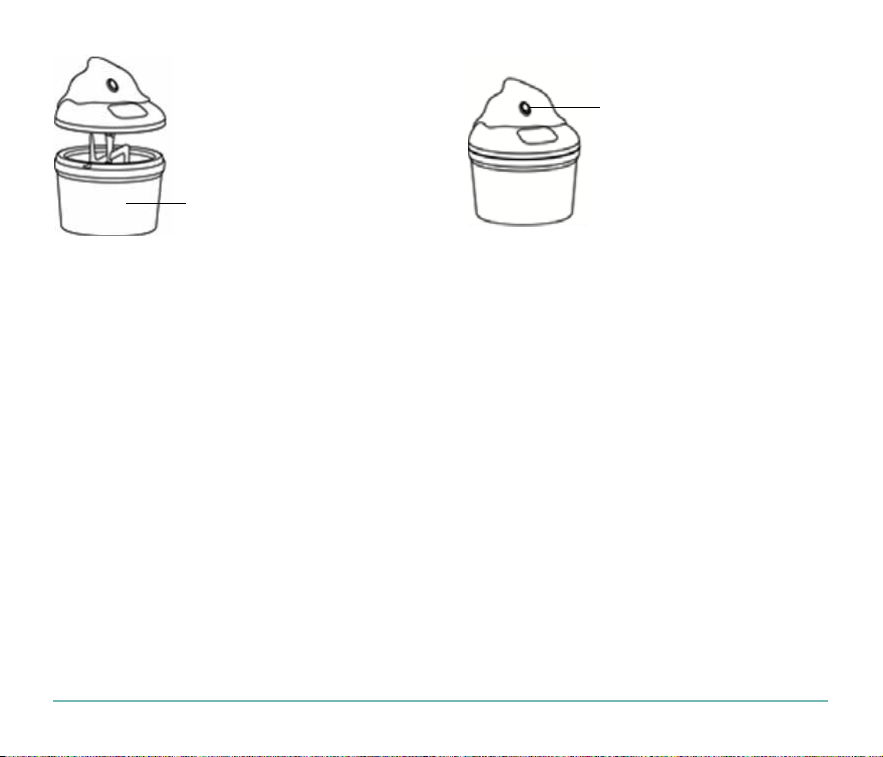
D. Place the assembled
see-through lid (2) with
motor unit (1) and mix-
ing paddle (3) into the
freezing bowl (4), and
turn the see-through lid
clockwise to lock it into
position.
E. Turn the On/O
indicator (5) to the On
position. The mixing
paddle should start.
4
5
NOTE:
It is extremely important that the freezing bowl be used immediately after it is removed
from the freezer, as it begins to thaw once removed. First make sure that the recipe mixture is
ready to be used.
The appliance must be switched “On” before adding the ice cream or sorbet recipe to pre-
vent the mix from immediately freezing on the inside of the freezing bowl.
Only use rubber, plastic or wooden utensils to serve directly from the freezing bowl. Metal
spoons may damage the surface of the freezing bowl.
F. Immediately pour mixture through the spout into the freezing bowl.
Frozen desserts will be done in less than 30 minutes. The time will depend on the recipe and
volume you are preparing. When the mixture has thickened to your liking, it is done. If you desire a
firmer consistency, transfer the dessert to an airtight container and store it in the freezer for two or
more hours.
NOTE: Do not store frozen desserts in the freezing bowl as they will stick to the sides of the
freezing bowl and may damage it. Store only in a freezer-safe, airtight container. If you choose
to store the ice cream in the freezing bowl, make sure you only use rubber, plastic or wooden
utensils to serve directly from the freezing bowl. Metal spoons will damage the surface of
the freezing bowl.

8
ADDITIONAL INGREDIENTS
Ingredients such as chocolate chips, candy and nuts should be added about 5 minutes before
the process is complete. Once the dessert has begun to thicken, add the ingredients through the
spout. Nuts and other ingredients should be no larger than a chocolate chip (½-inch or smaller in
diameter).
SAFETY FEATURES
The appliance is equipped with a safety device that stops it automatically if it overheats. Overheating
may occur if the recipe you are preparing is very thick, if the ice cream maker runs for too long, or if
the ingredients added (e.g. walnuts, etc.) are not chopped finely enough. To start the ice cream maker
again, press the On/O button, and let it cool down. After a few minutes you can start it up again.
Do not run the ice cream maker longer than necessary.
CAUTION: Do not run the ice cream maker inside the freezer or the refrigerator.
CLEANING
The freezing bowl, mixing paddle and see-through lid can be cleaned in warm water and mild de-
tergent. The motor unit can be cleaned with a damp cloth. Never immerse the motor unit in water.
Make sure all parts are dried thoroughly, and never place the freezing bowl in the freezer while it is
still wet. Never store any plastic parts in the freezer. Never clean the parts with abrasive products,
as this could damage them.
• Some recipes require the mixture to be pre-cooked. Make the recipe at least one day ahead.
This will allow the mixture to cool completely and expand. Pre-chilling the base mixture is
strongly recommended.
• Uncooked recipes will yield best results when an electric mixer is used to beat the eggs and
sugar. This helps the mixture to expand.
HELPFUL HINTS

9
HELPFUL HINTS
• Most ice cream recipes are a combination of cream, milk, eggs and sugar. You can use any
type of cream you like, but the type you use will have a big impact on the rich flavor and
creamy texture. The higher percentage of fat, the richer the ice cream. For example, heavy
cream has at least 36% fat, followed by whipping cream (35%), coee or light cream (18%) and
half & half (10%). Any combination can be used, just make sure the liquid volume remains the
same. For example, lighter ice cream can be made by using more milk than cream, or by
eliminating the cream altogether. Skim milk will work, but there will be a noticeable dierence
in texture.
• Ice cream mixtures will stay fresh in the refrigerator for several days. Be sure to shake well
before adding to the freezing bowl.
•
When pouring mixture into the freezing bowl, be sure to stop 1.5 inches from the top, as mixture
will expand during the freezing process.
• Alcohol inhibits the freezing process. To add alcohol to a recipe, do so during the last minutes
of the process.
• The result in the taste of a sorbet will depend greatly on the ripeness and sweetness of the
fruit and juice. Taste the fruit before adding it to the recipe. If it is too tart add sugar; if is very
ripe, decrease or omit the sugar.
Keep in mind that freezing subdues sweetness, so the recipe will not be quite as sweet when frozen.
• For those who are diet-conscious, artificial sweeteners can be used as substitutes for sugar.
NOTE: Only add artificial sweeteners to mixtures that are cold or have cooled completely.
When a recipe calls for heated liquid to dilute the sugar, omit the heating process and simply
stir in the sweetener until it is well dissolved.
1 packet of sweetener = 2 teaspoons of sugar
6 packets of sweetener = ¼ cup of sugar
8 packets of sweetener = 1/3 cup of sugar
12 packets of sweetener = ½ cup of sugar

10
VANILLA ICE CREAM
250 ml whole milk (3.5% fat), 100 g superfine sugar, 2 medium eggs, 450 ml whipping cream
(35% fat), 1 teaspoon vanilla extract.
• Gently heat the milk in a small saucepan until hot, but not boiling. Meanwhile beat the eggs
and sugar in a mixing bowl using a whisk.
• Slowly pour the hot milk into the egg and sugar mixture, while stirring.
• Pour the mixture into a saucepan and heat gently, without boiling, stirring constantly until it
thickens slightly and coats the back of a spoon.
• Allow the mixture to cool to room temperature, and then add the unwhipped cream and
vanilla extract and mix.
•
Put the mixture in the refrigerator for at least 12 hours before preparing in the ice cream maker.
CHOCOLATE ICE CREAM
250 ml whole milk (3.5% fat), 100 g superfine sugar, 25 g unsweetened cocoa powder, 1medium
egg, 450 ml whipping cream (35% fat), 1 teaspoon vanilla extract.
• Beat the egg and sugar in a mixing bowl, then whisk in the milk.
• Pour the mixture into a saucepan and heat gently, without boiling, stirring constantly until it
thickens slightly and coats the back of a spoon.
• Sieve the cocoa powder to add it to the mix, stirring until the mix turns smooth. If there are
lumps left, process the mix in a blender to remove them.
• Allow the final mix to cool at room temperature.
• Stir in the unwhipped cream and vanilla extract.
•
Put the mixture in the refrigerator for at least 12 hours before preparing in the ice cream maker.
RECIPES:
For more recipes please visit www.eurocuisine.net

Automatic Ice Cream,
Sorbet & Frozen
Yogurt Maker
Sorbetière et yaourtière
automatique
Máquina para hacer helado,
nieve y yogurt congelado
Model: ICM26GR & ICM26RD

LIMITED 3-YEAR WARRANTY
Euro Cuisine is proud to back this appliance with a limited 3-year warranty.
Euro-Cuisine warrants that this product will be free from defects in
workmanship or materials under normal home use for three years from the
date of the original purchase.
It is suggested that you complete and return the enclosed product registration
promptly to facilitate verification of the date of original purchase.
Should you experience any defects as described above in this three-year period, contact
Euro-Cuisine at: 888-343-5554, or write us at P.O. box 351208, Los Angeles, CA 90035.
When you call, please have the following information available:
• Product Name
• Product Model Number
• Purchase Date
• Proof of Purchase
• Description of Defect
This warranty excludes:
• Damage caused by accident, misuse, or shipment
• Any defects or damages caused by accessories, replacement parts or repair
service other than those authorized by Euro-Cuisine
• Retailers or other use for commercial purposes
• Damages caused by failure to follow safeguards section of instruction book

13
Merci d’avoir choisi notre produit. Nous espérons que vous aimerez l’utiliser.
LISEZ AVEC ATTENTION AVANT UTILISATION
CONSERVEZ CES INSTRUCTIONS
POUR RÉFÉRENCE ULTÉRIEURE
POUR UTILISATION DOMESTIQUE SEULEMENT
MESURES DE SÉCURITÉ IMPORTANTES
Lors de l’utilisation d’un appareil électrique, particulièrement en présence d’enfants, vous devez
toujours suivre les mesures de sécurité de base afin de réduire le risque d’incendie, de choc élec-
trique et de lésions corporelles, y compris ce qui suit :
1. LISEZ TOUTES LES INSTRUCTIONS AVANT UTILISATION.
2. Pour protéger contre le risque de choc électrique, n’immergez pas le cordon, la fiche ou le bloc
moteur de l’appareil dans de l’eau ou dans un liquide quelconque.
3. Cet appareil n’est pas destiné à être utilisé par des personnes (enfants inclus) ayant des
capacités physiques, sensorielles ou mentales réduites, ou ayant un manque d’expérience et
de connaissances, sauf si elles sont supervisées de près et reçoivent des instructions relatives
à l’appareil prodiguées par une personne responsable pour leur sécurité. Une supervision
étroite est nécessaire lorsqu’un appareil quelconque est utilisé par des enfants ou à proximité
d’enfants. Les enfants doivent être supervisés afin d’assurer qu’ils ne jouent pas avec l’appareil.
4. Débranchez toujours l’appareil de la prise lorsqu’il n’est pas utilisé, avant d’ajouter ou de
retirer des pièces, et avant le nettoyage.
5.
Évitez d’entrer en contact avec des pièces mobiles. Gardez les mains, les cheveux et les vêtements
ainsi que les spatules et d’autres ustensiles éloignés pendant le fonctionnement de l’appareil afin
de réduire le risque de lésions corporelles et/ou d’endommagement de l’appareil.

14
6. N’utilisez aucun appareil avec un cordon ou une fiche endommagés ou après un mauvais
fonctionnement, ou s’il est tombé ou a été endommagé de quelque manière que ce soit.
Retournez l’appareil au service technique pour les consommateurs de Euro Cuisine Inc. pour
le faire examiner ou réparer, ou pour un réglage électrique ou mécanique.
7. L’utilisation d’accessoires non recommandés par Euro Cuisine Inc. peut être la cause d’un
incendie ou d’un choc électrique, ou crée des risques de lésions corporelles.
8. N’utilisez pas cet appareil à l’extérieur.
9. Ne laissez pas le cordon pendre par-dessus le bord d’une table ou d’un comptoir, ou toucher
des surfaces chaudes.
10. Pour réduire le risque de lésions corporelles ou de dommages pour l’appareil même, gardez
les mains et les ustensiles hors du bol de congélation lors de l’utilisation de l’appareil.
N’UTILISEZ PAS DES OBJETS OU DES USTENSILES TRANCHANTS À L’INTÉRIEUR DU
BOL DE CONGÉLATION! Les objets tranchants rayeront et endommageront l’intérieur du
bol de congélation. Une spatule en caoutchouc ou une cuillère en bois peuvent être utilisées
lorsque l’appareil est en position d’arrêt.
11. Cet appareil est destiné à un usage domestique. Tout autre entretien à part du nettoyage et
de l’entretien par l’utilisateur doit uniquement être eectué par le service technique pour les
consommateurs d’Euro Cuisine Inc.
12. N’utilisez pas le bol de congélation à proximité de flammes, des plaques chauantes ou des
poêles. N’exposez pas l’appareil à une source de chaleur. Ne lavez pas l’appareil dans un lave-
vaisselle; cela pourrait créer un risque d’incendie, de choc électrique ou de lésion corporelle.
13. Lorsque l’appareil n’est pas utilisé, éteignez-le et débranchez-le de la prise avant d’assembler
ou de désassembler des pièces et avant de le nettoyer. Pour le débrancher, saisissez la fiche et
tirez pour la retirer de la prise. Ne tirez jamais à partir du cordon d’alimentation.

15
AVIS
Cet appareil est muni d’une prise polarisée (une broche est plus large que l’autre). Pour réduire
le risque de choc électrique, cette fiche s’adapte dans une prise polarisée dans un seul sens
seulement. Si la fiche ne s’adapte pas complètement dans la prise, inversez la fiche. Si elle ne
s’adapte toujours pas, adressez-vous à un électricien qualifié. N’essayez pas de désactiver cette
caractéristique de sécurité.
INSTRUCTIONS POUR CORDON ÉLECTRIQUE SPÉCIAL
Un cordon d’alimentation électrique court est fourni pour réduire les risques de s’y enchevêtrer,
et empêcher un trébuchement si le cordon était plus long. Des rallonges plus longues peuvent
être utilisées si l’on procède avec soin quand on les utilise.
Si une longue rallonge polarisée est utilisée, le courant électrique nominal indiqué de la rallonge
doit correspondre à celui de l’appareil au moins, et la rallonge plus longue doit être placée de
manière à ce qu’elle ne soit pas suspendue à partir du comptoir ou du dessus de table, d’où elle
pourrait être tirée par des enfants ou des animaux, et où l’on pourrait trébucher dessus.
ATTENTION
• N’immergez pas le bloc moteur dans de l’eau.
• Pour réduire le risque d’incendie ou de choc électrique, ne désassemblez pas le bloc moteur.
REMARQUE: Le bloc moteur ne comprend aucune pièce pouvant être réparée par l’utilisateur.
• Les réparations doivent uniquement être eectuées par le service technique pour les
consommateurs de Euro Cuisine Inc.
• Vérifiez la tension pour vous assurer que la tension indiquée sur l’étiquette de courant
nominal correspond à votre tension.
• Ne nettoyez jamais le bloc moteur avec des poudres à récurer ou des outils en métal dur.
16
SPÉCIFICATIONS:
Alimentation électrique: 120 V c.a., 60Hz Consommation électrique : 15 W
Avec votre nouvelle sorbetière et yaourtière d’Euro Cuisine, vous pouvez créer des arômes de
crème glacée sans limites, fouetter des sorbets ou des yogourts glacés exquis, et même créer
votre boisson glacée préférée, en l’espace de 20 à 30 minutes seulement!
1
2
4
5
6
3
1. Bloc moteur avec
indicateur Marche/Arrêt
2. Couvercle transparent
avec bec
3. Palette à mélanger
4. Bol de congélation
5. Interrupteur Marche/
Arrêt
6. 4 tasses pour crème
glacée en verre
7. Toutes les pièces entrant
en contact avec des
denrées alimentaires
sont exemptes de BPA

17
La sorbetière et yaourtière d’Euro Cuisine est dotée des car-
actéristiques suivantes :
• Bol de congélation doublement isolé
Des parois doubles gardent le bol de congélation froid plus longtemps, pour obtenir des
meilleurs résultats. Le liquide entre les parois assure une congélation profonde et uniforme.
Des pattes en caoutchouc antidérapantes empêchent le déplacement pendant l’utilisation.
• Couvercle transparent avec bec
Permet de commodément garder un œil sur le processus de congélation. Le bec permet
d’ajouter des ingrédients sans déranger le processus de congélation.
• Interrupteur «Marche/Arrêt»
Facile à utiliser et entièrement automatique. Élimine toutes les estimations lors de la
préparation de desserts congelés
AVANT LA PREMIÈRE UTILISATION
N’immergez PAS le bloc moteur dans de l’eau. Essuyez-le avec un chion humide. Lavez le cou-
vercle transparent, le bol de congélation et la palette de malaxage dans de l’eau chaude et savon-
neuse pour éliminer toute poussière et tous résidus des processus de fabrication et d’expédition.
Ne nettoyez PAS les pièces avec des nettoyants abrasifs ou des outils en métal dur.
PRÉPARATION DU BOL DE CONGÉLATION
L’étape la plus importante de la préparation de desserts congelés est d’assurer que le bol de con-
gélation est congelé de manière adéquate. Euro Cuisine Inc. ore un bol de congélation double-
ment isolé qui exige une congélation approfondie. Pour obtenir les meilleurs résultats possibles,
assurez-vous que le bol de congélation est lavé et entièrement séché. Enveloppez le bol de
congélation dans un sac en plastique et mettez-le dans l’arrière du congélateur ou à l’emplace-
ment où le compartiment du congélateur est le plus froid. Le fait d’envelopper le bol de congéla-
tion dans un sac en plastique empêche une brûlure de congélation. La durée nécessaire pour
congeler le bol de congélation de manière adéquate dépend de la température du congélateur.
18
En général, la durée de congélation est de 16 à 24 heures lorsque la température du congélateur
est réglée à - 18°C (0 °F) ou moins.
Étant donné que du liquide est présent entre les parois du bol de congélation, secouez le bol
pour vérifier qu’il est entièrement congelé. Vous ne devriez pas entendre de liquide se déplacer
entre les parois.
REMARQUE:
Le fait de conserver continuellement le bol de congélation dans le congélateur vous donne la
flexibilité de préparer votre dessert congelé préféré à tout moment.
PRÉPARATION DE CRÈME GLACÉE
Préparez le mélange de crème glacée selon la recette (voir Recettes). N’importe quelle recette
peut être utilisée pour préparer de la crème glacée, des sorbets, du yogourt glacé, etc. tant que la
recette ne demande pas plus de 500ml (1/2 quart US).
A. Placez le bloc moteur (1) sur le couvercle transparent avec le bec
(2), en alignant les deux supports du bloc moteur avec les trous situés
sur le couvercle transparent. Appuyez fermement pour engager le bloc
moteur sur le couvercle transparent; vous devriez entendre un clic.
B. Insérer la palette de malaxage (3) dans le bloc moteur (1).
C. Retirez le bol de congélation congelé (4) du congélateur. Étant donné
que du liquide est présent entre les parois du bol de congélation, sec-
ouez le bol pour vérifier qu’il est entièrement congelé; vous ne devriez
pas entendre un déplacement de liquide entre les parois. (Remarque :
Assurez-vous que la recette est déjà préparée avant de retirer le bol de
congélation de votre congélateur.)
1
2
3
19
D. Placez le couvercle
transparent assemblé (2)
avec le bloc moteur (1) et
la palette de malaxage (3)
dans le bol de congélation
(4), et tournez le couvercle
transparent dans le sens
horaire pour le verrouiller
en position.
E. Tournez l’indicateur
Marche/Arrêt (5) à la
position Marche. La
palette de malaxage
devrait commencer à
fonctionner.
4
5
REMARQUE:
Il est extrêmement important d’utiliser le bol de congélation immédiatement après son retrait
du congélateur, étant donné qu’il commence à se décongeler une fois qu’il est retiré. Com-
mencez par vous assurer que le mélange de la recette est prêt à être utilisé.
L’appareil doit être mis à la position «Marche» avant d’ajouter la recette de crème glacée ou
de sorbet afin d’empêcher une congélation immédiate du mélange sur l’intérieur du bol de
congélation.
Utilisez uniquement des ustensiles en caoutchouc, en plastique ou en bois pour servir directe-
ment à partir du bol de congélation. Les cuillères en métal pourraient endommager la surface
du bol de congélation.
F. Versez immédiatement le mélange par le bec dans le bol de congélation.
Les desserts congelés seront prêts dans moins de 30minutes. La durée dépend de la recette et du
volume que vous préparez. Lorsque le mélange s’est épaissi à votre goût, il est prêt. Si vous souhait-
ez obtenir une consistance plus ferme, transférez le dessert dans un récipient étanche à l’air et
conservez-le dans le congélateur pendant deux heures ou plus.

20
INGRÉDIENTS SUPPLÉMENTAIRES
Les ingrédients comme des copeaux de chocolat, des bonbons et des noix devraient être ajoutés
5minutes environ avant la fin du processus. Lorsque le dessert a commencé à s’épaissir, ajoutez
les ingrédients à travers le bec. Les noix et autres ingrédients ne doivent pas être plus grands
qu’un copeau de chocolat (diamètre de 13 mm/1/2 po ou moins).
DISPOSITIFS DE SÉCURITÉ
L’appareil est muni d’un dispositif de sécurité qui l’arrête automatiquement lorsqu’il surchaue.
Une surchaue peut avoir lieu si la recette que vous préparez est très épaisse, si la sorbetière
fonctionne pendant trop longtemps, ou si les ingrédients ajoutés (par ex. noix, etc.) ne sont pas
hachés assez fin. Pour redémarrer la sorbetière, appuyez sur le bouton Marche/Arrêt et laissez-la
refroidir. Vous pouvez la redémarrer au bout de quelques minutes.
Ne faites pas fonctionner la sorbetière plus longtemps que nécessaire.
ATTENTION: Ne faites pas fonctionner la sorbetière à l’intérieur du congélateur ou du frigidaire.
NETTOYAGE
Le bol de congélation, la palette de malaxage et le couvercle transparent peuvent être nettoyés
dans de l’eau chaude et un détergent doux. Le bloc moteur peut être nettoyé avec un chion hu-
mide. N’immergez jamais le bloc moteur dans de l’eau. Assurez-vous que toutes les pièces sont
bien séchées et ne mettez jamais le bol de congélation dans le congélateur alors qu’il est encore
mouillé. Ne conservez jamais des pièces en plastique dans le congélateur. Ne nettoyez jamais les
pièces avec des produits abrasifs, étant donné que cela pourrait les endommager.
REMARQUE: Ne conservez pas les desserts congelés dans le bol de congélation, étant donné
qu’ils se colleront sur les côtés du bol de congélation et pourraient endommager ce dernier. Con-
servez-les uniquement dans un récipient étanche à l’air et pouvant être mis dans un congélateur.
Si vous choisissez de conserver de la crème glacée dans le bol de congélation,
assurez-vous de
seulement utiliser des ustensiles en caoutchouc, en plastique ou en bois pour servir directement à
partir du bol de congélation. Les cuillères en métal endommageront la surface du bol de congélation.
This manual suits for next models
1
Table of contents
Languages:
Popular Ice Cream Maker manuals by other brands


Montiss
Montiss KIM5405MB user manual

ICETEAM 1927
ICETEAM 1927 COMPACTA VARIO US Instruction handbook

Coldelite
Coldelite EPS 60 XP Instruction handbook

Coldelite
Coldelite COMPACTA Series Instruction handbook

Italian Gelato
Italian Gelato ICETEAM 1927 STARGEL 5 Instruction handbook

Italian Gelato
Italian Gelato CATTABRIGA MANTEMATIC K20S Instruction handbook