Eurolux EBO910DT Instruction Manual

INSTALLATION, OPERATION
& MAINTENANCE INSTRUCTIONS
FOR EUROLUX BUILT-IN OVEN
Model:
EBO910DT
INSTALLATION, OPERATION AND MAINTENANCE INSTRUCTIONS
Thank you for buying our kitchen products.
To enable you to use your appliance effectively and safely, please read this instruction book carefully
before using the appliance and retain for future reference.
CONTENTS
IMPORTANT SAFETY INSTRUCTIONS ..........................................................................................................................1
APPLIANCE DETAILS....................................................................................................................................................3
INSTALLATION INSTRUCTIONS....................................................................................................................................4
ELECTRICAL CONNECTION ..........................................................................................................................................5
ACCESSORIES ..............................................................................................................................................................6
OPERATING INSTRUCTIONS........................................................................................................................................7
MAINTENANCE AND CLEANING................................................................................................................................10
TROUBLESHOOTING .................................................................................................................................................14
WARRANTY ..................................................................................................................
DISPOSAL INFORMATION
•Most of the packing materials are recyclable. Please dispose of those materials through
your local recycling depot or by placing them in appropriate collection containers.
•If you wish to discard this product, please contact your local authorities, and ask for the
correct method of disposal.
................................................. 15

1
IMPORTANT SAFETY INSTRUCTIONS
IMPORTANT: Read the assembly instruction section and safety precautions of this booklet carefully before removing the
contents of this carton.
1. This appliance is not intended for use by persons (including children) with reduced physical, sensory or mental
capabilities, or lack of experience or knowledge, unless they have been given supervision or instruction
concerning the use of the appliance by a person responsible for their safety. Children should be supervised to
ensure that they do not play with the appliance.
2. After removing the packaging, make sure to check if there is any damage to the appliance. If there is any
damage, (such as cracked glass) never attempt to install the appliance and immediately contact your retailer.
As packaging materials can be dangerous to children, they need to be collected immediately and put out of
reach.
3. In certain circumstances electrical appliances may be a safety hazard. Check the conformity of voltage and
power settings, which are specified on the information plate attached to the appliance and/or packaging, with
the usage conditions available.
4. Do not place heavy objects in or on these appliances, or use for storage, or let children play or swing from the
door. These appliances are designed for cooking food only or outdoors and must be fully built in. Do not use
the appliances until fully installed.
5. This appliance is designed for domestic household use only and for the cooking of domestic food products.
Use as a commercial appliance will void the warranty. It should not to be used in a marine environment or
outdoors.
6. This appliance is supplied with a set of cables for single phase connection. This is a high-powered appliance
and is required to be installed by an authorised person. If the electrical supply cord is damaged, either when
being installed or after installation, it must be replaced by the manufacturer, its service centre or similarly
qualified persons in order to prevent a hazard.
7. The electrical connection must be accessible after installation. WARNING –Ensure that the appliance is
switched off before replacing the lamp, to avoid the possibility of electric shock. The appliance is not intended
to be operated by means of an external timer or separate remote-control system.
8. Electrical connection must be made as per local wiring rules and regulations.
9. Always grasp the oven door in the centre of the handle as the areas around the door edges may be hot due to
the escape of hot air. Do not lift or move the appliance by pulling the handle.
10. Ensure that the kitchen is well ventilated or mechanical ventilation is in use while cooking in this appliance.
11. Do not store or use flammable materials or aerosols near the oven. Items made from aluminium, plastic or
plastic film should also be kept away from the appliance, as they may fuse to the surface.
12. Never line the oven bottom with aluminium foil, as the consequent accumulation of heat could compromise
the cooking and even damage the enamel.
13. WARNING - The oven will become hot during and directly after use. Do not touch any components during this
time, as they may be hot and can cause burns. Do not touch the heating elements inside the oven to avoid
burns. Young children should be kept away. Use heat resistant cooking gloves where-ever possible when
moving food and cooking utensils in and out of the oven.
14. Cleaning may only be commenced on the appliance once it has cooled down (best slightly warm). The
appliance should be disconnected from the power outlet or turned off at your isolation switch before
commencing any cleaning process. Do not use a steam jet or any other high-pressure cleaning equipment to
clean the appliance. Follow oven cleaner directions if these are being used.
15. Wash all accessories in hot soapy water or in a dishwasher, wipe dry with a paper or cloth towel. If you use
your oven for an extended period of time, condensation may form. Dry it using a soft dry cloth.
16. When the appliance is not being used, the knobs must be kept in the ‘OFF’ position.
17. Where this appliance is installed in a caravan, it shall NOT be used as a space heater.
18. Do not modify this appliance.

2
IMPORTANT SAFETY INSTRUCTIONS
19. Do not use harsh abrasive cleaners or sharp metal scrapers to clean the oven door glass as it can scratch the
surface, which may result in the glass shattering. Clean the glass door using warm damp cloth and dry it with a
soft cloth.
20. All cabinetry and materials used in the installation must be able to withstand a minimum temperature of 110°C
above the ambient temperature of the room it is located in, whilst in use. Certain types of vinyl or laminate
kitchen furniture are particularly prone to heat damage or discolouration at temperatures outside the
guidelines given above. Any damage caused by the appliance being installed without adhering to the
temperature limits set out above will be the liability of the owner. To avoid overheating, do not install behind a
decorative door.
21. This appliance must be correctly installed by a suitably qualified person, strictly in accordance with the
manufacturer’s instructions. Please see the specific section of this booklet that refers to installation.
22. The appliance must be installed and put in operation by an authorised technician under the conditions
provided by the manufacturer in this manual. The manufacturer cannot be held responsible for any damage
that might occur due to faulty installation.
23. The values indicated on the printed documents found on the product are values obtained in a laboratory
environment according to relevant standards. These values may vary according to the usage and environmental
conditions of the product.
24. Excess spillage must be remove before cleaning.
25. The appliance must not be installed behind a decorative door in order to avoid overheating.
26. Means for disconnection must be incorporated in the fixed wiring in accordance with the wiring rules.
3
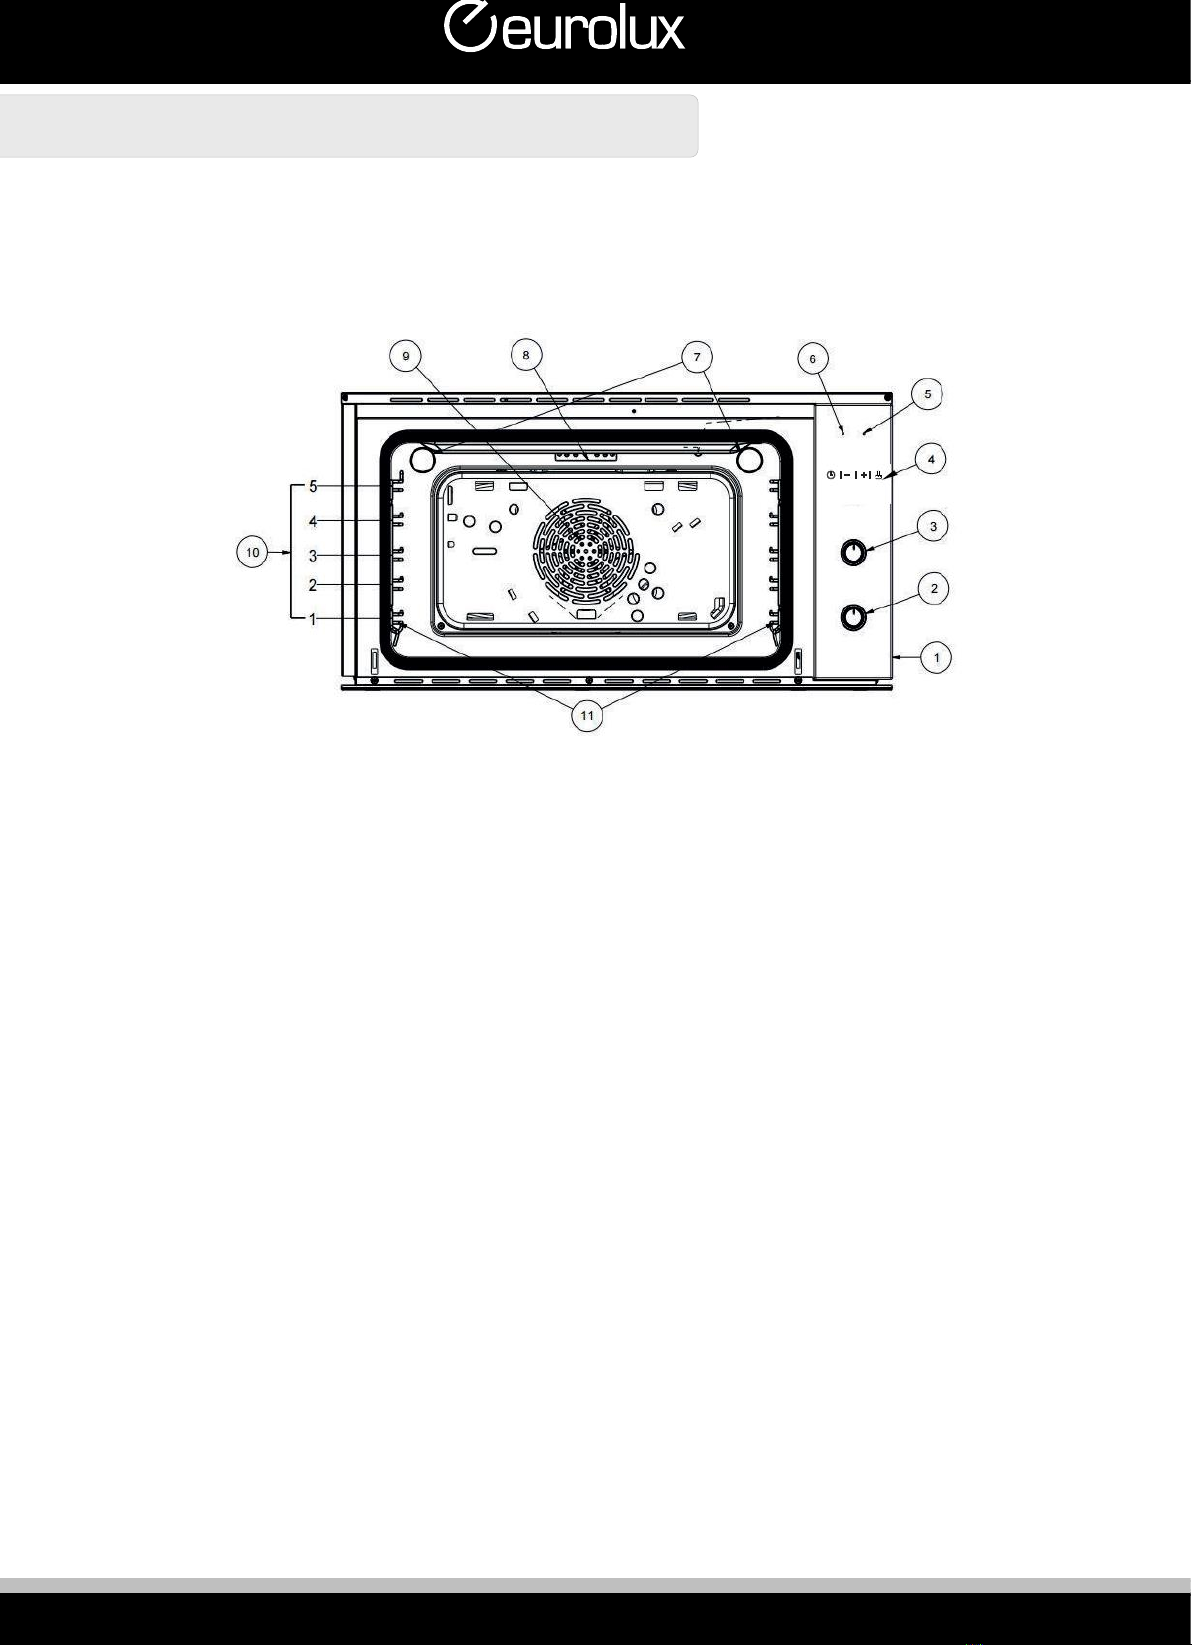
APPLIANCE DETAILS
1. Control Panel
2. Functions Knob
3. Temperature Knob
4. End of cooking timer / Clock button
5. Temperature °C indicator / symbol / warning light
6. F switch indicator / symbol / warning light
7. Lamps
8. Heating element
9. Fan
10. Rack Positions
11. Shelf support (removable)
4
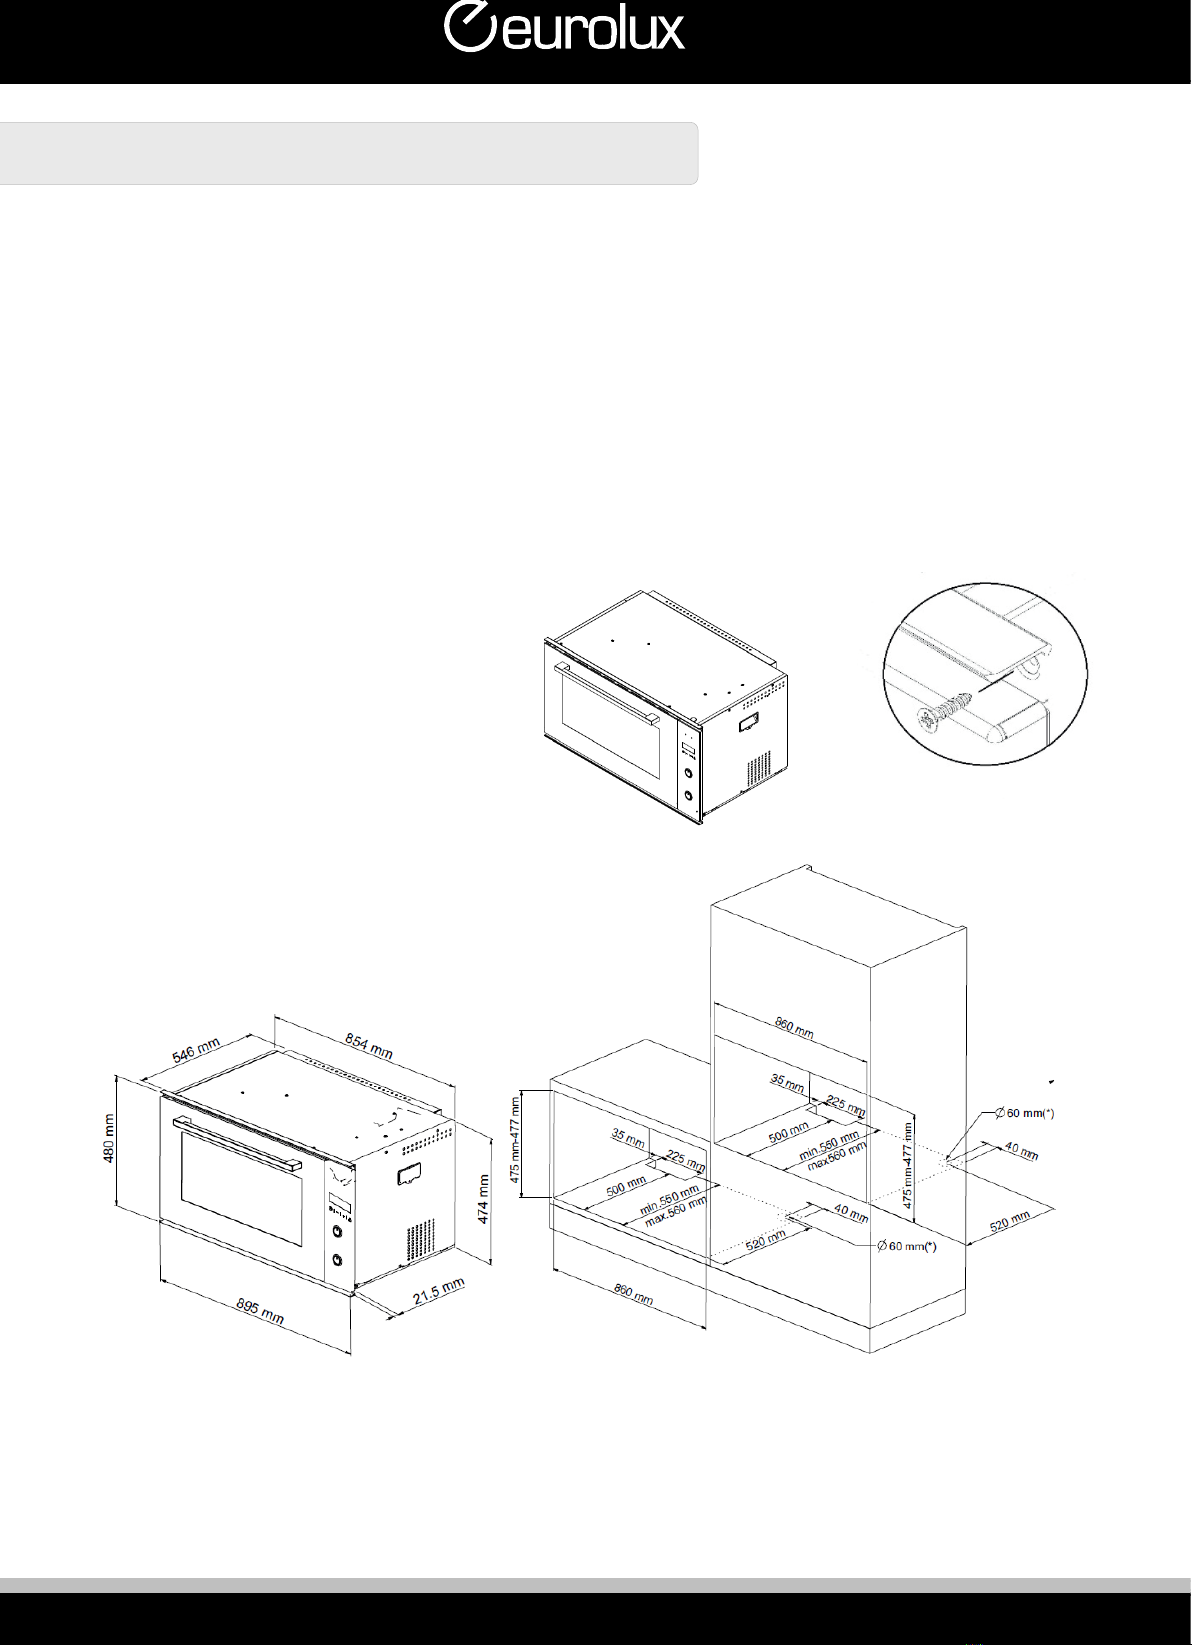
INSTALLATION INSTRUCTIONS
Important: installation must be done in compliance with the standards and in accordance with the regulations in force. It
must be performed by skilled personnel only.
CHARACTERISTIC FEATURES OF THE CABINET
•For flush-mounted cabinets, the components (plastic or veneered wood) must be held together by heat-resistant
adhesives (with at least 100°C); unsuitable materials and adhesives can cause buckling and ungluing.
•The cabinet must permit the free passage of the electrical wiring and must be strong enough to bear the weight of
the appliance.
•The oven must be mounted in a secure manner in the envisaged recess, it can be inserted into a column cabinet or
under the top of a modular cabinet, while still providing adequate ventilation.
ASSEMBLY INSTRUCTIONS
•Insert the appliance into the compartment
•Fix the body to the cabinet with the 2
screws provided using the holes in the
upper profile (right and left)
The figures below show the ventilation and cut-out requirements for the installation of the appliance into a standard
kitchen cabinet. A gap is required at the rear, with ventilation below and above, allowing the air to enter below the
appliance and exit above it.

5
ELECTRICAL CONNECTION
LOCAL AUTHORITY REQUIREMENTS
Installation is only permitted by a licensed electrician and carried out according to instructions
provided by the manufacturer. Incorrect installation might cause harm and damage, for which
the manufacturer accepts no responsibility.
Electrical Installation
This oven must be connected to a 220-240V 50Hz power supply. It must be earthed via the supply cord.
Before carrying out the connection to the power supply, the voltage rating of the appliance (stamped on the appliance
identification plate) must be checked for correspondence to the available mains supply voltage, and the mains electric
wiring should be suitable for the oven’s power rating (also indicated on the appliance identification plate). Use a suitable
electrical cable (wires minimum area1.5mm²) and a circuit breaker with a contact opening of at least 3mm must be
installed in the supply circuit.
The switched outlet must be connected to a suitable earth wiring, in conformity to current safety regulations.
The main’s switch should not be located above the appliance and no more than 1.25m away from it. The power supply
cord must not touch against any hot surfaces and must be placed so that its temperature does not exceed 75°C at any point
along its length.
After having installed the appliance, the switched outlet must always be in an accessible position.
NOTE: For connections to the mains power supply, never use adapters, reductions or multiple power points as these may
overheat and catch fire.
The mains terminal block is located on the back of the oven and the terminals are accessible by opening the terminal block
cover. Note: The back panel or terminal cover should not be opened when the mains power is still connected to the
appliance and never by an unauthorised person.
The electrical safety of this appliance can only be guaranteed if the oven is correctly and efficiently earthed. The
manufacturer declines all responsibility for damage resulting from an installation which has not been earthed correctly.
4

6
ACCESSORIES
•The accessory can be inserted in the oven at 5 different levels.
•To ensure that the wire rack operate safely, correct placement of
the wire rack between the side rail is imperative. Wire rack and the
pan only can be used between the first and fifth layers.
•The wire rack should use with the right direction, it will ensure that
during careful removal of the wire rack and pan, hot food items
should not slide out.
•The cooking guide table gices the ideal position for each use of the
oven.
Wire rack
It is used as a support for your baking pans, pastry tins and all the different
containers statring from the dripping pans provided or for cooking mainly the
grill and fan grill functions to grill meat, fish, toast and bread etc.
Dripping Pan
It is normally used to collect the juices of grilled foods or for cooking foods
directly. If not used when cooking, the dripping pan must be taken out of the
oven.

7
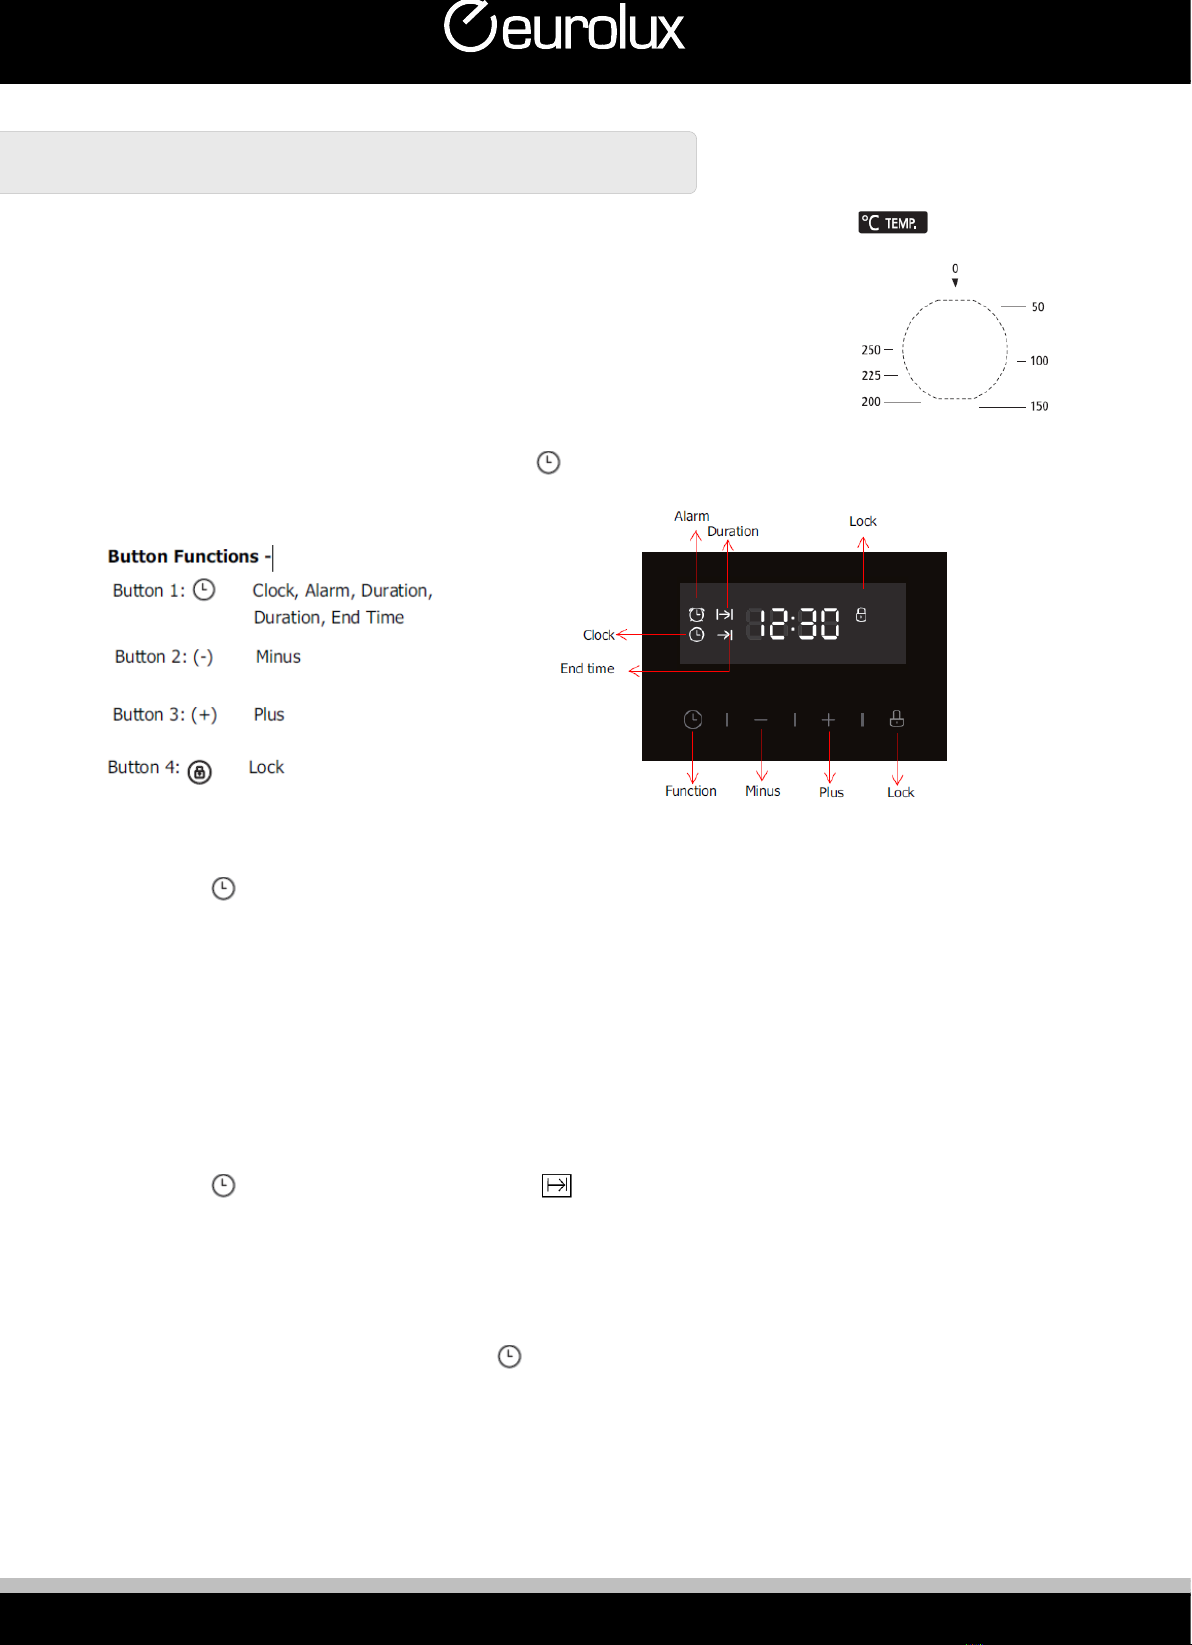
OPERATING INSTRUCTIONS
Selectors
The selectors are retractable knobs.
•Press them to extract them and reinsert them.
•It is advisable to keep the knob out while the Oven is working.
Functions Selector
•With the functions selector you can set the type of heating, the "F" switch
indicator symbol warning light and the lamps inside the oven light up.
•In ECO mode the oven lights are off; to switch them on, set the selector to
the 3D Convection function, then turn the selector back onto the ECO
function to continue low-energy cooking.
8
OPERATING INSTRUCTIONS
Temperature Selector
•The temperature selector is used to set the temperature.
•Position zero The oven does not heat up
•50–250°C Temperature range (Temperature in the cooking chamber °C)
•The warning light with the °C indicator symbol lights up when the oven is in
operation; it goes out instead during the pauses in heating.
End-of-Cooking Timer Selector
After powering on this oven, “0:00” and the clock icon will flash on the screen, press any button to quit.
Set Alarm
•Press and the alarm icon will begin to flash which means the alarm funciton has been chosen “0:00” will
display. Press the “+” and “-” button to set alarm time. The time can be adjusted between “0:01-23:59”. Press
once on plus or minus 1 and hold for 3 seconds for quick adjust. After waiting for 5 seconds to confirm setting, the
alarm icon will be displayed and the alarm time will be shown on the screen. You will then see the time counting
down on the screen. When the countdown is finished, “0:00” will be shoen on the screen and it will start buzzing 4
times every 5 seconds. Press any button to stop.
•If there is no opearation for 2 minutes the buzzing will stop. The alarm function is warning purposes only. It is upto
the user to turn off the oven.
Duration setting
•Press , Choose duration function and icon will begin to flash and “0:00” will display. Press the “+” and “-”
button to set the duration time adjusting range is between “0:01-23:59”. Wait 5 seconds to confirm settings, the
duration time will be set but the time shown on the screen will be back of the time of the day. The duration time
will be counting down internally and when finishing the count down, the power will turn off directly and
“Duration” icon will flash to get your attention. Also, “0:00” will be shown on the screen and it will start buzzing 2
times every 5 seconds. Press any button to stop.
•During the cooking duration, by pressing you can check and change the cooking duration.
•After the countdown has stopped, if there is no opearation for 2 minutes, buzzing will stop.
•If the duration time before end time, end time can only be added, not decreased. (The Max time added can be 23h
59m. When end time is longer than duration time + current time, end time can be decreased by pressing “-“. It will
be decreased untill end time equals to duration time + current time + 1 minute). If end time is longer than duration
time + current time, power will be off and end time icon will display. When end time equals to duration time +
current time, power will be on again and end time icon will turn off.
9
OPERATING INSTRUCTIONS
Time Function
•Press to choose time function. Time icon will flash, press “+” and “-” to set the time. The range is 24hrs. Press
once to plus or minus 1, hold for 3 seconds for quick adjust. No operation for 5 seconds, the time of the day will
show and the time icon will turn off.
•If the time setting is changed after setting the alarm, duration and end time, the alarm will not be changed and
duration and end time will reset.
Lock Function
Press lock button for 3 seconds any time, the lock function will activate and lock icon will display. Press lock button for
3 seconds again and it will be unlock. The icon will turn off. If any button is pressed during lock mode, the oven will stat
buzzing and the lock icon will flash for 3 seconds.
Other Notification
•When setting the alarm, alarm time will display along with alarm duration and end time icon will display.
•After setting the alarm, button 1 can be pressed to check and change the alarm time, duration, end time and day
time.
•When the duration and alarm time are set at the same time, if duration time is finished after alarm time, it will
only be buzzing for the alarm time when alarm time ends. If duration time is finished before the alarm time, it will
also only be buzzing for the alarm when the alarm time ends.
Cooking Chamber
•In the cooking chamber there are the Oven Lamps that are on while the oven is working. By turning the functions.
selector onto this symbol you can light up the lamp when the oven is switched off too.
•In ECO mode the oven lights are off; to switch them on, set the selector to the 3D Convection function, then turn
the selector back onto the ECO function to continue low-energy cooking.
•A cooling fan switches on and off when needed.
•Hot air escapes through the special slots located above the oven door.
CAUTION
Do not cover the ventilation slots, otherwise the oven will overheat.
10
MAINTENANCE AND CLEANING
PREPARING FOR FIRST USE
•Take the accessories and removable shelf supports out of the appliance.
•Clean the appliance before using it for the first time. Place the accessories and removable shelf supports in their
initial position
•Preheat the appliance with nothing inside it in order to burn off fat residues:
1. Set the function and the maximum temperature.
2. Leave the appliance in operation for one hour.
3. Set the function and the maximum temperature.
4. Leave the appliance in operation for 15 minutes.
5. Set the function and the maximum temperature.
6. Leave the appliance in operation for 15 minutes.
7. The accessories may get hotter than usual.
8. The oven can produce an unpleasant odour and smoke.
9. This is not a malfunction.
10. Make sure the airflow inside the room is adequate.
CLEANING AND CARE
•Clean the front of the appliance with a soft cloth moistened with warm soapy water.
•To clean the metal surfaces, use a regular detergent.
•Clean the inside of the appliance after each use. Fat or other food remains can cause a fire. The risk is higher for
the baking pan.
•Remove stubborn dirt with special oven detergents.
•After each use, clean the accessories and let them dry thoroughly. Use a soft cloth moistened with warm soapy
water.
•Do not clean non-stick accessories with strong detergents, sharp objects or in the dishwasher. This could damage
the non-stick coating.
•All surfaces can discolour or alter if you use unsuitable products. In particular the front of the oven gets damaged
by cleaning sprays and de-scalers. Remove residual detergent immediately.
•Danger of injury. Steam from an electric household appliance could reach live parts and cause short-circuiting.
Never use a steam appliance to clean the oven.
•Danger of burns! The heating elements must be switched off. The cooking chamber must not be hot.
•Clean the oven door only with a moist sponge. Dry it with a soft cloth.
•Do not use steel wool, acids or abrasive products that could damage the surface of the oven. Clean the oven
control panel, taking the same precautions.
•Regularly check the door seal. The door seal is around the frame of the oven compartment.
•To keep the door seals, clean, use a non-abrasive sponge with warm water. The seals must be soft and elastic.
•Do not operate the appliance if the door seal is damaged. Contact an authorized Service Centre.
•To clean the door seal please refer to the general information on cleaning.
11
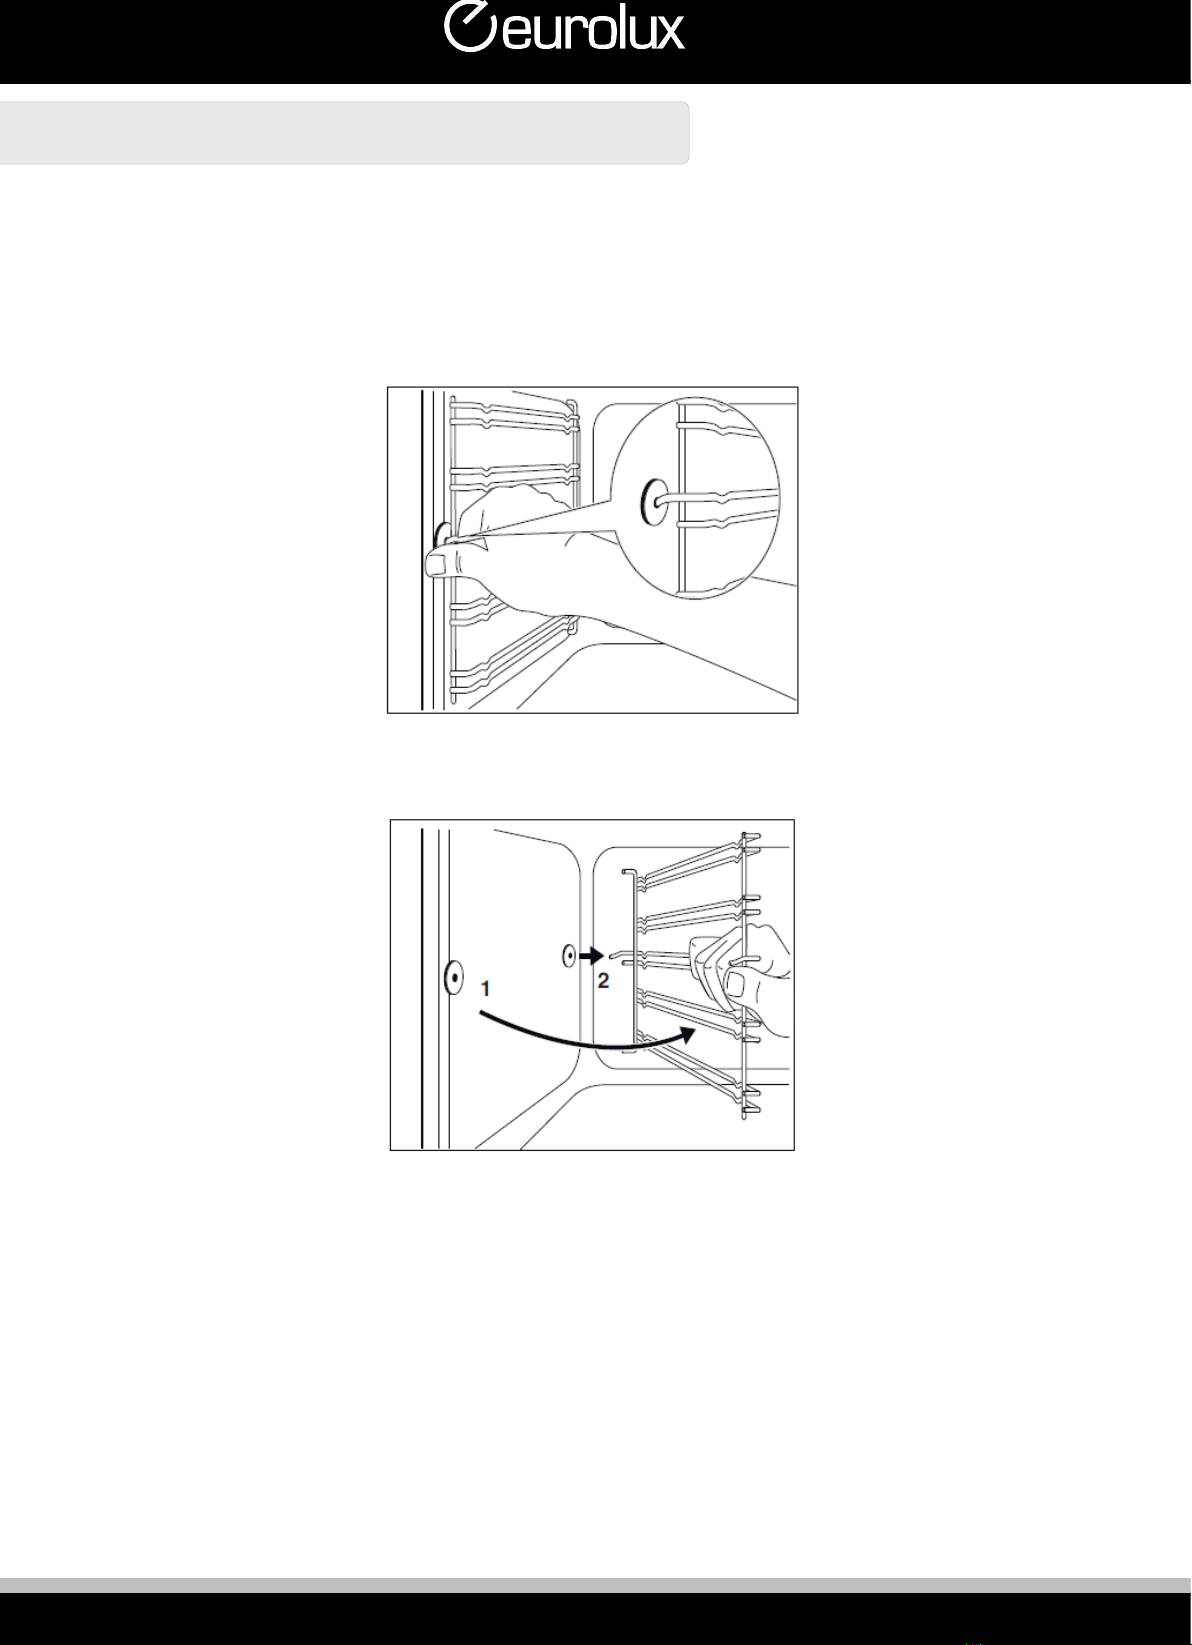
MAINTENANCE AND CLEANING
Removing the shelf supports
To clean the oven, remove the shelf supports
1. First remove the extraction rail from the side wall by pulling it forward.
2. Pull out the back of the shelf support from the side wall and remove it.
3. Install the rack supports by following the procedure described in reverse order.

12
MAINTENANCE AND CLEANING
Removing the appliance door
•Open the oven door completely
•Position the hooks "A" of the hinges outwards (Fig.7)
•Slowly close the door to reach the hooks "A", making sure that they lock in the slots "B" of the door, as shown in
Fig.8
•Using both hands, press lightly inwards on the door, allowing the door hinges "C" to detach from the slots "D" (see
Fig.9), and pull the door towards yourself until it has unhooked from the oven.
•After cleaning, fit the door back on properly by following the procedure in reverse order. Reposition the hooks “A”
inwards before closing the door (Fig.10)
CLEANING THE OVEN DOOR
•After removing the oven door from the framework, place it on a surface with the inner glass (double glazing) facing
towards yourself (Figure 3)
•Remove the double glazing carefully by raising it approximately 25 degrees (Figure 4) until the retaining
•springs unhook
•Push the double glazing in the direction of the arrow (Figure 5) and pull it completely out in order to proceed with
cleaning. At this point you can also remove the middle glazing in the oven door (follow the procedure of Figure 6)
and proceed with cleaning.
•When cleaning is completed, fit the parts back on by following the reverse procedure to that described above to
put the oven door back into its original condition.
13
MAINTENANCE AND CLEANING
Changing the light bulb
WARNING: Ensure that the appliance is switched off before replacing the lamp to avoid the possibility of electric shock.
•Wear protective gloves to change the light bulb.
•To make the replacement, proceed as follows:
1. Disconnect the power supply from the power socket or switch off the circuit breaker of the unit's power socket.
2. Unscrew the glass lamp cover anticlockwise (note that it might be stiff) and change the light bulb with a new one
of the same type.
3. Screw the glass lamp cover back into place.
NOTE: Use only halogen lamps 25-40 W / 220 V-240 V, T300°C.
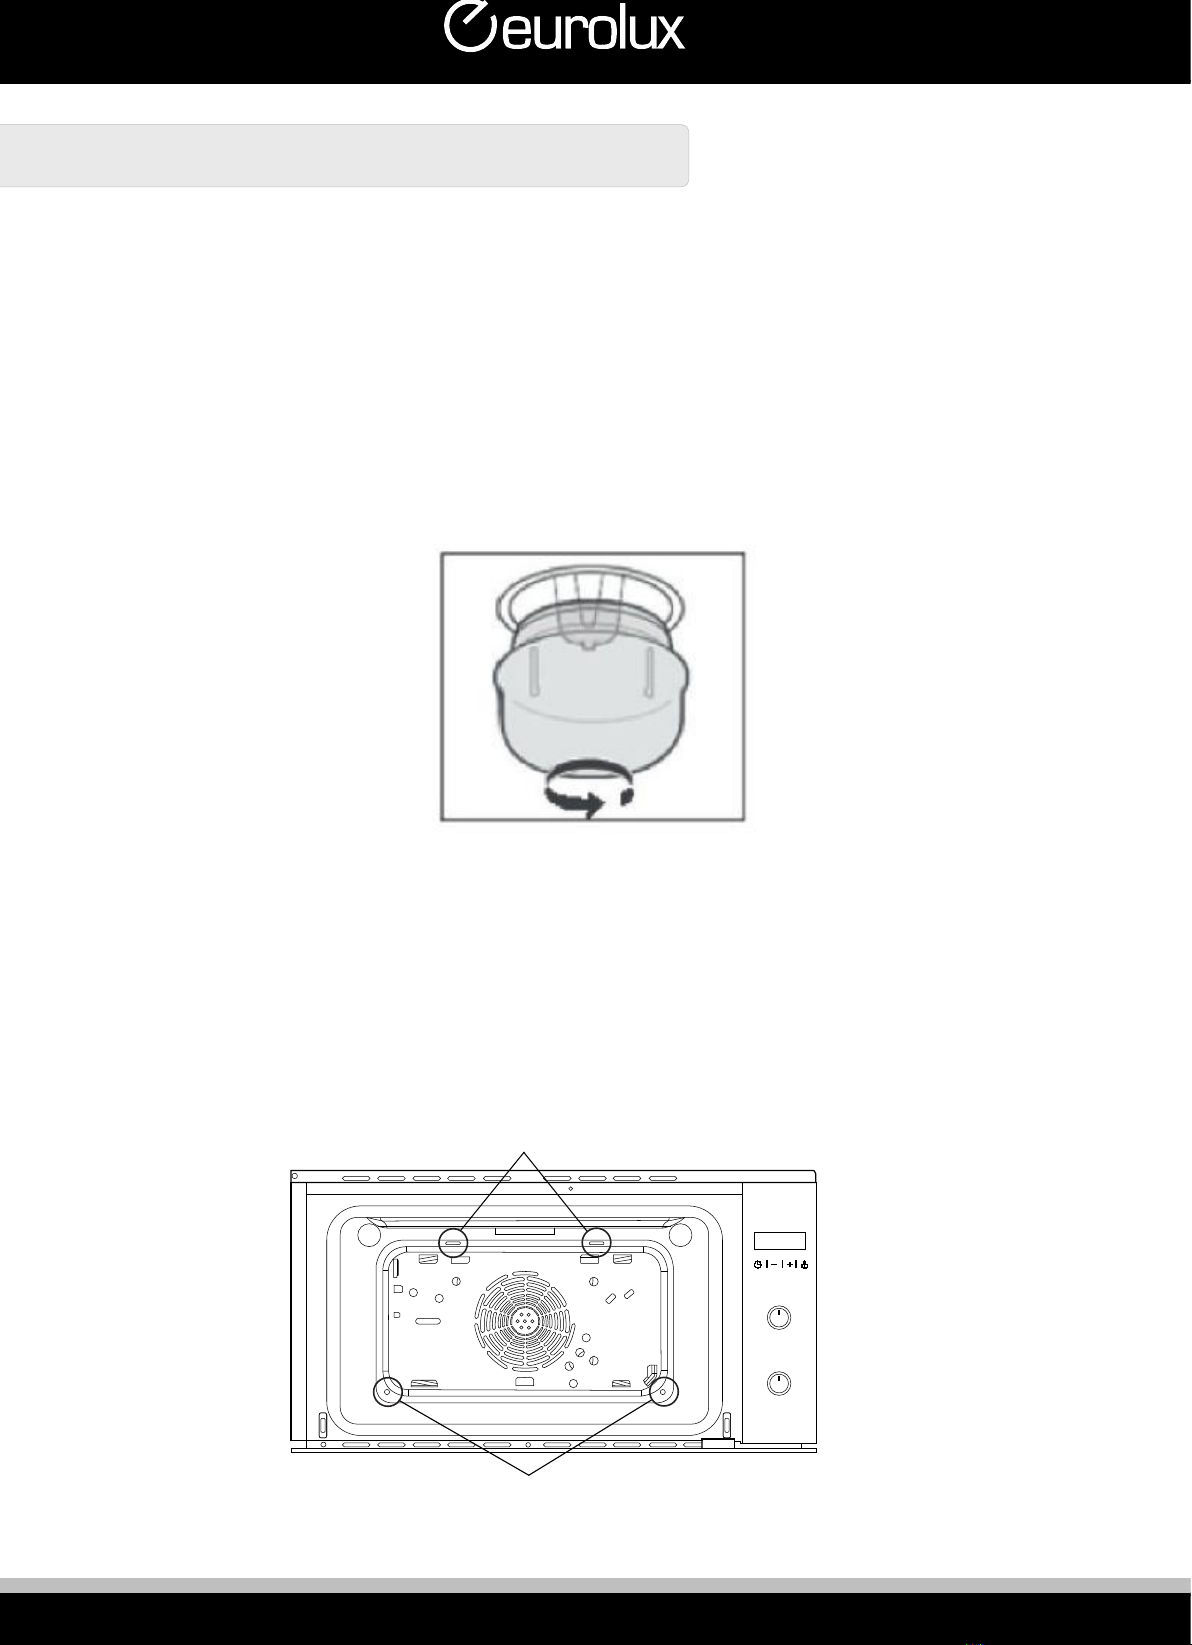
Disassembly of convection motor
WARNING: Turn off the electrical power supply to the appliance prior to servicing it. Failure to disconnect the power supply
during service may result in an electrical shock or fire hazard.
Step 1: Use a screwdriver to remove the screws on the back of the cavity inside to disassemble the convection motor cover,
and then pull it out from the clipping hole.
Step 2: To reassemble the convection motor cover, perform the operations described above in reverse.
CLIPPING
SCREW
14
TROUBLESHOOTING
If a fault occurs, before calling the after-sales service, please ensure that is not because of incorrect operations and refer to
the fault table, attempt to correct the fault yourself. You can often easily rectify technical faults on the appliance yourself. If
a dish does not turn out exactly as you wanted, you can find many tips and instructions for preparation at the end of the
operating manual.
Problem
Cause Possible
Solution
The oven fails to heat.
The oven is off.
Switch on the oven.
The oven fails to heat.
The end of cooking is on position "0"
Position the End of Cooking on
manual
The oven fails to heat.
You have not selected the required settings.
Check that all the settings are correct.
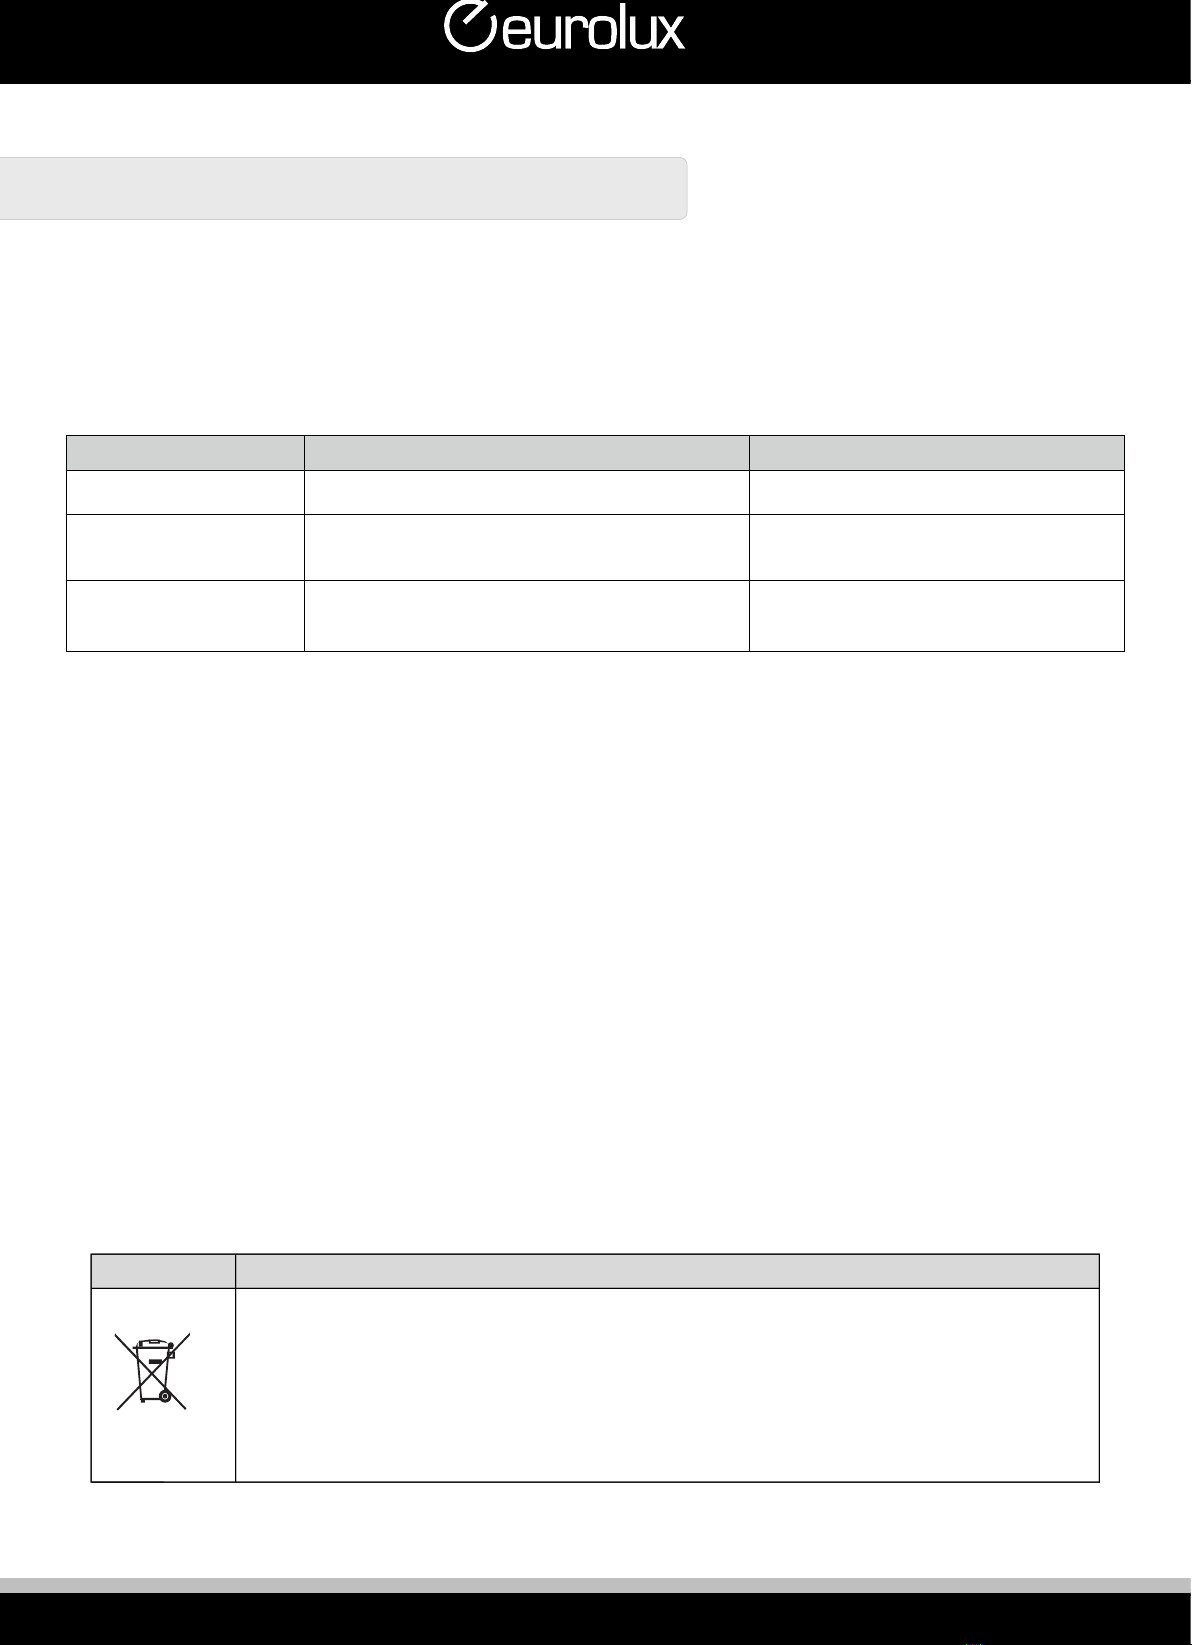
Correct disposal of this product
This symbol on the product, or in its packaging, indicates that this product may not be treated as household
waste. Instead, it should be taken to the appropriate waste collection point for the recycling of electrical and
electronic equipment.By ensuring this product is disposed of correctly, you will help prevent potential
negative consequences for the environment and human health, which could othenwise be caused by the
inappropriate waste handling of this product. For more detailed information about the recycling of this
product, please contact your local council. your household waste disposal servise, or the shop where you
purchased the product.

15
AUSTRALIAN CUSTOMERS
Our goods come with guarantees that cannot be excluded under the Australian Consumer Law. You are entitled to a replacement or
refund for a major failure and for compensation for any other foreseeable loss or damage. You are also entitled to have the goods
repaired or replaced if the goods fail to be of acceptable quality and the failure does not amount to a major failure.
OUR WARRANTY
Subject to the following conditions, this product is also covered by the manufacturer’s TWO (2) YEAR WARRANTY from the date of
purchase, covering all parts and labour (Our W arranty). Our Warranty (which is subject to the conditions below) covers rectification free
of charge of any fault arising from defective materials or components, or faulty workmanship. The product will be repaired or replaced at
the option of Eurolux. Our Warranty is subject to the product being used for single family domestic household use.
Our Warranty operates in addition to (and does not exclude, restrict or modify) any rights or remedies to which you may already be
entitled to under the Australian Consumer Law or any consumer guarantees law relating to this product.
WHAT IS COVERED: By Our Warranty
During the warranty period, Eurolux or its authorised Service Centre will at no extra charge, if your appliance is readily accessible without
the need of special equipment and subject to the terms and conditions of this warranty, repair or replace any parts which it considers
defective.
WHAT IS NOT COVERED BY OUR WARRANTY
1. Incomplete or improper installation.
2. Normal wear and tear e.g. cleaning, light globes,filters etc.
3. Failure resulting from power surges and electrical storms.
4. Insect or vermin infestation.
5. Unauthorised repairs or use of non genuine Eurolux parts.
6. Any failure caused by the product not being used in accordance with the instruction and installation manual provided with
the product.
7. Misuse or abuse, including failure to properly maintain or service.
8. The clearing of blockages in pumps and hoses.
9. Damage which occurs during delivery or installation.
10. Claims to product surface coating due to liquid or solid spill-overs, accidental damage or damage from cleaning products
not recommended by Eurolux.
HOW TO CLAIM OUR WARRANTY
Please refer to our website address below for Eurolux in Australia to register your warranty online. If you are contacting
Eurolux regarding any warranty claims and spare part enquiries, please make sure you have the following information on
hand:
1. Product Name/Model Number
2. Serial Number
3. Purchase Date (as per invoice, or proof or purchase
4. Purchased from
5. Warranty Registration Number
All Warranty Claims and Spare Parts Inquiries:
In Australia:
Telephone: 1300 355 541
A division of Shriro Australia Pty Ltd
2-34 Davidson Street, Greenacre, NSW 2190
AUSTRALIAN PRODUCT WARRANTY


EASY DECISION
A division of Shriro Australia Pty Limited
2-34 Davidson Street, Greenacre NSW 2190
AUSTRALIA: 1300 355 541
www.shriro.com.au
NEW ZEALAND: (09) 415 6000
www.monacocorp.co.nz
IM Ref: ECC EBO910DT 5/2021/4FC
FOR INDOOR USE ONLY
Table of contents
Other Eurolux Oven manuals

Eurolux
Eurolux EOR9 F8MT A User manual

Eurolux
Eurolux FVN 47 6E W User manual

Eurolux
Eurolux EO1 F8PMS XS User manual

Eurolux
Eurolux FEX4752 Operating and maintenance manual

Eurolux
Eurolux EBO605M Guide

Eurolux
Eurolux EO8 F10TCTG BK User manual

Eurolux
Eurolux EOP7 F8PTMS XS User manual

Eurolux
Eurolux EO6 F10PTU XS User manual
Popular Oven manuals by other brands

Hotpoint
Hotpoint DY330GW instructions

Unox
Unox Bakerlux Speed.Pro XESW-03HS-EDDN Installation - use - maintenance

Officine Gullo
Officine Gullo 2OGG Instructions for installation

PITSOS
PITSOS P1HEC38020 Instructions for use

VERDER
VERDER CARBOLITE GERO LHT 4/30 Installation, operation and maintenance instructions

GE
GE TRIVECTION ZET3038 Dimensions and installation information


