EuroSteam Evolution 6399 User manual


Fig. A Fig. B
Fig. D Fig. C
Fig. E Fig.F

READ THESE INSTRUCTIONS BEFORE USE.
• The appliance has been designed for home use only and must not be used for commercial or industrial
purposes.
• Do not leave the packing near children because it is potentially dangerous.
• Keep the appliance out of the reach of children and disabled persons when in use.
• In the event that this appliance is to be disposed of, it is suggested that the power chord be cut off. It is also
recommended that all potentially dangerous components are rendered harmless to prevent children from hurting
themselves when playing with the appliance.
• Before plugging the appliance into the main socket, ensure that the voltage shown on the rating plate matches
the local voltage supply.
• Always connect the iron to an earthed socket.
• DO NOT IMMERSE THE APPLIANCE IN WATER OR OTHER LIQUIDS.
• Do not start ironing if your hands are wet or if you are barefoot.
• Always plug into a power surge bar.
• Fill up the boiler with water before starting up the appliance. Be sure to unplug the appliance before pouring
water in to the tank.
• When filling the boiler, always use the funnel (11) and measuring cup (12) provided.
• Turn on the appliance only when it is in working position.
• The appliance may give out a little smoke when used for the first time. This transitory effect is perfectly normal
and is due to the fact that some of components have been slightly lubricated.
• The appliance may give out a little water when used for the first time, because it has to be primed.
• During use, rest the appliance onto a horizontal surface lying soleplate down on Teflon resting pad.
• Never leave the appliance unattended when it is connected to the power supply.
• The appliance must be used and placed on a stable surface.
• When Placing the iron on it’s stand, ensure that the surface on which the stand is places is stable.
• When you have finished ironing and when you have to go away for a short while, remember to unplug the iron
from the socket-outlet.
• Pressing the steam button before the iron has reached the optimum temperature may cause water to leak from
the steam holes.
• Always ensure grey dial around steam button is turned fully to the left (off position) at all times.
• The appliance is not to be used if it has been dropped, if there are visible sign of damage or if it is leaking. To
prevent any accident, all repairs, including, the replacement of the power cord, must be carried out by an
Authorized Service Centre or, in any case, by qualified personnel, in order to avoid any risk.
• Do not expose the appliance to atmospheric agents (rain, sun...).
• Never try to iron garments being worn.
• Do not touch the metal parts, the hot water or the steam when the iron is in operation and for several minutes
after it is turned off since it could cause burns.
• Do not aim the jet of steam towards parts of the body or pets.
• We suggest you keep the original box and packaging, as our free-of-charge service does not cover any damage
resulting from inadequate packaging of the product when this is sent back to an Authorized Service Centre.
• Remove any labels and protections from the soleplate before using the appliance for the first time.
• Always unwind the power code before use.
• The use of extensions not approved by the manufacturer can result in damage to property and personal injury.
CAREFULLY
IMPORTANT WARNINGS
DANGER FOR CHILDREN
DANGER DUE TO ELECTRICITY
DANGER OF DAMAGE ORIGINATING FROM OTHER CAUSES
WARNING OF BURNS
WARNING - MATERIAL DAMAGE

• If an extension cord is absolutely necessary, a 10 ampere (Europe) or 15 ampere (America) cord should
be used. Cords rated for less amperage may overheat. Care should be taken to arrange the cord so that it
cannot be pulled or tripped over.
• Do not use sparkling (carbonated) water. If your water supply is very hard, we suggest you use demineralised
water instead.
• When the iron is hot, do not rest it onto the connecting cable or the power cord. Take special care in ensuring
that the cable and the cord do not come into contact with the soleplate when it is hot.
• Do not pull the power cord to unplug the appliance.
• The appliance must only be cleaned with a soft, slightly damp cloth after unplugging the iron and allowing all its
parts to cool down. Never use solvents which may damaged the plastic parts.
• Clean the boiler at least every three months so as to eliminate any residue of time that could jeopardize proper
operation of the appliance.
• Do not pour descalers or other scented substances into the tank; under penalty of immediate cancellation of the
warranty.
• Do not wrap the power cord around the soleplate when the iron is hot.
• Do not put the soleplate in contact with metal surfaces.
• The boiler cap contains a safety device (set so that it triggers in the event of excess pressure in the boiler) and
must only replaced with an original spare part.
• To maintain the iron in good working order, disconnect the plug from the outlet at the end of every ironing
session, discharge the inside pressure by turning the grey dial around the steam button to the right until all
steam is released. Unscrew the safety cap and let the residual water in the tank evaporate. Empty the boiler.
• We decline any responsibility resulting from misuse or any use other than those covered in this booklet.
SAVE THESE INSTRUCTIONS IN A SAFE PLACE
AT ALL TIMES
Notes: when using the iron for the first time, test it on an old piece of fabric to ensure that the soleplate and the
water tank are completely clean.
DESCRIPTION OF THE APPLIANCE (FIG. A)
1 - Safety Cap
2 - Steam Control Knob
3 - Cap Remover
4 - Steam Push Button
5 - Ready Light
6 - Power Cord
7 - Temperature Regulator
8 - Soleplate
9 - Boiler
10 - Teflon Iron Resting Pad
11 - Funnel
12 - Measuring Jug
HOW TO USE AS STEAM IRON (AS DEMONSTRATED)
FILLING WITH WATER BEFORE IRONING
- Make sure that the iron is disconnected from the power supply before filling.
- Place the iron on the iron base (10) in a horizontal position and use the provided measuring jug (12) and funnel
(11) to fill the boiler. see Fig. B
- ENSURE THAT THE AMOUNT OF WATER NEVER EXCEEDS 210ml or 3/4 cup of water, that is the exact
amount indicated on the measuring jug; if the amount in the boiler tank is greater that 210ml water may leak
and/or spurt from the iron’s plate at the beginning of the ironing session.
- Do not fill the boiler tank with chemical additives or other perfuming or decalcification agents.
- Pour any remaining water out after use.

BEFORE IRONING
Ensure that the safety cap on the boiler is well tightened. Turn the cap until it stops and then tighten slightly
without applying too much strength to avoid breaking the gasket, which would cause the steam to leak out.
HOW TO PRIME THE BOILER
- Fill with water using measuring cup.
- Wait until light turns off.
- Turn grey dial fully to right (continuous steam).
- Wait until the reservoir is empty and steam runs out.
- If you see excessive water during priming it is normal.
HOW TO START THE APPLIANCE
- Insert the plug into the outlet. Turn the thermostat to the #9 position, as shown in figure C.
- When the ready light (5) goes on the iron is heating up.
- Wait for 4-5 minutes until the warning light goes off.
- Now you may start to steam iron.
- If light goes back on while ironing, continue ironing.
STEAM IRONING
You may use this iron in a vertical position when smoothing out hanging clothes or on the board.
STEAM OUTFLOW
The steam outflow may be DISCONTINUOUS or CONTINUOUS.
- DISCONTINUOUS STEAM: The Steam Control Knob (2) must be turned counter-clockwise. Press the push
button (4) shown in figure D by applying more or less strength according the amount of steam desired. This will
provide the best results.
- CONTINUOUS STEAM: Turn the Steam Control Knob clockwise as shown in figure E to obtain a constant and
continuous steam. Maximum intensity can also be obtained in the DISCONTINUOUS outflow by fully pushing the
steam push button (4).
- Never overturn the iron or tilt it forward or laterally while it is being used either in the discontinuous or continuos
mode.
- Continuous steam is mainly used for draining water when iron is till hot.
We recommended you use the iron in the DISCONTINUOUS mode as you will use the least amount of
water and will get the most powerful steam in this mode.
ATTENTION
ALWAYS stop the steam out flow before resting the iron on the separate base (10).
NEVER unscrew the safety cap (1) while the iron is being used. Always turn the iron off first. Removing the plug
from the outlet (4) to use continuous steam to let out all the residual steam.
HOW TO FILL THE BOILER WHILE THE APPLIANCE IS BEING USED
If you need to fill the boiler during an ironing, the following operations should be carried out:
- Remove the plug from the outlet.
- Fully press the push button (4) to let out all residual steam
- Unscrew the safety cap (1) this operation is made easier with the safety cap remover supplied.
- SLOWLY pour a small amount of water into the boiler tank 2-3 times to allow the steam to come out of the
filling tube. Then fill the boiler as usual.
- Screw the safety cap on tightly.
- Insert the plug into the outlet.
- Steam will recommence after a short time.
Remember that the amount of water to be poured into the boiler tank while the iron is being used should
not exceed 210ml or 3/4 cup as indicated on the measuring jug. To ensure the right quantity of water is
poured into the boiler tank, always drain the tank before refilling.
TIPS AND SUGGESTIONS FOR STEAM IRONING
- When using a vertical (hanging) position gently skim fabric (lightly touch) with iron while pushing and releasing
white steam button. Ideal for all clothing while hanging or draperies while hanging.
-Remember steam can also be used on delicate fabrics.
- Crease lines for pants/slacks are best done on the ironing board for a nice sharp crease.
- No pressing cloth is required.
DRY IRONING (NOT AS DEMONSTRATED)
- First make sure that there is no water in the boiler tank or stop the steaming by completely turning the steam
control knob (2) in a counter-clockwise direction.
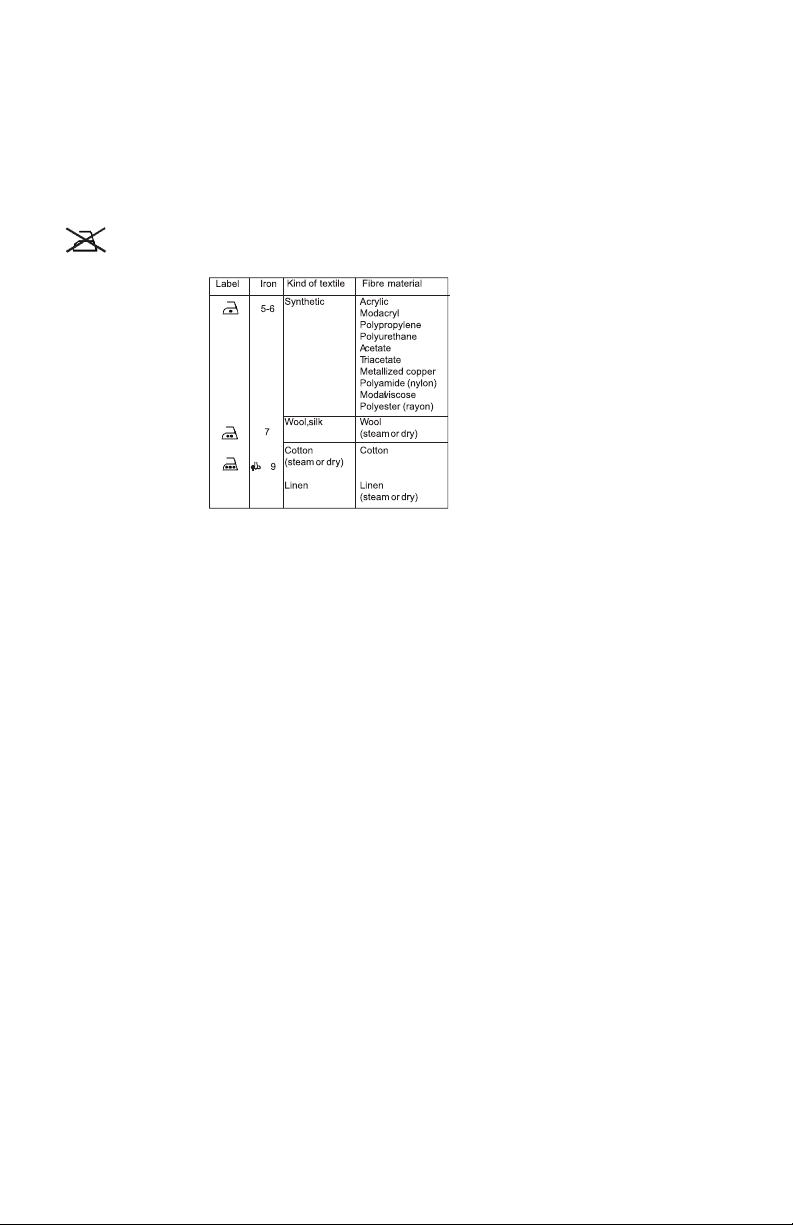
- Select the temperature best suited for the fabric by means of the thermostat knob. Fig. C. Refer to the table
below.
Note: This symbol on label means: this article cannot be ironed! (e.g. chlorofibre, elastodiene).
DRY IRONING CHART
HOW TO STORE EUROSTEAM EVOLUTION IRON
- Switch off the iron by turning the thermostat knob to “MIN”.
- Disconnect the plug from the outlet.
- Let out all the residual steam by using continuous steam.
- Let the iron cool down.
- Unscrew the safety cap (1) by means of the provided cap remover (3), overturn the iron and pour any remaining
water out of the boiler (Fig. F). Be careful of the hot water to avoid burns. This allows to always keep the boiler
tank well clean.
- When putting away the appliance at the end of the ironing session, do not screw the safety cap (1) down
completely but only by 3-4 turns.
- Turn the steam control knob in an anticlockwise direction until it stops, fully to the left side.
CLEANING
We suggest that these operations be carried out when water drops leaking out the soleplate are noticed, and in
any case every 3 months.
- To clean reservoir, pour equal portions of white vinegar and demineralized water into measuring cup, plug iron
in and leave cap off. The vinegar and water will boil in reservoir for 5-10 minutes.
- Empty the reservoir and refill with water. Give a good shake and empty water out.
Soleplate
- Before cleaning the iron, ensure that it is disconnected from the power supply and has completely cooled down.
- Do not use abrasives on the soleplate.
- Deposits and other residues on the soleplate can be removed with a rough cloth soaked in a vinegar and water
solution.
- Keep the soleplate smooth: avoid contact with hard and metal objects.
Boiler Tank
- Pour 1/4 cup vinegar and 1/4 cup distilled water into the boiler tank.
- Plug into outlet and set the thermostat control #9 setting.
- Let sit for 4-5 minutes, ans shake vigorously.
- Let cool for 10 minutes, push the steam push button until no more steam comes out and then unscrew and
empty.
This may need to be done several times depending on how long since last cleaning and type of water used.

Problem Question Solution
TROUBLESHOOTING
The iron doesn’t make steam Have you put the water in the boiler?
Have you plugged the iron in?
Is the knob on the max temperature?
Is the knob hard or locked or already in
the max position?
Is the iron horizontal on the iron support?
Is the lamp on?
Have you waited for the lamp to switch on
and off for at least three times?
Is the iron warming up?
Does the steam button work?
Is the steam wet?
Is the knob hard or locked or already in
the max position?
Have you pressed the steam push button
or turned the steam knob?
Are there leakages from the iron plate?
Are there some steam leakage from the
iron body with the steam regulator in
OFF position?
Is the cap well screwed?
The iron makes a low quantity
steam
The iron handle is warm and there are
some steam leakages
Steam leakage from the cap
Put the water in the boiler
Plug the iron in
Rotate the knob to the max position
Contact an Authorized Service Centre
Put the iron horizontal on the iron support
Contact an Authorized Service Centre
Wait for the lamp to switch on and off
at least three times
Contact an Authorized Service Centre
Rotate the knob to the max position
Contact an Authorized Service Centre
Contact an Authorized Service Centre
Contact an Authorized Service Centre
Contact an Authorized Service Centre
Contact an Authorized Service Centre
Table of contents
Other EuroSteam Iron manuals


