manuals.online logo
Brands
  1. Home
  2. •
  3. Brands
  4. •
  5. Eurotherm Drives
  6. •
  7. DC Drive
  8. •
  9. Eurotherm Drives 512C/08 User manual

Eurotherm Drives 512C/08 User manual

(8527+(50
'5,9(6
845&#6HULHV
3URGXFW#0DQXDO
+$6;<4<9##,VVXH#9
#&RS\ULJKW#(XURWKHUP#'ULYHV#/LPLWHG#4<<<
All rights strictly reserved. No part of this document may be stored in a retrieval system, or transmitted in any form or
by any means to persons not employed by a Eurotherm group company without written permission from Eurotherm
Drives Ltd.
Although every effort has been taken to ensure the accuracy of this document it may be necessary, without notice, to
make amendments or correct omissions. Eurotherm Drives cannot accept responsibility for damage, injury, or expenses
resulting therefrom.
&RQW15
:$55$17<
Eurotherm Drives warrants the goods against defects in design, materials and workmanship
for the period of 12 months from the date of delivery on the terms
detailed in Eurotherm Drives Standard Conditions of Sale IA058393C.
Eurotherm Drives reserves the right to change the content and product specification without notice.
&RQW16
5HTXLUHPHQWV
,03257$17=# 3OHDVH#UHDG#WKLV#LQIRUPDWLRQ#%()25(#LQVWDOOLQJ#WKH#HTXLSPHQW1
,QWHQGHG#8VHUV
This manual is to be made available to all persons who are required to install, configure or
service equipment described herein, or any other associated operation.
The information given is intended to highlight safety issues, and to enable the user to obtain
maximum benefit from the equipment.
Complete the following table for future reference detailing how the unit is to be installed and
used.
,167$//$7,21#'(7$,/6
Serial Number
(see product label)
Where installed
(for your own
information)
Unit used as a:
(refer to Certification
for the Inverter)
RComponent RRelevant Apparatus
Unit fitted: REnclosure
$SSOLFDWLRQ#$UHD
The equipment described is intended for industrial motor speed control utilising DC Shunt
Wound or DC Permanent Magnet Motors.
3HUVRQQHO
Installation, operation and maintenance of the equipment should be carried out by qualified
personnel. A qualified person is someone who is technically competent and familiar with all
safety information and established safety practices; with the installation process, operation and
maintenance of this equipment; and with all the hazards involved.
$
6DIHW\#,QIRUPDWLRQ
&RQW17
+D]DUGV
:$51,1*$#
7KLV#HTXLSPHQW#FDQ#HQGDQJHU#OLIH#WKURXJK#URWDWLQJ#PDFKLQHU\#DQG#KLJK#YROWDJHV1
)DLOXUH#WR#REVHUYH#WKH#IROORZLQJ#ZLOO#FRQVWLWXWH#DQ#(/(&75,&$/#6+2&.#+$=$5'1
• The equipment must be permanently earthed due to the high earth leakage current.
• The drive motor must be connected to an appropriate safety earth.
• Never perform high voltage resistance checks on the wiring without first disconnecting the
drive from the circuit being tested.
• When replacing a drive in an application and before returning to use, it is essential that all
user defined parameters for the product’s operation are correctly installed.
• This equipment contains electrostatic discharge (ESD) sensitive parts. Observe static
control precautions when handling, installing and servicing this product.
,03257$17=# 0HWDO#SDUWV#PD\#UHDFK#D#WHPSHUDWXUH#RI#<3#GHJUHHV#FHQWLJUDGH#LQ#RSHUDWLRQ1
$SSOLFDWLRQ#5LVN
The specifications, processes and circuitry described herein are for guidance only and may need
to be adapted to the user’s specific application.
Eurotherm Drives does not guarantee the suitability of the equipment described in this Manual
for individual applications.
5LVN#$VVHVVPHQW
Under fault conditions, power loss or other operating conditions not intended, the equipment
may not operate as specified. In particular:
• The motor speed may not be controlled
• The direction of rotation of the motor may not be controlled
• The motor may be energised
*XDUGV
The user must provide guarding and /or additional safety systems to prevent risk of injury and
electric shock.
3URWHFWLYH#,QVXODWLRQ
• All control and signal terminals are SELV, i.e. protected by double insulation. Ensure all
wiring is rated for the highest system voltage.
1RWH=# 7KHUPDO#VHQVRUV#FRQWDLQHG#ZLWKLQ#WKH#PRWRU#PXVW#EH#GRXEOH#LQVXODWHG1
• All exposed metalwork in the Inverter is protected by basic insulation and bonding to a
safety earth.
5&'V
These are not recommended for use with this product but ,where their use is mandatory, only
Type B RCDs should be used.
$
6DIHW\#,QIRUPDWLRQ
&RQWHQWV
&RQWHQWV##############################################################################################################3DJH
&RQW18
&KDSWHU#4 *(77,1*#67$57('
,QWURGXFWLRQ 11111111111111111111111111111111111111111111111111111111111111111111111111111111111111111111111111 404
2SWLRQDO#(TXLSPHQW 11111111111111111111111111111111111111111111111111111111111111111111111111111111111111111111111111404
(TXLSPHQW#,QVSHFWLRQ11111111111111111111111111111111111111111111111111111111111111111111111111111111111 404
$ERXW#WKLV#0DQXDO 1111111111111111111111111111111111111111111111111111111111111111111111111111111111111111 405
,QLWLDO#6WHSV1111111111111111111111111111111111111111111111111111111111111111111111111111111111111111111111111111111111111111405
+RZ#WKH#0DQXDO#LV#2UJDQLVHG 11111111111111111111111111111111111111111111111111111111111111111111111111111111111405
&KDSWHU#5 $1#29(59,(:#2)#7+(#&219(57(5
&RPSRQHQW#,GHQWLILFDWLRQ11111111111111111111111111111111111111111111111111111111111111111111111111111 504
8QGHUVWDQGLQJ#WKH#3URGXFW#&RGH11111111111111111111111111111111111111111111111111111111111111111 505
&KDSWHU#6 ,167$//,1*#7+(#&219(57(5
0HFKDQLFDO#,QVWDOODWLRQ 11111111111111111111111111111111111111111111111111111111111111111111111111111111 604
0RXQWLQJ#WKH#&RQYHUWHU 111111111111111111111111111111111111111111111111111111111111111111111111111111111111111111111605
• )LOWHU#,QVWDOODWLRQ 1111111111111111111111111111111111111111111111111111111111111111111111111111111111111605
(OHFWULFDO#,QVWDOODWLRQ111111111111111111111111111111111111111111111111111111111111111111111111111111111111 607
5HFRPPHQGDWLRQV 11111111111111111111111111111111111111111111111111111111111111111111111111111111111111111111111111111607
&KDSWHU#7 23(5$7,1*#7+(#&219(57(5
3UH0,QVWDOODWLRQ#3ODQQLQJ11111111111111111111111111111111111111111111111111111111111111111111111111111 704
%DVLF#:LULQJ#'LDJUDPV 1111111111111111111111111111111111111111111111111111111111111111111111111111111111111111111111704
• %DVLF#&RQQHFWLRQ 111111111111111111111111111111111111111111111111111111111111111111111111111111111111704
6HWWLQJ08S#)#&RPPLVVLRQLQJ 11111111111111111111111111111111111111111111111111111111111111111111111 705
2SWLRQ#6ZLWFKHV111111111111111111111111111111111111111111111111111111111111111111111111111111111111111111111111111111111705
• 6SHHG#)HHGEDFN#6FDOLQJ 1111111111111111111111111111111111111111111111111111111111111111111111111705
• 6SHHG#)HHGEDFN#6RXUFH 11111111111111111111111111111111111111111111111111111111111111111111111111705
• =HUR#2XWSXW#6RXUVH 11111111111111111111111111111111111111111111111111111111111111111111111111111111705
• &XUUHQW#6FDOLQJ111111111111111111111111111111111111111111111111111111111111111111111111111111111111111705
• &XUUHQW#0RWRU#6FDOLQJ11111111111111111111111111111111111111111111111111111111111111111111111111111706
3RWHQWLRPHWHUV11111111111111111111111111111111111111111111111111111111111111111111111111111111111111111111111111111111111706
%DVLF#6HWWLQJ08S#3URFHGXUH11111111111111111111111111111111111111111111111111111111111111111111111111 707
• &RQWUROOHU11111111111111111111111111111111111111111111111111111111111111111111111111111111111111111111111707
• 0RWRU 11111111111111111111111111111111111111111111111111111111111111111111111111111111111111111111111111111707
3UHSDUDWLRQ 111111111111111111111111111111111111111111111111111111111111111111111111111111111111111111111111111111111111111707
• 0DFKLQH 1111111111111111111111111111111111111111111111111111111111111111111111111111111111111111111111111707
• &RQWUROOHU11111111111111111111111111111111111111111111111111111111111111111111111111111111111111111111111707
• 3RZHU08S 11111111111111111111111111111111111111111111111111111111111111111111111111111111111111111111111708
&RQWHQWV
&RQWHQWV##############################################################################################################3DJH
&RQW19
&KDSWHU#8 /('#,1',&$7,216
/('#,QGLFDWLRQV111111111111111111111111111111111111111111111111111111111111111111111111111111111111111111111 804
&KDSWHU#9 7(50,1$/#'(6&5,37,216
7HUPLQDO#'HVFULSWLRQV 1111111111111111111111111111111111111111111111111111111111111111111111111111111111 904
&RQWURO#7HUPLQDOV111111111111111111111111111111111111111111111111111111111111111111111111111111111111111111111111111111904
3RZHU#7HUPLQDOV11111111111111111111111111111111111111111111111111111111111111111111111111111111111111111111111111111111905
)LHOG#7HUPLQDOV#+$X[LOLDU\#6XSSO\, 1111111111111111111111111111111111111111111111111111111111111111111111111111111905
&KDSWHU#: )$8/7#),1',1*
7URXEOHVKRRWLQJ 1111111111111111111111111111111111111111111111111111111111111111111111111111111111111111111 :04
&KDSWHU#; 5287,1(#0$,17(1$1&(#$1'#5(3$,5
5RXWLQH#0DLQWHQDQFH 11111111111111111111111111111111111111111111111111111111111111111111111111111111111 ;04
5HSDLU11111111111111111111111111111111111111111111111111111111111111111111111111111111111111111111111111111111111 ;04
5HWXUQLQJ#WKH#8QLW#WR#(XURWKHUP#'ULYHV 11111111111111111111111111111111111111111111111111111111111111111111111;04
'LVSRVDO11111111111111111111111111111111111111111111111111111111111111111111111111111111111111111111111111111111111111111111;04
&KDSWHU#< 5(3/$&(0(17#2)#845#:,7+#845&
845&2845#7HUPLQDO#'LIIHUHQFHV11111111111111111111111111111111111111111111111111111111111111111111 <04
)XQFWLRQDO#'LIIHUHQFHV#845&#)#845 11111111111111111111111111111111111111111111111111111111111111 <05
&KDSWHU#43 %/2&.#',$*5$0
%ORFN#'LDJUDP11111111111111111111111111111111111111111111111111111111111111111111111111111111111111111111 4304
&KDSWHU#44 7(&+1,&$/#63(&,),&$7,216
(QYLURQPHQWDO#5HTXLUHPHQWV111111111111111111111111111111111111111111111111111111111111111111111 4404
2SHUDWLQJ#&RQGLWLRQV 111111111111111111111111111111111111111111111111111111111111111111111111111111111 4404
• 7HUPLQDO#7LJKWHQLQJ#7RUTXHV 111111111111111111111111111111111111111111111111111111111111111114405
(OHFWULFDO#5DWLQJV1111111111111111111111111111111111111111111111111111111111111111111111111111111111111111111111111111114406
&KDSWHU#45 &(57,),&$7,21#)25#7+(#&219(57(5
(0&#DQG#WKH#*&(*#0DUN11111111111111111111111111111111111111111111111111111111111111111111111111111111 4504
*&(*#(0&#5HVSRQVLELOLW\ 111111111111111111111111111111111111111111111111111111111111111111111111111111111111111111114504
6SHFLDO#&RQVLGHUDWLRQV#IRU#,QVWDOODWLRQV#5HTXLULQJ#&RPSOLDQFH#ZLWK#8/#6WDQGDUGV 1111114506
&HUWLILFDWHV 111111111111111111111111111111111111111111111111111111111111111111111111111111111111111111111111111111111111114507
*HWWLQJ#6WDUWHG##404
845&#&RQYHUWHU
4#
*(77,1*#67$57('
,QWURGXFWLRQ
The 512C converter is intended for use in an Industrial Environment, it should be mounted
within an enclosure which provides protection to the converter and the user.
The converter should be permanently earthed at the terminals provided.
The 512C converter is suitable for the control of Permanent Magnet and Shunt Wound DC
Motors.
The converters are designed to operate from a single phase ac mains supply in the range of
110Vac to 415Vac at 50 or 60Hz. A simple transformer tap arrangement allows the converter to
be programmed to suit the applied voltage.
The Speed of the DC Motor is controlled using a linear closed loop system with a feedback
signal from either tachogenerator or armature voltage, the feedback source being switch
selectable.
A current loop within the speed loop always ensures that controlled levels of current are applied
to the motor, actual levels being scaleable via programmable switches.
Motor protection is provided by a Stall detection circuit which will remove current from the
motor after approximately 60 seconds.
Converter protection is provided by a Instantaneous Overcurrent trip circuit overriding control
in the event of a Short Circuit.
2SWLRQDO#(TXLSPHQW
,WHP
,WHP,WHP
,WHP 3DUW#1XPEHU
3DUW#1XPEHU3DUW#1XPEHU
3DUW#1XPEHU
8/#&RPSUHVVLRQ#/XJ#.LWV
6HH#SDJH#4516#IRU#PRUH#LQIRUPDWLRQ1
/$6;<:788349
/$6;<:788365
(0&#,QVWDOODWLRQ#*XLGHOLQHV#IRU#0RGXOHV#DQG#6\VWHPV
$#(XURWKHUP#'ULYHV#DSSOLFDWLRQ#PDQXDO#GHWDLOLQJ#(0&#UHTXLUHPHQWV
+$6;;;:<
([WHUQDO#$&#6XSSO\#+5),,#)LOWHU
)RU#845&#XQLWV#ZLWKRXW#LQWHUQDO#ILOWHUV/#RQ#FDEOH#UXQV#LQ#H[FHVV#RI#58
PHWUHV
5HIHU#WR#&KDSWHU#6
IRU#3DUW#1XPEHUV
)XVH#,VRODWRU#.LW
+LJK#VSHHG#VHPL0FRQGXFWRU#IXVHV#DUH#UHFRPPHQGHG1
6HH#WDEOH#4414#IRU#SDUW
QXPEHUV1
Table 1-1 Optional Equipment
(TXLSPHQW#,QVSHFWLRQ
• Check for signs of transit damage
• Check the product code on the rating label conforms to your requirement.
If the unit is not being installed immediately, store the unit in a well-ventilated place away from
high temperatures, humidity, dust, or metal particles.
Refer to Chapter 2: “An Overview of the Converter” to check the rating label/product code.
Refer to Chapter 8: “Routine Maintenance and Repair” for information on returning damaged
goods.
Refer to Chapter 11: "Technical Specifications" - Environmental Details for the storage
temperature.
405##*HWWLQJ#6WDUWHG
845&#&RQYHUWHU
$ERXW#WKLV#0DQXDO
This manual is intended for use by the installer of the 512C converter. It assumes a reasonable
level of understanding in these disciplines.
1RWH=# 3OHDVH#UHDG#DOO#6DIHW\#,QIRUPDWLRQ#EHIRUH#SURFHHGLQJ#ZLWK#WKH#LQVWDOODWLRQ#DQG#RSHUDWLRQ
RI#WKLV#XQLW1
Enter the “Model No” from the rating label into the table at the front of this manual. It is
important that you pass this manual on to any new user of this unit.
This manual is for the following models from the 512C Converter Series:
512C/04 4A DC Full Load Current
512C/08 8A DC Full Load Current
512C/16 16A DC Full Load Current
512C/32 32A DC Full Load Current
,QLWLDO#6WHSV Use the manual to help you plan the following:
,QVWDOODWLRQ
Know your requirements:
• certification requirements, CE/UL/CUL conformance
• mount in an enclosure
• conformance with local installation requirements
• supply and cabling requirements
+RZ#WKH#0DQXDO#LV#2UJDQLVHG
The manual is divided into chapters and paragraphs. Page numbering restarts with every chapter,
i.e. 5-3 is Chapter 5, page 3.
$Q#2YHUYLHZ#RI#WKH#&RQYHUWHU##504
845&#&RQYHUWHU
5#
$1#29(59,(:#2)#7+(#&219(57(5
&RPSRQHQW#,GHQWLILFDWLRQ
512C
HEALTH LEDS POTENTIOMETERS SWITCHES
CONTROL TERMINAL BLOCK
TRANSFORMER
TAPPING LINK
POWER TERMINALS
FIELD TERMINALS
& AUXILIARY SUPPLY
HEATSINK
LEGEND
PLATE
CONTROL
FIXING
POINTS
PCB
PROTECTIVE
GROUND
P1 P8
18
ON
123LED
LED1 - STALL TRIP
LED2 - POWER ON
LED3 - OVERCURRENT TRIP
P1 - RAMP UP
P2 - RAMP DOWN
P3 - SPEED STABILITY
P4 - CURRENT LIMIT
P5 - IR COMPENSATION
P6 - MINIMUM SPEED
P7 - MAXIMUM SPEED
P8 - ZERO SPEED OFFSET
MAINS OR
AUXILIARY
SUPPLY
AUX MAINS
380/415V 220/240V 110/120V
SELECTOR
Figure 2-1 View of Component Parts
505##$Q#2YHUYLHZ#RI#WKH#&RQYHUWHU
845&#&RQYHUWHU
&RQWURO#)HDWXUHV
6SHHG
6SHHG6SHHG
6SHHG
&RQWURO
&RQWURO&RQWURO
&RQWURO
&RQWURO#$FWLRQ &ORVHG#/RRS#ZLWK#3URSRUWLRQDO#,QWHJUDO#&RQWURO
DQG#$GMXVWDEOH#6WDELOLW\
6SHHG#)HHGEDFN $UPDWXUH#9ROWDJH 7DFKRJHQHUDWRU
433(#/RDG#5HJXODWLRQ 5#(#7\SLFDO 314#(#7\SLFDO
0D[LPXP#7RUTXH26SHHG
5DQJH
53=4 433=4
2YHUORDG 483(#IRU#93#VHFRQGV1
7RUTXH
7RUTXH7RUTXH
7RUTXH &RQWURO#$FWLRQ &ORVHG#/RRS#ZLWK#3URSRUWLRQDO#,QWHJUDO#&RQWURO
&RQWURO
&RQWURO&RQWURO
&RQWURO $FFXUDF\ 5#(
2YHUVSHHG ,QKHUHQW
2YHUORDG 1RQH#433(#&RQWLQXRXV#+FRQVLGHUDWLRQ#PXVW#EH
JLYHQ#WR#PRWRU#ZKHQ#RSHUDWLQJ#DW#ORZ#VSHHG,
,QSXWV2
,QSXWV2,QSXWV2
,QSXWV2
2XWSXWV
2XWSXWV2XWSXWV
2XWSXWV
$QDORJXH#,QSXWV 6HWSRLQW#5DPS 3#WR#.439433.RKP
$X[LOLDU\#6SHHG
6HWSRLQW
3#WR#.439433.RKP
&XUUHQW#/LPLW 3#WR#.:18983.RKP
7DFKRJHQHUDWRU
,QSXW
3#WR
.6839GF
443.RKP
$QDORJXH#2XWSXWV 6SHHG 3#WR#.4398P$
&XUUHQW
+6:;#2II,
3#WR#.89
+3#WR#,GF,
8P$
&XUUHQW
+6:;#2Q,
3#WR#.89
+3#WR#,FDO,
8P$
6HWSRLQW#5DPS 3#WR#.4398P$
7RWDO#6HWSRLQW 3#WR#.4398P$
.439#5HIHUHQFH .4398P$
0439#5HIHUHQFH 0#4398P$
'LJLWDO#,QSXWV 5XQ .43#WR
.579
433.RKP
6WDOO#2YHUULGH .43 433.RKP
'LJLWDO#2XWSXWV +HDOWK .57983P$
6RXUFH
=HUR#6SHHG#RU
6HWSRLQW
.57983P$
6RXUFH
$Q#2YHUYLHZ#RI#WKH#&RQYHUWHU##506
845&#&RQYHUWHU
8QGHUVWDQGLQJ#WKH#3URGXFW#&RGH
The unit is fully identified using a five block alphanumeric code which records how the
Converter was calibrated, and its various settings when despatched from the factory.
The Product Code appears as the “Model No.”. Each block of the Product Code is identified as
below:
%ORFN
1R1
9DULDEOH 'HVFULSWLRQ
4 845& *HQHULF#SURGXFW
5;; 7ZR#QXPEHUV#VSHFLI\LQJ#WKH#FXUUHQW#RXWSXW/#IRU#H[DPSOH=
37 7$PS
3; ;$PS
49 49$PS
65 65$PS
6;; 7ZR#QXPEHUV#VSHFLI\LQJ#PHFKDQLFDO#SDFNDJH#LQFOXGLQJ#OLYHU\#DQG
PHFKDQLFDO#SDFNDJH#VW\OH/#DQG#DQ\#RSWLRQ#LQVWDOOHG#RYHU#DQG#DERYH#WKH
VWDQGDUG#IHDWXUHV#RI#WKH#SURGXFW=
7ZR#QXPEHUV /LYHU\
33 6WDQGDUG#(XURWKHUP#'ULYHV#OLYHU\
340<< 'HILQHG#FXVWRPHU#OLYHULHV
7;; 7ZR#QXPEHUV#VSHFLI\LQJ#WKH#FRYHU=
,333#2SHQ#)UDPH
8;; 7ZR#QXPEHUV#VSHFLI\LQJ#WKH#VSHFLDO#RSWLRQV=
33 6WDQGDUG
34#0#<< 'RFXPHQWHG#6SHFLDO#2SWLRQV
507##$Q#2YHUYLHZ#RI#WKH#&RQYHUWHU
845&#&RQYHUWHU
604,QVWDOOLQJ#WKH#&RQYHUWHU
845&#&RQYHUWHU
6#
,167$//,1*#7+(#&219(57(5
,03257$17=# 5HDG#&KDSWHU#45=##%&HUWLILFDWLRQ#IRU#WKH#&RQYHUWHU%#EHIRUH#LQVWDOOLQJ#WKLV#XQLW1
0HFKDQLFDO#,QVWDOODWLRQ
512C
(8527+(50
'5,9(6
A
C
C
B
D
E
F
G
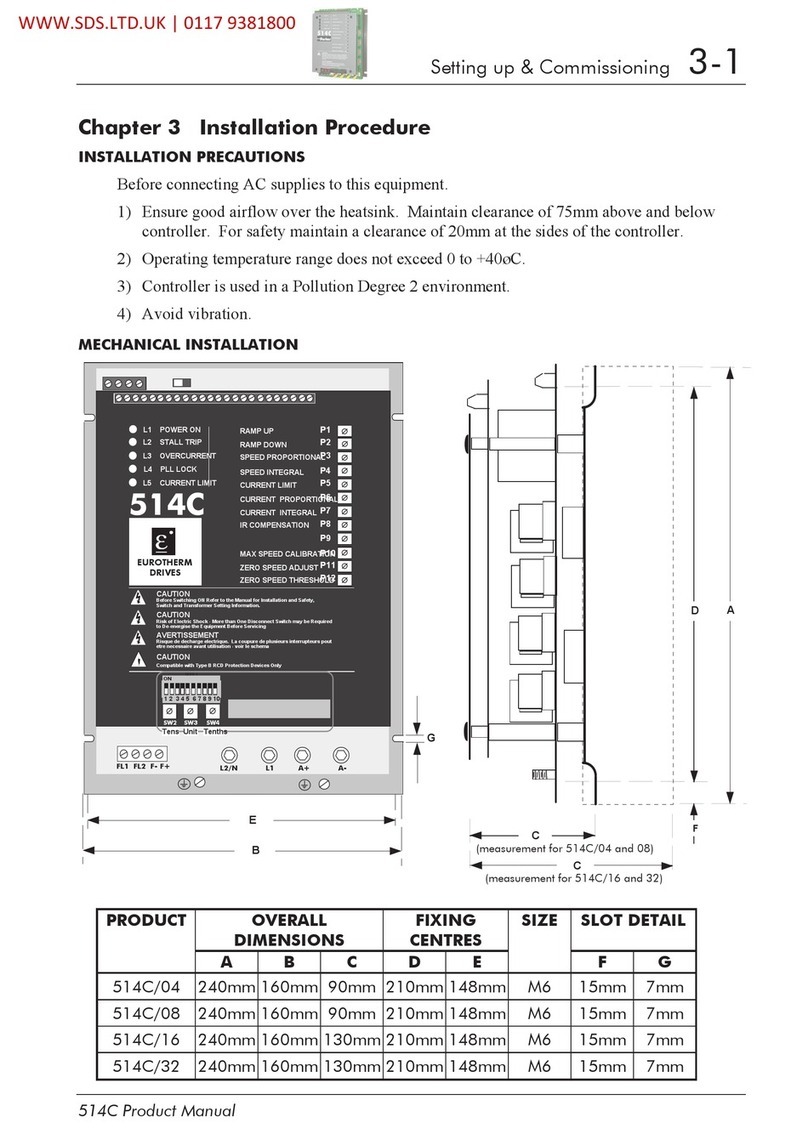
352'8&7 29(5$//
',0(16,216
),;,1*
&(175(6
6,=( 6/27#'(7$,/
$%&'( )*
845&237 573PP 493PP <3PP 543PP 47;PP 0948PP :PP
845&23; 573PP 493PP <3PP 543PP 47;PP 0948PP :PP
845&249 573PP 493PP <3PP 543PP 47;PP 0948PP :PP
845&265 573PP 493PP 463PP 543PP 47;PP 0948PP :PP
Table 3.1 Product Dimensions
,QVWDOOLQJ#WKH#&RQYHUWHU
#
605
845&#&RQYHUWHU
0RXQWLQJ#WKH#&RQYHUWHU
Before connecting AC supplies to this equipment:
• Ensure good airflow over the heatsink. Maintain clearance of 75mm above and below
controller. For safety maintain a clearance of 20mm at the sides of the controller.
• Operating temperature range does not exceed 0 to +40¡C.
• Controller is used in a Pollution Degree 2 environment.
• Avoid vibration.
)LOWHU#,QVWDOODWLRQ
L1 L2PE PE
LINE
LOAD
4 Holes M6 Insert
4 Holes M6 Clearance
230mm Leads
M5 Ring Lugs
A
B
C
D
L
W
E
H
PE L1 L2
Black
Red
Green
/Yellow
3URGXFW )LOWHU :DWW
/RVV
2YHUDOO#'LPHQVLRQV )L[LQJ
&HQWUHV
3URGXFW
)L[LQJ
7HUPLQDO
/:+( $%&'
845&237 &26;<446 4;:597 498 78 573 586 453 543 47; 7PP5
845&23; &26;<446 4;:597 498 78 573 586 453 543 47; 7PP5
845&249 &26;<446 4;:597 498 78 573 586 453 543 47; 7PP5
845&265 &26;<447 69:597 498 :3 573 586 453 543 47; 9PP5
Table 3.2 Filter Installation Information
606,QVWDOOLQJ#WKH#&RQYHUWHU
845&#&RQYHUWHU
02725 • Ensure motor is mechanically secure and mounted according to manufacturers specifications
and practice.
• Inspect brush gear, ensure commutator is in good condition and brushes are free to move in
brush box and in good condition.
• Check obstructions in motor vents to maintain cooling air path.
• Ensure motor choke (if specified) is correctly wired.
• Ensure motor is free to rotate and that pulleys and couplings are correctly aligned.
• Ensure transit damage has not occurred to motor windings or connections. Disconnect the
controller before carrying out electrical measurement e.g. insulation resistance.
845&237 845&23; 845&249 845&265
2YHUDOO#:LGWK 493PP
2YHUDOO#+HLJKW 573PP
2YHUDOO#'HSWK <3PP <3PP <3PP 463PP
:HLJKW 418.J 418.J 419.J 51<.J
$LUIORZ#&OHDUDQFH :8PP#DERYH#DQG#EHORZ
0RXQWLQJ#&HQWUHV 543PP#YHUWLFDO#[#47;PP#KRUL]RQWDO
&RQWURO#7HUPLQDOV 6FUHZ#7HUPLQDOV#ZLOO#DFFHSW#518PP5##VWUDQGHG#ZLUH1
7HUPLQDO#7LJKWHQLQJ#7RUTXH##319#1P/#718#OEI0LQ
)LHOG#7HUPLQDOV 6FUHZ#WHUPLQDOV#ZLOO#DFFHSW#7PP5#VWUDQGHG#ZLUH1
7HUPLQDO#7LJKWHQLQJ#7RUTXH##319#1P/#718#OEI0LQ
3RZHU#7HUPLQDOV 08#6WXGV#ZLWK#&ODPS1
7HUPLQDO#7LJKWHQLQJ#7RUTXH##51:#1P/#57#OEI0LQ
(DUWK#7HUPLQDOV
####
08#&KHHVH#+HDG#6FUHZ1
7HUPLQDO#7LJKWHQLQJ#7RUTXH##:14#1P/#96#OEI0LQ
Table 3.3 Motor Information
,QVWDOOLQJ#WKH#&RQYHUWHU
#
607
845&#&RQYHUWHU
(OHFWULFDO#,QVWDOODWLRQ
5HFRPPHQGDWLRQV
• Although the controller is designed to provide double or reinforced insulation between the
user and bare live parts, it is recommended that the “0v/Signal Ground” is earthed. Where a
number of controllers are used in a system the “0v/Signal Ground” terminals should be
connected together and earthed at one point.
• The controller is designed for armature current form factor of 1.5 or less. It is recommended
that a armature choke be fitted where a form factor of less than 1.5 current cannot be
guaranteed.
• Due to the earth leakage currents the controller and filter should be permanently earthed.
This can be achieved by either connecting two earthing conductors of the required value, see
table 11.1, or connecting one earthing conductor of at least 10mm2.
,03257$17=# 7KH#&RQYHUWHU#ILWWHG#ZLWK#DQ#LQWHUQDO#RU#H[WHUQDO#DF#VXSSO\#(0&#ILOWHU#LV#RQO\#VXLWDEOH#IRU
HDUWK#UHIHUHQFHG#VXSSOLHV#+71,1
704#2SHUDWLQJ#WKH#&RQYHUWHU
845&#&RQYHUWHU
7#
23(5$7,1*#7+(#&219(57(5
3UH0,QVWDOODWLRQ#3ODQQLQJ
%DVLF#:LULQJ#'LDJUDPV
%DVLF#&RQQHFWLRQ
13456789
10 11 12 14 15 16 19 23 L1 L2/N FL1 FL2 A+ A- F+ F- Aux
13

10K
SPEED
FS1 FS2
FS4
FS5
RUN Tachogenerator
Autotransformer
Branch Protection (Fuses or Circuit Breaker)
10K
10K
100%
CURRENT
LIMIT
EXTERNAL
(Optional)
SETPOINT
Speed Relay
Health Relay
3
1
1
2
Signal Ground
Mains Supply
PE
GRD
PE
GRD
DC
Motor
Optional
4Optional Autotransformer for non standard mains voltages.
5It is recommended that the “0V/common” be connected to protective earth/ground for safety
reasons. In a system comprising of more than one controller, the “0V/common” signals should
be connected together and joined to protective earth/ground at one point only.
6Stall override link between terminals 14 and 15 required when using controller in current
control.
2SHUDWLQJ#WKH#&RQYHUWHU
##
705
845&#&RQYHUWHU
6HWWLQJ08S#)#&RPPLVVLRQLQJ
2SWLRQ#6ZLWFKHV
6SHHG#)HHGEDFN#6FDOLQJ
6:46:5)(('%$&.#92/7$*(
2)) 21 43#0###58986(#3:#72#75,0
21 21 58#0###:89 0$;,080#63(('
2)) 2)) :8#0#458972#5(48,5('
21 2)) 458#0#6589 9$/8(
Table 4.1 Full speed tachogenerator/armature feedback voltage.
Example:
(a) Customer wishes to run motor at 1500rpm with a 60V/1000rpm tachogenerator.
Feedback voltage = 90V
From Table 4.1 set SW1 OFF SW2 OFF adjust P7 to give desired speed.
(b) Customer wishes to run motor at 2000rpm with 320V armature.
Feedback voltage = 320V
From Table 4.1 set SW1 ON SW2 OFF adjust P7 to give desired speed.
1RWH=# ,W#LV#QHFHVVDU\#WR#VHW#WKHVH#VZLWFKHV#IRU#ERWK#WDFKRJHQHUDWRU#DQG#DUPDWXUH#YROWDJH
IHHGEDFN1
6SHHG#)HHGEDFN#6RXUFH
6:6+2)),7DFKRJHQHUDWRU &RQWUROOHU#XVHV#7DFKRJHQHUDWRU#)HHGEDFN#IRU#6SHHG
&RQWURO1
6:6+21,$UPDWXUH
9ROWDJH
&RQWUROOHU#XVHV#$UPDWXUH#9ROWDJH#)HHGEDFN#IRU#6SHHG
&RQWURO1
=HUR#2XWSXW#6RXUVH
6:7+2)),=HUR#2XWSXW =HUR#6HWSRLQW#2XWSXW
6:7+21,=HUR#2XWSXW =HUR#6SHHG#2XWSXW
&XUUHQW#6FDOLQJ
)8//#/2$'#&855(17#&21752//(5#237,21
6:86:96::37 3; 49 65
2)) 2)) 2)) õ$4$#- 5$#- 7$##-
21 2)) 2)) 4$5$#- 7$#- ;$##-
2)) 21 2)) 4õ$ 6$#- 9$#- 45$#-
21 21 2)) 5$7$#- ;$#- 49$#-
2)) 2)) 21 5õ$ 8$43$53$
21 2)) 21 6$9$45$57$
2)) 21 21 6õ$ :$47$5;$
21 21 21 7$;$49$65$
Table 4.2 Current Calibration ( * see note on next page )
Example: Customer wishes to run 14 Amp Motor.
Option 1 Using 512/16 - From table 4.2 set SW7 ON, SW6 ON, SW5 OFF Ia = 14 Amp
Option 2 Using 512/32 From table 4.2 set SW7 OFF, SW6 ON, SW5 ON - Ical = 16 Amp
Turn down I Limit (P4) to give 14 Amps
706#2SHUDWLQJ#WKH#&RQYHUWHU
845&#&RQYHUWHU
1RWH=# -#;#$PS/#49#$PS#DQG#65#$PS#FRQWUROOHUV#FDQ#EH#VFDOHG#WR#FXUUHQWV#RI#7#$PS/#;#$PS#RU
49#$PS#RU#OHVV#EXW#LW#LV#UHFRPPHQGHG#WKDW#ORZHU#FXUUHQW#FRQWUROOHUV#EH#XVHG#LQ#WKHVH
FLUFXPVWDQFHV1
&XUUHQW#0RWRU#6FDOLQJ
6:;+2)),&XUUHQW#0HWHU %XIIHUHG#&XUUHQW#0HWHU#2XWSXW
89#(TXLYDOHQW#WR#433(#RI#&RQWUROOHU#&XUUHQW#5DWLQJ1
L1H1# #7#$PS#RQ#845&237
#;#$PS#RQ#845&23;
49#$PS#RQ#845&249
65#$PS#RQ#845&265
6:;+21,&XUUHQW#0HWHU %XIIHUHG#&XUUHQW#0HWHU#2XWSXW
89#(TXLYDOHQW#WR#433(#RI#&DOLEUDWHG#&XUUHQW##5DWLQJ1
)RU#([DPSOH#845&249#6:8021/6:9021/6::02))
&DOLEUDWHG#&XUUHQW##;#$PS#WKHUHIRUH#89##;DPS1
3RWHQWLRPHWHUV
345DPS#8S#5DWH 5RWDWH#&ORFNZLVH#IRU#)DVWHU#$FFHOHUDWLRQ#WR#6HW#6SHHG16DPH
+/LQHDU#=0#4#WR#73#VHFRQGV,DV#845
355DPS#'RZQ#5DWH 5RWDWH#&ORFNZLVH#IRU#)DVWHU#'HFHOHUDWLRQ#WR#6HW#6SHHG16DPH
+/LQHDU#=0#4#WR#73#VHFRQGV,DV#845
366SHHG#/RRS#6WDELOLW\ 2SWLPLVHV#6SHHG#/RRS#6WDELOLW\1#+#([FHVVLYH
DGMXVWPHQW#PD\#OHDG#WR#LQVWDELOLW\,
6DPH
DV#845
37,#/LPLW 5RWDWH#&ORFNZLVH#WR#LQFUHDVH#0D[LPXP#2XWSXW
&XUUHQW1
:LWK#QR#DGGLWLRQDO#FRQQHFWLRQ#WR#7RUTXH#2#&XUUHQW
/LPLW#7HUPLQDO#7:/#WKH#8SSHU#/LPLW#LV#443(1#7R
DFKLHYH#WKH#483(#PD[LPXP#FRQQHFW#7:#WR#.:1891
6DPH
DV#845
38,5#&RPSHQVDWLRQ 2SWLPLVHV#VSHHG#UHJXODWLRQ#DJDLQVW#ORDG#FKDQJH
ZKHQ#XVLQJ#$UPDWXUH#9ROWDJH#)HHGEDFN1#5RWDWH
&ORFNZLVH#WR#LQFUHDVH#FRPSHQVDWLRQ#DQG#UHGXFH
UHJXODWLRQ1+#([FHVV#DGMXVWPHQW#PD\#OHDG#WR#LQVWDELOLW\,
7XUQ#$QWL0FORFNZLVH#ZKHQ#7DFKRJHQHUDWRU#)HHGEDFN
XVHG1
6DPH
DV#845
390LQLPXP#6SHHG &RQWUROV#0LQLPXP#0RWRU#6SHHG#26HWSRLQW#ZKHQ
6SHHG##6HWSRLQW#3RWHQWLRPHWHU#FRQQHFWHG#WR#7HUPLQDO
71#5RWDWH#&ORFNZLVH#WR#LQFUHDVH#0LQLPXP#6SHHG#2
6HWSRLQW1#+$SSUR[LPDWHO\#63(#DGMXVWPHQW#ZKHQ#XVLQJ
43.#RKP#6SHHG##6HWSRLQW#3RWHQWLRPHWHU1,
6DPH
DV#845
3:0D[LPXP#6SHHG &RQWUROV#0D[LPXP#0RWRU#6SHHG1#5RWDWH#FORFNZLVH#WR
LQFUHDVH#PD[LPXP#VSHHG1
6DPH
DV#845
3;=HUR#6SHHG#2IIVHW $GMXVWV#=HUR#RU#0LQLPXP#6SHHG#IRU#=HUR#6SHHG
6HWSRLQW1
1HZ
)HDWXUH
Table 4.3 Customer Adjustments.
2SHUDWLQJ#WKH#&RQYHUWHU
##
707
845&#&RQYHUWHU
%DVLF#6HWWLQJ08S#3URFHGXUH
&DXWLRQ#
%()25(#$77(037,1*#72#&211(&7#32:(5
%()25(#$77(037,1*#72#&211(&7#32:(5%()25(#$77(037,1*#72#&211(&7#32:(5
%()25(#$77(037,1*#72#&211(&7#32:(5
&RQWUROOHU
Check:-
• the Main power supply voltage is within the operating range of the controller.
• the Armature voltage and current ratings are compatible with controller supplied.
• the Field voltage and current ratings are suitable.
• All external wiring circuits are correct, i.e:-
Power connections
Control connections
Motor connections
1RWH=# &RPSOHWHO\#GLVFRQQHFW#WKH#FRQWUROOHU#EHIRUH#SRLQW#WR#SRLQW#FKHFNLQJ#ZLWK#D#EX]]HU#RU#ZKHQ
FKHFNLQJ#LQVXODWLRQ#ZLWK#D#PHJJHU1
• For damage to equipment.
• For loose ends, clippings, drilling swarf etc., lodged in the drive or ancillary equipment.
0RWRU
• Inspect the motor, in particular the commutator for any extraneous matter. If an air supply is
available, it is recommended to blow over the commutator.
• Check the brushes are properly seated and that the brush spring tension is adequate.
• If possible check that the motor (and vent fan if fitted) can be turned freely by hand.
3UHSDUDWLRQ
0DFKLQH
Check:-
• That rotation of the motor in either direction will not cause damage.
• That nobody else is working on another part of the equipment that will be affected by
powering up.
• That other equipment will not be adversely affected by powering up.
&RQWUROOHU
• Prevent application of the main power supply by removal of the supply fuses.
• Disconnect the load from the motor shaft if possible.
• If there is any doubt as to the integrity of a particular installation, insert a high wattage
resistor (i.e. fire bar elements) in series with the motor armature.
• If it is possible to rotate the motor, and tachogenerator feedback is in use, check that forward
rotation results in positive tacho feedback, i.e. terminal 1 is positive with respect to terminal 8
or 11.

This manual suits for next models

4

Other Eurotherm Drives DC Drive manuals

Eurotherm Drives 514C Series User instructions

Eurotherm Drives

Eurotherm Drives 514C Series User instructions

Eurotherm Drives 584 Series User manual

Eurotherm Drives

Eurotherm Drives 584 Series User manual

Eurotherm Drives 590 DRV Digital User manual

Eurotherm Drives

Eurotherm Drives 590 DRV Digital User manual

Eurotherm Drives 584S/620 Installation and operating instructions

Eurotherm Drives

Eurotherm Drives 584S/620 Installation and operating instructions

Eurotherm Drives 584S User manual

Eurotherm Drives

Eurotherm Drives 584S User manual

Eurotherm Drives 620 Standard User manual

Eurotherm Drives

Eurotherm Drives 620 Standard User manual

Popular DC Drive manuals by other brands

Danfoss VLT AutomationDrive FC 301 Programming guide

Danfoss

Danfoss VLT AutomationDrive FC 301 Programming guide

Moons' STF-Multi axis Series Hardware manual

Moons'

Moons' STF-Multi axis Series Hardware manual

Siemens SINAMICS S120 System manual

Siemens

Siemens SINAMICS S120 System manual

LEGRAND 0 261 40 manual

LEGRAND

LEGRAND 0 261 40 manual

Grundfos CUE Series Installation and operating instructions

Grundfos

Grundfos CUE Series Installation and operating instructions

Bosch Rexroth Hagglunds DOb Installation and maintenance manual

Bosch

Bosch Rexroth Hagglunds DOb Installation and maintenance manual

GEZE E 170 /230 V AC Wiring diagram

GEZE

GEZE E 170 /230 V AC Wiring diagram

SOMFY Sonesse 28 WF Zigbee instructions

SOMFY

SOMFY Sonesse 28 WF Zigbee instructions

Eaton PowerXL DC1 installation manual

Eaton

Eaton PowerXL DC1 installation manual

Dover PullMaster PH136 Instructions and parts manual

Dover

Dover PullMaster PH136 Instructions and parts manual

M-system RPPD instruction manual

M-system

M-system RPPD instruction manual

Danfoss VLT Micro Drive FC 51 Series Programming guide

Danfoss

Danfoss VLT Micro Drive FC 51 Series Programming guide

Danfoss vlt aqua operating instructions

Danfoss

Danfoss vlt aqua operating instructions

BONFIGLIOLI Agile Applications manual

BONFIGLIOLI

BONFIGLIOLI Agile Applications manual

Trane TR150 Programming guide

Trane

Trane TR150 Programming guide

MR ETOS ED operating instructions

MR

MR ETOS ED operating instructions

D+H KA 66-SW-K Original instructions

D+H

D+H KA 66-SW-K Original instructions

SEW MOVIDRIVE MDX60B operating instructions

SEW

SEW MOVIDRIVE MDX60B operating instructions

manuals.online logo
manuals.online logoBrands
  • About & Mission
  • Contact us
  • Privacy Policy
  • Terms and Conditions

Copyright 2025 Manuals.Online. All Rights Reserved.