Eurotops Versand BK554 User manual

BK554 CHRONOGRAPH WATCH
INSTRUCTION MANUAL
* Please read these instructions carefully before using the product for the first time and keep
them for future reference.
* Before Use: First remove the plastic stopper and push the crown (C) fully into the watch.
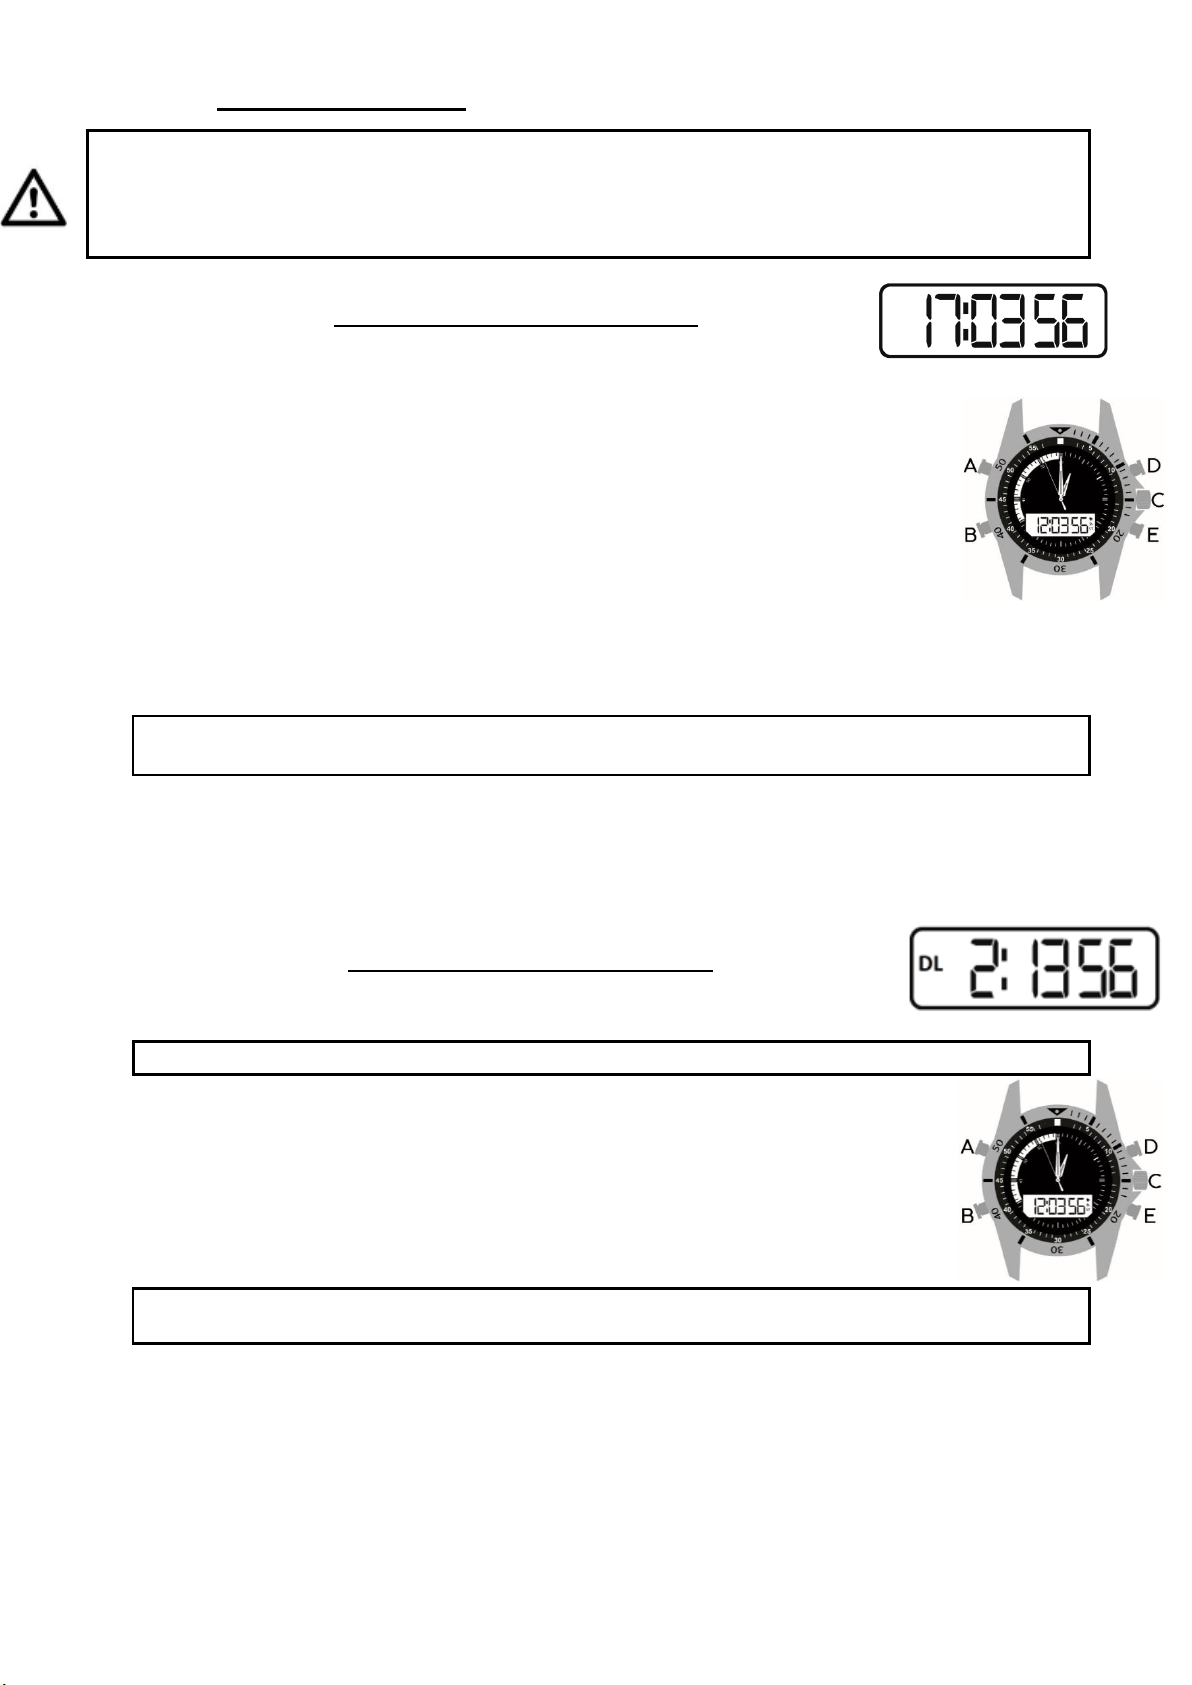
I. PRODUCT DESCRIPTION
A: Backlight
B: Mode
C: Crown
D: Set
E: Set
FEATURES
•6 Digits LCD Display: Hour, Minute, Second,
Month, Day and weekday
•Daily Alarm and Hourly Chime
•12/24H format selectable
•1/100 second Chronograph
•LED backlight
Fig.1
II. TECHNICAL SPECIFICATIONS
1. 1 pce 3V CR2025 button cell for the LCD display
2. 1 pce 1.55V SR626SW button cell for the movement
3. 1 ATM
III. USE
A. SETTING ANALOG TIME
1. Pull the crown “C” to position 2 (see fig. 2) and rotate it to set the time.
2. Push the crown back to position 1 to confirm and finish setting the time.
B. BUTTON FUNCTIONS
a) MODE
In real time display, press "B" button successively to toggle between the different modes.
1 2 3 4
Real time Date Alarm Dual time Chronograph
PRESS « B »
PRESS « B »
PRESS « B »
PRESS « B »
b) DIGITAL TIME SETTING
The minutes of digital real time and dual time should be strictly the same otherwise the hourly
chime will not beep at each sharp hour.
The dual time mode may be used either to set a second time zone when you travel or to let you
keep track of a foreign time. Make sure that the minutes are the same as digital real time.
1. SETTING THE DIGITAL REAL TIME
In real-time display mode:
1. Press "D" or "E" button for 3 seconds to enter time setting mode. The second digit will flash.
Press "B" button to reset it to zero.
NOTE: Pressing “B” while the seconds are in the range of 30 to 59 resets them
to 00 and adds 1 to the minute digit. In the range of 00 to 29, it resets the seconds
to 0 but the minutes are unchanged.
2. Press "D" or "E" button to confirm. The hour digit will flash. Press "B" button to set the hour
digit.
3. Repeat step 2 to set the minute digit and the hour format: 12 or 24-hour.
NOTE: When selecting 12h format, the letters "PM" display at left upper corner of the screen,
in real time and alarm modes.
4. Press "D" or "E" button to confirm and exit time setting mode.
NOTE: If no button is pressed for about 60 seconds, the watch will exit time setting mode and
return to real time mode.
2. SETTING THE DIGITAL DUAL TIME
In dual-time display mode (Refer to section a. “MODE”):
In dual-time mode, the screen displays the letters DL at the far left –see figure above.
1. Press "D" or "E" button for 3 seconds to enter dual time setting mode. The hour digit will
flash. Press "B" button to set the hour digit.
2. Press "D" or "E" button, the minute digit will flash, press "B" button to set the minute digit.
3. Repeat step 2 to set the hour format: 12H or 24H.
NOTE: When selecting 12H format, the letters "PM" display at left upper corner of the screen, in
dual time mode.
4. Press "D" or "E" button to confirm and exit dual time setting mode.
NOTE: If no button is pressed for about 60 seconds, the watch will exit date dual-time setting
mode and return to dual time mode.

c) SETTING THE DIGITAL DISPLAY'S DATE
In date display mode (Refer to section a. “MODE”):
In date mode, the screen displays the first two letters of the week of the day at the right –see
figure above.
1. Press "D" or "E" button for 3 seconds to enter date setting mode. The month digit will
flash, press "B" button to set the month digit.
2. Press "D" or "E" button, the day digit will flash, press "B" button to set the day digit.
3. Repeat step 2 to set the day of week. See below for the corresponding icons of the days
of week.
4. Press "D" or "E" button to confirm and exit date setting mode.
NOTE: If no button is pressed for about 60 seconds, the watch will exit date setting mode and
return to date mode.
d) SETTING THE ALARM AND HOURLY CHIME
In alarm display mode (Refer to section a. “MODE”):
In Alarm mode, the screen displays the letters AL at the far left - see figure above.
1. Press "D" or "E" button for 3 seconds to enter alarm setting mode. The hour digit will
flash, press "B" button to set the hour digit.
2. Press "D" or "E" button, the first minute digit will flash. Press "B" button to set the first
minute digit.
3. Press "D" or "E" button, the second minute digit will flash. Press "B" button to set the
second minute digit.
4. Then press "D" or "E" button briefly to enter the ALARM / HOURLY CHIME mode.
5. Press "B" button to adjust the flashing symbol according to the order shown below:
ALARM ON / CHIME ON ALARM OFF / CHIME OFF
ALARM ON / CHIME OFF ALARM OFF / CHIME ON
Note: When the icon of hourly chime is activated and the minutes of real time and dual time are
the same, the watch beeps every sharp hour.
Monday =
Tuesday =
Wednesday =
Thursday =
Friday =
Saturday =
Sunday =

5. Press "D" or "E" button briefly to confirm and exit alarm setting mode.
NOTE: If no button is pressed for about 60 seconds, the watch will exit alarm setting mode
and return to alarm display mode.
e) CHRONOGRAPH FUNCTIONS
In chronograph mode (Refer to section a. “MODE”):
In chronograph mode, the screen displays the letters ST at the right –see figure above.
Press button "D" or "E" button:
1. Once to start the chronograph;
2. A second time to stop the chronograph;
3. A third time to continue timing.
4. To reset the stopwatch to zero, press and hold "D" or "E" button till the timing resets to
zero.
NOTE: When you switch to other mode, the chronograph continues timing in the background if you
don’t stop it. The chronograph display range is limited to 59 minutes and 59.99 seconds. When it
reaches this limit, it restarts from zero.
f) BACKLIGHT FUNCTION
Press "A" button once to turn on the EL backlight for 3 seconds in any mode.
IV. WARNING
•To ensure a waterproof seal, always make sure that the crown has been pushed back into the normal
operating position.
•DO NOT USE the crown or any other buttons underwater or when the watch is wet.
•To maintain the aesthetic appearance of your watch, avoid contact with perfumes, nail polish, varnish,
cosmetics, cleaning products, adhesives, and paint, as they can cause discoloration, deterioration and
damage.
•To prevent any risk from perspiration, dust and humidity, regularly wipe your watch with a soft, dry cloth.
•To ensure the longevity of your watch, please observe the following instructions: Do not attempt to open
the watch casing. The battery must be replaced by a qualified person.
•Your watch is shock-resistant. However, to avoid damage, make sure you do not drop or hit it against
hard surfaces.
WARNING: You should not dispose of this device with your household waste. A selective collection system for
this type of product is implemented by your local authorities. Please contact your local authorities to find out how
and where collection takes place. These restrictions apply because electrical and electronic devices contain
dangerous substances that have harmful effects on the environment or on human health and must be recycled.
This symbol indicates that electrical and electronic devices are collected selectively. The symbol shows a waste
container crossed out with an X symbol.
Imported by EML/ PRODIS, 1 rue de Rome, 93110 Rosny-sous-Bois, France/ Made in P.R.C
Marketed by EUROTOPS VERSAND GMBH D-40764 LANGENFELD
Other Eurotops Versand Watch manuals


