EV Global Motors MINI-E-BIKE User manual

OWNER’S MANUAL
MINI-E-BIKE™

For future reference, please fill in the important information below.
Serial Number
(Your serial number can be found inside the main hinge. Unfold the Mini-E-Bike™
to see it.)
Model Code (Printed on the end of your shipping carton.)
Key Number
Dealer Name:
Address:
City/State/Zip:
Telephone:
Contact:

This manual contains important safety, performance and
maintenance information. Read the manual before taking
your first ride on your new Mini-E-Bike™, and keep the
manual handy for future reference.
TABLE OF CONTENTS
1. About This Manual 1
Why Should You Read This Manual 1
Important Safety Information 1
Inspection and Maintenance 3
2. Operational Instructions 5
Important Notices 5
LED Codes 6
Right Hand Controls 6
Left Hand Controls 7
Battery Management 8
Operating the Mini-E-Bike™ 10
Folding/Unfolding 11
Quick Release Binder 13
Using the Centerstand 14
Care and Cleaning 15
3. Fit and Safety 15
Fit 15
Safety Equipment 17
Mechanical Safety Check 18
4. Riding Safely and Responsibly 19
The Basics 19
Rules of the Road 20
Wet Weather Riding 21
Night Riding 22
5. How Things Work 22
Removing/Installing the Wheels 22
Brakes 24
Shifting 27
Tires and Tubes 30
6. Service and Maintenance 32
Service and Maintenance Schedule 33
Getting Home When Something Breaks 35
UpgradingYour Bike and Equipment 36
About Your Dealer 38

1
1. ABOUT THIS MANUAL
WHYYOU SHOULD READ THIS MANUAL
This manual was written to help you get the most
performance, comfort, enjoyment and safety when riding
your new Mini-E-Bike™.The manual describes specific care
and maintenance procedures that help protect your warranty
and ensure years of trouble free use. Please pay particular
attention to the section on battery charging and
maintenance.
It is important for you to understand your new Mini-E-Bike™,
its features and its operation, so you get maximum
enjoyment with maximum safety. By reading this manual
before you go on your first ride, you’ll know how to get the
most from your new Mini-E-Bike™.
It is also important that your first ride on a new Mini-E-Bike™
be taken in a controlled environment, away from cars,
obstacles, and other cyclists.
GENERAL WARNING:
Cycling can be a hazardous activity even under the best of
circumstances.Proper maintenance of your Mini-E-Bike™ is
your responsibility as it helps reduce the risk of injury. This
manual contains many "Warnings" and "Cautions"
concerning the consequences of failure to maintain or
inspect your Mini-E-Bike™. Many of the Warnings and
Cautions say "you may lose control and fall". Because any
fall can result in serious injury or even death, we do not
repeat the warning of possible injury or death whenever the
risk of falling is mentioned.
IMPORTANT SAFETY INFORMATION
Your Mini-E-Bike™ can provide many years of service, fun
and fitness - if you take responsibility for your own safety.
Understand the features of your Mini-E-Bike™ and become
aware of the challenges that you will meet on the road.There
is much that you can do to protect yourself while riding. We
will offer many recommendations and safety tips throughout
this manual. The following are those that we feel are most
important.
Always Wear A Helmet!
Helmets significantly reduce the number and severity of head
injuries. Always wear a helmet that complies with your state
laws when riding the Mini-E-Bike™. Check with your local
police department for requirements in your community. Do
not wear loose fitting clothing that can become tangled in the
moving parts of the Mini-E-Bike™. Wear sturdy shoes and
eye protection. Also check your state laws concerning other
protective gear that may be required when riding the Mini-E-
Bike™.

2
WARNING:
Not wearing a helmet significantly increases the chance of
serious injury or death in a crash. Always wear a helmet, eye
protection and appropriate apparel when you ride.
Know your Mini-E-Bike™!
Your new Mini-E-Bike™ incorporates many features and
functions that have never been built into a bicycle before.
Read this manual thoroughly to understand how those
features enhance your riding pleasure and safety.
Ride Defensively!
One of the most frequent cycling accidents occurs when the
driver of a parked car opens his door into a rider’s path.
Another common occurrence is when a car or another cyclist
moves suddenly into your path. Always be aware of other
vehicles around you. Do not assume that the driver or the
other cyclist sees you. Be prepared to take evasive action or
stop suddenly.
Make Yourself Easy To See!
Make yourself more visible by wearing bright reflective
clothing. Keep your reflectors clean and properly aligned.
Signal your intentions so that drivers and other cyclists can
anticipate your actions.
Ride WithinYour Limits!
Take it slow until you are familiar with the riding conditions
that you encounter. Be especially careful in wet conditions as
traction can be greatly reduced and brakes less effective.
Never ride faster than conditions warrant or beyond your
riding abilities. Remember that alcohol, drugs, fatigue and
inattention can significantly reduce your ability to make good
judgements and ride safely.
KeepYour Mini-E-Bike™ In Safe Condition
Follow the inspection and maintenance guidelines beginning
on page 3. Check critical safety equipment before each and
every ride.
Know The Law
Cyclists are required to follow the rules of the road.
Additionally, some communities regulate the use of
motorized bicycles regarding minimum age requirements and
necessary equipment. Check with your local police
department for specific details.
Offroad Riding
Offroad riding is not recommended because the Mini-E-
Bike™ tires are for street use only. Dust and extreme impacts
from offroad riding can cause electrical system problems.

3
INSPECTION AND MAINTENANCE
For your safety and enjoyment and to insure a long life for
your Mini-E-Bike™, inspect and maintain your Mini-E-Bike™
regularly. Use the table below for guidance. It is very
important that you check certain systems and components
before each and every ride. The proper condition and
function of these systems is critically important for your
safety.
Your Mini-E-Bike™ should be returned to your servicing
dealer at least once a year for a complete and thorough
inspection and tune up. If a problem arises that is not
described below, discontinue riding the Mini-E-Bike™ and
return it to your servicing dealer immediately. For more
information about service and maintenance, please refer to
page 32.

Refer to Component or Condition Inspect before Inspect Clean and/or Adjust/Tighten Repair/Replace
Page every ride periodically* lubricate if necessary
30 Tire pressure (60-65 psi)
18 Tire wear/damage
26 Brake pad adjustment
13 Handlebar quick release adjustment
6 Controls and displays
13 Seat post quick release adjustment
26 Brake pad wear
26 Brake cable tension/wear
34 Spoke tension
18 Wheel true
7 Hub bearings
33 Chain lubrication
28 Derailleur adjustment
2 Reflectors
8 Battery and charger
33 Headset
34 Bottom bracket
33 All bolts, nuts, and mounting hardware
*Every 5 to 10 rides depending on length and conditions of the ride.
4

5
2. OPERATIONAL INSTRUCTIONS
Please read and understand these instructions completely
before operating your Mini-E-Bike™ to prevent serious injury
to yourself and others, and to prevent damage to the bike.
IMPORTANT NOTICES
• Always recharge the battery pack immediately after
each use. Failure to do so may damage the battery.
• The charger can remain plugged-in for trickle-charge
purposes during long periods of storage.
• For storage periods over 3 months, the battery pack
should be checked and fully recharged every 3 months.
• Keep the battery compartment lid closed and locked
during use.
• Always remove the key from the battery compartment
lid before operating the Mini-E-Bike™. Never ride the
Mini-E-Bike™ with the key in the lid lock.

6
LED CODES
The three state-of-charge LEDs on the throttle controller
indicate battery state of charge. The Mini-E-Bike™ uses
these LEDs to alert you to particular conditions.The following
chart describes these signals and their various meanings.
CODE MEANING LEDs
System ON Whenever the power knob The charge level
is turned ON, the system LEDs cycle four
performs a series of checks. times in sequence.
This signal indicates that
the Mini-E-Bike™ is ON and
ready for operation.
Battery The battery has 100% to Green LED on.
state-of-charge 84% of run time remaining.
84% to 16% of run time Yellow LED on.
remaining.
Less than 15% of run time Red LED on.
Very low battery The state-of-charge battery Red LED flashes
charge is below the mini-
mum level.The motor is
shut off to protect the
battery. Charge the battery
immediately after use.
RIGHT HAND CONTROLS
Power On/Off
•Turn the power knob (A, Figure 1) on the throttle control
clockwise to the ON position.
•The three state-of-charge LEDs cycle four times in
sequence to indicate the system and controls are ready
for operation.
7
•Green (or full) indicates the battery is 100% to 84%
charged.
•Yellow (or half) indicates the battery is 84% to 16%
charged.
•Red (or empty) indicates the battery is less than 15%
charged.
The motor automatically shuts off when the battery is below
a preset limit to help extend battery life.The red LED flashes
to signify the motor is off and the battery must be recharged.
Recharge the battery pack immediately after use. Failure
to do so may damage the battery.
LEFT HAND CONTROLS
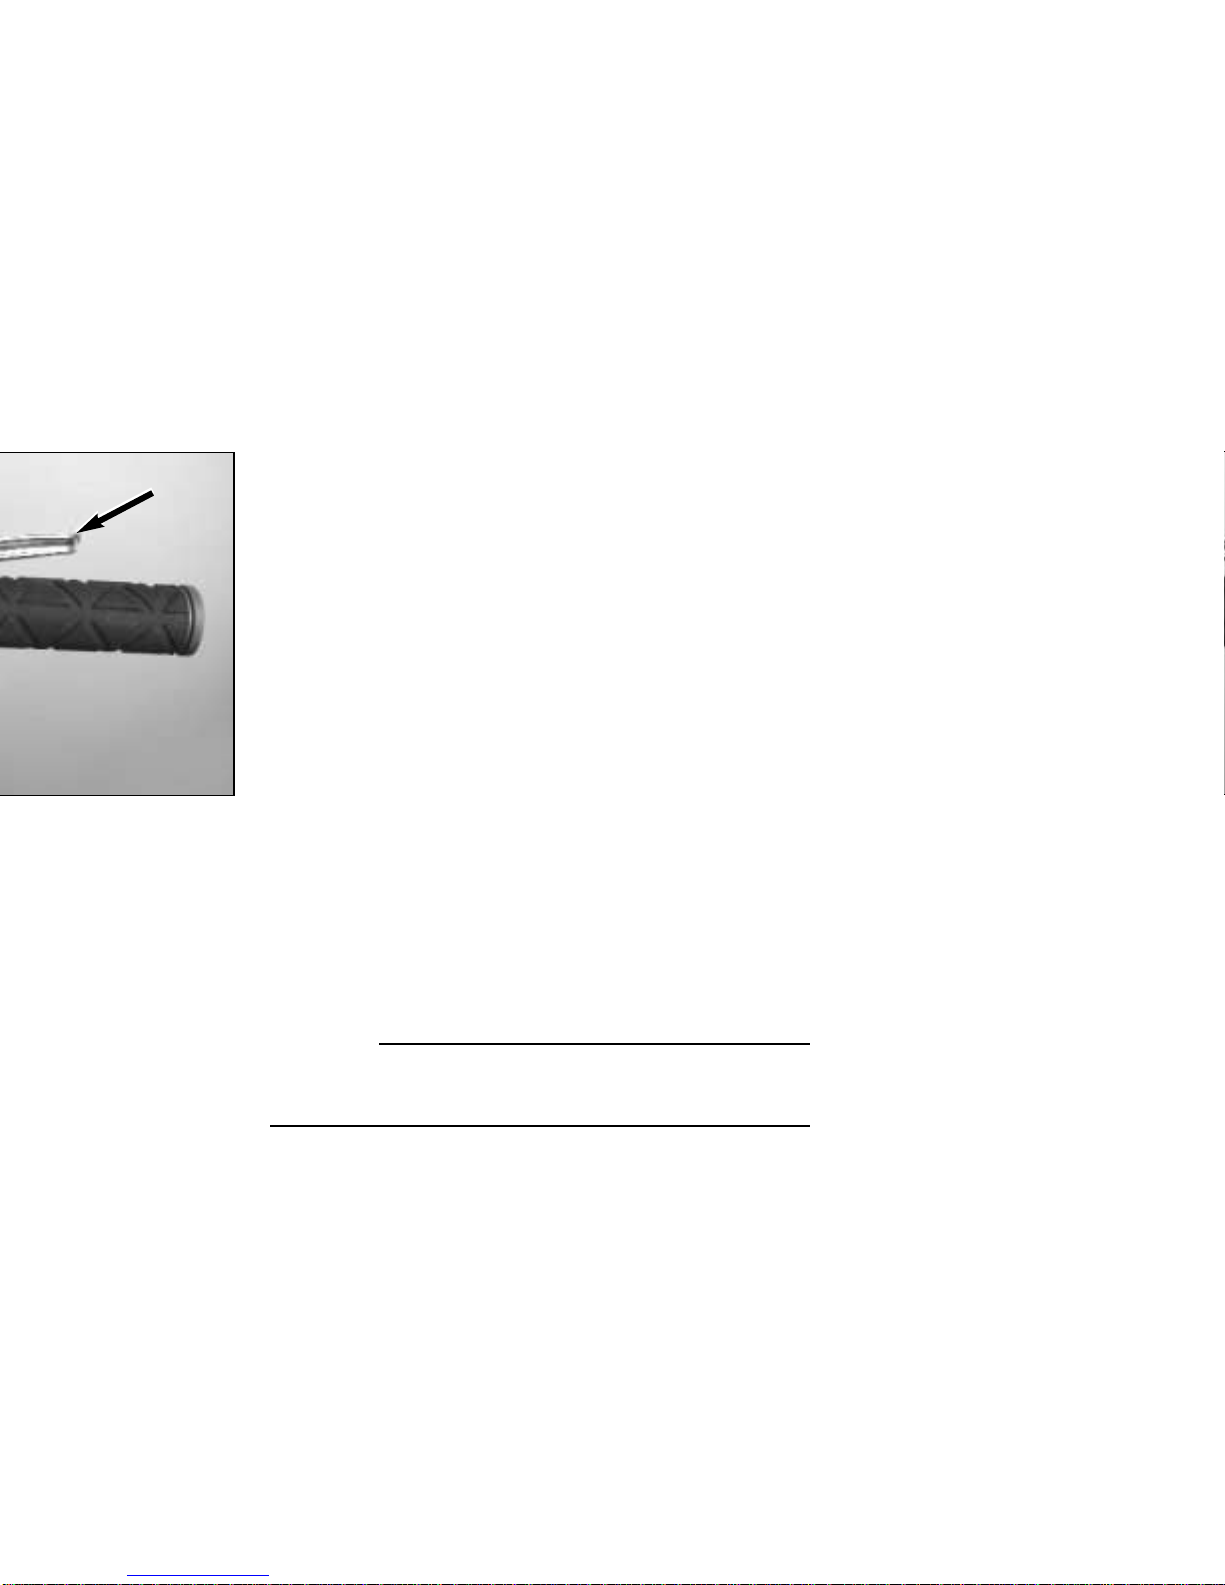
Twist Grip Gear Selector
By twisting this grip (A, Figure 2) while pedaling, you can
select any one of five gears on the rear wheel. The grip is
labeled with the corresponding gear selection.
Front Brake Lever
The front brake is activated by squeezing the left brake lever
(B, Figure 2).
WARNING:
Sudden or excessive application of the front brake may pitch
the rider over the handlebars, causing serious injury or
death.
Throttle
Press the throttle lever (B, Figure 1) with your thumb to apply
power to the motor while your are pedaling. Please note that
the motor only operates while you are pedaling. Power to the
motor is cutoff three seconds after you stop pedaling.
Rear Brake Lever
The rear brake is activated by squeezing the right brake lever.
(C, Figure 1).
Battery Charge Level
The three state-of-charge LEDs (D, Figure 1) on the throttle
control indicate the battery charge level.
FIG. 1
AC
D
D
B
8
BATTERY MANAGEMENT
Always recharge the battery pack immediately after each
use. Failure to do so may damage the battery. The charger
can remain plugged-in for trickle-charge purposes during
long periods of storage. For storage periods over 3 months,
the battery pack should be checked and fully recharged
every 3 months. Always turn off the master switch when the
Mini-E-Bike™ is not in use.
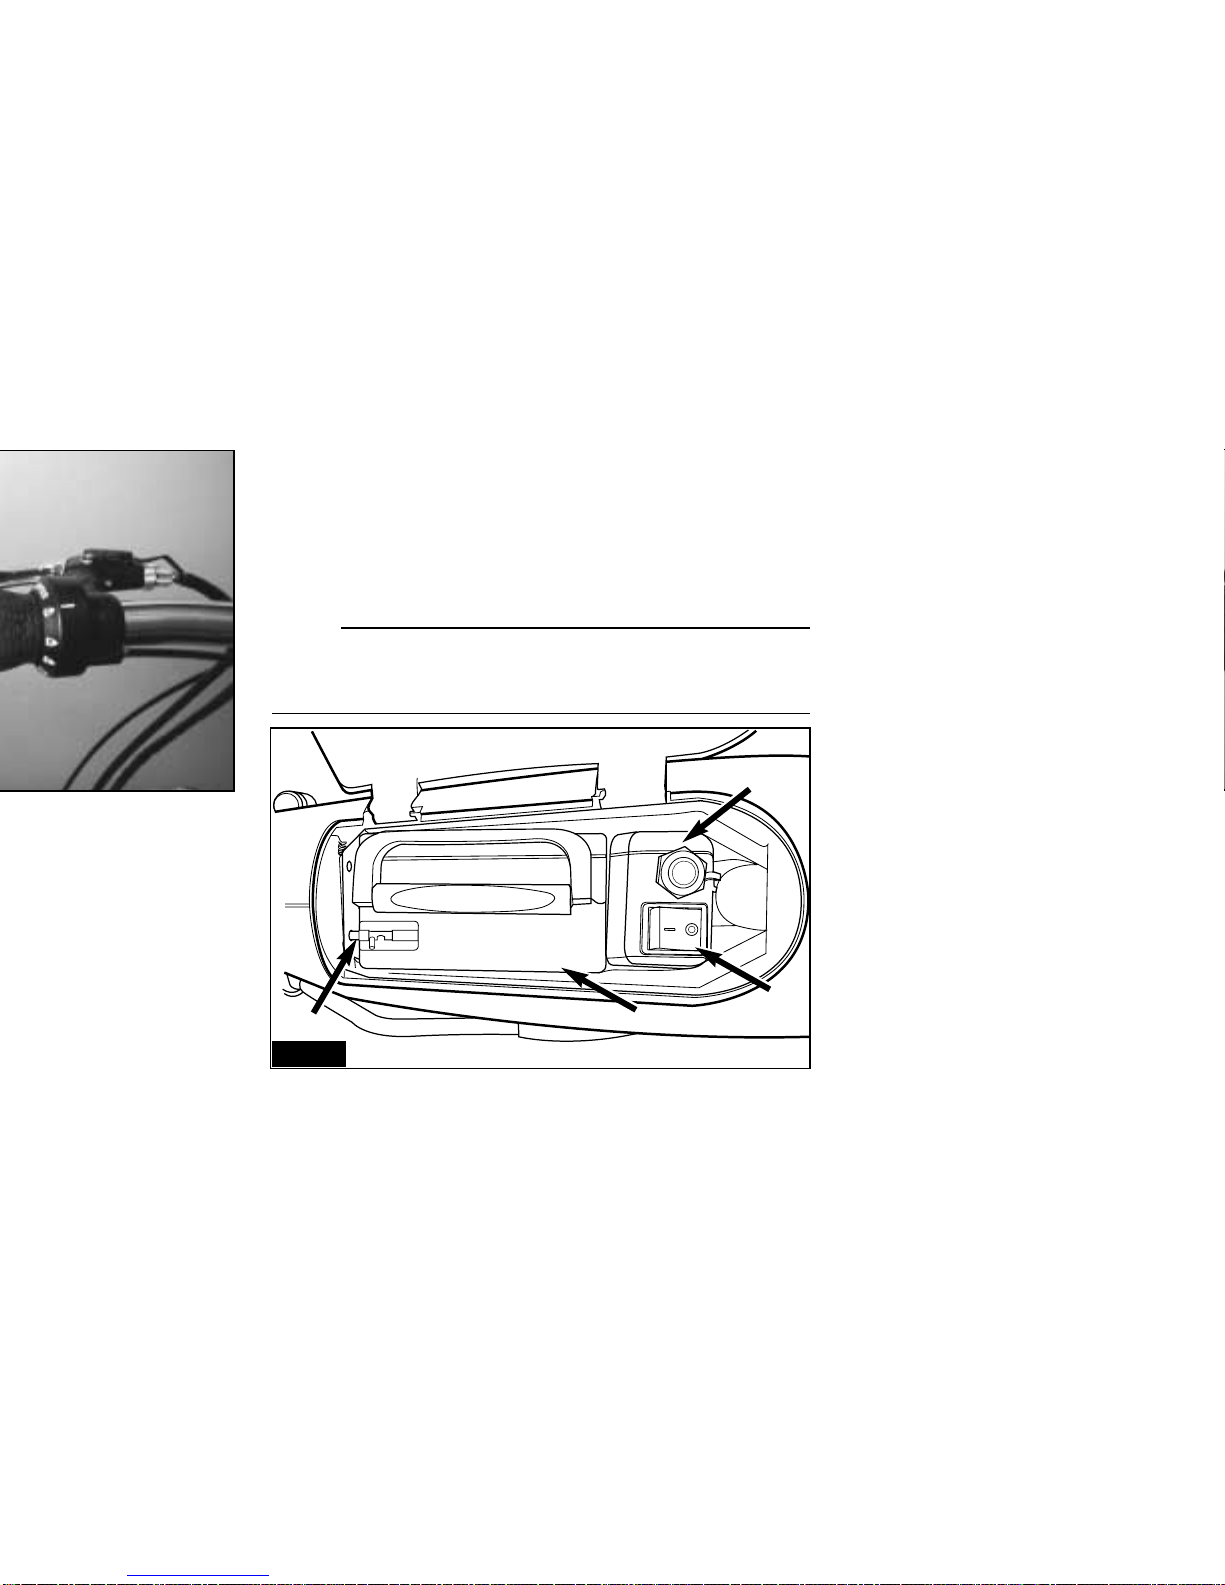
Battery Pack Removal
1. Unlock the lid on the battery compartment and open the
lid.
2. Turn the master switch (A, Figure 3) to the OFF (O)
position.
3. Release the battery latch (B, Figure 3).
4. Grasp the battery pack handle (C, Figure 3) and pull the
battery pack straight up and out of the battery
compartment.
NOTE:
If the seat is set low on the frame, the tip of the seat could
interfere with battery removal. If this is the case, open the
seatpost quick release and rotate the seat 90 degrees.
C
B
D
A
A
B
FIG. 2
FIG. 3

9
Battery Pack Installation
1. Position the battery pack over the battery compartment so
contacts on the bottom of the battery pack (Figure 4) sit
above the terminals at the front of the battery
compartment.
2. Lower the battery pack straight down into the
compartment until it bottoms. When properly installed, the
battery pack will sit down inside the compartment.
NOTE:
If the battery pack protrudes above the top of the battery
compartment, the battery has been installed backwards.
Remove the battery pack, rotate the battery pack 180
degrees, and reinsert it so the contacts on the bottom of the
battery pack engage the terminals at the front of the battery
compartment.
3. Secure the battery in place with the battery latch (B, Figure 3).
4. Close and lock the battery compartment lid.
Charging the Battery
The battery can be charged while it is on-board the Mini-E-
Bike™ or when removed from the battery compartment.
1. Remove the cap (D, Figure 3) from the charge port on the
battery.
2. Plug the 3-pin charge cord (A, Figure 5) into the charge
port on the battery pack. Press the lock bezel (B, Figure
5) down onto the port and rotate the bezel clockwise until
it locks into place.
3. Plug the female end of the power cord into the charger
(Figure 6), and plug the male end of the cord into a
standard U.S. 110/60 cycle wall socket.
FIG. 4

7. Fit the cap back onto the charge port, and reinstall the
battery into the battery compartment.
WARNING:
Keep the charger and battery pack away from water to
prevent electrical shock and shorting. The charger is
intended for indoor use only.
OPERATING THE MINI-E-BIKE™
1. Unlock the battery compartment and open the lid.
2. Turn the master switch (A, Figure 3) to ON. The master
switch uses the international symbols for on and off.The line
10
4. Turn the master switch to the ON (-) position. The LED on
the charger indicates the state of charge.
•Red means the charger power is ON.
•Yellow means the battery is being charged.
•Green means the battery is fully charged.
NOTE:
If the master switch is not on, the battery will not charge.
5. When the battery is fully charged, turn the master switch
to the OFF (o) position and unplug the power cord from the
wall socket.
6. Turn the lock bezel (B, Figure 5) 1/2 turn
counterclockwise, and remove the plug from the charge port.
FIG. 6
FIG. 5
B
A
11
FOLDING/UNFOLDING
Folding the Mini-E-Bike™
1. Raise the Mini-E-Bike™ onto the centerstand.
2. Turn off the power knob on the throttle control and turn off
the master switch on the battery pack.
3. Remove the battery pack. This lightens the Mini-E-Bike™
considerably so it will be easier to lift.
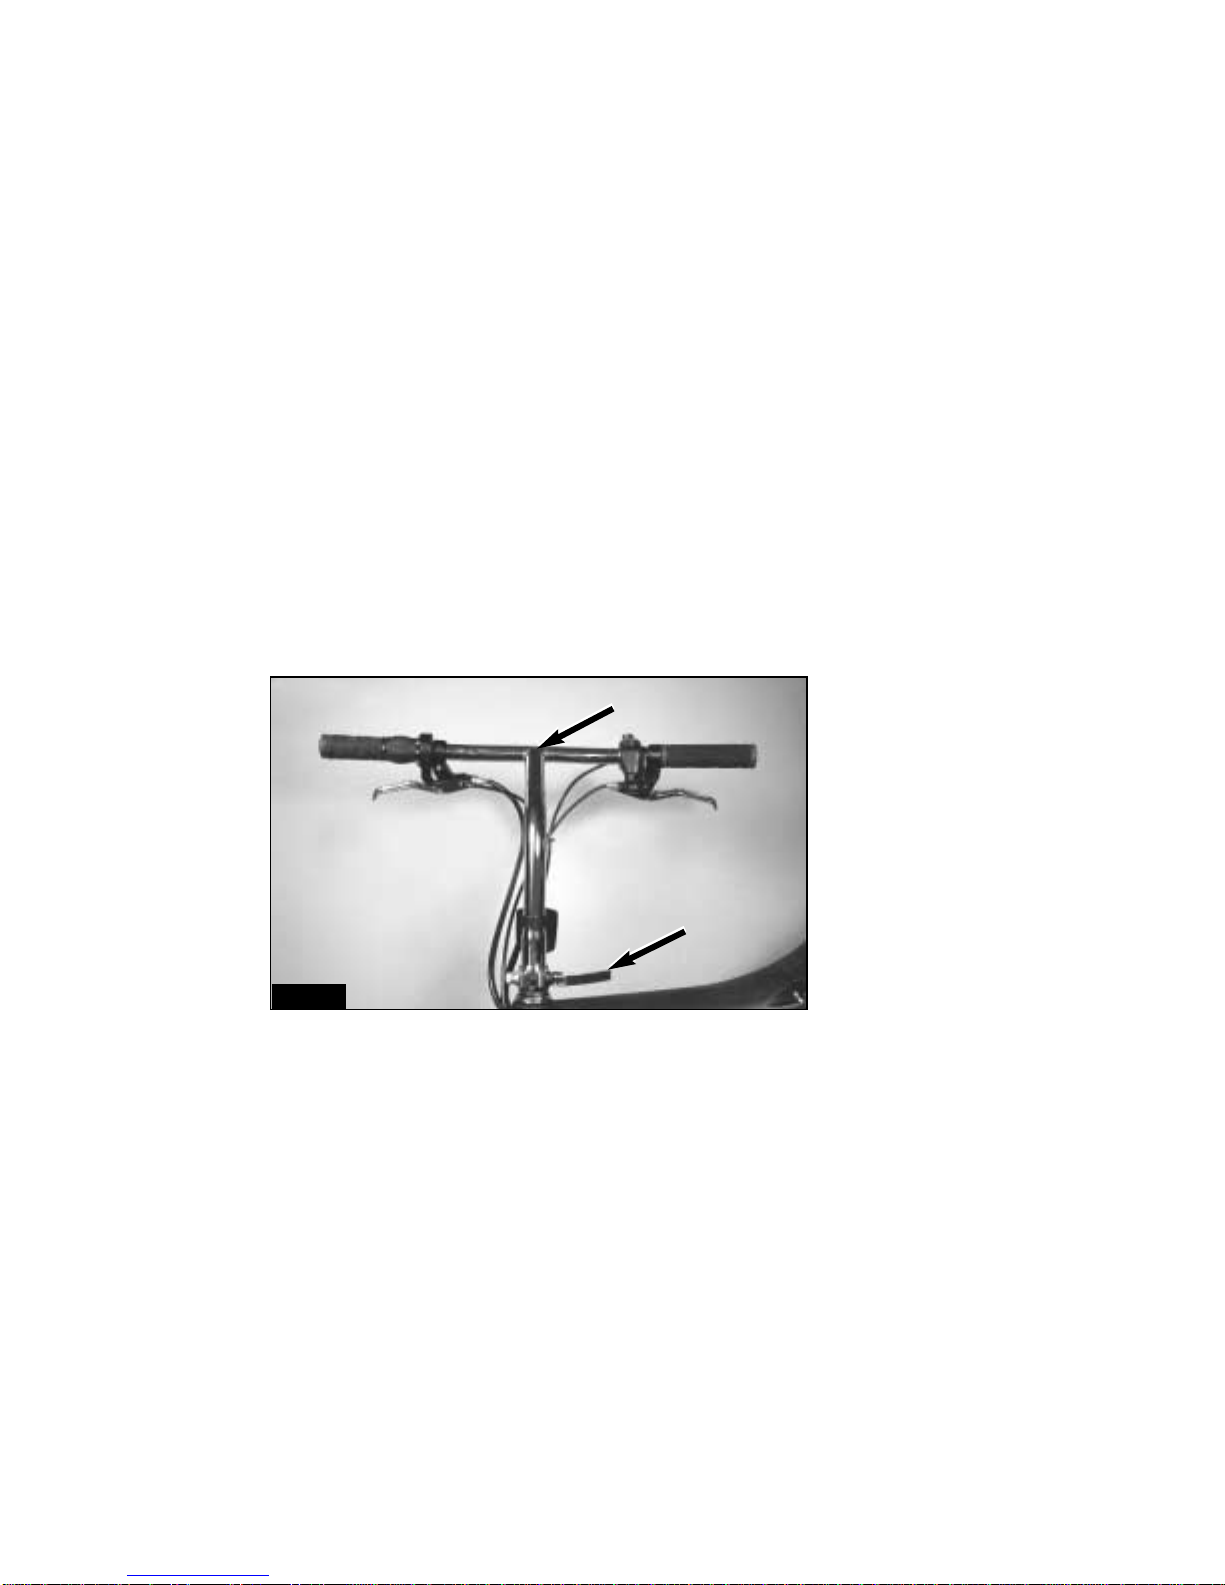
4. Unlock the handlebar quick release lever (A, Figure 7).
5. Rotate the handlebar (B, Figure 7) 90 degrees clockwise
so it faces the right side of the Mini-E-Bike™. Lock the
handlebar quick release lever.
(-) on the master switch indicates the ON position. The letter
“O” indicates OFF.
3. Close and lock the battery compartment lid.
4. Turn the power knob (A, Figure 1) on the throttle control
to ON. The state-of-charge LEDs cycle four times in
sequence and then indicate the current battery state-of-
charge.The Mini-E-Bike™ is powered and ready for use.
5. Roll the Mini-E-Bike™ forward to lower it from the
centerstand.
6. Start pedaling the Mini-E-Bike™. Once your speed
reaches approximately 2.0-2.5 miles per hour (3-4 km per
hour), apply the throttle. The motor turns on and provides
additional power to the rear wheel as long as you are
pedaling.
7. Once you reach your destination, turn off the power knob
(A, Figure 1) and then turn off the master switch (A, Figure 3).
Pedal Assist
Your Mini-E-Bike™ is a pedal-assist bike. That is, the motor
only operates while you are pedaling. A sensor on the right
side monitors the motion of the crank and signals the
controller when you are pedaling. The sensor glows red
when it detects crank rotation.To start from a stop, you must
push off and pedal. Power is not applied to the motor until
your speed equals 2.0-2.5 miles per hour (3-4 km per hour)
even if you are applying the throttle. During operation, the
controller automatically cuts power to the motor three
seconds after you stop pedaling. When you wish to use the
motor on your Mini-E-Bike™, you must pedal.
FIG. 7
B
A

6. On the right side, rotate the pedal upward so it is
perpendicular to the ground.
7. Release the lock lever from its clasp on the left side of the
Mini-E-Bike™.
8. Rotate the lock lever (A, Figure 8) clockwise until it points
forward. Pull the locknut and rotate the locknut (A, Figure 9)
out away from the Mini-E-Bike™ until the nut clears the lock
plate (B, Figure 9).
9. Grasp the seat and the handlebar. Pivot the front half of
the frame rearward around the hinge until the front wheel is
beside the rear wheel (Figure 10).
10. Use the strap on the seatpost to secure the handlebar
stem to the seatpost. This keeps the Mini-E-Bike™ securely
folded.
B
B
12
CAUTION:
Always use the strap to secure the handlebar stem to the
seatpost when the bike is folded (Figure 10). If you do not,
your finger or hand could be pinched if the bike should
unintentionally unfold while you are handling it.
Unfolding the Mini-E-Bike
1. Remove the strap from the handlebar stem. Wrap the
strap around the seatpost.
2. Grasp the seat and the handlebar firmly. Pivot the front
half of the frame forward until the hinge lock plate (B, Figure
9) closes against the lock bolt pivot.
3. Rotate the locknut (A, Figure 9) forward until the nut
engages the lock plate as shown in B, Figure 8.
FIG. 9
A
A
B
FIG. 8
A
B

13
4. Lock the hinge by rotating the lock lever (A, Figure 8)
rearward until it presses against the side cover. Secure the
lock lever in the clasp on the left side of the Mini-E-Bike™.
5. Rotate the right pedal down so it parallels the ground.
WARNING:
Be sure the handlebar quick release securely clamps the
handlebar stem to the fork stem. An improperly adjusted
handlebar quick release can produce instability that can
cause loss of control and a fall.
6. Unlock the handlebar quick release lever. Rotate the
handlebar counterclockwise until the handlebar is perpendi-
cular to the bike’s frame. Lock the handlebar quick release
lever securely.
7. Reinstall the battery pack as described above.
QUICK RELEASE BINDER
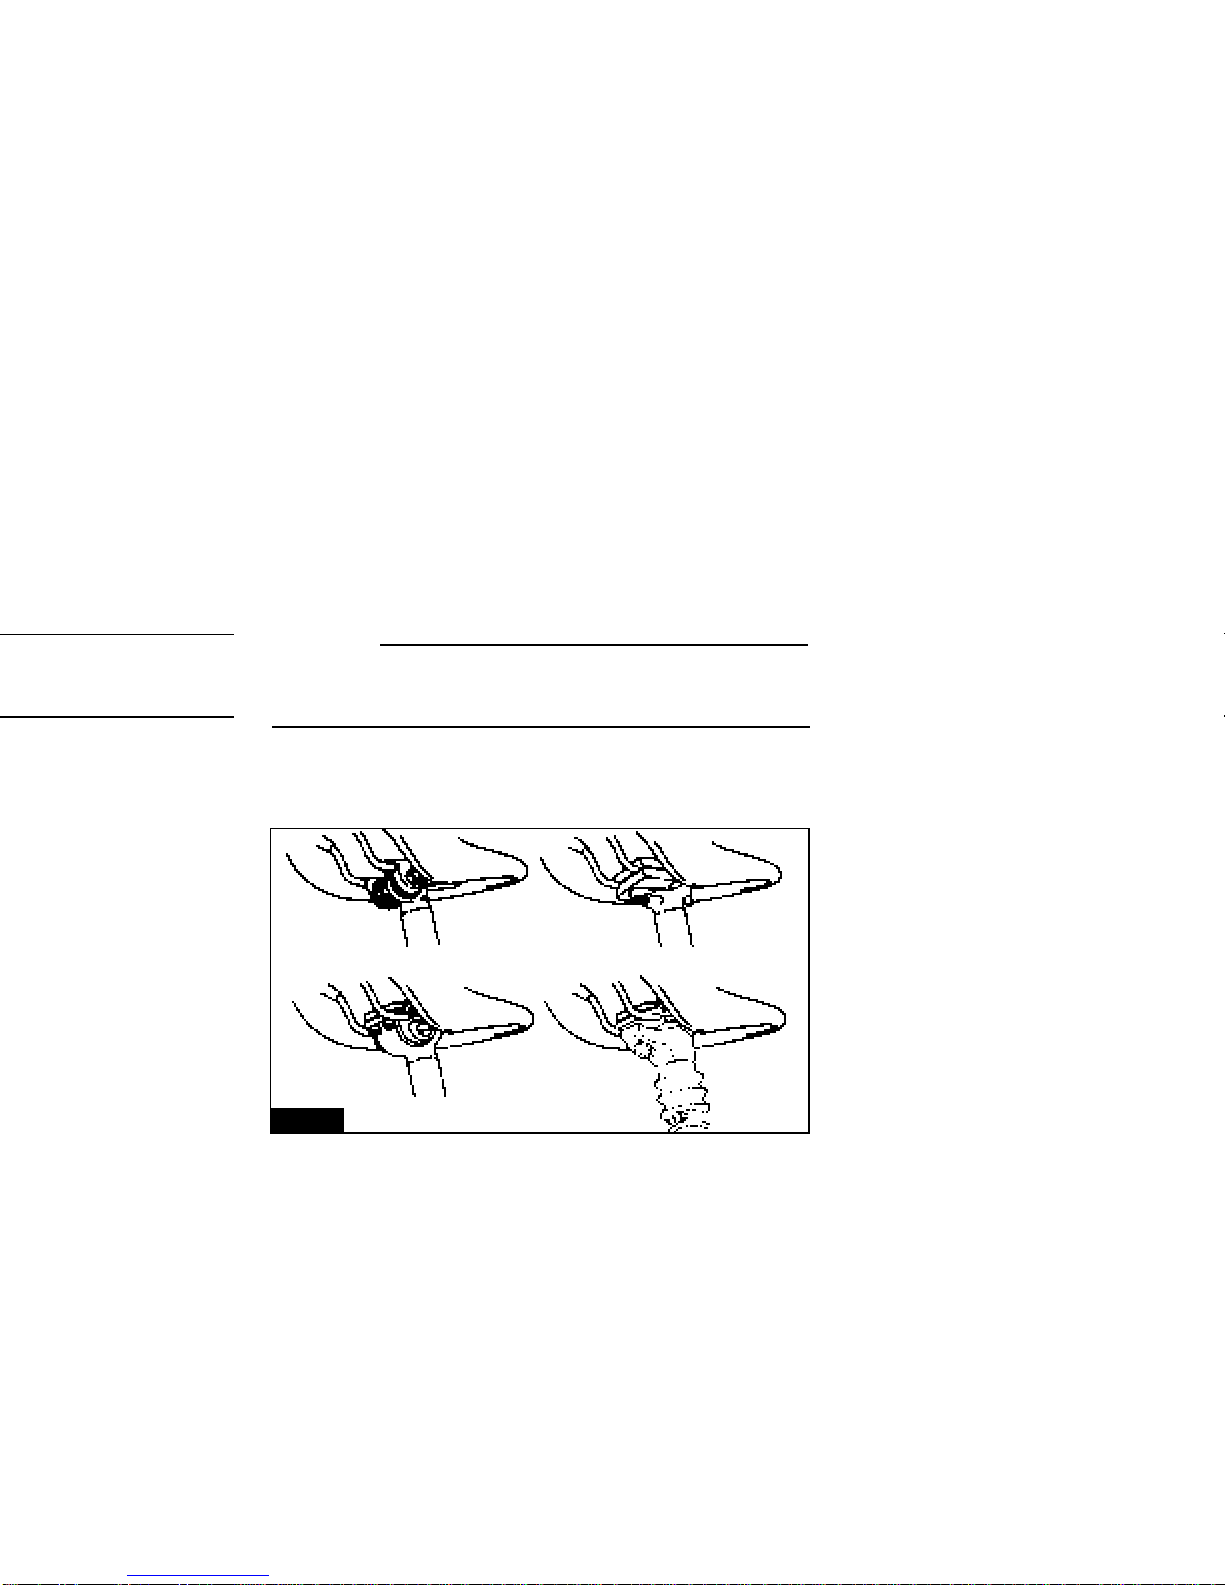
Locked/Unlocked
The handlebar and seatpost on your Mini-E-Bike™ are
secured with a quick release binder. While a quick release
binder looks like a bolt with a lever on one end and a nut on
the other, a quick release binder uses cam action to firmly
clamp the handlebar or the seatpost in place.
On your Mini-E-Bike™, each quick release binder is installed
so the lever is on the right side of the bike. The binder is
properly locked when the lever curves around the handlebar
stem (or seatpost) and points forward as shown in Figure 11.
FIG. 10
FIG. 11

14
To unlock (open) a quick release binder, pull the lever out
away from the handlebar as shown in (A, Figure 12).Tolock
(close) the quick release binder, use the palm of your hand to
press the lever forward to the locked position (Figure 11).
WARNING:
Riding with an improperly tightened quick release binder can
allow the handlebar or saddle to turn or move, which could
cause you to lose control and fall.Therefore:
1. Ask your dealer to help you make sure you know how to
correctly clamp your handlebar and seatpost in place.
2. Understand and apply the correct technique for clamping
your a quick release binder.
3. Before you ride the Mini-E-Bike™, first check that the
handlebar and seatpost are securely clamped in place.
Adjusting a quick release binder
The action of the quick release cam squeezes the collar
around the handlebar or seatpost to hold each component
securely in place.The amount of clamping force is controlled
by the tension adjusting nut (B, Figure 12).
CAUTION:
Holding the nut with one hand and turning the lever like a
wing nut with the other hand until everything is as tight as you
can get it will not clamp the handlebar or seatpost safely.The
full force of the cam action is needed to clamp them securely.
Turning the tension adjusting nut clockwise while keeping the
cam lever from rotating increases clamping force.Turning the
nut counterclockwise while keeping the cam lever from
rotating reduces clamping force. Less than half a turn of the
adjusting nut can make the difference between safe clamping
force and unsafe clamping force.
USING THE CENTERSTAND
1. To raise the Mini-E-Bike™ on the centerstand, perform the
following:
a. Use your foot to lower the centerstand until it rests on
the ground.
b. While stepping on the centerstand, simultaneously lift
the seat and pull the Mini-E-Bike™ rearward until the
centerstand locks in place.
FIG. 12
A
A
B
B
3. FIT AND SAFETY
FIT
Make sure the Mini-E-Bike™ fits. A bike that is too big or too
small for the rider is harder to control and can be
uncomfortable.
WARNING:
If your Mini-E-Bike™ does not fit properly, you may lose
control and fall. If your new Mini-E-Bike™ does not fit, ask
your dealer to exchange it before you ride it.
Saddle position
Correct saddle adjustment is an important factor in getting
the most performance and comfort from your Mini-E-Bike™.
15
2. To lower the Mini-E-Bike™ from the centerstand, roll the
Mini-E-Bike™ forward and off the centerstand. The
centerstand spring holds the stand up against the frame.
CARE AND CLEANING
Remove the battery pack before washing your Mini-E-Bike™.
WARNING:
Keep the battery pack and charger away from water to
prevent electrical shock and damage to the charger or
batteries.
Clean the Mini-E-Bike™ with a mild soap and a sponge. DO
NOT use a power hose or washer. Gently rinse with water.
Avoid spraying water directly onto the control switches, motor
and front hub bearings. Do not spray water inside the battery
compartment. Dry the frame mounted electrical connector in
the battery compartment before reinstalling the battery pack.
Use automotive wax to protect painted surfaces. Lubricate
the chain periodically to help prevent corrosion and minimize
wear.
FIG. 13

Your dealer will have positioned the saddle where experience
tells him most people find it comfortable. If you find the
saddle position is not comfortable, there are three
adjustments you can make.(See Figure 13 to determine the
type of saddle attachment used on your Mini-E-Bike™).
a. Up and down adjustment.
Your leg length determines the correct saddle height. The
saddle is at the correct height if you can just reach the“down”
pedal with one heel when you are seated on the saddle and
the crank arms are parallel to the seat tube. To check for
correct saddle height, perform the following:
1. Sit on the saddle, and place one heel on a pedal.
2. Rotate the crank until the pedal with your heel on it is in
the down position and the crank arm is parallel to the seat
tube.
3. Your leg should be completely straight and just touching
the center of the pedal. If this is not the case, your saddle
height needs to be adjusted.
WARNING:
Be sure the seatpost quick release securely clamps the
seatpost to the frame.An improperly adjusted seatpost quick
release can produce instability that can cause loss of control
and a fall.
To adjust the saddle height, unlock the quick release lever
(Figure 14) and move the seatpost up or down as required.
Make sure that the saddle is parallel to the top tube of the
16
Mini-E-Bike™, and lock the quick release lever so that you
cannot twist the saddle out of alignment. Check the
adjustment as described above. Under no circumstances
should the seatpost project from the frame beyond its
“Minimum Insertion” or “Maximum Extension” mark.
WARNING:
If the Minimum Insert mark or the Maximum Extension mark
on your seatpost extends beyond the frame, the seatpost
may break, which could cause you to lose control and fall.
b. Front and back adjustment
Loosen the saddle clamping mechanism (see Figure 13) and
slide the saddle back or forward on its rails. Start with the
saddle clamped in about the middle, and adjust it forward or
back until you find the position which is most comfortable for
you. Retighten the saddle clamping mechanism securely.
.
FIG. 14

c. Saddle tilt adjustment
Most people prefer a horizontal saddle; but some riders
prefer to have the saddle nose tilted slightly up or down.You
can adjust saddle tilt by loosening the saddle clamping
mechanism, tilting the saddle to the desired position, and
retightening the saddle clamping mechanism tight enough so
that you cannot move or jiggle the saddle.
Very small changes in saddle position can have a substantial
effect upon performance and comfort. Consequently,
whenever you make a change to your saddle position, make
only one directional change at a time, and make the changes
in small increments until you have found the position at which
you are most comfortable.
WARNING:
After any saddle adjustment, be sure to tighten the saddle
adjusting mechanism properly before riding. A loose saddle
clamp or seatpost binder can cause damage to the seatpost,
or can cause you to lose control and fall.A correctly tightened
saddle adjusting mechanism will allow no saddle movement
in any direction. Periodically check to make sure that the
saddle adjusting mechanism is properly tightened.
If, in spite of carefully adjusting the saddle height, tilt, and
fore-and-aft position, your saddle is still uncomfortable, you
may need a different saddle design. Saddles, like people,
come in many different shapes, sizes, and resilience.Your
17
dealer can help you select a saddle which, when correctly
adjusted for your body and riding style, will be comfortable.
CAUTION:
Extended riding with a saddle which is incorrectly adjusted or
which does not support your pelvic area correctly can cause
short-term or long-term injury to nerves and blood vessels.If
your saddle causes you pain or numbness, adjust the saddle
position and your riding position.If pain or numbness persist,
talk to your dealer about fitting a different saddle to your Mini-
E-Bike™.
SAFETY EQUIPMENT
WARNING:
Many states require specific safety devices. It is your
responsibility to familiarize yourself with the laws of the state
where you ride and to comply with all applicable laws,
including properly equipping yourself and your Mini-E-Bike™
as the law requires.
WARNING:
Do not remove the reflectors from your Mini-E-Bike™. They
are an integral part of the safety system on the Mini-E-
Bike™. Removing the reflectors may reduce your visibility to
others using the roadway. Being struck by other vehicles
often results in serious injury or death.
Table of contents


