Evak DPC-10 User manual

www.evak-pumps.com
Vol.PMDPC-15051-1.2-R
DPC-10
Water Pump Digital Pressure Controller
Installation and Operation Manual
EVAK PUMP TECHNOLOGY CORP.
No. 551, Zhongshan Rd., Qingshui Dist., Taichung City 436, Taiwan.
TEL:+886-426-233556 Fax:+886-426-235559

EC DECLARATION OF CONFORMITY
Applicant : EVAK PUMP TECHNOLOGY CORP.
Address of Applicant : No.551, Zhongshan Rd., Qingshui Dist., Taichung City 436,
Taiwan (R.O.C.)
Product Name : Water Pump Digital Pressure Controller
Model No. : DPC-10
Test Report No.:
:
E14060543
Directive : 2004/108/EC Electromagnetic Compatibility Directive
For the most specific risks of this machine, safety and compliance with the essential
requirements of the Directive has been based on elements of:
EN 61000-6-3:2007/A1:2011 / Electromagnetic compatibility (EMC) -- Part 6-3: Generic standards -
Emission standard for residential, commercial and light-industrial environments
EN 55011:2009/A1:2010 / Industrial, scientific and medical equipment - Radio-frequency disturbance
characteristics - Limits and methods of measurement CISPR 11:2009 (Modified)
EN 61000-6-1:2007 / Electromagnetic compatibility (EMC) -- Part 6-1: Generic standards - Immunity
for residential, commercial and light-industrial environments
IEC 61000-4-2:2008/Electromagnetic compatibility (EMC) - Part 4-2: Testing and measurement
techniques - Electrostatic discharge immunity test
IEC 61000-4-3:2006+A1:2007+A2:2010/Electromagnetic compatibility (EMC) - Part 4-3: Testing and
measurement techniques - Radiated, radio-frequency, electromagnetic field immunity test
IEC 61000-4-8:2009 / Electromagnetic compatibility (EMC) - Part 4-8: Testing and measurement
techniques - Power frequency magnetic field immunity test
Date :
Signature :
Qualification : General Manager
Place : Taichung City, Taiwan
EVAK PUMP TECHNOLOGY CORP.
No.551, Zhongshan Rd., Qingshui Dist., Taichung City 436, Taiwan (R.O.C.)
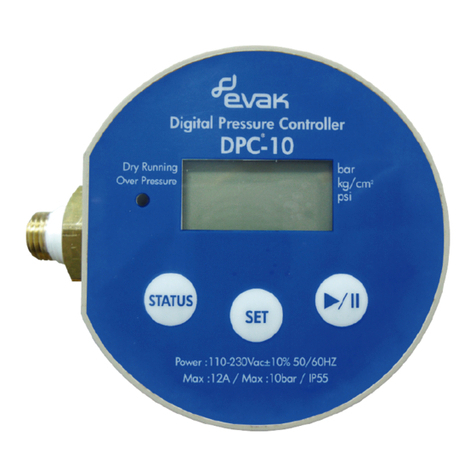
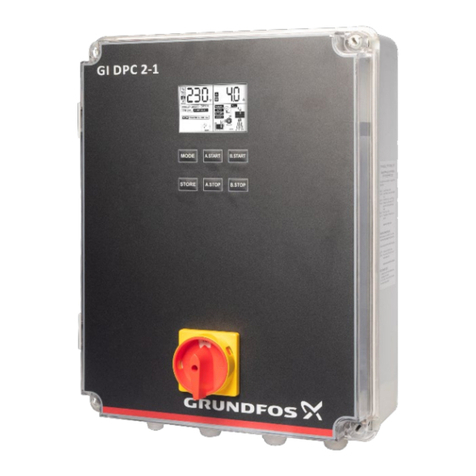
1.DPC-10 Panel introduction
2.Technical data
Supply voltage:115~220Vac ± 10% 50/60HZ
Maximum ambient temperature:+40℃
Maximum liquid temperature: +65℃
Maximum system pressure: 10bar
Maximum contact load AMP: 12A
Ingress Protection Rating: IP55
Dry Running
Digital Pressure Controller
DPC-10
bar
kg/cm
2
psi
Over Pressure
Power :115-220Vac ±10% 50/60HZ
Max :12A / Max :10bar / IP55
Model Number
LED Light
LCD Display
Technical Data
Button
Pressure Unit
»
»
»
»
»
»
»
Relay Capacity: 1HP in 110V or 2HP in 220V
»
The Max. motor size is 1HP in 110V or 2HP in
220V, but if connect to contactor in the control
panel then DPC-10 controller can fit the pump
over 2HP.

4.Button Function Introduction
3.Wiring diagram
Note:
L,N: Power Supply
W1,U1: Motor Wire
Blue,Brown: Controller Power Supply
Yellow,White: Controller Relay
WARNING Incorrect wiring could cause damage to the pressure controller,
confirm the color of the wires with the operation manual before wiring.
Button Icon Function
Browsing original pressure value.
Downward adjustment of the parameter value.
Pump start and stop operation.
Upward adjustment of the parameter value.
Possible with Button
Short press once:
Switch to Basic parameter setting.
Long press for 3 seconds:
Switch to Advance parameter setting.
After entering the parameter setting,short press once again:
Switch to next setting mode and enter the set value.
U1
Blue
N
Brown
L
Yellow
W1
Blue
L
W1
White
U1
Brown
N
Yellow
White
!
04
a. Single phase wiring connection
b. Three phase wiring connection-220V
c. Three phase wiring connection-380V
3 phase PUMP
AC 220V
M1
Coil
M1
DPC-10
Controller
White
Brown Blue
Yellow
U V W
3 3W AC 220V
R S T
3 phase PUMP
M1
DPC-10
Controller
White
Brown Blue
Yellow
U V W
3 4W AC 380V
R S T N
NFB
(MCCB)
AC 220V
M1
Coil
WARNING
!If connecting to a pump driven by 3ph/380V pump (Please
AC 110V,220V
NFB
(MCCB)
1
1 phase PUMP
DPC-10
Controller
White
Brown Blue
Yellow
NFB
(MCCB)
L N
If installing DPC-10 with a varistor, please connect varistor wire in parralled with
thin Brown and Blue wires of the DPC-10.
*
note the power voltage is not allowed over 400V.), the blue and yellow
wires of DPC-10 are forbidden connecting to R or S wire, otherwise the
DPC-10 controller will be burned out.
220V( <250V)
Note: If the voltage is over 250V, please add transformer by yourself.
WARNING
!
Any connection to the contactor, please add a
R.C capacitor (spark eliminator) to reduce the
possible electromagnetic interference.
WARNING
!
Any connection to the contactor, please add a
R.C capacitor (spark eliminator) to reduce the
possible electromagnetic interference.

5.The status of LED lights
6.Parameter display and settings
06
Item Light Message indication
Control loop off from the systemNon
Green
Orange
Red
Pump status
Control loop command the pump of
system to start running
Control loop is loaded into the system
Warning message to shut down the
system temporarily
Pump off
Pump on
Pump standby
Pump auto stop and display
the fault message(Dry running
1
2
3
4
Item
Parameter
Display
Code
Default
Unit
P-max kg/cm²
kg/cm²
kg/cm²
P-min
P-Dry
Description
Pressure of
water shortage
setting display
(Dry running)
Min. Pressure
setting display
Max. Pressure
setting display
» Press once: To see the
Max.
pressure setting value.
» Or stay on this screen for 5 seconds it will return to
the actual pressure status display automatically.
» Press again: To see the Min. pressure setting value.
» Or stay on this screen for 5 seconds it will return to
the actual pressure status display automatically.
» Press again: To see the pressure
of water shortage
setting value.
» Or stay on this screen for 5 seconds it will return to
the actual pressure status display automatically.
1
2
3
“ ” (Pressure value display)
or Over pressure)
Item Parameter Pump action Description
Stop (OFF)
Restart (ON)
Pump off Non
Pump on Orange
Press once to restart the pump running.
Long press for 3 seconds to stop the pump
1
2
“ ” (Restart or stop the pump running)
“ ” (Short press once to enter Basic Setting Mode)
Setting procedure : Max. pressure →Min. start pressure →Time-Delay
Item
Parameters
Display
Code
Default
Unit
Data
Range
P-max kg/cm²
0.01~
10.00
Description
Max. pressure
setting
(high pressure)
a.Select to modify Max. Pressure, press the
left or right button to adjust the value, after
finishing the setting, press the SET button
once and go to Min. start pressure
1
running.
0~60
kg/cm²
sec
- -
P-min
Delay
loAd
Min. start
pressure setting
(low pressure)
Time-Delay
setting when
reaching the
Max. Pressure
Load for 3
seconds to store
setting value
b.Stay on this screen for 30 seconds, the
display screen will back to the actual
pressure conditions automatically and the
preset data value is not stored.
c.Choose not to modify the pressure, press
the SET button, and go to next parameter
setting.
a.Select to modify Min. start pressure , press
the left or right button to adjust the value,
after finishing the setting, press the SET
button once and go to Time-Delay setting .
b.Stay on this screen for 30 seconds, the
display screen will back to the actual
pressure conditions automatically and the
preset data value is not stored.
c. Choose not to modify the pressure, press
the SET button, and go to next parameter
setting.
a.Select to modify the Time-delay setting
when reaching the Max. Pressure, press
the left or right button to adjust the value,
after finishing the setting, press the SET
button and go to " loAd " display.
b.Stay on this screen for 30 seconds, the
display screen will back to the actual
pressure conditions automatically and the
preset data value is not stored.
c.Choose not to modify the delay time, press
the SET button, and LCD display " loAd "
Above setting value are stored and
3 seconds later, go to the actual pressure
value display automatically.
2
3
4
setting.
Light
0.01~
10.00

“ ” long press for 3 seconds (Advanced setting Mode)
Item
Parameters
Display
Code
Default
Unit
Data
Range
Unit - -
Description
Switch the
display working
pressure unit
a.Select to switch the Unit of working
pressure, press the right button to change
the pressure unit (Cycle : kg/cm² → Psi
→ bar→ kg/cm²), then press the SET
button once and go to next parameter
setting.
b.Stay on this screen for 30 seconds, the
display screen will back to the actual
pressure conditions automatically and the
preset data value is not stored.
c.Choose not to modify the working pressure
unit, press the SET button once, and go
to next parameter setting.
1
P-Dry sec 1~120
0.01~
10.00
P-Dry
Detection time
setting of water
shortage
Pressure of
water shortage
setting
(Dry running)
a.Select to modify the detection time after
reaching the pressure setting of water
shortage (Dry running),press the left or
right button to adjust the value, after
b.Stay on this screen for 30 seconds, the
display screen will back to the actual
pressure conditions automatically and the
preset data value is not stored.
c.Choose not to modify P-Dry detection time
setting, press the SET button once, and
go to next parameter setting.
a. Select to modify the Pressure of water
shortage, press the left or right button to
adjust the value, after finishing the setting,
press the SET button and go to next
b.Stay on this screen for 30 seconds, the
display screen will back to the actual
pressure conditions automatically and the
preset data value is not stored.
c.Choose not to modify the pressure of water
shortage, press the SET button, and go
to next parameter setting.
2
3
1~600sec
hour
Auto
Reset
Auto
Time setting of
automatic
re-start running
after warning
shutdown (Dry
running or
Over pressure)
(α value)
Auto shutdown
setting after
continuous
running
a.Select to modify automatic re-start time,
press the left or right button to adjust the
value, after finish the setting,press the SET
button, and go to next parameter setting.
The time of automatic re-start = (automatic
time setting) * (trip times)³
(Cumulative trip times is up to 10 times, if
press the right button to re-start, then the
trip times can be re-calculated.)
b.Stay on this screen for 30 seconds, the
display screen will back to the actual
pressure conditions automatically and the
preset data value is not stored.
c.Choose not to modify the automatic re-start
time, press the SET button, and go to next
parameter setting.
a.Select to modify the auto shutdown setting
after continuous running, press the left or
right button to adjust the value, after finish-
ing the setting, press the SET button and
go to next parameter setting.
St-0: Pressure controller keeps running
and won’t shut down automatically.
St-.5: Pressure controller will auto shut
down after continuously running 0.5 hours
and won’t auto restart after the shutdown.
St-1~5: Pressure controller will auto shut
down after continuously running 1~5 hours
and won’t auto restart after the shutdown.
4
5
finishing
the setting, press the SET button
kg/cm²
parameter setting.
Item
Parameters
Display
Code
Default
Unit
Data
Range
Description
and go to next parameter setting.
St-0
St-.5
St-1
~
St-5
b.Stay on this screen for 30 seconds, the
display screen will back to the actual
pressure conditions automatically and the
preset data value is not stored.
c.Choose not to modify the automatic re-start
time, press the SET button, and go to next
parameter setting.
08

7.Standard default value
(Factory preset settings)
10
8.Setting value range
a. Pressure setting range : 0.01 ~ 10.00bar
b. Time-Delay setting range : 0 ~ 60 seconds
c. Detection time after Dry-running setting range: 1~120 seconds
d. Time of automatic re-start running after warning shutdown
(α value) setting range : 1 ~ 600 seconds
e. Auto shutdown setting range: St-0~St-5 (None and 0.5~5Hours)
a. Max. pressure value : 2.5kg/cm²
b. Min. pressure value : 1.5kg/cm²
c. Delay Time when reaching the Max. Pressure : 15seconds
d. The pressure unit : kg/cm²
e. Detection time of water shortage : 30 seconds
f. Pressure of water shortage : 0.5kg/cm²
g. Time of automatic re-start running after warning shutdown
(α value) : 60 seconds
h. Auto shutdown setting after continuous running : St-0
i. Over pressure value is fixed in 10bar and cannot modify
9.The actual operating parameters display
1).Max. pressure setting display (high pressure) (Show code P-max)
2).Min. start pressure setting display (low pressure) (Show code P-min)
↓ Press once
a. Press once to browse original pressure value
↓ Press once
- -
dF-n
dF-y
- -
- - - -
or
loAd
Restore to
default value
setting
LCD screen
display “loAd”
or “ ----” for 3
seconds to
store and finish
the setting
a.Select to restore default value settings
(dF-y), press the right button and adjust the
parameter value from dF-n to dF-y.
After finishing the setting, press the SET
button, then all the advanced value
settings are returned to default value.
LCD screen display "- - - -" for 3 seconds
and back to the actual pressure conditions.
b.Stay on this screen for 30 seconds, the
display screen will back to the actual
pressure conditions automatically and the
preset data value is not stored.
c.Choose not to return to default value
settings (dF-n), select dF-n and press the
SET button again, LCD screen display
"loAd" for 3 seconds and will back to the
After LCD screen display “loAd” or “ ----” for
3 seconds later, above setting value are
stored and go to the actual pressure value
automatically.
6
7
Item
Parameters
Display
Code
Default
Unit
Data
Range
Description
actual pressure conditions automatically.

12
1).Max. pressure setting (high pressure) (Show code P-max)
3).Pressure of water shortage setting display (Dry running)
(Show code P-Dry)
4).Actual pressure status display
↓ Press again
b. Press once to enter basic setting
Press
to adjust the value upward
Press
to adjust the value downward
2).Min. Start pressure setting (low pressure) (Show code P-min)
↓ Press once
Press
to adjust the value upward
Press
to adjust the value downward
↓ Press once

14
1).Change the display working pressure unit (Show code Unit)
3).Time-Delay setting after reaching the Max. Pressure(Show code
Delay)
4).All parameter settings is stored (Show code loAd)
c. Press for 3 seconds to enter advanced setting
Press
to adjust the value upward
Press
to adjust the value downward
↓Press once
↓3 seconds later
5).After finishing above setting, 3 seconds later will go to the actual
pressure status display automatically.
Press to set up unit
Cycle of working pressure unit:
kg/cm² → psi → bar → kg/cm²
↓Press once

16
2).Detection time setting of water shortage (Show code P-Dry & sec)
3).Pressure of water shortage setting (Show code P-Dry) 5). Auto shutdown setting after continuous running (Show code Auto)
Press
to adjust the value upward
Press
to adjust the value downward
↓ Press once
4).Time setting of automatic re-start running after warning shutdown
(Dry running or Over pressure) (α value) (Show code Auto reset)
Press
to adjust the value upward
Press
to adjust the value downward
↓ Press once
Press
to adjust the value upward
Press
to adjust the value downward
↓ Press once
»
St-0: Pressure controller keeps running and won’t shut down
automatically.
St-.5&St-1~5: Pressure controller will auto shut down after
continuously running 0.5 or 1~5 hours and won’t auto restart
after the shutdown.
»
Press
to adjust the value upward
Press
to adjust the value downward
↓ Press once

6).Restore to default value setting or not
Restore to default value settings (show code dF-y)
»
Press to adjust the value to dF-y
Press once and restore to default value (Show code ----)
7).After finishing above settings, LCD screen display “loAd” or “ ----”
3 seconds later, go to the actual pressure status display automati-
cally .
Not restore to default value settings (show code dF-n)
»
Press to set the value to dF-n
Press once then all settings are stored. (Show code loAd)
Pressure controller display “EEEE”
It means the failure of pressure
sensor.
Pressure controller display “FFFF”
It means the failure of temperature
sensor.
Pressure controller display “EEFF”
It means the failure of pressure and
temperature sensor.
b).FFFF
c).EEFF
a).EEEE
10.Fault Display
18
Other manuals for DPC-10
1
Table of contents
Other Evak Controllers manuals
