Evco S.r.l. • File EVIF60RS_(GB;I)_A4_v1.00.pdf
EVIF60RS Insulated serial interface (1 RS-232 input/5 RS-485 outputs) version 1.00
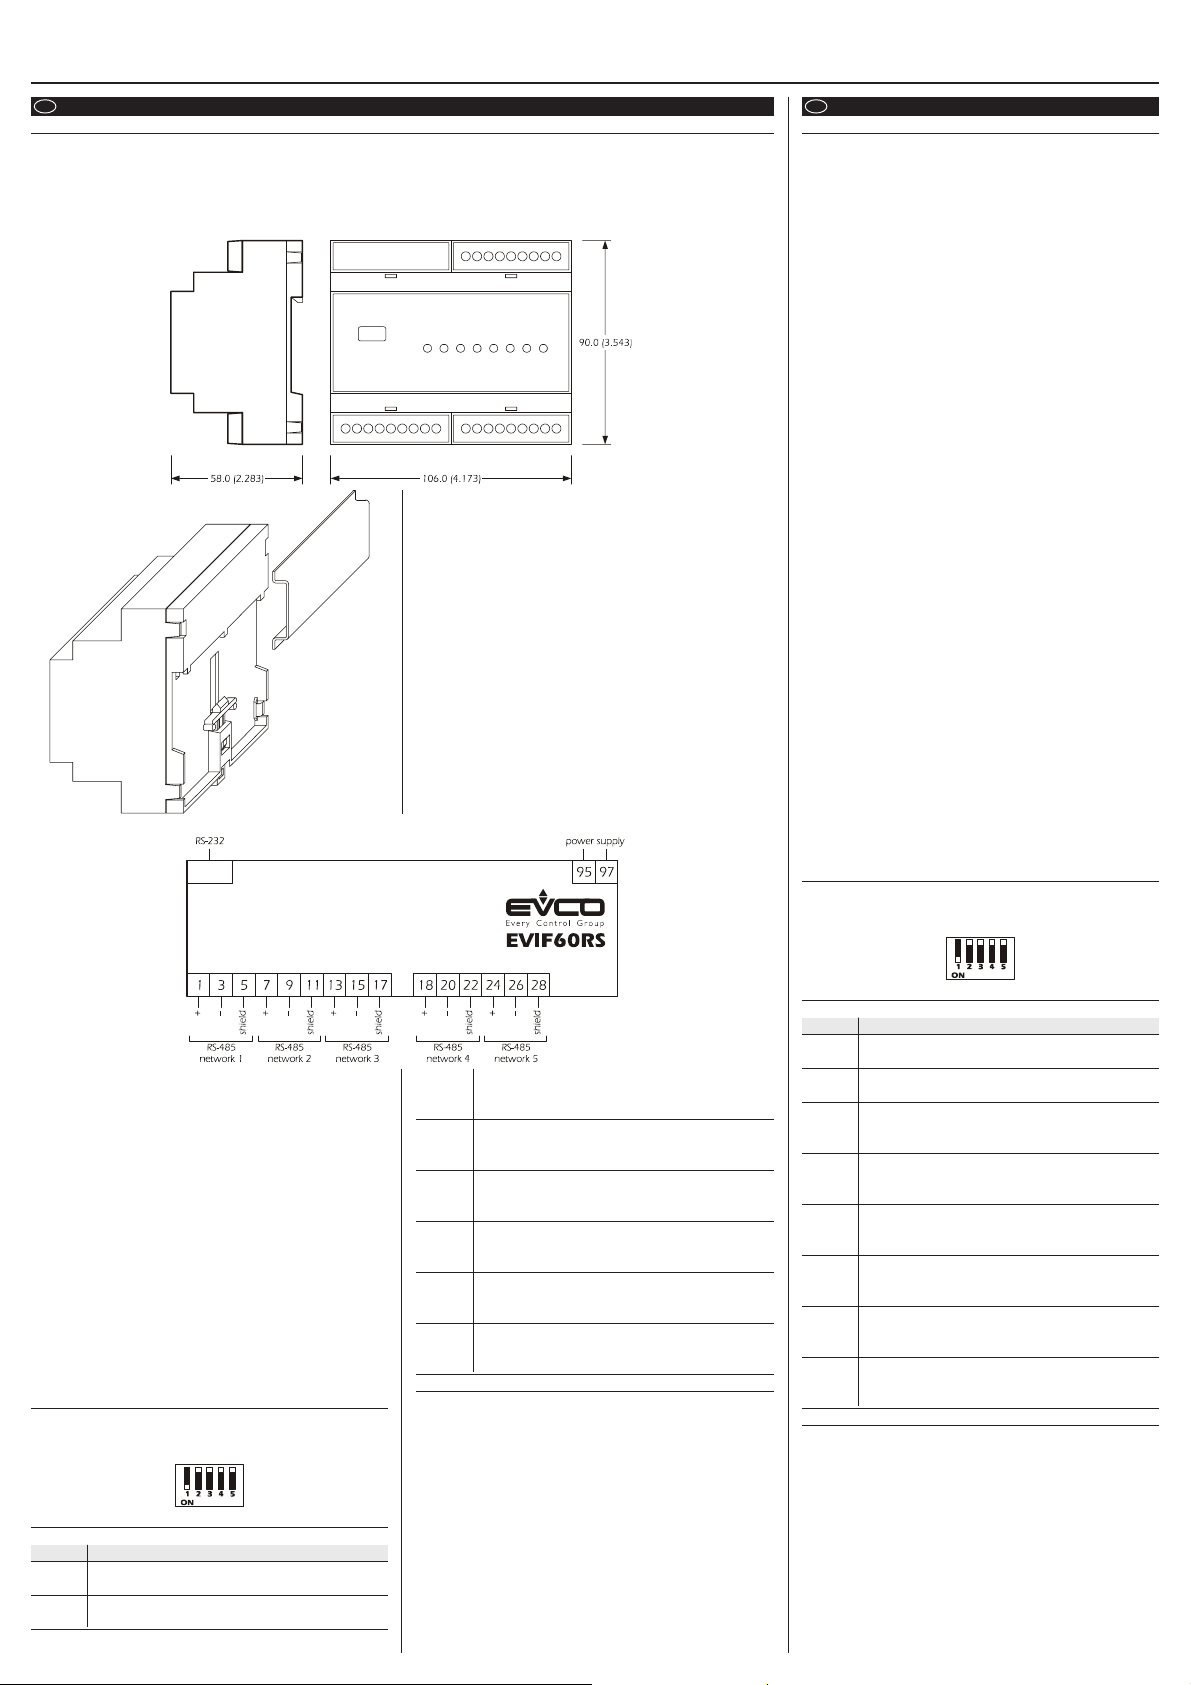
1.3 Wiring diagram
GB ENGLISH
1 GETTING STARTED
1.1 Important
Read these instructions carefully before installing and using the instrument and follow all additional information for installation and electrical
connection; keep these instructions close to the instrument for future consultations.
The operation of the interface has only been tested with instruments produced by Evco.
1.2 Installing the instrument
On DIN rail; dimensions in mm (in).
I ITALIANO
1 PREPARATIVI
1.1 Importante
Leggere attentamente queste istruzioni prima dell’installazione e prima
dell’uso e seguire tutte le avvertenze per l’installazione e per il collega-
mento elettrico; conservare queste istruzioni con lo strumento per con-
sultazioni future.
Il funzionamento dell’interfaccia è stato testato solo con strumenti Evco.
1.2 Installazione
Su guida DIN (si vedano i disegni del paragrafo 1.2 della sezione in
Inglese).
Avvertenze per l’installazione:
• accertarsi che le condizioni di lavoro (temperatura di impiego, umidi-
tà, ecc.) rientrino nei limiti indicati nei dati tecnici
• non installare lo strumento in prossimità di fonti di calore (resistenze,
condotti dell’aria calda, ecc.), di apparecchi con forti magneti (grossi
diffusori, ecc.), di luoghi soggetti alla luce solare diretta, pioggia,
umidità, polvere eccessiva, vibrazioni meccaniche o scosse
• in conformità alle normative sulla sicurezza, la protezione contro even-
tuali contatti con le parti elettriche deve essere assicurata mediante
una corretta installazione dello strumento; tutte le parti che assicura-
no la protezione devono essere fissate in modo tale da non poter
essere rimosse senza l’aiuto di un utensile.
1.3 Collegamento elettrico
Si veda il disegno del paragrafo 1.3 della sezione in Inglese.
Avvertenze per il collegamento elettrico:
• non operare sulle morsettiere utilizzando avvitatori elettrici o pneu-
matici
• se lo strumento è stato portato da un luogo freddo a uno caldo,
l’umidità potrebbe condensare all’interno; attendere circa un’ora pri-
ma di alimentarlo
• accertarsi che la tensione di alimentazione, la frequenza e la potenza
elettrica operativa dello strumento corrispondano a quelle dell’alimen-
tazione locale
• ogni rete RS-485 che ha origine dalle uscite RS-485 dello strumento
può essere composta da un massimo di 21 strumenti
• per realizzare le reti RS-485 utilizzare un doppino twistato
• per ridurre le riflessioni sul segnale trasmesso attraverso il cavo, inse-
rire la terminazione del primo e dell’ultimo elemento delle reti RS-485;
utilizzare terminazioni di tipo RC (120 Ω, 10 nF)
• disconnettere l’alimentazione prima di procedere con qualunque tipo
di manutenzione
• non utilizzare lo strumento come dispositivo di sicurezza
• per le riparazioni e per informazioni riguardanti lo strumento rivolger-
si alla rete di vendita Evco.
2 INSERIMENTO DELLE TERMINAZIONI
2.1 Inserimento delle terminazioni delle uscite RS-485
Con riferimento al dipswitch sul frontale dello strumento, posizionare il
rispettivo microinterruttore nella posizione ON.
3 SEGNALAZIONI
3.1 Segnalazioni
LED SIGNIFICATO
power 1 LED stato main
se è acceso, il driver dell’ingresso RS-232 sarà alimentato
power 2 LED stato sub
se è acceso, il driver delle uscite RS-485 sarà alimentato
main LED trasmissione dati da main a sub
se lampeggia, sarà in corso una trasmissione dati dall’in-
gresso RS-232 alle uscite RS-485
sub 1 LED trasmissione dati da sub 1 a main
se lampeggia, sarà in corso una trasmissione dati dalla pri-
ma uscita RS-485 all’ingresso RS-232
sub 2 LED trasmissione dati da sub 2 a main
se lampeggia, sarà in corso una trasmissione dati dalla se-
conda uscita RS-485 all’ingresso RS-232
sub 3 LED trasmissione dati da sub 3 a main
se lampeggia, sarà in corso una trasmissione dati dalla ter-
za uscita RS-485 all’ingresso RS-232
sub 4 LED trasmissione dati da sub 4 a main
se lampeggia, sarà in corso una trasmissione dati dalla
quarta uscita RS-485 all’ingresso RS-232
sub 5 LED trasmissione dati da sub 5 a main
se lampeggia, sarà in corso una trasmissione dati dalla
quinta uscita RS-485 all’ingresso RS-232
4 DATI TECNICI
4.1 Dati tecnici
Contenitore: autoestinguente grigio.
Grado di protezione del frontale: IP 40.
Connessioni: morsettiere a vite (alimentazione e uscite), connettore
telefonico (ingresso); l’interfaccia viene fornita con il cavo telefonico EC
CC 506 (cavo "dritto" lungo 2 m, per il collegamento al Personal Com-
puter) e con l’adattatore EC ACS 11 (per adattare
EC CC 506 alla COM del Personal Computer).
Temperatura di impiego: da 0 a 55 °C (10 ... 90% di umidità
relativa senza condensa).
Alimentazione: 230 VCA, 50/60 Hz, 3 VA.
Ingressi seriali: 1 ingresso RS-232.
Additional information for installation:
• working conditions (working temperature, humidity, etc.) must be
between the limits indicated in the technical data
• do not install the instrument close to heating sources (heaters, hot air
ducts, etc.), devices provided with big magnetos (big speakers, etc.),
locations subject to direct sunlight, rain, humidity, dust, mechanical
vibrations or bumps
• according to the safety legislation, the protection against electrical
parts must be ensured by a correct installation of the instrument; the
parts that ensure the protection must be installed so that you can not
remove them if not by using a tool.
Additional information for electrical connection:
• do not operate on the terminal blocks with electrical or pneumatic
screwers
• if the instrument has been moved from a cold location to a warm
one, the humidity could condense on the inside; wait about an hour
before supplying it
• test the working power supply voltage, working electrical frequency
and working electrical power of the instrument; they must corre-
spond with the local power supply
• each RS-485 network that has origin from the RS-485 outputs of the
instrument can be made of 21 instruments at most
• to realize the RS-485 networks use a twisted pair
• to reduce the reflections on the signal transmitted through the cable,
plug in the termination of the first and last element of the
RS-485 networks; use RC terminations (120 Ω, 10 nF)
• disconnect the local power supply before servicing the instrument
• do not use the instrument as safety device
• for repairs and information on the instrument please contact Evco
sales network.
2 PLUGGING IN THE TERMINATIONS
2.1 Plugging in the terminations of the RS-485 outputs
With reference to the dipswitch there is at the front of the instrument,
position the respective micro-switch on position ON.
3 SIGNALS
3.1 Signals
LED MEANING
power 1 LED main status
if it is lit, the driver of the RS-232 input will be supplied
power 2 LED sub status
if it is lit, the driver of the RS-485 outputs will be supplied
main LED data transmission from main to sub
if it flashes, a data transmission from the RS-232 input to
the RS-485 outputs will be running
sub 1 LED data transmission from sub 1 to main
if it flashes, a data transmission from the first RS-485 output
to the RS-232 input will be running
sub 2 LED data transmission from sub 2 to main
if it flashes, a data transmission from the second RS-485
output to the RS-232 input will be running
sub 3 LED data transmission from sub 3 to main
if it flashes, a data transmission from the third RS-485 out-
put to the RS-232 input will be running
sub 4 LED data transmission from sub 4 to main
if it flashes, a data transmission from the fourth RS-485 out-
put to the RS-232 input will be running
sub 5 LED data transmission from sub 5 to main
if it flashes, a data transmission from the fifth RS-485 output
to the RS-232 input will be running
4 TECHNICAL DATA
4.1 Technical data
Box: self-extinguishing grey.
Frontal protection: IP 40.
Connections: screw terminal blocks (power supply and outputs),
telephone connector (input); the interface is supplied with the telephone
cable EC CC 506 ("right" cable, 2 m long, for the connetcion to the
Personal Computer) and with the adapter EC ACS 11 (to adapt
EC CC 506 to the COM of the Personal Computer).
Working temperature: from 0 to 55 °C (32 to 131 °F, 10 ... 90% of
relative humidity without condensate).
Power supply: 230 VAC, 50/60 Hz, 3 VA.
Serial inputs: 1 RS-232 input.
Serial outputs: 5 RS-485 outputs; insulated interface (serial input-
serial outputs, not serial output-serial output).
Maximum speed of the data transmission: 19,200 baud.