Even Embers HTR1085AS/BS User manual

OWNER’S MANUAL
PELLET HEATER
WARNING
PLEASE READ THIS ENTIRE MANUAL BEFORE
INSTALLATION AND USE OF THIS PELLET FUEL-
BURNING APPLIANCE. FAILURE TO FOLLOW THESE
INSTRUCTIONS COULD RESULT IN PROPERTY
DAMAGE, BODILY INJURY OR EVEN DEATH. CONTACT
LOCAL BUILDING OR FIRE OFFICIALS ABOUT
RESTRICTIONS AND INSTALLATION INSPECTION
REQUIREMENTS IN YOUR AREA. SAVE THESE
INSTRUCTIONS.
NOTICE TO
INSTALLER:
LEAVE THESE
INSTRUCTIONS
WITH THE
HEATER OWNER
FOR FUTURE
REFERENCE.
Model HTR1085AS/BS
ASSEMBLY AND OPERATING INSTRUCTIONS SAVE THIS MANUAL FOR FUTURE REFERENCE
WARNING: FOR OUTDOOR USE ONLY
Scan to watch
assemby video.

IMPORTANT SAFETY WARNINGS
WE WANT YOU TO ASSEMBLE AND USE YOUR HEATER AS SAFELY AS POSSIBLE.
THE PURPOSE OF THIS SAFETY ALERT SYMBOL
IS TO ATTRACT YOUR ATTENTION TO POSSIBLE HAZARDS AS YOU ASSEMBLE AND USE YOUR HEATER.
WHEN YOU SEE THE SAFETY ALERT SYMBOL, PAY CLOSE ATTENTION TO THE INFORMATION WHICH FOLLOWS!
READ ALL SAFETY WARNINGS AND INSTRUCTIONS CAREFULLY
BEFORE ASSEMBLING AND OPERATING YOUR HEATER.
1. Improper installation, adjustment, service or maintenance can cause injury or property damage.
2. Read all instructions and guidelines carefully and thoroughly before installation, use or service.
3. Failure to follow these instructions could result in re.
WARNING
NOT for use in or on boats or recreation vehicles.
DANGER
1. Do not store or use gasoline, liquid propane or any other ammable vapors or
liquids in the vicinity of this appliance.
DANGER
1
Maintain a safe distance away from the heater as it is extremely hot during operation. Children and pets
should be supervised at all times when the heater is lit.
WARNING

2
General Warnings . . . . . . . . . . . . . . . . . . . . . . . . . . . . . . . . . . . . . . . . . . . . 3-4
Operating the Heater . . . . . . . . . . . . . . . . . . . . . . . . . . . . . . . . . . . . . . . . . . 4-5
Proper Care and Maintenance . . . . . . . . . . . . . . . . . . . . . . . . . . . . . . . . . . . . .6
Transporting and Storage. . . . . . . . . . . . . . . . . . . . . . . . . . . . . . . . . . . . . . . . .6
Assembly Instructions . . . . . . . . . . . . . . . . . . . . . . . . . . . . . . . . . . . . . . . . 7-14
Warranty Information . . . . . . . . . . . . . . . . . . . . . . . . . . . . . . . . . . . Back Cover
DANGER: Indicates an imminently hazardous situation which, if not avoided, will result in death or serious injury.
WARNING: Be alert to the possibility of serious bodily injury if the instructions are not followed. Be sure to read and
carefully follow all of the messages.
CAUTION: Indicates a potentially hazardous situation which, if not avoided, may result in minor or moderate injury.
TABLE OF CONTENTS:
For covers, accessories and other products, please visit us at:
www.evenembers.com
CALIFORNIA PROPOSITION 65 WARNING
WARNING: This product can expose you to chemicals, including carbon monoxide, which are
known to the State of California to cause birth defects or other reproductive harm.
For more information go to www.P65Warnings.ca.gov
WARNING: CONTAINS LEAD. MAY BE HARMFUL IF EATEN OR CHEWED. COMPLIES WITH
FEDERAL STANDARDS. KEEP OUT OF REACH OF CHILDREN.

WARNING
When using, basic safety precautions should always be followed including the following:
• Always place heater on a level non-combustible surface.
• Operate only per manufacturers instructions.
• Keep all combustible materials at least 36 inches (66 cm) away from the heater at all times. Do not use this heater
under any overhang or near any combustible structures.
• Minimum clearance from side and back of unit to combustible materials, 36 inches (66 cm) from side and 36
inches (66 cm) from back.
• DO NOT use on wood decks. Set up this heater on a hard, non-combustible smooth level surface.
• Keep a re extinguisher on hand. Refer to your local authority to determine proper size and type.
• Creosote – Formation and need for removal. When wood pellets are burned slowly, they produce tar and other
organic vapors that combine with expelled moisture to form creosote. The creosote vapors condense in a relatively
cool oven u and exhaust hood of a slow burning re. As a result, creosote residue accumulates on the ue lining
and exhaust hood. When ignited, this creosote makes an extremely hot re.
• Do not attempt to touch heater during use. Use handles or knobs.
• Alert both children and elders to the hazard of high surface temperatures.
• Never leave appliance unattended. Hot while in operation. Keep children, clothing and furniture away. Contact may
cause burns.
• Do not use accessories or attachments not recommended by the manufacturer, as they may not be compatible
with this appliance, and may cause damage or injury.
• Do not use this appliance for anything other than its intended use.
• NEVER add cooking pellets to a hot re pot by hand. You could be seriously burned. If the hopper runs out of
pellets or your re goes out, let the heater completely cool before relighting.
• Use only wood pellets. (cooking grade or heating grade wood pellets)
• Always store wood pellets away from heat.
• NEVER use gasoline, gasoline-type lantern fuel, or similar liquids to start or “freshen up” a re in this appliance.
Keep all such liquids well away from the appliance when in use.
• This heater is not for use indoors. Do not use inside a building, garage or any other enclosed area.
• This product is not designed for commercial use.
• Beware of high winds. This can knock over heater.
• This product is not designed for tabletop use. Do not set this product on a tabletop.
• Keep appliance clean. See Proper Care and Maintenance section for cleaning.
• Do not operate this heater while under the inuence of drugs, alcohol, or while fatigued.
• Do not use in the presence of explosive or ammable gases, vapor or other substances.
• Do not use this heater unless it is completely assembled and all parts are securely fastened and tightened.
• Use only identical replacement parts.
• Do not attempt to move this appliance while it is in use.
• Do not use this product for indoor heating, as toxic fumes will accumulate.
• Keep heater covered when not in use - out of the reach of children. Do not clean this product with a water
spray or the like.
GENERAL WARNINGS:
3
4
Follow these guidelines to prevent this colorless,odorless gas from poisoning you, your family
or others.
• Know the symptoms of carbon monoxide poisoning; headache, dizziness, weakness, nausea,
vomiting, sleepiness and confusion. Carbon monoxide reduces the blood’s ability to carry
oxygen. Low blood oxygen levels can result in loss of consciousness and death.
• See a doctor if you or others develop cold or u-like symptoms while cooking or in the vicinity
of this appliance. Carbon monoxide poisoning, which can easily be mistaken for a cold or u, is
often detected too late.
• Alcohol consumption and drug use increase the effects of carbon monoxide poisoning.
• Carbon monoxide is especially toxic to mother and child during pregnancy, infants, the elderly,
smokers and people with blood or circulatory system problems, such as anemia or heart
disease.
Read and follow all warnings and instructions contained in the preceding sections of this manual.
WARNING
OPERATING THE HEATER:
BREAKING IN YOUR HEATER:
• In manufacturing and preserving the components of your heater, oil residue may be present on the
surfaces.
• Please follow the “Initial Lighting Instructions” to cure the paint on your heater.
• DO NOT leave your heater unattended while in use.
• DO NOT move heater when in use.
WARNING
USE CAUTION AND COMMON SENSE WHEN OPERATING YOUR PELLET HEATER.
FAILURE TO ADHERE TO THE SAFETY WARNINGS AND GUIDELINES IN THIS MANUAL
COULD RESULT IN SEVERE BODILY INJURY OR PROPERTY DAMAGE. SAVE THIS
MANUAL FOR FUTURE REFERENCE.

LIGHTING THE HEATER:
Initial Lighting Instructions (To be used on initial ring)
Push shut-off lever (inside the hopper) down, turn heat adjustment lever to low before lling hopper
with pellets. Fill the hopper around ½ full. This one-time initial ring needs to be done to cure the
paint on the unit. Put the heat adjustment lever on the LOW setting to limit the number of pellets in
the repot for the entire initial burn period. Having the heat adjustment lever on the HIGH setting on
initial ring will result in very high temperatures and potentially damage your heater and voiding your
warranty. Pull the shut off lever (inside the hopper) up and lock in place. Light the pellets and let it burn
through all the pellets and allow the heater to cool down. You are now free to use the heater according
to the remainder of these instructions. These initial lighting instructions allow the high temperature
paint to cure properly. When curing, the paint will give off some smoke and this will happen for the rst
15 minutes.
5
OPERATING THE HEATER:
1. Make sure your heater has been assembled properly.
2. Push the shut-off lever down (inside pellet hopper).
3. Fill hopper with pellets. The pellets will not fall into the repot at this point since the shut-off
lever is closed.
4. Open the door and make sure the heat baffle is centered around the repot
5. Pull the shut-off lever up and lock in place (inside pellet hopper). This will allow pellets to fall into
repot.
6. Squirt a small amount lighter uid or gel onto the pellets and ignite with a butane lighter or match
and close the door.
7. Once the pellets have caught re after 5 minutes or so you can put the heat adjustment lever in
the High or Low setting.
8. Keep the door closed when using the heater. If the door is open, the heater will lose its draft and
the pellets will not burn properly.
9. Occasionally operate the ash clean-out handle to allow ash to drop into ash tray.
10. After several hours of use you may have excess pellets piled up at the bottom of the chute. If this
happens, you will need to pull and push the ash clean-out lever, which is located in the back of
the pellet heater, several times and/or use the ash clean-out tool to rake the pellets towards the
front of the repot. This only needs to be done after several hours of use to ensure maximum heat
output.

6
PROPER CARE & MAINTENANCE:
• Remove wood pellets from hopper if heater will not be used for a long period of time. Wood pellets
can become soggy due to moisture/humidity and clog up the repot and pellet chute.
• Disposal of ashes – Ashes should be placed in a metal container with a tight-tting lid. The
closed container of ashes should be placed on a non-combustible oor or on the ground, well
away from all combustible materials, pending nal disposal. When the ashes are disposed by
burial in soil or otherwise locally dispersed, they should be retained in the closed container
until all cinders have thoroughly cooled.
• To protect your heater from excessive rust, the unit must be kept clean and covered at all times
when not in use.
• Clean inside and outside of heater by wiping off with a damp cloth. Rust spots on the interior
surface can be buffed, cleaned, and sprayed with a high temperature paint. Soot buildup on the
glass can easily be wiped off.
• Depending on use, periodically remove the repot and baffle to clean the ash from in and around
the re pot. A shop-vac is handy for this chore. Make sure the heater is cold before starting this
procedure.
CLEANING AND MAINTENANCE:
• Keep the appliance free and clear of combustible materials, gasoline and other ammable vapors
and liquids.
• For peak performance of your heater, perform these checks at least twice per year or after
extended periods of storage.
• Be sure to tighten up all hardware (nuts, bolts, screws, etc.) at least twice per year.
CAUTION: Some parts may contain sharp edges. Wear protective gloves if necessary.
BEFORE STORING YOUR HEATER:
• Clean all surfaces.
• If storing the heater outdoors, cover the heater for protection from the weather.
• If the heater is stored outside during the rainy season, care should be taken to ensure that water does
not get into the pellet hopper. Wood pellets, when wet, expand greatly and will jam inside the hopper
and chute.
• Never move a heater when it is hot.
• Never store ammable liquids or spray canisters under or near the heater.
WARNING
TRANSPORTING AND STORAGE:
7
ASSEMBLY INSTRUCTIONS:
Make sure you have all items listed under PARTS LIST and PARTS CARD CONTENTS before
you begin the installation process.
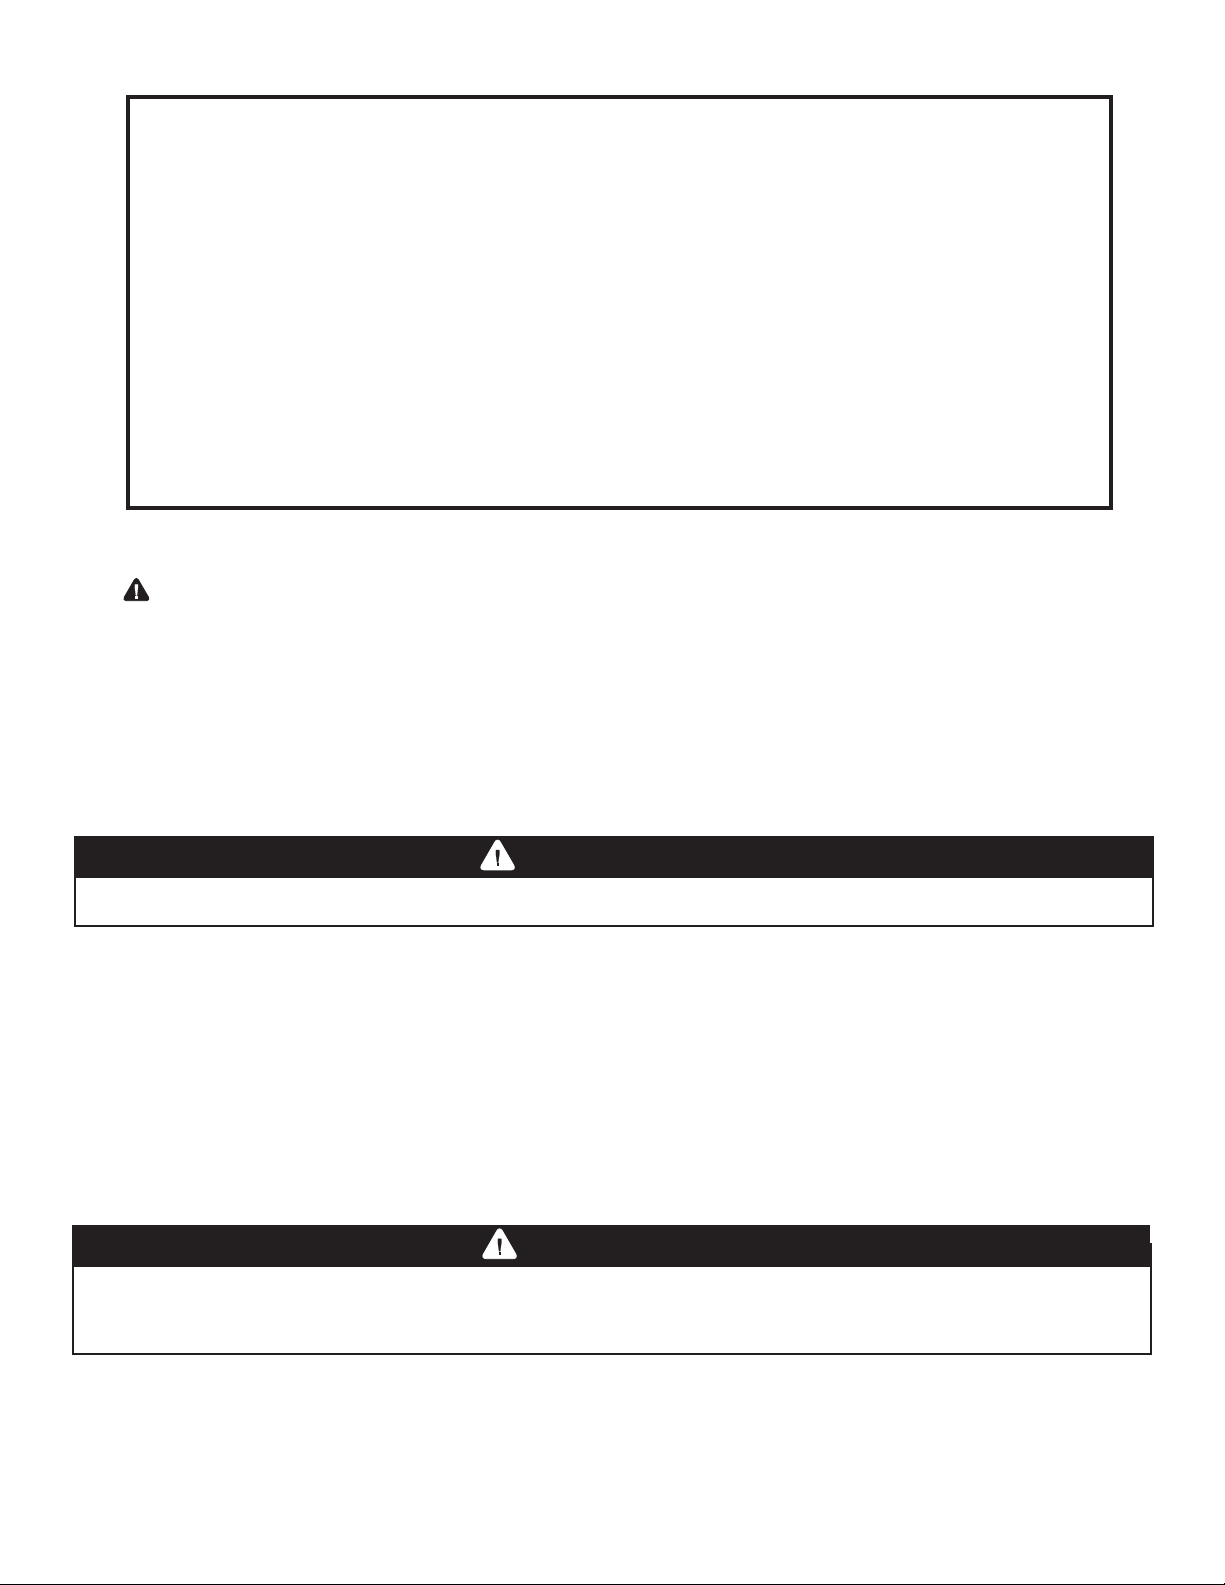
PARTS CARD CONTAINS:
(1) Cotter Pin
(4) M6 x 35 mm Bolts
(2) M5 x 12 mm Bolts
(1) M6 x 16 mm Bolt and M6 Lock Nut
(7) M6 Nuts
(4) M4 x 12 mm Bolts
(6) M6 x 12 mm Bolts
M6 Nuts - 7 pcs
M6 x 12 mm Bolts - 6 pcs
M6 x 35 mm Bolts - 4 pcs
Cotter Pin-1 pc
M6 x 16 mm
Bolt and M6 Lock
Nut - 1 pc
M4 x 12 mm
Bolts - 4 pcs
M5 x 12 mm
Bolts - 2 pcs

8
READ ALL SAFETY WARNINGS & INSTRUCTIONS CAREFULLY
BEFORE ASSEMBLING AND OPERATING YOUR EVEN EMBERS®PELLET HEATER.
FOR MISSING PARTS, PLEASE CALL CUSTOMER SERVICE AT 855-735-9922.
(Proof of purchase will be required.)
The following tools are required to assemble your Even Embers ® Pellet Heater:
• Phillips Screwdriver
1 Ash Clean-out Handle
1 Firepot
1 Heat Baffle
1 Heater Body Assembly
1 Ash Tray
1 Ash Tray Handle
1 Heater Base
4 Feet
PARTS LIST:
1 Chimney Cap
1 Lower Chimney
1 Upper Chimney
1 Heat Adjustment Lever
1 Heat Adjustment Lever Handle
1 Chimney Collar
1 Door Latch
1 Rack
1
2
3
4
5
6
7
8
9
10
12
13
14
15
11
FOR COVERS, ACCESSORIES AND OTHER PRODUCTS, PLEASE VISIT US ONLINE AT:
www.evenembers.com
Inspect contents of the box to ensure all parts are included and undamaged. Extra screws are
included in a small bag with the owners manual.
16

1
2 3
4
5
67
8
9
10
12
11
13
14
16
9
15
10
Heater Body
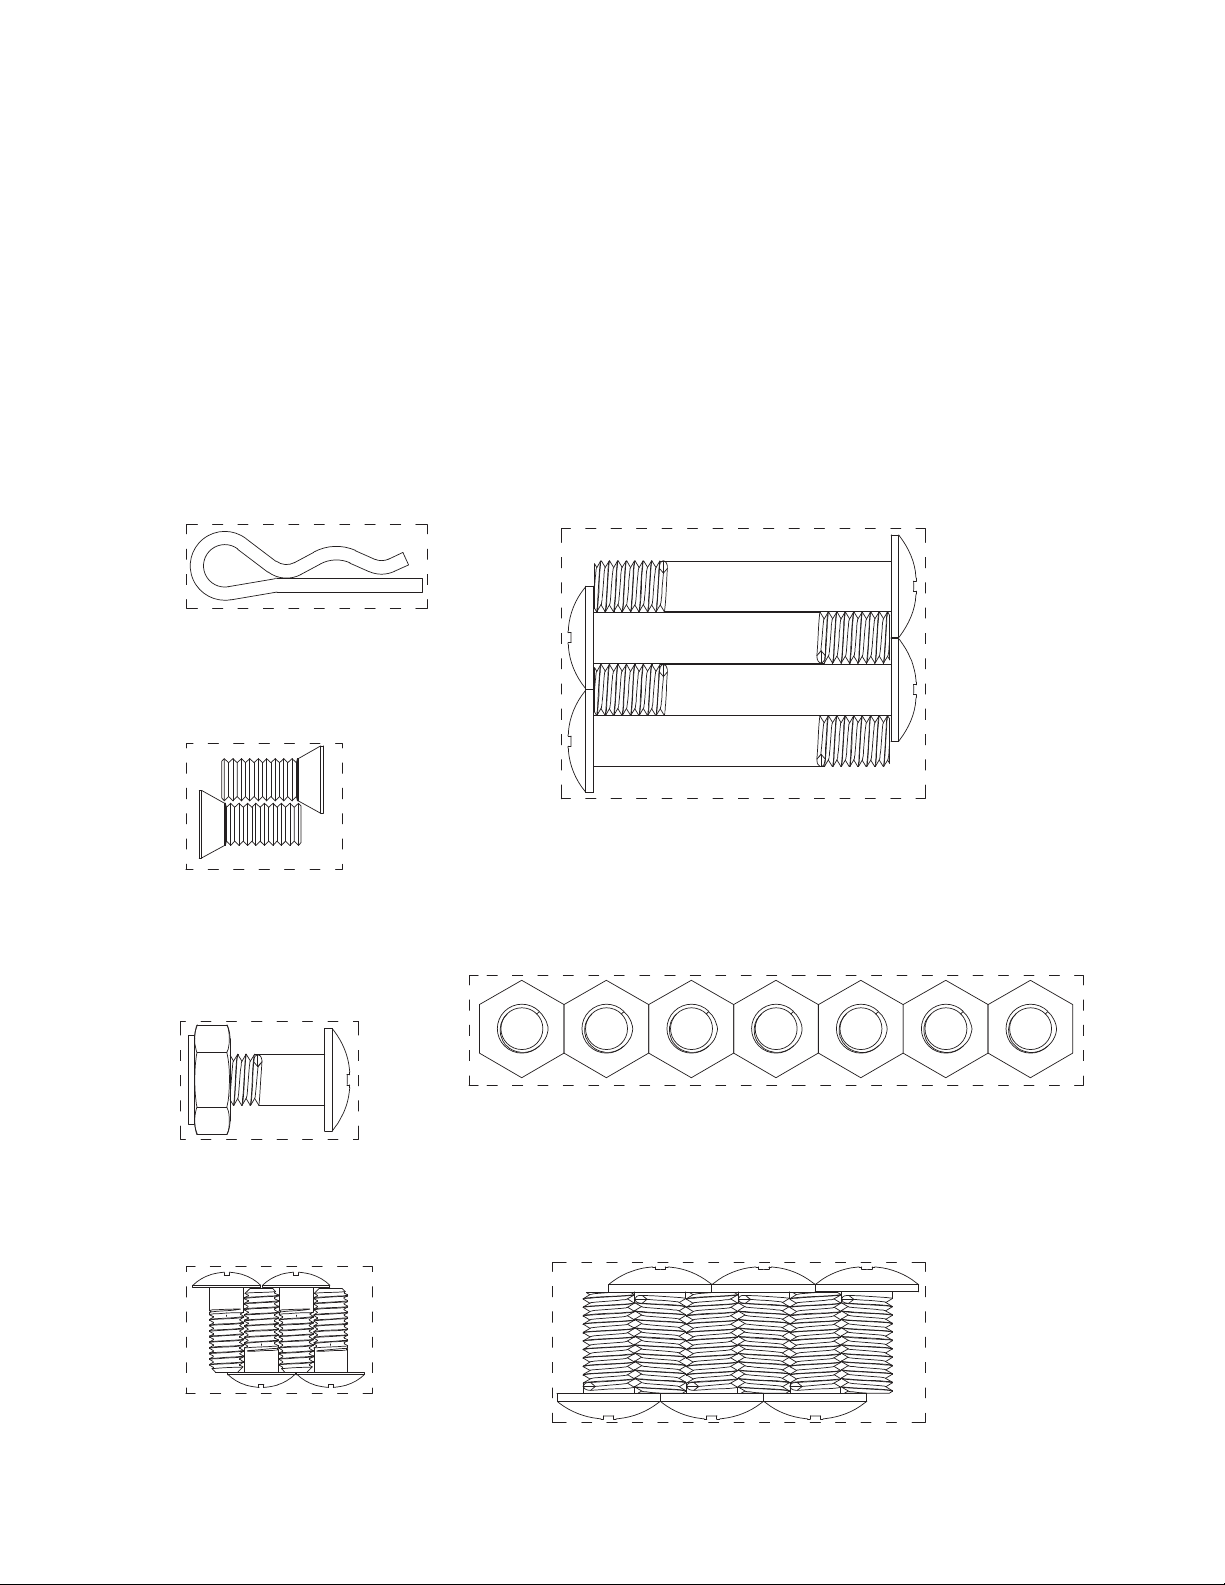
1
2
Place heater body upside
down as illustrated. Install
four M6 x 35 mm bolts and
two M6 x 12 mm bolts.
Install four feet.

11
3
4
Install chimney collar
using four M6 x 12 mm
bolts and four M6 nuts.
Install lower chimney to
chimney collar and fasten
in place with two M4 x 12
mm bolts.
Install upper chimney to
chimney cap and fasten in
place with three M6 nuts.
Install upper chimney to
lower chimney and fasten
in place with two M4 x 12
mm bolts.
Make sure holes in
chimney collar are facing
front and rear of heater.
12
1
2
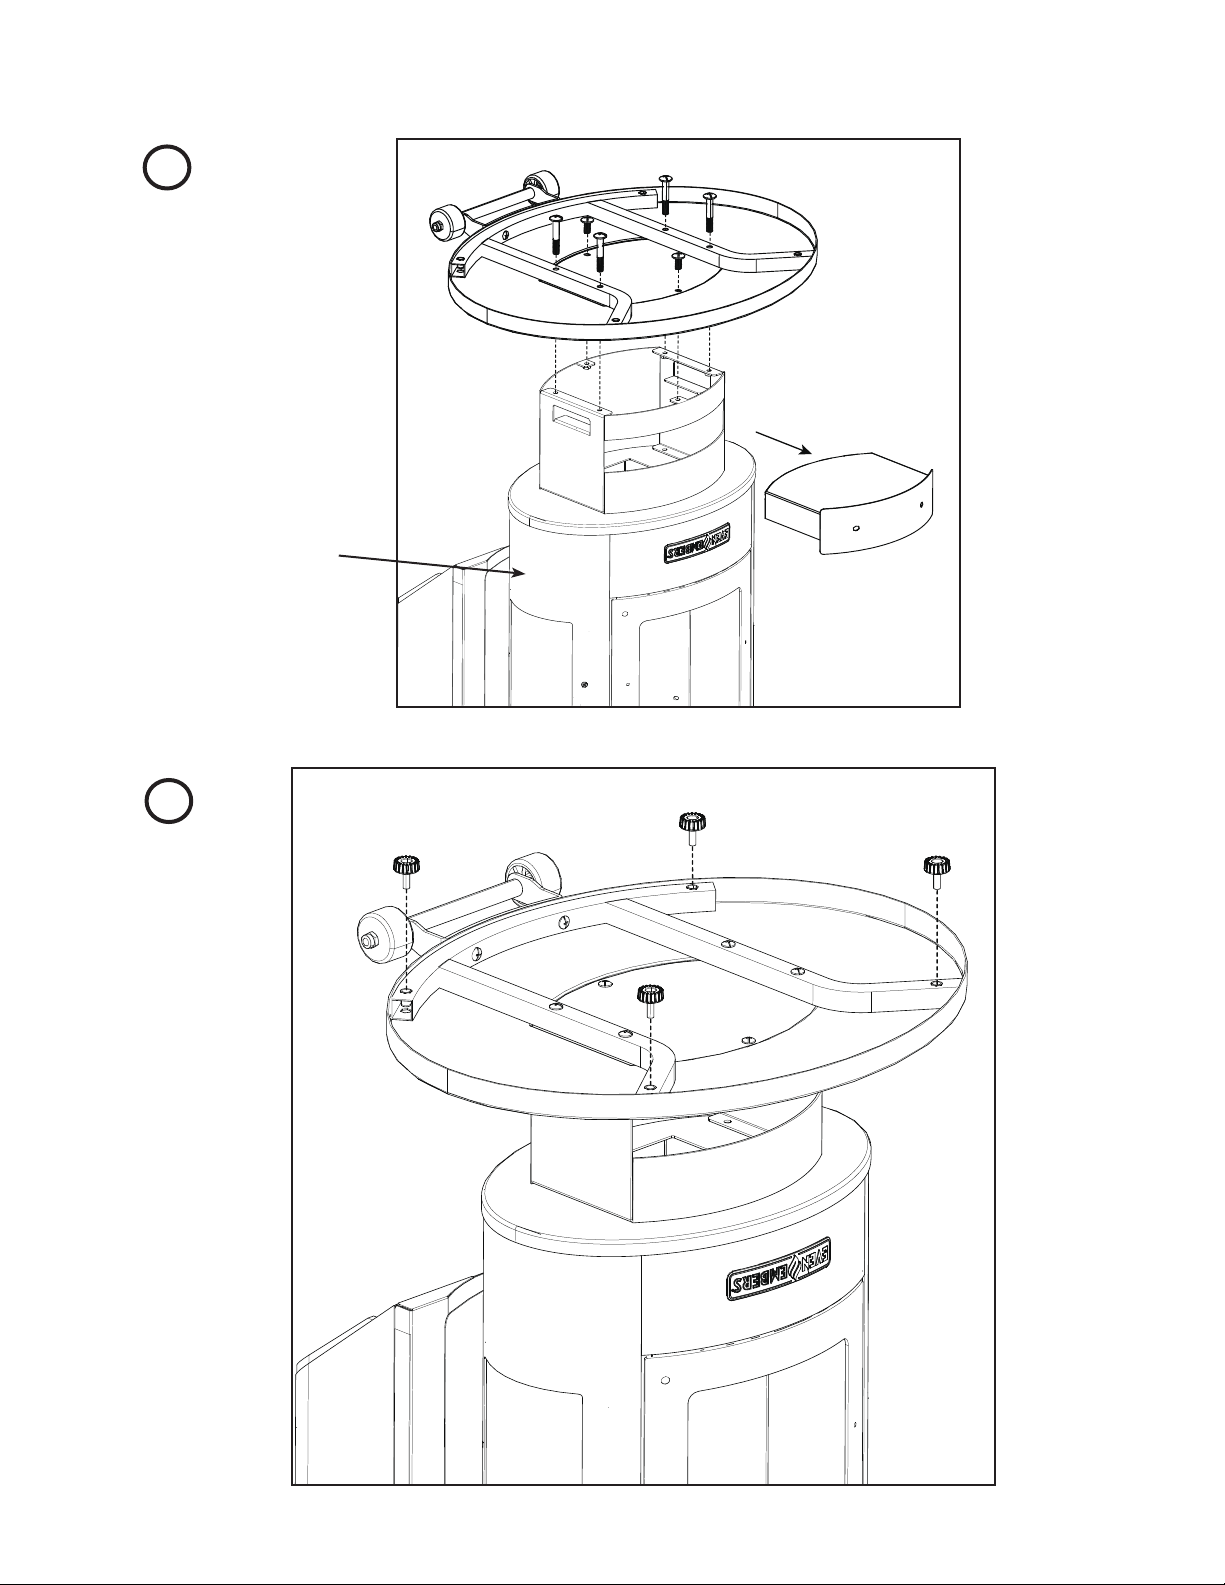
5
6
Set repot in place. Center
heat baffle into holes in
heater base around repot.
Install ash clean-out grate
handle through back of
heater body by screwing it
into clean-out grate.

13
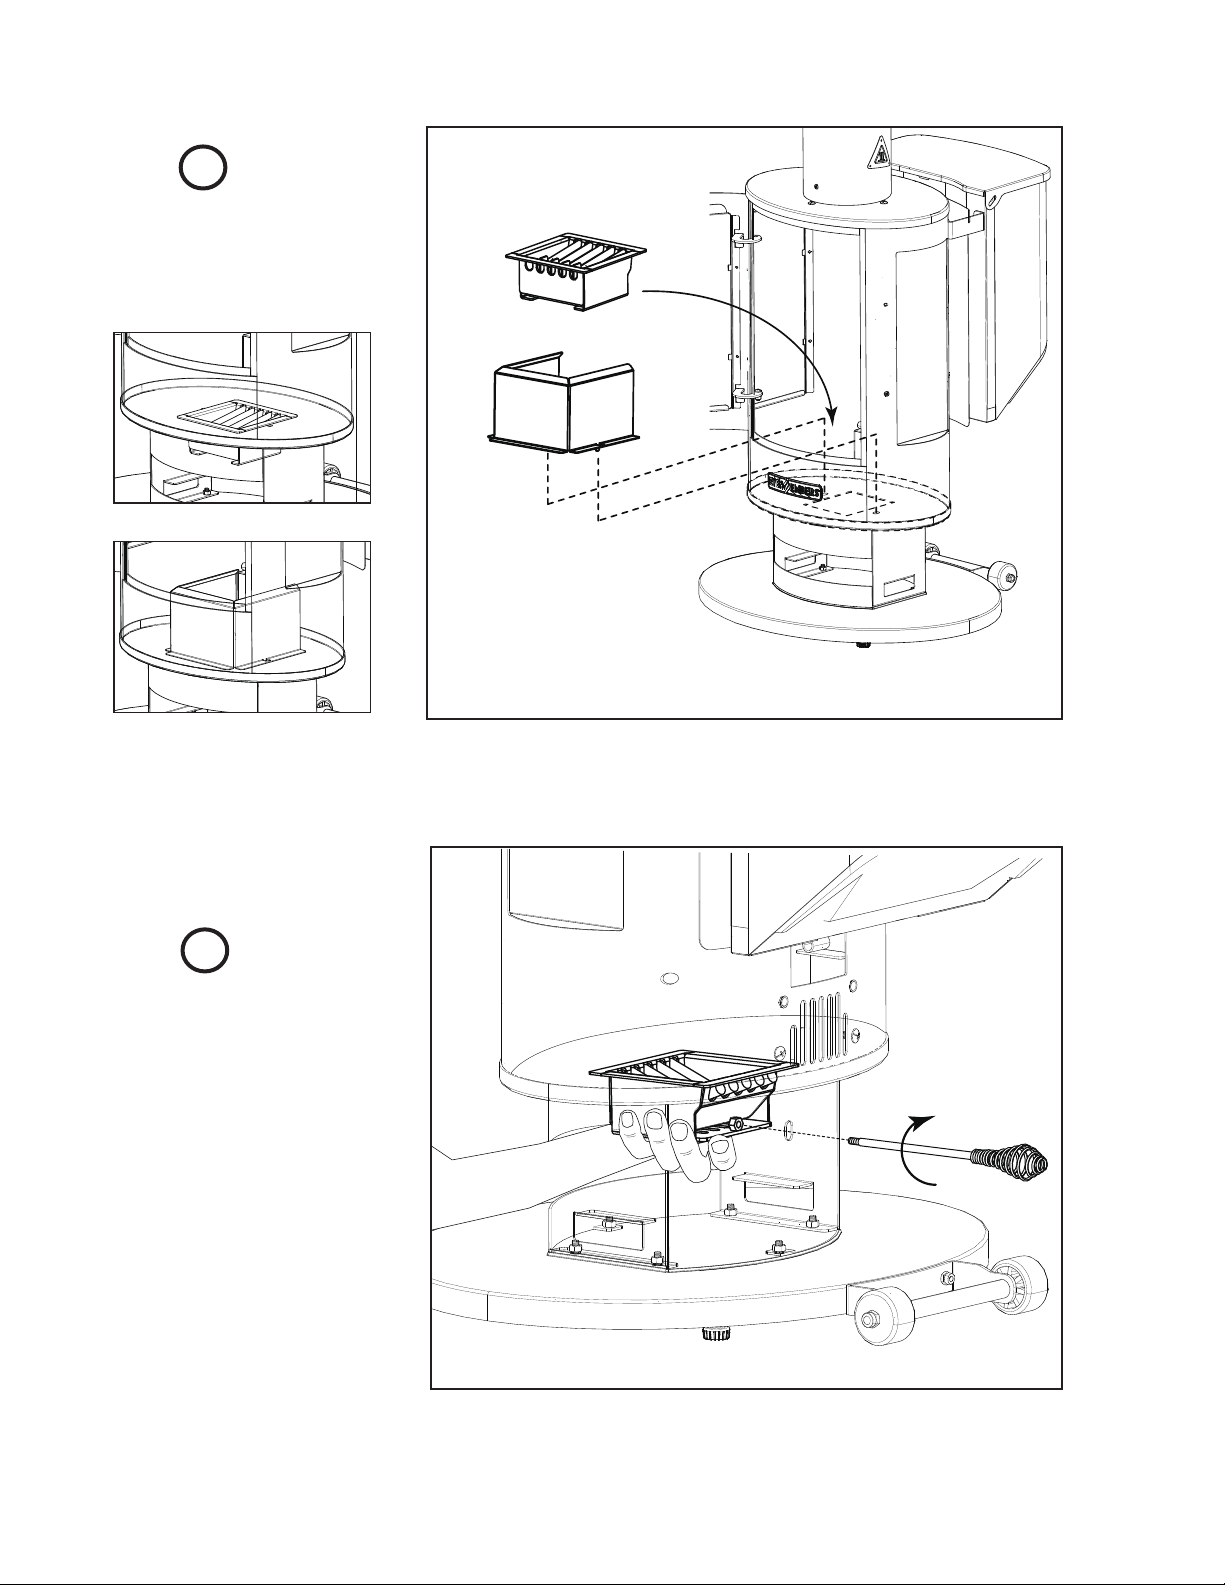
8
7
Install heat adjustment
lever and lock into place
with cotter pin.
Install spring coil handle
onto heat adjustment lever.
Install door latch using one
M6 x 16 mm bolt and M6
lock nut.

14
9
Even Embers Pellet Heater - Assembled
Install ash tray handle
using two pre-attached M5
x 12 mm bolts.
Insert ash tray into heater
body.

OM1085AS
0721, 0222, 0422
Owner’s Manual for Models
HTR1085AS/BS
The Boltz Group warrants to the original purchaser that the Even Embers®Pellet Fuel Heater is free from defects due to workmanship or materials
for One-year.
The Boltz Group obligations under this warranty are limited to the following guidelines:
• This warranty does not cover heaters that have been altered/modified or damaged due to: normal wear, rust, abuse, improper maintenance
and/or improper use.
• This warranty does not cover surface scratches, rust or heat damage to the finish, which is considered normal wear.
• Even Embers®may elect to repair or replace damaged units covered by the terms of this warranty.
• This warranty extends to the original purchaser only and is not transferable or assignable to subsequent purchasers.
The Boltz Group requires reasonable proof of purchase. Therefore, we strongly recommend that you retain your sales receipt or invoice. To obtain
replacement parts for your Even Embers®Pellet Fuel Heater under the terms of this warranty, please call Customer Service Department at 1-855-
735-9922. A receipt will be required. Even Embers®will not be responsible for any heaters forwarded to us without prior authorization.
EXCEPT AS ABOVE STATED, THE BOLTZ GROUP MAKES NO OTHER EXPRESS WARRANTY. THE IMPLIED WARRANTIES OF
MERCHANTABILITY AND FITNESS FOR A PARTICULAR PURPOSE ARE LIMITED IN DURATION TO THOSE LISTED ABOVE FROM THE DATE
OF PURCHASE. SOME STATES DO NOT ALLOW LIMITATIONS ON HOW LONG AN IMPLIED WARRANTY LASTS, SO THE ABOVE LIMITATION
MAY NOT APPLY TO YOU. ANY LIABILITY FOR INDIRECT, INCIDENTAL OR CONSEQUENTIAL DAMAGES ARISING FROM THE FAILURE OF
THE EVEN EMBERS®PELLET FUEL HEATER TO COMPLY WITH THIS WARRANTY OR ANY IMPLIED WARRANTY IS EXCLUDED. CUSTOMER
ACKNOWLEDGES THAT THE PURCHASE PRICE CHARGED IS BASED UPON THE LIMITATIONS CONTAINED IN THE WARRANTY SET OUT
ABOVE. SOME STATES DO NOT ALLOW THE EXCLUSION OR LIMITATION OF INCIDENTAL OR CONSEQUENTIAL DAMAGES, SO THE ABOVE
LIMITATION OR EXCLUSION MAY NOT APPLY TO YOU. THIS WARRANTY GIVES YOU SPECIFIC LEGAL RIGHTS, AND YOU MAY ALSO HAVE
OTHER RIGHTS WHICH VARY FROM STATE TO STATE.
WARRANTY
©2021 The Boltz Group LLC
Carrollton, Texas 75006 U.S.A.
www.evenembers.com
Table of contents
Popular Heater manuals by other brands


Dimplex
Dimplex TRP 100 M Installation and operating instructions

Claudgen
Claudgen HE8320RF Installation, operation and maintenance instructions

Pelonis
Pelonis PHTPU1501 owner's manual

Goldair
Goldair Select GSCT100 operating instructions

Blyss
Blyss NT20-12A quick start guide

Coleman
Coleman 5034A729 Instructions for use